2 Setting Up Base Data for Demand Flow Manufacturing
This chapter contains the following topics:
-
Section 2.1, "Understanding Base Data Setup for Demand Flow Manufacturing"
-
Section 2.4, "Defining Standard Unit of Measure Conversions"
2.1 Understanding Base Data Setup for Demand Flow Manufacturing
When using JD Edwards EnterpriseOne Demand Flow Manufacturing, you can work with either of two sets of data. If JD Edwards EnterpriseOne Demand Flow Manufacturing is integrated with other JD Edwards EnterpriseOne systems, you import the necessary data from those systems. However, if you use JD Edwards EnterpriseOne Demand Flow Manufacturing by itself, the setup applications that are described in this chapter enable you to set up the data that you need to run JD Edwards EnterpriseOne Demand Flow Manufacturing. applications. These will control all JD Edwards EnterpriseOne Demand Flow Manufacturing functionality.
You always have to set up scenarios because this functionality is unique to JD Edwards EnterpriseOne Demand Flow Manufacturing.
Within base data setup, you set up the following data:
-
Scenarios
-
Unit-of-measure conversions
-
Branch/plant information
-
Item definitions
-
Bills of material
-
Customers
-
Suppliers
-
Employees
-
Resources
-
Sales orders
|
Note: If you integrate JD Edwards EnterpriseOne Demand Flow Manufacturing with JD Edwards EnterpriseOne Manufacturing programs, you can use JD Edwards EnterpriseOne work centers. To do so, you import work center information from JD Edwards EnterpriseOne Manufacturing. You do not set up work centers within the JD Edwards EnterpriseOne Demand Flow Manufacturing product, but you can view the work centers that you imported. |
2.2 Prerequisite
Set up a calendar for planning parameters and resources.
2.3 Setting Up Scenarios
This section provides an overview of scenario setup and discusses how to:
-
Define an active scenario.
-
Define a default user scenario.
-
Set processing options for Copy Data Within Scenario (RF30L010).
-
Copy a scenario with data.
2.3.1 Understanding Scenario Setup
Before you can use JD Edwards EnterpriseOne Demand Flow Manufacturing, you must define scenarios using the DFM Scenario Master program (PF30L010). Scenarios control all activities in JD Edwards EnterpriseOne Demand Flow Manufacturing. Use this functionality to create what-if scenarios. You have to determine which scenario is the active scenario in the system. Only one scenario can be active at one time. Scenarios enable you to:
-
Hold a set of imported JD Edwards EnterpriseOne Manufacturing data or base data that was created in JD Edwards EnterpriseOne Demand Flow Manufacturing and is specific to the scenario.
-
Define control parameters for line design and planning.
-
Perform data retrieval and storage during any JD Edwards EnterpriseOne Demand Flow Manufacturing function.
The system uses scenarios to segment the business data tables in JD Edwards EnterpriseOne Demand Flow Manufacturing; thus, you can work with a set of data without affecting data that is associated with a different scenario.
When you set up a scenario, the system automatically adds the following hard-coded components to the scenario:
-
SCRAP and END_OF_LINE process.
-
Default labor and machine resources.
-
Default cell.
You use scenarios to define parameters for line design and for planning, For line design, you can specify default values for shift information, sequencing, and units of measure. For planning, you can associate a branch calendar, for example a shop floor calendar that you have defined in JD Edwards EnterpriseOne Manufacturing, with the scenario to use for back scheduling. The planning parameters are stored in the DFM Planning Parameters table (FF34S003).
To use JD Edwards EnterpriseOne Demand Flow Manufacturing, you first have to define the default user scenario using the DFM Default User Scenario program (PF30L013). You associate the scenario with the user profile based on the login ID. When you use any of the JD Edwards EnterpriseOne Demand Flow Manufacturing applications, the scenario that you have defined as the default user scenario automatically becomes the default scenario for the application. You can also associate a branch/plant with the default user scenario. This branch/plant becomes the default branch/plant for all applications that use a branch/plant.
|
Note: When you set up a scenario, the system displays a message asking you whether you want to make the scenario that you just created the default user scenario. |
Deleting a scenario also deletes all records in JD Edwards EnterpriseOne Demand Flow Manufacturing that are associated with the scenario. When you attempt to initiate a deletion, the system issues a warning that you have to accept before the deletion is accomplished. The system does not delete the default unit-of-measure conversion that you set up for JD Edwards EnterpriseOne Demand Flow Manufacturing because this conversion is not associated with a scenario.
For copying scenarios, the system provides you with two different copy functions. You can use the Copy button on the Search for Scenarios form to copy the line design and planning parameters from the current scenario to a new scenario that you want to create.
If you want to copy not only the scenario information, but also the entire set of Demand Flow base data or imported JD Edwards EnterpriseOne Manufacturing data that is associated with the scenario, you use the Copy Data Within Scenario batch program (RF30L010). This program also copies line design data that you have created in the original scenario, for example, processes, lines and mixed model families, to the new scenario. By using this batch program, you can avoid having to set up base data for the new scenario or reimport them from JD Edwards EnterpriseOne Manufacturing.
2.3.2 Forms Used to Set Up Scenarios
2.3.3 Defining an Active Scenario
Access the Search for Scenarios form. Click the Add button.
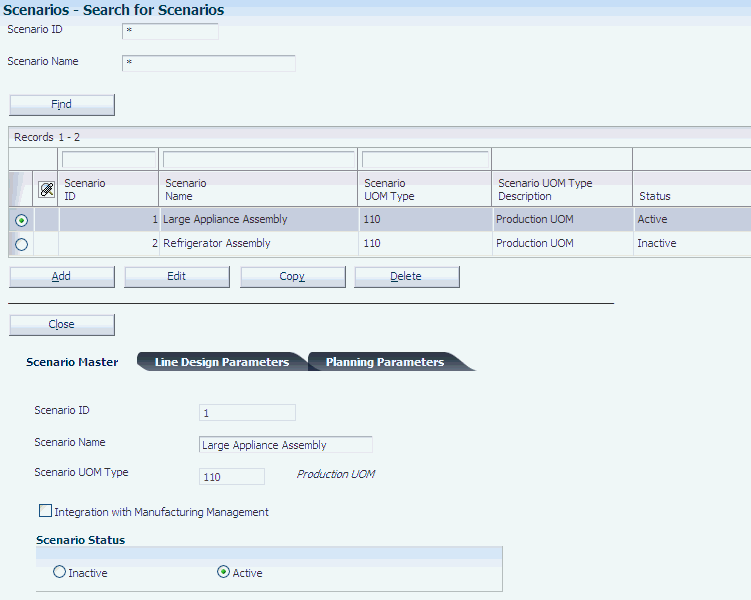
2.3.3.1 Scenario Master
Select the Scenario Master tab.
- Scenario ID
-
Displays the unique system-generated scenario ID. This field does not appear on any other program except the DFM Data Movement Configuration program (PF30L990).
- Scenario Name
-
Enter a user-defined name for the scenario. This name does not have to be unique.
- Scenario UOM Type (scenario unit of measure type)
-
Enter the unit-of-measure (UOM) type to be used for this scenario. Select a value from the Unit of Measure user-defined code (UDC) table (F30L/SC). The default value is 110.
- Integration with Manufacturing Management
-
Select to specify that JD Edwards EnterpriseOne Demand Flow Manufacturing is integrated with JD Edwards EnterpriseOne Manufacturing. The integration enables you to import JD Edwards EnterpriseOne work centers and use them to define processes, cells, and Demand Flow lines.
- Inactive and Active
-
Select the Active option if you want to define the scenario as active. Only one scenario can be active at one time.
2.3.3.2 Line Design Parameters
Select the Line Design Parameters tab.
Figure 2-2 Search for Scenarios form: Line Design Parameters tab

Description of "Figure 2-2 Search for Scenarios form: Line Design Parameters tab"
- Effective Hours per Shift
-
Enter the effective hours per shift to be used when assigning sequences to operations. The default value is 7.3.
- Operational Tolerance Percent
-
Enter the operational tolerance percentage to be used when assigning sequences to operations.
- Number of Shifts per Day
-
Enter the number of shifts per day. The default value is 1.
- Operation Number
-
Enter the operation number to be used when adding an operational definition. The default value is 10.00.
- Operational Interval
-
Enter the operational interval to be used when adding an operational definition. The default value is 10.00.
- Sequence Number and Sequence Interval
-
Enter the sequence number or the sequence interval to be used when adding a sequence of events or creating a sequence for a daily plan. The default value is 10.00.
- Seconds, Minutes, and Hours
-
Specify the unit of measure for work content. You can enter work content in hours, minutes, or seconds. The default value is seconds.
2.3.3.3 Planning Parameters
Select the Planning Parameters tab.
Figure 2-3 Search for Scenarios form: Planning Parameters tab
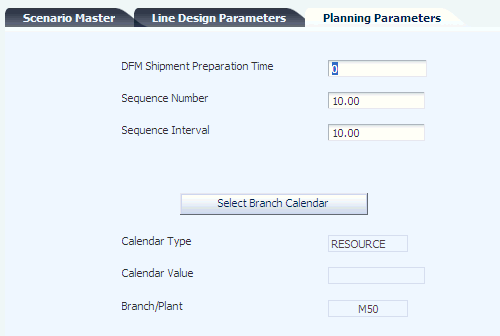
Description of "Figure 2-3 Search for Scenarios form: Planning Parameters tab"
- DFM Shipment Preparation Time
-
Enter a value that you use to calculate the recommended completion date in the Daily Planning and Sequencing program. You subtract the number of days that you enter here from the promised ship date of the sales order to arrive at a completion date.
- Select Branch Calendar
-
Click to display the Search for Work Day Calendar form. Select a branch-specific calendar for association with the scenario that you are setting up. The planning system uses this calendar for back scheduling.
2.3.4 Defining a Default User Scenario
Access the Search for Default User Scenarios form. Click the Add button.
Figure 2-4 Search for Default User Scenarios form
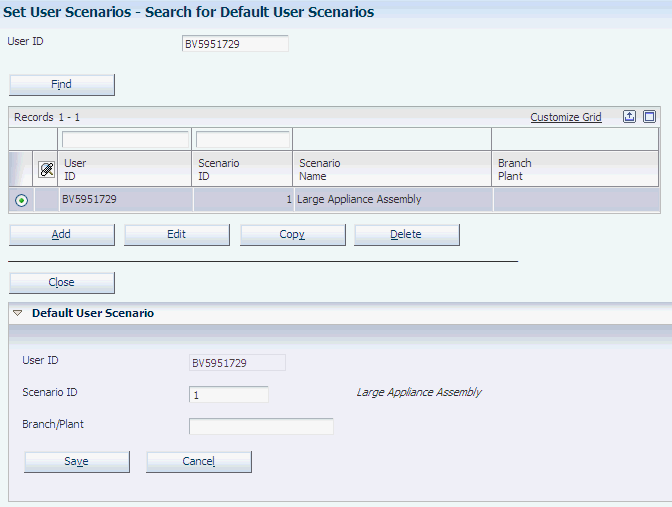
Description of "Figure 2-4 Search for Default User Scenarios form"
2.3.5 Setting Processing Options for Copy Data Within Scenario (RF30L010)
These processing options controls default processing for the Copy Data Within Scenario program.
2.3.5.1 Process
Use these processing options to specify the source and target scenario for the copy process.
- 1. Enter Copy From Scenario ID
-
Specify the scenario ID of the scenario whose data set you want to copy to a new scenario. Click the search button to access the Select Scenario form. On the Select Scenario form, you can view and select any scenario that is currently stored in the Scenario Master table (FF30L010).
- 2. Enter Copy To Scenario Name
-
Enter the name of the new scenario that you want to create based on an existing scenario and its data. If you leave this processing option blank, the program generates a scenario name using the Copy From Scenario ID and the date and time that the program is run.
2.3.6 Copying a Scenario with Data
Select Demand Flow Advanced Processing (GF30L31), Copy Data Within Scenario.
When you copy a scenario using this batch program, you copy the scenario information as well the data from the tables that are associated with the scenario. The system copies the data from the following tables to the new scenario:
-
Scenario Master (FF30L010).
-
Line Design Control Parameters (FF30L011).
-
DFM Planning Parameters (FF34S003).
-
Branch/Plant Master (FF30L014).
-
DFM Work Center Master (FF30L017).
-
DFM Customer Master (FF30L301).
-
DFM Supplier Master (FF30L3401).
-
DFM Employee Master (FF30L601).
-
DFM Item Definition Master (FF30L501).
-
DFM Item UOM Conversion Factor (FF30L512).
-
DFM Bill of Material Master (FF30L002).
-
Resource Master (FF30L015).
-
Task Master (FF30L005).
-
Standard Sequence of Events (FF30L110).
-
DFM Process Master (FF30L701).
-
Cell Master (FF30L905).
-
Line Master (FF30L912).
-
Mixed Model Family Master (FF30L101).
-
Mixed Model Family Items (FF30L102).
-
DFM Kanban Constants (FF31K50).
-
DFM Kanban Location (FF31K42).
-
DFM Kanban Pull Chain (FF31K41).
When you perform this copy process, the amount of data that is copied may be significant and impact system performance. Run this process outside of business hours.
2.4 Defining Standard Unit of Measure Conversions
This section discusses how to define standard unit of measure conversions.
2.4.1 Form Used to Define Standard Unit of Measure Conversions
2.4.2 Defining a Standard Unit of Measure Conversion
Access the Search for Standard UoM Conversion form. Click the Add button.
- From UoM (from unit of measure)
-
Enter the unit of measure to be converted. The standard unit of measure conversion is not associated with a scenario.
- To UoM Quantity (to unit of measure quantity)
-
Enter the factor that the system uses to convert one unit of measure to another unit of measure.
- To UoM (to unit of measure)
-
Enter the secondary unit of measure to which the original unit of measure is converted.
2.5 Defining Branch/Plant Data
This section discusses how to define branch/plant data.
2.5.1 Forms Used to Define Branch/Plant Data
2.5.2 Defining Branch/Plant Data
Access the Search for Branch/Plants form. Click the Add button.
2.5.2.1 Information
Select the Information tab.
- Branch/Plant
-
Enter the branch/plant for which you are setting up constants and shifts. You can associate this branch/plant with the default user scenario.
2.5.2.2 Constants
Select the Constants tab.
Define symbols to identify item numbers.
2.5.2.3 Shifts
Select the Shifts tab.
- Hours
-
Enter the number of hours per type of shift. If you subsequently change this value, the system issues a warning that you have to recalculate any line design values that were calculated based on the original number of hours.
- Shift Code
-
Identify the type of shift for the hours that you are entering.
2.6 Defining Items
This section provides an overview of item definition in JD Edwards EnterpriseOne Demand Flow Manufacturing and discusses how to:
-
Define item information.
-
Define unit of measure conversions for items.
2.6.1 Understanding Item Definition
You can set up item definitions using the DFM Item Definition Master program (PF30L501) if you are not importing item branch records from the JD Edwards EnterpriseOne Inventory Management system. You create item definitions for the end items (SKU), field replacement units (FRU), and options that are produced on the Demand Flow line. You set up items by scenario and branch. The default user scenario becomes the scenario for the item definition.
To set up an item definition, you have to provide the following information: item number, branch/plant, stocking type, planner number, buyer, number, supplier number, standard unit-of-measure conversion, and primary unit of measure. On the Demand Flow tab you can provide information for JD Edwards EnterpriseOne Demand Flow Manufacturing functionality.
The remaining fields on the Additional Info, Category Code, Quantities, and Item UoM tabs are not required, but are populated when you import Item Branch records. JD Edwards EnterpriseOne Demand Flow Manufacturing does not use the fields that are related to MPS/MRP, for example, planning code, planning fence, and planning fence rule. You can use the maximum and minimum order quantity for dividing sequence quantities.
You can calculate unit-of-measure conversions for the items. Depending on how you set the Standard Unit of Measure Conversion flag for the item, the unit-of-measure conversion is based on either the standard or the item-specific unit-of-measure conversion.
|
Note: If you try to delete an item that is used in a bill of material, the system issues an error message. |
2.6.2 Forms Used to Define Items
2.6.3 Defining Item Information
Access the Manage Item Definition form. Click the Add button.
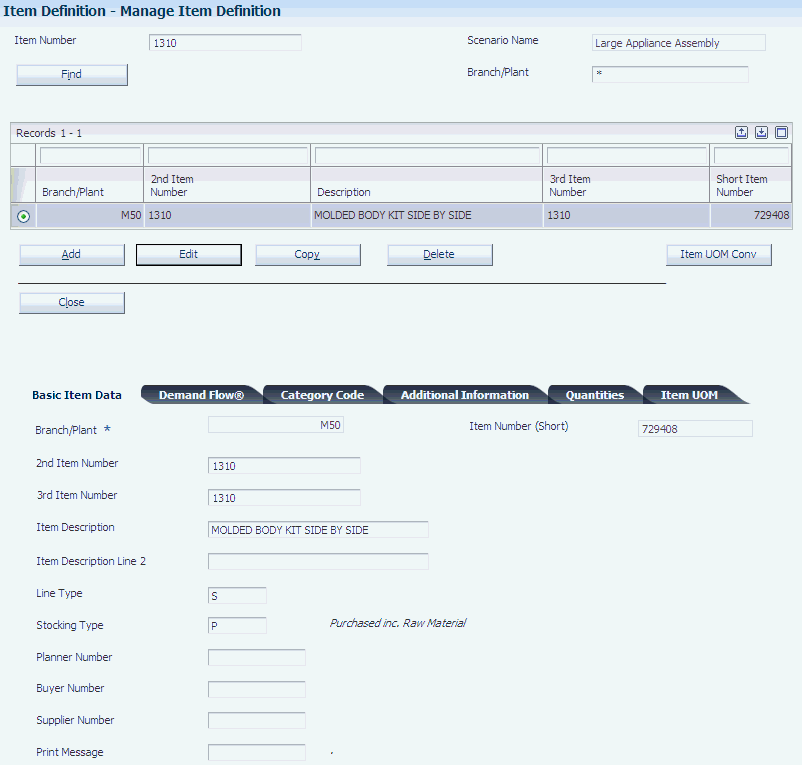
2.6.3.1 Basic Item Data
Select the Basic Item Data tab.
- Item Number (Short), 2nd Item Number, and 3rd Item Number
-
Enter a number for the item that you are setting up. The system provides three separate item numbers as alternative item numbers. The first item number is an 8-digit, system-generated number. It is disabled. The second item number is a 25-digit, user-defined, alphanumeric item number. The third item number is another 25-digit, user-defined, alphanumeric item number.
- Line Type
-
Enter a line type to control how the system processes lines on a transaction. It controls the systems with which the transaction interacts, such as JD Edwards EnterpriseOne General Ledger, JD Edwards EnterpriseOne Job Cost, JD Edwards EnterpriseOne Accounts Payable, JD Edwards EnterpriseOne Accounts Receivable, and JD Edwards EnterpriseOne Inventory Management. It also specifies the conditions under which a line prints on reports, and it is included in calculations. Values include:
S: Stock item
J: Job cost
N: Nonstock item
F: Freight
M: Miscellaneous charges and credits
- Stocking Type
-
Enter a UDC (41/I) that indicates how you stock an item, for example, as finished goods or as raw materials. The following stocking types are hard-coded and you should not change them:
0: Phantom item
B: Bulk floor stock
C: Configured item
E: Emergency/corrective maintenance
F: Feature
K: Kit parent item
N: Bulk floor stock
The first character of Description 2 in the UDC table indicates whether the item is purchased or manufactured.
- Planner Number
-
Enter the address number of the material planner for the item.
- Buyer Number
-
Enter the address number of the person who is responsible for setting up and maintaining the correct stocking levels for the item.
- Supplier Number
-
Enter the address number of the preferred provider of this item.
- Std UOM Conversion (standard unit-of-measure conversion)
-
Enter 1 in this field if you want to use the standard unit of measure instead of the item-specific unit of measure.
2.6.3.2 Demand Flow
Figure 2-6 Manage Item Definition form: Demand Flow tab

Description of "Figure 2-6 Manage Item Definition form: Demand Flow tab"
- Demand Flow Product
-
Select to designate the item as an end item. You can add an item to a mixed model family only if this check box is selected.
- Total Product Cycle Time
-
This field is populated when the total product cycle time for this product is calculated.
- Primary Line
-
Select the line where the item is produced primarily. You set up lines in the Line Master program (PF30L912). If you specify integration with JD Edwards EnterpriseOne Manufacturing for your scenario, the system validates the primary line as a work center. When you enter the primary line, the system automatically populates the Work Center field and the Work Center Branch/Plant field.
- Work Center and Work Center Branch/Plant
-
If you specify integration with JD Edwards EnterpriseOne Manufacturing for your scenario, the system automatically populates these fields when you enter a primary line. The system retrieves the values from the line master record of the primary line.
If you do not integrate JD Edwards EnterpriseOne Demand Flow Manufacturing with JD Edwards EnterpriseOne Manufacturing, these fields do not appear on the form.
- Explode BOM (explode bill of material)
-
Select to indicate that the bill of material for the item should be exploded to extend the demand by the quantity per from the bill of material.
- Kanban Controlled Item
-
Select to indicate that the item is kanban controlled. If the item is kanban controlled, size calculations are performed for single or dual cards.
2.6.3.3 Additional Information
Select the Additional Information tab.
The fields on this tab display item data if you have imported Item Branch records from Inventory Management.
- Dispatch Group
-
Displays a UDC that identifies the dispatch group. A dispatch group is a grouping that you define for products according to the physical characteristics that are important when storing and transporting those products.
- Order Policy Code
-
Displays a UDC that specifies the rules for inventory reordering in Requirements Planning and Procurement. Values are:
0: Reorder point.
1: Lot-for-lot or as required.
2: Fixed order quantity.
3: Economic order quantity.
4: Periods of supply.
5: Rate scheduled item.
These values are hard-coded.
- Value Order Policy
-
Displays a value that the system uses in conjunction with the order policy code to represent one of the following values:
When you select order policy code 2, this value represents the fixed order quantity.
When you select order policy 4, this value represents the number of days of net requirements that the system uses to determine order size.
When you select order policy code 5, this value represents the desired inventory level.
When the ending available quantity is less than the desired inventory level, then the system issues an "increase rate to" message. When the ending available quantity is greater than the desired inventory level, then the system issues a "decrease rate to" message.
- Planning Code
-
Displays a UDC to indicate how master production scheduling, material requirements planning, or distribution requirements planning processes this item. Values are:
0: Not Planned by MPS, MRP, or DRP.
1: Planned by MPS or DRP.
2: Planned by MRP.
3: Planned by MRP with additional independent forecast.
4: Planned by MPS, Parent in Planning Bill.
5: Planned by MPS, Component in Planning Bill.
These values are hard-coded.
- Planning Fence Rule
-
The system uses this code in conjunction with the Planning Time Fence Days field to determine how forecast demand or actual customer demand is used. Values are:
C: Use customer demand before and the greater of forecast or customer demand after the time fence.
F: Use forecast before and forecast plus customer demand after the time fence.
G: Use the greater of forecast or customer demand before and forecast after the time fence
S: Use customer demand before the time fence and forecast after the time fence.
- Planning Fence
-
Displays the number of days that the system uses in conjunction with the time fence rule to determine how the forecast is used. Displays the number of days after the start date when the time fence rule changes from the first rule to the second rule.
The system does not count the generation start date; that is, the day after the generation start date is day 1. For manufactured items, the system counts working days, as defined in the shop floor calendar. For purchased items, the system counts calendar days.
- Freeze Fence
-
Displays he number of days from the generation start date within which the system does not generate action messages. The same rules apply as to the planning fence.
- Message Display Fence
-
Displays the number of days after the generation start date within which the system should display order messages. The same rules apply as to the planning fence.
- Setup Labor
-
Displays standard setup hours that you expect to incur in the normal completion of this item. This value is not affected by crew size.
- Move/Queue Hours
-
Displays the total hours that an order is expected to be in queue at work centers and moving between work centers.
- Commodity Code
-
Displays the commodity code for the item.
- Round to Whole Number
-
Displays a code that determines whether the system performs rounding for planning purposes. Values are:
R: Round either up or down to the nearest whole number.
U: Round up to the nearest whole number.
Blank: Do not round.
- Issue Type Code
-
Displays a UDC that indicates how the system issues each component in the bill of material from stock. Values are:
I: Manual issue
F: Floor stock
B: Backflush
U: Super backflush
S: Subcontract item
Blank: Shippable end item
You can issue a component in more than one way within a specific branch/plant by using different codes on the bill of material and the work order parts list. The bill of material code overrides the branch/plant value.
- Time Basis
-
Enter a UDC (30/TB) that indicates how machine or labor hours are expressed for a product. Time basis codes identify the time basis or rate to be used for machine or labor hours that are entered for every routing step. For example, 25 hours per 1,000 pieces or 15 hours per 10,000 pieces. The system uses the values in the Description-2 field on the User Defined Codes form for costing and scheduling calculations. The description is what the code represents, but is not used in calculations.
- Item Revision Level
-
Enter a revision level in this field; verify that the revision level of the routing for an item matches the revision level on the bill of material for the item.
- Shrink Factor
-
Displays a fixed quantity or percentage that the system uses to determine inventory shrinkage for an item. The system increases the planned order quantity by this amount in MPS/MRP/DRP generation. The shrink factor method that you specify for the item determines whether the shrink factor is a percentage or a fixed quantity. If you are entering a percentage, enter 5 percent as 5.00 and 50 percent as 50.00.
- Shrink Factor Method
-
Displays the value that determines whether the shrink factor that you enter for this item is a percentage or a fixed quantity. Values are:
%: Percentage of the order or requested quantity.
F: Fixed amount to be added to the quantity.
- Leadtime Level
-
Displays the leadtime for an item at its assigned level in the production process. The system uses this value to calculate the start dates for work orders using fixed leadtimes. Level leadtime is different for purchased and manufactured items:
-
Purchased
The number of calendar days that are required for the item to arrive at the branch/plant after the supplier receives the purchase order.
-
Manufactured
The number of workdays that are required to complete the fabrication or assembly of an item after all the components are available.
You can enter level leadtime manually, or you can use the Leadtime Rollup program (R30822A) to calculate it. To calculate level leadtime using the Leadtime Rollup program, you must first enter a quantity in the Manufacturing Leadtime Quantity field.
-
- Leadtime Manufacturing
-
Displays the total number of days that are required to build an item from its lowest level components to the final assembly. This value is the total of the level leadtimes for all manufactured items, plus the highest manufacturing leadtime for all its components. If all components are purchased, the manufacturing leadtime equals the item's level leadtime. Purchased item leadtimes are not included in the calculation of manufacturing leadtimes. You can enter the manufacturing leadtime manually, or you can have the system calculate it when you run the Leadtime Rollup program.
- Leadtime Cumulative
-
Displays the total number of days that are required to build an item from its lowest level components to the final assembly. The system calculates the value differently for manufactured and purchased items.
-
Manufactured
The total of all level leadtimes for all manufactured items, plus the highest cumulative leadtime of all its components.
-
Purchased
The item's level leadtime. Leadtimes for purchased items are included in the calculation of cumulative leadtimes.
You can enter this value manually, or you can have the system calculate it when you run the Leadtime Rollup program.
-
- Leadtime Per Unit
-
Displays the total number of hours that are required to build one unit as specified on the routing. This value is factored by the time basis code. You can enter this value manually, or you can have the system calculate it when you run the Leadtime Rollup program. The system overwrites this value when you run the Leadtime Rollup program. The system uses this field to calculate start dates for work orders when you use variable leadtimes.
- Fixed/Variable
-
Displays a code that determines whether the system uses fixed or variable leadtimes. This code works in conjunction with the value from either the Leadtime Level field or the Leadtime Per Unit field. Values are:
F: Fixed leadtime: Calculates work order start dates using the value from the Leadtime Level field.
V: Variable leadtime: Calculates work order start dates using the value from the Leadtime Per Unit field.
- MFG Leadtime Quantity (manufacturing leadtime quantity)
-
Enter the quantity that determines the level leadtime for a manufactured item. Each of the routing steps for the item are extended by this quantity. For the system to calculate the level leadtime, the quantity in this field must be a value other than zero.
- Replenishment Hours
-
Displays the time that is required until a replacement kanban is available to the consuming location from its supplying location. The system uses this value only for Kanban card processing in Shop Floor Management.
- Sales - Inventory, Margin - Inventory, and Investment - Inventory
-
Displays a code that specifies this item's ABC ranking by sales amount, margin, or investment amount. Three types of ABC analysis exist—sales, margin, and on-hand value. Within each type of analysis, you can have three groups—A, B, and C. The ABC Code fields contain a percentage that tells the system how to define the A, B, and C groups for categorizing items during ABC analysis. Each group measures a total within the type of analysis. For all groups, the system compares the appropriate sales, margin, or on-hand value totals of a single item to the appropriate total for all items and calculates the value of each item. An item's value is its percentage of the appropriate total. The system then arranges the values of all items from highest to lowest value and accumulates the percentages. What happens next depends on the group:
-
A group: If an item's value causes the accumulated total to exceed the A accumulated percentage, the system assigns the item to the B group.
-
B group: When the accumulated total reaches the percentage that you entered for items in the A group, the system continues adding values until it reaches the percentage that you entered for items in the B group. The system assigns all items whose value falls between the A and B percentages to the B group.
-
C group: The C group consists of items whose accumulated value exceeds the B percentage. The percentage that you usually enter for the C group is .999.
Values are:
A: Assign this item to the first amount ranking.
B: Assign this item to the second amount ranking.
C: Assign this item to the third amount ranking.
D: Do not include this item when you run ABC analysis.
-
2.6.3.4 Quantities
Select the Quantities tab.
- Reorder Quantity
-
Displays the estimated reorder quantity for an item if not enough sales history is available for the system to accurately calculate a reorder quantity.
- Maximum Reorder Qty (maximum reorder quantity)
-
Displays the maximum order quantity for an item. You can base the quantity on factors other than usage, such as perishability, storage capacity, and so forth. You can use the maximum order quantity to divide the sequence quantity in planning and sequencing.
- Minimum Reorder Qty (minimum reorder quantity)
-
Displays the minimum order quantity for an item. You can base the quantity on factors other than usage, such as perishability, storage capacity, and so forth. You can use the minimum order quantity to divide the sequence quantity in planning and sequencing.
- Reorder Point
-
Displays the item quantity at which replenishment should occur. Typically, replenishment occurs when the total quantity on hand plus the quantity on order falls to, or below, a specified quantity. You can enter this quantity, or the system can calculate it if sufficient sales history does not exist.
- Multiple Order Quantity
-
The system uses the value that you enter in this field to generate multiple subsets of a work order if you want to produce the order in smaller lots than the quantity that the entire work order calls for. For example, if a work order has been generated for 1,000 pieces, and the work order multiple is set to 100, then ten sets of the work order for 100 pieces each print when the work order is released. All sets have the same work order number.
- Safety Stock
-
Displays the quantity of stock that is kept on hand to cover high-side variations in demand.
2.6.3.5 Item UOM
Select the Item UOM tab.
Complete the primary unit of measure field. You can also define unit-of-measure fields for purchasing, pricing, shipping, and production. You can define a secondary unit of measure, as well as component, weight, and volume units of measure.
2.7 Defining Bills of Material
This section discusses how to:
-
Set processing options for DFM Bill of Material Maintenance (PF30L002).
-
Define a bill of material.
-
Synchronize the bill of material with the routing.
2.7.1 Forms Used to Define Bills of Material
2.7.2 Setting Processing Options for DFM Bill of Material Maintenance (PF30L002)
These processing options control system functions for the DFM Bill of Material Maintenance program.
2.7.2.1 Validation
Use this processing option to perform item validation on the bills of material.
- Check for Recursive Components in BOM
-
Specify whether the parent item of the bill of material appears as its own component. Use this validation to avoid this problem during BOM leveling. If you leave this processing option blank, the system does not check for recursive components.
2.7.3 Defining a Bill of Material
Access the Add a Bill of Material form.
- Item Number
-
Enter the number of the component that you are adding to the bill of material.
- Quantity
-
Enter the quantity of the component that is needed to produce the product.
- Prep Code (preparation code)
-
Select a preparation code from the UDC table to indicate what preparation a component had to undergo to be used on the bill of material for the product. The same component can appear on the bill of material with different preparation codes.
- Package UOM (package unit of measure)
-
Enter the unit of measure in which to express the Kanban for the component.
- Issue From Location
-
Enter the location from which the component is issued.
- Completed To Location
-
Enter the location to which the item is completed.
- Active Ingredient
-
Complete this field to indicate whether an item is an active component of a parent item. When the item is an active component, the system can calculate a parent item's expiration date by comparing all component expiration dates and choosing the earliest date.
- Fixed or Variable
-
Enter a UDC to indicate whether the quantity per assembly for an item on the bill of material varies according to the quantity of the parent item that is produced, or is fixed regardless of the parent quantity. This value also determines whether the component quantity is a percent of the parent quantity. Values are:
F: Fixed Quantity
V: Variable Quantity
%: For fixed-quantity components, Work Orders and Material Requirements Planning do not extend the component's quantity per assembly value by the order quantity.
- Issue Type Code
-
Enter a UDC that indicates how the system issues each component in the bill of material from stock. Values are:
I: Manual issue
F: Floor stock
B: Back flush
U: Super back flush
S: Subcontract item
Blank: Shippable end item
You can issue a component in more than one way within a specific branch/plant by using different codes on the bill of material and the work order parts list. The bill of material code overrides the branch/plant value.
- Line Type
-
Enter a line type to control how the system processes lines on a transaction. It controls the systems with which the transaction interacts, such as JD Edwards EnterpriseOne General Ledger, JD Edwards EnterpriseOne Job Cost, JD Edwards EnterpriseOne Accounts Payable, JD Edwards EnterpriseOne Accounts Receivable, and JD Edwards EnterpriseOne Inventory Management. It also specifies the conditions under which a line prints on reports and is included in calculations. Values include:
S: Stock item
J: Job cost
N: Nonstock item
F: Freight
M: Miscellaneous charges and credits
- Effective From and Effective Through
-
Enter the effective date range to indicate:
-
The time frame during which a component on a bill of material is in effect.
-
The time frame during which a routing step is in effect as a sequence on the routing for the item.
-
The time frame during which a rate schedule is in effect.
The default value for the effective from date is the current system date. The default value for the effective through date is December 31 of the default year that is defined in the Data Dictionary for century change year.
You can enter future effective dates so that the system plans for upcoming changes. Items that are no longer effective in the future can still be recorded and recognized in JD Edwards EnterpriseOne Product Costing, JD Edwards EnterpriseOne Shop Floor Management, and JD Edwards EnterpriseOne Capacity Requirements Planning. JD Edwards EnterpriseOne Material Requirements Planning determines valid components by effectivity dates, not by the bill-of-material revision level. Some forms display data based on the effectivity dates that you enter.
-
2.7.4 Synchronizing the Bill of Material with the Routing
Access the Bills of Material - Synchronize with Routing form.
Figure 2-7 Bills of Material - Synchronize with Routing form
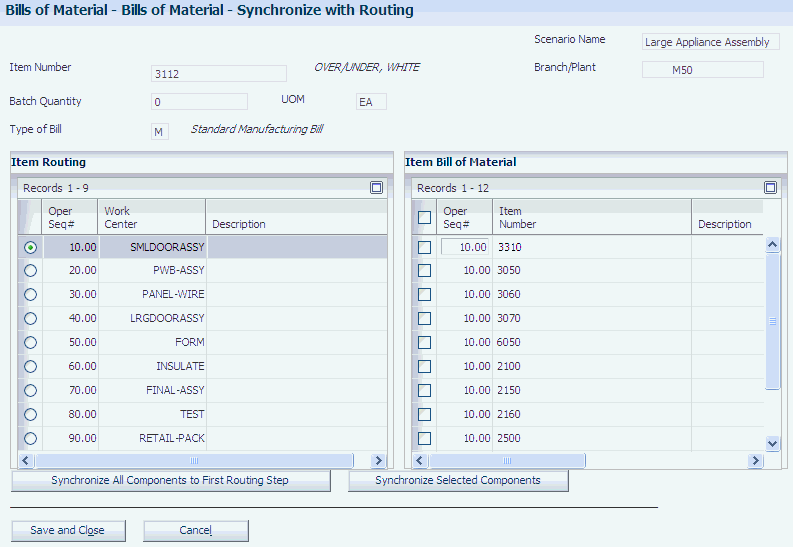
Description of "Figure 2-7 Bills of Material - Synchronize with Routing form"
- Synchronize All Components to First Routing Step
-
Click to associate all components on the bill of material with the first routing step.
- Synchronize Selected Components
-
Click to associate components with the routing steps where they are consumed.
2.8 Setting Up Customers
This section discusses how to set up customers.
2.8.1 Form Used to Set Up Customers
2.8.2 Setting Up Customers
Access the Search for Customers form. Click the Add button.
In addition to the fields that are described below, you can also use category codes for defining the customer further.
- Customer Number and Customer Name
-
Enter a number and name that identifies this customer in the FF30L301 table. You use the customer record when creating sales orders.
- Remark
-
Enter free-form text with information about the customer.
- Partial Shipments Allowed
-
Select to indicate whether the customer accepts partial shipments.
2.9 Setting Up Suppliers
This section discusses how to set up suppliers.
2.9.1 Form Used to Set Up Suppliers
2.9.2 Setting Up Suppliers
2.10 Setting Up Employees
This section discusses how to set up employees.
2.10.1 Form Used to Set Up Employees
2.11 Defining Resources
This section discusses how to define resources.
2.11.1 Forms Used to Define Resources
2.11.2 Defining Resources
Access the Search for Resources form. Click the Add button.
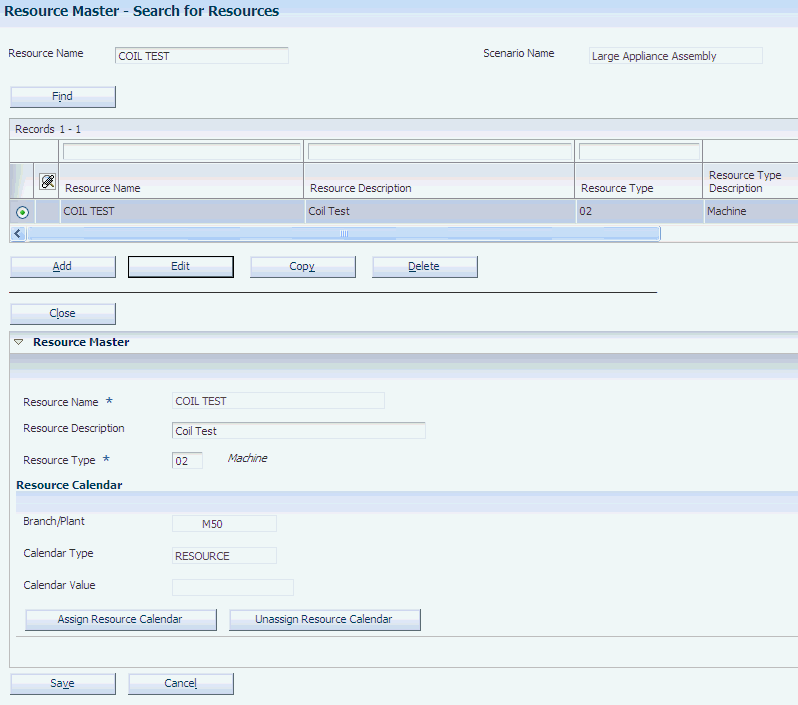
- Resource Name
-
Enter a name for the resource that you are defining. This name must be unique within the scenario.
- Resource Type
-
Specify the type of resource that you are setting up by selecting a value from the UDC table F30L/RT (Resource Type).
- Assign Resource Calendar
-
Click to access the Search for Work Day Calendar form. Selecting a work day calendar populates the Branch/Plant, Calendar Type, and Calendar Value fields.
- Unassign Resource Calendar
-
Click to disassociate the work day calendar from the resource.
If you try to remove the resource calendar, the system issues an error message if the resource calendar is used in any Demand Flow table.
2.12 Entering Sales Orders
This section discusses how to:
-
Set processing options for DFM Demand Entry (PF30L801).
-
Enter sales orders.
2.12.1 Form Used to Enter Sales Orders
2.12.2 Setting Processing Options for DFM Demand Entry (PF30L801)
These processing options control default values for the DFM Demand Entry program.
2.12.2.1 Defaults
Use these processing options to specify default values when entering sales orders.
- Order Company
-
Specify the default order company. If you leave this processing option blank, you have to enter an order company on every sales order.
- Branch/Plant
-
Specify the default branch/plant. If you leave this processing option blank, you have to enter a branch on every sales order.
- Order Type
-
Specify the default order type. If you leave this processing option blank, you have to enter a branch on every sales order.
- Line Increment
-
Specify the increment by which the system numbers order lines. If you leave this processing option blank, the default increment is 1.00.
2.12.3 Entering Sales Orders
Access the Demand Entry - Add Sales Order form.
- Customer Number
-
Enter the number of the customer for the sales order. The customer has to exist in the F30L301 table.
- Item Number
-
Enter the number of the items to be ordered.
- Order Quantity
-
Enter the sales order quantity for the item.
- Unit of Measure
-
The unit of measure from the item definition becomes the default value for this field.
- Request Date
-
Enter the date on which the sales order line is scheduled to be delivered to the customer.
- Promised Ship (promised ship date)
-
Enter the promised shipment date for the sales order line. For planning, this field is used to calculate a recommended completion date.
- Scheduled Pick (scheduled pick date)
-
Enter the scheduled pick date for the sales order line.
- Cancel Date
-
Enter a cancellation date, if you are canceling the sales order line.
- Status Code
-
If you import sales orders from the JD Edwards EnterpriseOne execution systems, this field is populated with the status of the sales order.
- Branch/Plant
-
Enter the branch/plant for the item for which you are creating a sales order line.
- Sales Order Priority
-
Select a code from UDC table H40/PR to indicate the priority for the sales order.
2.13 Viewing Work Centers
This section provides an overview of work centers in JD Edwards EnterpriseOne Demand Flow Manufacturing, lists prerequisites, and discusses how to view work centers.
2.13.1 Understanding Work Centers in JD Edwards EnterpriseOne Demand Flow Manufacturing
Importing work centers from JD Edwards EnterpriseOne Manufacturing enables the system to validate the work center that is associated with Demand Flow lines, processes, and cells against the Work Center Master table (F30006). After you have imported work centers from the F30006 table in JD Edwards EnterpriseOne Manufacturing into JD Edwards EnterpriseOne Demand Flow Manufacturing, you can view the imported work centers using the DFM Work Center Master program. You can search for work centers by work center, branch/plant, and work center type. The search retrieves work center records from the DFM Work Center Master table (FF30L017).
2.13.2 Prerequisites
To use work centers in JD Edwards EnterpriseOne Demand Flow Manufacturing:
-
Set the integration constant for the scenario.
-
Import work centers from JD Edwards EnterpriseOne.
2.13.3 Form Used to View Work Centers
2.13.4 Viewing Work Centers
Access the Search for Work Centers form.
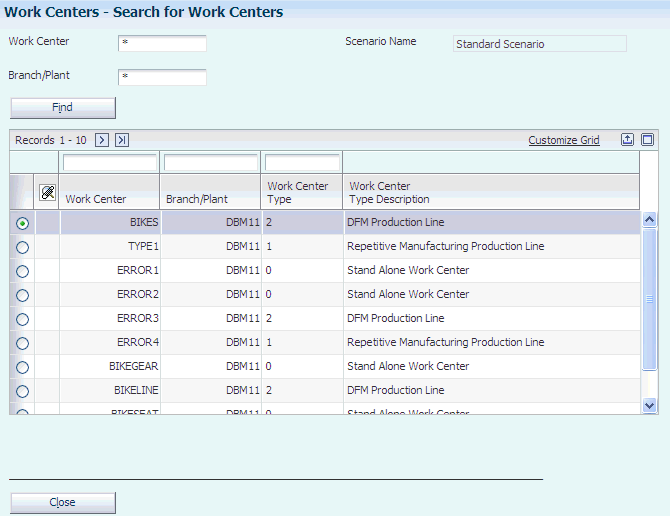
Complete the search fields and click the Find button. The Scenario Name field displays the default user scenario.
- Work Center
-
Displays the work center that you have imported from JD Edwards EnterpriseOne Manufacturing.
- Branch/Plant
-
Displays the work center branch that is associated with the imported work center.
- Work Center Type
-
Displays the type of work center that you imported from JD Edwards EnterpriseOne Manufacturing. Values are:
0: Stand alone work center.
1: Production line in a repetitive environment.
2: Production line in a lean environment.