13 Setting Up Advanced DBAs
This chapter contains the following topics:
-
Section 13.3, "Setting Up a Deduction DBA to Adjust Negative Pay"
-
Section 13.5, "Setting Up a DBA to Calculate If No Gross Pay"
13.1 Understanding Advanced DBA Setup
You can set up many different types of DBAs. These tasks are examples of some advanced DBAs that you might set up for the company. These tasks do not include every possible scenario, but represent some typical situations in which you need a DBA to perform a specialized function.
Some organizations grant employees loans, or cash advances, from their future earnings. For example, on the 10th of the month, an employee might request a 100.00 advance. If you grant the employee the advance, you need to deduct 100.00 from the payment that the employee receives on the 15th of the month. You can set up an advance deduction to deduct the cash advance from the employee's payment.
You can set up several types of DBAs to manage situations in which an employee's net pay is less than zero. The JD Edwards EnterpriseOne Payroll system does not print payments for amounts that are less than zero. For example, some employees, such as commissioned sales people, might have a pay period in which they have no gross earnings, or they do not have enough gross earnings to pay for all of their deductions. To track employees' pay and deductions in these instances, you can set up a deduction that adjusts negative net pay, or you can set up an overpayment deduction that allows you to take the missed deductions in future pay periods, when the employee has enough earnings to pay for them. You can also set up a DBA to calculate even in pay periods when an employee has no gross earnings.
13.2 Setting Up Advance Deductions
You set up an advance deduction for an employee to pay back a dollar amount advanced by the employer against an employee's earnings. An advance deduction DBA allows you to set up a declining balance that is active until the amount due equals zero.
This section discusses how to set up advance deductions.
13.2.1 Forms Used to Set Up Advance Deductions
13.2.2 Setting Up Advance Deductions
Access the Advanced DBA Information form.
|
Note: As an update to Release 9.1, the data in the Group Limits tab is read-only and is retrieved from the Group Limits table (F069130). |
Figure 13-1 Advanced DBA Information form
Description of ''Figure 13-1 Advanced DBA Information form''
- Calculate for All Employees
-
Enter a code that specifies whether the DBA is required. Values are:
Y: Yes
N: No
For advance deductions, this field should be set to N (No). When you enter Y (Yes), the system automatically processes the DBA for all qualifying employees. When this field is set to Y, you reduce the information that you must maintain for DBAs that you set up for plans or employees. Information is reduced because you do not need to define the DBA at any level other than the DBA setup level.
To define qualifying employees, complete these fields on the Advanced DBA Information form:
Employee Pay Class - (SALY)
Tax Area - (TARA)
Tax Area Residence (TARR)
Home Company - (HMCO)
When you leave any of these fields blank, the system includes all employees.
Note:
The system also uses Tax Area (TARA) and Home Company (HMCO) fields as screening criteria for DBAs that are not required. If either of these two fields contains a value and the Calculate for All Employees option is selected, the system uses the tax areas and home companies to qualify employees for the DBA. - Home Company
-
Enter the company number where the system generally stores employee records.
- Pay Class (H/S/P)
-
Enter a code that specifies how an employee is paid. Values are:
H: Hourly
S: Salaried
P: Piecework
- Tax Area (Work)
-
Enter a code that identifies a geographical location and the tax authorities for an employee work site, including employee and employer statutory requirements. In the Vertex payroll tax calculation software, the tax area code is synonymous with GeoCode. To determine the valid codes for your location, refer to the documentation for the tax calculation software that you are using.
- Tax Area (Residence)
-
Enter a code which identifies the resident tax area. When you select the Calculate for All Employees check box and enter a Resident Tax Area, the system calculates DBA for all employees, whose Employee Master Residence Tax Area matches. The resident tax area is used solely to trigger the DBA to calculate. The system will continue to store the work tax area on transactions in the DBA Ledger (F0709) table.
- Include in Union Plan
-
Enter a code that indicates if a DBA is associated with a union or group plan. If you enter Y, the union or group plan, job type, and job step from the Employee Master are transferred into the DBA Detail table (F0609) when the system creates DBA from the Employee DBA Instructions. Adding the union or group plan, job type, and job step to a DBA affects the following:
1: To which timecards the system allocates DBA during the payroll journal process.
2: Historical reporting, which uses the information for selection purposes.
- Declining Balance
-
Enter an option that indicates whether you want the system to use the amount due at the DBA, group, or employee level to determine whether to use the specified deduction in a payroll cycle.
When you select this option, the system continues deducting the amount in the Amount Due field until the amount is zero. When you select this option, you must also enter a value in the Amount Due field; otherwise, the system considers the deduction to be cleared or inactive.
If you do not select this option, the amount due is not used with the specified deduction.
You must select this options for advance deductions.
- Amount Due
-
Enter the balance or amount that the employee must pay back to the employer.
- Number of Periods
-
Enter an option that indicates whether the system uses the Number of Periods field to determine whether to include the DBA in the payroll cycle.
If you select this option, then you must also enter the number of periods in the Number of Deductions field. If you do not enter a value in the Number of Deductions field, then the system considers the DBA as inactive.
Use this option only when you set up a DBA that is not a wage attachment deduction. When you set up a wage attachment DBA, leave this option cleared and use the Employee Wage Attachment Entry form to enter the number of periods for which the deduction is taken.
Select the Number of Periods option to continue the DBA until the amount due is zero. If you do not select the Number of Periods option, the system ignores this function.
- Number of Deductions
-
Enter the number of periods for which a deduction or benefit should be taken. The system automatically decreases this number by one for each period taken.
You must enter a value in this field if you automate the Number of Periods field.
- Spending Account Type
-
Enter a value to define which type of spending account the system is using. An example of a spending account type setup might be:
MED: Medical expenses spending account (where the annual amount is accrued on Jan 1 or year begin.)
DCR: Dependent care expenses (where accrual of available funds is on a pay period by pay period basis.)
- Investment Group Codes
-
Enter a code that indicates the system to use the user defined code from Investments Group Codes (06/type AI) for grouping when balancing accruals for investing in various funds.
13.3 Setting Up a Deduction DBA to Adjust Negative Pay
This section provides an overview of deduction DBA setup to adjust negative pay and discusses how to set up a deduction DBA to adjust negative pay.
13.3.1 Understanding Deduction DBA Setup to Adjust Negative Pay
If an employee's gross pay does not cover the amounts to be deducted, the system adjusts deduction amounts to increase the net pay to zero. The system does not enable negative net pay situations. You can set up deductions to control this adjustment process. Depending on the deduction's arrearage rule, one of these actions occurs:
-
The system adjusts the deduction either partially or for the full amount.
-
The system puts the adjusted amount in arrears and makes the adjustment the next time that the employee is paid.
-
The system puts the adjusted amount in arrears and makes the adjustment each time the employee is paid within the same pay period but does not carry any remaining balance forward into the next pay period.
The system adjusts negative pay in different ways, depending on the arrearage method that you use.
This table describes negative pay adjustment options:
| Method | Description |
|---|---|
| P, blank, F | When all or part of the deduction cannot be taken and you have set up the DBA with one of these arrearage methods, the system:
Amounts not taken appear on the Deductions Not Taken report, which the system generates during pre-payroll processing. |
| Q, R, G, H | When all or some part of the deduction cannot be taken and you have set up the DBA with one of these arrearage methods, the system:
Amounts not taken appear on the Deduction Arrearage report, which the system generates during pre-payroll processing. |
| S, T, I, J | When all or some part of the deduction cannot be taken and you have set up the DBA with one of these arrearage methods, the system:
Amounts not taken appear on the Deduction Arrearage report, which the system generates during pre-payroll processing. |
13.3.1.1 Example: Payroll Calculations to Adjust Negative Pay
The When to Adjust Deductions field and the Order to Adjust Deductions field enable you to determine the sequence that the system uses to deduct the DBAs.
These tables illustrate one approach for deducting DBAs:
| Gross Deductions | DBA Code |
|---|---|
| Union | #3000 |
| Health | #1000 |
| Savings | #2000 |
| 401(k) | #7000 |
| Advance | #9000 |
| Taxes | Blank |
| Negative Net Pay | Blank |
| Gross Deductions | DBA Code |
|---|---|
| Union | #3000 |
| Health | #1000 |
| Savings | #2000 |
| 401(k) | #7000 |
| Advance | #9000 |
| Taxes | Blank |
| Negative Net Pay | Blank |
| Gross Deductions | DBA Code |
|---|---|
| Union | #3000 |
| Health | #1000 |
| Savings | #2000 |
| 401(k) | #7000 |
| Advance | #9000 |
| Taxes | Blank |
| Negative Net Pay | Blank |
| Gross Deductions | DBA Code |
|---|---|
| Union | #3000 |
| Health | #1000 |
| Savings | #2000 |
| RRSP | #7700 |
| Advance | #9000 |
| Taxes | Blank |
| Negative Net Pay | Blank |
These tables illustrate the order in which the system adjusts the DBAs if the When to Adjust Deductions field is 0 (default) and the Order to Adjust Deductions field is blank:
| Gross Deductions | DBA Code | DBA Type |
|---|---|---|
| 1st | #9000 | Advance |
| 2nd | #7000 | 401(k) |
| 3rd | #3000 | Union |
| 4th | #2000 | Savings |
| 5th | #1000 | Health |
| Last | Taxes | Blank |
| Gross Deductions | DBA Code | DBA Type |
|---|---|---|
| 1st | #9000 | Advance |
| 2nd | #7700 | RRSP |
| 3rd | #3000 | Union |
| 4th | #2000 | Savings |
| 5th | #1000 | Health |
| Last | Taxes | Blank |
When net pay goes below zero or minimum pay, the system adjusts deductions in a high to low order, from DBA code 9999 to DBA code 1000. For example, DBA #8611 would be adjusted before #5322. You can override the order by using the When to Adjust Deductions and Order to Adjust Deductions fields.
These two fields enable you to control how the deductions are adjusted. You can group deductions into three groups so that one group is adjusted before the other two. You can also assign priority numbers within each group.
In this example, you want the Savings and 401(k) or RRSP adjusted (not deducted) before the Advance, Union dues, and Health. Therefore, assign Savings and 401(k) or RRSP a value of 0 in the When to Adjust Deductions field. Assign Advance,Union dues, and Health a value of 1.
This table illustrates the sequence of adjustments that the system will use to bring the payment balance to zero:
| Gross Deductions | DBA Code | When to Adjust Deductions |
|---|---|---|
| Union | #3000 | 1 |
| Health | #1000 | 1 |
| Savings | #2000 | 0 |
| 401 (k) | #7000 | 0 |
| Advance | #9000 | 1 |
| Taxes | Blank | Blank |
| Negative Net Pay | Blank | Blank |
| 1st | #7000 (0) | 401(k) |
| 2nd | #2000 (0) | Savings |
| 3rd | #9000 (1) | Advance |
| 4th | #3000 (1) | Union |
| 5th | #1000 (1) | Health |
| 6th | Blank | Taxes |
| Gross Deduction | DBA Code | When to Adjust Deductions |
|---|---|---|
| Union | #3000 | 1 |
| Health | #1000 | 1 |
| Savings | #2000 | 0 |
| RRSP | #7000 | 0 |
| Advance | #9000 | 1 |
| Taxes | Blank | Blank |
| Negative Net Pay | Blank | Blank |
| 1st | #7000 (0) | RRSP |
| 2nd | #2000 (0) | Savings |
| 3rd | #9000 (1) | Advance |
| 4th | #3000 (1) | Union |
| 5th | #1000 (1) | Health |
| 6th | Blank | Taxes |
Company policy might be to deduct the advance from the employee's pay before taxes are deducted. The government will make up any tax inequity with this employee at year-end, but the company might not be able to retrieve the advance amount if the company no longer employs the individual.
This table illustrates the sequence of adjustments when you enter 2 in the When to Adjust Deductions field for the Advance:
| Gross Deduction | DBA Code | DBA Type |
|---|---|---|
| 1st | #7000 (0) | 401(k) |
| 2nd | #2000 (0) | Savings |
| 3rd | #3000 (1) | Union |
| 4th | #1000 (1) | Health |
| 5th | Blank | Taxes |
| 6th | #9000 (2) | Advance |
| Blank | Blank | Blank |
| 1st | #7700 (0) | RRSP |
| 2nd | #2000 (0) | Savings |
| 3rd | #3000 (1) | Union |
| 4th | #1000 (1) | Health |
| 5th | Blank | Taxes |
| 6th | #9000 (2) | Advance |
This example illustrates how the codes in the When To Adjust and Order to Adjust fields would work for one employee. When you set up the DBAs, you must consider how these codes affect all employees using these deductions.
13.3.2 Forms Used to Set Up a Deduction DBA to Adjust Negative Pay
13.3.3 Setting Up a Deduction DBA to Adjust Negative Pay
Access the General Accounting/Arrearage Information form.
- Arrearage Method
-
Enter a code indicating how to adjust deductions when the employee is in a negative pay situation. Values are:
P: Do a partial or full deduction as needed. This is the default.
F: Do a full reduction or none at all.
N: Do not reduce.
Q: Same as code P. In addition, place the amount in arrears, but do not apply the limits when collecting the arrearage. Write the arrearage balance to history.
R: Same as code P. In addition, place the amount in arrears and apply the limits when collecting the arrearage. Write the arrearage balance to history.
G: Same as code F. In addition, place the amount in arrears, but do not apply the limits when collecting the arrearage. Write the arrearage balance to history.
H: Same as code F. In addition, place the amount in arrears and apply the limits when collecting the arrearage. Write the arrearage balance to history.
S: Same as code P. In addition, place the amount in arrears for the current pay period only but do not apply the limits when collecting the arrearage. Do not write the arrearage balance to history.
T: Same as code P. In addition, place the amount in arrears for the current pay period only and apply the limits when collecting the arrearage. Do not write arrearage balance to history.
I: Same as code F. In addition, place the amount in arrears for the current pay period only, but do not apply the limits when collecting the arrearage. Do not write arrearage balance to history.
J: Same as code F. In addition, place the amount in arrears for the current pay period only and apply the limits when collecting the arrearage. Do not write arrearage balance to history.
- When To Adjust Ded (when to adjust deduction)
-
Enter a code that specifies when the system adjusts, or backs an amount out of, deductions. Values are:
0: Adjust deductions marked with 0 before payroll taxes.
1: Adjust deductions marked with 0, and then adjust those marked with 1 before payroll taxes.
2: Adjust payroll taxes before the deductions marked with 2. (This value is for future use.)
- Order To Adjust Ded (order to adjust deduction)
-
Enter a value that specifies the order in which deductions are taken when an employee's gross pay does not cover deductions. Values are 0001 through 9999. The system starts with the highest code. For example, 9999 is deducted before 0001.
13.4 Setting Up a Deduction DBA for Overpayment
This section provides an overview of deduction DBA setup for overpayment, lists prerequisites, and discusses how to set up a deduction DBA for overpayment.
13.4.1 Understanding Deduction DBA Setup for Overpayment
The system cannot write a payment for a negative amount. Therefore, when an employee's net pay drops below zero and stays below zero, even after all adjustments have been made, the system creates an overpayment. The overpayment amount is the amount needed to bring net pay back to zero. The system treats this amount like an advance to the employee and subtracts the amount from the employee's future pay until the overpayment is repaid.
The system uses a DBA to collect the overpayment. Whenever the system creates an overpayment for an employee, it assigns the DBA to the employee's DBA instructions and displays the amount on the payroll register. We ship the JD Edwards EnterpriseOne Payroll system with DBA 9997 as the DBA for overpayments. You can set up a different DBA number for overpayments if you want to use 9997 for other purposes.
13.4.2 Prerequisites
Before you complete the tasks in this section:
-
Verify that the overpayment processing option on the payroll workbench is set to DBA 9997.
-
Assign an account number for DBA 9997 (or the DBA that you want to use for overpayments) in the credit liabilities table in the automatic accounting instructions to avoid accounting errors. If you use a DBA code other than 9997, you need to set the overpayment processing option on the payroll workbench to the DBA code that you are using.
13.4.3 Form Used to Set Up a Deduction DBA for Overpayment
13.4.4 Setting Up a Deduction DBA for Overpayment
Access the Basic DBA Information form.
- DBA Type
-
Enter a code that specifies the type of payroll entry. Values are:
P: Time Cards (earnings)
D: Deductions withheld
B: Benefit (both cash and noncash)
A: Time accrual, such as sick and vacation time
- Paystub Text
-
Enter the text that you want the system to print on the employee's paystub. If you are using the Time and Labor system, the system does not create payments. However, this field is required to complete the form. Generally, you enter a description of the pay, deductions, benefits, and accruals (PDBA).
13.5 Setting Up a DBA to Calculate If No Gross Pay
This section provides an overview of DBA setup to calculate if no gross pay and discusses how to set up a DBA to calculate if no gross pay.
13.5.1 Understanding DBA Setup to Calculate If No Gross Pay
You can set up the system to calculate a DBA to calculate even if no gross pay exists. For example, you can set up a DBA to calculate a benefit when an employee is on a leave of absence.
You might also set up the system to calculate a deduction and place the amount in arrears to be withheld the next payroll cycle. The deduction is included on the Deduction Arrearage report during pre-payroll processing.
13.5.2 Forms Used to Set Up a DBA to Calculate If No Gross Pay
13.5.3 Setting Up a DBA to Calculate If No Gross Pay
Access the Basic DBA Information form.
- Method of Calculation
-
Enter a user-defined code from 07/DM that specifies the method that the system uses to perform certain calculations. For example, the system uses a method of calculation to calculate DBAs and workers' compensation insurance.
The method values are hard-coded. If you use methods 0 through 6, 8, 9, G, or M you must also enter a value in the Table Code field.
- Arrearage Method
-
Enter a code indicating how to adjust deductions when the employee is in a negative pay situation. Values are:
P: Do a partial or full deduction as needed. This is the default.
F: Do a full reduction or none at all.
N: Do not reduce.
Q: Same as code P. In addition, place the amount in arrears, but do not apply the limits when collecting the arrearage. Write the arrearage balance to history.
R: Same as code P. In addition, place the amount in arrears and apply the limits when collecting the arrearage. Write the arrearage balance to history.
G: Same as code F. In addition, place the amount in arrears, but do not apply the limits when collecting the arrearage. Write the arrearage balance to history.
H: Same as code F. In addition, place the amount in arrears and apply the limits when collecting the arrearage. Write the arrearage balance to history.
S: Same as code P. In addition, place the amount in arrears for the current pay period only but do not apply the limits when collecting the arrearage. Do not write the arrearage balance to history.
T: Same as code P. In addition, place the amount in arrears for the current pay period only and apply the limits when collecting the arrearage. Do not write arrearage balance to history.
I: Same as code F. In addition, place the amount in arrears for the current pay period only, but do not apply the limits when collecting the arrearage. Do not write arrearage balance to history.
J: Same as code F. In addition, place the amount in arrears for the current pay period only and apply the limits when collecting the arrearage. Do not write arrearage balance to history.
13.6 Setting Up Rollup and Master Accrual DBAs for Sick Accrual Requirements (Release 9.1 Update)
Many state and local jurisdictions, as well as federal agencies, now require mandatory sick pay accruals. A single timecard may be subject to two to three different sick pay accrual requirements. To accommodate these legislated requirements, you can set up rollup and master accrual DBAs. The rollup accrual DBA is used to calculate a single sick pay accrual requirement using a single jurisdiction's prescribed rate and limits. The rollup accrual is then added to a master accrual DBA, which stores the accrual balance for the employee. When two or more jurisdictions apply to the same timecard, the sick pay accrual calculation is performed for each applicable rollup accrual DBA, but only the accrual giving the most sick pay accrual to the employee is added to the master accrual DBA balance. When the employee uses sick time, this time is applied against the balance on the master accrual DBA.
The rollup accrual DBAs are linked to the master accrual DBA through the Basis of Calculation on the master accrual DBA.
Each individual rollup accrual calculation references the master accrual balance but uses its own year-to-date (YTD) and inception-to-date (ITD) limits to determine whether or not to calculate accrual. If the YTD or ITD limit of the individual rollup accrual is lower than the current master accrual balance, no accrual calculates but no part of the master accrual balance will be refunded, since the master accrual balance may come from multiple sources.
The system stores the accrual DBA information in the Payroll Transaction Constants (F069116) and the Payroll Transaction Constants - Tag File (F06911T) tables.
13.6.1 Prerequisites
Before you complete the tasks in this section, perform the following setup:
-
If you are defining accruals for a Federal contract job, set up the business unit as a Federal Contract Job. You can do this in one of these ways:
Use the Business Unit Constants program (P059051A) and select the Federal Contract Job check box for the business unit that you want to specify as a federal contract job.
Use the Work With Business Units program (P0006) to set up a category code designated with a user-defined value that represents a federal contract job in the Business Unit Master table (F0006).
-
If you are using the table calculation method for any of your rollup accruals, you need to define a calculation table corresponding to each sick pay accrual rate you will use. For example, if you have a sick pay accrual legislated rate of 1 hour per 30, you will need a table using Table Method OH (Hours Worked/Basis=Months) that defines a lower limit of zero, an upper limit of 999999999, and an Amt/Rate of .0333 (equals 1/30).
13.6.2 Creating Rollup Sick Pay Accruals
To create rollup sick pay accruals:
-
From the Pay/Deductions/Benefits Setup menu (G05BD4), select PDBA Setup.
The system displays the Work With PDBAs form. Use this form to review the PDBA data setup.
-
Determine the PDBA code to use for the rollup sick pay accrual and add the basic DBA information.
See Section 10.3, "Setting Up DBA Information"
After adding the basic rollup accrual information, return to the Work With PDBAs form.
-
Select the rollup accrual PDBA code and select Advanced DBA Info from the Row menu.
The system displays the Advanced DBA Information form. Use this form to enter the rollup accrual information
-
Complete the following fields to enter a rollup accrual:
-
Accrual Flag
Enter 1 for rollup accrual. For a rollup accrual, the system disables the Group Limit Code field.
-
Amount Limit 1
If there is an annual limit to the legislated accrual, enter the limit in hours.
-
ITD Limit - Rollup
If there is an ITD limit to the legislated accrual, enter the limit in hours. This field is applicable to rollup accruals only and is therefore enabled when you select Rollup Accrual in the Accrual Flag field.
-
Tax Area (Work)
If the rollup accrual relates to a State or local sick accrual requirement, enter the State or local level Geocode. For example, if a sick accrual applies to California, enter 05. If a sick accrual applies to San Francisco, enter 050759992.
-
Federal Contract Job
Select this check box to indicate that the DBA should apply to a business unit that is defined as a federal contract job.
If you select this field, the system enables the remaining fields in the Federal Contract Job section of the form.
-
Business Unit Source
Enter the value corresponding to the business unit on the timecard that you will use to determine whether federal sick pay accruals apply.
-
Category Code
Specify the name of the category code. Enter a value only if the business unit is identified as a federal contract job using a business unit category code.
-
Category Code Value
Specify the value that you will use to identify the business unit as a federal contract job. Enter a value only if the business unit is identified as a federal contract job using a business unit category code.
-
-
Enter values in these optional fields and click OK:
-
Home Company
-
Pay Class (H/S/P)
-
Tax Area (Residence)
-
Spending Acct Type
-
Investment Group Codes
-
Rollover Date Code
-
Anniversary Proration Rule
-
|
Note: After entering the accrual, you must enter the Basis of Calculation details for the PDBA. |
13.6.3 Creating Master Sick Pay Accruals
To create a master sick pay accrual:
-
From the Pay/Deductions/Benefits Setup menu (G05BD4), select PDBA Setup.
The system displays the Work With PDBAs form. Use this form to review the PDBA data setup.
-
Determine the PDBA code to use for the master sick pay accrual and add the basic DBA information.
See Section 10.3, "Setting Up DBA Information"
After adding the basic master accrual information, return to the Work With PDBAs form.
Note:
You must set up the master accrual with a PDBA number greater than the numbers that you used to set up rollup accruals. -
Select the master accrual PDBA code and select Advanced DBA Info from the Row menu.
The system displays the Advanced DBA Information form. Use this form to enter the master accrual information
-
Complete the following field to enter a master accrual:
-
Accrual Flag
Enter 2 for master accrual. For an accrual that you specify as a master accrual, the system clears and disables all limits associated with the DBA under the Individual Limits and Group Limits category of fields.
-
-
Enter values in these optional fields and click OK:
-
Pay Period Limit
-
Home Company
-
Pay Class (H/S/P)
-
Tax Area (Residence)
-
Spending Acct Type
-
Investment Group Codes
-
Rollover Date Code
-
Anniversary Proration Rule
-
|
Note: While entering the Basis of Calculation details for the master accrual, you need to define the limits for the range of rollup accruals on which the master accrual will be based. |
13.6.4 Sick Accrual Calculation in Different Scenarios
This section describes how sick accrual is calculated in different scenarios.
13.6.4.1 Rollup Sick Accrual for an Employee Working in One Jurisdiction
-
Set up a rollup sick accrual DBA with the table code set up to accrue 1 hour for 30 hours worked, and appropriate values in the other required fields. In this example, the DBA code 7930 is used for California.
-
Set up a master accrual DBA with Method of Calculation specified as %. In this example, the DBA code 7990 is used.
-
On the Basis of Calculation form, set up the pay type ranges for the master accrual DBA to include the rollup DBA ranges. In this example, the range is 7900 through 7931.
-
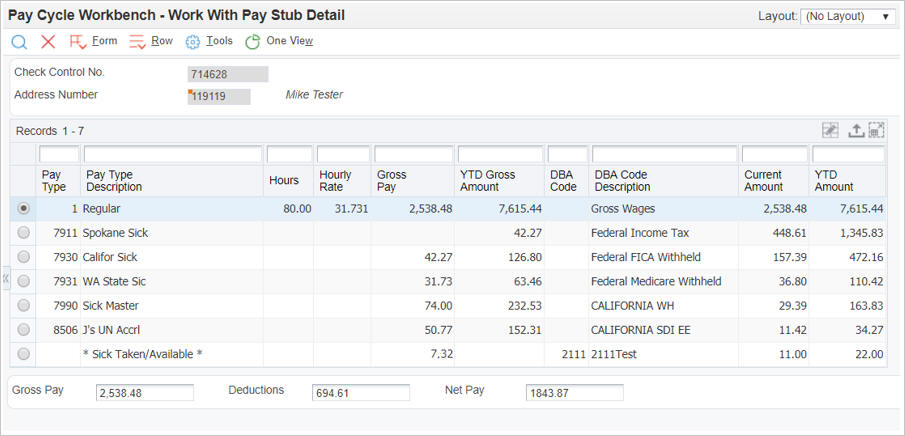
Enter a timecard for an employee with the work location set to the jurisdiction in which the employee worked. In this example, the work location is California.
-
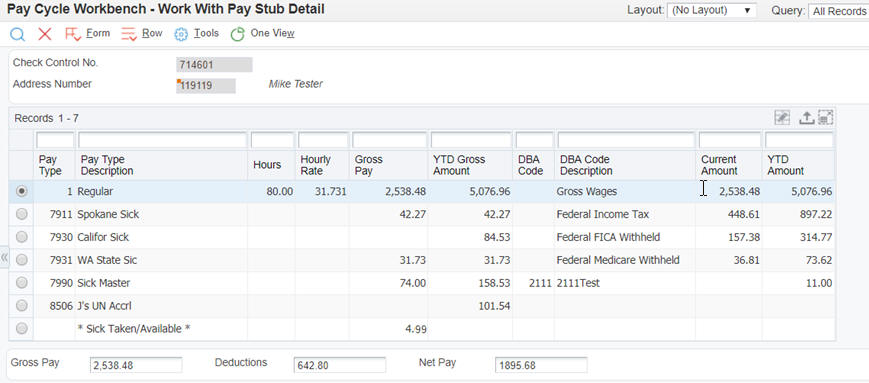
When you run payroll, the system calculates the rollup and master accruals. This screen shows that the system calculated the rollup accrual at the rate of 1 for 30 hours, and accrued the rollup balance to the master accrual balance:
Figure 13-2 Work with Pay Stub Detail and DBA Review Forms Showing Calculation of Accruals for a Single Jurisdiction
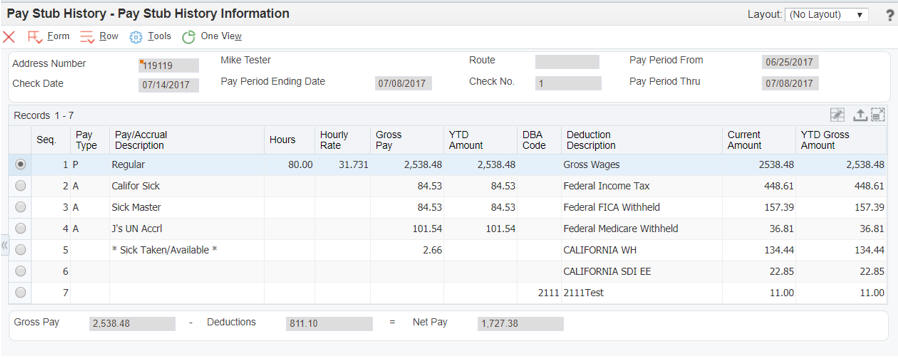
Description of ''Figure 13-2 Work with Pay Stub Detail and DBA Review Forms Showing Calculation of Accruals for a Single Jurisdiction''
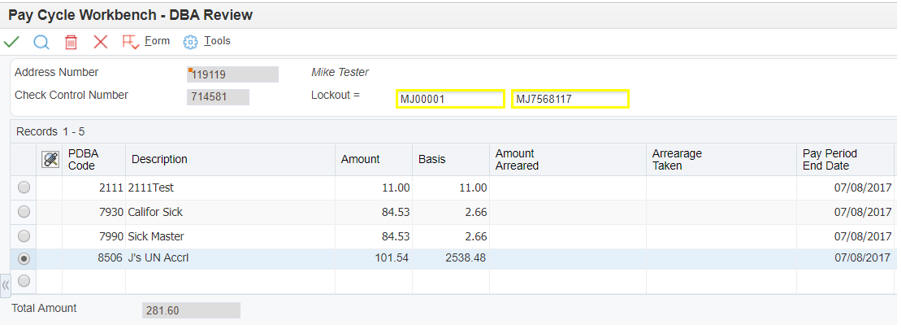
Description of ''Figure 13-2 Work with Pay Stub Detail and DBA Review Forms Showing Calculation of Accruals for a Single Jurisdiction''
13.6.4.2 Rollup Sick Accrual for an Employee Working in Two Jurisdictions
-
Set up a rollup sick accrual for Spokane with the table code set up to accrue 1 hour for 30 hours worked, and appropriate values in the other required fields. In this example, DBA code 7911 is used for Spokane.
-
Set up another rollup sick accrual for Washington State with the table code set up to accrue 1 hour for 40 hours worked, and appropriate values in the other required fields. In this example, DBA code 7931 is used for Washington State.
-
Set up a master accrual with Method of Calculation specified as %. In this example, DBA code 7990 is used.
-
On the Basis of Calculation form, set up the pay type ranges for the master accrual DBA to include the rollup DBA ranges. In this example, the range is from 7900 through 7931.
-
Enter two timecards for an employee with the work locations as Spokane and Washington State, for one week each.
-
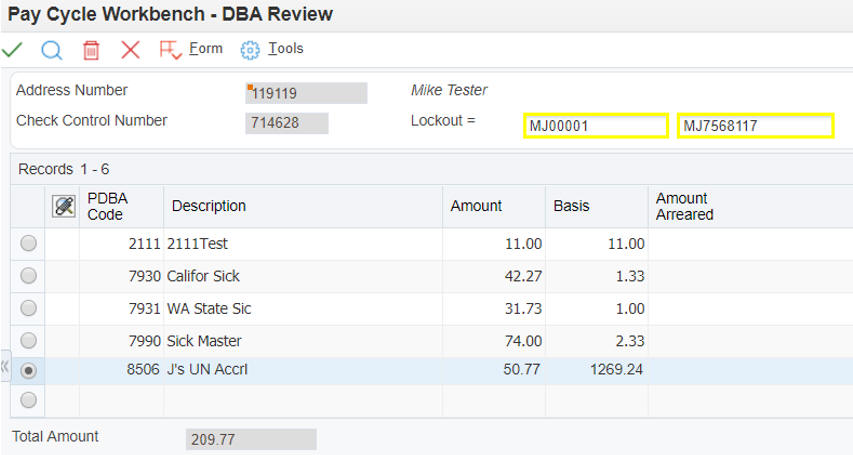
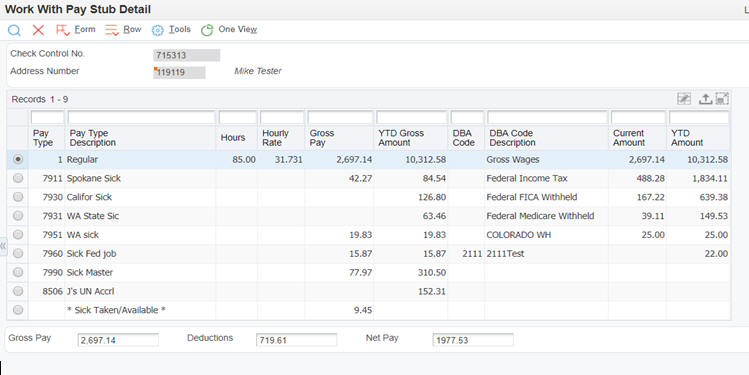
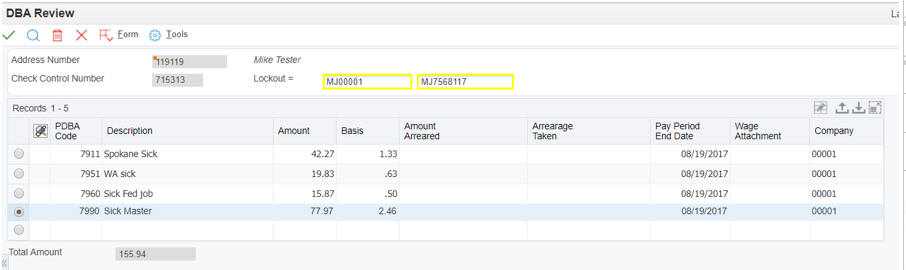
This is how the system calculates rollup and master accruals in the final update of payroll:
Figure 13-3 Work with Pay Stub Detail and DBA Review Forms Showing Accruals for Spokane and Washington State
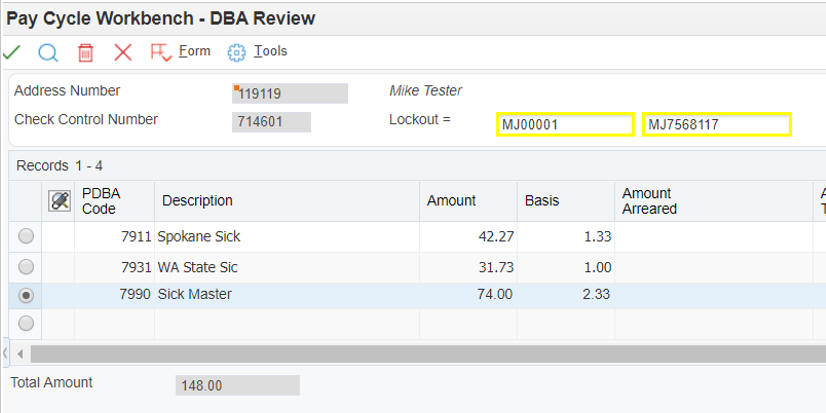
The system calculates rollup accrual for Spokane higher than the accrual for Washington State.
-
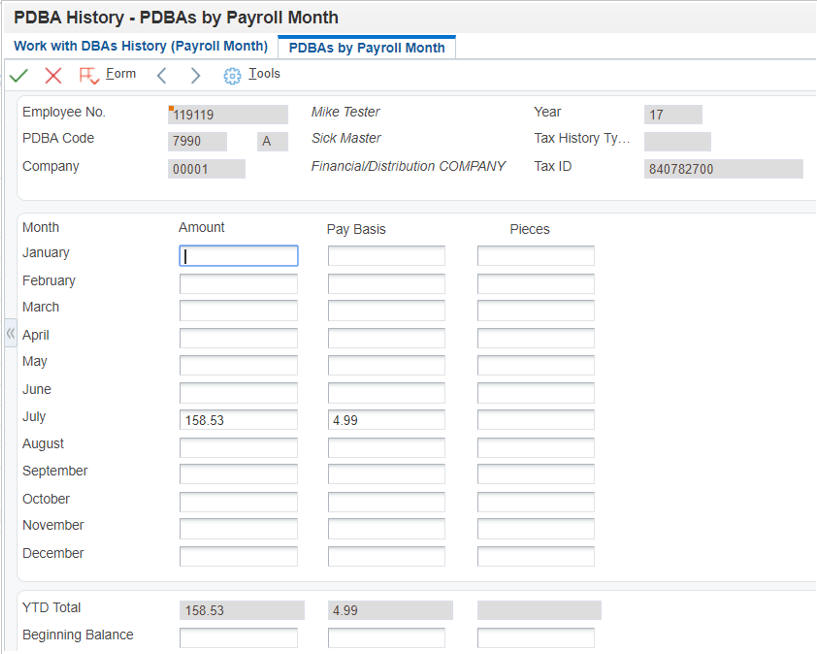
The PDBAs by Payroll Month screen shows the master accrual balance of 4.99 that includes 2.66 from the first and 2.33 from the second payroll.
-
Enter 40 hours for California State and 40 hours for Washington State.
-
Run pre-payroll.
This is how the system calculates rollup and master accruals in the final update of payroll:
Figure 13-5 Work with Pay Stub Detail and DBA Review Forms Showing Calculation of Accruals
Description of ''Figure 13-5 Work with Pay Stub Detail and DBA Review Forms Showing Calculation of Accruals''
Description of ''Figure 13-5 Work with Pay Stub Detail and DBA Review Forms Showing Calculation of Accruals''
-
You can see that the system calculates accrual for California at a rate higher than the rate for Washington State, and accrues the previous balance of 4.99 and the current accrual of 2.33 into the master accrual balance. The PDBAs by Rollup Month screen shows the increments in the previous balances of PDBAs.
Figure 13-6 PDBAs by Rollup Month Screen Showing Increments in Values of Accruals
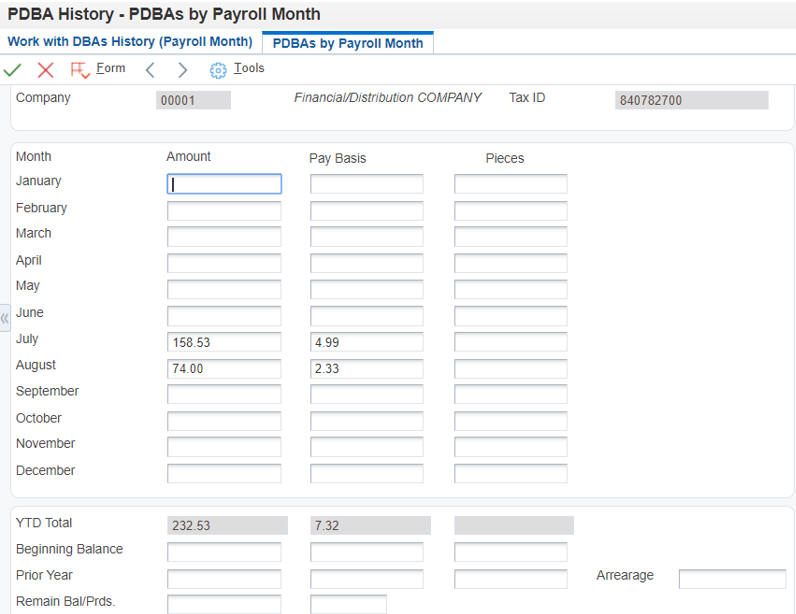
Description of ''Figure 13-6 PDBAs by Rollup Month Screen Showing Increments in Values of Accruals''
13.6.4.3 Rollup Sick Accrual for a Federal Contract Job
-
Set up a business unit as a federal contract job (FCJ). In this example, we have set up 8116.
-
Enter timecard for Spokane, Washington, and Colorado, all under the FCJ. In this example, we have entered 25 hours for Spokane, 40 for Washington State, and 20 for Colorado.
-
When you run pre-payroll, the system checks if two rollup accruals are applicable to the same timecard and the accrual calculation results in the same value. The system then uses the accrual with the lower number to add to the master accrual, and zeroes out the rollup with the higher number.
These forms show how the system calculates accruals for FCJ:
Figure 13-7 Work with Pay Stub Detail and DBA Review Forms Showing Calculation of Accruals
Description of ''Figure 13-7 Work with Pay Stub Detail and DBA Review Forms Showing Calculation of Accruals''
Description of ''Figure 13-7 Work with Pay Stub Detail and DBA Review Forms Showing Calculation of Accruals''
Figure 13-8 Example of One Time Overrides Form Showing Calculation of Accruals
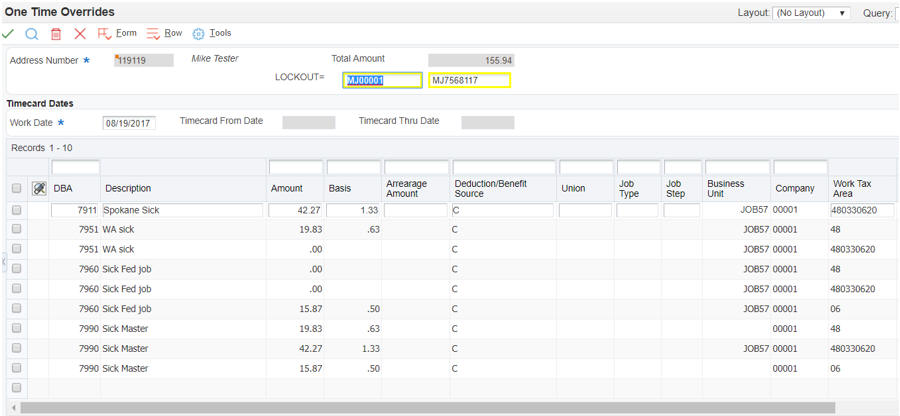
Description of ''Figure 13-8 Example of One Time Overrides Form Showing Calculation of Accruals''
In this scenario, this is how the system calculates accruals:
7911 Spokane Sick: Calculated, because it is higher than the FCJ rate
7951 WA Sick: Calculated, as the DBA number is lower than the FCJ
7951 WA Sick: Zeroed, because Seattle is a higher number
7960 Sick Fed Job: Zeroed, because WA is a lower number
7960 Sick Fed Job: Zeroed, because Seattle is a higher number
7960 Sick Fed Job: Calculated, because this is in Colorado
7990 Sick Master: Received the rollup from WA State
7990 Sick Master: Received the rollup from Spokane
7990 Sick Master: Received the rollup from FCJ in Colorado
13.6.5 Reviewing the Audit Trail Report for Master and Rollup Accruals
After you process pre-payroll, you can use the Audit Trail report (R07375) to review each master accrual DBA and the related rollup accruals in hours, that are calculated during pre-payroll or interims. You can run this report in detail or summary mode. When you run this report in detail mode, the report lists each rollup accrual contributing to the master accrual. Accruals on the report are shown in hours rather than in dollars. The report displays each rollup accrual by its:
-
Original Calculation
-
Calculation after any limits, such as ITD, YTD, QTD being met, which reduces the original calculation of the rollup accrual.
-
Final calculation
These columns show the rollup accrual calculation preserved, due to it resulting in the highest number of hours calculated.
Finally, the additional columns for rollup accrual shows the reason code and description, which help to explain why and how a given rollup accrual's hours have been reduced or zeroed out.
Figure 13-9 Detail View of Audit Trail Report
Description of ''Figure 13-9 Detail View of Audit Trail Report''
|
Note: You need to specify the step of the payroll cycle at which you want the system to run this report. To run this report during the pre-payroll cycle, define the step as 1 on Payroll Workbench (P07210). |