3 Setting Up System Options
This chapter contains the following topics:
3.1 Prerequisites
Before you complete the tasks in this chapter:
-
Select data for history tracking.
-
Research whether you should add employee records to the database before or after setting up the employee history and turnover tracking options.
3.2 Setting Up System Controls
You use system controls to control specific features or activate various modules within the software. For example, if you are using the software in conjunction with Personic Workflow or Criterion Blueprint, you need to activate the Personic or Criterion modules.
This section provides overviews of system controls for Human Capital Management and Human Capital Management self-service, and discusses how to set up system controls for each.
3.2.1 Understanding System Controls for Human Capital Management
This table lists and describes the data items that you can activate for specific processes in the Human Capital Management (HCM) and Payroll applications:
| Action | Data Item | Usage |
|---|---|---|
| To activate the French Canadian-Specific HCM Fundamentals system | SY05QU (Use HCM Foundation-French CDN Specific) | Set this data item to Yes if you have the French Canadian version of the JD Edwards Human Capital Management Foundation. Perform this action in addition to entering the Country Code on the User Profile Revisions form. |
| To activate the U.S.-specific HCM Fundamentals system | SY05U (Use HRM Foundation - U.S. Specific) | This data item allows the system to provide U.S.-specific fields and forms in the JD Edwards EnterpriseOne Human Capital Management Foundation system. |
| To activate the Canadian-specific HCM Fundamentals system | SY05C (Use HRM Foundation - Canadian Specific) | This data item allows the system to provide Canadian-specific fields and forms in the JD Edwards EnterpriseOne Human Capital Management Foundation system. |
| To activate JD Edwards EnterpriseOne Payroll B73.3 or later | SY07P733 (Use E1 Payroll B7.3.3 Or Later) | Set this data item to Yes if you are using JD Edwards EnterpriseOne Payroll B73.3 and above. If this data item is set to Yes, the system searches for history records in the F07* tables. If this data item is set to No, the system searches for history records in all of the tables that begin with F06. |
| To activate the Criterion module | SY05CRTN (Use Criterion Integration) | Set this data item to Yes if you are using Criterion BluePrint |
| To activate the Personic module | SY05PRSC (Use Personic Integration) | Set this data item to Yes if you are using Personic Workflow. |
| To activate Wage and Salary Administration | SY08W (Use HRM Wage & Salary Administration) | This system control will be available in a future release. |
| To activate the Quantum GeoCoder | HRGEO (Use GeoCoder for Tax Area in HR Apps) | Set this option to Yes to use the Quantum GeoCoder to automatically assign tax area information to employee and business unit records. This option is available for U.S. and Canadian Payroll only. |
3.2.2 Understanding System Controls for Human Capital Management Self-Service
The system controls for Human Capital Management control specific features of several human resources processes, such as benefits enrollment, compensation management, and self-service programs.
When you set up the common settings, the system updates the Common Settings for HR Employee Self Service Programs table (F05004).
3.2.3 Forms Used to Set Up System Controls
3.2.4 Setting Up System Controls for Human Capital Management
Access the EnterpriseOne System Control - Revisions form.
Figure 3-1 EnterpriseOne System Control - Revisions form
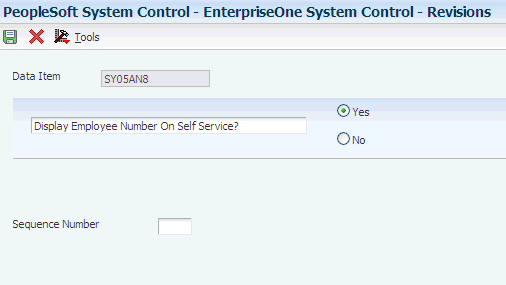
Description of ''Figure 3-1 EnterpriseOne System Control - Revisions form''
3.2.5 Setting Up System Controls for Human Capital Management Self-Service
Access the System Control - Revisions form.
Figure 3-2 System Control - Revisions form
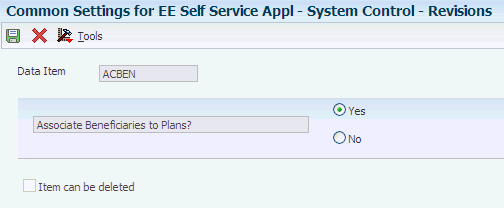
Description of ''Figure 3-2 System Control - Revisions form''
3.3 Setting Up General Options
This section provides an overview of system options setup and discusses how to:
-
Set up system options.
-
Set up position control options.
3.3.1 System Options Setup
To define default information that applies to the entire system, you set up system options. These options control the types of information that you track and the rules that the system uses to perform specific calculations. For example, you use system options to specify the date that the system will use for tracking changes.
This table describes the types of information that you control with system options:
| Information Type | Description |
|---|---|
| Pay information | To ensure that you enter acceptable pay rates for employees, set up the system to verify appropriate pay types for employee pay grades or pay-grade steps. |
| Employee history and turnover | To define whether you want to keep historical records of employee information, set up employee history and turnover options. These options are crucial to successful history and turnover tracking. |
| Recruitment | To automate the process of creating and maintaining requisitions, set up requisition information. |
| Position control information | To create, monitor, and control position budgets, set up position information. |
3.3.2 Forms Used to Set Up General Options
3.3.3 Setting Up System Options
Access the HRM Foundation System Options form.
Figure 3-3 HRM Foundation System Options form
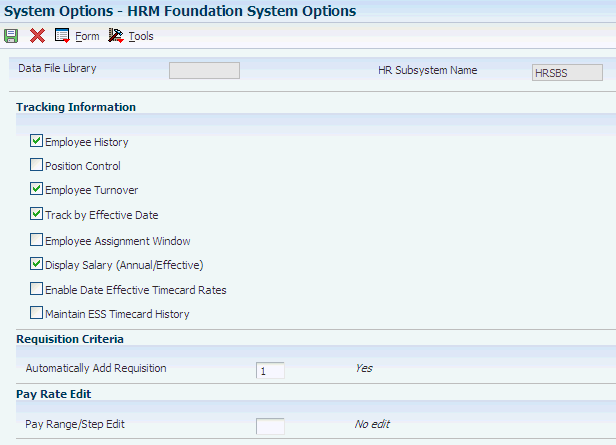
Description of ''Figure 3-3 HRM Foundation System Options form''
- Employee History
-
Select this option to create employee history records when you enter or change employee information. The system can create employee history records for only that information that is stored in the Employee Master table (F060116). To specify the information for which you want to track history, use the Select Data Items for History Tracking program (P08041).
Employee history records are stored in the HR History table (F08042).
- Position Control
-
Select this option to create records in the Position Activity table (F08111) when you enter or change position-related information for an employee. If you use this feature, you must also choose to track employee history.
If you select the Position Control option, select Position Control from the Form menu and complete the steps to set up position control options.
- Employee Turnover
-
Select this option to create employee turnover records when you change employee information.
Turnover information consists of any records in the Employee Turnover Analysis table (F08045) with a change reason that is not blank.
- Track by Effective Date
-
Use this option to indicate the date on which the system creates employee history and turnover records in relation to the date of the change. This field controls the dates that appear on history and turnover reports and review forms. It does not function as a suspense operation that allows you to enter a change now and update the history and turnover tables at a later time. When this field is activated, the system tracks both the effective date of a change and the date that the change was entered into the system.
If you select this option, the system uses the effective date of the change (data item EFTO) to track employee history and turnover.
If you do not select this option, the system uses the date on which you entered changes into the system instead of using the effective date of change.
If you use the effective date of the change, the system prompts you to enter an effective date each time you change any employee information for which you are tracking history or turnover.
If you use the effective date of the change, you must also track employee history, employee turnover, or both.
- Employee Assignment Window
-
Select this option to have the system display the Employee Assignment window when an employee changes to a new job, position, or home business unit.
You use the Employee Assignment window to update requisition information for the requisitions affected by the change.
- Display Salary (Annual/Effective)
-
Select this option if you want the system to display annual or effective salaries for employees.
An employee's annual salary is the number of hours per year that the employee works multiplied by the employee's hourly rate. The effective salary is the annual salary divided by pay frequency and then multiplied by periods to pay. For employees whose jobs are associated with a contract calendar, the system recalculates the effective salary if you enter a mid-calendar salary adjustment for the employee. After you enter a mid-calendar adjustment, the effective salary equals the salary that is to be paid to the employee from the time of the adjustment to the end of the contract.
You can set up the system to use the Pay Grade Step table as the source of employee pay rates. The pay rates in the Pay Grade Step table are based on the number of hours worked per year (hours per day times days per year) shown in the table.
When the employee's standard hours per year are different than the amount in the table, the employee's hours per year times the hourly rate shown in the table is the employee's effective salary.
When the table hours and employee hours are the same, the employee's effective and annual salaries are the same.
- Automatically Add Requisition
-
Enter a 1 if you want the system to automatically create a requisition for the position when you terminate an employee.
- Pay Range/Step Edit
-
Enter a value that specifies the edit level for the pay range minimum and maximum or pay grade step amount.
Values are:
Blank: No edit.
1: Issue a warning message if the change is out of range for the pay grade or the pay grade step amount. Processing is allowed to continue.
2: Issue a hard error if the change is out of range for the pay grade or the pay grade step amount. Processing stops and the system does not update any tables.
- Maintain ESS Timecard History (maintain employee self-service timecard history)
-
Enter a value that indicates whether you want to maintain the history of all updates to the F06116Z2 table. Values are:
Blank: do not maintain the history of updates to the F06116Z2 table.
1:maintain the historical record of updates in the F06116Z2 table.
3.3.4 Setting Up Position Control Options
Access the HRM Foundation Position Control Options form.
Figure 3-4 HRM Foundation Position Control Options form

Description of ''Figure 3-4 HRM Foundation Position Control Options form''
- Position Id Required
-
Enter a code that determines whether all employees are required to have a position ID. Codes are:
1: Required.
2: Optional. The Position ID field appears on the HR Employee Entry form.
3: Not required, and the Position ID field does not appear on the HR Employee Entry form.
If you leave this field blank, the system assumes that the Position ID is optional (code 2).
When you set this option to position ID required, the job ID associated with a position in the Position Master table becomes the default job for the employee.
- Pay Rate Source
-
Enter a code that specifies the default source for employee pay rates. When you add or change employee information, the system uses this code to locate a pay rate for an employee if you leave the salary and hourly rate fields blank. Values are:
1: Pay rate table
2: Pay grade step table
3: None
To calculate a salary for the employee, the system multiplies the employee's standard hours per year by the hourly rate from the table.
- Pay Grade Step Progression Rate Source
-
Enter a code that specifies the default pay grade step that the system uses to locate a pay rate for employees who have a salary forecast change date. The system uses this rate to calculate annual position budget amounts that are based on employee records. Values are:
1: Same Grade Step
2: Next Grade Step
- Salary Default Source
-
Enter a code that specifies the salary or rate default source for creating new positions or defining vacancies when you run the Create Next Year's Position program (P081820). Values are:
Blank: None
1: Pay Grade Minimum
2: Pay Grade Midpoint
3: Pay Grade Maximum
4: Pay Grade Step Amount
When the pay grade step is the source, the calculated hours/year (hours per day times days per year) from the pay grade step table are used as the default standard hours per year.
If this pay grade data does not exist, the system uses this hierarchy to determine the standard hours per year basis:
-
Home Company Standard Hours per Year.
-
Default Company Standard Hours per Year.
-
Data Dictionary.
-
2080.
-
- Rate Change in Projections
-
Enter a constant that determines whether future rate changes, based on an employee's salary forecast change date, will be taken into account in the calculation of position projected year end values. Values are:
Y: Yes
N: No
- Position Budget Edit - Salary
-
Enter a value that specifies whether you want the system to use position budget editing and, if so, whether the system displays a warning or error message when you enter or change a salary that is over the budgeted salary for the position. The system verifies the Salary, Hourly Rate, and Position fields on P0801CMP against the Position Master Table (F08101). Values are:
Blank: No edit
1: Warning message if over budget, but allowed to continue.
2: Hard error if over budget, processing stops, no table updates.
- Position Budget Edit - FTE (position budget edit - full-time equivalent
-
Enter a value that specifies whether you want the system to use position budget editing for full-time equivalents (FTE) and, if so, whether the system displays a warning or error message when a change to the FTE field is not within the budgeted FTEs for the position. Values are:
Blank: No edit
1: Warning message if over budget, but allowed to continue.
2: Hard error if over budget, processing stops, no table updates.
- Position Budget Edit - Hours
-
Enter a value that specifies whether you want the system to use position budget editing for work hours and, if so, whether the system displays a warning or error message when the employee's work hours are not within the budgeted effective hours for the position. Values are:
Blank: No edit
1: Warning message if over budget, but allowed to continue.
2: Hard error if over budget, processing stops, no table updates.
- Position Budget Edit - Headcount
-
Enter a value that specifies whether you want the system to use position budget editing for headcount and, if so, whether the system displays a warning or error message when you enter or change headcount that is not within the budgeted effective headcount for the position. Values are:
Blank: No edit
1: Warning message if over budget, but allowed to continue.
2: Hard error if over budget, processing stops, no table updates.
3.4 Setting Up Company Options
This section provides an overview of company option setup, lists a prerequisite, and discusses how to set up company options.
3.4.1 Understanding Company Option Setup
You set up company options to define default information that applies to all of the companies within your organization, and to define additional information that is specific to individual companies within your organization.
Typically, you first set up options for the default company, company zero. You can also set up company options for each company within your organization. If you do not set up company options for a company within your organization, the system uses the default company options when processing information for that company.
If you set up company options for each company within your organization, you can override some of the default company options. For example, you can enter standard hours per year for a particular company that vary from the standard hours per year that you entered for the default company.
Some of the default company options apply to all of the companies within your organization, and cannot be overridden at the individual company level. For example, if you signify that you are not using accounts payable integration or step progression processing at the default company level, none of the companies within your organization can use these options. However, if the default company options are set to activate these options, it is not necessary for all companies in your organization to use them. For example, if you have only one company within your organization that processes step progression information, you must set the default company options to allow step progression processing and then override that setting for all companies except the one company that processes step progression information.
You also set up company options to control payroll processing for the employees of each company. For example, you define this information at the default company level:
-
How the system retrieves the payroll deduction, benefit, and accrual (PDBA) history.
-
Whether the system overrides home company information on timecards.
-
Whether each company and business unit use the same debit account for automatic deposit processing.
-
How the system determines payment dates during payroll processing.
You must set up company options for the default company before you can process payroll or account for labor.
|
Note: If you use the JD Edwards EnterpriseOne General Accounting system, you must set up separate company options for that system. |
3.4.2 Prerequisite
Verify that the companies within your organization are set up in the JD Edwards EnterpriseOne General Accounting system. Typically, the Accounting Department is responsible for setting up companies.
3.4.3 Form Used to Set Up Company Options
3.4.4 Setting Up Company Options
Access the Company Options form.
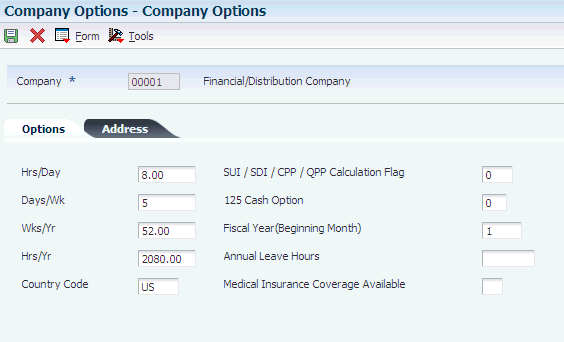
3.4.4.1 Options
- Company
-
Enter a code that identifies a specific organization, fund, or other reporting entity. The company code must already exist in the Company Constants table (F0010), and it must identify a reporting entity that has a complete balance sheet. At this level, you can have intercompany transactions.
Note:
You can use company 00000 for default values such as dates and automatic accounting instructions. You cannot use company 00000 for transaction entries. - Hrs/Day (hours per day)
-
Enter a value that indicates the number of hours in a standard working day. This information may be used for automatic overtime computations and other scheduling purposes.
- Days/Wk (days per week)
-
Enter the number of days in the work week. This number may be used (among other information) in the computation of automatic overtime.
- Wks/Yr (weeks per year)
-
Enter the number of work weeks in the year.
The number of bi-weekly, semi-monthly, and monthly periods in the year is assumed to be 26, 24, and 12, respectively.
- Hrs/Yr (hours per year)
-
Enter the number of work hours in the year. When you do not set the payroll company constants to use the Pay Grade Step table as the pay-rate source, the system uses this number to compute the hourly rate when you supply the annual salary (or to compute the annual salary when you supply the hourly rate).
When you set the constants to use the Pay Grade Step table as the pay rate source, the system uses this sequence to search for the standard number of hours that it uses to calculate the salary or hourly rate per pay period:
-
Employee entry forms.
-
Pay Grade Step table (hours per day multiplied by days per year).
-
Payroll company constants for the employee's company.
-
Payroll company constants for the default company (company 00000).
-
Data dictionary.
-
System default value of 2080 standard hours per year.
-
- Country Code
-
Enter a code from user-defined code (UDC) table 00/CN to indicate the country in which the company resides.
- SUI / SDI / CPP / QPP Calculation Flag(State Unemployment Insurance / State Disability Insurance / Canadian Pension Plan / Quebec Pension Plan calculation flag)
-
Enter a value that determines how the system adjusts State Unemployment Insurance, State Disability Insurance, the Canadian Pension Plan, or the Quebec Pension Plan.
Vertex can self-adjust the amount of tax calculated. Values are:
0: Self-adjust. This method always increases the tax to what it should be.
The formula used is: Current period tax = (YTD gross + current gross) × SUI, SDI, CPP, or QPP rate − YTD SUI, SDI, CPP, or QPP tax.
1: Do not self-adjust. The tax is calculated only on the current period wages.
2: Self-adjust when maximum base is reached.
If employees work in multiple states, set this value to 1 (do not self-adjust).
- 125 Cash Option
-
Enter 1 if you have a cash option for your 125 Plan. This value is used for taxation purposes for SUI and SDI. Certain states allow a 125 exemption amount if a cash option is allowed.
- Fiscal Year (Beginning Month)
-
Enter the number of the month in which the payroll fiscal year begins.
- Annual Leave Hours
-
Enter the standard number of hours generated as annual leave during automatic wage processing.
- Prevailing Wage Summarization Level (Release 9.1 Update)
-
Enter a value that determines whether the prevailing wage calculation creates an individual wage adjustment for each processed timecard or if a single adjustment record is created for all timecards in each job for each employee. Initially, the system retrieves the summarization level from the timecard's work company record in Company Options. If the summarization level is not defined at this level, the prevailing wage calculation uses the summarization level defined at the default company (00000) level. If the summarization level is still not defined for company 00000, then the system creates detail wage adjustments by default.
0: Create detail wage adjustments.
1: Create summarized wage adjustments for each job.
3.4.4.2 Address
- State
-
Enter a code from UDC table 00/S to specify the state or province. This code is usually a postal service abbreviation.
- County
-
Enter the name of a county, parish, or other political district that is necessary for the address or for tax purposes.
3.4.4.3 Additional Options
- Pay Cycle Control
-
Enter a code specifying whether to incorporate execution control into the payroll cycle steps. Valid codes are:
Y: You must set up execution control by version to determine who can execute the steps within the payroll cycle.
N: No execution control. The person who runs the first pre-payroll step must run all steps in the cycle. This value is the default.
- Spending Account Control
-
Enter a code indicating whether to use flexible spending accounts in processing payroll. Valid codes are:
Y: Use flexible spending accounts.
N: Do not use flexible spending accounts. This value is the default.
- P/R Register Edit (p___ r___ register edit)
-
Enter a code that specifies a type of error. The system always notes errors in the payroll register if the gross pay amount minus the taxes and applicable deductions does not equal net pay. Values are:
Y: Hard error. You must correct the error and run pre-payroll again. This value is the default.
N: Soft error. This error is noted on the payroll register but payroll cycle processing can continue. You must make the necessary corrections after the payroll cycle is complete.
- Employee Number Display Mode
-
Enter a code that specifies the type of employee number displayed on inquiry screens. Values are:
1: Display the eight-digit Address Book number (default).
2: Display the nine-digit Social Security number.
3: Display the eight-digit Additional Employee number preceded by a forward slash (/).
All forms of employee number remain valid.
- Enable Multi-currency Functionality
-
Enter a code that enables multicurrency functions within the JD Edwards EnterpriseOne Human Resources and JD Edwards EnterpriseOne Payroll systems. Values are:
Y or 1: Yes
N or 0: No
- Retrieve PDBA History System Flag (retrieve payroll deduction, benefit, and accrual history system flag)
-
Enter an option that identifies how the system retrieves PDBA history during payroll processing. You can set up the system to retrieve employee PDBA history for only the corporate tax ID in which the employee works during the pay period, or you can set up the system to retrieve all PDBA history for an employee, regardless of corporate tax ID.
You might choose to set up the system to retrieve PDBA history across all corporate tax IDs if employees in your organization frequently change companies. Retrieving PDBA history across multiple tax IDs allows the system to collect amounts that remain in arrears under one corporate tax ID if the employee moves to a company with a different corporate tax ID.
You can also determine how the system retrieves PDBA history at the PDBA level. Values are:
0: Use the information from PDBA setup to determine how the system retrieves PDBA history amounts.
1: Retrieve PDBA history only for the corporate tax ID in which the employee worked during the pay period, ignoring the setting at the PDBA level.
2: Retrieve PDBA history across all corporate tax IDs, ignoring the setting at the PDBA level.
- Payment Check Date Flag
-
Enter an option that determines how the system derives payment dates for interim payments. You can set this option to derive the payment date using the master pay cycles, or you can set this option to override the master pay cycle dates using a system-calculated date.
If you choose to override the master pay cycle dates, the system derives the payment date by adding the number of days entered in the Payment Date Offset field on the Interim Header Entry form to the system date. For example, if you use a payment date offset of 4, the system calculates the payment date for all interims entered on Monday as Monday +4, which is Friday. You might use this option if you enter interims continuously throughout a pay period and you want them all to have the same payment date. However, to accomplish this, you must change the payment date offset number daily. Values are:
0: Derive payment date using master pay cycles (default).
1: Derive payment date using system date + payment date offset formula.
- G/L Integration (general ledger integration)
-
Enter a code that indicates how batches of payroll journals are posted to the general ledger. Values are:
A: Automatic. If batches are in balance and no errors have occurred, the system posts batches automatically during the final update step of the payroll cycle. This value is the default.
M: Manual. Each batch must be posted manually.
N: None. No general ledger interface is available.
T: Time accounting.
- A/P Integration (accounts payable integration)
-
Enter a value to specify the level of integration. A/P Integration is used to set the level of integration between the JD Edwards EnterpriseOne Payroll and JD Edwards EnterpriseOne Accounts Payable systems. Pro forma vouchers are created during the payroll journal entries step of the payroll cycle. Actual vouchers are created in Accounts Payable during the final update step. Values are:
N: No integration.
0: Create vouchers for both DBAs and taxes that were set up with A/P integration.
1: Create vouchers only for DBAs that were set up with A/P integration.
2: Create vouchers only for taxes that were set up with A/P integration.
- Step Progression Automation
-
Enter a code that specifies whether you want the system to process job step progression information during payroll cycle processing or whether you want to process the information as a stand-alone feature outside of the payroll cycle. Be aware that processing job step progression during the payroll cycle might significantly increase pay cycle processing time.
Note:
This field works in conjunction with the Step Progression Process field on the Company Options form. To process job step progression information, the Step Progression History Update field must be set to 1 or 2. Also, this field is initially populated with the value from the Company Options setup. You can override the value here. However, if you change the value in the Company Options setup, then the system does not change the value in this field.Values are:
Y: Process job step progression information during payroll processing.
N: Process job step progression as a stand-alone feature (default).
- Step Progression Process
-
Enter a code that specifies whether the system updates Step Progression History tables and the level of detail in which the update occurs. Values are:
1: Update using Union, Job Type, and Job Step.
2: Update using Home Business Unit, Union, Job Type, and Job Step.
N: Do not update Step Progression History tables.
If you select 1, you must set up job step progression parameter tables for each union for which you want to process step progression information. If you select 2, you must set up job step progression parameter tables for each business unit and union combination for which you want to process step progression information. If you select 1 or 2, the companies within your organization are not required to process step progression information. However, if you select N, no companies in your organization can process step progression information.
- Maximum Deferral Rate
-
Enter the maximum percentage of pre-tax earnings that an employee is allowed to defer to a 401(k) plan. This rate is used in the 415 Nondiscrimination Test.
For example, to enter a rate of 12.75 percent, enter 12.75 in this field.
- Timecard Home Company Flag
-
Enter a code that determines whether the system overrides the value in the Home Company field on employee timecards with the home company from the Employee Master. Values are:
0: Override the Home Company field on the timecard with the home company from the Employee Master table (F060116). This value is the default.
1: Do not override the Home Company field on the timecard with the home company from the Employee Master table (F060116).
If you choose to override the value on the timecard, the system performs the override at different times depending on how the timecard is entered into the system. These examples illustrate when the override would occur if you set this option to 0 and entered a timecard with a home company that is different than the home company in the Employee Master:
-
If you enter a regular timecard, the system overrides the home company when the timecard is processed in pre-payroll.
-
If you enter a timecard using the Time Entry Interim Generator, the system overrides the home company when you exit the row in the detail area of the time entry form.
-
If you enter timecards for interim payments using the Interim Payment Workbench and if the Company field on the Interim Entry form is blank, then the system overrides the home company when you click OK during interim entry.
Note:
The system never overrides the home company on timecards that are entered using the Interim Entry form if a value appears in the Company if Different than Home Company field that is also on the Interim Entry form. The Company if Different than Home Company field is intended to be used as an override to this functionality. The system does not consider the value in this field when determining whether to override the home company for the interim payment.
Caution:
If your organization has multiple home companies with the same corporate tax ID, and those companies use the same bank account for payroll payments, set this option to 0. Setting this option to 1 might cause undesirable results. -
- Process Employees by Business Unit
-
Enter a value that specifies how the system processes information. Values are:
1: Process employees by business unit (as set up in Auto Deposit Instructions for Business Units program (P07236)). This option should be used if different auto deposit information per business unit is needed.
0: Process employees as one large group regardless of the business unit they work in. If you enter 0, auto deposit information from business unit 1 is used. You must set up auto deposit information for business unit 1 in the Auto Deposit Instructions for Business Units program (P07236).
- Bypass Voids with Special Taxes
-
Enter 1 if you want to bypass voided payments if those payments contain special taxes. Leave this option blank if you want to process voided payments if those payments contain special taxes.
|
See Also: |
3.5 Setting Up Business Unit Information
This section provides an overview of business unit constants setup and discusses how to:
-
Set up business unit constants.
-
Set up auto deposit instructions for a business unit.
3.5.1 Understanding Business Unit Constants Setup
You set up business-unit constants to define default information that is associated with a business unit. Default business-unit information expedites data entry for time entry and payroll information.
Setting up business-unit constants also allows you to:
-
Define taxing authorities for a business unit.
-
Apply flat burden rates to a specific business unit.
-
Set up the business unit to act as a certified job for governmental reporting purposes. Job information for the business unit is included in certified payroll reports.
You can associate a business unit with only one company.
When you set up a business unit, the system adds that business unit to the Business Unit Master table (F0006) if the business unit does not already exist in that table. In many companies, business units are set up in the JD Edwards EnterpriseOne General Accounting system by the Accounting department.
You must use the JD Edwards EnterpriseOne General Accounting system, and not the JD Edwards EnterpriseOne Payroll system, to revise the information in any of these fields:
-
Posting Edit - Business Unit
-
Level of Detail - Business Unit
-
Company
-
Equipment Rate Code
-
Address Number
3.5.2 Forms Used to Set Up Business Unit Constants
3.5.3 Setting Up Business Unit Constants
Access the Business Unit Constants Revisions form.
Figure 3-6 Business Unit Constants Revisions form
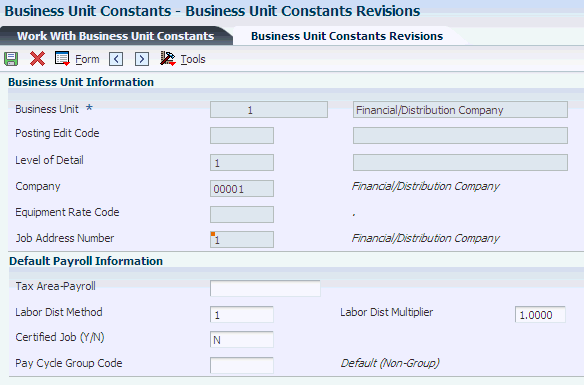
Description of ''Figure 3-6 Business Unit Constants Revisions form''
- Tax Area-Payroll
-
Enter a value that specifies a taxing authority. The system uses the value that you specify as the default value for all time entries for this Cost Center.
- Labor Dist Method (labor distribution method)
-
Enter a value that controls whether the labor costs include a flat burden for payroll taxes and benefits. Values are:
0: The flat burden factor is always 1.0000, so the resulting amount for the flat burden is zero.
1: The flat burden factor is always greater than 1.0000, so the labor costs include a flat burden.
- Labor Dist Multiplier (labor distribution multiplier)
-
Enter a multiplier to load direct labor costs with burden. For example, a factor of 1.32 will load every dollar of labor cost with 32 cents worth of burden.
- Certified Job (Y/N)
-
Enter a value that specifies whether to include information about this job in certified payroll reports used for governmental reporting. Values are:
Y: Include job information on certified payroll reports.
N: Do not include job information. This value is the default.
- Pay Cycle Group Code
-
Enter a code from UDC table 06/PG that indicates a pay cycle group. If you enter a pay cycle group code here, the system processes only those timecards whose business unit has that pay cycle group assigned in the business unit constants.
If you use the GeoCoder, the system uses the address information for the business unit to determine the GeoCode for the Tax Area - Payroll field. The system automatically populates this field if only one GeoCode is available.
See Understanding Tax Area Information Assignment Using the GeoCoder
3.5.4 Setting Up Auto Deposit Instructions for a Business Unit
Access the Auto Deposit Instructs for Company - [Acct Setup Instructs] form.
Figure 3-7 Auto Deposit Instructs for Company - [Acct Setup Instructs] form

Description of ''Figure 3-7 Auto Deposit Instructs for Company - [Acct Setup Instructs] form''
- Bank Transit Number
-
Enter the payment routing number for the employee's financial institution. This number is on the employee's check or deposit slip. It is located between the MICR colons (:) at the bottom of the check. If you change this number for an employee, the system creates a pre-note for the employee's next auto deposit.
- Bank Account Number
-
Enter the employee's unique account number at the financial institution. You can obtain the number from the MICR line of a voided check or a deposit slip from the employee's account. You can also obtain account numbers from other sources, such as passbooks or debit cards.
You must include dash cue symbols in the field. However, they are recorded in a translated mode as a hyphen.
When transcribing information, left justify and enter only numbers (0 through 9), alphabetic (A through Z), and hyphens (-). If fewer than 17 characters are required, leave the unused spaces blank. Spaces left within the depositor's account number are ignored when the paperless entry is prepared. For example, 0123 4 56789 appears as 0123456789 in the entry record, and 0123-4 56789 appears as 0123-456789.
If you change this number for an employee, the system creates a pre-note for the employee's next automatic deposit.
- Auto Deposit Company Identification
-
Enter a 10-character, alphanumeric code that identifies the originator of a file. This code must be included on all prenotification records and on each entry initiated pursuant to such prenotification. The company ID may begin with an ANSI one-digit Identification Code Designator (ICD), followed by the identification number.
The ANSI identification numbers and related ICDs are:
IRS Employer Identification Number (EIN): 1
Data Universal Numbering Systems (DUNS): 3
User Assigned Number: 9
- Company Name
-
Enter the immediate origin name for the ACHA file header record, typically the name of the company sending the deposits to the clearing house bank.
- Immediate Destination for AutoDeposit
-
Enter a 10-character code that specifies the routing number of the ACH Operator or receiving point to which the pre-note file is being sent. This code consists of a blank in the first position, followed by the four digit Federal Reserve Routing Symbol, the four digit ABA Institution Identifier, and the Check Digit (bTTTTAAAAC).
- Immediate Origin for AutoDeposit
-
Enter a 10-character code that specifies the routing number of the ACH Operator or sending point that is sending the pre-note file. This code consists of a blank in the first position, followed by the four-digit Federal Reserve Routing Symbol, the four-digit ABA Institution Identifier and the Check Digit (bTTTTAAAAC).
- SCC (service class code)
-
Enter a code that identifies the general classification of dollar entries to be exchanged. This standard is used to facilitate transmission of data between organizations. Automated Clearing House (ACH) entries required for payroll deposits use these service class codes:
200: ACH entries mixed debit and credits
220: ACH credits only (batch format)
225: ACH debits only (batch format).
At the time of this writing, only the use of class 200 is recommended.
- Discretionary Data
-
Enter additional codes that are of significance to your company.
This field enables specialized handling of all subsequent entries in the batch. The banking system does not use a standardized interpretation of the value you enter.
- File ID Modifier
-
Enter a code in the file header record that the system uses to distinguish multiple files created on the same date and among the same participants. Values can include only upper case letters A through Z and numbers 0 through 9.
- Header Record for Auto Deposits
-
Enter a code that identifies the first physical records on magnetic tape files. The header record identifies the data file and provides security and control information relative to that file.
- Trailer Record for Auto Deposits
-
Enter a code that identifies the trailer record for auto deposit tape files. This code is used for magnetic tape files only. Trailer records are the last physical records for each file. The trailer record identifies the data file and tape volume and provides the checking mechanism for processing verification (that is, block counts).