4 Working with Product Costing
This chapter contains the following topics:
4.1 Understanding Product Costing
Product costing enables you to differentiate what types of cost information you want to consider as you establish the total cost of a product that you want to manufacture. You can set up different types of cost components to capture the different types of cost.
Cost components are values in user-defined code (UDC) table 30/CA that represent the individual costs that accrue for an item, such as costs for material, labor, overhead, and extras. The system automatically calculates material, labor, and overhead costs. Extra costs, such as electricity, are manually controlled.
The system provides various sources for cost information. For material costs, the system uses the bill of material to retrieve the cost of manufactured parts, such as labor, outside operations, and extra costs, and the costs of lower-level material. You can use only bills of material of type M to establish standard costs. For labor and machine costs, the routing provides information such as labor, machine, and setup costs.
Based on the cost components that you set up, you can create hypothetical situations for a given cost method. You might want to calculate simulated costs because of changing factors in the business environment. You create cost scenarios by running the Cost Simulation program (R30812).
For example, you can use cost simulations to:
-
Simulate an increase in material costs.
-
Simulate changes in labor rates.
-
Develop strategies for pricing, contractual, or labor negotiation.
You can simulate cost change scenarios (rollups) as many times as needed before you finalize the changes.
In addition, you can:
-
Allow for extra costs that are related to the manufacturing of a product, such as costs for electricity, insurance, water, and warehouse space.
-
Review specific calculations that determine cost amounts for any item.
-
Maintain costs by branch for multifacility processing to account for costs that differ based on regional or business variations.
-
Define additional cost factors to include in product costing calculations.
Changes are finalized in the system when you perform a frozen cost update for a given cost method. You use the Item Cost Component - Frozen Update program (R30835) to freeze costs. A frozen update copies the simulated values, freezes them, and updates the Item Cost table (F4105) with the total cost. These costs remain in effect until you overwrite them with the results from another frozen update.
4.2 Analyzing Costing Inputs
This section discusses how to:
-
Analyze costing inputs from the bill of material.
-
Analyze costing inputs from the routing.
4.2.1 Forms Used to Analyze Costing Inputs
4.2.2 Analyzing Costing Inputs from the Bill of Material
Access the Enter Bill of Material Information form.
- Quantity
-
Enter the number of units that you use to manufacture the parent item. A quantity of zero is valid. The default value is 1.
- UM (unit of measure)
-
Enter the unit of measure that you use for the component quantity. Standard costs are established in the primary unit of measure, which should be the smallest unit of measure.
- F V (fixed/variable)
-
Enter a code that indicates whether the quantity per assembly for an item on the bill of material varies according to the quantity of the parent item produced, or is fixed regardless of the parent quantity. You can also use this value to determine whether the component quantity is a percentage of the parent quantity. Values are:
F: Fixed quantity.
V: Variable quantity (default).
%: Quantities are expressed as a percentage and must total 100 percent.
For fixed-quantity components, the JD Edwards EnterpriseOne Shop Floor Management system and the JD Edwards EnterpriseOne Requirements Planning system from Oracle do not extend the quantity per assembly of the component by the order quantity.
The system calculates the unit cost by dividing the component quantity by the accounting cost quantity that you set up for the item.
- Feat Cost % (feature cost percentage)
-
Enter a percentage that the Cost Simulation program uses to calculate the cost of a feature or option item as a percentage of the total cost of the parent.
Enter the percentage as a whole number, for example, enter 5 percent as 5.0.
- Percent Scrap
-
Enter the percentage of unusable component material that is generated during the manufacture of a parent item. During DRP/MPS/MRP generation, the system increases gross requirements for the component item by this percentage to compensate for the loss. Enter percentages as whole numbers, for example, 5 percent as 5.0.
Note:
The system compounds inventory shrinkage and scrap to calculate the total loss in the manufacture of a particular item. Accurate shrinkage and scrap factors support more accurate planning calculations.Like the JD Edwards EnterpriseOne Requirements Planning system, the JD Edwards EnterpriseOne Shop Floor Management system inflates component requirements by this percentage.
- Operation Scrap Percent
-
Displays the operation scrap percent. The system calculates this value by compounding the yield percentages from the last operation to the first operation in the routing. Use a processing option in the Work With Routing Master program to enable the system to calculate the operation scrap percent.
The system updates this value on the Enter Bill of Material Information form when you run the Planned Yield Update program (R3093).
Product costing inflates component requirements by this percentage when calculating material costs.
4.2.3 Analyzing Costing Inputs from the Routing
Access the Enter Routing Information form.
Figure 4-1 Enter Routing Information form
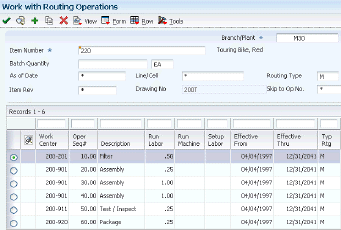
Description of "Figure 4-1 Enter Routing Information form"
- Work Center
-
Enter a work center number. Work centers are business units on the shop floor where routing steps take place. Work centers may include people, machines, or both.
You can track costs at the work center level if you have selected the Cost by Work Center option in the manufacturing constants.
- Run Labor
-
Enter the standard labor hours that you expect to incur in the normal production of this item.
The run labor hours in the Routing Master table (F3003) are the total hours that it takes the specified crew size to complete the operation. The hours are multiplied by the crew size during shop floor release and product costing.
- Run Machine
-
Enter the standard machine hours that you expect to incur in the normal production of this item.
- Setup Labor
-
Enter the standard setup hours that you expect to incur in the normal production of this item. This value is not affected by crew size and is divided by the accounting cost quantity to calculate the setup cost per unit.
- Time Basis
-
Enter a value from the Time Basis Code UDC table (30/TB) that indicates the time basis or rate to be used for the machine or labor hours that you enter for every routing step. For example, you can specify 25 hours per 1,000 pieces or 15 hours per 10,000 pieces.
The system uses the values in the Description 02 field on the User Defined Codes form for costing and scheduling calculations.
- Crew Size
-
Displays the number of people that is assigned to a work center. The Crew Size field on the Work Order Routing form contains the value that you specified for the work center in the Work Center Revision program (P3006). You can override the value for the routing, but this change does not affect the work center master record.
For product costing, the system multiplies the run labor value in the Routing Master table with the crew size in the specified work center to generate total labor amounts.
If the prime load code is L or B, the system uses the total labor hours for backscheduling. If the prime load code is C or M, the system uses the total machine hours for backscheduling without modification by crew size.
- Type Oper (type operation)
-
Enter a value from the Type Operation UDC table (30/OT) that indicates the type of operation. Values include:
A: Alternate routing.
TT: Travel time.
IT: Idle time.
T: Text.
For product costing, only operations with an operation type code of blank are costed.
- Yield % (yield percent)
-
Enter the yield percentage of the planned output for a step. The Planned Yield Update program uses this value to update the cumulative yield percentage in the routing and the operation scrap percentage in the bill of material. Materials Requirements Planning (MRP) uses the scrap percentage and the existing component scrap percentage to plan component demand.
- Cum Yield % (cumulative yield percentage)
-
Enter the cumulative yield percentage of the planned output for a step. The system uses this value to adjust the operation scrap percentage for the components at an operation step. The JD Edwards EnterpriseOne Requirements Planning system uses the operation scrap percentage along with the existing component scrap percentage to plan component demand.
4.3 Running the Costing Exceptions Report
This section provides an overview of the Costing Exceptions report and discusses how to:
-
Create the Costing Exceptions report.
-
Set processing options for Costing Exceptions (R30801).
4.3.1 Understanding the Costing Exceptions Report
Before you run a cost simulation, run the Costing Exceptions report (R30801). Costing exceptions are problems that are associated with an item and result in error messages. An example of a problem is an item without a routing.
The report uses the error messages from the Costing Exceptions Error Messages UDC table (30/EM). The error messages are hard-coded; therefore, you cannot add or change these error messages. You can define the severity level for each error message as appropriate for the company, using the Description 02 field in the UDC table. For example, if having labor costs of zero is an important exception in the company, you could assign that error message a high severity level. You can indicate in the processing options the minimum level of error messages that you want included in the report.
This table identifies the changeable, default severity setting for each of the hard-coded error messages:
| Severity Level | Description |
|---|---|
| Severity level 10 |
|
| Severity level 20 |
|
| Severity level 30 |
|
| Severity level 40 | No rates for work center. |
| Severity level 50 |
|
You should correct the problems and run the Costing Exceptions report again before you create a simulated rollup.
4.3.2 Creating the Costing Exceptions Report
Select Product Costing Reports (G3023), Costing Exceptions.
4.3.3 Setting Processing Options for Costing Exceptions (R30801)
These processing options control default processing for the Costing Exceptions report.
4.3.3.1 Error Message
This processing option controls the error message display on the report.
- Error Message
-
Specify the minimum message level to appear on the report.
4.3.3.2 Cost Method
These processing options control which cost method the system uses as a basis for determining costing errors.
- Cost Method
-
Specify the cost method on which to base costing errors. If you leave this processing option blank, the system uses cost method 07 (standard).
- Cost Method
-
Specify the purchasing cost method on which to base costing errors. If you leave this processing option blank, the system uses cost method 07 (standard).
4.4 Creating a Cost Simulation
This section provides an overview of the cost simulation, lists prerequisites, and discusses how to:
-
Create a cost simulation.
-
Set processing options for Cost Simulation (R30812).
4.4.1 Understanding the Cost Simulation
Use the Cost Simulation program (R30812) to calculate costs for discrete and process items based on hypothetical situations. The program updates the Item Cost Component - Add-Ons table (F30026) with the calculated simulated net-added and total costs. To calculate simulated labor, machine, and overhead costs, the Cost Simulation program calls the Cost Simulation - Routing Sheet program (R30818). After calculating all costs, the Cost Simulation program calls the Cost Simulation report (R30825) to print the cost information. You can also review simulated costs in the Cost Components program (P30026).
To retrieve a bill of material and routing, the program searches first for a bill for which batch quantity matches the accounting cost quantity. When the program does not find a matching batch bill, it uses the zero batch bill. The bill of material must have bill type M (standard manufacturing bill). Effective dates on components must be valid.
To enable the system to calculate cost components of type B and C:
-
The routing must have routing type M.
-
A routing operation must have a work center with rates in the Work Center Master table (F30006) for the cost component to appear.
-
The operation type code on the routing must be blank to indicate a normal manufacturing operation.
-
The effective dates on the routing must be valid.
The default as of date is the current date.
The R30812 program uses two temporary storage mechanisms to store the component item cost information and parent/component relationships of the bill of materials (BOMs) it explodes. The storage mechanisms are cache which uses memory, and temporary work tables which use a database.
The caches are very effective when the number of records is small. The cache becomes inefficient with large data sets, typically when the number of records stored in cache exceeds approximately 10,000 entries. Thus, cache should be used for processing smaller data sets. A temporary work table should be used for processing large data sets to avoid exceeding memory constraints in the system.
The cost simulation is affected by:
-
Cumulative yield.
-
Operation scrap.
-
Master routings.
-
Unit of measure conversions.
4.4.1.1 Cumulative Yield
Cumulative yield, which is defined on the routing, affects labor and machine hours when you run the cost simulation. Enough hours must be expended to obtain 100 percent yield at the last operation. In a series of routings, the hours must be adjusted accordingly.
This example illustrates how the costing of hours is affected by a cumulative yield of 85 percent:
| Yield | Labor | Machine | Setup |
|---|---|---|---|
| Without Yield | 5 | 5 | 5 |
| With Yield | 5.88 | 5.88 | 5 |
For each operation, the labor and machine hours are adjusted by dividing the hours by the cumulative yield. Setup hours are not affected.
4.4.1.2 Operation Scrap
Operation scrap, which is defined on the bill of material, affects material cost calculations when you run the cost simulation. Enough material must be available at each operation to obtain 100 percent yield at the last operation. When material cost is calculated, the quantity of the components is adjusted accordingly.
This example illustrates the effect of operation scrap on costing:
-
Parent = A
-
Component = B
-
Quantity per = 3
-
Cost of B = 5.00
-
Operation scrap = 8 percent
-
Cost of B rolled into parent item A = 3 × 1.08 × 5 = 16.20
4.4.1.3 Master Routings
The Cost Simulation program uses the master routing for the item from the Routing Master table if all of these conditions are met:
-
The Master Routing field in the manufacturing constants form is set to Y for the branch.
-
You have defined a cross-reference item for the parent item on the master routing.
You must define the cross-reference item with a cross-reference type of MR. The Address field must be blank.
-
You have defined an item routing for the cross-reference item.
4.4.1.4 Unit of Measure Conversions
The Cost Simulation program converts all units of measure to the primary unit of measure for the purpose of the cost simulation.
When one of the units of measure is a potent unit of measure, the conversion equation includes the standard potency value from branch/plant manufacturing data.
This example illustrates a conversion involving a potent unit of measure:
-
Component = B
-
Quantity per = 3
-
Primary unit of measure = GA (physical gallons)
-
Component unit of measure = GP (potent gallons)
-
Standard potency = 50 percent
-
Cost of B = 50.00 (from the Item Cost table)
-
Cost rolled into parent item = [(3 ÷ .5) × 50] = 300.00
4.4.1.5 Simulated Product Cost Tables
Simulated costs are generated using multiple tables in the JD Edwards EnterpriseOne system from Oracle. The Cost Simulation program sums the costs of all the components at each level of the bill of material of the parent item to arrive at a total cost for the parent item.
You can set the processing options in any of the cost simulation programs to specify the cost method that you want to use.
The Cost Simulation program uses information from these tables to generate costs:
4.4.1.6 Cost Simulation by Work Center
If you have selected the Cost by Work Center option in the manufacturing constants, you can use the Cost Simulation program and the Cost Simulation - Routing Sheet program to calculate and store simulated total and net-added costs by work center. For cost components that you have set up by work center, the system stores the simulated cost in the Item Cost Component Detail table (F300261).
You can display costs by work center on the Cost Simulation report (R30825).
4.4.2 Prerequisites
Before you run the Cost Simulation program, run the Costing Exceptions report to identify whether error messages exist for the item.
4.4.4 Setting Processing Options for Cost Simulation (R30812)
These processing options control default processing for the Cost Simulation program.
4.4.4.1 Default
These processing options control the default as of date and cost method for running this batch program.
- 1. As Of Date
-
Specify the date that is used to determine which routing and bill of material for each item is used in the rollup, based on their effectivity dates. If you leave this processing option blank, the program uses the current date.
- 2. Cost Method
-
Specify the cost method that will contain the new simulated costs in the Cost Components table. If you leave this processing option blank, the program calculates costs for cost method 07 (standard costs).
4.4.4.2 Processing
These processing options control how the batch program processes the data.
- 1. Single Level
-
Specify whether to simulate costs for a selected item or items, without recosting everything else in the bill of material. For example, you might have a new item that must be costed, but you do not want to recost all components. If you enter 1 and use data selection for the parent item, the program uses the costs of the lower-level components to roll up the cost for the new item, but does not recost the lower-level components themselves.
If you leave this processing option blank, the program does a complete rollup of all the components. Enter only the parent item numbers in the data selection.
If you are costing items in process manufacturing, leave the processing option blank and do a complete rollup to cost the ingredients. Values are:
Blank: Perform a complete rollup.
1: Perform a single-level rollup.
- 2. Clear and Recalculate
-
Specify how the program calculates routing-related B1 through C4 costs. Values are:
Blank: The program does not overwrite manually entered or previously simulated costs. The system uses the costs that already exist in the Simulated Cost Component Add-Ons table (F30026).
1: The program clears and recalculates labor and overhead for manufactured items. This is the most common option for this program.
2: The program clears and recalculates labor and overhead for all items. Use this option if you have purchased parts with routings and have to recalculate labor costs, for example, inspection steps.
3: The program clears labor and overhead for all items, but recalculates labor and overhead for manufactured items only. Use this option if a part changes from manufactured to purchased. This option ensures that labor and overhead are cleared for the changed items.
- 3. Cost Method
-
Specify the cost method to be used for retrieving costs for purchased items and outside operations.
- a. Purchased Items
-
Specify the cost method to use as the input for the costs of purchased items. If you leave this processing option blank, the program does not retrieve costs from the Item Cost table (F4105). The system uses costs that already exist in the Simulated Cost Component Add-Ons table.
- b. Outside Operation
-
Specify the cost method to use as the input for the purchase costs of outside operations. If you leave this processing option blank, the program does not retrieve costs from the Item Cost table (F4105).
Verify these steps before you run this program:
-
You have set up an item branch record for the *OP item, either manually or through the Order Processing program (R31410).
-
A valid cost exists in the Item Cost table for the method that you specify here.
-
- 4. Use Cache or Work File for Calculations
-
Specify the type of temporary storage mechanism that the system uses when the program is run. Values are:
Blank: The system uses cache (memory).
1: The system uses a temporary work table (database).
Note:
The cache should be used for processing smaller data sets. A temporary work table should be used for processing large data sets to avoid exceeding memory constraints in the system.
4.4.4.3 Print
This processing option controls which items appear on the Cost Simulation report.
- 1. Print Items
-
Specify which items appear on the Cost Simulation report. Values are:
Blank: Do not print
1: Print all items
2: Print changed items
4.4.4.4 Process Mfg
If you use process manufacturing, these processing options control how the system calculates the costs for co-products and by-products.
- 1. Calculate Co/By-Products
-
Specify whether the system calculates costs for co-products and by-products. If you leave this processing option blank, the program calculates costs only for the parent process. Values are:
Blank: Do not calculate costs for co-products and by-products.
1: Calculate costs for co-products and by-products.
- 2. Calculate And Clear Costs Of Ingredients Used As CoBy In Another Process
-
Specify whether the system clears and recalculates co-product costs, by-product costs, or both. If an ingredient that you include in data selection is also a co-product or by-product of another process that is not included in data selection, and you do not want the other process added to the rollup, enter 1 for this processing option.
If you leave this processing option blank, the system clears the cost of the co-product or by-product and adds all processes that produce it to the rollup to recalculate it. If you have many interconnected processes or processes that produce a common co-product or by-product, the system includes all of them in the rollup when you set this processing option to blank. You can select one process for rollup and have it include the entire enterprise. Values are:
Blank: Clear and recalculate co-product or by-product costs.
1: Do not clear co-product or by-product costs.
4.5 Reviewing and Revising Simulated Costs
This section provides an overview of simulated costs and discusses how to:
-
Set processing options for Cost Components (P30026).
-
Review and revise simulated costs.
4.5.1 Understanding Simulated Costs
After performing the cost simulation, you can analyze costing information to determine the effects of the current rollup scenario and revise the costing information, as necessary. When costs are correct, run the Frozen Standard Update program (R30835).
You review costing information and set up simulated cost scenarios to help plan for future cost changes. After running the Cost Simulation program, you can review the cost simulation report, which displays the previous cost of the item, the results of the most recent cost simulation, and the variance between the two.
After reviewing the simulated costs, you revise incorrect information and create simulated costs again to include the changes. You can change only simulated costs. You can set a processing option to manually maintain the routing cost components (B and C) and protect them from being overwritten.
If you want to delete costs, you must delete them at the bill of material level at which they occur. For example, you cannot delete costs for lower-level components by locating the parent item. Instead, locate the component item number and remove the costs for the component. The system does not make the corresponding cost change to the higher level components and the parent item until you run the Cost Simulation program. To delete outside processing costs (usually cost component Dx), delete the cost component from the routing. Then delete the cost component and net-added value on the Enter Cost Components form.
If you select the Cost by Work Center option in the Manufacturing Constants program (P3009), you can define cost components by work center, as well. When you use this feature, the amounts for a cost component at multiple work centers in the Item Cost Component Detail table must match the corresponding cost component amounts in the Item Cost Component Add-Ons table (F30026). You can use simulated rate and factor codes either at the work center or the cost component level, but not at both levels.
4.5.2 Forms Used to Review and Revise Simulated Costs
4.5.3 Setting Processing Options for Cost Components (P30026)
These processing options control default processing for the Cost Components program.
4.5.3.1 Process
These processing options control whether the system calculates costs from manual input or by running the Cost Simulation - Build Temp program (R30812).
- Routing Cost Entry
-
Specify how the system maintains net added cost components B1 through C4. Values are:
Blank: Use the Cost Simulation program to calculate net added component costs.
1: Use manually entered cost components.
Enter 1 to enable input into the Simulated Net Added field for these cost types:
B1: Direct Labor
B2: Setup Labor
B3: Machine Run
B4: Labor Efficiency
C1: Machine Variable Overhead
C2: Machine Fixed Overhead
C3: Labor Variable Overhead
C4: Labor Fixed Overhead
- Total Cost Entry
-
Specify how to calculate the net added total cost. Values are:
Blank: Use the Cost Simulation program to calculate net added total cost.
1: Enable simulated total to be calculated manually at the time net added costs are manually entered.
4.5.4 Reviewing and Revising Simulated Costs
Access the Enter Cost Components form.
To review and revise simulated costs:
-
Review these fields:
-
Simulated
-
Frozen
-
Cost Ledger
The item cost totals represent the total costs of all cost components as of the last cost simulation for simulated values, and as of the last frozen update for frozen values. Simulated and frozen values are from the Item Cost Component Add-Ons table (F30026).
If a discrepancy exists between the values in the Frozen and the Cost Ledger fields, the system highlights both fields.
-
Cost Method
-
-
Review or revise these fields in the detail area:
-
Cost Type
-
Simulated Net Added
The system uses this field to calculate cost during the simulation process.
-
Simulated Total
For the designated cost method, the system uses this field to calculate the cost of all the lower levels during the simulation process. You can also view frozen costs.
-
-
Select the record, and then select Cost Calc from the Row menu to access the detail calculations for the net-added value of a routing cost component (B or C).
-
On the Work With Work Center Cost form, select an operation and click Select.
The Work With Cost Calculation form displays real-time costs. The system calculates these values from work center data, work center rates, and manufacturing constants. They might be different from those on the Enter Cost Components form if you have changed the routing for the item, work center rates, or manufacturing constants since you last ran the Cost Simulation program or the Item Cost Component - Frozen Update program.
4.6 Reviewing Costed Bills of Material
This section provides an overview of the Costed Bill of Material program and discusses how to:
-
Set processing options for Costed Bill of Material (P30206).
-
Review costed bills of material.
-
Review costed bill details.
4.6.1 Understanding the Costed Bill of Material Program
When budgeting resources and planning for the future cost of items, you can use the Costed Bill of Material program (P30206) to review costs for both parent items and components.
The program displays summarized costs for the direct components, net-added costs, and total costs for the parent item from the Item Cost Component Add-Ons table. For each component, the program displays costs that it calculates based on the as of date from the bill of material and the required quantity multiplied by the value from the F30026 table. The program uses the as of date to exclude obsolete component lines in the bill of material.
You can review all costs of manufacturing a parent item, including assembly, subassembly, and component costs in either the simulated or the frozen view. The program displays costs in five user-defined categories:
-
Purchase
-
Labor
-
Machine
-
Overhead
-
Extras
You can review this information:
-
Net-added cost for the parent from the F30026 table at the top of the form.
-
Cost breakdown for all next-level components.
-
Total costs of the parent item from the F30026 table.
-
Total of all costs for the parent item.
The program can accumulate purchase costs for up to 500 components on each bill of material. Components beyond 500 are not included in the costing process.
|
Note: If you update costs on the bill of material by changing required quantities, components, or simulated or frozen costs of the component, the changes are reflected in the costed bill inquiry. To update the cost values in the F30026 as well, you must run the cost simulation again. Otherwise, any changes that you made to the bill of material appear on the Work With Costed Bill form, but not on the Enter Cost Component form. |
The totals are either total costs from the F30026 table or columnar totals that are calculated in real time, depending on how you set the processing option for calculating totals.
4.6.2 Forms Used to Review Costed Bills of Material
4.6.3 Setting Processing Options for Costed Bill of Material (P30206)
These processing options control default processing for the Costed Bill of Material program.
4.6.3.1 Display
These processing options control the information that appears on the Work With Costed Bill form.
- 1. Decimal Places (0-4) (Future)
-
Specify the number of decimal places that the system displays. Values are 0 through 4. If you leave this processing option blank, the system displays four decimals.
- 2. Totals
-
Specify whether the system displays the calculated totals or the standard totals. The calculated totals are the columnar totals. The standard totals are the unit costs from the Cost Components table multiplied by the requested quantity. Values are:
Blank: Display standard totals (default).
1: Display calculated totals.
- 3. Fixed Costs Based On
-
Specify whether the system bases fixed costs on the accounting cost quantity or on the requested quantity. Fixed costs based on accounting cost quantity will have the same fixed cost regardless of the requested quantity. Requested quantity displays the per unit cost multiplied by the requested quantity as if no fixed costs exist. Values are:
Blank: Base fixed costs on the accounting cost quantity (default).
1: Base fixed costs on the requested quantity.
4.6.4 Reviewing Costed Bills of Material
Access the Work With Costed Bill form.
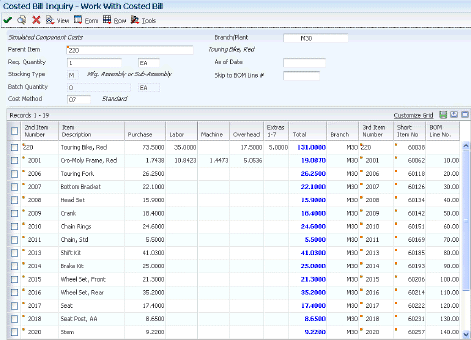
Complete the Branch/Plant and Parent Item fields to retrieve costs for a specific item.
|
Note: To toggle between frozen and simulated cost, select Frozen or Simulated from the View menu. |
Review the costs for the selected parent item by component in the Purchase, Labor, Machine, Overhead and Extras categories. You can also review the totals.
- Req. Quantity (required quantity)
-
Enter the number of parent items that you want to process. The system calculates lower-level values in quantity per the number of parent items requested. For instance, if three components are required per a parent item, then with a requested quantity of 10, the system would plan and cost for 30 components.
- As of Date
-
Enter the date that the system uses for effectivity checking. Enter a specific date to display documents (orders, bills of material, routings, as applicable) that are effective on or after that date. The current system date is the default, but you can enter any future or past date.
- Skip to BOM Line #(skip to bill of material line number)
-
Enter a number that specifies how the system displays the sequence of components on a single-level bill of material. The number initially indicates the sequence in which a component was added to the bill of material. You can modify this number to change the sequence in which the components appear.
4.6.5 Reviewing Costed Bill Details
Access the Costed Bill Detail form.
- Quantity Per
-
Displays the number of units that the system applies to the transaction.
- Effective From and Effective Thru (effective through)
-
Display a date range that indicates when a component part goes into effect on a bill of material and when the effectivity expires. The default for the start date is the current system date. The default for the end date is defined in the data dictionary.
You can enter future effective dates so that the system plans for upcoming changes. Items that are no longer effective in the future can still be recorded and recognized in the JD Edwards EnterpriseOne Product Costing system, JD Edwards EnterpriseOne Shop Floor Management system, and Oracle's JD Edwards EnterpriseOne Capacity Planning system. The JD Edwards EnterpriseOne Requirements Planning system determines valid components by effectivity dates, not by the bill of material revision level. Some forms display data based on the effectivity dates that you enter.
- Operation Scrap Percent
-
Displays a value that the system uses to increase or decrease the amount of materials to account for loss within the operation. The system updates this value on the Enter Bill of Material Information form when you run the Planned Yield Update program. The system calculates this value by compounding the yield percentages from the last operation to the first operation. Use a processing option in the Enter/Change Routing program to enable the system to calculate the component scrap percent.
- Percent of Scrap
-
Displays the percentage of unusable component material that is created during the manufacture of a particular parent item. During Distribution Requirements Planning (DRP), Master Production Schedule (MPS), and MRP generation, the system increases gross requirements for the component item to compensate for the loss. Enter percentages as whole numbers, for example, 5 percent as 5.0.
Note:
Inventory shrink and scrap are compounded to calculate the total loss in the manufacture of a particular item. Accurate shrink and scrap factors support more accurate planning calculations.
4.7 Reviewing Costed Routings
This section provides an overview of the Costed Routing Inquiry program and discusses how to:
-
Set processing options for Costed Routing Inquiry (P30208).
-
Review costed routings.
-
Review costed routing details.
4.7.1 Understanding the Costed Routing Inquiry Program
Use the Costed Routing/Process Inquiry program (P30208) to review the summarized costs of an item for each operation in the routing.
This information supports effective control of production costs. For example, you can:
-
Identify the work center that is responsible for an operation.
-
Determine whether a work center performs multiple operations.
-
Display simulated or frozen costs for labor values for cost methods.
-
Calculate the totals for all costs by cost categories.
This program calculates the cost that is associated with an operation by multiplying the routing hours by the work center rates for those operations with valid effective dates.
The program can accumulate purchase costs for up to 500 components on each bill of material. Components beyond 500 are not included in the costing process.
|
Note: If you update the routing for an item, the changes are reflected in the Costed Routing/Process Inquiry program. To display changed costs on the Enter Cost Components form as well, you must run the cost simulation again. Otherwise, the values on the Enter Cost Component form might differ from those on the Work with Costed Routing/Process Inquiry form. |
The Costed Routing Inquiry program uses the master routing for the item from the Routing Master table (F3003) if the following conditions exist:
-
The Master Routings option on the Manufacturing Constants Revisions form (W3009B) is selected for the branch.
-
The parent item has a cross-reference item defined for master routing.
You must define the cross-reference item with a cross-reference type of MR and leave the Address field blank.
-
An item routing has been defined for the cross-reference item.
4.7.2 Forms Used to Review Costed Routings
| Form Name | FormID | Navigation | Usage |
|---|---|---|---|
| Work With Costed Routing/Process | W30208A | Product Costing (G3014), Costed Routing/Process Inquiry | Review costed routings. |
| Costed Routing Details | W30208B | Select an operation on the Work With Costed Routing/Process form, and then select Details from the Row menu. | Review costed routing details. |
| Operation Bucket Key Window | W30COA | On the Work With Costed Routing/Process form, select Op Bucket Window from the Form menu. | Review the operation buckets for an item. |
4.7.3 Setting Processing Options for Costed Routing Inquiry (P30208)
These processing options control default processing for the Costed Routing Inquiry program.
4.7.3.1 Defaults
These processing options control the cost methods that the system uses for subcontracted and purchased items.
- Outside Operations Cost Method
-
Specify the cost method to be used for subcontracted items. If you leave this processing option blank, the system uses 01 as the default value.
- Purchased Cost Method
-
Specify the cost method to be used for purchased items. If you leave this processing option blank, the system uses cost method 07 (standard cost) as the default value.
4.7.3.2 Display
This processing option controls the amount of cost information that appears on the Work With Costed Routing/Process form.
- Skip to flag
-
Specify 1 to display the costs up to and including the operation sequence that is entered in the Skip to Op. Seq. (skip to operation sequence) field. If you leave this processing option blank, the costs are displayed beginning with the costs for the entered operation.
4.7.3.3 Process
This processing option controls whether the system includes cost buckets 1 and 2 in the total.
- Include 1 and 2 in total
-
Specify 1 to include cost buckets 1 and 2 in the total. If you leave this processing option blank, the total includes only cost buckets 3 through 6.
4.7.4 Reviewing Costed Routings
Access the Work With Costed Routing/Process form.
Use this program to display costs for the operations on the routing based on the selection criteria that you enter.
|
Note: To toggle between frozen and simulated costs, select Frozen or Simulated from the View menu. |
- Requested Quantity
-
Enter the number of parent items that you want to process. The system calculates lower-level values in quantity per the number of parent items that are requested. For instance, if 3 components are required per parent item, then with a requested quantity of 10, the system plans and costs 30 components.
Enter the number of parent items for which to display cost breakdowns. The system calculates costs in quantity per the parent item.
- As of Date
-
Enter the date that is used for effectivity checking. Enter a specific date to display documents (orders, bills of material, routings, as applicable) that are effective on or after that date. The current system date is the default, but you can enter any future or past date.
- Cost Method
-
Enter the UDC (40/CM) that specifies the basis for calculating item costs. Cost methods 01 through 19 are reserved for use by the JD Edwards EnterpriseOne system.
- Skip to Op. Seq. (skip to operation sequence) or Up to Seq. (up to sequence)
-
You control this field by setting the Skip to flag processing options.
This field enables you to enter the operation sequence at which you want to begin the display of information. The system displays the total from that operation forward on the Total line.
If you select the Up to Seq option, the system displays operations up to the entered sequence number, and the total for all operations up to and including this operation sequence number.
- Extras
-
Displays extra costs. You can use the Costed Operation Buckets UDC table (30/CO) to define in which buckets the system displays extra costs.
Use the processing option to control whether the system adds cost buckets 1 and 2 to the total of all costs for the parent item.
- Labor
-
Displays labor costs. UDC 30/CO specifies that labor costs are displayed in bucket 3.
The total of this column appears at the bottom of the form in the Totals row. The heading above the columns indicates which costs are displayed: frozen or simulated. You can toggle between simulated and frozen values.
You can also view a detailed breakdown of the cost components that the system adds to determine the total for the work center.
- Machine
-
Displays machine costs. In UDC 30/CO, Costed Operation Bucket No. 4 is defined to display machine costs.
The total of this column appears at the bottom of the screen in the Totals row. The heading above the columns indicates which costs are displayed: frozen or simulated. You can toggle between simulated and frozen values.
You also can view a detailed breakdown of the cost components that were added to arrive at the total for the work center.
- Overhead
-
Displays overhead costs. In UDC 30/CO, Costed Operation Bucket No. 5 is defined to display overhead costs.
The total of this column appears at the bottom of the screen in the Totals row. The heading above the columns indicates which costs are displayed: frozen or simulated. You can toggle between simulated and frozen values.
You can also view a detailed breakdown of the cost components that were added to arrive at the total for the work center.
- Components
-
Displays component costs. In UDC 30/CO, Costed Operation Bucket No. 6 is defined to display component costs.
The total of this column appears at the bottom of the screen in the Totals row. The heading above the columns indicates which costs are displayed: frozen or simulated. You can toggle between simulated and frozen values.
You can also view a detailed breakdown of the cost components that were added to arrive at the total for the work center.
- Total
-
Displays the total costs. This column contains system-calculated totals for each row of costs that were figured for each operation sequence.
The totals across the bottom of the form are the totals of each cost bucket.
The rightmost bottom total is the total of all costs for the routing for an item.
4.8 Updating Frozen Costs
This section provides an overview of frozen cost update and discusses how to:
-
Run the frozen update program.
-
Set processing options for Item Cost Component - Frozen Update (R30835).
4.8.1 Understanding Frozen Cost Update
After you perform simulated rollups to determine the effect of any changes, you can update the frozen costs with simulated values by running the Item Cost Component - Frozen Update program. Most companies run this program at the beginning of a new fiscal year to create their manufacturing costs for the next fiscal period.
You can set a processing option to run a work-in-process revaluation automatically when you update frozen costs. In this case, the WIP Revaluation program (R30837) runs for all items that are processed through the Item Cost Component - Frozen Update program. If any item is flagged for cost change in the Item Cost table, any open work order that contains this item is revalued, along with any work orders to which the parent item was issued. This logic is carried through to the highest-level parent item.
|
Note: This program uses the costs that were generated by the most recent version of the Cost Simulation program. If you have changed information since the last simulated cost rollup, those changes will not be reflected by the frozen update. |
The frozen cost update uses the costs that were generated by the Cost Simulation program to perform these actions:
-
Update unit costs in the Item Cost table for the cost method selected.
-
Update frozen costs in the Item Cost Component Add-Ons table for the cost method selected.
-
Update labor and overhead rates in the Work Center Rates table (F30008).
-
Print report totals by company, branch/plant, and GL category code.
-
For on-hand balances, create an Item Balance (IB) record in the Item Ledger table (F4111) if the cost method selected matches the sales and inventory cost method for an item.
-
For on-hand balances, write journal entries to the Account Ledger table (F0911) in either detail or summary format, creating batch type NC (Frozen Cost Update).
The system creates an item ledger record when the cost method that is selected for update is the sales and inventory cost method. The item ledger record indicates a change in inventory value for the updated items. The number of item ledger records that are written depends on the cost level of the item, which is defined in the Item Master table (F4101). For example, items at cost level 2 have an item ledger record for each branch/plant at which they are defined because costs can differ by branch/plant.
The program creates journal entries in either detail or summary format in amounts that match the item ledger records. Thus, the program maintains integrity between the Item Ledger table and the Account Ledger table. Use the Item Ledger/Account Integrity report (R41543) to verify this integrity.
These steps make up the process flow for updating frozen costs:
-
The program creates a journal entry only if an item ledger record has been written.
-
An item ledger record is written only if an item cost ledger record has been updated.
-
An item cost ledger record is updated only if a cost component record has been updated.
The program accesses these automatic accounting instructions (AAIs) to obtain the object account:
| AAI table number | Description | Use |
|---|---|---|
| 4134 | Inventory |
|
| 4136 | Expense or cost of goods sold (COGS) |
|
This table identifies information about detail and summary journal entries:
| Journal Entry Type | Description |
|---|---|
| Detail journal entry | Select detail format for the program to create matching debit and credit account-ledger records for every item ledger record that is created. Use the detail format when you want a detailed audit trail. However, consider that the potential volume is large and could cause disk space problems.
The program can generate several journal entries by cost component for the same item and branch, depending on how you set up the AAIs. |
| Summary journal entry | Select summary format for the program to create debit and credit records by subtotals of company, general ledger class code, and transaction type. Use the summary format to reduce the amount of detail in the general ledger. You can still run a report to provide a detailed audit trail. |
The program produces this output:
| Output | Description |
|---|---|
| Error messages | The program produces error messages if it finds any general ledger errors while formatting the journal entries. Correct any errors and run the Item Cost Component - Frozen Update program (R30835) again. To determine whether error messages exist, review the workflow messages for submitted jobs. |
| Item Cost Ledger Update report (R30834) | Displays the effect of the inventory revaluation based on the changes that were made to the cost revision records for the inventory items. You can print all items or only those that have a cost change. You can run the report in proof mode or final mode. The report provides this information:
|
4.8.1.1 Work File Processing
As with cost simulations, you can set up the Item Cost Component - Frozen Update program (R30835) to process the update using a work file or cache. Use a processing option to specify whether you want to use work file or cache processing. Use temporary work files for larger data sets where available system memory is not sufficient for successfully processing the number of records. The system uses two work files:
-
Work File for Cost Component (F30UI011)
-
Work File for Parent Child (F30UI012)
Use cache processing for smaller data sets.
4.8.2 Running the Frozen Update Program
Select Product Costing (G3014), Frozen Update.
4.8.3 Setting Processing Options for Item Cost Component - Frozen Update (R30835)
These processing options control default processing for the Item Cost Component - Frozen Update program.
4.8.3.1 Default
This processing option controls the default value for the cost method.
- 1. Cost Method
-
Specify the cost method that the system uses to update the Frozen Item Cost Component Add-Ons table (F30026) and the Item Cost table. If you leave this processing option blank, the system uses cost method 07 (standard costs) to calculate costs.
4.8.3.2 Processing
These processing options control processing criteria.
- 1. Update Costs
-
Specify whether the system updates costs. If you leave this processing option blank, the system creates exception reports and error messages, but does not update costs. Values are:
Blank: Do not update costs.
1: Update costs.
- 2. Single Level
-
Specify whether the system performs a complete cost rollup in a bill of material or updates only the cost for a selected item or items without updating the other costs. For example, you might have a new item to cost, although you do not want to recost the other items. After you create simulated costs for the new item, you can update its frozen costs without updating the costs of lower-level components. Values are:
Blank: Perform a complete cost rollup.
1: Perform a single-level cost rollup.
- 3. Update Work Center Rates
-
Specify whether the system updates work center rates when you run the batch program in final mode. Values are:
Blank: Do not update rates.
1: Update all rates in all work centers across all companies and all branch plants.
2: Update all work centers that are associated with items being frozen.
- 4. Use Flex Accounting
-
Specify whether to enable flexible accounting. The system looks for the flex accounting rules to determine how to populate cost object, business unit, subsidiary, or subledger fields. Values are:
Blank: Do not use flexible accounting.
1: Use flexible accounting.
- 5. WIP Revaluation (work in process revaluation)
-
Specify whether the system automatically runs the WIP Revaluation program to update work-in-process costs. Values are:
Blank: Do not run the WIP Revaluation program.
1: Run the WIP Revaluation program.
- 6. Use Cache or Work File for Calculations
-
Specify which type of temporary storage mechanism the system uses for when you run this program. Values are:
Blank: Cache (memory).
1:Temporary work table (database)
Use cache for processing smaller data sets. Use temporary work tables to process large data sets to avoid exceeding memory constraints in the system.
4.8.3.3 Process Mfg
If you use process manufacturing, this processing option controls whether the system updates the costs for co-products and by-products.
- 1. Update Co/By Products
-
Specify whether the system updates the costs of co-products and by-products for process manufacturing. If you leave this processing option blank, the system updates costs for the parent process only. Values are:
Blank: Do not update the costs of co-products and by-products.
1: Update the costs of co-products and by-products.
4.8.3.4 G/L
These processing options control the GL dates and how the system creates journal entries for the general ledger.
- 1. G/L Date (general ledger date)
-
Specify the date that appears on Item Ledger transactions and journal entries. If you leave this processing option blank, the program uses the system date.
- 2. G/L Transactions (general ledger transactions)
-
Specify how the system creates journal entries for the general ledger. Values are:
Blank: Do not create GL journal entries.
1: Create detailed GL journal entries for IB transactions.
2: Create summarized GL entries (one entry for each account).
4.8.3.5 Versions
This processing option controls which version of this program the system uses when the program is called from the Item Cost Component - Frozen Update program.
- 1. WIP Revaluation (work in process revaluation)
-
Enter the version of the program that you want the system to use. If you leave this processing option blank, the system uses the default version ZJDE0001.
4.8.3.6 Print
This processing option controls how much information is included in the printed report.
- 1. Print Items
-
Specify print output. Values are:
Blank: Print all items.
1: Print all items.
2: Print only changed items.
4.9 Freezing Work Center Rates
This section provides an overview of the Freeze Work Center Rates program and discusses how to:
-
Freeze work center rates.
-
Set processing options for Freeze Work Center Rates (R30860).
4.9.1 Understanding the Freeze Work Center Rates Program
You can use the Freeze Work Center Rates program (R30860) to update frozen work center rates. You run this program when any of the work center rates have changed. You can perform this task using the Frozen Standard Update program (R30835); however, for actual costing, you do not need to simulate costs and perform a rollup. Running the Freeze Work Center Rates program ensures that work centers are updated with changed costs in an actual costing environment.
In addition, the Freeze Work Center Rates program enables you to update frozen costs for selected work centers, as opposed to updating all work center rates in the system.
4.9.2 Freezing Work Center Rates
Select Product Costing (G3014), Freeze Work Center Rates.
4.9.3 Setting Processing Options for Freeze Work Center Rates (R30860)
These processing options control default processing for the Freeze Work Center Rates program.
4.9.3.1 Processing
This processing option controls whether the system freezes work center rates.
- Update Rates Mode
-
Specify whether the system simulates or freezes work center rates when you run the Freeze Work Center Rates program. Values are:
Blank: Simulate work center rates.
1: Freeze work center rates.
4.9.3.2 Print
This processing option controls the information that is included in the report.
- Print Work Centers
-
Specify which records the system includes on the report when you run the Freeze Work Center Rates program (R30860). Values are:
Blank: Do not generate a report.
1: Include all work center records.
2: Include changed work center records only.
4.10 Reviewing Frozen Cost Components
This section provides an overview of costing information review and discusses how to review frozen cost components.
4.10.1 Understanding Costing Information Review
After you run the Item Cost Component - Frozen Update program to revalue the inventory, you should review the updated costing information. These costs stay in effect until you run the update again. You can review frozen costs in the Cost Components program. You can also create a report based on the information in this program. The Item Ledger Inquiry program (P4111) provides information about the transactions that have affected the item that you are reviewing, including cost changes. You can review costs by viewing the bill of material and comparing frozen standard costs to the unit costs in the Item Cost table.
4.10.2 Form Used to Review Frozen Cost Components
| Form Name | FormID | Navigation | Usage |
|---|---|---|---|
| Work With Cost Components | W30026C | Product Costing (G3014), Enter/Change Cost Components | Review frozen cost components. |
4.10.3 Reviewing Frozen Cost Components
Access the Work With Cost Components form.
To review frozen cost components:
-
Complete these fields, and select Find on the Work With Cost Components form:
-
Item Number
-
Branch/Plant
-
Cost Method
-
-
Review the Frozen field.
-
Select Frozen or Simulated from the View menu to toggle between frozen and simulated costs.
-
Click Close.
Note:
The frozen total is the accumulated standard cost rolled up from the lower levels.
4.11 Reviewing the Cost Components Report
This section provides an overview of the Cost Components Report and discusses how to:
-
Run the Cost Components Report.
-
Set processing options for Cost Components Report (R30026P).
4.11.1 Understanding the Cost Components Report
Use the Cost Components Report (R30026P) to review the component costs and total cost for each item. This information comes from the Enter/Change Cost Components program (P30026).
You can customize this report to meet specific needs. For example, you can:
-
Process the report using any valid cost method.
-
Review the cost type and description by item number.
-
Identify items.
-
Define the exact information that appears on the report from data selection options.
For example, you can select specific items and decide whether to include factors or rates for add-on and extra costs.
-
Print the report for a single item, several items, or all items.
You can include any of the cost components that you define for an item in the cost bucket that you specify.
4.11.2 Running the Cost Components Report
Select Product Costing Reports (G3023), Cost Components.
4.11.3 Setting Processing Options for Cost Components Report (R30026P)
These processing options control default processing for the Cost Components Report.
4.11.3.1 Defaults
This processing option controls whether the report prints simulated or frozen costs.
- Simulated/Frozen Cost Selection
-
Specify whether to print simulated or frozen costs. Values are:
1: Print simulated costs.
2: Print frozen costs.
If you leave this processing option blank, the report includes only simulated costs.
4.12 Reviewing the Item Ledger
This section provides an overview of item ledger review and discusses how to review item ledger information.
4.12.1 Understanding Item Ledger Review
Use the Item Ledger Inquiry (The CARDEX) program (P4111) to view IB transactions for an item.
The Item Cost Component - Frozen Update program transfers IB transactions to the item ledger if all of these statements are true:
-
The frozen cost changes in the Item Cost table for a given cost method.
-
One cost method is used as the sales and inventory cost method.
-
A quantity on-hand exists.
4.12.2 Form Used to Review the Item Ledger
| Form Name | FormID | Navigation | Usage |
|---|---|---|---|
| Work With Item Ledger | W4111A | Product Costing (G3014), Item Ledger Inquiry (The CARDEX) | Review item ledger information. |
4.12.3 Reviewing Item Ledger Information
Access the Work With Item Ledger form.
To review the item ledger:
-
Complete the Item Number field.
-
Type IB in the Document Type field, and click Find.
-
Review these fields:
-
Transaction Date
Displays the date that an order was entered into the system. This date determines which effective level the system uses for inventory pricing.
-
Unit Cost
-
-
Click Close.
Note:
The value in the Quantity field represents the available quantity, which might consist of the on-hand balance minus commitments, reservations, and backorders. You enter this value in the Branch/Plant Constants program.