2 Setting Up the Resource Assignments System
This chapter contains the following topics:
-
Section 2.1, "Understanding the JD Edwards EnterpriseOne Resource Assignments System"
-
Section 2.2, "Understanding User-Defined Codes for Work Order Resource Assignments"
2.1 Understanding the JD Edwards EnterpriseOne Resource Assignments System
Assigning resources to work orders involves matching the work order requirements against the resources; checking the availability, competencies, and skills of the resources; and creating resource assignments that can be monitored and against which reports can be run.
When you use work order resource assignments, you define the available capacity of resources by setting up a base calendar with available working hours. You also can set up a resource calendar for a specific resource to override the base calendar—for instance, if an employee takes a vacation. When the base calendar is defined, you can associate resources with the base calendar in the Resource Master program (P48310) to define their availability. At any time, you can review the resource assignment information to determine whether resources are loaded according to their capacity.
If you want to check the competencies or skills of resources, you need to have Oracle's JD Edwards EnterpriseOne Human Capital Management Foundation and the JD Edwards EnterpriseOne Human Resources systems installed.
2.2 Understanding User-Defined Codes for Work Order Resource Assignments
This table lists the user-defined codes (UDCs) for the applications in the work order resource assignments module:
| User-Defined Code | Description |
|---|---|
| 42/WD: Resource Calendar Type | Specifies how the calendar is used. For example, the calendar might be specific to an industry such as banking, or it might be used within JD Edwards EnterpriseOne Resource Assignments. |
| 48/TP: Assignment Type | Specifies the type of assignment in scheduling, notification, and assignment. For future use. |
| 48/LP: Load Profile Method | Specifies the load profile method for resources. The load profile method indicates how the work of an assignment is distributed. Currently, only a flat load profile is supported. |
| 48/PT: Period Type | Specifies the type of period the system uses for displaying the availability and assignments of the resources You can set a default value in the processing options for the Resource Assignment program (P48331). |
| 48/CT: Calendar Type | Specifies the selected calendar type (for example, base calendar) when you define working hours in the Resource Working Hours program (P48307). Click the Search button for the Type field to access values. |
| 48/RC: Override Reason | Specifies the reason for the working hours override. If integrating with the HR Leave Request process, ensure that valid UDC values from 07/LV Leave Type are included in the Override Reason Code UDC. |
| 48/RD: Resource Details | Specifies whether the resources' assignments or availability appears on the Work with Resource Assignments form in the Resource Assignment program. You can set a default value in the processing options for the Resource Assignment program. |
| 48/01-48/20: Resource Attributes 01–20 | These user-defined codes define additional filter criteria for resources. For example, if the JD Edwards EnterpriseOne Human Resources or Payroll systems are not installed, you can use these codes to define criteria such as job type or competency. |
| 48/SD: Scheduling Day of Week | Specifies the days for which working hours are defined. This system uses this code in the Resource Working Hours program. |
| 48/WD: Work Day | Specifies which day of the week is the starting workday. You can set a default value in the processing options for the Resource Assignment program. |
| 48/TK: Task Status | Specifies the status of a task in scheduling, notification, and assignment. For future use. |
| 48/CK: Calendar Key | Classifies different resource calendars. For example, you might define normal shift, day shift, and night shift calendars. |
| 48/RL: Resource Assignment Level | Specifies whether resource assignments are at the level of the work order or the work order labor detail, based on the work order document type. To make assignments at the labor detail level, you must use this UDC to specify the work order document type. |
2.3 Setting Up Resource Assignment Constants
This section provides an overview of resource assignment constants and discusses how to set up resource assignment constants.
2.3.1 Understanding Resource Assignment Constants
Before you can assign resources to work orders, you must set up the resource assignment constants, using the Resource Assignment Constants program (P48301), to provide default values for the work day calendar and for the hours that can be set up for resources. You define resource assignment constants by business unit. At a minimum, you must define resource assignment constants for business unit ALL to provide global default values. You can also define default values for specific business units.
When you create a resource master record, the system uses the business unit that is associated with the resource to determine which default values to use. You can create resource master records for individuals or for assets. The system retrieves the business unit for individual resources from the address book, and retrieves the business unit for assets from the equipment master. If no constants exist for the business unit that is associated with the resource, the system uses the default values for business unit ALL.
The system uses the working hours default values when the working hours are created in the Resource Working Hours program. When you create base calendars, the system uses the default values from the resource assignment constants for business unit ALL. When you create resource calendars, the system uses the resource assignment constants that are set up for the business unit that is associated with the resource. If no business-unit specific constants exist, the system uses the values from the business unit ALL constants when creating resource calendars.
The system uses resource assignment constants to populate these fields with default values when you create a resource master record:
-
Calendar Type
-
Calendar Value
-
Branch
-
Shift
2.3.2 Forms Used to Set Up Resource Assignment Constants
| Form Name | FormID | Navigation | Usage |
|---|---|---|---|
| Work with Resource Assignment Constants | W48301B | Resource Assignment Setup (G13RA41), Resource Assignment Constants | Access forms to set up constants for resource assignments. |
| Resource Assignment Constants - Revision | W48301A | On the Work with Resource Assignment Constants form, click Add. | Set up resource assignment constants. |
2.3.3 Setting Up Resource Assignment Constants
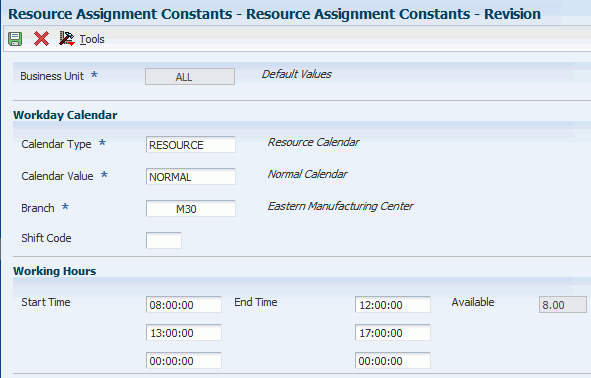
Access the Resource Assignment Constants - Revision form.
Figure 2-1 Resource Assignment Constants - Revision form
Description of "Figure 2-1 Resource Assignment Constants - Revision form"
- Business Unit
-
Enter the business unit number to set up constants for a specific business unit. Otherwise, enter ALL to set up default constants. At a minimum, you must define constants for business unit ALL. You can then define constants for additional business units if necessary.
- Calendar Type
-
Enter RESOURCE to set up constants for resource calendars. Calendar type values are stored in UDC 48/CT, and can include values such as RESOURCE or BASE.
- Calendar Value
-
Enter a code that, along with the Calendar Type field, further defines the type of calendar you are working with. Calendar value codes are stored in UDC 48/CK and might include values such as night shift, day shift, and holiday.
- Start Time
-
Enter the time that resources are typically available to begin working during the workday. The system uses this value to calculate available hours for the day. This field is currently not used when you are scheduling tasks.
Note:
You can enter multiple start and end time ranges. For example, if a resource is typically available from 8:00 until 12:00, then takes an hour break for lunch, and continues working from 13:00 through 17:00, you would enter 8:00 in the first row for Start Time, and 13:00 in the second row for Start Time. You would then enter 12:00 in the first row for End Time, and 17:00 in the second row for End Time. - End Time
-
Enter the time that resources are typically no longer available during the work day. The system uses this value to calculate available hours for the day. This field is currently not used when you are scheduling tasks.
Note:
You can enter multiple start and end time ranges. For example, if a resource is typically available from 8:00 until 12:00, then takes an hour break for lunch, and continues working from 13:00 through 17:00, you would enter 8:00 in the first row for Start Time, and 13:00 in the second row for start time. You would then enter 12:00 in the first row for End Time, and 17:00 in the second row for End Time. - Available
-
Review the number of hours that are available. The system calculates this value based on the values in the Start Time and End Time fields.
2.4 Defining Resource Working Hours
This section provides an overview of resource working hours, lists prerequisites, and discusses how to:
-
Add a base calendar.
-
Add a resource calendar.
2.4.1 Understanding Resource Working Hours
After you have defined default working hours in the Resource Assignment Constants program, you use the Resource Working Hours program to set up working hour calendars. You can set up two types of working hour calendars:
-
The base calendar enables you to set up the working hours in a typical work week for a group of resources. The group of resources is associated with the same work day calendar in the Resource Master program. When you create a base calendar, the system supplies the working hours using the default values from the Resource Assignment Constants for business unit ALL. You can edit these values as necessary. For days on which no work is done—for example, Saturday and Sunday—you can override the normal working hours by entering 0 (zero) in the Start Time and End Time fields. In addition, you can specify that the system considers certain days, such as holidays, nonworking days.
-
Resource calendars enable you to override the capacity for a particular resource for a particular date or date range. Use resource calendars for exceptions to the base calendar, such as vacation time for a specific resource.
The resource must exist in the Resource Master table (F48310) before you can create a resource calendar.
The calendar values that are defined in the Resource Working Hours program (P48307) are stored in the F48307 table.
2.4.1.1 Day of Week, Overrides, and Holidays
When you create a base calendar, you can define the days of the week on which that calendar should be used. If the calendar should be used for all or most days during the week, you can enter 0 (zero) in the Day of Week field, and specify the number of hours, using start and end times, that resources are available during each day of the week. You can then enter additional calendars for that same calendar type, calendar value, branch, and shift code combination to specify any days of the week that do not match those set up in the original base calendar.
For example, assume that all resources in Branch M30, regardless of shift, are available for 8 hours each day of the week except for Saturday and Sunday, when they are not available at all. You can create these three base calendars for this scenario:
| Calendar Type | Calendar Value | Branch | Day of Week | Hours Available |
|---|---|---|---|---|
| RESOURCE | NORMAL | M30 | 0 (Default for each day of the week) | 8 |
| RESOURCE | NORMAL | M30 | 6 (Saturday) | 0 |
| RESOURCE | NORMAL | M30 | 7 (Sunday) | 0 |
|
Note: The values in the Hours Available field are calculated based on the start and end times that you enter for the calendar. To calculate 0 (zero) available hours, enter 0 in both the Start Time and End Time fields. |
You can also create base calendars to specify company holidays, or other days on which large numbers of resources are not available as they would normally be. To create a base calendar for a specific day, you enter 9 in the Day of Week field. For example, if resources are typically available for 8 hours on Mondays, but a company holiday falls on a Monday, you can create a base calendar for the holiday by entering 9 in the Day of Week field, entering the date of the holiday in the Date field, and entering 0 in both the Start Time and End Time fields. You must enter 9 in the Day of Week field to enable the Date field.
2.4.2 Prerequisites
Before you complete the tasks in this section:
-
Verify that you have set up the resource assignment constants for business unit ALL and other business units, if required.
-
Verify that the resource exists in the Resource Master program before you add a resource calendar.
2.4.3 Forms Used to Define Resource Working Hours
| Form Name | FormID | Navigation | Usage |
|---|---|---|---|
| Work With Resource Working Hours | W48307A | Periodic Resource Assignment Processing (G13RA20), Resource Working Hours | View existing calendar values.
Add a calendar value or resource calendar value. |
| Working Hours Detail - Base | W48307B | On the Work With Resource Working Hours form, select the Base Calendar tab and then click Add. | Add a base calendar. |
| Work Hours Detail - Resource | W48307D | On the Work With Resource Working Hours form, select the Resource Calendar tab and then click Add. | Add a resource calendar. |
2.4.4 Adding a Base Calendar
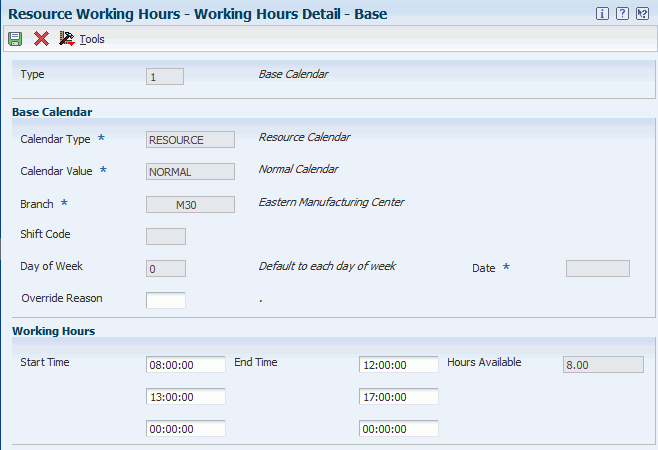
Access the Working Hours Detail - Base form.
Figure 2-2 Working Hours Detail - Base form
Description of "Figure 2-2 Working Hours Detail - Base form"
- Shift
-
Enter a user-defined code (00/SH) that identifies daily work shifts. Complete this field only if the base calendar is specific to resources during a specific shift.
- Day of Week
-
Enter a code to specify the days of the week for which the working hours that are associated with this calendar apply. If you do not specify a day of the week, the system uses 0 (zero). Values are:
0: Assign base or resource working hours to every day of the week.
1: Assign base or resource working hours to Monday.
2: Assign base or resource working hours to Tuesday.
3: Assign base or resource working hours to Wednesday.
4: Assign base or resource working hours to Thursday.
5: Assign base or resource working hours to Friday.
6: Assign base or resource working hours to Saturday.
7: Assign base or resource working hours to Sunday.
9: Override working hours for a specific date. If you want to define an override value for a specific date, enter 9 in the Day of Week field. Doing so enables the Date field. You might use this option to enter an override number of working hours for a company holiday.
- Override Reason
-
Enter a code to indicate the reason for the working hours override. For example, to specify that the override is due to a company holiday, enter HOL. Values are stored in UDC 48/RC.
- Date
-
Enter the override date for a base calendar entry in this field. This field is enabled only if you enter 9 in the Day of Week field. For example, if resources are typically available for 8 hours on Mondays, but a company holiday falls on a Monday, you can create a base calendar for the holiday by entering 9 in the Day of Week field, entering the date of the holiday in this field, and entering 0 in both the Start Time and End Time fields.
- Start Time
-
Enter the start time that the system uses to calculate available hours for the day. This field is currently not used when you are scheduling tasks.
The default values for this field come from the resource assignment constants for business unit ALL. You can override this value.
- End Time
-
Enter the finish time that the system uses to calculate available hours for the day. This field is currently not used when you are scheduling tasks.
The default values for this field come from the resource assignment constants for business unit ALL. You can override this value.
- Hours Available
-
Review the number of hours that a resource is available for scheduling on a single day. The system calculates available hours for the start and end times that you entered.
2.4.5 Adding a Resource Calendar
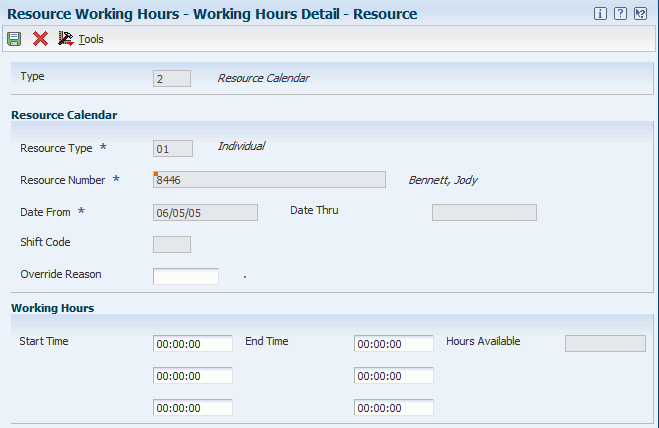
Access the Working Hours Detail - Resource form.
Figure 2-3 Working Hours Detail - Resource form
Description of "Figure 2-3 Working Hours Detail - Resource form"
- Resource Type
-
Specify the type of resource for which you are overriding working hours. You can enter resource working hours for an individual or for an asset. For example, you might enter resource working hours for an individual if that person is on vacation, or for an asset if the asset is undergoing maintenance. This is a user-defined code (05/RT). Values are:
01: Individual
02: Asset
- Date From and Date Thru
-
Enter the date range during which the override values are effective. For example, if a resource is on vacation for a week, enter the first day of vacation in the Date From field, and the last day of vacation in the Date Thru field.
- Shift Code
-
Specify the shift for which the override hours apply. For example, you might specify that the resource is available for the night shift. This field is informational only. The system does not use this value to calculate the available hours for the resource. The system uses the start and end times to calculate the number of available hours.
2.5 Defining Crew Maintenance Schedule Periods
This section provides an overview of crew maintenance schedule periods and discusses how to:
-
Define crew maintenance schedule periods.
-
Set the current period.
2.5.1 Understanding Crew Maintenance Schedule Periods
Before you can schedule work for a work crew, you must define the dates that define each work period for which you schedule work. You use the Maintenance Schedule Periods program (P48302) to define the crew maintenance schedule periods, which include the dates that are associated each scheduling period.
Before you can create schedule periods, you must first define schedule pattern codes in UDC 13/SP. When you define a schedule pattern code, you specify the number of days that are associated with each work period for that code by entering the number in the Special Handling field in the UDC table. For example, to define weekly schedule periods, you might create code W in UDC 13/SP, and enter 7 in the Special Handling field for that code.
After you define schedule pattern codes, you can create the crew maintenance schedule periods. You specify the schedule pattern code and the date on which the first schedule period begins, and the system generates all future schedule periods based on these values.
After you have generated the schedule periods, you must specify which of those periods is the current schedule period. Going forward, you can move the current schedule period manually or set up the system to automatically roll to the next schedule period using a batch program.
|
Note: If you change or regenerate the schedule periods after they are in the system, the system deletes all existing schedule periods from the start date and inserts the new schedule periods. |
After you generate the crew maintenance schedule periods, you can associate the schedule with a crew using the Resource Master program. The system uses the dates from the crew maintenance schedule periods to determine the date ranges on the crew scheduling programs so that you can display the current, next, following, and future periods without having to manually enter the date ranges.
A typical schedule period might define weekly work starting on Monday and finishing on Sunday. Schedule periods are user-defined and can be set up to include any number of days, depending on customer requirements.
2.5.2 Forms Used to Define Crew Maintenance Schedule Periods
| Form Name | FormID | Navigation | Usage |
|---|---|---|---|
| Work With Maintenance Schedule Periods | W48302A | Resource Assignments Setup (G13RA41), Maintenance Schedule Periods | Set the current period.
View and update maintenance schedule periods. |
| Maintenance Schedule Period Generation | W48302C | On the Work With Maintenance Schedule Periods form, click Add. | Define crew maintenance schedule periods. |
2.5.3 Defining Crew Maintenance Schedule Periods
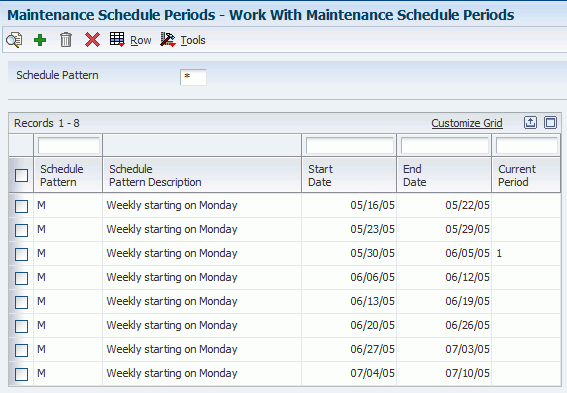
Access the Maintenance Schedule Period Generation form.
Figure 2-4 Maintenance Schedule Period Generation form

Description of "Figure 2-4 Maintenance Schedule Period Generation form"
After you complete the required fields on this form, click the Generate Periods button. The system displays the results of the generation process next to the button after processing is complete. For example, if the system successfully creates all periods, the message Period Build Successful appears on the form.
2.5.4 Setting the Current Period
Access the Work With Maintenance Schedule Periods form.
Figure 2-5 Work With Maintenance Schedule Periods form
Description of "Figure 2-5 Work With Maintenance Schedule Periods form"
Select a record, and then select Set Current from the Row menu to define the current schedule period.