7 Entering Requisitions
This chapter contains the following topics:
-
Section 7.2, "Understanding the Requisition Entry Business Function Application"
-
Section 7.3, "Entering a Requisition Using the Shopping Cart Program"
-
Section 7.4, "Entering Requisitions by Using the Requisition Entry Program"
7.1 Understanding Requisition Entry
The Requisition Self Service system provides two programs for entering requisitions:
-
Shopping Cart (P43E25)
-
Requisition Entry (P43E10)
The Shopping Cart program is intended to be used by novice users to create requisitions, either for stock items or for items such as office supplies, using Direct Connect. The Shopping Cart program contains only a few fields that the user must enter; and the system provides default information for most other fields, based on setup.
The Requisition Entry program is designed for more frequent users, such as buyers, and provides more fields and additional options for the requisition, such as flagging the item as a high priority or as a special request. The Requisition Entry program is also designed to allow direct entry of account information.
7.1.1 Requisition Entry With Delegation
Using delegation functionality, you can enable users in your organization to enter requisitions on behalf of others. For example, you might enable an administrative assistant to enter requisitions on behalf of the managers in his department.
Using the processing options of the P43E10, you can specify whether your organization allows delegation. You can choose to:
-
Disable the Requested By field: When you select this option, the system disables the Requested By field on the Requisition Entry form. The user cannot enter requisitions on behalf of another employee.
-
Enable the Requested By field: When you select this option, the system enables the Requested By field on the Requisition Entry form, and allows users to enter any valid address book number in this field. When you use this option, users can enter requisitions on behalf of any employee in the organization. Oracle recommends using this option only if you use application security to restrict the users who are able to enter requisitions using this application.
-
Enable the Requested By field with delegation: When you select this option, users can enter requisitions for themselves, and on behalf of those employees for whom they have been given delegation rights.
If you choose to enable the Requested By field with delegation, you must set up delegation records using the Requisition Delegation program (P43E280). These records include information about the dates during which the delegation is active, and the users for whom a delegated requestor has the authority to enter requisitions during that time.
|
Note: Delegation functionality is not available on the Shopping Cart program. |
7.1.2 Using Direct Connect
Both the Shopping Cart and the Requisition Entry program use the Direct Connect feature. When you have set up your system and suppliers to use Direct Connect, users can connect from within the requisition entry programs directly to suppliers' websites to search for items. After users select items and check out from the site, the system returns the user to the requisition entry program and populates the requisition cart with the items that they selected. The user does not actually purchase items on the site; they simply select items to be added to the requisition cart. Therefore, the users's request can be processed within the Requisition Self Service system and is subject to proper approvals and editing before the items are actually purchased.
Users can add items from multiple websites to the same requisition cart. As users select items from suppliers' websites, the system adds records to the Shopping Cart table (F43E20) and the Cross Reference table (F43E15). When the user submits the requisition, the system removes the records from the F43E20 table and creates records in these tables:
-
F43E01 (Requisition Header)
-
F43E11 (Requisition Detail)
7.1.3 Budget Checking and Commitments
Using the processing options for the Requisition Entry Business Function Application (P43E0001), you can specify that you want to perform budget checking once the user submits a requisition. If you activate budget checking, the system uses the same budget checking process as in the Procurement system.
If any line on the requisition does not pass budget checking, the entire requisition remains at a status of Composing, while the individual lines that did not pass are assigned a status of Over Budget. If the entire requisition does not pass, the system leaves the status of the requisition header at Composing. You can perform the following actions once the requisition and the individual lines are at this status:
-
Request an additional budget amount.
-
Change the account number on the requisition to one that has the necessary budget available.
-
Change the version of the Requisition Entry Business Function Application (P43E0001) in the Requisition Entry program to one that does not have budget checking activated and submit the requisition again.
See Understanding the Requisition Entry Business Function Application.
If the requisition passes the budget, the system can create a commitment, both financial and inventory, if the system has been set up for commitments. The process for commitments also works the same as in the Procurement system
7.1.4 Common Elements Used in This Section
- Domestic Cost
-
Review and/or enter a cost per unit in this field. This field displays the amount in the domestic currency.
- Foreign Cost
-
Review the amount in this field. This field is populated only if you enter a foreign supplier.
- Extended Amount
-
Enter the amount, which is the number of units multiplied by the unit price. You can also use this field to enter a lump sum amount. If you enter a lump sum amount, do not enter a quantity. The system always displays the extended amount in the domestic currency so that this amount appears in the same currency as that in the Total Amount field.
- Item Number
-
Enter a number for the inventory item. The system provides three separate item numbers plus an extensive cross-reference capability to other item numbers (see data item XRT) to accommodate substitute item numbers, replacements, bar codes, customer numbers, supplier numbers, and so forth. The item numbers are:
-
Item Number (short): An eight-digit, computer-assigned item number.
-
2nd Item Number: The 25-digit, free-form, user-defined alphanumeric item number.
-
3rd Item Number: Another 25-digit, free-form, user-defined alphanumeric item number.
-
- Item Description
-
Verify the description associated with the item. The system uses the item description from the Item Master table (F4101). Enter a different description if you do not want to use the value from the F4101 table.
- Quantity
-
Enter the number of units that you want to order. If you entered a lump sum in the Extended Amount field, do not enter a quantity.
- Supplier Number
-
Enter the address book number of the supplier.
- Supplier Description
-
Enter the associated description of the supplier number.
- UM (unit of measure)
-
Enter the user-defined code (00/UM) that indicates the quantity in which to express an inventory item, for example: CS (case) or BX (box).
- Unit Price
-
Enter the unit cost of one item, as purchased from the supplier, excluding freight, taxes, discounts, and other factors that might modify the actual unit cost that you record when you receive the item. The system always displays this amount in the domestic currency.
7.2 Understanding the Requisition Entry Business Function Application
The Shopping Cart and Requisition Entry programs both use a business function application to provide additional information for processing requisitions. The Requisition Entry Business Function Application (P43E0001) provides:
-
Default values for fields such as Order Type, Line Type, Product, and Service Line Type.
-
Processing information, such as whether the system should generate Post Before Cut Off (PBCO) and Post After Cut Off (PACO) warnings, and whether the system should validate the business unit on a requisition.
-
Options for budget checking, such as budget ledger type and level of detail.
When you set up the processing options for a version of the Requisition Entry Business Function Application, you specify the version number in the processing options for the Shopping Cart and Requisition Entry programs. To access the processing options for the Requisition Entry Business Function Application, you use the Interactive Versions program.
7.3 Entering a Requisition Using the Shopping Cart Program
This section provides an overview of the Shopping Cart program and discusses how to:
-
Set processing options for Requisition Entry Business Function Application.
-
Set processing options for the Shopping Cart program.
-
Enter requisitions using the Shopping Cart program.
7.3.1 Understanding the Shopping Cart Program
The Shopping Cart program (P43E25) provides a simple, efficient means of entering requisitions. The Shopping Cart program displays the commodity structure so that a user can select a particular item or service by selecting a commodity. The program also contains a Product tab, which lists items from the Item Master table, and a Supplier tab, which lists preferred suppliers for a particular item. Users can search for valid products and services using standard searching capability, which includes the use of wild cards.
Additionally, if any of the suppliers are set up for Direct Connect, the Supplier tab provides links to those suppliers' websites.
After you connect to a supplier's site, you select items directly on their site. When you return to the Shopping Cart program, the system loads the items that you selected into the shopping cart. You can then either click Submit, or you can connect to another supplier's site to continue shopping. Within one session, the system loads items from multiple suppliers into the same shopping cart. You can also add stock items to the shopping cart.
When you click Submit, the system displays the requisition number that it created and assigns the requisition a status of Submitted.If you have activated budget checking in the processing options for the Requisition Entry Business Function Application (P43E0001), the system performs budget checking after you click Submit. If errors occur during the requisition creation process, the system displays the Requisition Creation form and highlights the error, enabling you to correct the error and resubmit the requisition.
If your internet session times out before you click Submit, the system saves the contents of the shopping cart so that you do not have to recreate it.
7.3.2 Prerequisites
Before you complete the tasks in this section:
Activate the Budget Checking processing option for the Requisition Entry Business Function Application program if you want to use budget checking.
Set up the system for commitment tracking if you want to create commitments.
7.3.3 Forms Used to Enter Requisitions by Using the Shopping Cart Program
| Form Name | Form ID | Navigation | Usage |
|---|---|---|---|
| Shopping Cart - Order Items | W43E25D | Daily Processing (G43E11), Shopping Cart | Create a requisition by using a stock item, or use Direct Connect to shop for items on suppliers' websites. |
| Requisition Confirmation | W43E25C | Click Checkout on the Shopping Cart - Order Items form. | Confirm that you want to create the requisition. |
| Direct Connect Setup Message | W43E23C | Click a supplier number on the Shopping Cart - Order Items form. | This message notifies you that Direct Connect information has not been set up for a supplier, so you cannot connect to the supplier's website. |
7.3.4 Setting Processing Options for Requisition Entry Business Function Application (P43E0001)
These processing options specify information for the system to use when processing requisitions.
7.3.4.1 Defaults
- 1. Order Type
-
Specify the default document type for the system to assign to requisitions. Enter a valid document type from user-defined code 00/DT.
- 2. Service Line Type
-
Specify the default service line type for the system to assign to requisitions. This value specifies how the system processes lines on a transaction and is used only when you enter a requisition for a service. The line type affects the systems with which the transaction interfaces (General Ledger, Job Cost, Accounts Payable, Accounts Receivable, and Inventory Management). The line type also specifies the conditions for including a line on reports and in calculations. The line type specified must have an inventory interface of A or N and the Edit Item Master for Non Stock option must be cleared in the Line Type Constants program (P40205).
- 3. Product Line Type
-
Specify the default line type for the system to assign to requisitions. This value specifies how the system processes lines on a transaction and is used only when you enter a requisition for a product. The line type affects the systems with which the transaction interfaces (General Ledger, Job Cost, Accounts Payable, Accounts Receivable, and Inventory Management). The line type also specifies the conditions for including a line on reports and in calculations. If you enter a valid item from the Item Master table, the system uses the default line type from the Item Branch or the Item Master table.
- 4. Unit of Measure
-
Specify the default unit of measure for the system to assign to the requisition if you leave the Unit of Measure field blank. If you enter a valid item from the Item Master table on the requisition, the system uses the value that is specified in the Transaction Unit of Measure processing option for the unit of measure.
- 5. Transaction Unit of Measure
-
Specify where the system locates transaction unit of measure information to use as the default during requisition entry. Values are:
1: Uses the primary unit of measure from the F4101 table as the default for the transaction unit of measure.
Blank: Uses the purchasing unit of measure from the F4101 table. The transaction unit of measure directly relates to the number that you have entered in the Quantity field on the Requisition Entry form.
- 6. Account Description
-
Specify which account description to use as the default for requisitions. Values are:
1: Uses the business unit and the subsidiary (cost code header) as the default account description. Typically, the account is a nonposting header account. The object account is not used when the system retrieves the account description.
Blank: Uses the business unit, object, and subsidiary as the default account description.
7.3.4.2 Processing
- 1. Business Unit Validation
-
Specify how the system validates the branch/plant. Values are:
1: Validates the branch/plant against the F4101 table. If you are performing stock purchasing, enter 1 for this processing option. When you enter 1, the system uses the address book number in the F4101 table as the default for the ship to address book number.
Blank: Validates the branch/plant against the F0006 table. Typically, you use this processing option when you are performing services expenditure purchasing. When you leave this processing option blank, the ship to address book number appears by default from the address book number in the F0006 table. You can access the F0006 table through the Revise Single Business Unit program.
- 2. PBCO Warning
-
Specify whether the system should generate a PBCO warning. The PBCO warning indicates that the G/L date for the requisition is in a period prior to the current period for the company specified on the requisition. However, if the Allow PBCO Postings option in the General Accounting Constants program is not selected, the system generates an error regardless of the value in this processing option. Values are:
1: Do not issue the PBCO warning. Typically, you use this value when you are performing services or expenditure-type purchasing.
Blank: Compares the G/L date on the requisition to the current period in the F0010 table for the company and business unit specified on the requisition. If the G/L date for the requisition is in a period prior to the current period for the company, the system generates a PBCO warning. The warning ensures that you are not recording purchases in a prior general accounting period.
- 3. PACO Warning
-
Specify whether the system should generate a PACO warning. The PACO warning indicates that the G/L date for the requisition is in a period that falls after the current or next period. Values are:
1: Do not generate.
Blank: Generate. The system compares the G/L date on the requisition to the current period in the F0010 table for the company on the requisition. If the G/L date falls outside of the current or next period, the system generates a PACO warning.
- 4. Edit Supplier Master
-
Specify whether the system validates the supplier number against the F0401 table. Values are:
1: Do not validate.
Blank: Validate.
- 5. Financial AAIs
-
Specify whether the system should use financial automatic accounting instructions (AAIs) or distribution AAIs. Values are:
1: Use distribution AAIs.
Blank: Use financial AAIs, specifically the CD, CT, CR AAIs. If you leave this processing option blank, the system verifies that the account number on the requisition falls within the allowable account ranges specified in the CD, CT, and CR AAIs.
- 6. Project/Job Validation
-
Specify how the system should validate the header business unit and the account business unit on the detail line. Values are:
Blank: Allows the account business unit on the detail line to be different from the header business unit.
1: Generates a warning if the account business unit on the detail line and the header business unit are different.
2: Generates an error if the account business unit on the detail line and the header business unit are different.
3: Issues an error if the job (account business unit on the detail line) does not belong to the project (header business unit). A project number is assigned to a job in the Business Unit Master (F0006). If you enter 3 in this processing option, the system verifies that the Project Number field in the F0006 table for the business unit in the detail line has the same number as the header business unit on the requisition.
Note:
A business unit description may be displayed as Branch/Plant, Project, Job, or Business Unit.
7.3.4.3 Budget
- 1. Activate Budget Checking
-
Specify whether to activate budget checking. If you activate budget checking, the system compares the actual amount (amount listed in the AA ledger) plus commitments (amount listed in the PA ledger) to the budget ledger specified in the Budget Ledger Type processing option to determine if the amount for a detail line is over budget. If a detail line exceeds the budget for an account, the system prevents the requisition from being submitted for approval and changes the status of the line to Over Budget. Values are:
Blank: Do not activate.
1: Activate.
- 2. Budget Ledger Type
-
Specify the ledger type for the system to use when performing budget checking. Enter a valid ledger type from the Ledger Type Master Setup program (P0025). If you specify a budget ledger type, the system performs budget checking only for that budget ledger type. If you leave this processing option blank, the system performs budget checking on all budget ledger types specified in the Ledger Type Master Setup program (P0025).
- 3. Level of Detail
-
Specify the value (3 through 9) for the level of detail that the system uses during the budget checking process. If you leave this processing option blank, the system uses a default value of 9.
You can use this processing option with the processing option for level of detail accumulation.
- 4. Budget Total Method
-
Specify the method for the system to use to calculate the budget. If you leave this processing option blank, the system uses the job cost budget calculation method. Values are:
1: Uses the job cost budget calculation method (original budget + period amounts for the current year + prior year postings).
2: Uses the standard financial budget calculation method (sum of period amounts for the current year).
3: Uses the standard financial spread calculation method (original budget + period amounts for the current year).
- 5. Period Accumulation Method
-
Specify the time period that the system uses when accumulating the budget. Values are:
Blank: Use the total annual budget to accumulate the budget.
1: Accumulate the budget through the current period.
- 6. Tolerance Percentage
-
Specify the percentage by which the detail line amount can exceed the budget before the system places the order on budget hold.
- 7. Budget Accumulation Level of Detail (Release 9.1 Update)
-
Specify whether the system uses the Level of Detail processing option value (under the Budgeting tab) to accumulate budget amounts. Values are:
Blank: The system determines the budget amount from the account entered in the purchase order detail line.
1: The system determines the budget checking account from the values in the purchase order detail account and the Level of Detail processing option. The system then calculates the budget amount by accumulating the budget amounts of all the child accounts of the budget checking account.
- 8. Exclude Subledger/Type (Release 9.1 Update)
-
Specify whether the system excludes the subledger and subledger type when validating the budget information. Values are:
Blank: The system includes only those accounts that have a subledger and a subledger type specified in the purchase order detail.
1: The system does not consider the subledger and subledger type. All of the accounts (with and without a subledger and a subledger type) are considered for budget checking.
- 9. Job Cost Account Sequence
-
Specify the job cost account sequence that the system uses for budgeting. Values are:
Blank: Uses the standard account sequence (for example, cost center, object, and subsidiary).
1: Uses the job cost sequence (for example, job, cost code, and cost type).
7.3.5 Setting Processing Options for Shopping Cart (P43E25)
The processing options for the Shopping Cart program provide the system with default versions to use when accessing additional programs from within the Shopping Cart program.
7.3.5.1 Versions
- 1. Enter version for P43E15 Requisition Inquiry program
-
Specify a version of the Requisition Inquiry program for the system to use. The system accesses the Requisition Inquiry program when encountering problems with processing the requisition. For example, if budget checking is activated and the requisition does not meet the budget requirements, the user can correct the requisition by using the Requisition Inquiry program.
- 2. Enter version for Requisition Entry business function
-
Specify a version of the Requisition Entry Business Function application (P43E0001) for the system to use when processing requisitions entered using the Direct Connect Shopping Cart program. The Requisition Entry Business Function application provides the system with default information for requisitions and with additional information for processing requisitions.
7.3.6 Entering Requisitions Using the Shopping Cart Program
Access the Shopping Cart - Order Items form.
Figure 7-1 Shopping Cart - Order Items form (1 of 2)
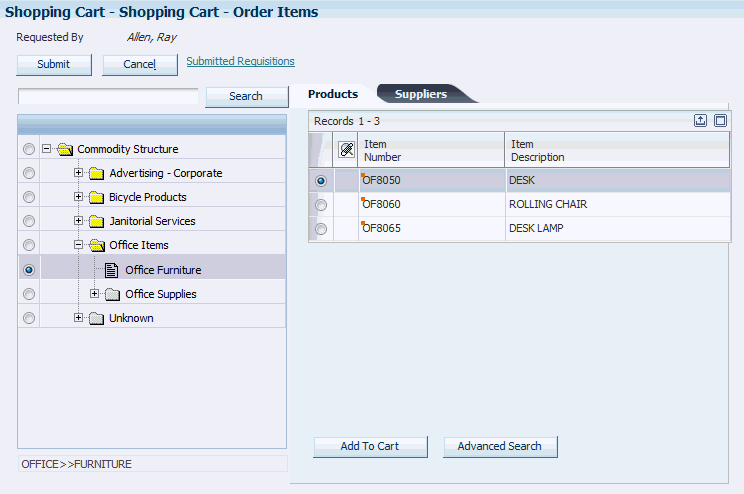
Description of "Figure 7-1 Shopping Cart - Order Items form (1 of 2)"
Figure 7-2 Shopping Cart - Order Items form (2 of 2)
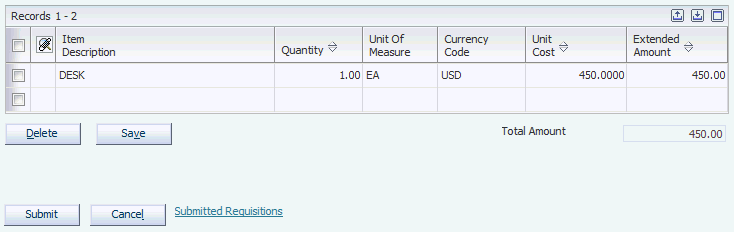
Description of "Figure 7-2 Shopping Cart - Order Items form (2 of 2)"
- Quantity
-
Enter the quantity for the items in the shopping cart. You can change this value after selecting items from the supplier's website. If you are entering a requisition for which a lump sum is used, for example, a service, do not enter a quantity.
7.4 Entering Requisitions by Using the Requisition Entry Program
This section provides overviews of the Requisition Entry program, G/L class code assignment, and discusses how to:
-
Set processing options for Requisition Entry.
-
Enter requisitions by using Requisition Entry.
-
Enter requisition details.
7.4.1 Understanding the Requisition Entry Program
Whereas the Shopping Cart program provides a simple and efficient means for users to order items such as office supplies, the Requisition Entry program (P43E10) provides the ability to enter different types of requisitions in a variety of ways, including:
-
Requisition entry using a G/L account number.
If you know the G/L account number for the requisition, you can enter the account number instead of choosing a commodity. If the account number is associated with a commodity, the system retrieves that commodity and populates the Commodity field for you. Use the processing options for the Requisition Entry program to specify how the system displays the account number field. You can select from three formats:
-
Standard account number, displayed as one field.
-
Job cost sequence, displayed as three fields.
-
Standard account number, displayed as three separate fields.
-
-
Requisition entry without details.
You can enter the header information for a requisition, such as the description, but enter the details for the requisition at a later time. The requisition remains at a status of Composing until you complete the details and then submit it for approvals. The system does not save any line default information that you enter; you must reenter it when you complete the entire requisition.
Note:
For this type of requisition, the system creates a temporary detail record in the F43E11 table that you cannot view using the Requisition Entry program. After you add requisition detail lines, the system removes the temporary detail record from the F43E11 table. -
Requisition with multiple suppliers.
You can select items from multiple suppliers on the same requisition. When you use the Requisition Expeditor program (P43E060) or the Batch Requisition Consolidation program (R43E060) to create purchase orders for requisitions with multiple suppliers, the system creates as many purchase orders by supplier as necessary.
-
Requisition entry for a high priority item.
If you need to receive an item quickly, you can select the High Priority option for your requisition. Buyers can filter their search in the Requisition Expeditor program (P43E060) to process such requisitions before others.
-
Requisitions for special requests.
If you need to request an item for which you do not have a supplier or item number, click the Special Request option, which directs the system to disable editing for the requisition. For a special request requisition, the system requires only a description; and the requisition remains at a status of Composing until you resolve and submit the requisition for approvals. If you enter a commodity for the requisition, the system then alerts the buyer attached to that commodity. If you do not enter a commodity, the system alerts the buyer attached to the Unknown commodity, if one is attached. If the Unknown commodity is not attached to a buyer, the system does not route the requisition for approval.
After researching special requests, use the Edit Details form to resolve the requisition by entering the necessary information, and then clear the Special Request option. When you clear the Special Request option, the system performs editing on all fields, so you must enter all necessary information before you clear the option. You can then submit the requisition for approvals.
-
Requisitions with multiple account distribution.
Using the Edit Details form, you can distribute the amount for the requisition to several accounts. For example, you can distribute the expense for window cleaning to all affected departments. You can enter multiple account distributions only for requisitions with a line type that has an inventory interface of A or B.
-
Requisitions using delegation functionality.
You can set up users to have requisition entry rights for other users. For example, you might set up an administrative assistant with delegation rights for the managers that he supports. Using delegation authority, the administrative assistant can enter requisitions on behalf of the managers, and the system uses the managers' information, rather than the information of the administrative assistant, for approval routing.
-
Requisitions with foreign suppliers.
Although you can also use the Shopping Cart program to enter requisitions using a foreign supplier, the Requisition Entry program enables users to view both the domestic and foreign currency for the requisition during the entry process when using a foreign supplier.
As in the Shopping Cart program, the Requisition Entry program displays the commodity structure, from which you can select the commodity for the item or service that you are requesting. If the commodity is attached to an item, the system displays a list of items from which to select in the Choose Item or Supplier subform. If a commodity is attached to specific suppliers, the system displays the suppliers in the same subform. You can also enter the commodity directly into the field, and the system displays the associated items or suppliers in the Choose Item or Supplier subform. You can also use the search feature on the Requisition Entry form to search for the commodity you want to select. Users can search for valid products and services using standard searching capability, which includes the use of wild cards.
Using processing options, you can also specify whether users are able to use the UNKNOWN commodity when entering a requisition. You can also search for a commodity using standard wildcard search functionality.
The Requisition Entry program enables you to connect to suppliers' websites to shop for items using Direct Connect. You connect to suppliers' websites by clicking the supplier number. After you click a supplier number, the system populates the Supplier Number field for you and connects you to their website.
You might have suppliers attached to a commodity that are not set up for Direct Connect. If you click a supplier that is not set up for Direct Connect; the system displays a message notifying you that it has not been set up, and then populates the Supplier Number field for you.
The Requisition Entry program enables you to add additional text for the requisition for situations where you need to provide justification or an explanation for the requisition. Click the Justification field to enter free-form text for the requisition. When the requisition is submitted for approval, the approver can view the text at the header and detail level of the requisition.
After you have determined which items you want to request, click the Add to Cart field. The system adds the items to the Requisition Cart subform. When the items are in the requisition cart, you can use the Edit Details form to add or change information for the details lines, and then click Submit. When you click Submit, the system displays the requisition number and assigns the requisition a status of Submitted. If errors occur during the requisition submit process, the system highlights the error(s), enabling you to correct the requisition and submit it again.
If you have activated budget checking in the processing options for the Requisition Entry Business Function Application, the system performs budget checking.
You can click Save for Later if you are not ready to submit the requisition. The system stores the requisition in the F43E11 table. However, the system does not perform budget checking or send the requisition through workflow approvals. The requisition remains at a Composing status.
7.4.2 Understanding G/L Class Code Assignment
Depending on the information that you enter on the requisition, the system obtains the G/L class code from different sources. The system uses this hierarchy when obtaining the G/L class code:
-
If you enter an item number, the system uses the G/L class code from the item location record.
-
If the item location record does not have a G/L class code, the system uses the G/L class code from the item branch record.
-
If the item branch record does not have a G/L class code, the system uses the G/L class code on the item master record.
-
If you have not entered an item number, but have entered a commodity, the system uses the G/L class code for the commodity.
-
If the G/L class code for the commodity is blank, the system uses the line type on the commodity and retrieves the G/L class code from the line type constants.
-
If the commodity on the requisition is UNKNOWN, the system uses the line type specified in the processing options for the Requisition Entry Business Function Application, as the line type for the UNKNOWN commodity is blank. You can change this line type, if necessary.
Using the line type specified in the processing options, the system retrieves the G/L class code from the line type constants.
-
If the Line Type processing option is blank, the system uses the data dictionary default values for line type (value for the LNTY field is S and the value for RLNTY is N) and retrieves the G/L class code from the line type constants.
|
Note: The Line Type field is editable, and can be changed by the user. If you are using a line type with an inventory interface, the system determines which AAI to use as follows:If the inventory interface is set to Y or C, the system uses the 4310 AAI. If set to B, the system uses the 4315 AAI. If set to A, the system uses the 4318 AAI. |
7.4.3 Prerequisites
Before completing the tasks in this section:
Set up the commodity structure.
See Setting Up the Commodity Structure.
Set up workflow approvals.
See Setting Up Requisition Approval Workflow.
Set the processing options for the Requisition Entry Business Function Application program.
Activate the Budget Checking processing option for the Requisition Entry Business Function Application program if you want to use budget checking.
Set up the system for commitment tracking if you want to create commitments.
Set up Direct Connect information.
See Chapter 3, "Setting Up Direct Connect and Purchase Order Dispatch".
Set up delegation information, if necessary.
7.4.4 Forms Used to Enter Requisitions by Using the Requisition Entry Program
7.4.5 Setting Processing Options for Requisition Entry (P43E10)
These processing options provide additional information for the system to use when processing requisitions.
7.4.5.1 Display
- 1. Suppress Canceled Lines
-
Specify whether the system should suppress canceled lines. Values are:
Blank: Do not suppress.
1: Suppress.
Note:
If you create requisition lines and then cancel the lines in the same session of the Requisition Entry program, the system does not create records for them in the Requisition Detail table; therefore, such records do not appear upon re-inquiry. - 2. Account Display
-
Specify how the system displays the Account Number field on the Requisition Entry form. Values are:
Blank: Displays the standard account number, third account number, account ID, or the speed code, depending on the first character that the user enters. You specify in the General Accounting constants the correlation between special characters and account number formats.
1: Displays the job cost sequence. For example, the system displays job, cost code, and cost type, and displays the fields separately.
2: Displays the standard sequence. For example, the system displays business unit, object account, and subsidiary, and displays the fields separately.
- 3. Cost Protection
-
Specify whether the system protects the product cost fields. Values are:
1: Disables the product cost fields.
Blank: Enables the product cost fields.
- 4. Business Unit Display
-
Specify the description that the system displays for the Business Unit field. Depending on the value that you specify, the system displays applicable field descriptions for other fields. Values are:
Blank: Displays the description, Branch/Plant, and displays field descriptions applicable to Procurement.
1: Displays the description, Job, and displays field descriptions applicable to Subcontracts.
2: Displays the description, Project, and displays field descriptions applicable to Subcontracts.
3: Displays the description, Business Unit, and displays field descriptions applicable to Procurement.
- 5. Display account fields on Products tab
-
Use this processing option to specify whether the system displays and enables account fields on the Products tab. Values are:
Blank: Do not display or enable.
1: Display and enable.
- 6. Enable Requested By
-
Use this processing option to specify whether the user can update the value in the Requested By field. By default, the system populates the field with the signed-on user's address book number. Values include:
Blank: Disable the Requested By field.
1: Enable Requested By field, and allow the user to change the value to any address book number.
2: Enable Requested By field with delegation, and allow the user to change the value to only the address book numbers for whom they have been assigned delegation rights.
- 7. Enable Business Unit
-
Use this option to specify whether a user can update the value in the business unit field.
The system populates this field with the business unit of the signed-on user. Therefore, if you allow users to enter requisitions on behalf of other employees, you should enable this field so that the delegated user can enter the business unit of the original requestor.
Values include:
Blank: Disable Business Unit field.
1: Enable Business Unit field.
- 8. Disable Unknown Commodity
-
Use this option to specify whether the commodity Unknown can be used when entering a requisition. Values include:
Blank: Allow the use of the Unknown commodity during requisition entry.
1: Do not allow the use of the Unknown commodity during requisition entry. If you select this option, the user must enter a valid commodity code.
7.4.5.2 Versions
- 1. P43E0001 Version
-
Specify the version of the P43E0001 that the system uses.
7.4.6 Entering Requisitions by Using Requisition Entry
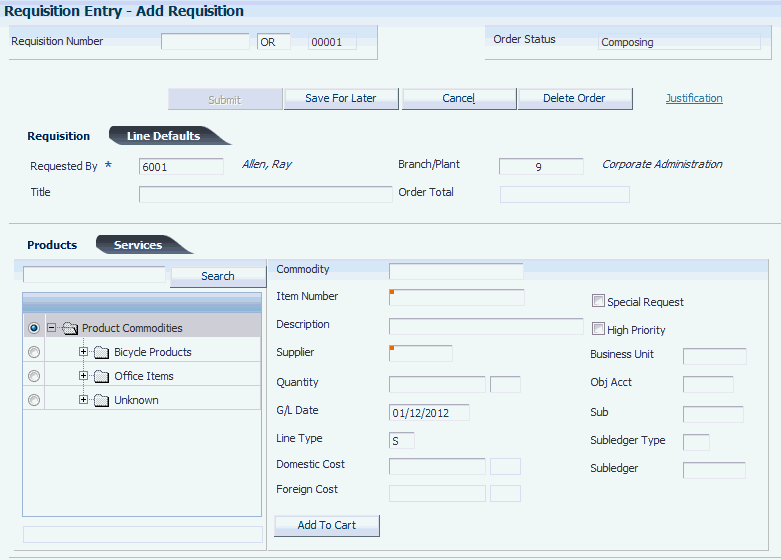
Access the Add Requisition form.
Select the Requisition tab to enter a title for the requisition and to enter justification information. Complete these fields:
- Requested By
-
The system populates this field with the user ID of the person signed on to the system. Whether this field is editable is determined by the processing option settings for the P43E10.
If this field is enabled, users can search for valid address book numbers to enter in this field. If the field is enabled with delegation, users can only select from employees who have been set up with delegation rights. If the field has been enabled without delegation, users can enter any valid address book number here.
- Job, Branch/Plant, Project, and Business Unit
-
Displays one of these field descriptions depending on the value you specify in the Business Unit Display processing option for the Requisition Entry program. This field represents the business unit for an account number, and the system retrieves the default value for this field. Whether this field is editable is also determined by the processing options.
To determine the default value for this field, the system first checks to see if a default location has been set up in the Default Location & Printers program (P400951) for the user ID in the Requested By field. If one is set up, the system uses this value as the default. If one is not set up, the system then checks the Business Unit field on the Address Book master record for the user ID in the Requested By field and uses that value.
- Title
-
Enter a title for the requisition. You can enter up to 30 alphanumeric characters.
- Justification
-
Click this field if you want to enter additional information for the requisition.
Select the Line Defaults tab to enter information that the system uses as default values for requisition lines. The system does not store these values at the header level for the requisition, as the values are used only to provide default information for requisition lines. Complete these fields:
- Order Date
-
Enter a date if you want to use a date other than the default, which is the current date.
- Requested Date
-
Enter a date by which you want to receive the item. You must enter a date that falls after the value specified in the Order Date field.
- Ship To
-
Enter the address number of the location to which you want to ship the order. The address book provides default values for customer address, including street, city, state, zip code, and country. The system uses the ship to address specified in the Branch Plant Constants as the default value. If the ship to address in the Branch Plant Constants is blank, the system uses the value specified in the Business Unit Master table (F0006).
Select the Products tab to enter information for a product requisition, and then complete these fields:
- Commodity
-
Enter a commodity or allow the system to populate this field with the value you select from the commodity structure. You can also use the search feature to find a commodity.
- Item Number
-
Enter the item number for the item you are ordering. If you selected an item from the Choose Item or Supplier subform, the system populates this field with the value you selected. If you enter a value in the Commodity field and the commodity has an item associated with it, you can override the item associated with that commodity.
- Description
-
Overrides the description for the item you selected.
- UoM (Unit of Measure)
-
Enter a user-defined code (00/UM) that indicates the quantity in which to express an inventory item, for example, CS (case) or BX (box).
- Supplier
-
Enter the supplier number for the product. If you selected a supplier from the Choose Item or Supplier subform, the system populates this field with the value you selected.
- Quantity
-
Enter the quantity for the item that you are ordering. If you are entering a lump sum order, do not enter a quantity.
- G/L Date
-
Enter a date to identify the financial period to which the transaction is to be posted. The system uses this date when performing budget checking and when creating commitments.
- Line Type
-
Review, and if necessary, update the value in this field to specify the line type of the item you are entering. The system populates this field with the default line type. However, you can change this value if necessary.
- Domestic Cost
-
Review and/or enter a cost per unit in this field. This field displays the amount in the domestic currency.
- Foreign Cost
-
Review the amount in this field. This field is populated only if you enter a foreign supplier.
- Special Request
-
Select this option if this item does not have an item or account number associated with it. If you select this option, the system disables all editing for the requisition and alerts the buyer. The system does not submit the requisition, and all lines within the requisition are not processed.
- High Priority
-
Select this option to indicate that the buyer should expedite the requisition. The buyer can search on requisitions with this option selected when reviewing requisitions in the Requisition Inquiry program (P43E15).
- Account Number, Job, Cost Code, Cost Type, Business Unit, Object Account, and Subsidiary
-
Displays one of three formats for the account number depending on the value you specified in the Account Display processing option for the Requisition Entry program. Whether this field is enabled for editing is also controlled by the processing options.
Enter the account number associated with the product. If you enter an account associated with a commodity, the system populates the Commodity field with the related commodity.
- Sub
-
Enter a code that represents a subset of an object account. Subsidiary accounts include detailed records of the accounting activity for an object account.
- Subledger Type
-
Enter a user defined code (00/ST) that is used with the Subledger field to identify the subledger type and how the system performs subledger editing. Values include:
A: Alphanumeric field, do not edit.
N: Numeric field, right justify and zero fill.
C: Alphanumeric field, right justify and blank fill.
- Subledger
-
Enter a code that identifies a detailed, auxiliary account within a general ledger account. A subledger can be an equipment item number or an address book number. If you enter a subledger, you must also specify the subledger type.
Select the Services tab to enter information for a services request, and complete these fields:
- Extended Price
-
Enter the extended price, which is the number of units multiplied by the unit price.
- Supplier
-
Enter the number of the supplier for the service. If you selected a supplier from the Choose Item or Supplier subform, the system populates this field with the value you selected.
- Account Number, Job, Cost Code, Cost Type, Business Unit, Object Account, and Subsidiary
-
Displays one of three formats for the account number depending on the value you specified in the Account Display processing option for the Requisition Entry program.
Enter the account number associated with the service. If you enter an account associated with a commodity, the system populates the Commodity field with the related commodity.
- G/L Date
-
Enter a date to identify the financial period to which the transaction is to be posted. The system uses this date when performing budget checking and when creating commitments.
- Sub
-
Enter a code that represents a subset of an object account. Subsidiary accounts include detailed records of the accounting activity for an object account.
- Subledger Type
-
Enter a user defined code (00/ST) that is used with the Subledger field to identify the subledger type and how the system performs subledger editing. Values include:
A: Alphanumeric field, do not edit.
N: Numeric field, right justify and zero fill.
C: Alphanumeric field, right justify and blank fill.
- Subledger
-
Enter a code that identifies a detailed, auxiliary account within a general ledger account. A subledger can be an equipment item number or an address book number. If you enter a subledger, you must also specify the subledger type.
Click Add to Cart to populate the Requisition Cart subform.
- Quantity Ordered
-
Use this field to change the quantity for individual requisition lines.
- Tr. UoM (transaction unit of measure)
-
Use this field to change the unit of measure for individual requisition lines.
- Extended Amount
-
Use this field to change the extended amount for individual requisition lines. Enter the amount, which is the number of units multiplied by the unit price. You can also use this field to enter a lump sum amount. If you enter a lump sum amount, do not enter a quantity. The system always displays the extended amount in the domestic currency.
7.4.7 Entering Requisition Details
Access the Edit Requisition Details form.
Figure 7-4 Edit Requisition Details form (1 of 2)
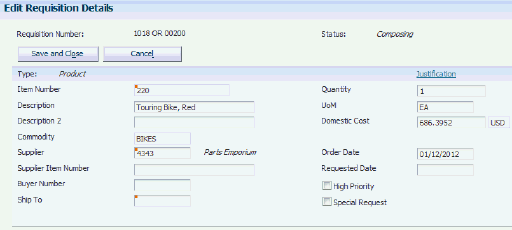
Description of "Figure 7-4 Edit Requisition Details form (1 of 2)"
- Description 2
-
Enter additional text for the description of the requisition.
- Supplier Item Number
-
If you selected items from a supplier using Direct Connect, the system populates this field with the item number from the supplier's system. You can change the value in this field.
- Buyer Number
-
Enter or change the buyer number.
- Ship To
-
Enter or change the ship to address.
- Order Date
-
Use this field to change the order date.
- Requested Date
-
Use this field to change the requested date.
- High Priority
-
Select or clear this option.
- Special Request
-
Select or clear this option. If you are resolving a special request, you must enter values in all other required fields before clearing this option. The system performs editing on all fields after you clear this option, so if you have not entered required values, the system generates errors.
- Domestic Amount
-
This field displays the amount of the requisition in domestic currency. If the supplier is a domestic supplier, this field is editable when updating a requisition. If the supplier is a foreign supplier, you can edit the Foreign Amount field, and the system calculates the value in the Domestic Amount field.
- Foreign Amount
-
This field displays the amount of the requisition in foreign currency, and appears only if the supplier is a foreign supplier. This field is editable when updating a requisition.
- Distributed by
-
Select a method by which to distribute the amount. Based on the value you select, the system enables and disables the related fields. Values are:
Percentage: Distribute the amount for the requisition by percentage.
Fixed Amount: Distribute the amount for the requisition by dollar amount.
Fixed Quantity: Distribute the amount for the requisition by units. The system does not enable this field if you entered a lump sum amount.
-
Click this button after you select a method for distribution to display the related fields.
- Account Number
-
Enter the account number to which you want to distribute an amount.
- G/L Date
-
Enter the G/L date for the accounting period to which you want to post the journal entry.
- Distributed Percentage
-
Enter a distribution percentage for the account specified.
- Distributed Amount
-
Enter a distribution amount for the account specified.
- Distributed Quantity
-
Enter a distribution quantity for the account specified.
- Save and Close
-
Click this button when you are finished entering detail for your requisition. You must then click the Submit button on the Add Requisition form. If you do not submit the requisition, the system does not save your requisition in the F43E11 table.