6 Working with JD Edwards EnterpriseOne Sales Order Management for Apparel Management
This chapter contains the following topics:
-
Section 6.1, "Understanding JD Edwards EnterpriseOne Sales Order Management for Apparel Management"
-
Section 6.4, "Setting Up Price List Exchange Rates for Style Items"
-
Section 6.6, "Creating Sales Orders for Style Items with Sales Order Entry (P42101)"
-
Section 6.7, "Entering Sales Orders for Style Items with Sales Order Entry (P4210)"
-
Section 6.9, "Performing a Mass Update of Sales Order Style Items"
6.1 Understanding JD Edwards EnterpriseOne Sales Order Management for Apparel Management
JD Edwards EnterpriseOne Sales Order Management helps you to manage the sales process from the time a customer service representative takes an order until payment for it is received from the customer. The Sales Order Management system is integrated with the JD Edwards EnterpriseOne Financial, Inventory, Manufacturing, Warehouse Management, Transportation Management, Apparel Management, and EDI systems to ensure that customer demand is met.
JD Edwards EnterpriseOne Sales Order Management supports a matrix entry form for adding customer orders in Apparel Management. This matrix integration enables you to manage style items. For each style item or collection template that you enter on the order, the system displays a matrix entry form on which you can enter item quantities by size, color, or any other attributes. The system displays Matrix Entry for a style item during sales order entry only if an item structure is attached to the style item.
See Adding a Structure to Style Item Root Level 0.
JD Edwards EnterpriseOne Sales Order Management integrates with Apparel Management, Price List, Allocations, Inventory Management, and Collection Management.
This diagram illustrates the integration of JD Edwards EnterpriseOne Sales Order Management:
Figure 6-1 Integration of Sales Order Management
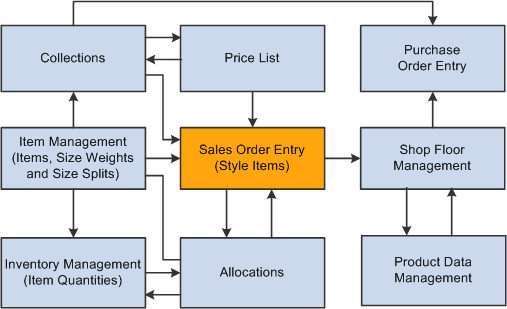
Description of "Figure 6-1 Integration of Sales Order Management"
JD Edwards EnterpriseOne Sales Order Management used with Apparel Management provides the following ways to create orders for style items:
-
By style item root level 0 (parent level).
When you enter the parent style item (for example, JEAN), the Matrix Entry form displays all of the corresponding levels (for example, JEAN.BLK.36.34, JEAN.BLUE.32.32).
-
By intermediate item level (for example, JEAN.BLK).
When you enter the intermediate style item, the Matrix Entry form displays all of the corresponding levels (JEAN.BLK.36.34, JEAN.BLK.32.30).
-
By collection template.
When you use a collection template, which is built in the Collection Templates Entry program (PCW42), the Matrix Entry form displays all of the items from the collection template.
Using Sales Order Management with Apparel Management can significantly decrease your data entry time and errors because:
-
One style item root level 0 (JEAN) automatically displays all lower level items (JEAN.BLK.26.17, JEAN.BLK.26.18) in the sales order detail line.
-
Collection templates contain groups of similar or different items that are typically sold together.
Some additional features of Sales Order Management when used with Apparel Management include:
-
Price effective dates, which the collection provides by default to the sales order header.
-
Style item validation for a collection in a sales order.
-
Splitting of total quantities in a sales order detail line based on the size split percentages defined for a size grid.
-
Sales order mass update functionality for style items to update multiple sales order detail records in order to change commitments or dates and to cancel sales order lines.
-
Use of collection, season, and season year in the sales order header.
-
Foreign and domestic sales orders for style items.
-
Ability to create price lists used to update the price for style child items in the Item Base Price File (F4106) based on the price defined for the style root level 0 item.
-
Ability to copy price lists based on customer, customer group, and currency code.
This diagram illustrates the sales order management process:
Figure 6-2 Sales Order Management process flow
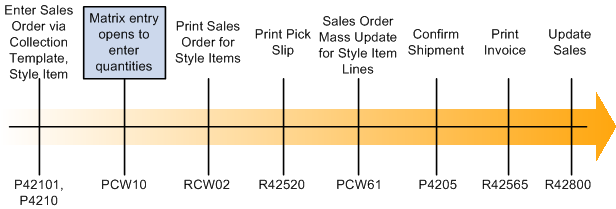
Description of "Figure 6-2 Sales Order Management process flow"
The process flow for Sales Order Management for Apparel Management is similar to and uses many of the same programs as JD Edwards EnterpriseOne Sales Order Management. The process flow consists of these steps:
-
Enter sales order (P4210 or P42101).
You can enter style items or use a collection template to enter an order.
When you enter style items, the Matrix Entry program (PCW10) opens so that you can enter specific quantities for different child style items.
Note:
If you enter the lowest level child style item, Matrix Entry will not open because there are no more attributes below that level from which to choose. -
Print sales order for style items (RCW02).
Use the Print Sales Order for Style Items program to print the sales order for style items in a matrix format.
-
Print pick slip (R42520).
Use the standard JD Edwards EnterpriseOne program. It does not contain any specific style item functionality.
-
(Optional) Perform a mass update of sales order style item lines (PCW61).
Use this program to update dates or reset commitments for sales order style item lines, or to cancel order lines.
-
Confirm shipment (P4205).
Use the standard JD Edwards EnterpriseOne program. It does not contain any specific style item functionality.
-
Print invoice (R42565).
Use the standard JD Edwards EnterpriseOne program. It does not contain any specific style item functionality.
See "Invoicing" in the JD Edwards EnterpriseOne Applications Sales Order Management Implementation Guide.
-
Run Sales Update (R42800).
Use the standard JD Edwards EnterpriseOne program. It does not contain any specific style item functionality.
6.1.1 Collections
Sales order entry integrates with Collection Management. Using processing options, you can set a default collection to automatically populate your sales orders. You can also perform a check during sales order entry to verify that the items entered belong to the collection that is attached to the sales order; or you can create collection templates that can help simplify sales order entry.
6.1.2 Backordering
In the Sales Order Management process for the JD Edwards EnterpriseOne Apparel Management system, you do not normally backorder seasonal merchandise. Fashion trends vary each year based on apparel industry experts and fashion shows. Orders placed based on a fashion show or a seasonal trend are not delivered instantly because the items require time for manufacturing and delivery. Also, backordered sales order lines are not considered for the apparel allocation process. For these two reasons, backordering is not usually activated for sales order processing for style items in this industry.
However, you can perform backorders, if desired, for a "permanent style item", an item that is not part of a collection and not a seasonal item. How you use this functionality is dependent on your business needs.
6.1.3 Data Purging
You run the Purge Sales Order Header (F4201) program (R4201P) to remove records from the Sales Order Header (F4201) and Sales Order Header Style Items Tag File (F41F201T) tables and to archive the deleted records. Typically, you run the Purge Sales Order Header (F4201) program at the end of the sales order process to clean up the sales order tables. When you purge these sales order tables, you have the option to archive the deleted records. The F41F201T table has a corresponding history table, the Sales Order Header Style Items Tag History File (F41F2019), which is similar to the Sales Order Header History table (F42019). If purging is done through the Sales Update (R42800) option, the F41F201T is purged as well.
6.1.4 Reposting Active Sales Orders
If you are using allocations and have outstanding proposals, then you must validate the proposals to clear the commitments before you run the Repost Active Sales Orders program (R42995). If you repost a style item that is in a proposal, you may cause commitment issues for that style item.
6.1.5 Prerequisites
Before you begin the tasks in this chapter:
-
Ensure that customer address information is set up in the JD Edwards EnterpriseOne Address Book system.
-
Ensure that the JD Edwards EnterpriseOne Sales Order Management system is set up to support style items.
-
Define customer information including customer and address book records and customer billing instructions.
6.2 Setting Up Price Lists for Style Items
This section provides an overview of price lists for style items, lists prerequisites, and discusses how to:
-
Set processing options for Price List (PCW17).
-
Set up price lists for style items.
-
Purge price lists for style items.
-
Run the Price List Creation report (RCW23).
6.2.1 Understanding Price Lists for Style Items
Price lists drive the prices in the JD Edwards EnterpriseOne Apparel Management system. The solution offers a set of applications that, based on the collection concept and customer or distribution channel characteristics, enables you to define specific conditions. You use price lists to generate prices for style items.
Use price lists to define prices for style items by:
-
Style item root level 0 or child style items.
When you enter prices for a style item, the child style items inherit these prices. You can also create exceptions to the prices. Price exceptions can be set specific to a particular level like color or size.
-
Item and branch.
-
Item, branch, and location.
-
Customer.
-
Customer group, distribution channel, or both (for example, retail, wholesale, geographical location).
-
Multicurrency pricing for export markets.
You can set up and use exchange rates when creating price lists.
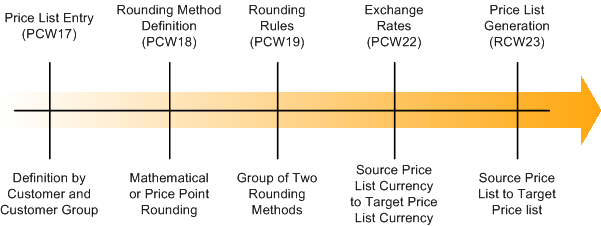
This diagram illustrates the price list process:
You can create separate price lists for items based on individual levels. For example, you might price larger sizes or darker colors higher than smaller sizes or lighter colors. You might also price longer inseam lengths higher. A defined price can be active during a specific period of time with a defined currency. For example, the style item Jean might be 19.00 USD for customer 4242 effective from October 1, 2015 until March 31, 2016. You can also manage price exceptions.
You complete these steps to define price lists:
-
Enter price lists.
You can define prices by customer or customer group using the Price List program (PCW17). Prices are inherited by child style items, but you can define exceptions to the prices.
-
Generate price lists.
You run the Price List Creation program (RCW23) for your price lists to create the item price records in the Item Base Price File table (F4106). Depending on how you set processing options, the Price List program calls the Price List Creation program automatically, on demand, or not at all.
-
Create rounding definitions.
You use the Rounding Method program (PCW18) to specify whether the system uses mathematical or price point rounding to round the price of a style item.
-
Create rounding rules.
You use the Rounding Rule program (PCW19) to specify which rounding definitions to use. You can use one of each type of rounding definition (mathematical rounding and price point rounding) to create a rounding rule.
-
Define exchange rates.
You use the Price List Exchange Rate program (PCW22) to define exchange rates. You can set up multiple exchange rates with different effective dates. The system uses these exchange rates to create the base price for an item. This exchange rate is not the exchange rate used by the JD Edwards EnterpriseOne Financials system.
-
Generate price lists.
Rather than enter all of your prices manually, you can use the Price List Generation program (PCW25) to create and copy prices. You can also use multipliers, rounding rules, and exchange rates to create a new price list. The Price List Generation program calls the Generate Price List report (RCW07) to generate a price list.
You use the Price List program (PCW17) to create base prices for style items. You can generate prices in three different ways based on your processing option settings:
-
Automatically
When you select OK, the system automatically generates prices.
-
On demand
Select an option from the Row menu to generate prices.
-
By batch
You must manually run the Price List Creation program (RCW23) to create prices.
You can also use processing options to specify at which child item level you enter prices and whether the prices are based on the style item, style item and branch/plant, or style item, branch/plant, and location.
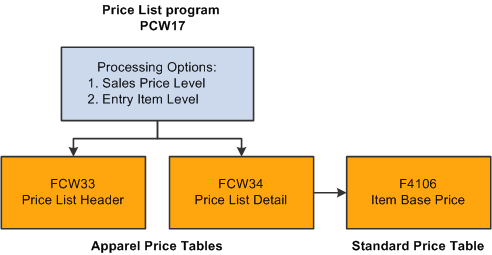
When you use the Price List program to create prices, the system populates the Price List Header table (FCW33) and the Price List Detail table (FCW34). The system uses these tables to populate the standard Item Base Price table (F4106). Before updating the F4106 table, you can add rounding rules, multipliers, and exchange rates to update the prices that you have entered using the Price List program. You do all of these tasks to arrive at the base price in the F4106 table.
This diagram illustrates how the Price List program functions:
|
Note: Price List is specific to Apparel Management and is not related to JD Edwards EnterpriseOne Advanced Pricing. |
6.2.2 Prerequisites
Before you set up price lists, you may want to define the following user-defined codes (UDCs) if you plan to use them when you set up your price lists:
-
Collection Category Code 1 (41F/O1)
-
Collection Category Code 2 (41F/O2)
-
Collection Category Code 3 (41F/O3)
-
Collection Category Code 4 (41F/O4)
-
Collection Category Code 5 (41F/O5)
You can use these UDCs, which are located on the Category Codes tab in the Price List program, for reporting and classification purposes. Theses fields are optional.
You can set up the UDCs from Apparel Setup, User Defined Codes, Collection Management menu (G41F462).
6.2.3 Forms Used to Set Up Price Lists for Style Items
| Form Name | FormID | Navigation | Usage |
|---|---|---|---|
| Work with Price List | WCW17A | Sales Order Management (G41F14), Work with Price List | Review price lists for style items. |
| Price List Header | WCW17C | Sales Order Management (G41F14), Work with Price List
Click Add. |
Set up price lists for style items. |
| Price List Detail | WCW17B | Sales Order Management (G41F14), Work with Price List
Select a row and select Price List Detail from the Row menu. |
Set up price lists for style items. |
6.2.4 Setting Processing Options for Price List (PCW17)
Processing options enable you to specify the default processing for programs and reports.
6.2.4.1 Process
- 1. Sales Price Level (Required)
-
Specify whether the system maintains standard sales prices for an item, different sales prices for each branch/plant, or different sales prices for each location and lot within a branch/plant. The system maintains sales prices in the Base Price file (F4106). Valid codes are:
1: Item level
2: Item/Branch level
3: Item/Branch/Location level
- 2. Item Level Number
-
Specify the item level for which the price can be defined.
- 3. Update Sales Price Record (Required)
-
Specify how to update item base prices. Values are:
1: Update item base price record automatically.
2: Update item base price record on demand.
3: Do not update item base price record.
In this case, you need to run the Price List Creation report (RCW23) to update the item base price record.
All of these values are also applicable for purging price list details.
6.2.5 Setting Up Price Lists for Style Items
Access the Price List Header form.
-
Select either the Customer Number or Customer Price Group option, depending on how you want to set up your price list.
-
Enter the customer number or customer price group (based on the previous step) in the Customer Number or Customer Price Group field.
If you enter a customer price group, the associated category codes appear, enabling you to select the appropriate values.
-
On the Currency and Dates tab, complete the Currency Code, Effective Date, and Expiration Date fields.
-
If desired, enter category codes on the Category Codes tab.
You can enter up to five different category codes for your price list. You can use them for grouping and reporting purposes.
You can also use these codes as search criteria when looking for specific price lists to review.
-
If you want to attach a collection to your price list, complete the Collection, Season Code, and Season Year fields on the Collection tab.
These fields are informational only; the system does not search for a correlation between the date of the collection and the date of the price list.
-
Click OK to create the price list header.
-
On the Work with Price List form, click Find and select your price list.
-
With your price list selected, select Price List Detail from the Row menu.
-
Enter the style item root level 0 for which you want to create a price in the Root column.
Note:
The name of this column depends on the description entered in the 41F/CH UDC table. -
If you want to create the price at a lower item level, enter the level values in the appropriate columns.
-
If you set the processing option to record price by branch/plant or location, enter the appropriate branch/plant and location information.
-
Enter the price for the item in the Unit Price column.
If you want to create a credit price, enter it in the Credit Price column.
-
When you finish entering item prices, click OK.
If you have the Update Sales Price Record processing option set to automatically update the item base price, the system updates the F4106 table automatically when you click OK.
-
If you have the Update Sales Price Record processing option set to update the item base price on demand, you must select Update Sales Price from the Row menu on the Work With Price List form to update the item base price.
Note:
This option is disabled if you do not have the processing option set to update the item base price on demand. -
If you have the Update Sales Price Record processing option set to not update the item base price, then you must run the Price List Creation report when you are ready to update the item base price record.
Note:
This option is disabled if you do not have the processing option set to update the item base price on demand.
6.2.6 Purging Price Lists for Style Items
Access the Work With Price List form.
-
Find and select the price list that you want to purge.
-
Select Purge Detail from the Row menu.
-
Select OK when asked "Do you want to purge the selected price list?"
|
Caution: Selecting to purge a price list deletes that price list detail as well as all of the item base price records in the F4106 table that you created from your price list. |
6.2.7 Running the Price List Creation Report
If the Update Sales Price Record processing option for the Price List program is set to not update the item base price, you must run the Price List Creation report (RCW23) to update the F4106 table with the base prices.
Reports (G41F19), Price List Creation
6.3 Rounding Prices for Style Items
This section provides overviews of price rounding methods and price rounding rules, lists prerequisites, and discusses how to:
-
Set up rounding methods for style items.
-
Set up rounding rules for style items.
6.3.1 Understanding Price Rounding Methods
Sales pricing takes into account different rules based on currency, rounding, and exceptions to produce a final base price. The rules are based on two different types of rounding methods:
-
Mathematical rounding
Use mathematical rounding to calculate a final price by rounding to the nearest value. This rounding method rounds values that fall within a certain range to the nearest value. You define both the range and the value. For example, you might want to round prices to the nearest tenth or hundredth, depending on the currency.
-
Price point rounding
Use price point rounding to convert prices to values that appear to provide a better value to the buyer. For example, a buyer may think that an item with a price of 9.99 USD is a better value than the same item with a price of 10.00 USD.
Use the Rounding Method program (PCW18) to create a list of rounding values for several ranges of prices based on either mathematical or price point rounding. The system applies the rounding values to the price list. The system stores rounding methods in the Rounding Methods table (FCW35).
For price point rounding, you specify a value that is calculated for a particular price range. For example, prices between 12.00 USD and 15.00 USD are rounded to 14.99 USD. You can specify multiple price ranges.
Mathematical rounding enables you to specify the unit used for rounding a range of prices. For example, for prices from 0.00 USD to 10.00 USD, the system rounds prices to the nearest dollar.
6.3.2 Understanding Price Rounding Rules
Use rounding methods to create rounding rules that enable you to calculate a final base price. Sales price uses three types of rounding rules:
-
Mathematical rounding.
-
Price point rounding.
-
A combination of mathematical rounding and price point rounding.
For this method, the system uses mathematical rounding first, followed by price point rounding.
Use the Rounding Rules program (PCW19) to create rounding rules based on mathematical rounding methods, price point rounding methods, or a combination of the two. The system stores rounding rules in the Rounding Rules table (FCW36).
This diagram shows the relationship of rounding methods and rounding rules:
Figure 6-5 Relationship of rounding methods and rounding rules
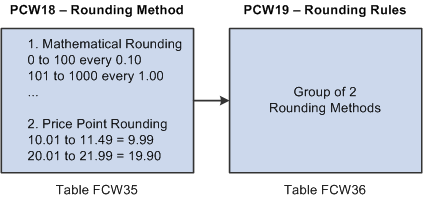
Description of "Figure 6-5 Relationship of rounding methods and rounding rules"
6.3.3 Prerequisites
Before setting up rounding methods and rounding rules, verify that the following UDCs are set up.
-
UDC 41F/RT should have the following values:
Code Description 01 Special Handling Hard Coded M Mathematical <leave blank> Y P Price Point <leave blank> Y -
UDC 41F/RM should have the following values:
Code Description 01 Special Handling Hard Coded G Greater <leave blank> Y L Lower <leave blank> Y N Nearest <leave blank> Y -
UDC 41F/ST should have the following values:
Code Description 01 Special Handling Hard Coded M Modify <leave blank> Y N No <leave blank> Y Y Yes <leave blank> Y
6.3.4 Forms Used to Round Prices for Style Items
| Form Name | FormID | Navigation | Usage |
|---|---|---|---|
| Work with Rounding Method | WCW18A | Sales Order Management Setup (G41F43), Rounding Method | Review rounding methods for style items. |
| Rounding Method Detail | WCW18B | Sales Order Management Setup (G41F43), Rounding Method
Click Add. |
Set up rounding methods for style items. |
| Work with Rounding Rules | WCW19B | Sales Order Management Setup (G41F43), Rounding Rules | Review rounding rules for style items. |
| Rounding Rules Detail | WCW19A | Sales Order Management Setup (G41F43), Rounding Rules
Click Add. |
Set up rounding rules for style items. |
6.3.5 Setting Up Rounding Methods for Style Items
Access the Rounding Method Detail form.
-
Select the Mathematical or Price Point option for the type of rounding method that you want to create.
-
Enter a name for your rounding method in the Rounding Name field.
This field is required.
-
Enter the first value for your range of prices in the Rounding Start column.
-
Enter the ending value for your range of prices in the Rounding End column.
-
If using mathematical rounding, enter the place value to which you want to round in the Rounding Value column.
For example, if you enter the following values:
Start End Value 0.00 100.00 1.00 101.00 1000.00 10.00 1001.00 10000.00 100.00 Then:
Any price between 0 and 100 will be rounded to an integer.
Any price between 101 and 1000 will be rounded to a number divisible by 10.
Any price between 1001 and 10000 will be rounded to a number divisible by 100.
-
If using price point rounding, enter the price to which you want to round in the Rounding Value column.
For example, you might enter the following values:
Start End Value 90.00 100.00 99.00 900.00 1000.00 999.00 1495.00 1505.00 1499.00 9000.00 10000.00 9999.00 -
Click OK.
6.3.6 Setting Up Rounding Rules for Style Items
Access the Rounding Rules Detail form.
To set up rounding rules for style items:
-
Enter a name for the rounding rule in the Rounding Rule field.
-
Complete the Rounding Mode field.
This field uses the 41F/RM UDC. The values are hard-coded. They are G (Greater), L (Lesser), and N (Nearest).
The rounding mode works in conjunction with the mathematical rounding range that you set up for your rounding method. For example, the value to be rounded is 975.366 and the mathematical rounding method has the following values:
-
Start = 950
-
End = 999
-
Value = 10
In this example, if the Rounding Mode value is L (Lesser), then the final rounded value is 970.
If the Rounding Mode value is G (Greater), then the final rounded value is 980.
Finally, if the Rounding Mode value is N (Nearest), then the final rounded value is 980.
-
-
Select the mathematical rounding, price point rounding, or both methods that you want to attach to your rounding rule.
You can only attach one mathematical rounding method and one price point rounding method to your rounding rule. If you attach one of each, then the mathematical rounding is performed first.
6.4 Setting Up Price List Exchange Rates for Style Items
This section provides an overview of price list exchange rate setup, lists prerequisites, and discusses how to set up price list exchange rates for style items.
6.4.1 Understanding Price List Exchange Rate Setup
When you generate price lists, you have the option of using a price list exchange rate to calculate the target price. This rate is independent of the JD Edwards EnterpriseOne standard exchange rate used in the Financials system. The apparel industry typically needs to set up style items and prices for future seasons, the exchange rate enables you to calculate what you think the exchange rate will be at that time and then use that exchange rate to arrive at the base price for your style items.
You can have multiple currency rates with effective dates. The system uses the rate defined for the closest preceding effective date from the system date. For example, if your company's currency is the Euro, then you can convert Euros into various other currencies, like U.S. dollars and Japanese yen, using a user-defined exchange rate. Use the Price List Exchange Rates program (PCW22) to set up price list exchange rates. The system uses the price list exchange rates during price list generation. The system stores this information in the Price List Exchange Rate table (FCW38).
6.4.2 Prerequisite
Before you set up price list exchange rates, set the processing option for the Price List Exchange Rates program to specify the Currency Code - From.
6.4.3 Forms Used to Set Up Price List Exchange Rates for Style Items
| Form Name | FormID | Navigation | Usage |
|---|---|---|---|
| Work with Price List Exchange Rates | WCW22A | Sales Order Management Setup (G41F43), Price List Exchange Rate | Review price list exchange rates for style items. |
| Price List Exchange Rate Detail | WCW22B | Sales Order Management Setup (G41F43), Price List Exchange Rate
Click Add. |
Set up price list exchange rates for style items. |
6.4.4 Setting Up Price List Exchange Rates for Style Items
Access the Price List Exchange Rate Detail form.
-
Enter a currency in the From Currency field.
The system automatically displays the currency of the company in this field.
-
Enter a currency in the To Currency field.
-
Enter the date from which the conversion rate becomes effective in the Effective Date column.
-
Enter the conversion rate to use to convert from the currency code to the target currency in the Exchange Rate column.
You can enter several different exchange rates with effective dates. The system uses the exchange rate with the preceding effective date closest to the system date.
-
Click OK.
6.5 Generating Price Lists for Style Items
This section provides an overview of price list generation, lists prerequisites, and discusses how to:
-
Set processing options for Price List Generation (PCW25).
-
Set the processing option for Generate Price List (RCW07).
-
Generate price lists for style items.
-
Generate the price for one style item.
-
Create item exceptions.
6.5.1 Understanding Price List Generation
Price List Generation enables you to copy prices from a source price list to a target price list. This capability provides an easier way to set up a large number of prices rather than creating them all individually and manually. You can also use a specific exchange rate, a multiplier, and rounding rules when you generate a target price.
You can define exceptions by item group to the multipliers and rounding rules. For example, price exceptions can be set specific to a particular color or size.
For example, if your company's currency is EURO, you can convert EURO into various other currencies, like USD and JPY, using a user-defined exchange rate. This diagram illustrates the conversion process:
Figure 6-7 Price list generation from base price in Euros
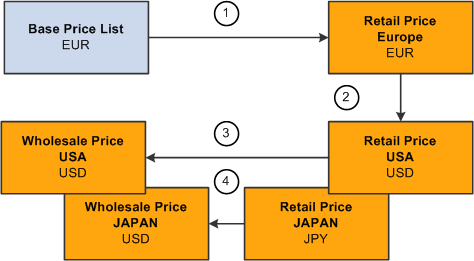
Description of "Figure 6-7 Price list generation from base price in Euros"
You use the Price List Generation program to copy prices from a source price list to a target price list. After you set up source and target information, select an option from the Row menu to call the Generate Price List report (RCW07). This report performs the actual copy to the target price list. The Price List Generation program writes price list and price list exception information to the Price List Generation (FCW40) and Price List Generation - Exception (FCW42) tables.
You can use the Price List Generation program to copy prices for all of the items in a source price list, or you can copy just one item based on a processing option for the Generate Price List report. To take advantage of this functionality, set up different versions of the Generate Price list report and specify which version to call from the Price List Generation program. You might want to copy just one style item if you have made changes to a style item in the source price list or added a new style item to the list.
6.5.1.1 Examples: Generating Price Lists
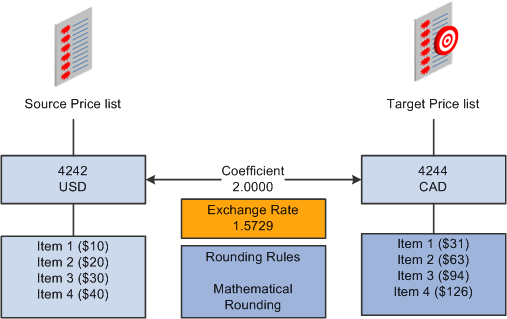
You can use the Price List Generation program to copy a list of prices. You can also use a coefficient, exchange rate, and rounding rules to arrive at the target price list.
This diagram illustrates price list generation using a coefficient:
Figure 6-8 Price list generation for all items using a coefficient
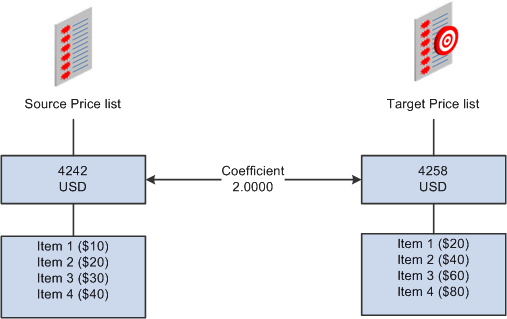
Description of "Figure 6-8 Price list generation for all items using a coefficient"
This diagram illustrates price list generation using a coefficient and an exchange rate:
Figure 6-9 Price list generation for all items using coefficient and exchange rate

Description of "Figure 6-9 Price list generation for all items using coefficient and exchange rate"
This diagram illustrates price list generation using a coefficient, exchange rate, and rounding rules:
Figure 6-10 Price list generation for all items using coefficient, exchange rate, and rounding rules
Description of "Figure 6-10 Price list generation for all items using coefficient, exchange rate, and rounding rules"
6.5.2 Prerequisites
Before you complete the tasks in this section, verify that:
-
Price List Header records (FCW33) for the target price list exist before you run the price generation process.
-
The style item price level for all target price list header records is equal to the style item price level of the source price list.
6.5.3 Forms Used to Generate Price Lists for Style Items
| Form Name | FormID | Navigation | Usage |
|---|---|---|---|
| Work with Price List Generation | WCW25A | Sales Order Management (G41F14), Price List Generation | Review price lists for style items. |
| Generate Price List Detail | WCW25B | Sales Order Management (G41F14), Price List Generation
Click Add. |
Generate price lists for style items. |
| Price List Header Search and Select | WCW26A | Sales Order Management (G41F14), Price List Generation
Click the Source Price List or Target Price List icon. |
Select the source and target price lists. |
| Style Item Search and Select | WCW41011A | Sales Order Management (G41F14), Price List Generation
On the Work with Price List Generation form, select a row and select For One Item from the Row menu. |
Generate the price list for one style item. |
| Work with Item Exceptions | WCW25C | Sales Order Management (G41F14), Price List Generation
On the Work with Price List Generation form, select the row and select Item Exceptions from the Row menu. |
Review item exceptions. |
| Item Exceptions Detail | WCW25E | Sales Order Management (G41F14), Price List Generation
On the Work with Item Exceptions form, click Add. |
Create item exceptions. |
6.5.4 Setting Processing Options for Price List Generation (PCW25)
Processing options enable you to specify the default processing for programs and reports.
6.5.4.1 Process
- 1. Currency Code
-
Specify the currency code by which the system processes the transactions between the source and target price lists.
- 2. Generate Price List Version (RCW07)
-
Specify which version of the Generate Price List (RCW07) the system will use for Price List Generation.
If you leave this option blank, the system uses version XJDE0001.
- 3. Price List Generation Process
-
Specify how the price list needs to be processed. Values are:
Blank: The system deletes all existing target items and copies the price from all source items.
1: The system processes only new items in the source without deleting the existing target items.
2: The system processes all source items without deleting the existing target items. This processing option is applicable only when all items are processed.
- 4. Item Exception
-
Specify how the item exception needs to be set up. Values are:
Blank: Multiple item groups can be used to define the item exception.
1: Only one item group can be used to define the item exception.
6.5.5 Setting the Processing Option for Generate Price List (RCW07)
Processing options enable you to specify the default processing for programs and reports.
6.5.5.1 Process
- 1. Generate Price List for One Item (Y/N)
-
Specify whether the system generates the price list for one item or for all items. Values are:
Y: Generate price list for one item.
N: Generate price list for all items.
6.5.6 Generating Price Lists for Style Items
Access the Generate Price List Detail form.
Figure 6-11 Generate Price List Detail form
Description of "Figure 6-11 Generate Price List Detail form"
To generate price lists for style items:
-
Click the Source Price List icon.
-
On the Price List Header Search and Select form, select the price list to use as the source price list and click Select.
The Source Price List section is populated with the price list header information.
-
Click the Target Price List icon.
-
On the Price List Header Search and Select form, select the price list to use as the target price list and click Select.
The target price list must have the same sales price level as the source price list.
The Target Price List section is populated with the price list header information.
-
Enter a coefficient in the Coefficient field.
The system uses this number as a multiplier when calculating the new price list. For example, if you enter 2.00000 as the coefficient, then the target prices are double the source price values. This field is required so if you do not want to use a multiplier, then enter 1.00000 in the Coefficient field.
-
Enter the rounding rule that you want to use in the Rounding Rule field.
You can use the search button to select the rounding rule. After you select a rounding rule, the remaining field values are automatically populated.
-
Click OK and then click Cancel to return to the Work with Price List Generation form.
-
Find and select the new price list record that you just created.
-
Select Copy All Items from the Row menu.
This option calls the Generate Price List report to copy all of the items from the source price list to the target price list.
Note:
The availability of this option depends on how the processing option is set up for the version of the Generate Price List report that you are calling. You specify whether to generate prices for one item or all items using this processing option. The version of Generate Price List is specified in the processing options of the Price List Generation program.See Setting the Processing Option for Generate Price List (RCW07).
-
View the report output to verify the results.
6.5.7 Generating the Price for One Style Item
Access the Work with Price List Generation form.
|
Note: You might want to regenerate the price for one style item when you add a new price or modify one price in the source price list and do not want to regenerate all of the prices in the price list. |
-
Select the row that corresponds to the price list that contains the item price that you want to recalculate.
-
Select Copy One Item from the Row menu.
Note:
The availability of this option depends on how the processing option is set up for the version of the Generate Price List report that you are calling. You specify whether to generate prices for one style item or all style items using this processing option. The version of Generate Price List is specified in the processing options of the Price List Generation program.See Setting the Processing Option for Generate Price List (RCW07).
-
Find and select the style item for which you are recalculating the price and click Select.
-
Submit the report.
The Generate Price List (RCW07) report runs and copies the style item from the source price list to the target price list.
-
View the report output to verify the results.
6.5.8 Creating Item Exceptions
Access the Item Exceptions Detail form.
|
Note: You can use a different coefficient for one or several groups of style items. If you define individual parameters for style items, they override any general parameters that you define for the entire price list. |
-
Select the row that corresponds to the price list for which you want to define an exception.
-
Select Item Exceptions from the Row menu.
-
Click Add to define new parameters for the price calculation.
-
Enter the item price group that you want to define in the Item Price Group field.
-
Enter the multiplier that you want to use for the price generation in the Coefficient field.
-
Enter the rounding rule that you want to use in the Rounding Rule field.
You can use the search button to select the rounding rule. After you select a rounding rule, the remaining field values are automatically populated.
-
Click OK to return to the Work with Price List Generation form.
6.6 Creating Sales Orders for Style Items with Sales Order Entry (P42101)
This section provides an overview of creating sales orders for style items, lists prerequisites, and discusses how to create sales orders for style items.
6.6.1 Understanding Creating Sales Orders for Style Items
The JD Edwards EnterpriseOne Sales Order Management system has the following features to support the creation of sales orders for style items:
-
Matrix entry for multi-attribute style items.
-
Collection integration.
-
Automatic total quantity split by size.
During sales order entry, you use matrix integration to manage style items. When working with style items, the Sales Order Entry programs (P4210 and P42101) call the Matrix Order Entry program (PCW10), which uses the Matrix Work File table (FCW20). The Matrix Order Entry program opens for the style item only if the style item has a structure in the Item Structure Detail table (FCW01). The Matrix Entry program appears when you exit the line on the Order Detail form. The Matrix Order Entry form facilitates entry of child style item quantities by attributes such as size and color.
(Release 9.1 Update) You can view the availability of selected style items at the parent level (style item root level 0) or child level (intermediate item level) for a branch/plant or all branch/plants on the Matrix Entry form. To view style item availability on the Matrix Entry form, you must embed the Style Item Availability form on the Matrix Entry form, and map the Selected Style Item field of the Matrix Entry form to the Style Item field of the Style Item Availability form.
See "Creating Embedded EnterpriseOne Form Content" in the JD Edwards EnterpriseOne Tools Composite Application Framework User's Guide.
Sales order entry integrates with Collection Management. Using processing options, you can set a default collection to automatically populate your sales orders. You can also perform a check during sales order entry to verify that the items entered belong to the collection that is attached to the sales order; or you can create collection templates that can help simplify sales order entry.
|
Note: The Matrix Entry program supports only the primary unit of measure (UOM) when processing quantities, regardless of the UOM entered in the Sales Order Entry program.If you enter a transaction UOM other than the primary UOM of the style item root level 0, then the system displays a warning message to notify you that the UOMs differ. Quantities that you originally entered in the Sales Order Entry program or quantities entered in Matrix Entry are processed using the primary UOM. |
If you have set up size weight or size split functionality, you can manually enter quantities in the Total Quantity field on the Matrix Entry form and the system will use the size weight or size split setup to allocate quantities across the sizes. To enter quantities on the Order Detail form before the Matrix Entry form appears, first enter a value in the Quantity Ordered field, then enter the style item in the Item Number field, and then exit the row.
See Defining Size Weight.
|
Note: If the Use Apparel Management Module system constant (SY41F) is disabled in the JD Edwards EnterpriseOne System Control program (P99410), you can order a style item, but the system does not display the Matrix Entry form. |
When updating an existing sales order, you can only modify the existing style end items on the order. You cannot enter new style item lines. Also, the system does not perform automatic size split or size weight for end style items based on the quantity from the Edit Sales Order form.
6.6.1.1 Sales Order Entry Programs
Along with the Sales Order Entry program (P42101), you can also use the Sales Order Entry program (P4210) to create sales order records in the JD Edwards EnterpriseOne Sales Order Management tables. The two Sales Order Entry programs (P4210 and P42101) work together to process sales order information. Both programs update the same tables in the system. Even if you do not use the P4210 entry program to create and modify sales orders, you must create a version of that program that specifies processing information. You use this version of the P4210 program in the processing options of the P42101 program. When you create and modify sales orders using P42101, the system uses the information in the processing options of P42101, along with the information in the specified version of P4210, to process the sales order.
6.6.1.2 Sales Order Entry and Collections
The Sales Order Entry programs support the entry of sales orders for style items by collection and collection template. You set processing options on the Style tab of the Sales Order Entry program to facilitate the automatic use of collections at sales order entry.
You can enter a collection on the Sales Order Header form and validate all of the style items in the order to verify that they are included in the collection.
You can also use collection templates to simplify sales order entry. When you attach a collection template to the sales order, all of the style items for that collection template automatically populate the lines in the Matrix Entry form. You can then enter the desired quantity for each style item.
Within the Sales Order Entry program (P4210), you can use a collection template by selecting Style Templates from the Form menu to call the Style Templates program (PCW43). You select a collection template on the Collection Template Search & Select form (WCW43A), and the collection template is passed to the Matrix Entry form for processing.
For both Sales Order Entry programs (P4210, P42101), you can also enter a collection template name in the sales order detail line instead of a style item number. The appropriate prefix must precede the collection template for the system to recognize it. This prefix is specified in the Prefix for Collection Templates processing option for the Sales Order Entry program (P4210). For example, you might specify % as the prefix in the processing option and enter %{template name} on the sales order detail line to retrieve the collection template. You can also enter only the prefix in the item number field and then use the visual assist to select the collection. Depending on the processing option for collections validation for the Sales Order Entry program (P4210), the items in the template may need to belong to the collection that is attached to the sales order header.
When you access the Matrix Entry form from the Manage Existing Order form, you can modify only the existing style end items on the order.
See Prerequisites.
6.6.1.3 Setup Considerations for Sales Order Entry
If you are using Allocations for style items and you use blanket sales orders, you may want to set up the blanket sales order process to use the Other Quantity 2 SO field by setting the Commit to Quantity 1 or Quantity 2 processing option on the Commitment tab of the Sales Order Entry program (P4210).
6.6.2 Prerequisites
Before you create sales orders for style items:
-
Use the ZJDE0007 Sales Order Entry - Style version of the Sales Order Entry program (P42101) to create sales orders for style items or set up your own version accordingly.
-
Set the processing options for the version of Sales Order Entry (P4210) specified in the Sales Order Model Version processing option on the Versions tab of the Sales Order Entry program (P42101).
-
Set the processing option for the Matrix Entry program (PCW10) to specify whether the system automatically splits quantities and whether the automatic split can be overridden by manually entering values.
If you set this processing option to automatically split quantities, then the quantities are split according to the size split set up for the matrix grid used by the style item or customer.
-
Set the processing option for the Matrix Entry program (PCW10) to specify whether the system displays the standard availability or the quantity available for allocation.
See Working with Allocations for JD Edwards EnterpriseOne Apparel Management.
6.6.3 Forms Used to Create Sales Orders for Style Items
| Form Name | FormID | Navigation | Usage |
|---|---|---|---|
| Manage Existing Order | W42101C | Sales Order Management (G41F14), Create Sales Order | Review sales orders. |
| Order Header Revisions | W42101E | Sales Order Management (G41F14), Create Sales Order
Click Add. |
Create sales orders for style items. |
| Enter New Order | W42101D | Sales Order Management (G41F14), Create Sales Order
Click Save and Continue on the Order Header Revisions form. |
Create sales orders for style items. |
| Matrix Entry | WCW10B | Sales Order Management (G41F14), Create Sales Order
Enter a style item on the Enter New Order form and exit the row. |
Create sales orders for style items. |
6.6.4 Creating Sales Orders for Style Items
Access the Order Header Revisions form.
To create sales orders for style items:
-
Complete the required fields for the order header and any other information that you want to add.
-
On the Style tab, if you are using a collection with your order, complete the following fields:
-
Collection
Enter a code that represents a coherent assortment of items introduced at the same time mostly for one brand (manufacturer), season, year, and market. You must enter a value from the Collection Header table (FCW06).
If you use the Visual Assist to select a collection, the remaining field values are automatically populated based on that collection.
-
Season Code
Enter a code that specifies the season for which the collection is being manufactured.
-
Season Year
Enter a code that specifies the year of manufacture for the collection.
-
Price Effective Date
Enter a date that determines the applicable price for the collection.
Note:
You must enter a valid combination of collection, season code, and season year or the system displays an error. Also, if the Validate Items Against Collection processing option for Sales Order Entry (P4210) is set to 1 or 2, then the Collection field becomes a required field, and the system displays an error if you leave it blank.See Prerequisites.
-
-
Click Save and Continue.
-
On the Enter New Order form, enter the style item information, such as the quantity and item number, on the first line and then exit the row.
You can also just enter the style item number and wait to enter the quantities on the Matrix Entry form.
When you exit the row, the Matrix Entry form appears.
Note:
You can enter the style item root level 0 in the Item Number column or be as specific as you want. For example, you could enter JEAN and Matrix Entry displays all of the colors and sizes of jeans. Or, you could enter JEAN.BLK and Matrix Entry displays all of the sizes for black jeans.
Note:
(Release 9.1 Update) If the JD Edwards EnterpriseOne Sales Order Management system is integrated with the Composite Application Framework, you can view the availability of a style item. To view the style item availability, select the row for the style item and review the item availability information in the Style Item Availability subform.
Note:
Instead of a style item number, you can also enter a collection template name in the Item Number column. The appropriate symbol must precede the collection template for the system to recognize it. This symbol is specified in the Prefix for Collection Templates processing option for the Sales Order Entry program (P4210).If you enter a collection template in the Item Number column, then the system retrieves all of the style items associated with that collection template and automatically populate the lines in the Matrix Entry form with those items.
See Prerequisites.
-
Enter the quantity you want to order for each of the child style items in the appropriate columns.
If the processing option for Matrix Entry is set to automatically split quantities, then the quantities are already entered for each child style item. The system splits the quantities according to the size split set up for the matrix grid used by that particular style item or customer. You can manually override these quantities if the processing option in Matrix Entry is set to allow an override.
See Setting Processing Options for Matrix Entry (PCW10).
Note:
If you enter a quantity on the Enter New Order form, the Total Original Quantity field at the bottom of the form displays the original quantity that you entered on the sales order line. The Total Selected Quantities field reflects the total quantities that you entered in Matrix Entry. Use these fields to ensure that you are maintaining the original quantity entered. If the Total Selected Quantities value is not equal to the Total Original Quantity value, then the system displays an error when you attempt to create the order.
Note:
(Release 9.1 Update) The system displays the Omit Zero Quantities check box on the Matrix Entry form if you set the Availability processing option of the Matrix Entry program (PCW10) as Y.If you select the Omit Zero Quantities check box, the system displays the style items with zero on-hand quantity in gray color font and you cannot enter the quantity for those items. Additionally, if the on-hand quantity of all the style items in a row is zero, the system does not display that row.
If the Splitting Code processing option for the Matrix Entry program is set to automatically split quantities, then the system splits the quantity among the style items with available on-hand quantity.
-
After you enter all of your desired quantities, click OK.
The system adds new lines to the sales order to reflect the quantities ordered for each child style item.
-
Review your sales order detail lines and click Submit and Enter New if you want to enter another order or click Submit and Close.
-
To update an existing sales order, select Order, Style Matrix Entry from the Row menu.
This option enables you to execute Matrix Entry so that you do not have to update the individual sales order detail lines.
You can only modify the existing style end items on the order. Also, the system does not perform automatic size split or size weight for end style items based on the quantity from the Edit Sales Order form.
Optional: You can also enter a reason for the update in the Reason Code field on the header of the Matrix Entry form. This reason code is saved on any sales order line that is cancelled through the Matrix Entry form. If the line is only changed, the reason code is not saved on the order line.
Note:
You cannot enter new style item lines when updating an existing sales order. Also, this option is disabled if you have audit logging enabled.
6.7 Entering Sales Orders for Style Items with Sales Order Entry (P4210)
This section provides an overview of sales order entry for style items, lists prerequisites, and lists the forms used to enter sales orders for style items.
6.7.1 Understanding Sales Order Entry for Style Items
Along with the Sales Order Entry program (P42101), you can also use the Sales Order Entry program (P4210) to create sales order records in the JD Edwards EnterpriseOne Sales Order Management tables. The two Sales Order Entry programs (P4210 and P42101) work together to process sales order information. Both programs update the same tables in the system. Even if you do not use the P4210 entry program to create and modify sales orders, you must create a version of that program that specifies processing information. You use this version of the P4210 program in the processing options of the P42101 program. When you create and modify sales orders using P42101, the system uses the information in the processing options of P42101, along with the information in the specified version of P4210, to process the sales order.
(Release 9.1 Update) During sales order entry, you can view the availability of selected style items at the parent level (style item root level 0) or child level (intermediate item level) for a branch/plant or all branch/plants on the Matrix Entry form. To view style item availability on the Matrix Entry form, you must embed the Style Item Availability form on the Matrix Entry form, and map the Selected Style Item field of the Matrix Entry form to the Style Item field of the Style Item Availability form.
See "Creating Embedded EnterpriseOne Form Content" in the JD Edwards EnterpriseOne Tools Composite Application Framework User's Guide.
When entering a sales order in the Sales Order Entry program (P4210), you can use a collection template for your order. When you select to use a collection template, all of the style items associated with that collection template automatically appear as line items on the Matrix Entry form. Using templates enables you to be more efficient during sales order entry because you do not have to enter individual items.
To use a collection template, select Style Templates from the Form menu on the Sales Order Detail Revisions form.
You can also use a collection template by entering the template name preceded by a symbol on the sales order entry detail line. The symbol must be the one that you specified in the Prefix for Collection Templates processing option for the Sales Order Entry program (P4210).
When updating an existing sales order, you can only modify the existing style end items on the order. You cannot enter new style item lines. Also, the system does not perform automatic size split or size weight for end style items based on the quantity from the Sales Order Detail Revisions form.
6.7.2 Prerequisites
Before you enter sales orders for style items:
-
Set up the following processing options for Sales Order Entry (P4210) on the Style tab of the processing options:
-
1. Collection
Specify a default collection that the system uses in the sales order header. The system stores collection codes in the Collection Detail table (FCW07). Also, you must define the combination of collection, season code, and season year as a valid collection using the Collections program (PCW07). If the combination is not valid, then all three values will be left blank on the sales order header.
-
2. Season Code
Specify a default season code that the system uses in the sales order header. Enter a value from UDC table 41F/SE. Also, you must define the combination of collection, season code, and season year as a valid collection using the Collections program (PCW07). If the combination is not valid, then all three values will be left blank on the sales order header.
-
3. Season Year
Specify a default season year that the system uses in the sales order header. Enter a value from UDC table 41F/SY. Also, you must define the combination of collection, season code, and season year as a valid collection using the Collections program (PCW07). If the combination is not valid, then all three values will be left blank on the sales order header.
-
4. Validate Items Against Collection
Specify whether the items entered into the grid are validated against the collection. Also specify whether or not to issue a warning or error when you validate items. Values are:
Blank: Do not validate items. You can enter any items into the grid.
1: Issue a warning if the item entered is not part of the collection.
2: Issue an error if the item entered is not part of the collection.
Note:
If this processing option is set to 1 or 2, the system requires you to enter a collection in the sales order header to validate the style items. If you leave this processing option blank, you can leave the Collection field in the sales order header blank. -
5. Prefix for Collection Templates
Specify a symbol used to prefix the collection template entered in the Item Number field to display the Matrix Entry form with a collection template. Collection templates are a subset of items belonging to a collection. When entering a sales order, generally an item number is entered and the Matrix Entry form displays the item only. To display a collection template, you must prefix the template by the special symbol that is specified in this processing option. For example, if the symbol is * (asterisk) and the template name is M06, then entering *M06 in the order line displays the Matrix Entry form using collection template M06.
-
6. Send Address Number for Split Percentage to Matrix Entry (PCW10)
Specify the customer for whom the system retrieves the category code values to identify the split percentage in the Matrix Entry program (PCW10). This processing option value determines whether to send the Ship To or Sold To customer number to the Matrix Entry program. Values are:
Blank: Send Ship To customer number.
1: Send Sold To customer number.
The system identifies the category code in address book used for split percentages by using the SPLITC code in the 41F/00 UDC table.
The system locates the appropriate grid code for that category code value in the size split table, which was set up using the Automatic Splitting by Size Definition program (PCW33).
-
7. Item Search and Select
Specify whether to override the standard item number visual assist. Values are:
Blank: Display the standard item visual assist.
1: Use the Item Search & Select program (PCW41011) to display the style items for selection.
This processing option is enabled only if the Use Apparel Management Module system constant (SY41F) is enabled in the JD Edwards EnterpriseOne System Control program (P99410).
-
-
Specify which version of Matrix Entry to use by setting the Style Matrix Entry (PCW10) processing option on the Versions tab of the Sales Order Entry program (P4210).
-
Set the processing option for Matrix Entry (PCW10) to specify whether the system automatically splits quantities and whether the automatic split can be overridden by a manual entry of the values.
If you set this processing option to automatically split quantities, the quantities are split according to the size split set up for the matrix grid used by the style item.
-
Set the processing option for Matrix Entry (PCW10) to specify whether the system displays the standard availability or the quantity available for allocation.
See Working with Allocations for JD Edwards EnterpriseOne Apparel Management.
6.7.3 Forms Used to Enter Sales Orders for Style Items
| Form Name | FormID | Navigation | Usage |
|---|---|---|---|
| Customer Service Inquiry | W4210E | Sales Order Management (G41F14), Enter Sales Order | Review sales orders. |
| Sales Order Header | W4210G | Sales Order Management (G41F14), Enter Sales Order
Click Add. |
Enter sales orders for style items. |
| Sales Order Detail Revisions | W4210A | Sales Order Management (G41F14), Enter Sales Order
Click OK on the Sales Order Header form. |
Enter sales orders for style items. |
| Collection Template Search & Select | WCW43A | Sales Order Management (G41F14), Enter Sales Order
Select Style Templates from the Form menu. |
Select a collection template to use for the sales order. |
| Matrix Entry | WCW10B | Sales Order Management (G41F14), Enter Sales Order
Enter a style item on the Sales Order Detail Revisions form and exit the row. |
Enter sales orders for style items. |
6.8 Printing Sales Orders for Style Items
You use the Print Sales Order for Style Items program (RCW02) to print the sales order for style items in a matrix format. The report prints a header section for each order on a new page. If a unit price for a given style item level is different than any other unit price for that same style item level, then the report does not print the unit price. For example, the unit price for the same jeans might vary depending on length. A longer length might have a higher price. In this case, the unit price does not print. The report prints No Data Found if the system cannot location any orders within the data selection criteria. This program only prints a report; the system does not update any data.
This section lists a prerequisite and discusses how to print sales orders for style items.
6.8.1 Prerequisite
Before you begin the task in this section, set the processing options for the Print Sales Order for Style Items program to specify the From and Through next status codes of the sales orders to be processed. These processing options are required.
6.8.2 Printing Sales Orders for Style Items
Select Reports (G41F19), Print Sales Order for Style Items or select Periodic Processing (G41F20), Sales Order Form.
6.9 Performing a Mass Update of Sales Order Style Items
This section provides an overview of performing a mass update of sales order style items, lists prerequisites, and discusses how to:
-
Set processing options for Sales Order - Mass Update for Style Items (PCW61).
-
Perform a mass update of sales order style items.
6.9.1 Understanding the Mass Update of Sales Order Style Items
Use the Sales Order - Mass Update for Style Items program (PCW61) to update a large number of sales order style item lines at one time. You can:
-
Update dates for multiple sales order style item lines by:
-
Requested date.
-
Promised delivery date.
-
Promised ship date.
-
Scheduled pick date.
-
-
Update the next status for multiple sales order style item lines when you update one or more dates.
-
Reset commitments for multiple sales order style item lines from hard to soft commitment.
You can also reset the next and last status values when you reset commitments.
-
Cancel multiple sales order style item lines.
|
Note: The Sales Order - Mass Update for Style Items program will only display and process sales order lines that contain style items with an item structure attached.Also, the Sales Order - Mass Update for Style Items program prevents the processing of Transportation order lines and order lines that have the potential to go in and out of Warehouse. |
6.9.2 Prerequisites
Before performing a mass update of sales order style item lines:
-
Set the processing options for Sales Order - Mass Update of Style Items (PCW61).
-
Enter multiple sales orders for style items.
-
If you are resetting commitments, then you must create non-primary inventory locations, and run some of the order lines through pick slips.
6.9.3 Form Used to Perform a Mass Update of Sales Order Style Items
| Form Name | FormID | Navigation | Usage |
|---|---|---|---|
| Sales Order - Mass Update for Style Item Lines | WCW61D | Periodic Processing (G41F20), Sales Order - Mass Update for Style Items | Perform a mass update of sales order style items. |
6.9.4 Setting Processing Options for Sales Order - Mass Update for Style Items (PCW61)
Processing options enable you to specify the default processing for programs and reports.
6.9.4.1 Defaults
- 1. Order Type
-
Specify the order type that the system uses as the default value on the Sales Order Inquiry tab for filtering sales order detail lines.
- 2. Branch/Plant
-
Specify the branch/plant that the system uses as the default value on the Sales Order Inquiry tab for filtering sales order detail lines.
- 3. Requested Date
-
Specify whether you can update the requested date for the sales order. Values are:
Blank: The system does not allow you to update the requested date.
1: The system allows you to update the requested date.
- 4. Promised Delivery Date
-
Specify whether you can update the promised delivery date for the sales order. Values are:
Blank: The system does not allow you to update the promised delivery date.
1: The system allows you to update the promised delivery date.
- 5. Promised Ship Date
-
Specify whether you can update the promised shipment date for the sales order. Values are:
Blank: The system does not allow you to update the promised shipment date.
1: The system allows you to update the promised shipment date.
- 6. Scheduled Pick Date
-
Specify whether you can update the scheduled pick date for the sales order. Values are:
Blank: The system does not allow you to update the scheduled pick date.
1: The system allows you to update the scheduled pick date.
6.9.4.2 Display
- 1. From Next Status Code
-
Specify a default value for the Next Status From field on the Sales Order Inquiry tab that the system uses for filtering sales order lines.
If you leave this processing option blank, the system does not use the Next Status From value for filtering the display of sales order lines.
- 2. Thru Next Status Code
-
Specify a default value for the Next Status Thru on the Sales Order Inquiry tab that you the system uses for filtering sales order lines.
If you leave this processing option blank, the system does not display sales order lines with a Next Status value of 999.
6.9.4.3 Process
- 1. Reset Commitments
-
Specify whether to enable the Reset Commitments option on the Row menu. The Reset Commitments option enables you to reset commitments for sales order lines. Values are:
Blank: Disable the Reset Commit option on the Row menu.
1: Enable the Reset Commit option on the Row menu.
- 2. Update Dates
-
Specify whether to enable the Update Dates option on the Row menu. This option enables you to update dates for sales order lines. Values are:
Blank: Disable the Update Dates option on the Row menu.
1: Enable the Update Dates option on the Row menu.
- 3. Cancel Lines
-
Specify whether to enable the Cancel Lines option on the Row menu. This option enables you to cancel sales order lines. Values are:
Blank: Disable the Cancel Lines option on the Row menu.
1: Enable the Cancel Lines option on the Row menu.
- 4. Mandatory Reason Code
-
Specify whether the system requires a valid reason code for canceling sales order lines. Values are:
Blank: Canceling sales order lines does not require a valid reason code.
1: Canceling sales order lines requires a valid reason code.
- 5. Reason Code
-
Specify a default value for the reason code that you want the system to use for canceling sales order detail lines. The system displays this value on the Process tab of the Sales Order - Mass Update form.
- 6. Override Next Status
-
Specify the Next Status value the system uses when you update dates on sales order detail lines. The system displays the value that you enter here on the Process tab of the Sales Order - Mass Update form.
- 7. Update Next Status
-
Specify whether the system updates the status of sales order lines when you enter new dates. Values are:
Blank: The system does not update the status of sales order lines when you enter new dates.
1: The system updates the status of sales order lines when you enter new dates using the value in the Override Next Status processing option.
- 8. Enable/Disable Non Selected Dates
-
Specify whether the system updates date fields that are not selected for update on the Defaults tab. Values are:
Blank: Does not update date fields that are not selected for updates.
1: Updates date fields that are not selected for updates.
6.9.4.4 Versions
- 1. Sales Order Entry (P4210)
-
Specify the version of the Sales Order Entry program (P4210) that the system uses to update sales order lines. If you leave this processing option blank, the system uses default version ZJDE0001.
6.9.4.5 Reset Commit
- 1. Status Code - Next
-
Specify the Next Status code the system uses when resetting commitments for order lines. The system automatically displays the value that you enter here on the Process tab of the Sales Order - Mass Update form, but you can override the value. A valid Next Status value is required for resetting commitments.
- 2. Status Code - Last
-
Specify the Last Status code that you want the system to use when resetting commitments for order lines. The system automatically displays the value that you enter here on the Process tab of the Sales Order - Mass Update form, but you can override the value. A valid Last Status value is required for resetting commitments.
6.9.5 Performing a Mass Update of Sales Order Style Items
Access the Sales Order - Mass Update for Style Item Lines form.
Figure 6-13 Sales Order - Mass Update for Style Item Lines form
Description of "Figure 6-13 Sales Order - Mass Update for Style Item Lines form"
To perform a mass update of sales order style items:
-
Enter values for the desired fields on the Sales Order Inquiry tab and QBE line and click Find to retrieve the sales order lines that you want to update.
-
Select the Process tab.
-
If you want to update order dates, perform these steps:
-
Enter the new date to which you want to update the checked dates in the Date Updated field.
-
Select which dates to update with the new date.
You can select to update the requested date, promised delivery date, promised ship date, or scheduled pick date.
Note:
The dates are selected or deselected and enabled or disabled based on the values in the processing options. -
Select the rows that you want to update.
-
If you also want to update the next status, enter a status in the Override Next Status field.
A default status appears based in the Override Next Status processing option.
-
Verify that the Update Next Status option is selected.
This option will be selected if you set the Update Next Status processing option to 1.
-
Select Update Dates from the Row menu.
-
-
If you want to reset commitments, perform these steps:
-
Verify the Status Code - Last and Status Code - Next fields.
These values are defined on the Reset Commit tab of the processing options.
-
Select the rows that you want to update.
-
Select Reset Commit from the Row menu.
-
-
If you want to cancel sales order lines, perform these steps:
-
Enter a reason for canceling the lines in the Reason Code field.
This field may or may not be mandatory based on a processing option.
If you entered a reason code in the Reason Code processing option, the system displays it in this field.
-
Select the rows that you want to cancel.
-
Select Cancel Lines from the Row menu.
-