7 Processing Change Requests
This chapter contains the following topics:
-
Section 7.1, "Understanding the Change Request Integration Process"
-
Section 7.2, "Change Request Integration Assumptions and Constraints"
-
Section 7.4, "Running Change Request Data Extract and Import Programs"
-
Section 7.5, "Importing and Exporting Change Order Data in Contract Management"
7.1 Understanding the Change Request Integration Process
After a project or related committed contracts have been approved in the Contract Management system, any changes to those projects or contracts must go through the change request process. Change requests can be initiated in either the EnterpriseOne or Contract Management systems, and might be required in these situations:
-
A Contract Management user requests additional budget for an existing cost code.
-
A user changes an existing line or adds a new line on a purchase order (committed contract).
In any of these situations, a change request (if the change is initiated in EnterpriseOne) or a change order (if the change is initiated in Contract Management) is created so that the change goes through any necessary approval processing, and so that the data is updated in both the EnterpriseOne and Contract Management systems.
In order for this integration to function properly, the EnterpriseOne system must be set up to create new lines on a purchase order when a change request is entered against that purchase order. Because progress payments (requisitions) are handled at the line-level, each change must be recorded as a new line so that the payment that is associated with that new line can be made correctly. This table illustrates how changing a purchase order adds new lines to the purchase order, and the subsequent committed contract in Contract Management:
| Purchase Order in EnterpriseOne | Committed Contract in Contract Management | Payment Example |
|---|---|---|
| Purchase Order Line 1 | Committed Contract Line 1 | Full Payment |
| Purchase Order Line 2 | Committed Contract Line 2 | Full Payment |
| Purchase Order Line 3 | Committed Contract Line 3 | Partial Payment |
| Purchase Order Line 4 (resulting from a change to line 1) | Committed Contract Change Order Line 1 | Partial Payment |
| Purchase Order Line 5 (resulting from a change to line 2) | Committed Contract Change Order Line 2 | No Payment At This Time |
If you create a change request in EnterpriseOne, you run the E1 to CM Change Request Export program (R5301CMD) to generate two XML files that can be consumed by Contract Management. One XML file for budget change requests and another for commitment change requests. These files include the change request header and detail data for the selected change requests. The data in these XML files is extracted from these EnterpriseOne tables:
-
F5301B – Change Request Master Table
-
F5311 – Change Request Details Table
-
F0006 – Business Unit Master
-
F4301 – Purchase Order Master
-
F0901 – Account Master
|
Note: Only cost and subcontract information are included. Service and contract billing information are not included in the file. |
In addition to creating the XML files, this program also updates the CM Change Order Cross Reference table (F5311X) and generates a PDF report. The report includes:
-
A statement regarding whether the file was successfully created.
-
File location information.
When you run the E1 to CM Change Request Export program, you can set a processing option to specify whether to include records that have already been exported from EnterpriseOne and included in an XML file. The system knows which records have already been exported based on the data in the F5311X table, which is updated when the program is processed. You might choose to re-export change request data if you generated an XML file, but then lost the file and needed to regenerate it with the same data.
The system also uses the change request status to determine which change requests are approved, and should be included in the XML files. You define the approved status codes in the processing options of the export program, and the export program determines which change request headers and detail lines to send to Contract Management. In order for a change request record (header or detail line) to be sent, it must meet these criteria:
-
The change request header must be at the approved status, as defined in the processing options.
-
The change request line (either budget or subcontract) must also be at the approved status, as defined in the processing options.
-
A change request header will not be sent if it does not include any approved lines.
-
A line will not be sent if it is not associated with an approved change request header.
-
The approved status must exactly match the approved status that you enter in the export program's processing options.
If the change request header is not approved, the entire change request is excluded from the XML files. Additionally, if individual lines on the change request are not approved, the system does not include those lines in the files. You define approved status codes in the processing options before running the R5301CMD. Be aware that the status codes must match exactly for the header or the line to be included in the XML file. If you leave the status code processing options blank, only those change request records with a blank status will be included in the file.
As each detail record qualifies for export and is added to the XML files, the system also writes a record to the F5311X table. Be aware that an individual line on a change request might contain information for a subcontract change, a budget change, or both. In the event that a line contains both types of data, two separate records are created, one in each XML file. Two records are also written to the F5311X.
Once the XML files are created, the user signs into the Contract Management Exchange application and selects the file(s) for import. The changes are imported into Contract Management in an unapproved status. Users must approve the changes in Contract Management using standard change order processes.
See Oracle Primavera Contract Management User's Guide, Working With Contracts, Project Costs, and Changes.
If a change order is created in Contract Management, the user signs into the Contract Management Exchange application and exports change order data. The export process extracts change order data for the selected project and creates an XML file with the data.
|
Note: Only approved change orders are sent to EnterpriseOne. In addition to approving the change order, you must also verify that the change order does not have a value in the Date Exported field. Only approved change orders with no value in the Date Exported field are included in the integration process. When you run the data extract process from Contract Management, the system populates the Date Exported field, which excludes the change order from being exported during future data extract processing. If you must reprocess a change order that has already been sent to EnterpriseOne, for example, in the event of loss of data or file corruption, you can delete the value in the Date Exported field. |
Once the XML file is available, the EnterpriseOne user runs the CM to E1 Process Change Request (R5310CMI). If running in manual mode, the user must first move the XML file to the specified location on the enterprise server. Also, before you run the R5310CMI, you must define status codes to assign to each of the incoming change records. You define status codes for the change header, for budget lines, and for subcontract lines.
The R5310CMI program uses the status codes that you define to create change requests in EnterpriseOne. Additionally, the program updates the Change Request Master (F5301B) and Change Request Details (F5311) tables. The program also generates a report that includes the number of change requests that were processed and the number of change requests that were successful. If the system encounters errors during processing, those errors are written to the work center.
After the change requests are created in EnterpriseOne, you process and approve them using standard change request processing.
7.1.1 Status Codes
Before you synchronize change orders from Contract Management to EnterpriseOne, you must define the status codes that are used when creating change requests in EnterpriseOne based on the incoming change orders from Contract Management. You use the Change Request Status Defaults program (P5311CM), which you access from the Contract Management Integration Workbench, to set up these status codes. You can set up status codes for change request headers, budget line changes, and subcontract line changes.
You can also define status code information for specific jobs (projects), or define status codes that can be assigned to changes for all jobs. When users import change orders into EnterpriseOne by running the R5310CMI, the system searches through the status codes that you define to determine which status to assign to the incoming records. Setting up status codes is discussed in more detail later in this chapter.
7.1.2 Allocating Costs on a Change Order in Contract Management
When creating a change order in Contract Management, users have the ability to allocate the amount on the line to more than one cost code. Users can also enter an amount without allocating that amount against any cost code. However, in EnterpriseOne, a change request line must include a cost code (account number), and it can have only one account number at the line level.
Therefore for this integration does not support the ability to allocate costs on a change order line to multiple cost codes, or to leave the cost code blank.
If either of these conditions are encountered during processing, the system will issue an error, and the change order must be corrected before it can be synchronized.
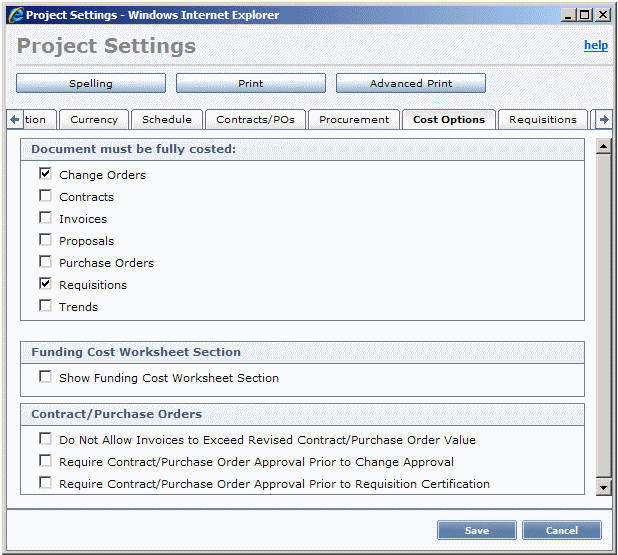
Contract Management users can also enter project settings that ensure that each line in a change order includes a cost code. This graphic illustrates the settings for change orders and requisitions:
See Oracle Primavera Contract Management User's Guide, "Working With a Project.".
7.2 Change Request Integration Assumptions and Constraints
This section lists the assumptions and constraints that you need to be aware of when processing change requests and change orders between EnterpriseOne and Contract Management.
-
Once a change request or change order has been synchronized to the target system, no further updates to that change request or change order will be synchronized.
-
Currency codes for all amounts associated with the change order or request will use the currency of the associated company.
-
Only EnterpriseOne change requests will be synchronized to the Contract Management system. Planned change orders and change orders that originate in EnterpriseOne are not supported by this integration.
-
Change orders and requests must always result in new lines on the contract or purchase order. Existing lines are not updated.
To accommodate this requirement, you must set the processing options for the P5310 program accordingly. Details of the processing options that need to be set up are included in this section.
-
Change requests that are entered to change the unit of measure (UOM) for services or material are not supported.
-
This integration does not support the Contract Management features that enable users to enter multiple cost codes per change order line, or to leave a change order line without a cost code.
7.3 Defining Change Request Status Codes
You use the Change Request Status Defaults program (P5311CM), which you access from the Contract Management Integration Workbench, to specify the status codes that are assigned to change orders and change order lines that are imported into EnterpriseOne from Contract Management.
When you run the CM to E1 Process Change Request program (R5310CMI), the system searches the status code information that you set up here to determine what status to assign to the incoming changes. This program enables users to indicate status codes at the header level, the budget cost line level and the subcontract line level. Additionally, users can set up status codes at the business unit (project) level, or globally by entering *ALL in the Job Number field.
For example, you might want to assign an unapproved status code to changes that are associated with a particular project, but assign an approved status to changes associated with all other projects. To do so, you would create two "sets" of status codes. The first set of status codes would be for the projects that you want to assign unapproved status codes to. You would create a line for the header, budget, and subcontract levels, and would enter the project number in the Job Number field for each line. You would then enter the unapproved status code in each of these lines. You then create an additional set of status codes by creating a line for the header, budget, and subcontract levels, entering an approved status code, and entering *ALL in the Job Number field. Using this example, the system would find status codes for all incoming change order lines.
If you do not set up generic status codes using the *ALL designation in the Job Number field, it is possible that the system will not be able to find status code information for some incoming change records. When this occurs, the system uses the default status codes that are defined in the processing options of the P5310 program. You specify the version of the P5310 program that the system uses by entering it in the processing options of the R5310CMI.
|
Note: If the system cannot find status code information for an incoming change, either in the status codes that you defined, or in the version of the P5310 that you specify in the processing options, the change lines are not imported into EnterpriseOne, and the system sends an error to the employee's work center. |
7.3.1 Forms Used to Define Change Request Status Codes
| Form Name | FormID | Navigation | Usage |
|---|---|---|---|
| Contract Management Integration Workbench | W51010A | From the Primavera Contract Management menu (G51312), select Contract Management Integration Workbench. | Access forms to define status codes. |
| Change Request Status Defaults | W5311CMA | From the Contract Management Integration Workbench form, select Change Request Flow and then CR Status Defaults from the Form menu. | Define change request status codes. |
7.3.2 Defining Change Request Status Codes
Access the Change Request Status Defaults form.
Figure 7-2 Change Request Status Defaults form

Description of "Figure 7-2 Change Request Status Defaults form"
-
Enter one of the following values in the Change Request Default Status Type field:
-
01: Enter this value to enter a budget cost status.
-
02: Enter this value to enter a subcontract status.
-
-
Enter a value in the Job Number field to specify the project that the status code pertains to.
You can enter a specific project number, or enter *ALL to define status codes for all incoming projects.
-
In the Status Code field, enter the value that denotes an approved status for the change request header.
-
In the Cost Status field, enter a value that denotes an approved status for cost code line items.
-
In the Subcontract Status field, enter a value that denotes an approved status for subcontract line items.
7.4 Running Change Request Data Extract and Import Programs
After you create change requests in EnterpriseOne, you must then run the E1 to CM Change Request Export program (R5301CMD) to extract that data and create an XML file that can be consumed by Contract Management. You run the program directly from the Contract Management Integration Workbench. If you are running in automated mode, when you run the program, an FTP script sends the XML file to a specified location where it can be consumed by the Contract Management system. If you are not using FTP to transfer files, you must manually send the file to a Contract Management user or move the file to a location where it can be consumed by Contract Management.
Similarly, once change orders have been entered in the Contract Management system, and the data has been extracted from Contract Management, you run the CM to E1 Process Change Request program (R5310CMI). You run this program from the integration workbench after the XML file that is generated by the Contract Management system is available.
This section discusses how to:
-
Set processing options for the E1 to CM Change Request Export program (R5301CMD).
-
Set processing options for the CM to E1 Process Change Request program (R5310CMI).
See Chapter 3, "Using the Contract Management Integration Workbench."
7.4.1 Setting Processing Options for the E1 to CM Change Request Export Program (R5301CMD)
You set processing options before you run a program to ensure that data is processed correctly.
7.4.1.1 Process Tab
Set the processing options on this tab to specify how data is processed when running this program.
- 1. Allow Re-Export
-
Use this processing option to specify whether the XML file will include previously exported change requests. You might choose to re-export records that have already been extracted and sent to Contract Management if there are problems with the original XML file, and you must regenerate the file with data that was already processed. Values include:
0 or blank: Do not include already exported records.
1: Include previously exported records.
- 2. Approved Change Request Status
-
Use this processing option to specify the status for approved change request headers. Only change requests with this status code will be included in export files. Values are user-defined, and are stored in UDC table (53/ST). If you leave this option blank, only change request headers with a blank status are included in the export. Also note that an approved change request header will be included in the export only if it is also associated with one or more approved change request lines. If the header is approved, and there are no approved lines on the change request, it will not be exported.
- 3. Approved Cost Status Code
-
Use this processing option to specify the status for approved budget line items. Only lines with this status will be included in the budget export file. Values are stored in UDC table (53/ST). If you leave this option blank, only change request lines with a blank status are included in the export. Also note that any approved change request lines will be included in the export only if it is also associated with an approved change request header. If the line is approved, and the header is not approved, the line will not be exported.
- 4. Approved Subcontract Status Code
-
Use this processing option to specify the status for approved subcontract line items. Only lines with this status will be included in the subcontract export file. Values are stored in UDC table (53/ST). If you leave this option blank, only change request lines with a blank status are included in the export. Also note that any approved change request lines will be included in the export only if it is also associated with an approved change request header. If the line is approved, and the header is not approved, the line will not be exported.
7.4.1.2 File Transfer Tab
Set the processing options on this tab to specify information about the file transfer process.
- 1. Manual File Transfer Path Where XML Files Will Be Written
-
Use this processing option to specify the file location that the system uses for storing the resulting XML files when running in manual mode.
The name of the resulting XML file will be in the format of:
E1toCMCommitmentChangeRequest_MMDDYY_hhmmss.xml and E1toCMBudgetChangeRequest_MMDDYY_hhmmss.xml.
The file name will be appended to the value entered in this processing option to determine the fully qualified path and name. For example, if you enter C:\B9\DV900\Export\ in this option, the resulting XML file will be written as:
C:\B9\DV900\Export\ E1toCMCommitmentChangeRequest _MMDDYY_hhmmss.xml
All directories specified in the path must already exist. These examples illustrate what the path might be for a Linux and an IBM i on IBM Power Systems implementation:
Linux: /slot/ems3561/appmgr/CMExchange/E1toCMChange/
IBM i on IBM Power Systems: /E900SYS_9/CMExchange/E1toCMChange/
All directories specified in the path must already exist. If this processing option is left blank, the resulting XML files will be written to the B9 directory where R5301CMD is running. For example C:\B9\. Be sure to include the final slash.
- 2. Automated File Transfer Path Name – Including Script
-
Use this processing option to specify the file location and name of the FTP script on the enterprise server. Include the path, file name and file extension. For example:
C:\CMExchange\E1toCMChange.bat, /E9000SYS_9/CMExchange/E1toCMChange_IBMi.sh, or /slot/ems1234/CMExchange/E1toCMChange.sh.
This option is only used when running in automated mode. This path will also indicate where the resulting XML files are written, they will be in a subdirectory of the path indicated. The name of the resulting XML files will be in the format of E1toCMCommitmentChangeRequest_MMDDYY_hhmmss.xml and E1toCMBudgetChangeRequest_MMDDYY_hhmmss.xml. All directories specified in the path must already exist.
- 3. Automated Mode
-
Use this processing option to specify if the process is running in automated mode or manual mode. Automated mode allows for files to be transferred to Contract Management by FTP. Manual mode allows the files to be transferred by the user after they are created. Values are:
0 or blank: Manual Mode, no FTP.
1: Automated Mode, use FTP.
7.4.2 Setting Processing Options for the CM to E1 Process Change Request program (R5310CMI)
You set processing options before you run a program to ensure that data is processed correctly.
7.4.2.1 Defaults Tab
Set the processing options on this tab to specify default information for change request processing.
- 1. Define Where to Insert Amounts for Budgets
-
Use this option to specify where the amount that is coming from Contract Management is inserted in the EnterpriseOne database. Values are:
Blank: Insert the amount as the original cost.
1: Insert amount as quoted cost.
2: Insert amount as final cost.
- 2. Define Where to Insert Amounts and Quantities for Subcontracts
-
Use this option to specify where the amounts and quantities associated with subcontracts that are coming from Contract Management are inserted in the EnterpriseOne database. Values are:
Blank: Insert the amount and quantity as the original amount and quantity.
1: Insert amount and quantity as quoted amount and quantity.
2: Insert amount and quantity as final amount and quantity.
7.4.2.2 File Transfer Tab
Set the processing options on this tab to specify information about the file transfer process.
- 1. Path to FTP Script
-
Use this processing option to specify the file location and name of the FTP script on the enterprise server. Include the path, file name, and file extension. For example, enter:
C:\CMExchange\E1toCMChange.bat, /E9000SYS_9/CMExchange/E1toCMChange_IBMi.sh or /slot/ems1234/CMExchange/E1toCMChange.sh.
All directories specified in the path must already exist.
7.4.2.3 Versions Tab
Set the processing options on this tab to specify version information.
- 1. P5310 Version
-
Use this processing option to specify the version of the P5310 that the system uses when creating change requests in EnterpriseOne. If you leave this option blank, the system uses version ZJDE0001.
Note:
It is critical that the version of the P5310 that you enter in this processing option is set up to create new detail lines when a change is made, and not to update an existing line. You must set the Subcontract Detail Line Item option on the Subcontract Commit tab of the P5310 processing options to include a blank value. You must also set the Subcontract Change Order Number option on the same tab to 1.Additionally, you should review the status codes that are set up in this version, as the system uses these status codes as the default codes if no status codes have been defined for the incoming project. If no status codes have been defined, and the status codes in this version of the P5310 are blank, the incoming change records will not be imported into EnterpriseOne, and an error is sent to the employee work center.
7.5 Importing and Exporting Change Order Data in Contract Management
This section discusses how to:
-
Export change orders from Contract Management.
-
Import change data into Contract Management.
7.5.1 Exporting Change Order Data from Contract Management
After you create change orders in Contract Management, you can extract that data so that it is available to be processed in the EnterpriseOne system. Your system administrator can assist you with determining which values to use during this task.
-
Access the Contract Management Exchange application.
-
Complete these fields and then click Next:
-
CM Server Host
-
CM Server Port
-
CM Service Type
-
-
Enter a valid user name and password for the Contract Management system and then click Next.
Note:
The user that you log in as must have access and permission to update data into the Contract Management database. If the user credentials that are entered do not have sufficient access, the system will produce an error, and the user will not be able to continue. -
Select the Contract Management database you want to extract data from and then click Next.
-
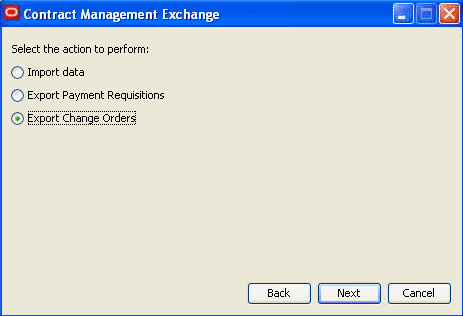
Select the Export Change Orders option and then click Next.
-
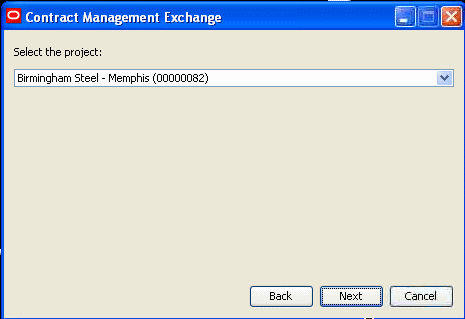
Specify the project associated with the change orders that you want to export and then click Next.
-
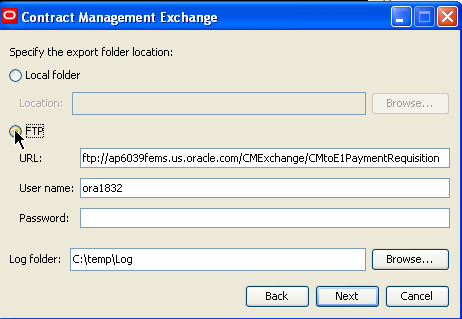
Specify the location for the export and log folders and then click Next.
Figure 7-5 Specify the export folder location
Description of "Figure 7-5 Specify the export folder location"
-
Click Finish.
The system creates an XML file with the change order data in the specified folder and produces a log file for review.
7.5.2 Importing Change Data into Contract Management
After change requests have been created in the EnterpriseOne system, and the change request data extract program has been processed, you can import the change requests into Contract Management, where they will be created as change orders. To import change order data into Contract Management, complete the following steps. Your system administrator can assist you with determining which values to use during this task.
-
Access the Contract Management Exchange application.
-
Complete these fields and then click Next:
-
CM Server Host
-
CM Server Port
-
CM Service Type
-
-
Enter a valid user name and password for the Contract Management system and then click Next.
Note:
The user that you log in as must have appropriate access and permission to the Contract Management database. If the user credentials that are entered do not have sufficient access, the system will produce an error, and the user will not be able to continue. -
Select the Contract Management database you want to import data into and then click Next.
-
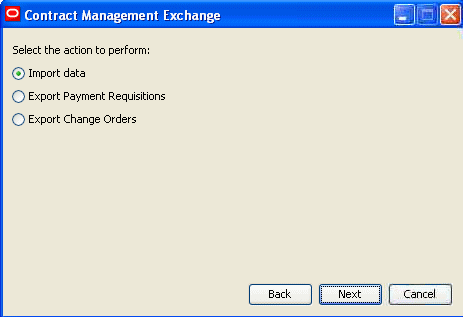
Select the Import Data option and then click Next.
-
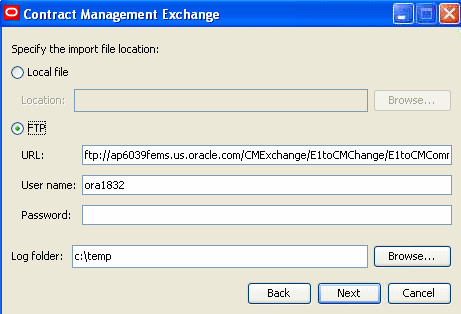
Specify the location of the file that you want to import and then click Next.
Figure 7-7 Specify the import file location
Description of "Figure 7-7 Specify the import file location"
-
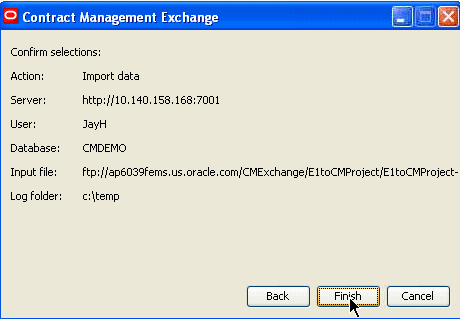
Confirm you selections and click Finish.
The system imports the selected data and produces a log file for review.
|
Note: You can import only one file at a time. If you created multiple files from the EnterpriseOne system, you must run this process multiple times for each file that you want to import into the Contract Management system. |
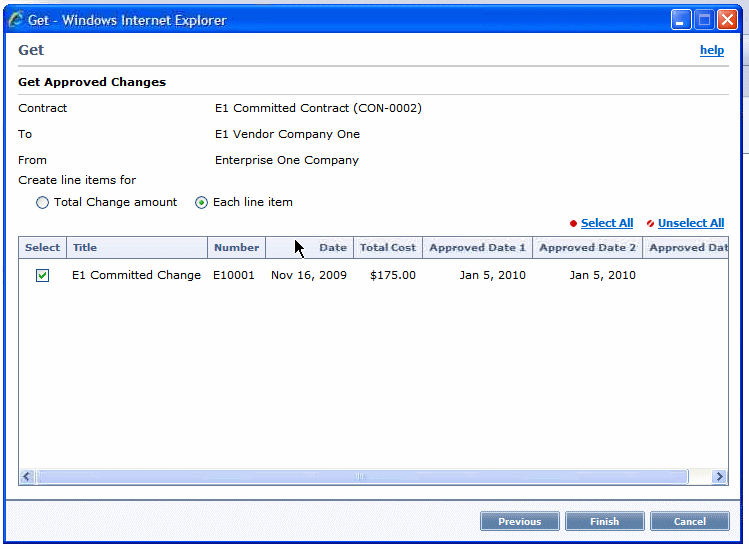
After you import change request data into Contract Management, you must then approve the change. After the change is approved, you then distribute the amounts associated with the newly created change order across the affected line items of the associated contracts, and subsequently, the requisitions that are generated for that contract. You distribute the changes to each line item by selecting the Each line item option on the Get Approved Changes form in Contract Management. This graphic illustrates the appropriate setting for this option:
See Oracle Primavera Contract Management User's Guide, "Working With Contracts, Project Costs, and Changes," Preparing Requisitions for Payment.
