9 Mobile Service Time Entry (Release 9.1 Update)
This chapter discusses these topics:
9.1 Understanding Mobile Service Order Time Entry
You use the Mobile Service Time Entry application to enable remote workers to enter timecard information against an existing work order using a mobile device. The Mobile Service Time Entry application gives users the ability to:
-
Search for and review existing timecards that have been processed or are awaiting processing.
-
Enter timecard information.
-
Edit timecard information for unprocessed timecards.
The Mobile Service Time Entry program uses the Service Work Order Time Entry Processing Options program (M311221) to identify whether certain fields appear in the application, and to specify default values for some fields. You can set up multiple versions of this program, and assign them to different employees or roles within your organization.
|
See Also: |
9.1.1 Understanding the Home Screen Graph
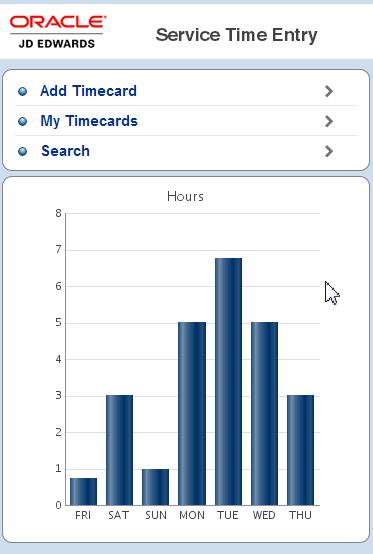
When you log into the Mobile Service Time Entry application on your mobile device, the system displays a chart that graphically identifies the number of hours you have entered for each day in the current week. The current week includes the system date, and the previous six calendar days. The user can tap on a specific day to review processed and unprocessed timecards associated with that day.
Figure 9-1 Service Time Entry Home Screen
Description of "Figure 9-1 Service Time Entry Home Screen"
9.1.2 Accessing Mobile Service Time Entry Using the Mobile Menu (Release 9.1 Update)
The Mobile EnterpriseOne Menu application (M0001) is now available as part of the JD Edwards EnterpriseOne mobile solution set. This application enables users to access all JD Edwards EnterpriseOne mobile applications from a single point of entry. This application also enables users to sign in only one time, and access all available mobile applications.
If your organization uses the Mobile EnterpriseOne Menu application to deploy your mobile applications, the user interface of the application will look slightly different than it appears in the screens shown in the following documentation in this chapter. Those differences include:
-
Screen Logo and Banner
The logo and banner at the top of many forms has been updated.
-
Menu Button
Many screens now include the
 (menu) button. This button enables the user to return to the Mobile Solutions screen where they can launch other mobile applications, or sign out of all mobile applications they have accessed.
 -
Signing Out
If you are accessing your application from the Mobile EnterpriseOne Menu application, you will no longer have Sign Out links within each application. Instead, you must return to the Mobile Solutions Home screen by clicking the menu button (described above), and then click the Sign Out link. Using this link logs the user out of all available EnterpriseOne mobile applications.
9.1.3 Understanding Mobile Service Time Entry Data Flows
The Mobile Service Time Entry application uses business services to pass data between the JD Edwards EnterpriseOne database and the user's mobile device. See Section A.5, "Mobile Service Time Entry Business Services."
The following sections describe the data flow for each piece of functionality offered by the application.
|
Note: (Release 9.1 Update)The launch and sign-in portion of the following data flows do not include use of the Mobile EnterpriseOne Menu application, which enables users to sign into all available JD Edwards EnterpriseOne mobile applications with a single sign-in. For information on the Mobile EnterpriseOne Menu data flow, see Chapter 3, "Using the Mobile Menu (Release 9.1 Update)." |
9.1.3.1 Mobile Timecard Entry Data Flow
Using the Mobile Service Time Entry application, users can enter new timecards for the time that they work. This list describes the flow of data during the timecard entry process:
-
The user launches the Mobile Service Time Entry application from their mobile device and enters their sign on credentials.
-
The getServiceTimeCardProcessingOption operation (J1700070) gets the processing option values associated with the M311221 application.
-
The getServiceTimeCards operation (J1700050) retrieves the user's timecards for the week, which is the system date plus the previous six days, and generates a bar graph that displays the number of hours worked during each day.
-
The user selects Add Timecard from the menu, and the system brings the user to the Add Timecard form. Or, the user taps a bar in the graph, and then taps the Add button on the My Timecards form.
-
The user completes the fields required to enter a timecard. After entering a valid work order number, the getServiceOperationSequence operation (J1700060) retrieves the operation sequences associated with the order. The user then selects one of the sequence numbers from the list of available values.
-
The user taps the Save button and the processServiceTimecard operation (J1700080) saves the user's time entry record in the EnterpriseOne database.
-
The user is returned to the Home screen and the bar graph is updated to include the newly entered timecard.
9.1.3.2 Mobile Timecard Edit Data Flow
Using the Mobile Service Time Entry application, users can edit or delete existing timecards that have not yet been processed in the EnterpriseOne system. This list describes the flow of data during the timecard edit and delete process:
-
The user launches the Mobile Service Time Entry application from their mobile device and enters their sign on credentials.
-
The getServiceTimeCardProcessingOption operation (J1700070) gets the processing option values associated with the M311221 application.
-
The getServiceTimeCards operation (J1700050) retrieves the user's timecards for the week, which is the system date plus the previous six days, and generates a bar graph that displays the number of hours worked during each day.
-
The user completes one of the following actions to retrieve the timecard they want to edit or delete:
-
The user taps a bar in the graph if the timecard they want to edit or delete is associated with one of the days displayed in the graph. For example, to edit a timecard that was entered for Wednesday, tap the Wednesday bar in the graph. The system displays the My Timecards form listing all of the timecards for that day.
-
The user taps the My Timecards menu option. The system displays the My Timecards form listing all of the timecards for the week.
-
-
From the My Timecards form, the user selects the timecard they want to edit or delete.
-
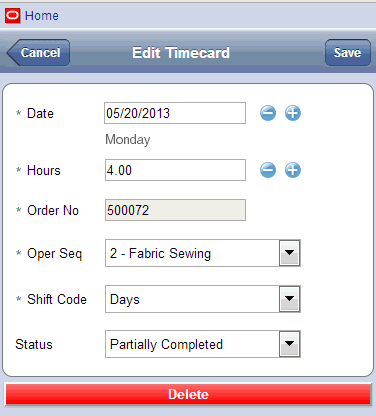
To edit the timecard, the user can change all values except for the Order Number value, and then tap the Save button. The processServiceTimecard operation (J1700080) saves the updated information in the EnterpriseOne database.
To edit the order number, the user must delete the timecard with the incorrect order number, and add a new timecard with the correct order number.
-
To delete a timecard, the user taps the Delete button, and clicks OK to confirm the deletion. The processServiceTimecard operation (J1700080) deletes the record from the EnterpriseOne database.
-
The user is returned to the My Timecards page where the updated data is reflected.
9.1.3.3 Mobile Timecard Search Data Flow
Using the Mobile Service Time Entry application, users can search for and review existing timecards. Users can review processed or unprocessed timecards. This list describes the flow of data during the timecard search process:
-
The user launches the Mobile Service Time Entry application from their mobile device and enters their sign on credentials.
-
The getServiceTimeCardProcessingOption operation (J1700070) gets the processing option values associated with the M311221 application.
-
The getServiceTimeCards operation (J1700050) retrieves the user's timecards for the week, which is the system date plus the previous six days, and generates a bar graph that displays the number of hours worked during each day.
-
The user taps the Search option in the menu.
-
On the My Timecards form, the user can:
-
Select the Include Processed Records option to display both processed and unprocessed timecards. If this option is not selected, the search returns only unprocessed timecards.
-
Enter an order number.
-
Update the Work Date From and Work Date Thru fields. The user can manually enter these dates, use the default dates, or use the plus or minus icons to change the dates.
-
The user taps the Search button and the getServiceTimecards operation (J1700050) retrieves the timecards that match the search criteria.
-
9.1.4 Prerequisite Knowledge and Data Requirements
Before you use the Mobile Service Time Entry application, Oracle strongly recommends that you have a solid understanding and working knowledge of the service time entry process.
|
See Also: Entering Time in the JD Edwards EnterpriseOne Applications Service Management Implementation Guide. |
9.2 Configuring Mobile Service Time Entry
Before you can use the Mobile Service Time Entry application on a mobile device, you must set the processing options for the Service Work Order Time Entry Processing Options program (M311221) .
9.2.1 Setting Processing Options for the Service Work Order Time Entry Program (M311221)
You use processing options to set default values for processing and display information.
9.2.1.1 Display Tab
- 1. Hide Operation Status Code
-
Use this option to specify whether the Operation Status Code field is displayed on the Add Timecard, Edit Timecard, and Process Timecard screens of the mobile application. Values include:
Blank: Display the field.
1: Hide the field.
9.2.1.2 Default Tab
- 1. Enter the Shift Code for Service Time Entry
-
Use this option to specify the default Shift Code for time entry records created with the mobile application. Valid shift code values are stored in UDC table 06/SH. Users can override the value during the time entry process.
- 2. Enter the Operation Status Code
-
Use this option to specify the default Operation Status Code for time entry records created with the mobile application.Valid status code values are stored in UDC table 31/OS. Users can override the value during the time entry process.
- 3. Number of Past Days to Search Timecards
-
Use this option to specify how the system calculates the default value in the Work Date - From field when performing a timecard search. The Work Date - Thru field is always populated with the system date. The number of days that you enter in this option determines how many previous days are included in the search. For example, if the system date is April 10, 2015, and you enter 5 in this field, the system populates the Work Date - From field with April 5, 2015, which is 5 days previous to the system date. The user can override this date when searching for timecards. The default value for this option is 0 (zero), which populates both the From and Thru date fields with the system date.
9.3 Searching for Timecards
This section discusses how to search for timecards on a mobile device.
-
Complete the steps to log into the Mobile Service Time Entry application.
-
From the Home screen, tap Search in the menu.
-
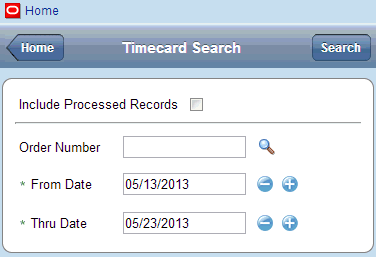
The system directs you to the Timecard Search Screen.
-
To search for only unprocessed timecards, leave the Include Processed Records option deselected. Select this option only if you want your search results to include processed timecards. Note that processed timecards can not be edited or deleted using this application.
-
Optionally, complete the Order Number field to search for timecards associated with a specific order.
-
Verify and/or update the dates in the From Date and Thru Date fields. The default value in the Thru Date field is the system date. The default value in the From Date field is determined by a processing option setting in the Service Work Order Time Entry Processing Options program (M311221). You can manually override these dates, or use the plus or minus buttons to change the dates.
-
After you have entered your search criteria, tap the Search button.
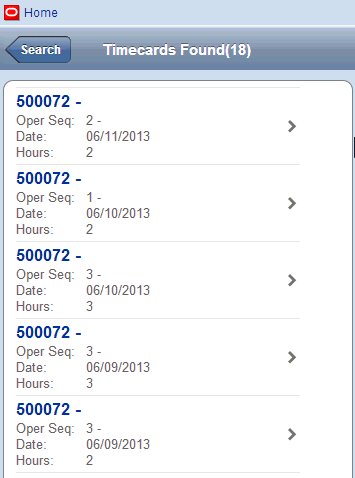
The system returns a list of timecards that match the search criteria on the Timecards Found screen, and displays the number of records returned in the screen header.
-
Tap on a record to select and view the timecard, or tap the Search button to return to the Timecard Search screen.
9.4 Entering Timecards
This section discusses how to enter service timecards on a mobile device.
-
Complete the steps to log into the Mobile Service Time Entry application and access the Service Time Entry Home screen.
Figure 9-4 Service Time Entry Home Screen
Description of "Figure 9-4 Service Time Entry Home Screen"
-
To add a timecard, complete one of these options on the Home screen:
-
Tap the Add Timecard menu option.
-
Tap a bar in the graph for the day for which you want to enter a timecard. On the My Timecards form, tap the Add button.
-
-
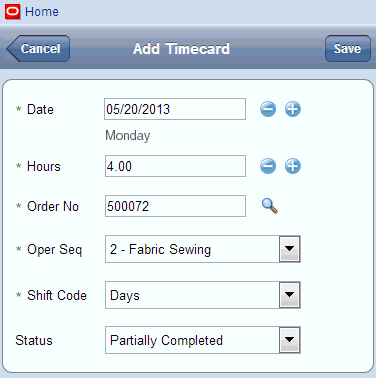
The system directs you to the Add Timecard screen.
Complete these fields:
-
Date
The system date (if you accessed this screen from the menu option) or the date associated with the bar graph you selected is automatically entered as the default date. You can manually change the date, or you can use the plus and minus buttons to change the date.
-
Hours
You can manually enter a value in this field, or you can use the plus and minus buttons to add or subtract time in 15-minute increments to the value.
-
Order No
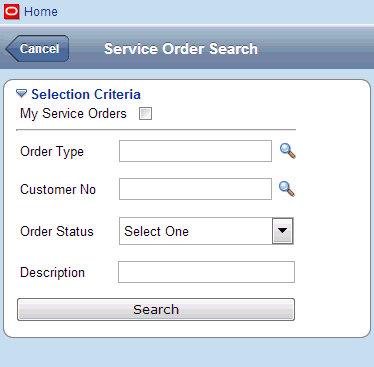
You can manually enter a valid order number, or tap the visual assist to access the Service Order Search screen. The order you select must be set up with valid Operation Sequence information, as the Oper Seq field is required to enter a timecard. You can select the My Service Orders option to view all service orders to which you are assigned.
If you use the Service Order Search screen to find your order number, tap the Search button after entering search criteria, and then select the order to add it to the timecard.
-
Oper Seq
-
Shift Code
-
Status
-
-
After completing the timecard, tap the Save button.
-
The system directs you to the My Timecards screen, and includes the newly created timecard in the timecard list.
-
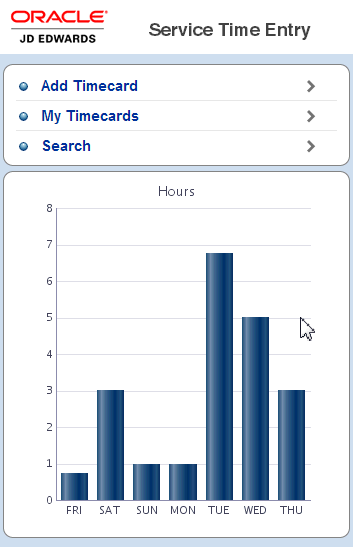
To return to the Home screen, tap the Home button. The Home graph is also updated with the newly created timecard.
Figure 9-7 Service Time Entry Home Screen

Description of "Figure 9-7 Service Time Entry Home Screen"
Notice the additional number of hours displayed in the bar for Monday.
9.5 Editing Existing Timecards
This section discusses how to edit service timecards on a mobile device.
-
Complete the steps to log into the Mobile Service Time Entry application.
-
From the Home screen, you can either tap the bar in the graph that includes the timecard you want to edit, search for the timecard you want to edit, or select the timecard from the My Timecards screen. You can edit only unprocessed timecards.
-
Select the timecard you want to edit. The system brings you to the Edit Timecard screen.
You can update all of the fields on the timecard, with these exceptions:
-
You cannot change the Order Number field on an existing timecard. If you want to update the order number, you must delete the timecard, and create a new timecard with the correct order number.
-
You cannot edit processed timecards.
-
-
When you are finished editing the timecard, tap the Save button.
-
The system returns you to the My Timecards screen, or the Timecards Found screen (depending on how you originally accessed the timecard), and includes the information for the updated timecard. Tap Home to return to the Home screen.
9.6 Deleting Existing Timecards
This section discusses how to delete service timecards on a mobile device.
-
Complete the steps to log into the Mobile Service Time Entry application.
-
From the Home screen, you can either tap the bar in the graph that includes the timecard you want to delete, search for the timecard you want to delete, or select the timecard from the My Timecards screen. You cannot delete a processed timecard.
-
Select the timecard you want to delete. The system brings you to the Edit Timecard screen.
-
Tap the Delete button.
-
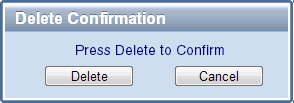
On the Delete Confirmation screen, tap Delete to confirm the deletion.
-
The system returns you to the My Timecards screen or the Timecards Found screen (depending on how you originally accessed the timecard) and displays the updated information. Tap the Home button to return to the Home screen.
