4 Modifying One View Reports
This chapter contains the following topics:
-
Finding Information About a One View Report (Release 9.1 Update)
-
Enabling the Decimal Formatting Feature (Release 9.1 Update)
4.1 Introduction to Modifying One View Reports
The Manage Reports selection on the One View menu enables you to modify reports in various ways. Depending on what you want to change, the modifications are made in either JD Edwards EnterpriseOne or in Oracle BI Publisher.
These are some changes you might want to make:
-
Change the default output format for a report.
-
Add or delete columns.
You can add columns from the data model of the report to suit your needs. For example, if the data model includes the Category Code 1 column but your company uses Category Code 2, you can change the report definition to add Category Code 2.
-
Change the chart type, add a table, or change fonts.
If you prefer a different chart type, color, or font, you can change the report layout accordingly.
-
Add a company or department logo.
Except for changing the output format, the procedures to modify reports differ for shared and personal reports.
Before modifying a report, you first must decide whether the modifications are personal preferences or whether they are applicable to the entire organization. If other people in the company are copying a shared report and making similar changes, changing the shared report might be beneficial. The decision to modify a shared report could be based on whether the modifications will improve its value to the organization.
|
Note: Oracle recommends that anytime you want to modify a report delivered by JD Edwards, you should copy the report to a new name and then modify the copy. By following this procedure, any modifications you make will not be overwritten if JD Edwards delivers an update to the report. |
The options for modifying reports are:
-
Copy a shared report to a personal report and modify the personal report. After the report is modified, you can keep it as a personal report for your own use or promote it to a shared report.
Note:
A promotion request must be approved by a system administrator before a personal report becomes a shared report. -
Copy a personal report to another personal report, and modify the copied report. After modifying the copied report, you can keep it as a personal report for your own use or promote it to a shared report.
-
Reserve a shared report. When you reserve a shared report, the system creates a copy of the report in your personal reports with the same name. You can then modify the personal report version of the report and promote it. When the promotion request is approved, the system replaces the shared report with the modified version and removes the personal report version.
When you select a report from Manage Reports in the One View menu, a side panel appears. The side panel has a Layout tab and a Report Definition tab. The icons that appear on the Layout and Report Definition tabs depend on the security level of the user and whether the report is shared or personal.
System administrators can set up security records by individual or by role to limit access for specific One View Reporting features by individual user or role.
For more information about feature authorizations, see "Setting Up One View Reporting Feature Authorizations" in the JD Edwards EnterpriseOne Tools One View Administration Guide.
|
Note: To modify or create One View reports, users must be authorized to One View Reporting features and have an associated Oracle BI Publisher user ID. For further information, see "Installing and Configuring One View Reporting" in the JD Edwards EnterpriseOne Tools One View Administration Guide. |
4.2 Finding Information About a One View Report (Release 9.1 Update)
Information about each One View report is available on the side panel's Layout and Report Definition tabs. By clicking the About One View Report icon, you can view the One View application, version, and form on which the report is based. Additionally, the One View report information includes the report query ID, which you can use to add the report as a task to EnterpriseOne menus, EnterpriseOne Pages, and the shortcut launcher.
See "Creating Tasks in Web Client" in the JD Edwards EnterpriseOne Tools System Administration Guide.
To find information about One View reports:
-
Navigate to the application where the One View report resides.
-
From the One View menu, select Manage Reports.
-
Select a report from the drop-down list.
The side panel displays.
-
On either the Layout or Report definition tab, click the About One View Report icon.
The One View Reporting information displays in the About window.
4.3 Modifying Personal Reports
Because the changes you make to personal reports are available only to you, more options appear on the Layout and Report Definition tabs for personal reports than for shared reports. You create personal reports by copying an existing shared or personal report, or by adding a new report.
To create personal reports from existing reports, copy either a shared or personal report to a new report with a different name. The copied report appears under My Reports in the One View menu.
Follow these guidelines when naming reports:
-
Do not use any of the following special characters: ~`\'!@#$%^&*()+={[}]|\;:"<,>.?/
-
Uniquely name the reports within each application.
Within the scope of an application or within Data Browser, the report names must be unique for each owner.
-
Use a maximum of 50 characters.
4.3.1 Creating Personal Reports from Existing Reports
To create a personal report from an existing report:
-
Access a One View Reporting enabled form.
-
From the One View menu, select Manage Reports and then select either a shared or a personal report.
-
On the Report Definition tab, click the Copy icon.
-
In the Enter Name for Copy field, enter a name for the report.
Important:
Unless you have reserved a shared report to modify it, Oracle recommends that you do not name a personal report the same as a shared report.When you reserve a shared report, the system creates a personal copy for you to modify and promote to shared status. If the name of the personal report is the same as the shared report, your changes will overwrite the previous version of the shared report if the promotion request is approved.
You can also add a completely new report that is not based on an existing report. For details, see Adding New One View Reports.
4.3.2 Layout Tab for Personal Reports
You use report layouts to arrange objects, such as data items and columns, in a report template. A report can have multiple layouts, including those that you create yourself. If you want a personal report to become a shared report, you can promote it. If the promotion request is approved, the personal report becomes a shared report.
The Layout tab enables you to select a different layout for a report, select row set options, and change the output format. The Edit Layout icon appears on the Layout tab for personal reports. Because you can change the report layout for personal reports without affecting other users, the Edit Layout icon appears on the Layout tab.
This is an example of the Layout tab for a personal report:
See Layout Tab for additional information about layout options.
4.3.2.1 Editing Report Layouts
You use Oracle's BI Publisher Layout Editor to create and modify One View report layouts. The following examples show changes you might want to make to a report layout:
-
Map a category code to a chart.
-
Add a chart.
-
Change a chart type.
-
With Tools 9.1 Update 5, add a warning when the number of records meeting the report criteria exceeds the number of records displayed in the report.
-
With Tools 9.1 Update 5, display the selection criteria for the report.
The following table shows the Edit Layout icon and describes how to use it:
| Edit Layout Icon | Description |
|---|---|
| Click this icon to edit the layout of a personal report. When you click the Edit Layout icon, the BI Publisher Layout Editor appears, enabling you to change a report layout or add a new layout. |
To make other types of report modifications, such as adding or deleting columns from the data model, see Report Definition Tab for Personal Reports.
4.3.2.2 Modifying the Layout of Personal Reports
Access a One View Reporting enabled form.
-
From the One View menu, select Manage Reports.
-
Select a report from My Reports.
-
On the side panel Layout tab, click the Edit Layout icon.
-
In the BI Publisher Layout Editor, modify the existing report layout or add a new layout.
Note:
Do not click the Sign Out link, or you will have to sign into BI Publisher manually to run One View reports during the same session.
For more details, see "Editing Reports" in the Oracle® Fusion Middleware Report Designer's Guide for Oracle Business Intelligence Publisher.
4.3.3 Adding Selection Criteria to the Report Layout of Personal Reports (Tools Release 9.1 Update 5)
If you want to display the selection criteria used to get the report results, you can add this information on your report.
|
Note: You must reserve the report before you add selection criteria to the report layout. In order for the selection criteria nodes to be available in Oracle BI Publisher Layout Editor, you must reserve the report at least once. |
Access a One View Reporting enabled form.
-
From the One View menu, select Manage Reports.
-
Select a report from My Reports.
-
On the side panel Layout tab, click the Edit Layout icon.
-
In BI Publisher, select the Edit option for your report.
-
In the BI Publisher Layout Editor, insert a List where you would like to display the selection criteria on your report.
-
From the Data Source pane, under the Grid01\Criteria folders, select either "Report Criteria" or "Report Criteria with Table Names" and drag it into the list box that you just created.
Both options will display the report criteria. However, the second option will also display the name of the table for that particular report criterion.
-
Format the list as desired.
-
You need to remove the filter so that the data on the report is not affected. To remove the filter, click on the section outside the list box and then choose Configure events under Interactivity. This provides a dialog box to check or uncheck the filter. Uncheck the filter to turn it off and click OK.
-
Select Save.
Note:
Do not click the Sign Out link, or you will have to sign into BI Publisher manually to run One View reports during the same session.
For more information, see "Editing Reports" in the Oracle® Fusion Middleware Report Designer's Guide for Oracle Business Intelligence Publisher.
4.3.4 Adding a Report Warning to the Report Layout of Personal Reports (Tools Release 9.1 Update 5)
When a user runs a report, the report displays data up to either the number of records specified in the Retrieve Record Count field or the system limit, whichever is lower. If the report data is limited, the user running a report interactively will receive a pop-up warning. However, you may want to add this report warning to the report itself.
Access a One View Reporting-enabled form.
-
From the One View menu, select Manage Reports.
-
Select a report from My Reports.
-
On the side panel Layout tab, click the Edit Layout icon.
-
In BI Publisher, select the Edit option for your report.
-
From the Data Source pane, under the Grid01 folder, select "Report Warning" and drag it into the area of the report where you would like it to appear.
-
Select Save.
Note:
Do not click the Sign Out link, or you will have to sign into BI Publisher manually to run One View reports during the same session
For more information, see "Editing Reports" in the Oracle® Fusion Middleware Report Designer's Guide for Oracle Business Intelligence Publisher.
4.3.5 Report Definition Tab for Personal Reports
A report definition contains information about a One View report, such as which columns were selected from the data model, the naming convention that was used, the row setting, the name of the report, and so on. You use the report definition side panel to create or modify a report definition.
|
Note: You cannot edit a One View report definition when using a List View grid format because the Report Definition tab is not available in a List View grid. This means that you cannot perform any of the functions discussed in this section, such as save, save as, reserve, request to publish, delete, etc. Change your grid format to a Table View in order to access the Report Definition tab. For more information on grid formats, see "Using the Grid" in the JD Edwards EnterpriseOne Tools Foundation Guide. (Tools Release 9.2.0.5) |
This is an example of the Report Definition tab for a personal report:
The Selected Columns portion of the Report Definition side panel displays the columns that were selected for the report. You can remove a column from the report definition by clicking it. To include additional columns in the report definition, click any QBE column header with a plus (+) sign. Additionally, the icons on the tab enable you to perform the following tasks:
-
Change the data model of a report.
-
Copy an existing report.
-
Copy an existing report with sample data.
-
Promote a personal report to a shared report.
-
Sync a report to the data dictionary naming convention.
-
Add all columns in the data model to the report definition.
-
Remove all columns in the data model from the report definition.
-
Delete a report.
The following table describes the report definition options:
| Report Definition Options | Description |
|---|---|
| Type | The two types of reports are:
|
| Name | The name of the report. |
| Naming Convention | You can select one of two options when adding a new report:
|
| Status | Reports can have three statuses:
|
| Select Row Set | Three row set options are available for the grid data that is used in reports:
|
| Selected Columns | The columns selected from the data model for the report. |
4.3.5.1 Report Definition Icons for Personal Reports
These icons appear on the Report Definition tab for personal reports:
| Report Definition Icon | Description |
|---|---|
| Use the Save Report option to save a report when you want to replace the data model while retaining the report layouts. When you select this option, the BI Publisher Layout Editor launches automatically, enabling you to add or delete columns in the layout as required. | |
| Use the Save As Report option to have the system save the report definition and report layouts of an existing report to a new report, along with a new data model and sample data. The new report appears under My Reports in the One View menu. | |
| Use the Copy Report option to copy a report's sample data, report definition, data model, and report layout to a new report. The new report appears under My Reports.
Although you are not permitted to use the same name for the new report as that of the report being copied, if a report already exists with the name that you enter for the new report, it will be overwritten with the sample data, report definition, data model, and report layout of the report that is being copied. |
|
| Use the Promote Report option to promote a personal report to a shared report.
System administrators can promote personal reports to shared reports. If you designed or modified a personal report that you want to share with others, you can initiate a promotion request if you have publish permission. After you click the Promote Report icon, the report status changes from Editing to Pending Promote. If the promotion request is approved, the report becomes a shared report and is removed from My Reports in the One View menu. If the promotion is rejected, the report status changes from Pending Promote back to Editing, and the report remains a personal report. |
|
| Sync Report is an advanced option that you use to synchronize a report to the data dictionary item naming convention. Use the Sync Report feature to enable a report for multiple languages.
Sync Report converts a report that uses the column title naming convention to a new report that uses the data dictionary item naming convention. |
|
| Use the Add All Columns option to add all the columns in the data model to the report definition. | |
| Use the Remove All Columns option to remove all the columns in the data model from the report definition. | |
| Use the Delete Report option to delete a personal report. |
|
Note: Oracle recommends that anytime you want to modify a report delivered by JD Edwards, you should copy the report to a new name and then modify the copy. By following this procedure, any modifications you make will not be overwritten if JD Edwards delivers an update to the report. |
Changing the Data Model of a Report
The Save Report feature enables you to replace the data model and sample data of an existing report while retaining the report definition and report layouts. Use this option to keep the existing report layout and modify it with the new data model columns.
To create a new data model and sample data, use the find browse form to locate the data you want for the report and then select the Save Report option. You are asked to confirm that you want to replace only the data model before the system makes the change. Because replacing only the data model could require that you add or delete columns from the report layouts, the BI Publisher Layout Editor launches automatically, enabling you to review the layout and make any necessary changes.
|
Note: Do not click the Sign Out link, or you will have to sign into BI Publisher manually to run One View reports during the same session. |
Copying an Existing Report to Create a New Report Using the Save As Feature
When you select Save As Report, the system saves the report definition and report layouts of the existing report to a new personal report with the name that you specify, but it replaces the data model and sample data with the data shown on the find browse form.
If you do not want to replace the data model and sample data, you should use the Copy Report option instead of the Save As Report option.
Copying an Existing Report with Sample Data
The Copy Report option copies the sample data, report definition, data model, and report layout of a report to a new personal report with the name that you specify. If a report already exists with the same name, it will be overwritten by the copied report.
If you do not want to copy the sample data, you should use the Save As Report option instead of the Copy Report option.
Promoting a Personal Report to a Shared Report
The Promote Report option initiates a request to convert a personal report to a shared report. The promotion request must be approved by a system administrator. If the personal report is promoted to shared status, it no longer appears as a personal report.
Sync a Report to the Data Dictionary Naming Convention
You might prefer to use the data dictionary item naming convention in report layouts if your organization uses more than one language. Data dictionary item names are translated according to a user's language preference. Column titles might not be translated in the same way.
The results of using the sync option are:
-
A report with the column title naming convention is converted to a new report using the data dictionary item naming convention. The column title in the report layout is also changed.
-
The current data in the grid becomes the sample data for the new report.
Adding All Columns in the Grid to the Report
Instead of adding columns to a report individually, you can add all of the columns in the grid to the report simultaneously.
You might want to use this option if the find browse form has only a few columns in the grid, or if you have a customized grid with only a few columns selected but you need all the columns for reporting. Oracle recommends that you avoid using this option in One View Reporting applications when all the grid columns are displayed.
Removing All Columns in the Data Model from a Report
Instead of removing columns from a data model individually, you can delete all columns from the data model.
You have the option to delete personal reports if you no longer need them. The Delete Report option deletes the report definition, data model, and report layout. After the report is deleted, it no longer appears under My Reports in the One View menu. Shared reports must be deleted by a system administrator.
4.3.6 Saving a Report with a New Data Model
The Save Report option replaces the data model of an existing report while retaining the report layouts.
Access a One View Reporting enabled form.
-
From the One View menu, select Manage Reports.
-
Select a report from My Reports.
-
On the find browse form, locate the data for the new report.
-
On the Report Definition tab, click the Save Report icon.
The message "Do you want to keep your report and layouts while replacing the data model?" appears.
-
Click OK to replace the data model.
The BI Publisher Layout Editor appears.
-
If necessary, edit the report layout to match the new data model.
Note:
Do not click the Sign Out link, or you will have to sign into BI Publisher manually to run One View reports during the same session.For information about Oracle's BI Publisher Layout Editor, see "Editing Reports" in the Oracle® Fusion Middleware Report Designer's Guide for Oracle Business Intelligence Publisher.
4.3.7 Using Save As Report
The Save As Report option creates a new report with the same report definition and report layouts as the existing report but with a new data model.
Access a One View Reporting enabled form.
-
From the One View menu, select Manage Reports.
-
Select a report from My Reports.
-
On the find browse form, locate the data for the new report.
-
On the Report Definition tab, click the Save As Report icon.
-
In the Enter Name for Save As field, enter a name for the new report and then click OK.
The new report appears under My Reports in the One View menu.
4.3.8 Copying Personal Reports
The Copy Report option copies an existing report definition, data model, and report layouts to a new report.
Access a One View Reporting enabled form.
-
From the One View menu, select Manage Reports.
-
Select a report from My Reports.
-
In the side panel, click the Report Definition tab.
-
Click the Copy Report icon.
-
In the Enter Name for Copy field, enter a name for the report and then click OK.
The new report appears under My Reports in the One View menu.
You can also add a new report that is not based on an existing report. For details, see Adding New One View Reports.
4.3.9 Promoting Personal Reports
Access a One View Reporting enabled form.
|
Note: If a personal report has the same name as a shared report, the shared report must first be reserved before you initiate a promotion request. |
-
From the One View menu, select Manage Reports.
-
Select a report from My Reports.
-
In the side panel, click the Report Definition tab.
-
Click the Promote Report icon.
The report status changes from Editing to Pending Promote.
For additional information, see "Promote One View Reports" in the JD Edwards EnterpriseOne Tools One View Administration Guide
4.3.10 Syncing a Report to the Data Dictionary Naming Convention
Access a One View Reporting enabled form.
-
From the One View menu, select Manage Reports.
-
Select a report from My Reports.
-
On the find browse form, locate the data for the report.
-
In the side panel, click the Report Definition tab.
-
Click the Sync Report to DD Item naming convention only icon.
-
In the Enter Name for Sync (to DD Item only) field, enter a name for the new report and then click OK.
The new report appears under My Reports in the One View menu.
4.3.11 Adding Selected Columns to Personal Reports
Access a One View Reporting enabled form.
-
From the One View menu, select Manage Reports.
-
Select a report from My Reports.
-
On the find browse form, locate the data for the report.
-
In the side panel, click the Report Definition tab.
-
On the find browse form, click any QBE column header with a plus (+) sign to add it to the report definition.
The item that you selected appears in the Selected Columns list.
-
To save the report with the original name, click the Save Report icon.
The message "Do you want to keep your reports and layout while replacing the data model?" appears.
-
To replace the data model, click OK.
The message "Layouts may need to be adjusted for any column changes in report definition." appears. If you click OK, the BI Publisher Layout Editor appears, enabling you to add the new column to the report layout.
-
To save the report with a different name, click the Save As icon and enter a new name in the Enter Name for Save As field.
Note:
Do not click the Sign Out link, or you will have to sign into BI Publisher manually to run One View reports during the same session.
|
Note: Decimal placement in decimal fields can vary based on customer implementation. An example is Unit Price. To ensure that the format of a report matches the format of a decimal field in a JD Edwards EnterpriseOne interactive application, you should assign the decimal precision to the column in the Layout Editor. |
4.3.12 Adding All Columns to Personal Reports
|
Note: You might want to use this option if the find browse form has only a few columns in the grid, or if you have a customized grid with only a few columns selected but you need all the columns for reporting. Oracle recommends that you avoid using this option in One View Reporting applications when all the grid columns are displayed. |
Access a One View Reporting enabled form.
-
Select a grid format.
-
From the One View menu, select Manage Reports.
-
Select a report from My Reports.
-
On the find browse form, locate the sample data for the report.
-
In the side panel, click the Report Definition tab.
-
Click the Add All Columns icon.
All columns are added to the report definition and appear under Selected Columns.
-
Click either the Save Report or Save As Report icon to save your changes.
Note:
The Save Report option replaces the data model of an existing report while retaining the report definition and the report layouts.The Save As Report option creates a new report with a new report definition, data model, and report layout.
4.3.13 Removing Selected Columns from Personal Reports
Access a One View Reporting enabled form.
-
In the BI Publisher Layout Editor, remove the columns from the report.
-
In the JD Edwards EnterpriseOne application, select Manage Reports from the One View menu.
-
Select a report from My Reports.
-
On the find browse form, define the data for the report.
-
In the side panel, click the Report Definition tab.
-
Under Selected Columns, click the item that you want to remove from the data model.
The item that you selected is removed from the Selected Columns list and appears on the find browse form with a plus (+) sign.
-
To save the report with the original name, click the Save Report icon.
The message "Do you want to keep your reports and layout while replacing the data model?" appears.
-
To replace the data model, click OK.
The message "Layouts may need to be adjusted for any column changes in report definition." appears. If you click OK, the BI Publisher Layout Editor appears, enabling you to delete the column if it appears in the report layout.
-
To save the report with a different name, click the Save As icon and enter a new name in the Enter Name for Save As field.
Note:
Do not click the Sign Out link, or you will have to sign into BI Publisher manually to run One View reports during the same session.
4.3.14 Removing All Columns from Personal Reports
Access a One View Reporting enabled form.
-
From the One View menu, select Manage Reports.
-
Select a report from My Reports.
-
In the side panel, click the Report Definition tab.
-
Click the Clear All Columns icon.
All columns are removed from the Selected Columns list.
-
On the find browse form, click any QBE column header with a plus (+) sign to add it to the report definition.
-
Click either the Save Report or Save As Report icon to save your changes.
Note:
The Save Report option creates a new report with the report layouts of the existing report but with a different data model.The Save As Report option creates a new report with a new report definition, data model, and report layout.
4.3.15 Deleting Personal Reports
Access a One View Reporting enabled form.
-
From the One View menu, select Manage Reports.
-
Select a report from My Reports.
-
On the Report Definition tab, click the Delete icon.
The following message appears: "Are you sure that you want to delete the selected report? The reserve lock will be released if the related report has been reserved."
-
Click OK to delete the report.
4.4 Modifying Shared Reports
The process to modify a shared report differs from the one that you use to modify a personal report. To modify a shared report, you must first reserve the report so that no one else can edit it while you are making changes. When you reserve a shared report, the system copies it to a personal report so that you can modify it in the same way that you edit other personal reports. When the modifications are complete, you promote the report to a shared report. If the promotion request is approved by a system administrator, the modified report replaces the existing shared report.
The basic steps to modify a shared report are as follows:
-
Reserve the report.
When you reserve a report, the system creates a local copy under My Reports. The shared report becomes a personal report.
-
Modify your personal copy of the shared report.
-
When the modifications are complete, promote the report.
When the promotion request is approved, the personal report replaces the previous version of the shared report.
When you select a shared report from Manage Reports in the One View menu, a side panel appears. The side panel has a Layout tab and a Report Definition tab. The icons that appear on these tabs depend on the security level of the user and whether the report is shared or personal.
4.4.1 Layout Tab for Shared Reports
Shared reports do not have an Edit Layout icon on the Layout tab like personal reports do. For shared reports, you use icons on the Report Definition tab to start the modification process, including changes to a report layout.
The Layout tab displays the following information and options:
-
Type
-
Name
-
Naming Convention
-
Status
-
Available Layouts
-
Select Row Set
-
Formats
For a description of these options, see Layout Tab.
4.4.2 Report Definition Tab for Shared Reports
The Report Definition tab for a shared report shows information about a One View report, such as which columns were selected from the data model, the naming convention, the row setting, the name of the report, and the report status. The icons on the tab enable you to:
-
Copy a report.
-
Reserve a report.
-
Sync a report to the data dictionary naming convention.
The following table describes the report definition options.
| Report Definition Options | Description |
|---|---|
| Type | The two types of reports are:
|
| Name | The name of a report. |
| Naming Convention | You can select one of two options when adding a new report:
|
| Status | Reports can have three statuses:
|
| Select Row Set | The three row set options for the grid data that is used in reports are:
|
| Selected Columns | The columns selected from the data model for the report. |
4.4.2.1 Report Definition Icons for Shared Reports
The following icons appear on the Report Definition tab for shared reports:
| Report Definition Icon | Description |
|---|---|
| Use the Copy Report option to copy a report.
When you copy a report, the system copies the sample data, report definition, data model, and report layout to a new personal report, which appears under My Reports. |
|
| Use the Reserve Report option to reserve a shared report.
You must reserve a shared report before you can modify it. When a report is reserved, only one person can make changes. The report remains reserved until it is promoted or until the reserved lock is removed. When you reserve a report, its status changes to Shared (Reserved by user ID). |
|
| Sync Report is an advanced option that you use to synchronize a report to the data dictionary item naming convention. Use the Sync Report feature to enable a report for multiple languages.
Sync Report converts a report that uses the column title naming convention to a new report that uses the data dictionary item naming convention. |
Copying a shared report creates a personal report that you can modify to suit your needs. Any changes that you make to a copied report are available only to you. To modify a shared report, you first must reserve the report and follow a different process to make the changed report available to others in your organization.
When you copy a report, you are not permitted to name the new report the same as the report you are copying. However, if an existing report has the same name as the new report, then the existing report will be overwritten with the sample data, report definition, data model, and report layout of the new report. The system notifies you if you attempt to name a report the same as an existing report so that you can confirm or cancel the copy operation.
A shared report must be reserved before you can modify it. You must have publish permission to reserve a report. If the report has been reserved by another user, you cannot reserve it until the status changes from Reserved to Shared.
When you reserve a report, the system creates a local copy under My Reports. The system also stores the Reserved status for your user ID. Because the shared report is copied to a personal report when you reserve it, an existing personal report with the same name will be replaced by the shared report. Consequently, if you attempt to reserve a shared report with the same name as a personal report, the system notifies you so that you can cancel the reserve request if you do not want to overwrite the existing report.
Syncing a Report to the Data Dictionary Naming Convention
You might prefer to use the data dictionary item naming convention in report layouts if your organization uses more than one language. Data dictionary item names are translated according to a user's language preference. Column titles might not be translated in the same way.
The results of using the sync option are as follows:
-
A report with the column title naming convention is converted to a new report using the data dictionary item name naming convention. The column title in the report layout is also changed.
-
The current data in the grid becomes the sample data for the new report.
4.4.3 Copying Shared Reports
Access a One View Reporting enabled form.
-
From the One View menu, select Manage Reports.
-
Select a shared report.
-
In the side panel, click the Report Definition tab.
-
Click the Copy Report icon.
-
In the Enter Name for Copy field, enter a name for the report and then click OK.
The new report appears under My Reports in the One View menu.
You can also add a new report that is not based on an existing report. For details, see Adding New One View Reports.
4.4.4 Reserving Shared Reports
Access a One View Reporting enabled form.
-
From the One View menu, select Manage Reports.
-
Select a shared report.
-
In the side panel, click the Report Definition tab.
-
Click the Reserve Report icon.
The system copies the reserved report to a personal report (under My Reports) with Editing status. The shared report that was reserved displays a status of Shared (Reserved by user ID).
4.4.5 Syncing a Report to the Data Dictionary Naming Convention
Access a One View Reporting enabled form.
-
From the One View menu, select Manage Reports.
-
Select a shared report.
-
On the find browse form, define the data for the report.
-
In the side panel, click the Report Definition tab.
-
Click the Sync Report to DD Item naming convention only icon.
-
In the Enter Name for Sync (to DD Item only) field, enter a name for the new report and then click OK.
The new report appears under My Reports in the One View menu.
4.5 Enabling the Decimal Formatting Feature (Release 9.1 Update)
With the adoption of Oracle BI Publisher 11.1.1.7, JD Edwards EnterpriseOne has improved how One View reports manage decimal formatting. One View Reporting was originally released using Oracle BI Publisher 11.1.1.5. The BI Publisher 11.1.1.5 release did not provide the ability to dynamically format JD Edwards decimal amounts based on transaction and company currency. Because of this limitation, the initial release of EnterpriseOne One View Reporting used manual decimal masks to consistently show amounts with two decimal places. For other currencies, customers would have to modify their One View reports by applying a different decimal mask to show the correct number of decimal places.
Oracle BI Publisher 11.1.1.7 can dynamically format JD Edwards decimal amounts based on transaction and company currency. Data for a zero-decimal currency will display amounts with no decimals, whereas data for two-decimal currencies will display amounts with two decimals. With the adoption of BI Publisher 11.1.1.7 and this dynamic decimal support, the manual decimal masks for One View reports have been removed.
The dynamic format masking feature in BI Publisher 11.1.1.7 creates additional decimal masking data, which is sent to Oracle BI Publisher's Layout Editor. The system automatically creates masking data for every decimal column in the data set. You can edit a data item's default decimal format in the Layout Editor to display the data on a report with a different decimal format.
BI Publisher 11.1.1.7 does not provide dynamic format masking for summarized data. Because pivot tables display only summarized amounts, they are an exception to dynamic format masking. In BI Publisher 11.1.1.7, the default formatting for pivot table amount columns is to display amounts with one decimal place and no separator commas, as shown in this example: 123456.1. This format is not ideal, since large numbers without comma separators are difficult to read, and most currencies have other than one decimal.
To improve readability, JD Edwards has chosen to use a manual decimal mask to display pivot tables within One View reports with two decimal places. For currencies that have something other than one decimal, the One View reports that JD Edwards delivers will display data tables and pivot tables with noticeable differences. For example, zero decimal currencies will display the number 123456 as123,456.00 in a pivot table, and as 123,456 in a data table. If your company uses a currency with other than two decimals, you can easily personalize pivot tables within the delivered One View reports to show the desired decimals by changing the decimal mask.
See Manually Assigning Row and Column Masks.
4.5.1 Activating the Decimal Formatting Feature
To activate the new decimal formatting feature, you must add a new property to the One View Reporting BI Publisher soft coding record.
See "Creating a Soft Coding Record" in the JD Edwards EnterpriseOne Tools One View Administration Guide.
4.5.2 Updating Decimal Formats in One View Reports
After decimal formatting has been activated, reports that you created with Oracle BI Publisher 11.1.1.5 might not display amounts with the desired decimal placement until you manually convert them to use the new 11.1.1.7 decimal format. The decimal format is automatically updated when you choose certain options on the Report Definition tab in a One View application.
For personal reports, decimal formats are updated when you select an existing report and use the Save, Save As, Copy, Promote, or Sync options on the Report Definition tab.
For shared reports, decimal formats are updated when you select an existing report and use the Copy, Reserve, and Sync options on the Report Definition tab.
After selecting any of these options, the system creates a column mask or a row mask for every decimal column in the data set. When you select Save, Save As, Copy, Promote, Sync, or Reserve, column and row masks are generated automatically and are associated with their respective decimal columns in the Oracle BI Publisher Layout Editor. Generally, no user intervention is required to create the column or row masks.
To change the default format mask created by the system, you can edit the Formatting Mask property under the Properties > Data Formatting folder in the Layout Editor.
4.5.3 Row and Column Masks
After a report has been updated to BI Publisher 11.1.1.7, the Layout Editor's Data Source pane displays column masks or row masks for every decimal column in the data set. The mask columns contain the decimal format data, which you can associate with decimal columns in the report layout
There are two types of masks:
-
Column Masks
Column masks are created for non-currency columns where the decimal position remains the same for all rows in the grid. Examples of column masks are Line Number and Quantity.
-
Row Masks
Row masks are created for currency columns where the decimal position could be different for each grid row. Examples of row masks are Amount, Balance, and Foreign Amount.
The following example shows how row and column masks appear in the Layout Editor. The column masks appear in the Columnmasks folder, whereas the row masks appear in the Grid's Rowset folder.
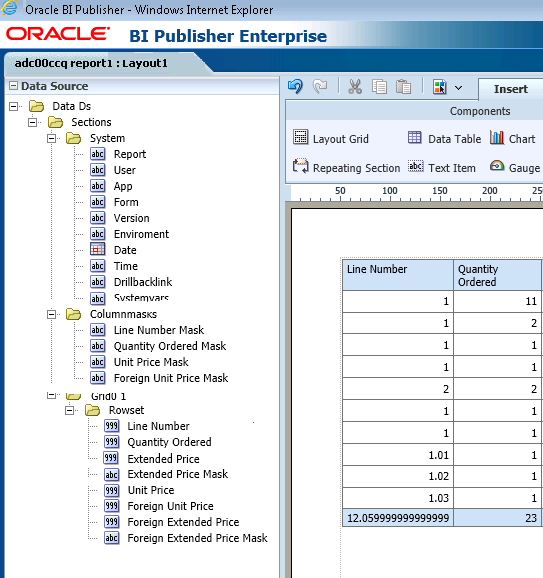
Description of the illustration ''layout_row_column_masks.png''
4.5.3.1 Column Masks
A column mask is created for columns where the decimal position remains the same for all rows in the grid. These columns are always non-currency fields in a JD Edwards EnterpriseOne table. The decimal position is determined by data dictionary properties for the data item on which the column is based.
Mask columns follow the naming convention <column name> Mask. For example, if the data set has the decimal column Unit Price, the corresponding mask column is Unit Price Mask. The Layout Editor's Data Source pane displays mask columns in the Columnmasks folder. Additionally, if the report's data table includes decimal columns, the Formatting Mask property on the Properties > Data Formatting pane displays the decimal format mask for each decimal column.
Mask columns are listed only if there is a column in the original data set which requires a column mask.
4.5.3.2 Row Masks
A row mask is created for columns where the decimal position might be different for each grid row. These columns are currency fields in a JD Edwards EnterpriseOne table. The decimal position for currency fields is determined by currency triggers in the EnterpriseOne software. The Layout Editor's Data Source pane displays row masks in the Rowset folder.
If the columns you selected in the One View application for the data set do not have decimal formatting, no column or row masks are created in the Layout Editor. If the data set includes currency columns, they are created as row masks not column masks.
Only one mask type can be associated with a column in the report's data set.
4.5.4 Manually Assigning Row and Column Masks
You can manually assign row and column masks in the Layout Editor when creating a new One View report. After creating a table, assign FormatMask columns to respective fields in the table.
4.6 Working with the Drill Back Feature (Release 9.1 Update)
Drill back enables you to access information related to One View reports in a seamless and intuitive manner. It provides you with the end-to-end traceability between One View reports and JD Edwards EnterpriseOne applications.
The drill back feature enables you to trace and investigate transactions by drilling from a specific row in a One View report table back to the source transaction in the JD Edwards EnterpriseOne application. An example may be to drill from a specific overdue invoice on a One View Customer Ledger report back to that same transaction within the Invoice Entry application, or to drill from that invoice back to the specific customer in the Customer Master application. The ability to drill back on One View report data provides users with the ability to investigate and navigate through the system to make informed decisions and take the best course of action.
When you pass your cursor over columns in a One View report, the cursor will change to a hand symbol when it encounters columns with drill back capability.
With the Oracle BI Publisher 11.1.1.7 release, One View reports have a Drill Back Link Composer that enables you to specify the JD Edwards EnterpriseOne application where the related detail resides. To define a drill back link, you define the:
-
JD Edwards EnterpriseOne interactive application.
Specify the name of the application that is associated with the data in the report.
-
Form name.
JD Edwards EnterpriseOne interactive applications can include multiple forms. Select the form that you want to appear when the application is launched.
With Tools 9.1 Update 5, if you select a Find/Browse form, a find is automatically performed when the application is launched, so that the user does not have to select the Find button to see data in the application.
-
Version.
Some JD Edwards EnterpriseOne interactive applications have more than one version. Select the appropriate version to launch.
-
Report fields.
Specify the fields in the report that are required to access the detail in the application. You can verify the required fields by launching the interactive application and noting the fields that are required to populate the detail form. You do not typically need to map all fields that are on the form.
The fields that you select pass data between the report and the interactive application.
4.6.1 Drill Back Link Composer
The Drill Back Link Composer resides on the One View Reporting side panel's Report Definition tab. Expanding the Drill Back Link Composer section reveals the fields that are required to define a drill back URL.
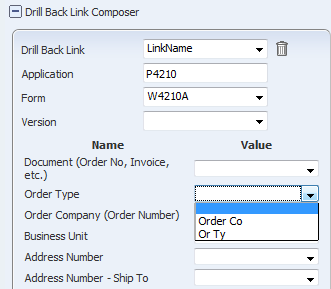
Description of the illustration ''drillback_link_mapfields.png''
To create a new drill back URL, expand the Drill Back Link Composer. For the Drill Back Link field select (add new link) from the drop-down list. Specify the JD Edwards EnterpriseOne application that is associated with the report data. After you enter the application name, the form names for the application appear in the Form field's drop-down list. When you select a form, the fields on the form are listed, along with a drop-down list for each data item. The drop-down list shows the report fields with the same data type as the data item. You can leave a data item blank or map it to one of the report's grid columns or to a custom variable in the report.
After the drill back information is saved, the drill back URL is generated automatically when you close the One View application. To access the URL, open the application and expand the Drill Back Link Composer. The drill back link displays at the bottom of the Drill Back Link Composer side panel, as shown in the following example:
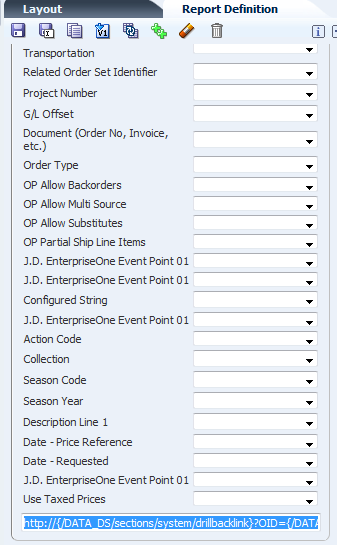
Description of the illustration ''drillback_link_url.png''
After the drill back URL has been created, you must copy it from the Drill Back Link Composer and paste it into the BI Publisher Layout Editor to implement the drill back feature. The following example shows the drill back URL in the properties for the Sold To column in the report layout.
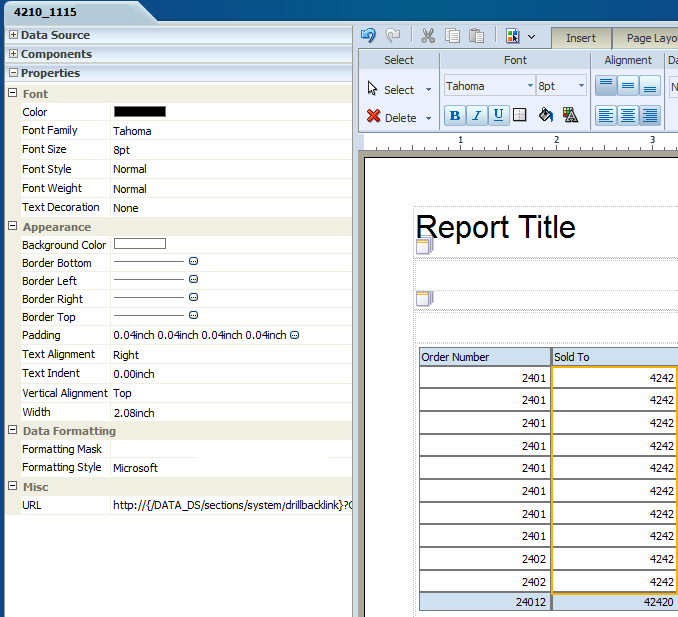
Description of the illustration ''layout_editor_paste_url.png''
Once the URL is part of the layout, when you run the report in interactive mode, you can click any report field that was defined as part of the drill back URL to display the detail information. The detail is sent to the One View report by the drill back URL.
4.6.2 Creating a Drill Back URL
Access a One View Reporting enabled form.
-
From the One View menu, select Manage Reports.
-
Select a report from My Reports.
-
In the side panel, click the Report Definition tab.
-
Expand the Drill Back Link Composer by clicking the plus (+) sign.
-
From the Drill Back Link drop-down list, select (add new link).
-
Enter a new link name in the New Link Name field, and then click OK.
-
In the Application field, enter the name of the JD Edwards EnterpriseOne application that is associated with the data in the report.
-
From the Form drop-down list, select a form name. With Tools Release 9.1 Update 5, if you select a Find/Browse form, the system automatically performs a find when the user uses the drill back link to access the application.
-
If the application has more than one version, select a version from the Version drop-down list.
-
Map the appropriate data items with the report fields for which you want drill back data.
Note:
You can only map data items which are selected as columns on the report. -
Copy the drill back URL at the bottom of the Drill Back Link Composer.
Note:
The only drill back information that is stored for each One View report is the application name, form name, and version. A drill back URL is generated automatically when you map data items with report fields. Because the mapping selections are not saved, you must create the entire mapping to modify a drill back URL. -
Click the Save icon.
-
Click the Layout tab in the side panel.
-
Click the Edit Layout icon to launch the BI Publisher Layout Editor.
-
In the Layout Editor, click the Edit link.
-
Select the column in the report for which you want to implement drill back capability.
-
Expand the Properties folder.
-
Expand the Misc folder, and paste the drill back URL into the URL field.
-
Click the Save icon.
-
Close the Layout Editor by clicking the X in the top-right corner to return to the JD Edwards EnterpriseOne One View application.
-
Close the One View application.
4.6.3 Modifying a Drill Back URL
Access a One View Reporting enabled form with a One View report that has a drill back URL.
-
From the One View menu, select Manage Reports.
-
Select a report from My Reports.
-
In the side panel, click the Report Definition tab.
-
Expand the Drill Back Link Composer by clicking the plus (+) sign.
-
In the Drill Back Link field, select a pre-defined link from the drop-down list.
The drill back link information displays.
-
Change the data item mapping selections as required.
Note:
The only drill back information that is stored for each One View report is the application name, form name, and version. A drill back URL is generated automatically when you map data items with report fields. Because the mapping selections are not saved, you must create the entire mapping to modify a drill back URL. -
Copy the drill back URL at the bottom of the Drill Back Link Composer.
-
Click the Save icon.
-
Click the Layout tab in the side panel.
-
Click the Edit Layout icon to launch the BI Publisher Layout Editor.
-
In the Layout Editor, click the Edit link.
-
Select the column in the report for which you want to change the drill back URL.
-
Expand the Properties folder.
-
Expand the Misc folder, and paste the drill back URL into the URL field.
-
Click the Save icon.
-
Close the Layout Editor by clicking the X in the top-right corner to return to the JD Edwards EnterpriseOne One View application.
-
Close the One View application.
4.6.4 Deleting a Drill Back URL
Access a One View Reporting enabled form with a One View report that has a drill back URL.
-
From the One View menu, select Manage Reports.
-
Select a report from My Reports.
-
In the side panel, click the Report Definition tab.
-
Expand the Drill Back Link Composer by clicking the plus (+) sign.
-
In the Drill Back Link field, select a pre-defined link from the drop-down list.
-
Click the Delete Link icon to delete the drill back URL.
The Drill Back Link field changes to (reset).
-
Click the Save icon.
-
Click the Layout tab in the side panel.
-
Click the Edit Layout icon to launch the BI Publisher Layout Editor.
-
In the Layout Editor, click the Edit link.
-
Select the column in the report for which you want to delete drill back capability.
-
Expand the Properties folder.
-
Expand the Misc folder, and delete the drill back URL from the URL field by pressing the Delete or the Backspace key on your keyboard.
-
Click the Save icon.
-
Close the Layout Editor by clicking the X in the top-right corner to return to the JD Edwards EnterpriseOne One View application.
-
Close the One View application.
4.7 Considerations When Modifying Reports
Consider the following issues when modifying reports:
Removing Columns from the Data Model
A warning message appears in JD Edwards EnterpriseOne if you remove a column from the data model and the column is referenced by the report layout. The message indicates that you might need to adjust the layout based on the change to the data model. Oracle's BI Publisher Layout Editor then launches automatically with a column substitution wizard, which enables you to specify a substitution for the missing column.
As a workaround, use the Layout Editor to remove the column from the report layout before removing it from the data model in JD Edwards EnterpriseOne.
|
Note: Do not click the Sign Out link, or you will have to sign into BI Publisher manually to run One View reports during the same session. |
Viewing Output Formats in BI Publisher Layout Editor
You can view only one output format at a time in the BI Publisher Layout Editor. To view a different format, use the View a list option and then select a format from the Output Format drop-down list.
|
Note: Do not click the Sign Out link, or you will have to sign into BI Publisher manually to run One View reports during the same session. |
Viewing All Records in the Interactive Viewer
BI Publisher is designed to show a limited number of rows in the interactive report. Use the vertical scroll bar in the interactive report to see the rest of the data.
Other output formats, such as PDF, do not have this limitation.
When you save the changes you make to an existing report using the Save Report option, the BI Publisher data model and the report definition for One View reports will be replaced but report layouts will be retained.
See Report Definition Icons for Personal Reportsfor more details.
In some instances, blank numeric data in a JD Edwards EnterpriseOne grid column appears as 0 (zero) in a BI Publisher report. An example is the data dictionary item SHPN (the shipment number in P4210). SHPN does not display a value if it is zero because that is how it is configured in the data dictionary. On a find browse form, a column based on a data dictionary item that has this display rule will be blank if the value is zero.
To enable data calculations, a blank numeric value in a grid column is sent to the BI Publisher server as a zero to enable data calculations. For this reason, the One View report shows a zero even though the EnterpriseOne grid column is blank.