17 Review Cases Mobile Application
This chapter discusses these topics:
-
Section 17.2, "Setting Up the Review Cases Mobile Application"
-
Section 17.3, "Using the Review Cases Mobile Tablet Application (M17500)"
|
Important Note: Before using the mobile application, Oracle strongly recommends that users have a complete understanding of how to use the associated processes and application in the JD Edwards EnterpriseOne base software.For additional information about the processes and application associated with the mobile application discussed in this chapter, see: |
17.1 Review Cases Mobile Application Overview
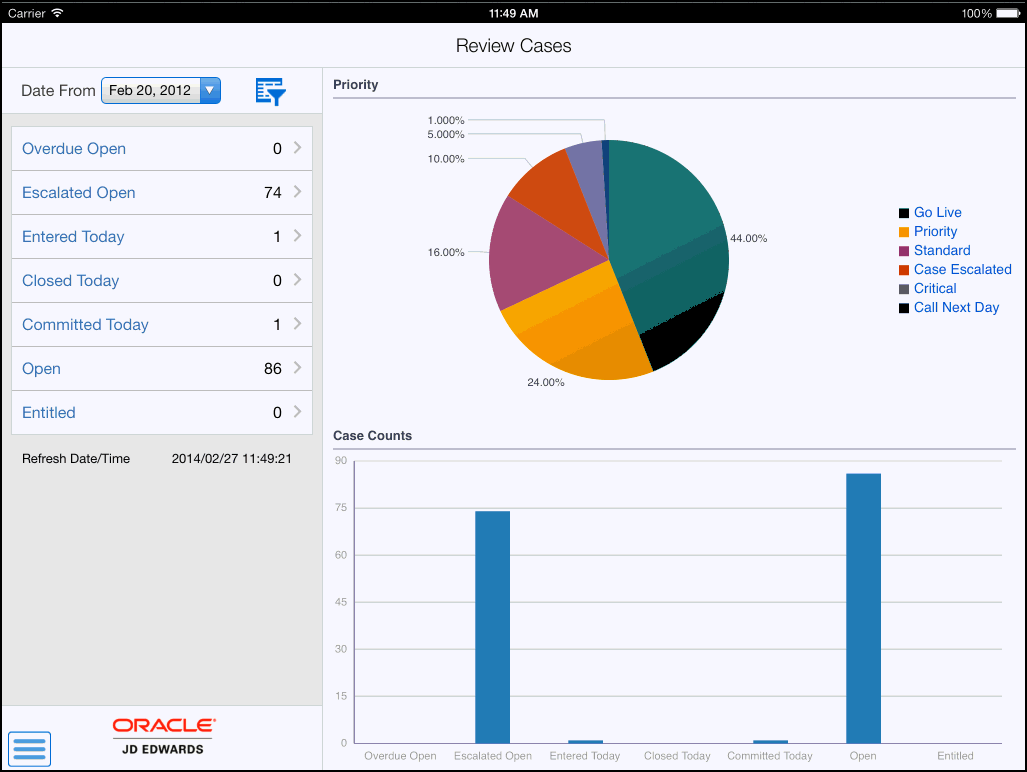
You use the Review Cases mobile application to easily view the number of cases based on several categories over a specific period of time. The categories are: Overdue Open, Escalated Open, Entered Today, Closed Today, Committed Today, Open, and Entitled. You can view a list of cases that fall in each of these categories and review the details of each case. You can review and analyze cases by priority through a pie-chart. You can use filters to search for cases.
You can also view existing photos of the case, and add new photos to the case.
This table lists the application that are available to review cases:
| Type of Application | Additional Information |
|---|---|
| Base EnterpriseOne application | To review cases, use this application in the JD Edwards EnterpriseOne system:
|
| Tablet application | Review Cases (M17500)
To download the application to your tablet, search on the following text in the application store:
|
Before using the Review Cases tablet application, you set processing options for the Review Cases mobile tablet application (M17500).
17.1.1 Differences and Limitations: Review Cases
Mobile applications are intended to be a simplified version of the applications that are available in the base software. In most cases, the mobile applications provide a subset of the functionality available in the base software.
The Review Cases mobile application is set up with search filters that are coded in the application, as described in the following table. When you launch the mobile application, the system displays cases that satisfy the criteria of these inbuilt filters. These search filters might cause your search results to appear differently in the mobile application, compared to the base application.
However, the mobile application provides you with editable filter fields that you can use to search for and filter cases.
| Case Category | Hard-Coded Search Filters |
|---|---|
| Overdue Open | This category includes only those cases that are not specified as closed or cancelled in the filter, and the system date is greater than the committed date in the Date/Time Committed field in the Work With Case program (P17500). |
| Escalated Open | This category includes only those cases that are not specified as closed or cancelled in the filter, and the escalation method specified (Escalation 1) has a value greater than 1 (One) in the Work With Case program. |
| Entered Today | This category includes only those cases that have the system date as the case-entered date in the Date/Time Begin field in the Work With Case program. |
| Closed Today | This category includes only those cases that have the system date as the case-ending date in the Date/Time End field in the Work With Case program. |
| Committed Today | This category includes only those cases that have the system date as the case-committed date in the Date/Time Committed field in the Work With Case program. |
| Open | This category includes only those cases that are not specified as closed or cancelled in the filter. |
| Entitled | This category includes only those cases that are not specified as closed or cancelled in the filter, and the Entitlement Check field in the Work With Case program is populated with 1, 2, 3, or 4. |
17.2 Setting Up the Review Cases Mobile Application
Before using the Review Cases mobile application (M17500), you must set up the processing options of the application in the JD Edwards EnterpriseOne system. You use the processing options to specify the versions of the programs that the system uses to process cases for the mobile application.
Before you set up the processing options for the M17500 program, review the processing options for the Work With Case program (P17500). You review these processing options to verify the validity of the options in the specified versions when you process case data by using the mobile device.
17.2.1 Setting Processing Options for the Review Cases Mobile Tablet Application (M17500)
You use processing options to specify default processing information for a program.
17.2.1.1 Versions
- 1. Work With Case (P17500) Version
-
Use this processing option to specify which version of the Work With Case program (P17500) the system uses. To process cases, the Review Cases mobile tablet application (M17500) uses the processing options of the version that you specify. If you leave this processing option blank, the system uses ZJDE0001.
- 2. Equipment Address Location (P1704) Version
-
Use this processing option to specify which version of the Equipment Address Location program (P1704) the system uses. To process work orders, the Review Cases mobile tablet application (M17500) uses the processing options of the version that you specify. If you leave this processing option blank, the system uses ZJDE0001.
- 3. Address Book (P01012) Version
-
Use this processing option to specify which version of the Address Book program (P01012) the system uses. To process cases, the Review Cases mobile tablet application (M17500) uses the processing options of the version that you specify. If you leave this processing option blank, the system uses ZJDE0001.
17.3 Using the Review Cases Mobile Tablet Application (M17500)
The Review Cases mobile tablet application (M17500) enables you to view summarized lists of cases by categories, and view detailed information about each case on a mobile tablet.
Before you can use the application, you must download and install the application from the application store on your device.
17.3.1 Reviewing Cases Using a Mobile Tablet Application (M17500)
To review cases:
-
Open the application by tapping the Review Cases icon on your device, and then log in.
See Chapter 3, "Logging Into Mobile Enterprise Applications"
-
On the Review Cases home screen, review the current cases data. To refresh the data on the screen, swipe down on the panel with the list of cases counts.
- Date From
-
This field uses the default date of one week prior to the system date. When you launch the application, the system displays case counts and data based on this date. You can change the date by tapping the Date From dropdown menu and selecting a different date. When you select a different date, the system updates the cases counts and data.
- Cases Category Fields
-
The fields in this section list the number of cases by category since the selected date. Example, Overdue Open category lists the number of cases that are open and overdue since the specified date.
Note that the case counts displayed in these fields are also graphically displayed in the Case Counts section on the right side of the screen.
- Priority
-
This graph displays the cases grouped by priority.
-
Tap any of the cases category fields on the left pane, segments in the Priority pie chart, or the bars in the Case Counts graph to display a list of cases in that category.
-
You can use filters to search and filter cases. To filter cases, tap the filter icon at the top of the left pane.
- Status
-
Tap the From and To dropdown menus and specify the status range that the system uses to search for cases.
- Customer
-
To add a customer to your search criteria, you can use the search icon to search for a value and return it to the Customer field, or you can manually enter the address book number of a customer in the field.
To search for a customer, tap the search icon. In the Customer Address search screen, you can use a combination of the customer name and search type to search for a customer. After you specify values for your search, tap the Search button. The system pulls up all records that satisfy the search criteria.
To discontinue the search and to go back to the filters screen, tap the Cancel button.
To return a value back to the Customer field, tap the customer record from the search result.
- Inventory Item
-
To add an inventory item to your search criteria, you can use the search icon to search for a value and return it to the Inventory Item field, or you can manually enter the item number in the field.
- Provider Group
-
To add a provider group to your search criteria, you can use the search icon to search for a value and return it to the Provider Group field, or you can manually enter the provider group address book number in the field.
-
In the filters screen, to continue the search by using the specified filter values, tap the Apply button. When you tap the Apply button, the system:
-
Takes you to the list of cases that are displayed based on your filter values.
-
Saves the filter values that you entered. The system displays the saved filter values the next time you open the filter screen.
To discontinue the use of filter values in your search, tap the Cancel button. When you tap the Cancel button, the system:
-
Takes you to the screen that has the cases counts and graphs associated with the last saved filter values, if applicable.
-
Ignores the filter values that you entered, and restores the last saved filter values to the filter fields.
To delete all filter values you specified, and to enter new filter values, tap the Clear button.
-
-
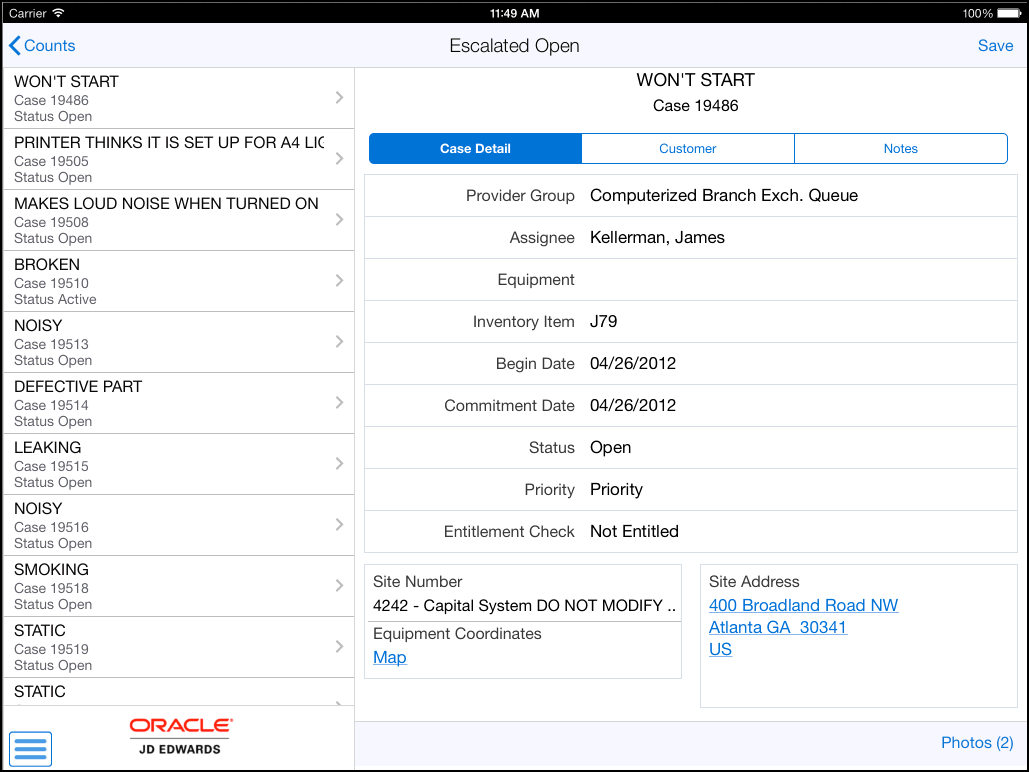
The first case on the list is displayed in the right pane of the screen.
-
Tap the data in the Site Address section, or the Map link in the Equipment Coordinates section, to use the device's map and navigational features.
-
To review details about a different case, tap the case. The selected case is highlighted in the case list. The Case Detail tab is open by default.
-
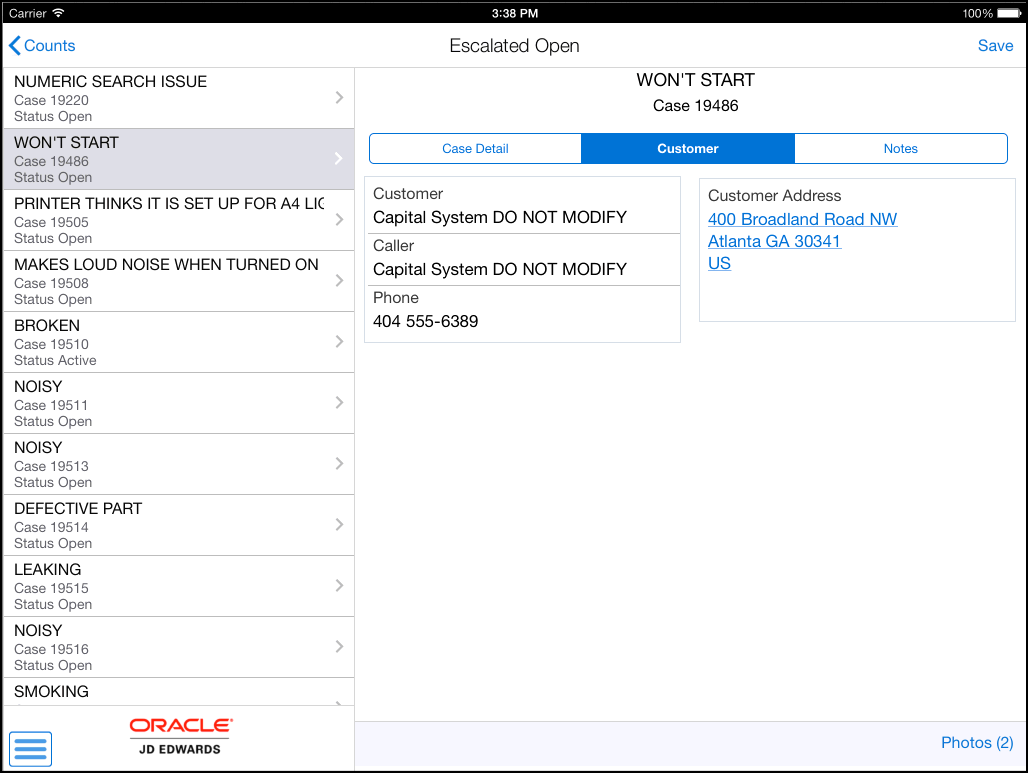
To review customer information, tap the Customer tab.
-
Tap the data in the Customer Address section to use the device's navigational feature.
-
To review notes history and to enter new notes, tap the Notes tab.
-
To enter external notes that all users logging in to the JD Edwards EnterpriseOne system can access and view, tap the New External Notes field and enter texts. You can view previous external notes from the External Notes History field.
To enter internal notes that only employees can access and view, tap the New Internal Notes field and enter texts. You can view previous internal notes from the Internal Notes History field
-
To view photos of the case, tap the Photos button. The number displayed on the Photos button represents the total number of photos attached to the case.
-
A list of photos appear as thumbnails in the left pane. In the right pane, the system displays the photo that appears first in the list.
To view a photo, tap the photo thumbnail. To delete the photo, tap the Delete button. On the confirmation window that opens up, tap to confirm that you are deleting the photo. The system removes the photo from the list of photos.
To add a photo to the case, tap the Add button. The system displays two options: Album and Camera.
To attach an existing photo from your device's photo gallery to the case, tap the Album option.
To take a new photo, tap the Camera option to use the device's camera feature.
-
You can add a description of the photo. To save the photo, tap the Save button. The system adds the photo to the list of photos, and increments the number of photos available by 1 (One).
To discontinue adding the photo and to go back to the Photos screen, tap the Cancel button.
-
To log out of the application, tap the menu button at the bottom left of the screen, and then tap Logout.


