3 Managing Supply and Demand Information
This chapter contains the following topics:
3.1 Understanding Supply and Demand Information
After a material requirements planning (MRP) run, you can use the JD Edwards EnterpriseOne In-Memory Planning Advisor solution to review and manage supply and demand information to optimize the production plan. You use the Planning Advisor Summary (P34X100) and Planning Advisor Console (P34X200) programs to analyze and manage supply and demand data.
This image illustrates the Planning Advisor Summary and Planning Advisor Console process flow:
Figure 3-1 Planning Advisor Summary and Planning Advisor Console Process Flow
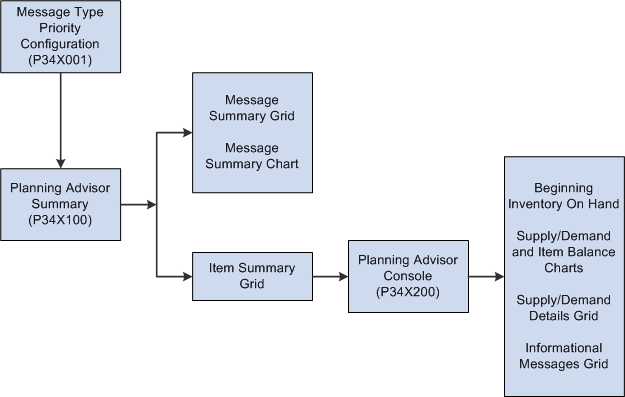
Description of "Figure 3-1 Planning Advisor Summary and Planning Advisor Console Process Flow"
After you set up the message type priority configuration in the Message Type Priority Configuration program (P34X001), use the Planning Advisor Summary program (P34X100) to view message and item summary information and the message summary chart. Use the Planning Advisor Console program (P34X200) to view supply and demand information, such as beginning inventory on hand, Supply and Demand chart, Item Balance chart, supply and demand details, and informational messages. You navigate to the Planning Advisor Console program either from the Item Summary grid in the Planning Advisor Summary program or the In-Memory Planning Advisor Operations (G3415) menu.
3.2 Working with Planning Advisor Summary
This section provides an overview of the Planning Advisor Summary program, lists prerequisites, and discusses how to:
-
Set processing options for the Planning Advisor Summary program (P34X100).
-
Search for message and item summary information.
-
Review message summary information.
-
Review item summary information.
3.2.1 Understanding Planning Advisor Summary
Use the Planning Advisor Summary program (P34X100) to view MRP action messages and message type counts for a message type configuration, and summarized information about the items associated with the message types.
While searching for message summary and item summary for a message type configuration, you can specify parameters to filter the data that you want to view. To filter data, use the fields in the Item Information tab and the Message Information tab in the Item Selection group. To further refine your search, use the enhanced queries.
To search for message summary and item summary information, you must specify the Configuration Name. Additionally, you must specify at least one filter criterion in the Item Selection group, or use the enhanced query. The system uses the Item Branch table (F4102) and MRP Message File table (F3411) to display the filter criteria.
You can use the Query Management function to save search criteria. If you save an enhanced query, you can populate the Message Summary grid with data that meet the query data. For example, if you create and save an enhanced query that includes a branch/plant and specify to use that query as a default value, then the Planning Advisor Summary form is initialized with the data for the specified branch/plant when you click the Find button.
See "Working with Search Criteria" in the JD Edwards EnterpriseOne Tools Foundation Guide.
The Planning Advisor Summary enables you to manage watchlists. A watchlist is based on an existing query and represents a collection of items that match user-defined criteria.
See the JD Edwards EnterpriseOne Applications One View Watchlists Implementation Guide.
The Planning Advisor Summary form contains the following subforms:
-
Message Summary (S34X100A)
-
Item Summary (S34X100B)
The system retrieves information for the Planning Advisor Summary form from the following tables:
-
Item Master (F4101)
-
Item Branch File (F4102)
-
MPS/MRP/DRP Message File (F3411)
The system stores information for the Planning Advisor Summary program in the following tables:
-
Message Summary Work Table (F34X100W)
-
Item Summary Work Table (F34X101W)
-
Item List Work Table (F34X110W)
3.2.1.1 Message Summary Subform
The Message Summary subform displays a summarized count of message types for a message type configuration. The system displays the message types in the order that you specified when you set up the message type configuration. The Message Type Notification column displays icons with hover text, stating whether the message type count is less than, greater than, or equal to the threshold level defined for the message type.
This table describes the icons that the system displays for each message type count:
| Message Type Count | Icon |
|---|---|
| Less than the medium message count threshold | Green circle |
| Greater than or equal to the medium message count threshold but less than the highest message count threshold | Yellow triangle |
| Greater than or equal to the highest message count threshold | Red square |
For example, if you set the medium message count threshold for a message type as 100 and the highest message count threshold as 200, the system displays a green circle icon if the message count for the message type is less than 100, a yellow triangle icon if the message count is greater than or equal to 100 but less than 200, and a red square icon if the message count is greater than or equal to 200.
The system issues a lead time alert for actionable message types and displays an exclamation mark if the calculated start date for at least one message, based on the fixed lead time set up in the Item/Branch Plant Manufacturing Data, is less than the current date. The system calculates the start date by backscheduling from the requested date using working days, as defined in the Shop Floor Calendar for manufactured items, and calendar days for purchased items.
The Message Summary subform contains a Message Summary by Priority bar chart. This bar chart displays total message counts for high, medium, and low priority messages as user defined by the specified configuration. The bar colors are consistent with the message type notification icons; red for high priority, yellow for medium priority, and green for low priority. When you click a bar on the chart, the system displays the Item Summary subform with the details of the items associated with the message types.
The Message Summary subform contains a Message Summary by Priority bar chart. This bar chart displays the total message counts for high, medium, and low priority messages as user-defined for the specified configuration. The bar colors correspond to the message type notification icons; red for high priority, yellow for medium priority, and green for low priority. When you click a bar on the chart, the system displays the Item Summary subform with the details of the items associated with the message types.
3.2.1.2 Item Summary Subform
The system displays the Item Summary subform when you perform one of the following actions:
-
Select a row in the Message Summary grid.
-
Click an icon in the Message Type Notification column.
-
Click an icon in the Leadtime Alert column.
-
Click a bar in the Message Summary by Priority chart.
The system displays the items that have messages with the selected message type or message types in the Item Summary grid. The system displays the columns for the message type counts in the Item Summary grid based on the configuration name and in the order that you specified when you set up the configuration. The Message Sequence that you set up for the message types in the Message Type Priority Configuration program (P34X001) determines the sequence in which the system displays the message type counts in the Item Summary grid. This corresponds to the sequence in which the system displays the message types in the Message Summary grid. The system retrieves the list of items displayed in the Item Summary grid from the Item List Work Table (F34X110W).
For the Past Due Supply Quantity and Safety Stock columns, the system displays the corresponding values in gray colored font to indicate that they are included in the on-hand inventory (determined by the Inventory On Hand processing option settings for the Planning Advisor Console program). If the past due supply quantity or safety stock is excluded from the on-hand inventory, the system displays the corresponding value in black colored font.
The system issues a lead time alert for actionable message types and displays an exclamation mark if the calculated start date for at least one message, based on the fixed lead time set up in the Item/Branch Plant Manufacturing Data, is less than the current date. The system calculates the start date by backscheduling from the requested date using working days, as defined in the Shop Floor Calendar for manufactured items, and calendar days for purchased items.
3.2.1.3 Viewing Days of Supply
In the Item Summary grid, you can view the number of days that the supply for an item/branch will cover the demand for the item/branch. The system displays the following days of supply fields:
-
Inventory On Hand
-
Days Until 1st Receipt
-
Days Until 2nd Receipt
-
Days of Supply Current
-
Days of Supply After 1st Receipt
-
Days of Supply After 2nd Receipt
Based on whether past due supply is included in or excluded from the on-hand quantity, the number of days of supply until the first and second receipt of material can be a negative value or a positive value. Set the Past Due Supply Quantity processing option for the Planning Advisor Console program (P34X200) to 1 to include past due supply in the on-hand quantity.
See Setting Processing Options for the Planning Advisor Console Program (P34X200).
This table describes the calculation for the days of supply fields:
| Field | Calculation |
|---|---|
| Inventory On Hand | The system calculates the starting balance as on-hand quantity minus the past due demand. |
| Days of Supply Current | The system calculates the number of days until the stock level for the item/branch falls below 0. For the calculation, the system considers total demand (independent and dependent) for firm (not planned) demand. The starting on-hand quantity is the on-hand quantity after applying the P34X200 processing options to include in/exclude from on-hand inventory, and this value is retrieved from the Item Summary Work Table table (F34X101W). Demand is aggregated by date and deducted from the starting on-hand quantity until the stock level falls below 0. The system displays a negative value as 0. |
| Days Until 1st Receipt | The system calculates the number of days from the Start Date until the first receipt of material.
If past due supply is included in the on-hand quantity, this field can have a negative value. If past due supply is not included in the on-hand quantity, this field has a positive value. |
| Days Until 2nd Receipt | The system calculates the number of days from the Start Date until the second receipt of material.
If past due supply is included in the on-hand quantity, this field can have a negative value. If past due supply is not included in the on-hand quantity, this field has a positive value. |
| Days After 1st Receipt | The system calculates the number of days until the stock level for the item/branch falls below 0. For the calculation, the system considers total demand (independent and dependent) for firm (not planned) demand. The starting on-hand quantity is the on-hand quantity after applying the P34X200 processing options to include in/exclude from on-hand inventory. For the first receipt, supply is aggregated by date and added to the on-hand quantity on the date of the first receipt. Demand is aggregated by date and deducted from the supply until the stock level falls below 0.
If past due supply is included in the on-hand quantity, the system considers supply records with a date less than the planning horizon start date in the starting balance. If past due supply is excluded from the on-hand quantity, the system ignores supply records with a date less than the planning horizon start date. |
| Days After 2nd Receipt | The system calculates the number of days until the stock level for the item/branch falls below 0. For the calculation, the system considers total demand (independent and dependent) for firm (not planned) demand. The starting on-hand quantity is the on-hand quantity after applying the P34X200 processing options to include in/exclude from on-hand inventory. For the second receipt, supply is aggregated by date and added to the current supply on the date of the second receipt. Demand is aggregated by date and deducted from the supply until the stock level falls below 0.
If past due supply is included in the on-hand quantity, the system considers supply records with a date less than the planning horizon start date in the starting balance. If past due supply is excluded from the on-hand quantity, the system ignores supply records with a date less than the planning horizon start date. |
This table describes the icons that the system displays in the Days Until 1st Receipt and Days Until 2nd Receipt fields:
| Icon | Description |
|---|---|
| Red square | The number of days until the first or second receipt of material is greater than the current days of supply. |
| Yellow triangle | The number of days until the first or second receipt of material is equal to the current days of supply. |
| Green circle | The number of days until the first or second receipt of material is less than the current days of supply. |
| Red X | No receipt exists for the planning horizon. |
This table describes the icons that the system displays in the Inventory On Hand field:
| Icon | Description |
|---|---|
| Green circle | The starting on-hand quantity is greater than or equal to 0. |
| Red square | The starting on-hand quantity is less than 0. |
3.2.1.3.1 Example: Days of Supply Calculation
For the days of supply calculations, the system uses the data in the Planning Details Supply/Demand Worktable table (F34X200W). For supply information, the F34X200W table is populated with data from the Purchase Order Detail File table (F4311) or the Work Order Master File table (F4801), starting with the oldest active order. The system retrieves inventory information from the Item Location File table (F41021) or the Lot Master table (F4108), and demand information from the Sales Order Detail File table (F4211), starting with the oldest active order. Calculations for the number of days until the first receipt and number of days until the second receipt of material start on the planned start date that you define as part of the Planning Advisor Console program (P34X200) processing options.
|
Note: The system uses calendar dates for the days of supply calculations. For calendar dates, a week starts on Sunday and ends on Saturday, and a month ends on the last day of the month. |
The following examples show how the system calculates the number of days of supply based on whether past due supply is included in or excluded from the on-hand quantity.
Example 1
This example uses the following data:
-
The Past Due Supply Quantity processing option for the Planning Advisor Console program (P34X200) is set to 1 to include past due supply in the on-hand quantity.
-
The planning start date is February 18.
| Day | On Hand | Demand | Inventory On Hand | Days of Supply - Current | Days Until 1st Receipt | Days After 1st Receipt | Days Until 2nd Receipt | Days After 2nd Receipt |
|---|---|---|---|---|---|---|---|---|
| 250 | green circle | 2 | 1 - green circle | 5 | 5 - yellow triangle | 25 | ||
| Feb 18 | 100 | 150 | 150 | 150 | ||||
| Feb 19 | 100 | 50 | 280 | 330 | 330 | |||
| Feb 20 | 100 | -50 | 230 | 230 | ||||
| Feb 21 | 100 | 130 | 130 | |||||
| Feb 22 | 100 | 30 | 30 | |||||
| Feb 23 | 100 | -70 | 830 | 760 | ||||
| Feb 25 | 300 | 460 | ||||||
| Feb 28 | 250 | 210 | ||||||
| Mar 1 | 75 | 135 | ||||||
| Mar 8 | 100 | 35 | ||||||
| Mar 15 | 100 | -65 | ||||||
| Mar 22 | 100 | |||||||
| Mar 29 | 100 |
Example 2
This example uses the following data:
-
The Past Due Supply Quantity processing option for the Planning Advisor Console program (P34X200) is set to 1 to include past due supply in the on-hand quantity.
-
The planning start date is February 25.
| Day | On Hand | Demand | Inventory On Hand | Days of Supply - Current | Days Until 1st Receipt | Days After 1st Receipt | Days Until 2nd Receipt | Days After 2nd Receipt |
|---|---|---|---|---|---|---|---|---|
| 250 + 1110 | green circle | 18 | -6 - green circle | -2 | -2 - yellow triangle | 18 | ||
| Feb 18 | 100 | 1260 | 150 | 150 | ||||
| Feb 19 | 100 | 1160 | 280 | 330 | 330 | |||
| Feb 20 | 100 | 1060 | 230 | 230 | ||||
| Feb 21 | 100 | 960 | 130 | 130 | ||||
| Feb 22 | 100 | 860 | 30 | 30 | ||||
| Feb 23 | 100 | 760 | -70 | 830 | 760 | |||
| Feb 25 | 300 | 460 | 460 | |||||
| Feb 28 | 250 | 210 | 210 | |||||
| Mar 1 | 75 | 135 | 135 | |||||
| Mar 8 | 100 | 35 | 35 | |||||
| Mar 15 | 100 | -65 | -65 | |||||
| Mar 22 | 100 | |||||||
| Mar 29 | 100 |
Example 3
This example uses the following data:
-
The Past Due Supply Quantity processing option for the Planning Advisor Console program (P34X200) is set to 1 to include past due supply in the on-hand quantity.
-
The planning start date is February 21.
| Day | On Hand | Demand | Inventory On Hand | Days of Supply - Current | Days Until 1st Receipt | Days After 1st Receipt | Days Until 2nd Receipt | Days After 2nd Receipt |
|---|---|---|---|---|---|---|---|---|
| 250 + 280 | green circle | 2 | -2 - green circle | 2 | 2 - yellow triangle | 22 | ||
| Feb 18 | 100 | 430 | 150 | 150 | ||||
| Feb 19 | 100 | 330 | 280 | 330 | 330 | |||
| Feb 20 | 100 | 230 | 230 | 230 | ||||
| Feb 21 | 100 | 130 | 130 | 130 | ||||
| Feb 22 | 100 | 30 | 30 | 30 | ||||
| Feb 23 | 100 | -70 | -70 | 830 | 760 | |||
| Feb 25 | 300 | 460 | ||||||
| Feb 28 | 250 | 210 | ||||||
| Mar 1 | 75 | 135 | ||||||
| Mar 8 | 100 | 35 | ||||||
| Mar 15 | 100 | -65 | ||||||
| Mar 22 | 100 | |||||||
| Mar 29 | 100 |
Example 4
This example uses the following data:
-
The Past Due Supply Quantity processing option for the Planning Advisor Console program (P34X200) is blank to exclude past due supply from the on-hand quantity.
-
The planning start date is February 18.
| Day | On Hand | Demand | Inventory On Hand | Days of Supply - Current | Days Until 1st Receipt | Days After 1st Receipt | Days Until 2nd Receipt | Days After 2nd Receipt |
|---|---|---|---|---|---|---|---|---|
| 250 | green circle | 2 | 1 - green circle | 5 | 5 - yellow triangle | 25 | ||
| Feb 18 | 100 | 150 | 150 | 150 | ||||
| Feb 19 | 100 | 50 | 280 | 330 | 330 | |||
| Feb 20 | 100 | -50 | 230 | 230 | ||||
| Feb 21 | 100 | 130 | 130 | |||||
| Feb 22 | 100 | 30 | 30 | |||||
| Feb 23 | 100 | -70 | 830 | 760 | ||||
| Feb 25 | 900 | 460 | ||||||
| Feb 28 | 250 | 210 | ||||||
| Mar 1 | 75 | 135 | ||||||
| Mar 8 | 100 | 35 | ||||||
| Mar 15 | 100 | -65 | ||||||
| Mar 22 | 100 | |||||||
| Mar 29 | 100 |
Example 5
This example uses the following data:
-
The Past Due Supply Quantity processing option for the Planning Advisor Console program (P34X200) is blank to exclude past due supply from the on-hand quantity.
-
The planning start date is February 25.
| Day | On Hand | Demand | Inventory On Hand | Days of Supply - Current | Days Until 1st Receipt | Days After 1st Receipt | Days Until 2nd Receipt | Days After 2nd Receipt |
|---|---|---|---|---|---|---|---|---|
| 250 | red square | 0 | no receipt | 0 | no receipt | 0 | ||
| Feb 18 | 100 | 150 | 150 | 150 | ||||
| Feb 19 | 100 | 50 | 280 | 50 | 50 | |||
| Feb 20 | 100 | -50 | -50 | -50 | ||||
| Feb 21 | 100 | |||||||
| Feb 22 | 100 | |||||||
| Feb 23 | 100 | 830 | ||||||
| Feb 25 | 300 | |||||||
| Feb 28 | 250 | |||||||
| Mar 1 | 75 | |||||||
| Mar 8 | 100 | |||||||
| Mar 15 | 100 | |||||||
| Mar 22 | 100 | |||||||
| Mar 29 | 100 |
Example 6
This example uses the following data:
-
The Past Due Supply Quantity processing option for the Planning Advisor Console program (P34X200) is blank to exclude past due supply from the on-hand quantity.
-
The planning start date is February 21.
| Day | On Hand | Demand | Inventory On Hand | Days of Supply - Current | Days Until 1st Receipt | Days After 1st Receipt | Days Until 2nd Receipt | Days After 2nd Receipt |
|---|---|---|---|---|---|---|---|---|
| 250 | red square | 0 | 2 - red square | 7 | no receipt | 7 | ||
| Feb 18 | 100 | 150 | 150 | 150 | ||||
| Feb 19 | 100 | 50 | 50 | 50 | ||||
| Feb 20 | 100 | -50 | -50 | -50 | ||||
| Feb 21 | 100 | -150 | -150 | |||||
| Feb 22 | 100 | -250 | -250 | |||||
| Feb 23 | 100 | 830 | 480 | 480 | ||||
| Feb 25 | 300 | 180 | 180 | |||||
| Feb 28 | 250 | -70 | -70 | |||||
| Mar 1 | 75 | |||||||
| Mar 8 | 100 | |||||||
| Mar 15 | 100 | |||||||
| Mar 22 | 100 | |||||||
| Mar 29 | 100 |
3.2.1.4 Access to Additional Programs from the Item Summary Subform
From the Item Summary subform, you can access the Planning Advisor Item Hover Form program (P34X100H) and the Planning Advisor Contact Hover Form program (P34X300H).
Use the Planning Advisor Item Hover Form program to view additional item information. Click the orange square in the upper left corner of the Item Number field to access the Additional Item Information hover form that includes information, such as the lead time level, lead time per unit, order policy code, and so on. The hover form automatically closes when you move your mouse away from the form.
Use the Planning Advisor Contact Hover Form program to view additional information about the material planner for the item. To access the Planning Advisor Contact Hover Form program, click the orange square in the upper left corner of the Planner Number field. The system displays the phone numbers and email address of the planner.
The system retrieves the phone and email information for the planner by Address Book Number and Line ID from the Who's Who record with the Type set to Attention Name in the Address Book - Who's Who table (F0111).
|
Note: To set up a phone number, you must set a matching Line ID record for the Address Book Number in the Address Book - Phone Numbers table (F0115). Additionally, set the Phone Type to the Special Handling values for codes E1 and E2 in UDC 00/HV.To set up an email address, you must set a matching Line ID record for the Address Book Number in the Electronic Address table (F01151). |
You can access related programs by selecting a list item from the Row Exits drop-down list in the Item Summary subform. After you select the list item, click the arrow button to navigate to the program. You can select one of these list items:
-
Item Ledger
The system displays the Item Ledger Inquiry (THE CARDEX) program (P4111) when you select this list item.
-
Item Availability
The system displays the Item Availability program (P41202) when you select this list item. Alternatively, click the Quantity On Hand link to navigate to the Item Availability program.
-
Planning Console
The system displays the Planning Advisor Console program (P34X200) when you select this list item. Alternatively, click the Item Number link to navigate to the Planning Advisor Console program.
You set processing options to specify the versions of the program to launch when you access programs from the Row Exits drop-down list.
See Setting Processing Options for the Planning Advisor Summary Program (P34X100).
-
Attachments
The system displays the Media Object Viewer when you select this list item.
3.2.2 Prerequisites
Before you perform the tasks in this section:
-
Set up message type priority configurations in the Message Type Priority Configuration program (P34X001).
-
(Optional) Set up security for One View Watchlists.
-
If you use single-facility planning, run the MRP/MPS Requirements Planning program (R3482).
-
If you use multifacility planning, run the Master Planning Schedule - Multiple Plant program (R3483).
3.2.3 Setting Processing Options for the Planning Advisor Summary Program (P34X100)
Processing options enable you to specify the default processing for programs and reports.
3.2.3.1 Defaults
- 1. Configuration Name
-
Specify the default message type configuration name that the system displays in the Planning Advisor Summary form.
3.2.3.2 Versions
Use these processing options to specify the versions of programs.
When you select a version, review the version's processing options to ensure that the version meets the requirements.
- 1. Item Ledger Inquiry (P4111)
-
Specify the version of the Item Ledger Inquiry program (P4111) that the system will use when you access this program from the Planning Advisor Summary form. If you leave this processing option blank, the system uses version ZJDE0001.
- 2. Planning Advisor Console (P34X200)
-
Specify the version of the Planning Advisor Console program (P34X200) that the system will use when you access this program by clicking the Item Number link in the Planning Advisor Summary form. If you leave this processing option blank, the system uses version ZJDE0001.
- 3. Item Availability (P41202)
-
Specify the version of the Item Availability program (P41202) that the system will use when you access this program from the Planning Advisor Summary form. If you leave this processing option blank, the system uses version ZJDE0001.
3.2.4 Searching for Message and Item Summary Information
To search for message and item summary information:
-
Access the Planning Advisor Summary form.
Form Name Form ID Navigation Planning Advisory Summary W34X100A In-Memory Planning Advisor Operations (G3415). Select Planning Advisor Summary (P34X100).
-
(Optional) Expand the Item Selection group.
-
On the Item Information tab, enter values in these fields, as applicable:
- Configuration Name
-
Enter the name of the message type configuration for which you want to search for message and item summary information.
If you set the Configuration Name processing option for the Planning Advisor Summary program (P34X100), the system displays that value in this field. You can override the default value.
This is a required field.
- Item Number
-
Enter a number that the system assigns to an item. It can be in short, long, or third item number format.
- Planner Number
-
Enter the address book number of the material planner for the item. Alternatively, you can specify the planner number in an enhanced query.
- Planning Code
-
Enter a code that indicates how Master Production Scheduling (MPS), Material Requirements Planning (MRP), or Distribution Requirements Planning (DRP) processes this item. Values are:
0: Not Planned by MPS, MRP, or DRP
1: Planned by MPS or DRP
2: Planned by MRP
3: Planned by MRP with additional independent forecast
4: Planned by MPS, Parent in Planning Bill
5: Planned by MPS, Component in Planning Bill
These codes are hard-coded.
Alternatively, you can specify the planning code in an enhanced query.
- Branch/Plant
-
Enter an alphanumeric code that identifies a separate entity within a business for which you want to track costs. For example, a business unit can be a warehouse location, job, project, work center, branch, or plant. You can assign a business unit to a document, entity, or person for purposes of responsibility reporting.
Alternatively, you can specify the branch/plant in an enhanced query.
Note:
Business unit security can prevent you from viewing information about business units for which you have no authority. - Master Planning Family
-
Enter a value from UDC (41/P4) that represents an item property type or classification, such as commodity type or planning family. The system uses this code to sort and process similar items. This field is one of the six classification categories available primarily for purchasing purposes.
Alternatively, you can specify the master planning family in an enhanced query.
- Supplier
-
Enter the address book number of the preferred provider of the item. Alternatively, you can specify the supplier in an enhanced query.
- Buyer Number
-
Enter the address book number of the person responsible for setting up and maintaining the correct stocking levels for the item. Alternatively, you can specify the buyer number in an enhanced query.
-
(Optional) Click the Message Information tab.
-
On the Message Information tab, enter values in these fields, as applicable:
- Project Number
-
Enter a number that identifies an Engineer to Order project in the system. You must set up the project in the Add/Revise Project program (P31P011).
Alternatively, you can specify the project number in an enhanced query.
- Production Number
-
Enter an alphanumeric value that provides the ability to associate supply transactions to a demand transaction. Alternatively, you can specify the production number in an enhanced query.
The production number is a 30-digit alphanumeric value that the system generates based on user-defined segments and segment values. To maintain a unique identifier, the system concatenates the production number short to the system-generated production number.
The production number can also be a user-input value that is different from the system-generated value. If the user inputs a value for the production number, then the system does not concatenate the production number short to the production number.
A production number is generated or entered at the time of sales order entry or forecast entry. MRP populates all messages generated from this demand with the production number. All transactions associated with the production number can be managed through the Production Number Workbench program (P34403).
-
Click Find.
3.2.5 Reviewing Message Summary Information
To review message summary information:
-
Access the Planning Advisor Summary form.
Form Name Form ID Navigation Planning Advisor Summary W34X100A In-Memory Planning Advisor Operations (G3415). Select Planning Advisor Summary (P34X100).
Specify the search criteria and click Find.
-
Review the following fields in the Message Summary grid of the Planning Advisor Summary form:
- Msg Type
-
Displays a value from UDC 34/MT that identifies the type of message.
The system displays the message types in the order that you specified when you set up the message type priority configuration.
- Message Type Description
-
Displays the description of the message type from the Planning Advisor Message Type Configuration table (F34X001).
- Message Type Count
-
Displays the count of the message type.
- Message Type Notification
-
Displays an icon to indicate how critical the message type is.
The system displays the icons based on the message type count threshold level that you set up as part of the message type configuration. Hovering over an icon displays text, stating whether the message type count has exceeded the threshold level or not.
- Leadtime Alert
-
Displays an icon that represents the level notification for a lead time alert. The system starts with the requested date and offsets the total lead time to calculate the appropriate start date on an actionable message type. The system issues a critical notification if the start date is less than the system date.
Hovering over an icon displays text, indicating that action is required for one or more messages inside the level lead time.
-
Review the Message Summary by Priority chart on the Message Summary subform.
Figure 3-2 Planning Advisor Summary form: Message Summary by Priority Chart
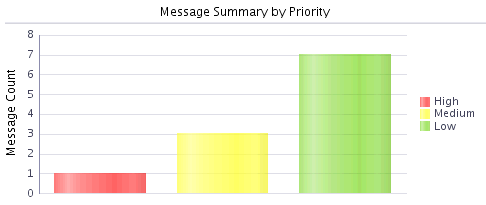
Description of "Figure 3-2 Planning Advisor Summary form: Message Summary by Priority Chart"
The chart displays a graphical representation of the total count of message types by their priority. The red bar represents message types with high priority, the yellow bar represents message types with medium priority, and the green bar represents message types with low priority.
-
Click Close.
3.2.6 Reviewing Item Summary Information
To review item summary information:
-
Access the Planning Advisor Summary form.
Form Name Form ID Navigation Planning Advisor Summary W34X100A In-Memory Planning Advisor Operations (G3415). Select Planning Advisor Summary (P34X100).
Specify the search criteria and click Find.
As applicable, select the records in the Message Summary subform, or click the icon in the Message Type Notification column or the Leadtime Alert column. Alternatively, click a bar in the chart on the Message Summary subform.
Additional Item Information W34X100HA On the Item Summary subform of the Planning Advisor Summary form, click the orange square in the Item Number field. Planning Advisor Contact Information W34X300HA On the Item Summary subform of the Planning Advisor Summary form, click the orange square in the Planner Number field. -
On the Planning Advisor Summary form, review the following fields in the Item Summary grid:
- Inventory On Hand
-
Displays an icon with hover text, indicating whether the starting on-hand quantity is greater than or less than the past due demand. The system calculates the starting balance as on-hand quantity minus the past due demand. The system displays a red square icon if the starting balance is less than 0, and a green circle icon if the starting balance is greater than or equal to 0.
- Days Until 1st Receipt
-
Displays an icon with hover text, indicating the number of days until the first receipt of material. The system calculates the number of days from the Start Date until the first receipt of material. The system displays one of these icons based on the calculation:
Red square icon: The number of days until the first receipt of material is greater than the current days of supply.
Yellow triangle icon: The number of days until the first receipt of material is equal to the current days of supply.
Green circle icon: The number of days until the first receipt of material is less than the current days of supply.
Red X icon: No receipt exists for the planning horizon.
- Days Until 2nd Receipt
-
Displays an icon with hover text, indicating the number of days until the second receipt of material. The system calculates the number of days from the Start Date until the second receipt of material. The system displays one of these icons based on the calculation:
Red square icon: The number of days until the second receipt of material is greater than the days of supply after the first receipt.
Yellow triangle icon: The number of days until the second receipt of material is equal to the days of supply after the first receipt.
Green circle icon: The number of days until the second receipt of material is less than the days of supply after the first receipt.
Red X icon: No receipt exists for the planning horizon.
- Leadtime Alert
-
Displays an icon that represents the level notification for a lead time alert. The system starts with the requested date and offsets the total lead time to calculate the appropriate start date on an actionable message type. The system issues a critical notification if the start date is less than the system date.
Hovering over the icon displays text, indicating that action is required for one or more messages inside the level lead time.
- Item Number
-
Displays the item number of the item associated with the message type that you selected in the Message Summary grid.
- Item Description
-
Displays the description of the item associated with the message type that you selected in the Message Summary grid.
- Quantity On Hand
-
Displays the number of units that are physically in stock. The system displays the quantity on-hand in the primary unit of measure.
- Past Due Supply Quantity
-
Displays a value that represents the supply units that are past due. The system displays the supply quantity that is past due in the primary unit of measure.
- UM
-
Displays a user-defined code (00/UM) that identifies the unit of measure that the system uses to express the quantity of an item, for example, EA (each) or KG (kilogram).
- Days of Supply Current
-
Displays the number of days for which the current on-hand supply covers the demand. The system calculates the number of days until the stock level falls below zero.
- Days of Supply After 1st Receipt
-
Displays the number of days for which the current on-hand supply, in addition to the first receipt of material, covers the demand. The system aggregates supply quantities by date and adds the quantities to the on-hand supply on the first receipt date. The system calculates the number of days until the stock level falls below zero after the first receipt.
- Days of Supply After 2nd Receipt
-
Displays the number of days for which the on-hand supply, in addition to the second receipt of material, covers the demand. The system aggregates supply quantities by date and adds the quantities to the on-hand supply on the second receipt date. The system calculates the number of days until the stock level falls below zero after the second receipt.
- Safety Stock
-
Displays the quantity of stock kept on hand to cover high-side variations in demand.
- Branch/Plant
-
Displays an alphanumeric code that identifies a separate entity within a business for which you want to track costs. For example, a business unit can be a warehouse location, job, project, work center, branch, or plant.
You can assign a business unit to a document, entity, or person for responsibility reporting.
Note:
Business unit security can prevent you from viewing information about business units for which you have no authority. - Stocking Type
-
Displays a user-defined code (41/I) that indicates how you stock an item, for example, as finished goods or as raw materials. The following stocking types are hard-coded and you should not change them:
0: Phantom item
C: Configured item
F: Feature
K: Kit parent item
M: Manufactured item
N: Nonstock
P: Purchased item
S: Stock item
The first character of Description 2 in the user-defined code table indicates that the item is purchased (P) or manufactured (M).
- Primary Supplier
-
Displays the address book number of the preferred provider of the item.
- Primary Supplier Name
-
Displays the name of the primary supplier.
- <Message Type Count>
-
Displays a number that represents an aggregated message type count. You can define counts for columns that are based on message types found in UDC 34/MT by using the Planning Advisor Message Type Priority Configuration program (P34X001).
The system displays the message type count columns based on the configuration name and in the order that you specified when you set up the configuration.
- Planner Number
-
Displays the address book number of the material planner for the item.
- Planner Name
-
Displays the name of the material planner for the item.
- Master Planning Family
-
Displays a value from UDC (41/P4) that represents an item property type or classification, such as commodity type or planning family. The system uses this code to sort and process similar items. This field is one of six classification categories available primarily for purchasing purposes.
- Planning Code
-
Displays a code that indicates how Master Production Scheduling (MPS), Material Requirements Planning (MRP), or Distribution Requirements Planning (DRP) processes the item. Codes are:
0: Not Planned by MPS, MRP, or DRP
1: Planned by MPS or DRP
2: Planned by MRP
3: Planned by MRP with additional independent forecast
4: Planned by MPS, Parent in Planning Bill
5: Planned by MPS, Component in Planning Bill
Note:
These values are hard-coded. - Buyer Number
-
Displays the address book number of the person responsible for setting up and maintaining the correct stocking levels for the item.
- Buyer Name
-
Displays the name of the buyer for the item.
-
(Optional) Click the orange square in the upper left corner of the Item Number field.
-
Review the following item information on the Main tab of the Additional Item Information hover form:
- Leadtime Level
-
Displays a value that represents the lead time for an item at its assigned level in the production process, as defined on Plant Manufacturing Data. The system uses this value to calculate the start dates for work orders by using fixed lead times.
Level lead time is different for purchased and manufactured items:
Purchased - The number of calendar days required for the item to arrive at your branch/plant after the supplier receives your purchase order.
Manufactured - The number of workdays required to complete the fabrication or assembly of an item after all the components are available.
You can enter level lead time manually on Manufacturing Values Entry, or you can use the Leadtime Rollup program to calculate it. To calculate level lead time using the Leadtime Rollup program, you must first enter a quantity in the Manufacturing Leadtime Quantity field in the Item Branch table (F4102).
- Leadtime Per Unit
-
Displays the total number of hours that are required to build one unit as specified on the routing. This value is factored by the time basis code.
- Fixed/Variable Leadtime
-
Displays a code that determines whether the system uses fixed or variable lead times.
This code works in conjunction with the value from either the Level Leadtime field or the Leadtime Per Unit field. Codes are:
F: Fixed lead time. The system calculates work order start dates by using the value from the Leadtime Level field.
V: Variable lead time. The system calculates work order start dates by using the value from the Leadtime Per Unit field.
- Order Policy Code
-
Displays a code that specifies the rules for inventory reordering in the JD Edwards EnterpriseOne Requirements Planning and JD Edwards EnterpriseOne Procurement systems. Values are:
0: Reorder point (Not planned by MPS/MRP/DRP)
1: Lot-for-lot or as required
2: Fixed order quantity
3: Economic order quantity (EOQ)
4: Periods of supply
5: Rate scheduled item
Note:
These values are hard-coded. - Order Policy Value
-
Displays a value that the system uses in conjunction with the order policy code to represent one of the following:
When you select order policy code 2 (fixed order quantity), this value represents the fixed order quantity.
When you select order policy 4 (periods of supply), this value represents the number of days of net requirements that the system uses to determine order size.
When you select order policy code 5 (rate scheduled item), this value represents the desired inventory level. When the ending available quantity is less than the desired inventory level, then the system issues an Increase Rate Quantity to message. When the ending available quantity is greater than the desired inventory level, then the system issues a Decrease Rate Quantity to message.
- Planning Fence Rule
-
Displays a code (system 34, table TF) that the system uses in conjunction with the Planning Time Fence Days field to determine how forecast demand or actual customer demand is used.
For example:
S tells the system to plan using customer demand before the time fence, and forecast after the time fence.
F tells the system to plan using forecast before the time fence, and forecast plus customer demand after the time fence.
If you enter 5 in the Planning Time Fence Days field and S in the Planning Fence Rule field, then the system uses only the customer demand for the regeneration for the first 5 days. After 5 days, the system uses the forecast for the regeneration.
Codes are:
C: Customer demand before, greater of forecast or customer demand after
F: Forecast before, forecast plus customer demand after
G: Greater of forecast or customer demand before, forecast after
S: Customer demand before, forecast after
1: Zero before, forecast after
3: Zero before, forecast plus customer demand after
- Planning Fence
-
Displays the number of days that the system uses in conjunction with the time fence rule to determine how the forecast is used. Enter the number of days after the start date when the time fence rule changes from the first rule to the second rule.
For example, if the time fence rule is S (customer demand before the time fence, forecast after the time fence), the generation start date is 01/03/22, and the planning time fence is 3 days, then the system plans by using customer demand through 01/06/22. Beginning on 01/07/22, the system plans by using the forecast.
Note:
The system does not count the generation start date. This means that the day after the generation start date is day 1.For manufactured items, the system counts working days as defined in the shop floor calendar.
For purchased items, the system counts calendar days.
- Freeze Fence
-
Displays the number of days from the generation start date within which the system does not generate action messages.
For example, if the generation start date is 01/03/22, and the freeze time fence is 3 days, the planning system does not generate messages with required dates that are less than or equal to 01/06/22.
Note:
The system does not count the generation start date. This means that the day after the generation start date is day 1.For manufactured items, the system counts working days as defined in the shop floor calendar.
For purchased items, the system counts calendar days.
-
Review the following item information on the Additional tab of the Additional Item Information hover form:
- Planner
-
Displays the address book number of the material planner.
- Buyer
-
Displays the address book number of the person responsible for setting up and maintaining the correct stocking levels for the item.
- Supplier
-
Displays the address book number of the preferred provider of the item.
- Minimum Order Quantity
-
Displays the minimum order quantity for the item.
- Maximum Order Quantity
-
Displays the maximum order quantity for the item.
- Multiple Order Quantity
-
Displays the multiple order quantity for rounding up planned order quantities in MPS/MRP.
- Safety Stock
-
Displays the quantity of stock kept on hand to cover high-side variations in demand.
- Manufacturing Effective Days
-
Displays the number of days that an item must remain in inventory before the system considers the item to be available for sales and manufacturing commitments. To calculate the lot effective date, the system adds the number displayed in this field to the based-on date that appears in the F4108 table.
- Purchasing Effective Days
-
Displays the number of days after a purchased item is received that a lot becomes available. The system uses this number when calculating and displaying the effective date in the Purchase Orders (P4310) and the PO Receipts (P4312) programs.
-
(Optional) Click the orange square in the upper left corner of the Planner Number field.
-
Review the planner information on the Planning Advisor Contact Information hover form.
-
Click Close.
3.3 Working with Planning Advisor Console
This section provides an overview of Planning Advisor Console, lists prerequisites, and discusses how to:
-
Set processing options for the Planning Advisor Console program (P34X200).
-
Review search criteria for supply and demand.
-
Define beginning inventory on hand.
-
Work with supply and demand, and item balance charts.
-
Manage supply and demand.
-
Create planned orders.
-
Freeze orders.
-
Implement plans.
-
Review informational messages.
3.3.1 Understanding Planning Advisor Console
Use the Planning Advisor Console program (P34X200) to analyze supply and demand information by item. The Planning Advisor Console form enables you to review search criteria, define beginning inventory on hand, work with supply and demand charts, work with supply and demand details, create supply orders, review informational messages, and save, restore, and implement plans. The system uses data from the latest MRP run as the starting point.
To access the Planning Advisor Console form (W34X200A), perform one of these actions:
-
Select Planning Advisor Console (P34X200) from the In-Memory Planning Advisor Operations (G3415) menu.
-
Click the Item No. link in the Item Number field of the Item Summary grid in the Planning Advisor Summary program (P34X100).
-
Select the Planning Console option in the Row Exits drop-down menu in the Item Summary group and click Go.
When you access the Planning Advisor Console form in standalone mode, the system opens the Planning Selection and Supply/Demand Details groups and collapses all other groups.
When you access the Planning Advisor Console program from the Planning Advisor Summary program, the system filters the search based on the item and branch/plant that you specified on the Planning Advisor Summary program.
When you access the Planning Advisor Console form from the Planning Advisor Summary form, the system collapses all groups on the form except the Supply/Demand Charts and Supply/Demand Details groups.
The Planning Advisor Console form contains the following features:
-
Planning Selection group
-
Beginning Inventory On Hand group
-
Supply/Demand Details group
-
Supply/Demand Charts group
-
Informational Messages group
-
Save Plan button
-
Implement Plan button
-
Create Planned Order button
-
Restore Plan button
The system retrieves information for the Planning Advisor Console form from the following tables:
-
Bill of Material Master File (F3002)
-
Schedule Quantity Detail (F31091)
-
Work Order Parts List (F3111)
-
Configurator Master Table (F3201)
-
Configurator Component Table (F3215)
-
Supply/Demand Inclusion Rules (F34004)
-
Forecast Consumption Periods (F3405)
-
Customer Address Relationship (F3406)
-
MPS/MRP/DRP Message File (F3411)
-
MPS/MRP/DRP Lower Level Requirements File (F3412)
-
Forecast File (F3460)
-
Forecast Shipment Summary (F3462)
-
Related Order Cross Reference Table (F4080)
-
Item Master (F4101)
-
Item Branch File (F4102)
-
Item Location File (F41021)
-
Lot Master (F4108)
-
Sales Order Detail File (F4211)
-
Purchase Order Detail File (F4311)
-
Purchase Order Receipt Routing File (F43092)
-
Work Order Master File (F4801)
-
Work Order Master Tag File (F4801T)
The system stores data for the Planning Advisor Console program in the Planning Details Supply/Demand Worktable (F34X200W).
The following sections describe the features of the Planning Advisor Console program in detail.
3.3.1.1 Planning Selection
Use the Planning Selection group on the Planning Advisor Console form to enter or review the basic filter criteria for supply and demand information.
When you access the Planning Advisor Console program from the Planning Advisor Summary program, all the filter fields are pre-populated, and you can modify only the Unit of Measure field. By default, the system displays the primary unit of measure.
When you access the Planning Advisor Console program in standalone mode, the system converts the units of measure (UOMs) in the Supply/Demand Details grid to the UOM that you enter in the Unit of Measure field when you click Find. However, the system always displays the quantities in the Beginning Inventory on Hand and the Supply/Demand Charts groups in the primary UOM.
In the Item Number field, you click the orange square in the upper left corner to access the Additional Item Information form. The system calls the Planning Advisor Item Hover Form program (P34X100H) and displays the Additional Item Information form. The Additional Item Information form displays additional item information from the Planning Advisor Summary and Planning Advisor Console programs.
When you access the Planning Advisor Console program from the Planning Advisor Summary program, the system displays the primary unit of measure in the Unit of Measure field. The system uses the primary UOM in the Beginning Inventory on Hand and Supply/Demand Charts groups on the Planning Advisor Console form.
When you access the Planning Advisor Console form, the system displays the start date based on the date in the Start Date processing option of the Planning Advisor Console program. If the start date is a non-working day, the system displays the next working day.
The system calculates the end date by adding the planning horizon days, weeks, and months specified in the Planning Horizon Periods processing options to the date in the Start Date processing option of the Planning Advisor Console program. The system displays the end date in the End Date field in the Planning Selection group on the Planning Advisor Console form. If the calculated end date is a non-working day, the system displays the previous working day.
The Planning Advisor Console program also uses workday calendar dates to determine the planning horizon dates.
The system retrieves all past due demand. The system retrieves past due forecast based on processing option settings in the Planning Advisor Console program.
If the Forecast Consumption Logic processing option on the Process tab is set to a value of 1 to use forecast consumption, then the start date for forecast retrieval is the beginning date of the current forecast consumption period.
You can perform a more refined search of supply and demand records by using the query by example (QBE) lines in the Supply/Demand Details grid.
You review the days of supply and ending available alerts in the Critical Component Alerts group. You click the DOS (days of supply) or EA (ending available) link to access the Critical Component form.
3.3.1.2 Beginning Inventory On Hand
The Beginning Inventory On Hand group displays a summarization of the available quantity in the Quantity on Hand field for the item defined in the Item Number field in the Planning Selection group. The quantity on hand can include receipt routing buckets, safety stock, expired lots, held lots, and past due supply.
You set the Inventory On Hand processing options on the Defaults tab of the Planning Advisor Console program to define the initial quantities to include in the inventory on hand. You select the Include option in the Beginning Inventory On Hand group to interactively change the quantities to include in the available quantity calculation while on the Planning Advisor Console form. The system refreshes the Supply/Demand Details grid and charts every time you select an Include option.
You select the Quantity in Transit, Quantity in Inspection, Quantity in Operation 1, and Quantity in Operation 2 links to display the Receipt Routing Inquiry form of the Planning Advisor Console Receipt Routing Inquiry program (P34X221). You can also access the Receipt Routing Inquiry form from the In Transit Orders, In Inspection Orders, Operation 1 Orders, and Operation 2 Orders options on the Form menu.
You set the Lot Hold Codes to be considered as inventory on hand (Up to 5 Codes) Lot Hold Code 1 through 5 processing options on the Select tab of the Planning Advisor Console program to specify the lot hold codes from UDC 41/L that the system considers as inventory on hand. The system does not consider the lot hold codes specified in the processing option as on hold.
The expired lot quantity is a summarization of quantities from lots where the quantity on hand defined in the F41021 table is not equal to zero, and the lot expiration date defined in the F4108 table is not equal to zero and is less than or equal to the planning start date. You select the Expired Lots Quantity link or the Expired Lots option on the Form menu to access the Expired Lots form of the Planning Advisor Console Held Lots Inquiry program (P34X210).
The held lot quantity contains a summarization of quantities from lots with a hold code not equal to blank and not equal to the lot hold codes specified in the processing option. This summarization also includes only those lots effective as of the start date. The system retrieves the information for the held lot quantity from the Lot Master table (F4108). You select the Held Inventory Quantity link or the Held Lots option on the Form menu to access the Held Inventory form of the Planning Advisor Console Held Lots Inquiry program (P34X210).
The system retrieves all orders before the start date for past due supply and demand. The system stores all orders in the F34X200W table. The system displays individual past due supply and past due demand rows in the Supply/Demand Details grid. If past due supply is not included in the on-hand inventory, the system displays the row in gray colored font to indicate that it does not affect the inventory.
The system includes or excludes past due demand rows based on the planning time fence rule defined for the item:
| Time Fence Rule | Before Time Fence | After Time Fence | 34XEXCF - Past Due Demand |
|---|---|---|---|
| 1 | Zero | Forecast | All sales and forecasts are excluded. |
| 3 | Zero | Forecast plus customer demand | All sales and forecasts are excluded. |
| C | Customer demand | Greater of forecast or customer demand | All forecasts are excluded. |
| F | Forecast | Forecast plus customer demand | All sales are excluded. |
| G | Greater or forecast or customer demand | Forecast | All forecasts are excluded. |
| S | Customer demand | Forecast | All forecasts are excluded. |
| H | Forecast consumption periods | Current consumption period only and based on calculation.
|
3.3.1.3 Supply/Demand Details Grid
Use the Supply/Demand Details grid in the Supply/Demand Details group to review a consolidated list of supply and demand messages for the item and branch/plant defined in the Planning Selection group. The system uses data from the latest MRP run as the starting point.
The system first displays the inventory in the Supply/Demand Details grid, and then supply or demand, based on the setting in the Supply/Demand Sequence processing option on the Display tab of the Planning Advisor Console program. The system first displays the inventory in the grid regardless of the Supply/Demand Sequence processing option setting.
The system sorts the Supply/Demand Details grid by supply and demand within the From and Thru Dates.
|
Note: You cannot perform column-specific sorting in the Supply/Demand Details grid. |
You use the From Date and Thru Date fields to filter the rows in the Supply/Demand Details grid. The date filtering does not apply to the charts in the Supply/Demand Charts group.
You select the Show Shipped check box to view shipped quantities in the Supply/Demand Details grid. If you do not select this check box, the system hides the shipped quantities.
|
Note: The system displays the Show Shipped check box only if the Forecast Consumption Logic processing option is set to 1 and the planning fence rule for the item/branch is H. |
The Supply/Demand Details grid displays quantities in the UOM that you enter in the Unit of Measure field in the Planning Selection group. The system displays the negative symbol (-) for demand quantities.
The Planning Advisor Console program retrieves all the orders before the Start Date for past due supply and demand. The system displays individual past due supply and past due demand rows in the Supply/Demand Details grid.
The system includes purchase orders, work orders, rate schedules, and co/by products.
The system displays all orders with an ETO project number. The system does not consider ETO orders in the ATP and CATP charts. The system disables grid lines that contain project-specific items based on the stocking type and project number in the Planning Advisor Console program (P34X200).
The system converts the UOM to the primary UOM for past due amounts.
The Supply/Demand Details grid includes the following supply:
-
Inventory on-hand
-
Lots effective and effective on hold
-
Lot expired and expired on hold
-
Purchase orders
-
Purchase order receipt routings
-
Work orders
-
Work order receipt routings
-
Rate schedules
The system displays all rates that start before the end date in the End Date field in the Planning Selection group. The system uses the quantities in the F31091 table for the distributions for rates that have not started. If the rate start date is in the past or if there is quantity completed on the rate, then the open quantity on the rate is evenly distributed across the remaining work days of the rate. If there is no information in the Schedule Quantity Detail table (F31091), then the system distributes the open quantity based on the month, week, and day schedule. The Adjusted Date field is disabled for rate orders.
For example, if you have a weekly rate for 100, the system displays the rate in the grid, and the quantity is editable. The system also displays five additional rows of rate distribution records, one for each work day of the week, with a quantity of 20 each. You cannot directly edit the rate distribution records but if you change the rate line from 100 to 150, the system updates each of the rate distribution records from 20 to 30 to make up the 150 for that week.
-
Planned orders (from F3411 messages).
The Supply/Demand Details grid includes the following demand:
-
Sales orders
-
Interplant demand
-
Configured components
-
Forecasts
Note:
If you do not enter forecast document types in the processing options of the Planning Advisor Console program, then the system does not include forecasts in the Supply/Demand Details grid. -
Work order project demand
-
Parts list
-
Work order dependent demand (pegging)
If the value of the Interplant Demand processing option is 1, the system considers firm and planned transfer orders as customer demand. If you use forecast consumption, the system uses interplant demand to consume forecast when the Interplant Demand processing option is set to 1.
The system disables inventory, rate distribution, and demand records in the Supply and Demand grid.
|
Note: You cannot change demand in the Supply/Demand Details grid. |
The system defines the unadjusted date, adjusted date, unadjusted quantity, and adjusted quantity from the supply and demand orders as follows:
| Unadjusted Date (34XSDDJ) | Adjusted Date (34XSDDJU) | Unadjusted Quantity (34XSDQ) | Adjusted Quantity (34XSDQU) | |
|---|---|---|---|---|
| Purchase Orders | Lot Effective Date (DLEJ) from the F4311 table | Same as Unadjusted Date (34XSDDJ)
OR If there is a message to expedite or defer an order, then the date is the Recommended Complete Date (RRQJ) from the F3411 table. |
Units - Open (UOPN) from the F4311 table | Same as Unadjusted Quantity (34XSDQ)
OR If there is a message to increase or decrease order quantity, then the quantity is the Required Quantity (TRQT) from the F3411 table. |
| Work Orders | If the Planned Effective Date (DPL) from the F4801 table is Blank, then the date is the Requested Date (DRQJ) from the F4801 table; otherwise the date is the Planned Effective Date (DPL) from the F4801 table. | Same as Unadjusted Date (34XSDDJ)
OR If there is a message to expedite or defer an order; then that date is the Recommended Complete Date (RRQJ) from the F3411 table. |
[(Units - Order)/(Transaction Quantity (UORG) )] - (Quantity Completed (SOQS)) - [(Units - Quantity Canceled)/(Scrapped (SOCN))] from the F4801 table. | Same as Unadjusted Quantity (34XSDQ)
OR If there is a message to increase or decrease order quantity, then the quantity is the Required Quantity (TRQT) from the F3411 table. |
| Rate Schedules | Planned Effective Date (DPL) from the F4801 table | Same as Unadjusted Date (34XSDDJ)
OR If there is a message to expedite or defer an order, then the date is the Recommended Complete Date (RRQJ) from the F3411 table. |
[(Units - Order)/(Transaction Quantity (UORG) )] - (Quantity Completed (SOQS)) - [(Units - Quantity Canceled)/(Scrapped (SOCN))] from the F4801 table | Same as Unadjusted Quantity (34XSDQ)
OR If there is a message to increase or decrease order quantity, then the quantity is Required Quantity (TRQT) from the F3411table. |
| Planned Orders | Not Applicable | Requested Date (DRQJ) from the F3411 table | Not Applicable | Required Quantity (TRQT) from the F3411 table |
| Forecast Consumption Shipped | Forecast consumption at the beginning of the period based on End Date (ENDD) from the F3405 table | Same as Unadjusted Date (34XSDDJ) | Shipped Quantity (UORG) from the F3462 table | Same as Unadjusted Quantity (34XSDQ) |
| Sales Orders | Scheduled Pick Date (PDDJ) from the F4211 table | Same as Unadjusted Date (34XSDDJ) | [(Units - Order)/(Transaction Quantity (UORG))] - (Units - Shipped to Date (QTYT)) - [(Units - Quantity Canceled)/(Scrapped (SOCN))] from the F4211 table | Same as Unadjusted Quantity (34XSDQ) |
| Forecast | Requested Date (DRQJ) from the F3460 table | Same as Unadjusted Date (34XSDDJ) | Forecast Quantity (FQT) from the F3460 table | Same as Unadjusted Quantity (34XSDQ) |
| Forecast Consumption Period | Forecast Consumption End Date (ENDD) from the F3405 table | Same as Unadjusted Date (34XSDDJ) | Not Applicable | Not Applicable |
| Parts List | Date Requested (DRQJ) from the F3111 table | Same as Unadjusted Date (34XSDDJ) | If the Committed (H/S) (COMM) from the F3111 table is equal to N or Blank, then[(Units - Order)/(Transaction Quantity (UORG))] - (Quantity Available (TRQT) (or 0 if negative)); otherwise, [(Units - Order)/(Transaction Quantity (UORG))] - (Units - Quantity Committed (QNTA) (or 0 if negative)) | Same as Unadjusted Quantity (34XSDQ) |
| Pegging Orders | Date Requested (DRQJ) from the F3412 table | Same as Unadjusted Date (34XSDDJ) | Quantity (UORG) from the F3412 table | Same as Unadjusted Quantity (34XSDQ) |
The Unadjusted Quantity and Unadjusted Date fields represent the original quantity and date from sales, purchase, and work orders.
You use the Adjusted Date, Adjusted Quantity, Adjusted Start Date, Adjusted Effective Date, Override Supplier Number, and Override Production Number fields to make changes to supply records in the Supply/Demand Details grid.
The Adjusted Quantity and Adjusted Date fields display the recommended quantity and date from MRP messages. You can also change the quantity and date of messages in the Supply/Demand Details grid using the Adjusted Quantity and Adjusted Date fields. The system generates a new message for any change to supply.
The system applies bold font to values in the Adjusted Quantity and Adjusted Date fields to indicate a change to the value from the original value in the Unadjusted Quantity and Unadjusted Date fields. The change in value is the result of either applying MRP messages or manually changing values in the Supply/Demand Details grid.
The system highlights the Adjusted Date, Unadjusted Date, Adjusted Quantity, and Unadjusted Quantity columns in teal color, based on the setting of the Adjusted/Unadjusted option on the Supply and Demand chart.
If the adjusted date violates the lead time level defined for the item, the system displays the Adjusted Date field value in bold red colored font. If you change the quantity for an order that is already within the lead time date, the system highlights the Adjusted Date field in red colored font.
The Adjusted Available and Unadjusted Available fields display a value that represents a running total of availability after the quantity for the current line is applied. The value in the Adjusted Available field also incorporates MRP messages which can adjust the date or quantity of supply orders. The system displays availability in the primary UOM.
The system bases the Unadjusted Available on the Primary Unadjusted Quantity, and changes the value only when you click the Implement button.
The system bases the Adjusted Available on the Primary Adjusted Quantity, and changes the value whenever you change the Adjusted Date or Adjusted Quantity. When you change the Adjusted Date or Adjusted Quantity, the system clears the Adjusted Available column for all rows and the column remains cleared until you click the Find button or the plan is saved, restored, or implemented.
Rows that do not affect availability have a blank availability column. Sales orders and forecasts that the system excludes based on the planning fence rules have a blank availability.
Rate orders have blank availability but the system populates the distribution records. The system adds the past due supply in the Available columns for the inventory row if past due supply is included in the on-hand inventory.
The system populates the Available columns for the past due orders with the appropriate adjustment made to the available quantities.
If the system excludes a record from the Supply and Demand chart and the Ending Available chart, then the system highlights the corresponding grid rows in the Supply/Demand Details grid in gray colored font. The system highlights grid rows in black colored font to indicate that the corresponding records are included in the Supply and Demand and Ending Available charts.
If you use forecast consumption by customer, demand is driven by customer demand and unconsumed forecast for each customer. The system displays all customer demand records and includes them in the charts. Unconsumed forecast is aggregated by date and is displayed using the new forecast type that you specify in the P34X200 processing option, Forecast Type for Demand by Customer. The system hides all forecast records with the forecast type that you specify in the P34X200 processing option Forecast Types (up to 5 types).
This table describes how the 34XDSPF and 34XEXCF flags are set for customer demand and forecast, if you use the forecast consumption by customer functionality:
| Customer Demand/Forecast | Display in Supply/Demand Grid (34XDSPF) | Include/Exclude from Charts (34XEXCF) |
|---|---|---|
| Current Customer Demand | 0 (Display) | 0 (Include) |
| Current Forecast With Input Forecast Type | 1 (Do not display) | 1 (Exclude)
The system excludes this only if all forecast has been consumed. |
| Past Due Customer Demand | 0 (Display) | 0 (Include) |
| Past Due Forecast | 1 (Do not display) if you do not use forecast consumption. Otherwise, consumed forecast = 1 (Do not display) and unconsumed forecast = 0 (Display) | 1 (Exclude)
The system excludes this only if all past due forecast has been consumed. |
| Summarized Past Due Forecast | 1 (Do not display) | 1 (Exclude) |
You can freeze or unfreeze a single order using the Freeze Order or Unfreeze Order option on the Row menu. The system displays the Freeze Order and Unfreeze Order options only for purchase orders and work orders. To freeze an order, select the order in the Supply/Demand Details grid and then select the Freeze Order option on the Row menu. To unfreeze an order that is frozen, select the order in the Supply/Demand Details grid and then select the Unfreeze Order option on the Row menu. After you select the Freeze Order or Unfreeze Order option, the system updates the Freeze Code (UNCD) column in the Purchase Order Detail File (F4311) or Work Order Master File (F4801), and immediately refreshes the value of the Freeze Code field in the Supply/Demand Details grid. The system displays Y in the Freeze Code field in the Supply/Demand Details grid to indicate that an order is frozen, and N to indicate that an order is not frozen.
|
Note: You can freeze or unfreeze only purchase orders (including transfers) and work orders. The system does not display the Freeze Order and Unfreeze Order options on the Row menu for other supply/demand types.Even after you freeze an order, you can modify the dates and quantities for the supply/demand type. |
You select the Restore Plan button in the Supply/Demand Details group or the Restore Plan option on the Form menu to cancel unsaved changes and restore the Supply/Demand Details grid to the original supply and demand data and MRP messages. Alternatively, you can navigate back to the Planning Advisor Summary form.
You select the Refresh option on the Form menu to delete all changes and reload the F34X200W table with the latest supply and demand data and MRP messages.
The system cancels an order when you change the quantity in the Adjusted Quantity field to zero (0). You review current order information by selecting the orange square in the upper left corner of the Order Number field in the Supply/Demand Details grid.
If you change the quantity to 0 for a supply record with a document number, then the system adds a new Cancel message for the order to the F3411 table.
If you change the quantity to 0 for a supply record without a document number (O, B, and N type messages), then the system deletes the message from the F3411 table.
If the system cancels an order from a message or you cancel an order by entering zero in the Adjusted Quantity field, the system designates the canceled order by using strike-through text on the grid line in the Supply/Demand Details grid. You can change the value in the Adjusted Quantity field, and the system sets the grid row to regular text for an order.
The Inventory, Work Orders, Purchase Orders, Sales Orders, and Forecast grid options are available in the Supply/Demand Details grid to provide different views of the data.
3.3.1.4 Supply/Demand Charts
Use the Supply/Demand Charts group to view item balance information and supply and demand messages in graphical chart format. The system converts the transaction UOM for each record in the Supply/Demand Details grid to the primary UOM to build the charts.
The combination of the Start Date and Planning Horizon Periods processing options on the Select tab of the Planning Advisor Console program determines the planning horizon buckets that are displayed in the Item Balance and Supply and Demand charts. The system uses workday calendar dates to determine the planning horizon buckets in the charts. If supply falls on a non-working day, the system moves it to the next horizon bucket, and if demand falls on a non-working day, the system moves it to the previous horizon bucket.
If all the Planning Horizon Periods processing options have a value of zero (0), then the Planning Advisor Console program uses two work days as the default value for rendering the charts.
If all the Planning Horizon Periods processing options add to a value of one (1) because you request only one day, week, or month, then the Planning Advisor Console program uses two work days, weeks, or months as the default value for the period to render the charts.
You use the Adjusted and Unadjusted options in the Supply/Demand Charts group to include or exclude messages in the Item Balance and Supply and Demand charts. Both the Item Balance and Supply and Demand charts display the adjusted and unadjusted values.
The Adjusted option is the default value upon entry to the Planning Advisor Console form. Adjusted values represent either MRP messages or your changes to quantities and dates in the Supply/Demand Details grid.
After a quantity or date change or the creation of a planned order, tab out of the Supply/Demand Details grid or click Find to refresh the charts with the new values from the Supply/Demand Details grid. The system updates the charts whenever you exit a row in the Supply/Demand Details grid.
You select the Unadjusted option to review the unadjusted values which represent the current supply and demand without the application of MRP messages or your changes.
3.3.1.4.1 Item Balance Charts
The Item Balance charts render with the Supply and Demand chart. The Item Balance charts display the available balance for an item in a line chart that plots quantity on the y-axis versus date on the x-axis. The system displays the item balance for an item as the ending available (EA), available to promise (ATP), or cumulative available to promise (CATP).
When you enter the Planning Advisor Console form, the system displays the initial item balance chart based on the value in the Item Balance Chart processing option on the Defaults tab of the Planning Advisor Console program. You select an option on the Item Balance Chart in the Supply/Demand Charts group to change the chart display.
The Item Balance chart represents the planning horizon days, weeks, and months breaks using a single slash (/) for weekly planning periods and a double slash (//) for monthly planning periods.
The following sections describe the charts available in the Supply/Demand Charts group.
Ending Available
On the Ending Available chart, each planning horizon bucket displays the values for the ending available in that period. The system uses the following calculations for EA:
First period EA = On Hand + Supply - Demand
Remaining periods, EA = Previous Ending Available + Supply - Demand
The system applies planning fence rules to the Ending Available chart. However, the system does not display the planning fences in the Ending Available chart.
The system displays a red reference line to indicate a zero value when negative values exist in the chart.
Available to Promise
Available to Promise is the uncommitted portion of a company's inventory or planned acquisitions. You use this amount to accurately promise customer orders.
On the Available to Promise chart, each planning horizon bucket displays values for the available to promise in that period. The system accumulates unadjusted and adjusted values for the period. The system uses the following calculations for ATP:
First period ATP = On Hand + Supply - Customer Demand
Remaining periods, ATP = Supply - Customer Demand
For available to promise, the system defines customer demand as actual demand that excludes forecasts and ETO project-related quantities.
Planning fence rules do not apply to ATP. Negative ATP displays as zero (0) on the chart.
Cumulative Available to Promise
On the Cumulative Available to Promise chart, each planning horizon bucket displays values for the cumulative available to promise in that period.
The system uses the look-ahead method for the CATP calculation.
The system uses the following calculations for CATP:
First period CATP = ATP in first period - all negative ATP
Remaining periods, CATP = Sum of previous ATP + current period ATP - total negative ATP in future periods
The CATP is a running total of the ATP, and CATP can have a negative value.
The system displays a red reference line to indicate a zero value when negative values exist in the chart.
3.3.1.4.2 Supply and Demand and Ending Available Charts
The system aggregates the adjusted primary units for customer demand and forecast records in the F34X200W table by date, and then evaluates which records to mark for exclusion based on the planning fence rule for the item/branch. If you are using the forecast consumption by customer functionality, the system uses the customer address relationship to determine the demand based on the greater of sales (retrieved from the F4211 table) or forecast (retrieved from the F3460 table). The system creates a record with the aggregated quantity for unconsumed forecast by date for the new forecast type in the F34X200W table. The total of customer demand and the aggregated unconsumed forecast drive the demand for the Supply and Demand and Ending Available charts.
Customer demand records marked for exclusion from the charts still display in the Supply/Demand Details grid. The system highlights records in the Supply/Demand Details grid in gray colored font to indicate that the record is excluded from the Supply and Demand and Ending Available charts. The system highlights records in black colored font to indicate that the record is included in the charts.
|
Note: The system displays past due supply in black colored font. However, if you do not select the Past Due Supply Quantity check box in the Planning Advisor Console form, the system displays past due supply in gray colored font. |
On the Supply and Demand chart, each planning horizon bucket displays raw values for supply and demand in that period. The values are not cumulative across the time periods.
The Supply and Demand chart is a double bar chart that plots the quantity on the y-axis versus the date on the x-axis. For each time period, the chart displays one blue bar for supply and one red bar for demand.
The system accumulates unadjusted or adjusted values for the period. Supply includes all records in the F34X200W table within the period of adjusted or unadjusted dates where the Supply or Demand Code is equal to S.
The Supply and Demand and Ending Available charts include the following supply:
-
Inventory on-hand
-
Lots expiring today
-
Purchase orders
-
Work orders
-
Rate schedules
The system charts rate schedules for only the dates included within the planning horizon specified in the Planning Horizon Periods processing options of the Planning Advisor Console program.
Demand includes all records in the F34X200W table within the period of adjusted or unadjusted dates where the Supply or Demand Code (34XSDDS) is equal to D.
The Supply and Demand and Ending Available charts include the following demand:
-
Sales orders
-
Interplant demand
-
Configured components
-
Forecasts
-
Work order project demand
-
Parts list
-
Pegging orders
If the value of the Interplant Demand processing option is 1, the system considers firm and planned transfer orders as customer demand. If you use forecast consumption, the system uses interplant demand to consume forecast when the Interplant Demand processing option is set to 1.
The Supply and Demand chart also includes messages for planned orders and transfer orders.
The system does not include bulk items in supply and demand.
The system displays the Freeze Fence Date and Planning Fence Date fields above the Supply and Demand chart.
The system takes the first character from the Freeze Fence Date and Planning Fence Date control fields to display in the chart after the date on the x axis of the Supply and Demand chart. If the date falls within the daily buckets, then the system displays the first character on the corresponding date. If the date falls in the weekly or monthly buckets, then the system displays the first character on the first bucket that the date corresponds to.
3.3.1.5 Create Planned Order
You can create new orders for MRP from the Supply/Demand Details grid in the Supply/Demand Details group of the Planning Advisor Console program. When you select the Create Planned Order button, the system calls the Planning Advisor Create Order program (P34X240) and displays the Create Planned Order form.
You enter information, such as dates, quantity, unit of measure, supplier, production number, project number, and source demand to create a new supply order. The Create Planned Order form enables fields for entry based on the planning stocking type, which is the first letter of the second description in UDC 41/I. For example, if the planning stocking type is P then the system displays the Supplier Number field on the Create Planned Order form.
If an item is project-specific (ETO), then the system displays the Project Number and Source Demand fields in the Additional Details group. If an item is production-controlled, then the system displays the Production Number field in the Additional Details group.
|
Note: An item cannot be both production-controlled and project-specific. |
When you create a new planned order and click Save, the system updates the F34X200W table, refreshes the Supply/Demand Details grid, and refreshes the Supply and Demand and Item Balance charts. The system adds the new order messages to the F3411 table when you save the plan. If the newly created planned order violates the lead time level defined for the item, the system displays the Adjusted Date field value in bold red colored font in the Supply/Demand Details grid.
3.3.1.6 Pegging and Parts List Updates
In-Memory Planning Advisor uses pegging to determine the parent source of demand for component items. The system updates pegging and parts list records when you change the Adjusted Quantity field value in the Supply/Demand Details grid. The system updates the pegging records based on the type of order as follows:
-
New planned order: If you create a new planned order for a parent item, the system creates pegging records for the first-level components based on the specified planned order quantity.
-
Existing planned order: If you change the adjusted quantity for an existing planned order for a parent item, the system updates the pegging records for the first-level components based on the corresponding BOM batch quantity.
-
Firm order: If you change the adjusted quantity for a firm order for a parent item, the system updates the parts list of the first-level components based on the change ratio between the adjusted quantities before and after the change.
Planned orders use the BOM definition (batch quantities, component quantity, UOMs, scrap) and parent item attributes, such as shrink factor and the Round to Whole Numbers flag to identify the first level of components. Firm orders use the data in the Work Order Parts List table (F3111) to identify the first-level components.
3.3.1.7 Pegging Updates on Restore
When you click the Restore button for new planned orders, the system:
-
Deletes all pegging records for a new planned order when you delete the planned order
-
Decreases the net change in demand for each item/branch by the quantity of the Pegging Orders (Demand) record for the first-level components
-
Decreases the quantity of the record from the item/branch past due demand if the Pegging Orders (Demand) record has a request date before the Planning Start Date
For existing planned orders, including firm orders without a parts list, the following apply when you click Restore:
-
When a change to an existing planned order is restored to the original value, the system creates the pegging records of the first-level components based on the original values.
-
The system updates the net change in demand for each item/branch based on the net change of the pegging records of the first-level components. Net change in demand is the difference between the values before and after they are restored in the F34X200W table.
-
If the updated pegging records of the first-level components have a requested date that falls before the Planning Start Date, the system decreases the updated quantity from the total past due demand record of the item/branch.
-
If the pegging records of the first-level components created from the F3412 record have a requested date before the Planning Start Date, then the system adds the original quantity to the total past due demand record of the item/branch.
-
If you change an existing planned order for a component and there are pegging records associated with the component, then the system updates only the pegging records of the first-level components. The pegging records associated with the component remain the same until the corresponding parent order is modified.
For firm orders, the following apply when you click Restore:
-
When you change an existing firm order and click the Restore button, the system restores the parts lists of only the first-level components to their original values using the new adjusted quantity and date.
-
The system updates the net change in demand for each item/branch based on the net change of the first-level components parts list records. The net change in demand is the difference between the unadjusted values and the unsaved adjusted values in the F34X200W table.
-
If the updated parts lists of the first-level components have a requested date before the Planning Start Date, the updated quantity is decremented from the item/branch past due demand.
-
If the original parts lists of the first-level components have a requested date before the Planning Start Date, the original quantity is added to the item/branch past due demand.
3.3.1.8 Freeze Orders
You can freeze all firm orders, including purchase orders, work orders, and transfer orders from the Planning Advisor Console program. You select the Freeze option from the Form menu to display the Freeze Orders form of the Planning Advisor Console Freeze Orders program (P34X290).
The Freeze Orders form displays all work orders and purchase orders, with the eligible orders pre-selected. The system displays frozen orders as deselected. You can deselect the orders that you do not want to freeze, and then click the Freeze button or select the Freeze option on the Row menu to freeze the orders. When you freeze the orders, the system updates the Freeze Code (UNCD) in the Purchase Order Detail File (F4311) or Work Order Master File (F4801), and the Planning Details Supply/Demand Worktable (F34X200W) tables. Although you can select a frozen order in the Freeze Orders form, the system does not perform any table updates when you freeze an order that is already frozen.
3.3.1.9 Save Plans
The system enables you to make changes to the current MRP in the Supply/Demand Details grid and then save the changes to the plan. You change the quantity or date for a message by using the Adjusted Quantity and Adjusted Date fields in the Supply/Demand Details grid. When you click the Save Plan button, the system updates existing messages and adds new messages to the F3411 table.
The system applies the following changes when you save the plan:
-
If you change the adjusted date for a record with only an Increase Order Quantity to message, then the system adds a new Defer or Expedite message to the F3411 table.
-
If you change the adjusted quantity for a record with only a Defer message, then the system adds a new Increase Order Quantity to or Decrease Order Quantity to message to the F3411 table.
-
If you change the adjusted quantity increase to the original quantity, or the deferred date to the original date for a record with Increase Order Quantity to and Defer messages, the system updates the message quantity and date in the F3411 table.
Although you changed the quantity and date back to the original quantity and date, the system does not delete the F3411 message. Deleting the message can make the change invalid if older messages exist for the same order.
-
If you change the quantity to be less than the original quantity for a record with an Increase Order Quantity to message, then the system updates the quantity and message type of the F3411 record. The system performs the same processing for Decrease Order Quantity to, Defer, and Expedite messages.
-
If you add a B type message, then the start date becomes today's date.
-
If you change the request date to a past date, then the system retains the message type as B. The system creates an Order & Expedite message if the date is within the lead time level.
-
If you create a B type message for an order where the request date falls before the lead time, the system retains the request date and enters a start date equal to the start date on the Planning Advisor Console form.
-
If you modify the request date to a future date, the system changes the message type to O and updates the F3411 record.
-
If the request date is greater than or equal to the lead time, then the system updates the O message.
-
If the system adds an O type message and you modify the request date to a future date, the system updates the date field in the F3411 table.
-
If you modify the request date to today's date for an O type message, then the system updates the message to a B type.
-
If you change the date to a past date for O type message, then the system modifies the message to a B type.
-
If MRP generates a Cancel message for an existing work order, then the system updates the Adjusted Quantity field to a value of 0.
-
If you modify the quantity and defer the date on a work order, then the system adds a new Increase Order Quantity to or Decrease Order Quantity to message and adds a new Defer or Expedite message, depending on the messages in the F3411 table.
For production-controlled items, you can change the production number in any of the messages and the system updates the production number on the order. The system validates that the item is production-controlled and that the production number exists in the Production Number Master File (F34401) table.
3.3.1.10 Implement Plans
You select the Implement Plan button in the Supply/Demand Details group or the Implement Plan option on the Form menu to display the Planning Advisor Console Implement form of the Planning Advisor Console Implement program (P34X250).
After you click the Implement Plan button, the system saves the plan to the F3411 table.
The Planning Advisor Console Implement form displays all supply records changed in the Supply/Demand Details grid. You review the pending changes to the plan. You select the orders to process the messages associated with them and then click the Confirm button.
The system runs the version of the MRP/MPS Detail Message Process program (R3411) specified in the Process Message Version (R3411) processing option on the Process tab of the Planning Advisor Console program.
The Subsystem Job processing option on the Subsystem Job tab of the MRP/MPS Detail Message Process program does not apply when implementing messages in the Planning Advisor Console program.
The system processes messages for the orders.
3.3.1.11 Informational Messages
You use the Informational Messages group to review non-actionable messages. The system loads the Informational Messages subform (S34X200A) with non-actionable messages from the F3411 table.
The system filters the data by short item number and branch/plant to load the Informational Messages subform.
When you access the Planning Advisor Console form, the system expands the Informational Messages group only if messages with message types A, M, or T exist.
3.3.1.12 Item Summary for Other Branch/Plants
If an item is defined in multiple branch/plants, you can view the item summary information for other branch/plants from the Planning Advisor Console program. You access the Items Other Branches Summary form by selecting the Other Branches option on the Form menu of the Planning Advisor Console form.
The Items Other Branches Summary form contains the following features:
-
Parent Item group
This is a read-only section in a collapsible group.
-
Item summary grid
-
Item Balance Chart group
You can view the item summary information for a branch/plant in the item summary grid. Click the Item Number link in the item summary grid to access the Planning Advisor Console for the item for the branch/plant displayed in the corresponding grid row.
The Item Balance Chart group contains the Ending Available chart that enables you to view ending available information in graphical chart format for the selected branch/plant grid row. The system displays the primary UOM on the y-axis for the selected branch/plant.
For the selected item/branch, the Ending Available chart in the Item Balance Chart group is the same Ending Available chart that displays on the Planning Advisor Console form.
You use the Adjusted and Unadjusted options in the Item Balance Chart group to include or exclude messages in the Ending Available chart.
The Unadjusted view does not include the net change in demand. The Adjusted view includes the net change in demand.
The Item Balance Chart displays the freeze fence date and planning fence date for the branch/plant in the selected grid row.
3.3.1.13 Critical Component Items
A critical component is a component of an item that the Planning Advisor Console program evaluates when changes are made to the supply of the parent item. By defining critical component items, you can find out when a critical component is at risk during the planning process.
You access the Critical Component Summary form from the Planning Advisor Console form by using a Form menu option or clicking an alert link.
As you work with critical component items on the Critical Component Summary form, you select a Row menu option or click the Item Number link to navigate to the Planning Advisor Console to review the critical components. The system returns to the Critical Component Summary form when you click the Save or Implement button on the Planning Advisor Console form.
See Working with Critical Component Summary.
The system displays component demand for new planned orders, existing planned orders, and firm orders on the Planning Advisor Console form.
The system generates pegging records for new planned orders that you create from the Planning Advisor Console. The system uses the appropriate backschedule date in the F34X310W table to create a projected component demand for the first-level BOM.
For existing planned orders, the system displays date and quantity changes made to a component's demand. The system updates the F34X200W table records with adjusted quantities and dates. For date changes, the system adjusts the date based on the workday calendar for each pegging record. If no pegging records exist, then the system creates projected component demand in the F34X200W table.
For firm orders, the system displays date and quantity changes made to a component's demand. The system updates the F34X200W table records with adjusted quantities and dates. For date changes, the system adjusts the date based on the workday calendar for each parts list record. If no parts list exists, then the system creates a projected component demand in the F34X200W table.
The system saves pegging changes to the F3412 table.
The system performs the Save and Restore functions at the item level.
3.3.1.14 Alerts
During initial entry to the Planning Advisor Console form, the system displays Days of Supply (DOS) and Ending Available (EA) alerts for all the critical component items of the current item.
The system displays the DOS Alert and EA Alert fields in the Critical Component Alerts group of the Planning Selection group. If either value is not zero, then the system expands the Planning Selection group.
The DOS alert count is the number of components that are displayed with at least one red square icon in the DOS columns. The system adds one to the DOS alert count if the system finds a critical level on any of the DOS columns for an item/branch. The three levels associated with the DOS alert are Inventory on Hand, Days Until 1st Receipt, and Days Until 2nd Receipt. For example, if any or all of the three levels are displayed with a red square icon for a component item, then the DOS alert count is 1. If three different items have any of the three levels displayed with a red square icon, then the DOS alert count is 3.
The system refreshes the DOS Alert counts when you click the Implement button.
The EA alert represents the count of negative EA for critical components per parent item. The system refreshes the EA Alert counts when quantity or dates change in the Supply/Demand Details grid.
The system issues DOS alerts based on firm orders. The system does not update the DOS alerts after you make changes to the date or quantity in the Supply/Demand Details grid until you click the Implement button. After you click the Implement button, the system updates the firm orders and the DOS alerts.
You select the DOS or EA link to access the Critical Component Summary form.
3.3.2 Prerequisites
Before you complete the tasks in this section:
-
If you use single-facility planning, run the MRP/MPS Requirements Planning program (R3482).
-
If you use multifacility planning, run the Master Planning Schedule - Multiple Plant program (R3483).
-
Set the processing options in the Inventory On Hand processing option on the Defaults tab of the Planning Advisor Console program (P34X200) to include and exclude receipt routing quantities from on-hand inventory in the Planning Advisor Console program.
See Setting Processing Options for the Planning Advisor Console Program (P34X200).
-
Set up critical components, if applicable.
-
If you use forecast consumption, set up forecast consumption periods.
(Optional) If you use the forecast consumption by customer functionality, define customer address relationships. If you do not define customer address relationships, the system uses the Default Customer Address Relationship processing option value.
3.3.3 Setting Processing Options for the Planning Advisor Console Program (P34X200)
Processing options enable you to specify the default processing for programs and reports.
3.3.3.1 Select
- 1. Start Date
-
Specify the beginning date of the planning horizon.
If you leave this processing option blank, then the system uses the system date.
- 2. Planning Horizon Periods
-
Specify the periods used in the planning horizon.
Note:
If the Planning Horizon Periods processing options are left blank, then the system uses a default value of 2 for the days, weeks, and months. - Number of planning days
-
Specify the number of days to include in the planning horizon.
- Number of planning weeks
-
Specify the number of weeks to include in the planning horizon.
- Number of planning months
-
Specify the number of months to include in the planning horizon.
- 3. Supply/Demand Inclusion Rule
-
Specify the supply and demand inclusion rules version (40/RV) that the system uses. This a required value.
Supply and demand inclusion rules define the order type, line type, and line status to select.
- 4. Forecast Types (up to 5 types)
-
The system does not select any forecast types if the value of all five forecast type processing options is blank.
- Forecast Type 1
-
Specify the forecast type (34/DF) that the system uses for forecast selection.
- Forecast Type 2
-
Specify the forecast type (34/DF) that the system uses for forecast selection.
- Forecast Type 3
-
Specify the forecast type (34/DF) that the system uses for forecast selection.
- Forecast Type 4
-
Specify the forecast type (34/DF) that the system uses for forecast selection.
- Forecast Type 5
-
Specify the forecast type (34/DF) that the system uses for forecast selection.
- 5. Lot Hold Codes to be considered as inventory on hand (Up to 5 Codes)
-
The system does not consider any hold codes as inventory on-hand if the value of all five lot hold code processing options is blank.
- Lot Hold Code 1
-
Specify the lot hold code (41/L) that the system considers as inventory on hand.
If the system needs to consider all held lots as inventory on hand, then use the asterisk (*) symbol.
- Lot Hold Code 2
-
Specify the lot hold code (41/L) that the system uses for the on-hand inventory.
- Lot Hold Code 3
-
Specify the lot hold code (41/L) that the system uses for the on-hand inventory.
- Lot Hold Code 4
-
Specify the lot hold code (41/L) that the system uses for the on-hand inventory.
- Lot Hold Code 5
-
Specify the lot hold code (41/L) that the system uses for the on-hand inventory.
3.3.3.2 Defaults
- 1. Inventory On Hand
-
These processing options control how the program calculates the on-hand inventory.
- Safety Stock
-
Specify whether the system includes or excludes safety stock in on-hand inventory. The system includes safety stock in the initial calculation of on-hand inventory. Values are:
Blank: Exclude the quantity from on-hand inventory. The system deducts safety stock from on-hand inventory.
1: Include the quantity in on-hand inventory. The system retains safety stock in on-hand inventory.
- Quantity In Transit
-
Specify whether the system includes or excludes quantity in transit in on-hand inventory. Values are:
Blank: Exclude the quantity from on-hand inventory and include the quantity in the corresponding adjusted and unadjusted order quantity.
1: Include the quantity in on-hand inventory and exclude the quantity from the corresponding adjusted and unadjusted order quantity.
- Quantity In Inspection
-
Specify whether the system includes or excludes quantity in inspection in on-hand inventory. Values are:
Blank: Exclude the quantity from on-hand inventory and include the quantity in the corresponding adjusted and unadjusted order quantity.
1: Include the quantity in on-hand inventory and exclude the quantity from the corresponding adjusted and unadjusted order quantity.
- Quantity In Operation 1
-
Specify whether the system includes or excludes quantity in operation 1 in on-hand inventory. Values are:
Blank: Exclude the quantity from on-hand inventory and include the quantity in the corresponding adjusted and unadjusted order quantity.
1: Include the quantity in on-hand inventory and exclude the quantity from the corresponding adjusted and unadjusted order quantity.
- Quantity In Operation 2
-
Specify whether the system includes or excludes quantity in operation 2 in on-hand inventory. Values are:
Blank: Exclude the quantity from on-hand inventory and include the quantity in the corresponding adjusted and unadjusted order quantity.
1: Include the quantity in on-hand inventory and exclude the quantity from the corresponding adjusted and unadjusted order quantity.
- Expired Lots Quantity
-
Specify whether the system includes or excludes the expired lot quantity in the on-hand inventory. Values are:
Blank: Exclude the quantity from the on-hand inventory.
1: Include the quantity in the on-hand inventory.
- Held Lots Quantity
-
Specify whether the system includes or excludes held lot quantities. Values are:
Blank: Exclude the quantity from the on-hand inventory and exclude held lots after the planning horizon start date specified on the Supply/Demand Details grid.
1: Include the quantity in the on-hand inventory and include held lots after the planning horizon start date specified on the Supply/Demand Details grid.
Note:
If the lot hold codes are on or before the planning horizon start date, the system includes the held lots specified in the Lot Hold Codes to be considered as inventory on hand processing option in the on-hand inventory quantity as not on hold. The system also includes held lots in on-hand inventory if the lots become effective or expire after the planning horizon start date. - Past Due Supply Quantity
-
Specify whether the system includes or excludes the past due supply quantity in on-hand inventory. Values are:
Blank: Exclude quantity from on-hand inventory.
1: Include quantity in on-hand inventory.
- 2. Item Balance Chart
-
Specify the type of item availability that displays in the Item Balance chart. Values are:
Blank: Ending Available
1: Available to Promise
2: Cumulative Available to Promise
3.3.3.3 Display
- 1. Supply/Demand Sequence
-
Specify the sequence in which the system displays supply and demand orders. Values are:
Blank: Display supply orders and then demand orders.
1: Display demand orders and then supply orders.
Note:
Although the system considers inventory as supply, regardless of the processing option setting, inventory records are always displayed before the supply or demand orders.
3.3.3.4 Process
- 1. Forecast Consumption Logic
-
Specify whether the system uses forecast consumption logic. Values are:
Blank: Do not use forecast consumption.
1: Use forecast consumption.
This value invokes forecast consumption logic applied to aggregate sales order and forecast quantities within the forecast consumption period for items with a planning fence rule equal to H. If you select this option, the system uses the current Forecast Consumption Period beginning date as the default value for the Forecast Start Date.
2: Use forecast consumption by customer.
This value invokes forecast consumption logic applied to aggregate sales orders and forecast quantities for individual customers for an item with a planning fence rule equal to H. If you select this option, then the system uses the current Forecast Consumption Period beginning date as the default value for the forecast start date.
- 2. Forecast Type for Demand by Customer
-
Specify the forecast type (UDC 34/DF) that the system uses to create a forecast for the actual daily demand by the customer when you set the Forecast Consumption Logic processing option to 2. This value cannot equal any value that is selected for the Forecast Types processing option.
- 3. Default Customer Address Relationship
-
Use this processing option when the Forecast Consumption Logic processing option is set to a value of 2 for forecast consumption by customer. Use this processing option to specify the default customer address relationship that the system uses for calculating actual daily demand when a relationship is not set up using the Forecast Consumption by Customer Address Relationship program (P3406). Values are:
1: Use the ship to address book number.
2: Use the sold to address book number.
- Interplant Demand Consumes Forecast
-
Use this processing option to specify whether to use interplant demand to consume forecast when using forecast consumption. When using any other planning rule, you can use this option to specify whether to consider interplant demand as customer demand. When the option is set, the system considers interplant demand for firm and planned transfer orders. When the option is blank, the system considers interplant demand as a separate source of demand. Values are:
Blank: Do not consider interplant demand as customer demand.
1: Consider interplant demand as customer demand.
3.3.3.5 Versions
Use these processing options to specify the versions of programs.
When you select a version, review the version's processing options to ensure that the version meets the requirements.
- 1. Forecast Revisions (P3460)
-
Specify the version of the Forecast Revisions program (P3460) that the system uses. If you leave this processing option blank, then the system uses version ZJDE0001.
- 2. Item Availability (P41202)
-
Specify the version of the Item Availability program (P41202) that the system uses. If you leave this processing option blank, the system uses version ZJDE0001.
- 3. Bill of Material Inquiry (P30200)
-
Specify the version of the Bill of Material Inquiry program (P30200) that the system uses. If you leave this processing option blank, the system uses version ZJDE0004.
- 4. Item Branch - Manufacturing Data (P41026)
-
Specify the version of the Item Branch program (P41026) that the system uses. If you leave this processing option blank, the system uses version ZJDE0002.
- 5. Work Order Scheduling Work Bench (P31225)
-
Specify the version of the Work Order Scheduling program (P31225) that the system uses. If you leave this processing option blank, the system uses version ZJDE0001.
- 6. Purchase Order Inquiry (P4310)
-
Specify the version of the Purchase Order Inquiry program (P4310) that the system uses. If you leave this processing option blank, the system uses version ZJDE0001.
- 7. Sales Order Entry (P4210)
-
Specify the version of the Sales Order Entry program (P4210) that the system uses. If you leave this processing option blank, the system uses version ZJDE0001.
- 8. Sales Order Inquiry (P4210)
-
Specify the version of the Sales Order Inquiry program (P4210) that the system uses. If you leave this processing option blank, the system uses version ZJDE0001.
- 9. Work Order Parts List (P3111)
-
Specify the version of the Work Order Parts List program (P3111) that the system uses. If you leave this processing option blank, the system uses version ZJDE0001.
- 10. Pegging Inquiry (P3412)
-
Specify the version of the Pegging Inquiry program (P3412) that the system uses. If you leave this processing option blank, the system uses version ZJDE0001.
- 11. Item Ledger Inquiry (P4111)
-
Specify the version of the Item Ledger Inquiry program (P4111) that the system uses. If you leave this processing option blank, the system uses version ZJDE0001.
- 12. MRP/MPS Requirements Planning (R3482)
-
Specify the version of the MRP/MPS Requirements Planning program (R3482) that the system uses when you access this program from the Form menu option on the Planning Advisor Console form. If you leave this processing option blank, the system disables the Form menu option.
- 13. Master Planning Schedule - Multiple Plant (R3483)
-
Specify the version of the Master Planning Schedule - Multiple Plant program (R3483) that the system uses when you access this program from the Form menu option on the Planning Advisor Console form. If you leave this processing option blank, the system disables the Form menu option.
- 14. Process Message Version (R3411)
-
Specify the version of the MRP/MPS Detail Message Processing program (R3411) that the system uses to implement messages. The system uses only the version processing options template information to process messages. The system does not run the R3411 program.
If you leave this processing option blank, then the system uses version XJDE0002.
Note:
The Subsystem Job processing option on the Subsystem Job tab of the MRP/MPS Detail Message Process program does not apply when you implement messages on the Planning Advisor Console program (P34X200).
3.3.4 Reviewing Search Criteria for Supply and Demand
To review search criteria for supply and demand:
-
Access the Planning Advisor Console form.
Form Name Form ID Navigation Planning Advisor Console W34X200A - Click the Item No. link in the Item Number field of the Item Summary grid in the Planning Advisor Summary program (P34X100).
-
In-Memory Planning Advisor Operations (G3415).
Select Planning Advisor Console (P34X200).
Additional Item Information W34X100HA On the Planning Advisor Console form, click the orange square in the Item Number field. -
On the Planning Advisor Console form, enter or review the following fields in the Planning Selection group, as applicable:
- Item Number
-
Enter or review the number that the system assigns to an item. It can be in short, long, or third item number format.
- Unit of Measure
-
Enter a user-defined code (00/UM) that identifies the unit of measurement for an amount or quantity. For example, it can represent a barrel, box, cubic meter, liter, hour, and so on.
- Planner Number
-
Enter or review the address number of the material planner for the specified item.
- Branch/Plant
-
Enter or review the alphanumeric code that identifies a separate entity within a business for which you want to track costs. For example, a business unit can be a warehouse location, job, project, work center, branch, or plant.
You can assign a business unit to a document, entity, or person for purposes of responsibility reporting.
Note:
Business unit security can prevent you from viewing information about business units for which you have no authority. - Start Date
-
Enter or review the date that specifies the planning start date for planning information retrieval.
- End Date
-
Enter or review the date that specifies the planning end date for planning information retrieval. The system calculates the planning end date by adding the horizon periods to the planning start date.
Note:
When you navigate to the Planning Advisor Console form from the Planning Advisor Summary program, the system populates the Item Number, Branch/Plant, Unit of Measure, Start Date, and End Date fields with data from the Planning Advisor Summary form and the processing options of the Planning Advisor Console program. -
(Optional) In the Planning Selection group, click the orange square in the upper left corner of the Item Number field.
-
Review the item information on the Main and Additional tabs of the Additional Item Information hover form.
-
(Optional) In the Planning Selection group, click the orange square in the upper left corner of the Planner Number field.
-
Review the planner information on the Planning Advisor Contact Information hover form.
-
Click Find.
-
Review supply and demand information.
-
Review the alerts in the Critical Component Alerts group.
-
Define additional criteria, as applicable, using the Beginning Inventory On Hand group and QBE lines in the Supply/Demand Details and Informational Messages grids.
-
Manage supply and demand, as applicable.
3.3.5 Defining Beginning Inventory On Hand
To define beginning inventory on hand:
-
Access the Planning Advisor Console form.
Form Name Form ID Navigation Planning Advisor Console W34X200A - Click the Item No. link in the Item Number field of the Item Summary grid in the Planning Advisor Summary program (P34X100).
-
In-Memory Planning Advisor Operations (G3415).
Select Planning Advisor Console (P34X200).
Receipt Routing Inquiry W34X221A - From the Beginning Inventory On Hand group, select the Quantity in Transit link.
-
From the Form menu, select the In Transit Orders option.
-
From the Beginning Inventory On Hand group, select the Quantity in Inspection link.
-
From the Form menu, select the In Inspection Orders option.
-
From the Beginning Inventory On Hand group, select the Quantity in Operation 1 link.
-
From the Form menu, select the Operation 1 Orders option.
-
From the Beginning Inventory On Hand group, select the Quantity in Operation 2 link.
-
From the Form menu, select the Operation 2 Orders option.
Expired Lots W34X210B - From the Beginning Inventory On Hand group, select the Expired Lots Quantity link.
-
From the Form menu, select the Expired Lots option.
Held Inventory W34X210B - From the Beginning Inventory On Hand group, select the Held Inventory Quantity link.
-
From the Form menu, select the Held Lots option.
-
Review the search criteria for supply and demand, as applicable.
-
Review the quantity on hand for each category in the Beginning Inventory On Hand group:
- Quantity on Hand
-
Displays the number of units that are physically in stock. The system displays the quantity on hand in the primary unit of measure.
- Quantity in Transit
-
Displays the quantity currently in transit from the supplier.
The value displays in the primary unit of measure.
- Quantity in Inspection
-
Displays the quantity currently being inspected. This quantity has been received, but is not considered on hand.
The value displays in the primary unit of measure.
- Quantity in Operation 1
-
Displays the quantity which is currently at a user-defined operation within the dock-to-stock process. The quantity has been received, but may or may not be considered to be on hand.
The value displays in the primary unit of measure.
- Quantity in Operation 2
-
Displays the quantity which is currently at a user-defined operation within the dock-to-stock process. The quantity has been received, but may or may not be considered to be on hand.
The value displays in the primary unit of measure.
- Safety Stock
-
Displays the quantity of stock kept on hand to cover high-side variations in demand.
- Expired Lots Quantity
-
Displays a value that represents the number of units in expired lots. The system displays the expired lot quantity in the primary unit of measure.
- Held Inventory Quantity
-
Displays a value that represents the number of units in held lots. The system displays the held lot quantity in the primary unit of measure.
- Past Due Supply Quantity
-
Displays a value that represents the supply units that are past due. The system displays the supply quantity that is past due in the primary unit of measure.
-
To review the receipt routing in transit orders, select the Quantity in Transit link.
-
Review the following fields on the Receipt Routing Inquiry form:
- Order Number
-
Displays a number that identifies an original document. This document can be a voucher, a sales order, an invoice, unapplied cash, a journal entry, and so on.
- Order Ty (order type)
-
Displays a user-defined code (00/DT) that identifies the type of document. This code also indicates the origin of the transaction. JD Edwards has reserved document type codes for vouchers, invoices, receipts, and time sheets, which create automatic offset entries during the post program. (These entries are not self-balancing when you originally enter them.)
The following document types are defined by JD Edwards and you should not change them:
P: Accounts Payable documents
R: Accounts Receivable documents
T: Payroll documents
I: Inventory documents
O: Purchase Order Processing documents
J: General Accounting/Joint Interest Billing documents
S: Sales Order Processing documents
- Order Type Description
-
Displays a description of the order type.
- Quantity In Transit
-
Displays the quantity currently in transit from the supplier.
- Primary UM (primary unit of measure)
-
Displays a user-defined code (00/UM) that indicates the quantity in which to express an inventory item, for example, CS (case) or BX (box).
- Primary Unit of Measure Description
-
Displays a description of the primary unit of measure.
- Freeze Code
-
Displays a code that indicates if the line on the order is frozen. MPS/MRP does not suggest changes to frozen orders. Values are:
Y: Yes, freeze the order.
N: No, do not freeze the order. This value is the default.
-
To review the receipt routing quantity in inspection, select the Quantity in Inspection link.
-
Review the fields on the Receipt Routing Inquiry form.
- Quantity in Inspection
-
Displays the quantity currently in transit from the supplier.
-
To review the receipt routing quantity in operation 1, select the Quantity in Operation 1 link.
-
Review the fields on the Receipt Routing Inquiry form.
- Quantity in Operation 1
-
Displays the quantity currently in transit from the supplier.
-
To review the receipt routing quantity in operation 2, select the Quantity in Operation 2 link.
-
Review the fields on the Receipt Routing Inquiry form.
- Quantity in Operation 2
-
Displays the quantity currently in transit from the supplier.
-
To review the expired lot quantities, select the Expired Lots Quantity link.
-
Review the following fields on the Expired Lots form:
- Lot Serial Number
-
Displays a number that identifies a lot or a serial number. A lot is a group of items with similar characteristics.
- Lot Description
-
Displays a user-defined code (41/L) that indicates the status of the lot. If you leave this field blank, it indicates that the lot is approved. All other codes indicate that the lot is on hold.
You can assign a different status code to each location in which a lot resides on Item/Location Information or Location Lot Status Change.
- Quantity on Hand
-
Displays the number of units that are physically in stock. The system displays the quantity on-hand in the primary unit of measure.
- Lot Effectivity Date
-
Displays the date on which a lot becomes available. The system uses this date for availability and commitment processing to indicate that the lot is available on or after the date that you specify. You must complete this field when the inventory first becomes an on-hand quantity for the lot. If you leave this field blank, the system calculates the effective date of the lot by using the value for Effective Days in the Item Branch File table (F4102) or the current date if the value for Effective Days is zero.
- Lot Expiration Date
-
Displays the date on which a lot of items expires. The system automatically enters this date if you have specified the shelf life days for the item on Item Master Information or Item Branch/Plant Information. The system calculates the expiration date by adding the number of shelf life days to the date that you receive the item. You can commit inventory based on the lot expiration date for items. You choose how the system commits inventory for an item on Item Master Information or Item Branch/Plant Information.
- Best Before Date
-
Displays the last date on which the products in a lot should be consumed. The system calculates the date by retrieving the value from the Best Before Days field in the Item Master program (P4101). You can also use this date as a "through" date for commitment processing. You can commit a lot by this date by using the Commitment Date Method field in the Item Branch program (P41026).
- On Hand Date
-
Displays the date when a lot is considered to be on-hand in a branch/plant. The system determines the on-hand date by using the transaction date on which the first inventory for a particular lot is determined to be on hand. The system automatically assigns this date to the Lot Master table (F4108).
- Best On Date
-
Displays the last date on which the products in a lot should be consumed. The system calculates the date by retrieving the value from the Best Before Days field in the Item Master program (P4101). You can also use this date as a "through" date for commitment processing. You can commit a lot by this date by using the Commitment Date Method field in the Item Branch program (P41026).
- Sell By Date
-
Displays the date by which a lot should be completely sold. The system uses this date as a "through" date for commitment processing. The system calculates the sell-by date by using the value in the Sell By Days field, which is contained in the Item Branch File table (F4102), when the inventory becomes available on-hand.
-
To review the held inventory quantities, select the Held Inventory Quantity link.
-
Review the following fields on the Held Inventory form:
- Lot Status Code
-
Displays a user-defined code (41/L) that indicates the status of the lot. If you leave this field blank, it indicates that the lot is approved. All other codes indicate that the lot is on hold.
You can assign a different status code to each location in which a lot resides on Item/Location Information or Location Lot Status Change.
- Lot Status Code Description
-
Displays the description of the lot status code.
- Quantity Held
-
Displays the number of units that are physically in stock. The system displays the quantity on-hand in the primary unit of measure.
-
Select the Include option to include or exclude the following quantities in on-hand inventory, as applicable:
-
Quantity in Transit
-
Quantity in Inspection
-
Quantity in Operation 1
-
Quantity in Operation 2
-
Safety Stock
-
Expired Lots Quantity
-
Held Lots Quantity
-
Past Due Supply Quantity
-
-
Manage supply and demand, as applicable.
3.3.6 Working with Item Balance and Supply and Demand Charts
To work with the item balance chart and the supply and demand chart:
-
Access the Planning Advisor Console form.
Form Name Form ID Navigation Planning Advisor Console W34X200A - Click the Item No. link in the Item Number field of the Item Summary grid in the Planning Advisor Summary program (P34X100).
-
In-Memory Planning Advisor Operations (G3415).
Select Planning Advisor Console (P34X200).
Figure 3-3 Planning Advisor Console: Supply/Demand Charts Group
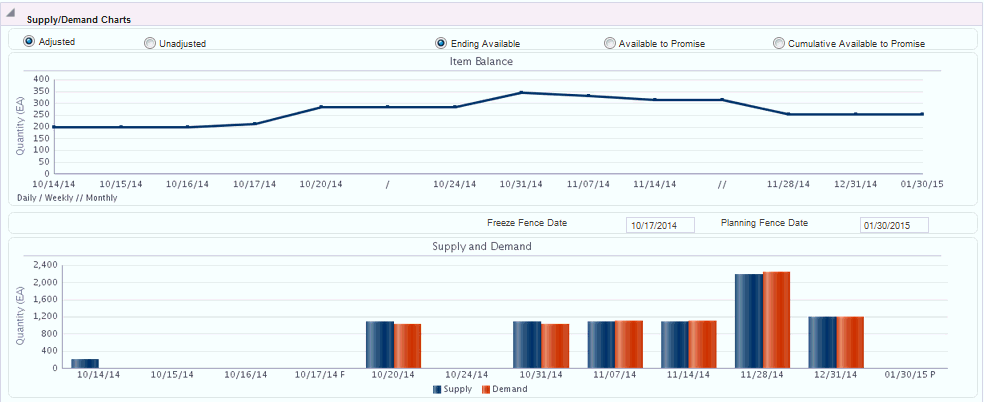
Description of "Figure 3-3 Planning Advisor Console: Supply/Demand Charts Group"
-
On the Planning Advisor Console form, review the search criteria and define the beginning inventory on hand, as applicable.
-
Click Find.
The system displays the charts.
-
Review the options, fields, and chart in the Supply/Demand Charts group.
-
Select the Adjusted or Unadjusted option, as applicable, and review the Supply and Demand chart.
-
Review the values in the following fields:
- Freeze Fence Date
-
Displays a date that represents the number of days from the generation start date during which the system should not create or replan order messages. For example, if the generation start date is January 3, and the freeze time fence is three days, the planning system does not display messages with dates that are prior to or equal to January 6.
Imbalances of supply and demand within the freeze fence are planned outside the freeze fence.
The system calculates the freeze fence date by using the planning horizon start date and adding the number of days set up in the Freeze Fence field on the Plant Manufacturing tab of the Additional System Info form in the Item Branch program (P41026).
If the item is a manufactured item with an M stocking type, then the system uses the shop floor calendar to calculate the date. For example, if the horizon start date is January 2 and the value in the Freeze Fence field is 10 days, then the freeze fence date is January 16.
If the item is a purchased item with a P stocking type, then the system uses the regular calendar to calculate the date. For example, if the horizon start date is January 2 and the value in the Freeze Fence field is three days, then the freeze fence date is January 5.
- Planning Fence Date
-
Displays a date that represents the number of days that the system uses with the time fence rule to determine how demand is used. Enter the number of days after the generation start date when the time fence rule changes from the first rule to the second rule. For example, if the time fence rule is S (customer demand before the time fence, forecast after the time fence), the generation start date is January 3, and the planning time fence is three days, then the system plans according to customer demand through January 6. Beginning on January 7, the system plans according to the forecast.
The system calculates the planning fence date by using the horizon start date and adding the number of days set up in the Planning Fence field on the Plant Manufacturing tab of the Additional System Info form in the Item Branch program (P41026).
If the item is a manufactured item with an M stocking type, then the system uses the shop floor calendar to calculate the planning fence date. For example, if the horizon start date is January 2, and the value in the Planning Fence field is 15 days, then the planning fence date is January 23.
If the item is a purchased item with a P stocking type, then the system uses the regular calendar to calculate the planning fence date. For example, if the horizon start date is January 2 and the value in the Planning Fence field is 10 days, then the planning fence date is January 12.
-
Review the Item Balance chart in the Supply/Demand Charts group.
The system displays the Item Balance chart with the Supply and Demand chart.
The Item Balance chart is a line chart that plots quantity on the y-axis versus date on the x-axis.
The chart designates the beginning of the weekly planning horizon with one slash (/) and the beginning of the monthly planning horizon with two slashes (//).
-
Select the Ending Available, Available to Promise, or Cumulative Available to Promise option, as applicable, and review the Item Balance chart.
-
Review the Supply and Demand chart in the Supply/Demand Charts group.
The double-bar chart plots quantity on the y-axis versus date on the x-axis. The system displays blue bars for supply and red bars for demand.
The system renders the chart with every change in the Supply/Demand Details grid in the Supply/Demand Details group.
The system takes the first character from the Freeze Fence Date and Planning Fence Date control fields to display in the chart after the date on the x axis of the Supply and Demand chart. If the date falls within the daily buckets, then the first character displays on the corresponding date. If the date falls in the weekly or monthly buckets, then the first character displays on the first bucket that the date corresponds to.
If the value in the Freeze Fence field on the Plant Manufacturing tab of the Additional System Info form is zero (0), then the system does not calculate the date and the first character of the field name does not display on the form.
If the value in the Planning Fence field on the Plant Manufacturing tab of the Additional System Info form is zero (0), then the system defaults the planning horizon start date to the planning fence date.
-
Review the Item Balance and the Supply and Demand charts.
-
Manage supply and demand, as applicable.
3.3.7 Managing Supply and Demand
To manage supply and demand:
-
Access the Planning Advisor Console form.
Form Name Form ID Navigation Planning Advisor Console W34X200A - Click the Item No. link in the Item Number field of the Item Summary grid in the Planning Advisor Summary program (P34X100).
-
In-Memory Planning Advisor Operations (G3415).
Select Planning Advisor Console (P34X200).
Work Order W34X200HC Click the orange square in the upper left corner of the Order Number field. The system displays the W34X200HC form for work orders if the item/branch stocking type is M.
Purchase Order W34X200HA Click the orange square in the upper left corner of the Order Number field. The system displays the W34X200HA form for purchase orders if the item/branch stocking type is P.
Transfer Order W34X200HD Click the orange square in the upper left corner of the Order Number field. The system displays the W34X200HD form for transfer orders if the item/branch stocking type is P.
-
On the Planning Advisor Console form, review the search criteria and define the beginning inventory on hand, as applicable.
-
Enter dates in the From Date and Thru Date fields in the Supply/Demand Details group, as applicable.
Figure 3-4 Planning Advisor Console: Supply/Demand Details Group
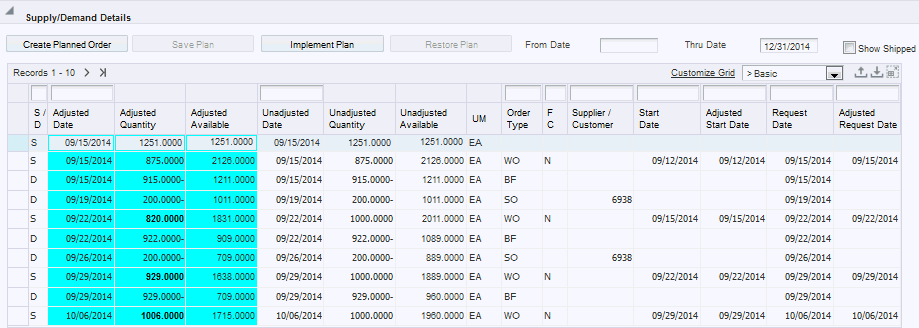
Description of "Figure 3-4 Planning Advisor Console: Supply/Demand Details Group"
- From Date
-
Enter a date that specifies the beginning date for the display of supply and demand details.
The From Date value must be greater than or equal to the planning horizon start date, and less than or equal to the Thru Date value.
The default value for this field is blank.
- Thru Date
-
Enter a date that specifies the ending date for the display of supply and demand details.
The Thru Date value must be less than or equal to the planning horizon end date and greater than or equal to the planning horizon start date.
The default value for this field is the planning horizon end date specified in the End Date field in the Planning Selection group.
If you select the Adjusted option on the Supply and Demand chart, then the Supply/Demand Details grid displays records with an adjusted date greater than or equal to the From Date, and less than or equal to the Thru Date. The system sorts the records in the Supply/Demand Details grid based on the adjusted dates.
If you select the Unadjusted option on the Supply and Demand chart, then the Supply/Demand Details grid displays records with an unadjusted date greater than or equal to the From Date, and less than or equal to the Thru Date. The system sorts records in the Supply/Demand Details grid based on the unadjusted dates.
When the From Date value is equal to the planning horizon start date and the Thru Date value is equal to the planning horizon end date, then the system ignores the Thru Date as a filter for the Supply/Demand Details grid. The system displays rates after the planning horizon end date if they exist, but only when the full horizon date is set in the From Date and Thru Date fields.
-
Review the fields in the Basic grid of the Supply/Demand Details grid in the Supply/Demand Details group:
- S/D (Supply or Demand)
-
Displays a user-defined code (34X/SD) that identifies whether the record type is supply or demand. Oracle recommends that you do not change the hard-coded values defined in JD Edwards EnterpriseOne. Values are:
S: Supply
D: Demand
- Adjusted Date
-
Enter a date that specifies the supply or recommended MRP date that users can modify.
The override date represents different supply dates from orders in the system. For example, lot effective dates from purchase orders, and work order planned completed dates from work orders.
The override date also represents recommended dates from MRP. For example, MRP messages suggest changes to the date on an order.
- Adjusted Quantity
-
Enter a number that represents the units of supply or demand that users can modify. The supply or demand units represent quantities from different orders in the system. For example, open units from purchase orders, transaction quantities from sales orders, and transaction quantities from work orders.
- Adjusted Available
-
Displays a value that represents a running total of availability after the quantity for the current line is applied. This value also incorporates MRP messages which can adjust the date or quantity of supply orders.
- Unadjusted Date
-
Displays a date that specifies the supply or demand date. The supply or demand date represents different supply or demand dates from orders in the system. For example, lot effective dates from purchase orders, scheduled pick dates from sales orders, and work order planned completed dates from work orders.
- Unadjusted Quantity
-
Displays a number that represents the units of supply or demand. The supply or demand units represent quantities from different orders in the system. For example, open units from purchase orders, transaction quantities from sales orders, or transaction quantities from work orders.
- Unadjusted Available
-
Displays a value that represents a running total of availability after the quantity for the current line is applied.
- UM (unit of measure)
-
Displays a user-defined code (00/UM) that indicates the quantity in which to express an inventory item, for example, CS (case) or BX (box).
- Order Type
-
Displays a user-defined code (00/DT) that identifies the type of document. This code also indicates the origin of the transaction. JD Edwards has reserved document type codes for vouchers, invoices, receipts, and time sheets, which create automatic offset entries during the post program. (These entries are not self-balancing when you originally enter them.) The following document types are defined by JD Edwards and you should not change them:
P: Accounts Payable documents
R: Accounts Receivable documents
T: Payroll documents
I: Inventory documents
O: Purchase Order Processing documents
J: General Accounting/Joint Interest Billing documents
S: Sales Order Processing documents
- F/C (Freeze Code)
-
Displays a code that indicates if the line on the order is frozen. MPS/MRP does not suggest changes to frozen orders. Values are:
Y: Yes, freeze the order.
N: No, do not freeze the order. This value is the default.
- Supplier/Customer
-
Displays a number that identifies an entry in the Address Book system, such as employee, applicant, participant, customer, supplier, tenant, or location.
- Start Date
-
Displays the start date for the order. You can enter this date manually, or have the system calculate it using a backscheduling routine. The routine starts with the requested date and offsets the total lead time to calculate the appropriate start date.
- Adjusted Start Date
-
Displays the order start date or the recommended start date that users can modify. The override start date can represent a recommended date from MRP, when messages suggest that the start date on an order be changed.
- Request Date
-
Displays the date that an item is scheduled to arrive or that an action is scheduled for completion.
- Adjusted Request Date
-
Displays a user-specified date that represents the order request date or the recommended request date that users can modify. This date can also represent the suggested recommended completion date for MRP-generated messages.
-
(Optional) Click the orange square in the upper left corner of the Order Number field.
-
Review the order information in the hover form.
The system displays the hover form for supply rows only.
For work orders, the system displays the hover form for work orders and displays work order information if the item/branch stocking type is M.
For purchase orders, the system displays the hover form for purchase orders and displays purchase order information if the item/branch stocking type is P.
For transfer orders, the system displays the hover form for transfer orders and displays transfer order information if the item/branch stocking type is P and the supply branch is available for the order.
-
(Optional) Click the Order Number link in the Order Number field.
-
Review the order information and click Close.
-
Select the Inventory, Work Orders/Parts List, Purchase Orders, Sales Orders, and Forecast grid and review information, as applicable.
-
(Optional) Select a row and then select the Freeze Order or Unfreeze Order option on the Row menu to freeze or unfreeze a purchase order or work order.
The system displays the updated value in the Freeze Code field.
-
Select the Basic grid.
-
Change the date in the Adjusted Date field, as applicable.
-
Change the quantity in the Adjusted Quantity field, as applicable.
-
Click Find to refresh the grids and charts with changes to dates. The system reflects changes to quantities on the grids and charts immediately.
-
Click the Restore Plan button to cancel unsaved changes and restore the Supply/Demand Details grid to the original supply and demand data and MRP messages.
-
Make changes to the plan, as applicable.
-
Click the Save Plan button to save your changes to the plan.
-
Manage supply and demand, as applicable.
3.3.8 Reviewing Item Summary for Other Branch/Plants
To review item summary for other branch/plants:
-
Access the Items Other Branches Summary form.
Form Name Form ID Navigation Items Other Branches Summary W34X260B On the Planning Advisor Console form, select the Other Branches option on the Form menu. -
Review the following fields in the Parent Item group of the Items Other Branches Summary form:
-
Item Number
-
Planner Number
-
Branch/Plant
-
Start Date
-
End Date
-
-
(Optional) In the Parent Item group, click the orange square in the upper left corner of the Item Number field.
-
Review the item information on the Main and Additional tabs of the Additional Item Information hover form.
-
(Optional) In the Parent Item group, click the orange square in the upper left corner of the Planner Number field.
-
Review the planner information on the Planning Advisor Contact Information hover form.
-
Review the fields in the item summary grid:
- Ending Available
-
Displays an icon that indicates whether an item has a negative ending available value. Values are:
Green circle: A negative ending available value does not exist.
Red square: A negative ending available value exists.
- Inventory On Hand
-
Displays an icon with hover text, indicating whether the starting on-hand quantity is greater than or less than the past due demand. The system calculates the starting balance as on-hand quantity minus the past due demand. The system displays a red square icon if the starting balance is less than 0, and a green circle icon if the starting balance is greater than or equal to 0.
- Days Until 1st Receipt
-
Displays an icon with hover text, indicating the number of days until the first receipt of material. The system calculates the number of days from the Start Date until the first receipt of material. The system displays one of these icons based on the calculation:
Red square icon: The number of days until the first receipt of material is greater than the current days of supply.
Yellow triangle icon: The number of days until the first receipt of material is equal to the current days of supply.
Green circle icon: The number of days until the first receipt of material is less than the current days of supply.
Red X icon: No receipt exists for the planning horizon.
- Days Until 2nd Receipt
-
Displays an icon with hover text, indicating the number of days until the second receipt of material. The system calculates the number of days from the Start Date until the second receipt of material. The system displays one of these icons based on the calculation:
Red square icon: The number of days until the second receipt of material is greater than the days of supply after the first receipt.
Yellow triangle icon: The number of days until the second receipt of material is equal to the days of supply after the first receipt.
Green circle icon: The number of days until the second receipt of material is less than the days of supply after the first receipt.
Red X icon: No receipt exists for the planning horizon.
- Leadtime Alert
-
Displays an icon that represents the level notification for a lead time alert. The system starts with the requested date and offsets the total lead time to calculate the appropriate start date on an actionable message type. The system issues a critical notification if the start date is less than the system date.
- Net Change in Demand
-
Displays a number that represents the net change in the component demand due to a quantity change on the parent item. For newly planned orders, the net change in demand is the total of the pegging record quantities. For existing planned orders, the net change in demand is the total of unsaved changes in quantity. Net change in demand can be negative or positive and is calculated for only the first level components of a parent item.
- Quantity On Hand
-
Displays the number of units that are physically in stock. The system displays the quantity on-hand in the primary unit of measure.
- Past Due Supply Quantity
-
Displays a value that represents the supply units that are past due. The system displays the supply quantity that is past due in the primary unit of measure.
- UM
-
Displays a user-defined code (00/UM) that identifies the unit of measure that the system uses to express the quantity of an item, for example, EA (each) or KG (kilogram).
- Days of Supply Current
-
Displays a number that indicates the number of days for which the current on-hand supply covers demand. The system calculates the number of days until the stock level falls below zero.
- Days of Supply After 1st Receipt
-
Displays a number that indicates the number of days for which the current on-hand supply plus the first receipt of material covers demand. The system aggregates supply quantities by date and adds the quantities to on hand supply on the first receipt date. The system calculates the number of days until the stock level falls below zero after the first receipt.
- Days of Supply After 2nd Receipt
-
Displays a number that indicates the number of days for which the on-hand supply plus the second receipt of material covers demand. The system aggregates supply quantities by date and adds the quantities to on-hand supply on the second receipt date. The system calculates the number of days until the stock level falls below zero after the second receipt.
- Safety Stock
-
Displays the quantity of stock kept on hand to cover high-side variations in demand.
- Stocking Type
-
Displays a user-defined code (41/I) that indicates how you stock an item, for example, as finished goods or as raw materials. The following stocking types are hard-coded and you should not change them:
0: Phantom item
B: Bulk floor stock
C: Configured item
E: Emergency/corrective maintenance
F: Feature
K: Kit parent item
N: Nonstock
The first character of Description 2 in the user-defined code table indicates that the item is purchased (P) or manufactured (M).
- Primary Supplier
-
Displays the address book number of the preferred provider of this item.
- Planner Number
-
Displays the address number of the material planner for this item.
- Plan Fmly (planning family)
-
Displays a user-defined code (41/P4) that represents an item property type or classification, such as commodity type or planning family. The system uses this code to sort and process similar items.
This field is one of the six classification categories available primarily for purchasing purposes.
- Pln Cod (planning code)
-
Displays a code that indicates how Master Production Schedule (MPS), Material Requirements Planning (MRP), or Distribution Requirements Planning (DRP) processes this item. Valid codes are:
0: Not Planned by MPS, MRP, or DRP
1: Planned by MPS or DRP
2: Planned by MRP
3: Planned by MRP with additional independent forecast
4: Planned by MPS, Parent in Planning Bill
5: Planned by MPS, Component in Planning Bill
These codes are hard coded.
- Buyer Number
-
Displays the address number of the person responsible for setting up and maintaining the correct stocking levels for the item.
- Substitute Item Flag
-
Displays a value of 1 to indicate that this is a substitute line item.
-
Click Cancel.
3.3.9 Creating Planned Orders
To create planned orders:
-
Access the Planning Advisor Console form.
Form Name Form ID Navigation Planning Advisor Console W34X200A - Click the Item No. link in the Item Number field of the Item Summary grid in the Planning Advisor Summary program (P34X100).
-
In-Memory Planning Advisor Operations (G3415).
Select Planning Advisor Console (P34X200).
Create Planned Order W34X240A - Click the Create Planned Order button in the Supply/Demand Details group.
-
Select the Create Planned Order option on the Form menu.
-
On the Planning Advisor Console form, review the search criteria and define the beginning inventory on hand, as applicable.
-
Review the supply and demand orders in the Supply/Demand Details grid in the Supply/Demand Details group.
-
Click the Create Planned Order button to create supply orders, such as work orders, purchase orders, and transfer orders.
-
Review the following fields in the Order Details group on the Create Planned Order form:
-
Item Number
-
Stocking Type
-
Branch/Plant
The system passes the item number and branch/plant information to the Create Planned Order form from the Planning Advisor Console form. The system also populates the stocking type for the item from the Item/Branch record.
- Stocking Type
-
Displays a user-defined code (41/I) that indicates how you stock an item, for example, as finished goods or as raw materials. The following stocking types are hard-coded and you should not change them:
-
Phantom item
-
Bulk floor stock
-
Configured item
-
Emergency/corrective maintenance
-
Feature
-
Kit parent item
The first character of Description 2 in the user-defined code table indicates if the item is purchased (P) or manufactured (M).
-
-
-
Complete the fields in the Order Details group on the Create Planned Order form, as applicable:
-
Order Type
Displays the default order type that the system retrieves from the program versions specified on the Versions tab of the MRP/MPS Detail Message Process program (R3411). The system uses the version of the MRP/MPS Detail Message Process program specified in the Process Message Version (R3411) processing option on the Process tab of the Planning Advisor Console program.
For work orders, the system retrieves the order type from the version of the Manufacturing Work Order Processing program (P48013) specified in the Enter the version of WO Entry (P48013) to be used processing option.
For purchase orders, the system retrieves the order type from the version of the Purchase Order Entry program (P4310) specified in the Enter the version of Purchase Order Entry (P4310) to be used processing option.
For rate scheduled items, the system retrieves the order type from the version of the Rate Schedule Revisions program (P3109) specified in the Enter the version of Rate Schedule Revisions (P3109) to be used processing option.
For transfer orders, if the Transfer Order option is selected, the system retrieves the order type from the version of the Transfer Order Entry program (P4210) specified in the Enter the version of Transfer Order Entry (P4210) to be called processing option.
-
Request Date
This is a required field.
-
Quantity
This is a required field.
-
UOM (unit of measure)
This is a required field.
If this field is blank, then the system populates the field with the primary UOM.
-
-
Complete the following fields in the Additional Details group, as applicable:
- Start Date
-
Enter the start date for the order. You can enter this date manually, or have the system calculate it using a backscheduling routine. The routine starts with the required date and offsets the total lead time to calculate the appropriate start date.
For purchase orders, the system hides the Start Date field.
For rate orders, the system uses the system date if the date fields are left blank on the Create Planned Order form. The Start Date maps to the From Date in the Enter/Change Rate Schedule program (P3109), and the Request Date maps to the Thru Date in the Enter/Change Rate Schedule program.
The system enables this field for manufactured items with a planning stocking type M.
- Effective Date
-
Enter the date on which a lot becomes available. The system uses this date for availability and commitment processing to indicate that the lot is available on or after the date that you specify. You must complete this field when inventory first becomes an on-hand quantity for the lot. If you leave this field blank, the system calculates the effective date of the lot by using the value for Effective Days in the Item Branch File table (F4102) or the current date if the value for Effective Days is zero.
If this field is left blank, then the system populates the effective date based on the request date and the lead time from the F4101 table. The system uses the Manufacturing Effective Days (lot effective default days) field for an M stocking type and the Purchasing Effective Days field for a P stocking type on the Lot Processing tab of the Item Master Revisions form.
- Supplier
-
Enter the address book number of the preferred provider of this item.
The system enables this field for purchased items with a stocking type of P.
This is a required field for purchased items.
- Project Number
-
Enter a number that identifies an Engineer to Order project in the system. The project must be set up in the Add/Revise Project program (P31P011).
The system enables this field for manufactured items associated with a project that has a special handling code of P in UDC 40/I.
If you enter a project number in this field, then Source Demand is a required field.
- Source Demand
-
Enter a number that identifies the demand order that generated the project replenishment message.
The system enables this field for manufactured items associated with a project that has a special handling code of P in UDC 40/I.
This is a required field if a project number was entered in the Project Number field.
If you enter a value in this field, then the Project Number is a required field.
- Production Number
-
Enter an alphanumeric value that provides the ability to associate supply transactions to a demand transaction. The production number is a 30-digit alphanumeric value that the system generates. The production number is based on user-defined segments and segment values. To maintain a unique identifier, the system concatenates the production number short to the system-generated production number.
The production number can also be a user input value that is different from the system-generated value. If the user inputs a value for the production number, then the system does not concatenate the production number short to the production number.
A production number is generated or entered at the time of sales order entry or forecast entry. Material requirements planning (MRP) populates all messages generated from this demand with the production number. All transactions associated with the production number can be managed through the Production Number Workbench program (P34403).
The system enables this field for manufactured items that are production-controlled.
-
Complete the following fields in the Transfer Order group, as applicable:
- Transfer Order
-
Select the Transfer Order option to create transfer orders.
- Supply Branch
-
Enter a code that represents a high-level business unit. Use this code to refer to a branch or plant that might have departments or jobs, which represent lower-level business units that are subordinate to the branch/plant. For example:
-
Branch/Plant (MMCU)
-
Dept A (MCU)
-
Dept B (MCU)
-
Job 123 (MCU)
Business unit security is based on the higher-level business unit.
Supply Branch is a required field if you select the Transfer Order option.
-
Note:
If a value exists in the Supply Branch field for a planned transfer order, then the system automatically generates the corresponding demand record for the supply branch. The system uses UDC value 545 (Planned Transfer Orders) in UDC 34X/C1. -
Click Save.
The system saves the order, updates the F34X200W table, refreshes the Supply/Demand Details grid, and refreshes the Supply and Demand and Item Balance charts.
The system returns to the Planning Advisor Console form.
3.3.10 Freezing Orders
To freeze orders:
-
Access the Planning Advisor Console form:
Form Name Form ID Navigation Planning Advisor Console W34X200A - Click the Item No. link in the Item Number field of the Item Summary grid in the Planning Advisor Summary program (P34X100).
-
In-Memory Planning Advisor Operations (G3415).
Select Planning Advisor Console (P34X200).
Freeze Orders W34X290A Select the Freeze Orders option on the Form menu. -
On the Planning Advisor Console form, review the search criteria and define the beginning inventory on hand, as applicable.
-
Review the supply and demand orders in the Supply/Demand Details grid in the Supply/Demand Details group.
-
Select the Freeze Orders option on the Form menu.
-
Review the fields on the Freeze Orders form.
The system passes the item number and branch/plant information to the Freeze Orders form from the Planning Advisor Console form.
The system displays all the purchase orders and work orders that you can freeze. The system displays frozen orders as deselected.
-
Deselect the orders that you do not want to freeze.
-
Click the Freeze button. Alternatively, select the Freeze option on the Row menu.
The system refreshes the grid on the Freeze Orders form and displays the frozen orders in light gray colored font.
-
Click Close.
The system displays the Planning Advisor Console form.
3.3.11 Implementing Plans
To implement plans:
-
Access the Planning Advisor Console form.
Form Name Form ID Navigation Planning Advisor Console W34X200A - Click the Item No. link in the Item Number field of the Item Summary grid in the Planning Advisor Summary program (P34X100).
-
In-Memory Planning Advisor Operations (G3415).
Select Planning Advisor Console (P34X200).
Planning Advisor Console Implement W34X250A - Click the Implement Plan button in the Supply/Demand Details group.
-
Select the Implement Plan option on the Form menu.
-
On the Planning Advisor Console form, review the search criteria and define the beginning inventory on hand, as applicable.
-
Make changes to the plan in the Supply/Demand Details grid in the Supply/Demand Details group.
-
Click the Save Plan button.
-
Click the Implement Plan button in the Supply/Demand Details group.
-
Review the fields on the Planning Advisor Console Implement form.
The system passes the item number and branch/plant information to the Planning Advisor Console Implement form from the Planning Advisor Console form.
-
Select the rows to process.
-
Click Confirm to implement changes to the plan.
-
Review the plan changes in Supply/Demand Details group.
-
Manage supply and demand, as applicable.
3.3.12 Reviewing Informational Messages
To review informational messages:
-
Access the Planning Advisor Console form.
Form Name Form ID Navigation Planning Advisor Console W34X200A - Click the Item No. link in the Item Number field of the Item Summary grid in the Planning Advisor Summary program (P34X100).
-
In-Memory Planning Advisor Operations (G3415).
Select Planning Advisor Console (P34X200).
-
On the Planning Advisor Console form, review the search criteria and define the beginning inventory on hand, as applicable.
-
Review the following fields in the Informational Messages grid, as applicable:
-
Message Type
-
Message Type Description
-
Hold Code
-
Quantity
-
Primary UOM
-
Primary Unit of Measure Description
-
Order Number
-
Order Type
-
Order Type Description
-
Planner Remarks
- Message Type
-
Displays a code that distinguishes different messages generated in the Distribution Requirements Planning/Master Production Schedule/Material Requirements Planning system. Valid codes are:
A: Warning messages (user controlled)
B: Order and expedite
C: Cancel
D: Defer
E: Expedite
F: Frozen order (user controlled)
G: Increase order quantity to (user controlled)
H: Decrease rate quantity to
I: Increase rate quantity to
L: Decrease order quantity to (user controlled)
M: Manual reminder
N: Create rate
O: Order
P: Firm order
S: FPO adjustment suggestion
T: Past due order
- Message Type Description
-
Displays the description of the message type code.
- Hold Code
-
Displays a code that is used in Distribution Requirements Planning/Master Production Schedule/Material Requirements Planning and capacity message files to indicate how the message is created and whether or not the message is on hold. Valid codes are:
A: System generated.
M: Manually entered. Not deleted by the system when replanning.
Z: A held message. Not deleted by the system when replanning.
- Planner Remarks
-
Displays brief information or explanation about an item.
-
3.4 Working with Critical Component Summary
This section provides an overview of Critical Component Summary, lists prerequisites, and discusses how to:
-
Review critical component alerts.
-
Manage critical components.
-
Work with critical components and item balance charts.
3.4.1 Understanding Critical Component Summary
Use the Critical Component Summary program (P34X260) to review critical components by parent item. The Critical Component Summary form enables you to review and define search criteria, review critical component information, and review the Ending Available chart.
To access the Critical Component Summary form (W34X260B), you click the DOS (days of supply) or EA (ending available) link in the Critical Component Alerts group in the Planning Selection group on the Planning Advisor Console form. Alternatively, select the Critical Components option on the Form menu.
The DOS or EA links display only when the component count is greater than zero (0). You can click an alert regardless of the error count.
The Critical Component Summary form contains the following features:
-
Parent Item group
This is a read-only section in a collapsible group.
-
Critical Component grid
-
Item Balance Chart group
The Item Balance Chart group contains the Ending Available chart.
The Critical Component Summary program uses the following processing options on the Versions tab of the Planning Advisor Console program:
-
Item Availability (P41202)
-
Bill of Material Inquiry (P30200)
-
Item Ledger Inquiry (P4111)
The system stores data for the Critical Component Summary program in the Planning Advisor Critical Component Items table (F34X010), Planning Details Supply/Demand Work Table (F34X200W), and the Item Summary Work Table (F34X101W).
You cannot make updates from the Critical Component Summary form.
3.4.1.1 Critical Component Grid
Use the Critical Component grid to review critical components by parent item. The system sorts the grid by BOM level starting with the highest level number.
The grid displays the highest BOM level if multiple occurrences of the item exist in the BOM.
|
Note: Use the Bill of Material option on the Row menu to review the bill of material for a selected critical component. |
The table columns are QBE-enabled to provide additional search capabilities.
The following conditions apply to the Ending Available (EA) field:
-
If EA has a negative value during the planning horizon, then the system displays the red square icon.
-
If EA does not have a negative value during the planning horizon, then the system displays the green circle icon.
The EA Alert count equals the number of components that display a red square icon in the Ending Available column.
The grid displays the Days of Supply Current, Days of Supply After 1st Receipt, and Days of Supply After 2nd Receipt values and icons to represent inventory on hand, days until 1st receipt, and days until 2nd receipt. Hover text displays the number of days until 1st and 2nd receipts.
The DOS Alert count equals the number of components that display a red square icon in the columns related to days of supply.
You click the link in the Quantity On Hand field to access the Item Availability program (P41202).
If the past due supply quantity and safety stock are included in the on-hand inventory, the system displays the values in the Past Due Supply Quantity column and the Safety Stock column in gray colored font. If the past due supply quantity and safety stock are excluded from the on-hand inventory, the system displays the corresponding values in black colored font.
You access the Planning Advisor Console form using the following navigation:
-
Select the Planning Console option on the Row menu.
-
Click the Item Number link in the Item Number field in the Critical Component grid.
The system uses the current version of the Planning Advisor Console program.
You must save the changes made in the Supply/Demand Details grid to save the data to the plan as you navigate between the parent item and the component items.
If you change a value so that the EA chart gets a negative value for a lower level critical component (multi-level), then return to the Planning Advisor Console program and reinquire. The system refreshes the charts when you return to the Critical Component Summary and Planning Advisor Console forms. You must verify that the EA alert count is increased by a value of 1.
3.4.1.2 Item Balance Chart
Use the Item Balance Chart group to view ending available information in graphical chart format for the selected critical component grid row. The system displays the primary UOM on the y-axis for the selected critical component.
For the selected item, the Ending Available chart in the Item Balance group is the same Ending Available that displays on the Planning Advisor Console form.
You use the Adjusted and Unadjusted options in the Item Balance Chart group to include or exclude messages in the Ending Available chart.
The Unadjusted view does not include the net change in demand. The Adjusted view does include net change in demand.
The Item Balance Chart displays the freeze fence date and planning fence date for the item in the selected critical component grid row.
If an alert is set in a column in the Critical Component grid, then the Ending Available chart contains a negative value.
3.4.1.3 Net Change in Demand
Net change in demand is a number that represents the net change in component demand due to a quantity change on the parent item. Net change in demand can be negative or positive.
The system calculates net change in demand for only the first-level components of a parent item. The system stores the net change in demand value in the Item Summary Work Table (F34X101W).
For new planned orders, the net change in demand is the total of the pegging record quantities in the primary UOM.
For existing planned orders, the net change in demand is the total of unsaved changes in quantity in the primary UOM.
|
Note: The system does not update pegging and net change in demand for fixed BOM quantities. |
For work orders without a parts list, the net change in demand is the total of unsaved changes in quantity in the primary UOM.
For work orders with a parts list, the net change in demand is the total of unsaved changes in quantity in the primary UOM.
When you select the Refresh S/D option on the Row menu of the Planning Advisor Console program, the system resets the net change in demand to zero for the parent item and all critical components in the Supply/Demand Details group.
|
Note: The Refresh button is only available in the Supply/Demand Details group on the Planning Advisor Console form for the parent item. The Refresh button is not available when navigating to the Planning Advisor Console form from the Critical Component Summary form. |
Net change in demand data remains at all levels as you navigate between the parent item and component items. If you exit the Planning Advisor Console program without saving the data, or click the Refresh button, the system resets the net change in demand.
When you click the Save Plan button on the Planning Advisor Console form, the system saves changes to the plan only for the item/branch displayed on the Planning Advisor Console form.
The system decreases net change in demand by the total of quantity changes for the first-level components of the item that you save.
When a component is defined as critical on multiple subassemblies, a balance of net change in demand remains until you save all corresponding parents.
|
Note: The system decreases and updates the net change in demand for orders with a parts list, however the system does not update the 34XSDPQU field in the F34X200W table. |
The system saves and implements changes to the plan only for the item/branch displayed on the Planning Advisor Console when you click the Implement Plan button.
The system refreshes the supply and demand information so that the system clears all net change in demand.
3.4.1.4 Leadtime Notification
The system provides a visual indicator of lead time violation in the Critical Component grid when a critical component violates the lead time constraint. You define the lead time in the Leadtime Level field on the Additional System Info. form of the Item Branch.
The system starts with the requested date and offsets the total lead time to calculate the appropriate start date on an actionable message type. The system issues a critical notification if the start date is less than the system date.
A message must exist for a critical component in the F3411 table that impacts the component's date. Message types B (order and expedite), D (defer), and E (expedite) impact lead time notifications.
The red exclamation icon displays in the Leadtime Alert field in the Critical Component grid to identify a lead time notification for a critical component. This icon is a display-only icon in the Critical Component Summary program.
3.4.2 Prerequisites
Before you complete the tasks in this section, set the Item Availability (P41202), Bill of Material Inquiry (P30200), and Item Ledger Inquiry (P4111) processing options on the Versions tab of the Planning Advisor Console program.
See Setting Processing Options for the Planning Advisor Console Program (P34X200).
3.4.3 Reviewing Critical Component Alerts
To review critical component alerts:
-
Access the Planning Advisor Console form.
Form Name Form ID Navigation Planning Advisor Console W34X200A - Click the Item No. link in the Item Number field of the Item Summary grid in the Planning Advisor Summary program (P34X100).
-
In-Memory Planning Advisor Operations (G3415).
Select Planning Advisor Console (P34X200).
-
On the Planning Advisor Console form, review the following alerts in the Critical Component Alerts group in the Planning Selection group, as applicable:
- DOS (days of supply alert count)
-
Displays a value that represents the number of critical components that have critical days of supply issues in a certain period of time for a specific parent item or sub assembly.
- EA (ending available alert count)
-
Displays a value that represents the number of BOM or parts list components that have a negative ending available balance in a certain period of time for a specific parent item or sub assembly.
-
Click the DOS or EA link, as applicable to access the Critical Component Summary form.
-
Review critical components.
3.4.4 Managing Critical Components
To manage critical components:
-
Access the Critical Component Summary form.
Form Name Form ID Navigation Critical Component Summary W34X260B Click the DOS or EA link in the Critical Component Alerts group in the Planning Selection group on the Planning Advisor Console form. -
On the Critical Component Summary form, review the following fields in the Parent Item group, as applicable:
-
Item Number
-
Planner Number
-
Branch/Plant
-
Start Date
-
End Date
Note:
When you navigate to the Critical Component Summary form from the Planning Advisor Console program, the system populates the Item Number, Planner Number, Branch/Plant, Start Date, and End Date fields with data from the Planning Advisor Console form and the processing options of the Planning Advisor Console program. -
-
(Optional) In the Parent Item group, click the orange square in the upper left corner of the Item Number field.
-
Review the item information on the Main and Additional tabs of the Additional Item Information hover form.
-
(Optional) In the Parent Item group, click the orange square in the upper left corner of the Planner Number field.
-
Review the planner information on the Planning Advisor Contact Information hover form.
-
On the Critical Component Summary form, review the fields in the Critical Component Summary grid, as applicable.
- Ending Available
-
Displays an icon that indicates whether a critical component has a negative ending available value. Values are:
Green circle: A negative ending available value doesn't exist.
Red square: A negative ending available value exists.
- Inventory On Hand
-
Displays an icon with hover text, indicating whether the starting on-hand quantity is greater than or less than the past due demand.
- Days Until 1st Receipt
-
Displays an icon with hover text, indicating the number of days until the first receipt of material.
- Days Until 2nd Receipt
-
Displays an icon with hover text, indicating the number of days until the second receipt of material.
- Leadtime Alert
-
Displays an icon that represents the level notification for a lead time alert. The system starts with the requested date and offsets the total lead time to calculate the appropriate start date on an actionable message type. The system issues a critical notification if the start date is less than the system date.
- BOM Level (bill of material level)
-
Displays a component level within the BOM. If the component exists on multiple levels of the BOM, the system displays only the highest component level for the associated parent.
- Net Change in Demand
-
Displays a number that represents the net change in component demand due to a quantity change for the parent item. For newly planned orders, the net change in demand is the total of the pegging record quantities. For existing planned orders, the net change in demand is the total of unsaved changes in quantity. Net change in demand can be negative or positive and is calculated for only the first-level components of a parent item.
- Quantity On Hand
-
Displays the number of units that are physically in stock. The system displays the quantity on-hand in the primary unit of measure.
- Past Due Supply Quantity
-
Displays a value that represents the supply units that are past due. The system displays the supply quantity that is past due in the primary unit of measure.
- Days of Supply Current
-
Displays a number that indicates the number of days for which the current on-hand supply covers demand. The system calculates the number of days until the stock level falls below zero.
- Days of Supply After 1st Receipt
-
Displays a number that indicates the number of days for which the current on-hand supply and the first receipt of material cover the demand. The system aggregates supply quantities by date and adds the quantities to on-hand supply on the first receipt date. The system calculates the number of days until the stock level falls below zero after the first receipt.
- Days of Supply After 2nd Receipt
-
Displays a number that indicates the number of days for which the on-hand supply and the second receipt of material cover the demand. The system aggregates supply quantities by date and adds the quantities to on-hand supply on the second receipt date. The system calculates the number of days until the stock level falls below zero after the second receipt.
- Safety Stock
-
Displays the quantity of stock kept on hand to cover high-side variations in demand.
- Stocking Type
-
Displays a user-defined code (41/I) that indicates how you stock an item, for example, as finished goods or as raw materials. The following stocking types are hard-coded and you should not change them:
0: Phantom item
B: Bulk floor stock
C: Configured item
E: Emergency/corrective maintenance
F: Feature
K: Kit parent item
N: Nonstock
The first character of Description 2 in the user-defined code table indicates if the item is purchased (P) or manufactured (M).
- Primary Supplier
-
Displays the address book number of the preferred provider of this item.
- Planner Number
-
Displays the address number of the material planner for this item.
- Plan Fmly (planning family)
-
Displays a user-defined code (41/P4) that represents an item property type or classification, such as commodity type or planning family. The system uses this code to sort and process similar items.
This field is one of the six classification categories available primarily for purchasing purposes.
- Pln Cod (planning code)
-
Displays a code that indicates how Master Production Schedule (MPS), Material Requirements Planning (MRP), or Distribution Requirements Planning (DRP) processes this item. Valid codes are:
0: Not Planned by MPS, MRP, or DRP
1: Planned by MPS or DRP
2: Planned by MRP
3: Planned by MRP with additional independent forecast
4: Planned by MPS, Parent in Planning Bill
5: Planned by MPS, Component in Planning Bill
These codes are hard coded.
- Buyer Number
-
Displays the address number of the person responsible for setting up and maintaining the correct stocking levels for the item.
- Substitute Item Flag
-
Displays a value of 1 to indicate that this is a substitute line item.
-
Enter additional search criteria, as applicable, using the QBE lines.
-
Click the Item Number link to review information on the Planning Advisor Console form.
3.4.5 Working with Critical Components and Item Balance Charts
To work with critical components and item balance charts:
-
Access the Critical Component Summary form.
Form Name Form ID Navigation Critical Component Summary W34X260B Click the DOS or EA link in the Critical Component Alerts group in the Planning Selection group on the Planning Advisor Console form. -
On the Critical Component Summary form, review the search criteria and define additional search criteria in the QBE lines of the Critical Component grid, as applicable.
The system automatically displays the chart for the first component in the grid. When you navigate back to the Critical Component Summary form from the Planning Advisor Console for a specific row, the previously selected row remains selected and the system display the chart for the critical component in that row.
-
Click Find.
The system displays the Item Balance chart for the first selected row.
-
Review the options, fields, and chart in the Item Balance Chart group.
-
Select the Adjusted or Unadjusted option, as applicable, and review the Item Balance chart.
-
Review the values in the Freeze Fence Date and Planning Fence Date fields.
-
Review the Ending Available chart in the Item Balance Chart group.
The Ending Available chart is a line chart that plots quantity on the y-axis versus date on the x-axis.
The chart designates the beginning of the weekly planning horizon with one slash (/) and the beginning of the monthly planning horizon with two slashes (//).
-
Manage critical components, as applicable.
3.5 (Optional) Purging Planning Advisor Work Tables
This section provides an overview of the Planning Advisor Work Table Purge program and discusses how to:
-
Set processing options for the Planning Advisor Work Table Purge program (R34X200P).
-
Run the Planning Advisor Work Table Purge program.
3.5.1 Understanding the Planning Advisor Work Table Purge
If the system processing ends abnormally or a browser is closed with an active Planning Advisor Console session open, the system may not clean up work files properly. To clean up any records that are no longer used, you must run the Planning Advisor Work Table Purge program (R34X200P) to delete all work file records that are more than one day old. The Planning Advisor Work Table Purge program purges records from the F34X100W, F34X101W, F34X110W, F34X200W, and F34X310W tables.
The system generates an output report that indicates that the purge of each table is a success or a failure.
3.5.2 Setting Processing Options for the Planning Advisor Work Table Purge Program (R34X200P)
Processing options enable you to specify the default processing for programs and reports.
3.5.2.1 Select
- 1. User ID
-
Specify the user ID that the system uses to purge planning advisor work table records. If you leave this processing option blank, the system purges the planning advisor records for all users.
- 2. Date - Updated
-
Specify the date that the system uses to purge planning advisor work table records. If you enter a date, then the system purges records with an update date that is less than or equal to the date you specified. If you leave this processing option blank, then the system purges records with an update date that is less than the system date.