3 Setting Up and Using Content Manager
This chapter explains how to set up Oracle Communications Billing and Revenue Management (BRM) Content Manager.
Before you read this document, you should be familiar with the following topics:
-
BRM concepts and architecture. See BRM Concepts.
-
Content Manager concepts. See "Understanding Content Manager" for more information.
See "Installing Content Manager" for instructions on installing Content Manager.
See "Setting Up Content Manager" for instructions on setting up your initial Content Manager environment.
See "Using Content Manager" for instructions to add content provider and content customer accounts.
Setting Up Content Manager
To set up Content Manager, follow these procedures.
-
Configuring Time-to-Live for Content Service Profile Objects
-
Configuring the Remittance Fields File and Remittance Plan
Note:
-
All procedures except "Pricing Content Products" and "Configuring the Remittance Fields File and Remittance Plan" are optional, but you must perform them in the order shown.
-
You generally follow these procedures only once to set up your content billing service.
-
Setting Up Access and Deny Lists
You set up access and deny lists to authorize customers to access content depending on the category. See "Content Categories and Customer Authorization" for more information.
Note:
If you do not set up access and deny lists, content categories will not be used to restrict customer access to content.-
Define access and deny lists in the service definition.
See "Setting Up the Service Definition File" for information.
-
Run the load_content_srvc_profiles utility to load the service definition file:
load_content_srvc_profiles -dv filenameThe -d option sets the debug level to DEBUG and the -v option prints debug messages to the sdtout file. If you do not include the file name as a parameter, the default file name pin_content_srvc_profiles is used.
Tip:
You can load changes to the service definitions at any time by running the load_content_srvc_profiles utility. When the service definition file is loaded, BRM creates one content service profile object (/service/content) for each service definition. -
Enable service profile authorization in the Connection Manager (CM) configuration file (BRM_Home/sys/cm/pin.conf):
-
Open BRM_Home/sys/cm/pin.conf with a text editor such as vi.
-
If it is not already present, add this line to the file:
# -cm content_use_profiles 1
Note:
If this line is not included in the CM pin.conf file or if the parameter is set to 0, authorization based on content categories is not implemented.Tip:
If you do not use content categories for authorization and rating, set the content_use_profiles value to 0 to improve system performance. -
If you enabled service profile authorization in the previous step, change the size of the fm_utils_content_srvc_profile_cache from the default of 1024, to at least 1048576:
- cm_cache fm_utils_content_srvc_profile_cache 100, 1048576, 13Note:
If your CM has other service profile caches, cm.pinlog might report the need to increase the total allocated cache space beyond the default of 6291456. To increase the default, add this entry to the CM pin.conf file with a value that increases the default by a multiple of 1024:- cm cm_cache_space value
-
Save the file.
-
-
Stop and restart the CM. See the discussion of starting and stopping the BRM system in BRM System Administrator's Guide.
Customizing the Authorization and Accounting Policies
You can customize Content Manager customer authorization and accounting policy opcodes to meet your business requirements.
Example customization:
-
Configure Content Manager to authorize and rate customer usage based on data fields not included by default. For example, add fields that allow content providers to rate usage based on customer location. See "Adding Custom Fields for Authorizing and Rating" for more information.
Note:
You must add custom accounting fields before you use them to price content products. -
Configure Content Manager to send additional information as name-value pairs to content providers in authorization replies. Content providers can use this data at their option. See "Customizing Authorization" for more information.
Pricing Content Products
Content is rated based on the content category that the content provider sends with accounting requests to Content Manager. See "Content Categories and Content Rating" for more information.
To set up content pricing:
-
Use Pricing Center to create content plans, deals, and products.
-
Associate content categories with rate plans from the "Content Manager Sample Price List" as shown in Figure 3-1:
Figure 3-1 Content Categories and Rate Plans
Description of "Figure 3-1 Content Categories and Rate Plans"
-
Associate access and deny lists with content products. See "Associating Access and Deny Lists with Content Products" for more information.
Important:
Be sure the spelling of the content category values in the rate plan selector for the product matches the spelling of the content categories defined in the associated service definition. If there is a spelling mismatch, customers could be authorized to access content but not be charged for it or denied access to content that is part of a purchased product.
Creating a Test Customer
Create a test customer by using Customer Center. Give the test customer access to sample content categories. Use a content (not remittance) plan to create the test customer account.
Content providers can use your test customer to test sample code.
What's Next?
See "Configuring Time-to-Live for Content Service Profile Objects" for more information.
Configuring Time-to-Live for Content Service Profile Objects
The BRM Connection Manager (CM) uses cached service profile objects for authorizing customers based on content categories. Set the content _profile_cache_ttl value to specify how frequently you want the cache to be refreshed. This value normally depends on how frequently you expect to create and load changes in the service definition file.
To adjust the time-to-live parameter:
-
Open BRM_Home/sys/cm/pin.conf with a text editor such as vi.
-
Add this line to the file:
# -cm content_profile_cache_ttl ttl_in_secondsNote:
If this line is not included in the CM pin.conf file, the default value of 3600 seconds is used. -
Save the file.
When the specified time expires, the cached service profile object is refreshed from the BRM database.
Configuring the Remittance Fields File and Remittance Plan
You can remit a portion of the content charges to the content provider.
To set up the remittance environment:
-
Add the following fields to the remittance field file (BRM_Home/sys/data/pricing/example/pin_remittance_flds) using an editor such as vi:
fields (
   service_type RESERVED
   event_type RESERVED
   product_name RESERVED
   profile_name RESERVED
   field content_provider EVENT PIN_FLD_CONTENT_INFO PIN_FLD_CONTENT_PROVIDER
   field content_category EVENT PIN_FLD_CONTENT_INFO PIN_FLD_CONTENT_CATEGORY_NAME
)
For more information, see the comments in the pin_remittance_flds file.
-
Load the remittance fields file. See "Loading the Remittance Fields File" in BRM Configuring and Running Billing.
-
Use Pricing Center to create a remittance plan that includes one or more remittance products.
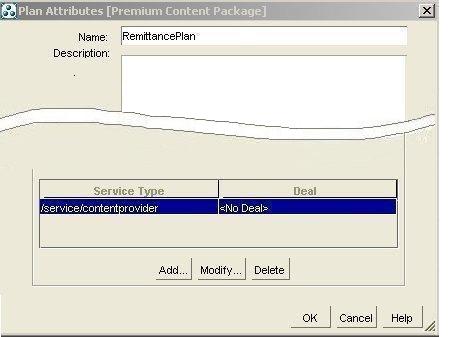
Important:
Include a /service/contentprovider service type with the remittance plan, as in Figure 3-2:Figure 3-2 Including Service Type with Remittance Plan
Description of "Figure 3-2 Including Service Type with Remittance Plan"
See the discussion of remitting funds to third parties in BRM Configuring and Running Billing for more information on remittance plans.
Tip:
Use the remittance product, deal, and plan in the sample price list as a guide. See "Content Manager Sample Price List" for more information.What's Next?
After you have completed the configuration steps in "Setting Up Content Manager", you can add content provider and content customer accounts. See "Using Content Manager" for more information.
Using Content Manager
This section includes "Setting Up Content Providers" and "Creating Content Customer Accounts". Follow these procedures to set up new content providers and content customers.
Setting Up Content Providers
To set up a content provider to use your billing service:
-
Send the Content SDK installation file and documentation to the content provider.
-
Work with the content provider to identify a content category for each type of content they provide.
See "About Content Categories" for more information on content categories.
-
Decide which fields will determine the usage rates for the content provider. These fields might include any extended fields you added in "Adding Custom Fields for Authorizing and Rating".
-
Give the content provider the following information:
Important:
The content provider must specify this information in the Infranet.properties configuration file in their Content SDK installation. See "Understanding BRM Content SDK" for more information.-
The host name and port number for your Content Manager installation.
-
The username and password you will assign to the content provider when you create their account.
-
Whether the content provider should connect to your service with a PCP or an HTTP connection.
Important:
If you are using an HTTP connection:-
Tell the content provider to point to the http://hostname/Webkit_home/Content.jsp (English installation) page.
-
If you use a secure HTTP (HTTPS) connection, the content provider must use a proxy server. See "HTTPS Connections" for more information.
-
See "Configuring the Infranet.properties File" for more information on these parameters.
-
-
If a content provider will use batch accounting:
-
Assign a directory on a host to which the content provider can send call detail record (CDR) files.
-
Inform the content provider how to access the directory and how to transfer usage files to it.
-
Use Batch Controller and Universal Event (UE) Loader to load the CDR files. See the discussion of loading events from external sources in BRM Setting Up Pricing and Rating.
Note:
Content Manager ships with an event import template (BRM_Home/apps/content/SampleContentUELTemplate.xml) that supports the default accounting log field structure.
-
-
Create a remittance specification file to add information about the content provider. This file defines remittance profiles for each content provider for each content category for which they supply content. See "Sample Content Provider Remittance Profiles" and the discussion of remitting funds to third parties in BRM Configuring and Running Billing for more information.
-
Load the remittance specification file. See "Loading the Remittance Specifications" in BRM Configuring and Running Billing.
-
Create a content provider account by using Customer Center. Use a remittance plan to create the remittance account.
See the discussion of remitting funds to third parties in BRM Configuring and Running Billing for more information.
Creating Content Customer Accounts
When Content Manager is set up and content provider accounts are created, you can add customer accounts. To create content customer accounts, use Customer Center.
Important:
Do not set up content customers with a remittance plan or deal. Remittance plans are only for content provider accounts.Setting Up the Service Definition File
To set up a service definition file:
-
Create a file that includes access and deny lists in service definitions.
Each service definition in the file consists of records with the fields shown in Table 3-1:
Table 3-1 Field Names in Service Definition File
Field Name Description Provisioning_Tag
The name of the service definition. You use the value of this field in the provisioning tag field in the Detailed Product Info tab for a product in Pricing Center. This associates the access or deny list in the service definition with the product.
Root_or_Brand_Tag
The root or brand name associated with the provisioning tag.
Filter_Mode
This specifies whether the category list that follows it is an allow list or deny list. Possible filter_mode values:
1 = Allow customers access to content whose category is in the list.
16 = Deny customers access to content whose category is in the list.
Important: You can have an access list or a deny list in a service definition, but not both. If a customer purchases more than one product that collectively include more than one access or deny list, "Content Category Authorization Rules" apply.
Content_Category
The list of content categories associated with the service definition. See "About Content Categories" for more information.
Each service definition can include either an access list or a deny list. See "Sample Service Definition File" and "Content Category Authorization Rules" for the service definitions.
Note:
When you load the file with the load_content_service_profiles utility, the provisioning tag name for each access and deny list name becomes available to associate with products. See "Associating Access and Deny Lists with Content Products" for more information.You can set up a content category that allows the content provider to specify the price of the content. See "About Prerated Content" for more information.
-
Save the file using a descriptive name.
Sample Service Definition File
This sample service definition file describes the content categories used in the "Content Manager Sample Price List":
Provisioning_Tag: ContentPackage
Root_or_Brand_Tag: 0.0.0.1 /account 1 1
Filter_Mode: 1
Content_Category: Alerts
Content_Category: Directory
Content_Category: FodorsHotels
Content_Category: FunFacts
Content_Category: Horoscope
Content_Category: Icons
Content_Category: InstantMessaging
Content_Category: Jokes
Content_Category: Lottery
Content_Category: MCommerce
Content_Category: Messaging
Content_Category: Movies
Content_Category: News
Content_Category: RingTons
Content_Category: Sports
Content_Category: Stock
Content_Category: Traffic
Content_Category: Weather
Content_Category: Zagatsrestaurants

Provisioning_Tag: Games
Root_or_Brand_Tag: 0.0.0.1 /account 1 1
Filter_Mode: 1
Content_Category: Hearts
Content_Category: SKT
Content_Category: Solitaire
Content_Category: InteractiveChess
Content_Category: Trivia
Content_Category: VirtualGolf

Provisioning_Tag: RewardGamesPackage
Root_or_Brand_Tag: 0.0.0.1 /account 1 1
Filter_Mode: 1
Content_Category: BlackJack
Content_Category: Poker
Content_Category: Slots

Provisioning_Tag: TeenPackage
Root_or_Brand_Tag: 0.0.0.1 /account 1 1
Filter_Mode: 1
Content_Category: ChatRooms
Content_Category: LocalTeenEvents
Content_Category: Music
Content_Category: Photosharing
Content_Category: TeenEvents
Adding Custom Fields for Authorizing and Rating
To authorize and rate customer usage based on data in the default fields, you add custom fields to the Content Manager data structure.
Note:
-
For information on the default authorization and accounting fields, see the PCM_OP_CONTENT_AUTHORIZE and PCM_OP_CONTENT_ACCOUNTING opcodes.
-
You can also add custom fields to return additional information with authorization replies. See "Customizing Authorization" for more information.
To add custom fields for authorization and rating:
-
Determine appropriate field names.
-
Extend the /event/activity/content object to include the new fields. See the discussion of creating custom fields and storable classes in BRM Developer's Guide.
-
If you use batch accounting for processing usage files that have custom fields, you must use Universal Event Mapper to modify the event import template (BRM_Home/apps/content/SampleContentUELTemplate.xml) to include the new or modified fields.
For more information, start Developer Center and go to UE Mapper Help.
-
Modify the PCM_OP_CONTENT_POL_RESOLVE_EVENT_EXTENSIONS opcode to translate the name-value pairs sent by the content provider into name-value pairs.
Associating Access and Deny Lists with Content Products
To associate an access or deny list with a content product:
-
In the service definition file, note the provisioning tag value of the service definition that contains the access or deny list that you want to associate with the product.
-
In the Provisioning Tag field in the Detailed Product Info tab for the product in Pricing Center, select the provisioning tag value noted in step 1.
Note:
The provisioning tag associates a product with a service profile object created when the service definition file was loaded. The service profile object contains the access or deny list defined in the corresponding service definition in the service definition file. See "Setting Up Access and Deny Lists" for more information.
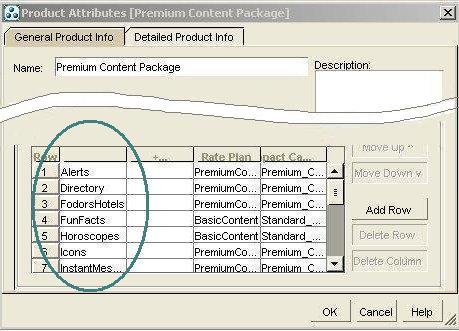
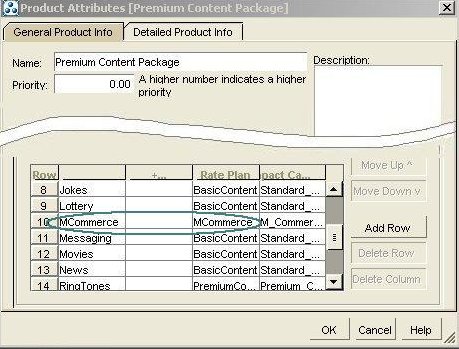
Figure 3-3 shows the Detailed Product Info tab for the Premium Content Package in the "Content Manager Sample Price List":
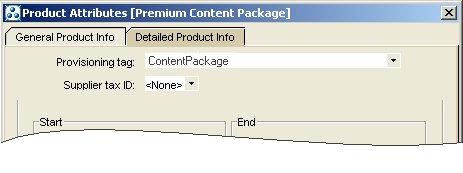
In this example, when customers purchase the Premium Content Package, they are authorized to use any content in a content category listed in the ContentPackage service definition. These categories include Alerts, Directory, FodorsHotels, and so forth.
Rules for Using Content Provisioning Tags with Products
-
Before you can select a provisioning tag value in the Provisioning Tag field, you must have loaded the access and deny lists. See "Setting Up the Service Definition File" for more information.
-
If you associate provisioning tags with content products, you must enable service profiles. Enable service profile authorization in the CM configuration file as described in "Setting Up Access and Deny Lists".
-
If you associate provisioning tags with content products, be sure the spelling of the content category values in the rate plan selector for the product matches the spelling of the content categories defined in the associated service definition.
Important:
If there is a spelling mismatch between the items in the rate plan selector and the service definition file, customers could be authorized to access content but not be charged for it or denied access to content that is part of a product. -
See "Content Category Authorization Rules" for information on authorization logic.
Sample Content Provider Remittance Profiles
This is the remittance specification file text for content providers MegaContent and Janes Dreams:
Account_Begin
   remittance_account_number         "0.0.0.1-9617"
   remittance_type =                 "B”
   remittance_product_name =         "RemittanceProduct"

   Criteria_begin
      field   service_type =         "/service/content"
      field   product_name =         "Games Package”
      field   event_type =           "/event/activity/content"
      field   content_category =     "Games"
      field   provider_id =          ”MegaContent”
   Criteria_end

   Criteria_begin
      field   service_type=          "/service/content"
      field   product_name=          "Premium Content Package”
      field   event_type=            "/event/activity/content"
      field   content_category=      "Stock_Trade"
      field   provider_id =          ”MegaContent”
   Criteria_end
Account_end

Account_Begin
   remittance_account_number         "0.0.0.1-9675"
   remittance_type =                 "B”
   remittance_product_name =         "RemittanceProduct"

   Criteria_begin
      field   service_type =         "/service/content"
      field   product_name =         "Games Package”
      field   event_type =           "/event/activity/content"
      field   content_category =     "Games"
      field   provider_id =          ”Janes_Dreams”
   Criteria_end

   Criteria_begin
      field   service_type=          "/service/content"
      field   product_name=          "Premium Content Package”
      field   event_type=            "/event/activity/content"
      field   content_category=      "Horoscope"
      field   provider_id =          ”Janes_Dreams”
   Criteria_end
Account_end
About Prerated Content
You can arrange for a content provider to specify the price for a content item at purchase time rather than by the content category. Content priced at purchase time is called prerated content. Typically you set up one category for prerated content. In the "Content Manager Sample Price List", this category is called MCommerce.
Important:
When sending prerated content usage data, advise content providers to send usage data in the amount field, not the quantity field.To support prerated content:
-
In Pricing Center, create a rate plan for a content product with one balance impact entry in the rate structure.
-
Enter 1 as the Scaled Amount value.
-
Select an appropriate Impact Category value.
Figure 3-4 shows the rate plan properties for the MCommerce rate plan in the sample price list:
-
Use the product's rate plan selector to associate the rate plan with a content category for prerated content.
Figure 3-5 shows the rate plan selector entry for MCommerce in the "Content Manager Sample Price List":

Creating Content Manager Reports
To create reports on content usage and remittance, see the discussion of Content Manager reports in BRM Reports.
Caution:
In a multischema system, the Billing Provider and Content Provider reports are accurate only when each content provider account's associated remittance objects, remittance events, content manager events, and user accounts are in the same database schema. If they are not all in the same schema, some data is not included in the reports.