14 Real-Time Rating Based on Date and Time
This chapter explains how to use Oracle Communications Billing and Revenue Management (BRM) to set up rates based on date and time.
Before you read this chapter, you should be familiar with rating and price lists. See "About Creating a Price List".
About Rating Based on Date and Time
BRM rates billable events by capturing data about the events (for more information, see "About Creating a Price List"), such as the date and time each event occurred. Because BRM is aware of the date and time of an event, the rating opcodes can use the date and time to determine how to rate the event.
Ways to Specify When Rates Are Valid
You can specify when rates are valid in the following ways:
-
In products. You can specify when a product is valid, including all the rates it contains. See "Restricting When a Product Is Available".
-
In rate tiers. You can use rate tiers to specify a set of rates, each based on a specific time or day. See "Using Rate Tiers to Set Up Rating Based on Date and Time".
When you create rates based on date and time, you can specify how to recognize the time that the event occurred (for example, at the start, end, or duration of the event).
You specify a time-of-day mode to indicate when a rate should be applied relative to either an event's start time, its end time, or the difference between the two. This is especially useful when an event overlaps a time boundary where a rate changes.
For example, 12 a.m. Monday might be the boundary between a special weekend rate and a regular weekday rate:
-
To apply the special weekend rate to the entire event, specify Start Time.
-
To apply the regular weekday rate to the entire event, specify End Time.
-
To apply the weekend rate to the portion of the event before midnight and the weekday rate after midnight, specify Timed.
Note:
Midnight (12 a.m.) is shown as 00.00.00.
Using Rate Tiers to Set Up Rating Based on Date and Time
You use rate tiers to set up valid dates and times for rates. Figure 14-1 shows a rate tier that includes two different rates:
Figure 14-1 Rate Plan with Two Different Rates
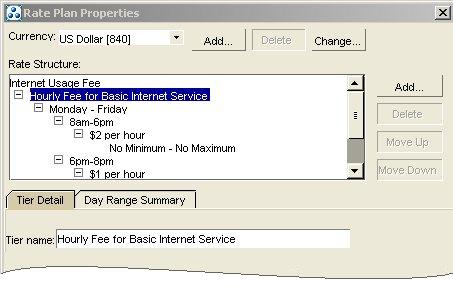
Description of ''Figure 14-1 Rate Plan with Two Different Rates''
You can include multiple rate tiers in a rate plan. Figure 14-2 shows a rate plan with three rate tiers, each valid for a different set of dates:
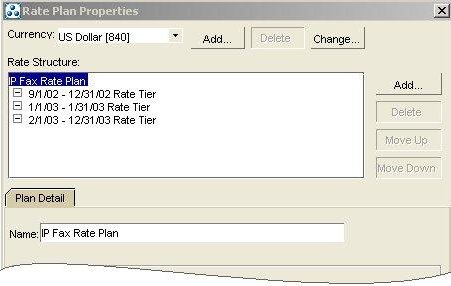
Specifying Which Rate Tiers Are Applied First
As you create rate tiers, they appear on a list. BRM applies rates from the top of the list down. You can change the order in which rate tiers are applied by changing their places in the list shown in Figure 14-2.
For example, at the top of the rate tier list you could insert a promotional rate tier valid only until the end of May 2003. BRM applies that rate only until May 31, 2003. After that, the promotional rate tier is no longer valid, and BRM no longer applies it.
Specifying How Long Rate Tiers Are Valid
You specify how long a rate tier is valid by specifying a duration. You can specify that a rate tier is always valid or is valid for either an absolute or a relative date range. Figure 14-2 shows three rates with validity specified by date.
For example, your basic IP Fax rate tier should not change and always applies. You could specify an absolute date range of 12/1/01 through 12/31/01 for a promotional holiday rate tier. You could also specify a relative date range of 30 days from purchase until 60 days from purchase to give your customers special rates during the second month.
Specifying When Rate Tiers Are Valid
You specify when a rate tier is valid by selecting ranges of dates, days of the week, and times of day. For example:
-
For each rate tier, you specify a valid date range. For example, you can specify that a rate tier is valid for the entire year 2001.
-
For each date range, you specify one or more valid day-of-the-week ranges. For example, you can specify that a rate tier is valid Monday through Friday.
-
For each day-of-the-week range, you specify one or more valid time-of-day ranges. For example, you can specify that a rate tier is valid between 6 a.m. and 8 p.m.
Using Date, Day, and Time Ranges Together
Date ranges consist of a start date and an end date between which a rate tier is valid. For example, a promotional rate tier for usage fees is valid only for the month of January.
Day ranges consist of a list of days during which a rate is valid. For example, a rate tier for off-peak IP usage fees is valid only on weekends.
Time-of-day ranges consist of a start time and an end time between which a rate tier is valid. For example, an after-hours rate tier for IP usage fees is valid only between 10 p.m. and 6 a.m.
Within each date range, you can use multiple day ranges; within each day range, you can use multiple time-of-day ranges.
The following examples show how you can use date, day, and time-of-day ranges together. Figure 14-3 shows some time ranges that specify free IP usage for the first month after an account is created. Figure 14-4 shows some time ranges that specify IP usage rates effective after the first month.
Figure 14-3 Free IP Usage for First Month
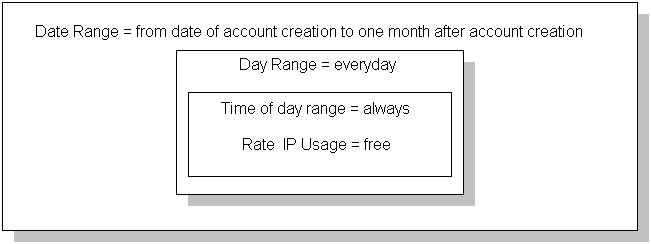
Description of ''Figure 14-3 Free IP Usage for First Month''
Figure 14-4 Time Range Based IP Usage Rates after First Month
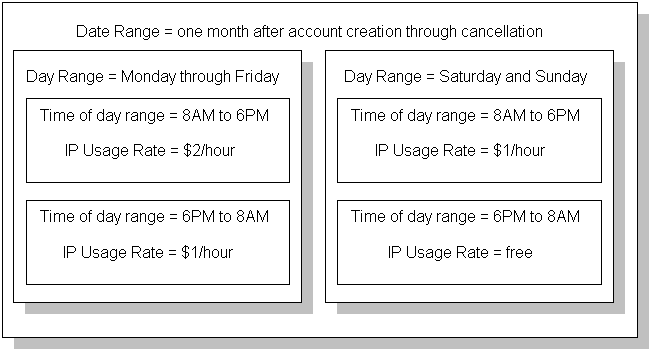
Description of ''Figure 14-4 Time Range Based IP Usage Rates after First Month''
Using the Correct Time Zone
Because BRM uses the date and time of an event to determine how to rate the event, using the correct time zone during rating is important. You specify whether real-time rating uses the event time zone or the server time zone to rate the event. By using time zone data, BRM can correctly calculate event start and end times before rating occurs.
Specifying a Time Zone Mode
When you create a product in Pricing Center, you specify which of the following time zone modes BRM uses for rating events whose rates are based on time of day:
-
Event: BRM uses the time zone in which the event occurs. For example, if a user in California logs on to a terminal server located in California, BRM uses California time, even if the BRM server that rates the event is in New York. This is the default time zone mode.
-
Server: BRM uses the time zone in which the BRM server that rates the event is located. For example, if a California user logs on to a terminal server located in California but the BRM server that rates the event is in New York, BRM uses New York time. For information about setting your system's server time zone, see "Resetting the Server Time Zone".
For information about setting the time zone mode, see the Pricing Center Help.
Resetting the Server Time Zone
The server time zone is where the server you use for rating resides.
By default, the server time zone is set to America/Los_Angeles. If your rating server is not in that time zone, reset the server time zone to the time zone ID indicating the server location.
Important:
BRM supports only the time zone IDs defined in instances of the Java TimeZone class.To reset the server time zone:
-
Get a list of time zone IDs in the Java TimeZone class by running the following function:
TimeZone.getAvailableIDs() -
In the list, find the ID for the time zone in which your server resides and write it down.
-
Open the BRM_home/sys/cm/timezones.txt file, where BRM_home is the directory in which BRM is installed.
This file lists all the time zone IDs available for use in your system.
-
If the ID for the time zone in which your server resides is not in the timezones.txt file, do the following:
-
Open the BRM_home/sys/cm/sample_timezone.txt file.
-
Add an entry to the sample_timezone.txt file for the time zone in which your server resides by following the instructions in the file.
Important:
BRM supports only the time zone IDs defined in instances of the Java TimeZone class.Each time zone ID entry in the sample_timezone.txt file contains 13 mandatory parameters. The value of the tzone_name parameter must match the name of a time zone ID in the Java TimeZone class. To get a list of time zone IDs in the TimeZone class, run the
TimeZone.getAvailableIDs()function.Note:
To add multiple time zone IDs to the file, enter each time zone ID entry on a separate line. -
Save and close the sample_timezone.txt file.
-
-
Open the BRM_home/sys/cm/pin.conf file.
-
If you added an entry to the sample_timezone.txt file in step 4, add the following entry to the pin.conf file:
- fm_rate timezone_file sample_timezone.txt
-
Find the following entry in the pin.conf file:
-rating_timezone server_timezone_ID
where server_timezone_ID specifies the ID of the time zone in which the BRM server performing rating is located.
-
Replace the current server_timezone_ID value with the time zone ID of your BRM rating server.
For example, if your rating server is in Saskatchewan, use the following time zone ID:
- fm_rate rating_timezone Canada/Saskatchewan
Note:
To add multiple time zones to the file, add separate -fm_rate rating_timezone entries. -
Save and close the file.
-
Stop and restart the CM.
Configuring Applications to Generate Time Zone Data
When a BRM client application or service integration client (such as RADIUS Manager and Universal Event Loader) generates an event, that event includes time zone data. You must configure event-generating applications to generate the correct time zone data. This means creating an entry in a pin.conf or properties file. See the configuration section of your client application or the service integration component documentation for details.
Using Event Start Time to Determine a Product's Validity
By default, in real-time rating an event's end time is used to determine a product's validity.
You can specify that the event start time be used for determining the product's validity by adding an entry to the CM configuration file.
To use the event start time to determine the product's validity:
-
Open the BRM_Home/sys/cm/pin.conf file.
-
Add the following entry:
- fm_rate use_prods_based_on_start_t /eventYou can use /event to use the start time for all events, or use a subclass of /event to specify just events of a given type.
-
Stop and restart the CM.