4 Configuring BRM-Initiated Payment Processing
This chapter provides instructions for setting up Oracle Communications Billing and Revenue Management (BRM) credit card and direct debit processing by using Paymentech.
To use Paymentech with BRM, you must install the Paymentech Manager software. Paymentech Manager integrates the Paymentech software with BRM.
Important:
Paymentech Manager is an optional component, not part of BRM.Before reading this chapter, read ”About Billing” in BRM Configuring and Running Billing for information about how BRM handles billing. See "About BRM-Initiated Payment Processing" for information about BRM-initiated payment processing,
Note:
The initials FUSA are sometimes used to represent Paymentech in BRM file names. For example, the Paymentech Data Manager (DM) is named dm_fusa.Unless otherwise noted, the procedures described in this chapter apply to both credit card and direct debit processing with Paymentech. BRM-initiated payments refers to both credit card and direct debit transactions.
For information about creating a custom DM to handle direct debit processing, see "Implementing a Direct Debit Payment Method".
Overview of Setting Up BRM-Initiated Payment Processing
To enable BRM-initiated payment processing for Paymentech:
-
Install BRM. For more information, see ”Putting Together Your BRM System” in BRM Installation Guide.
-
Install the Paymentech Manager software. See ”Installing Paymentech Manager” in BRM Installation Guide.
-
Establish a link with Paymentech.
Note:
To perform transactions with Paymentech, you need a leased line, such as a T-1 link or a frame-relay link. Connecting to Paymentech by using a standard modem is not supported. -
To use the HeartBeat application to monitor connectivity, provide Paymentech with the IP address and port number of the machine running the Paymentech DM. See "Using the Paymentech HeartBeat Application".
-
Edit the payment processor configuration file (BRM_Home/sys/data/pricing/example/pin_ach) and load it into the BRM database. This file specifies merchant names for Paymentech and any other payment processors that you use. See "Setting Up Merchants and Payment Processors".
-
To use direct debit processing, Visa CVV2, or American Express CID for your credit card processing, edit the Connection Manager (CM) configuration file (BRM_Home/sys/cm/pin.conf). See "Configuring the Connection Manager for Paymentech".
-
Specify connection parameters by editing the Paymentech DM configuration file (BRM_Home/sys/dm_fusa/pin.conf). The Paymentech DM (dm_fusa) provides a link between BRM and the Paymentech credit card processor. See "Configuring the Paymentech Data Manager".
-
Start the Paymentech DM. See ”Starting and Stopping the BRM System” in BRM System Administrator's Guide.
-
Test the installation. See "Testing Paymentech Credit Card Processing".
Information You Need from Paymentech
Before setting up BRM-initiated payment processing, you need the following information from Paymentech:
-
The IP address and port for the Paymentech online server (the server used for registering customers) and batch server (the server used for handling regular payments).
-
The presenter ID and password and the submitter ID and password. See the Paymentech documentation for more information.
-
Merchant numbers for each currency you support. See "About Merchant Numbers and Account Identifiers". The same sets of merchant IDs and merchant numbers can be used for both credit card and direct debit.
Even if you already use Paymentech for credit card processing, you must plan for a setup and testing period for Paymentech direct debit.
Information Paymentech Needs from You
Paymentech needs the following information specific to your BRM software configuration. Table 4-1 lists the defaults suggested by BRM.
Table 4-1 BRM Default Values for Paymentech
| Paymentech Information | BRM Default |
|---|---|
|
The IP address and port number for the machine running the Paymentech Data Manager (dm_fusa). |
None. This is required only to use the Paymentech HeartBeat application, which is integrated with the Paymentech Data Manager. It is required to secure the port. For more information, see "Using the Paymentech HeartBeat Application". |
|
Is this for an existing Presenter ID (PID)? |
No |
|
What is the application software that formats the file? |
Written by in-house programmers |
|
What is the communications software that sends the file? |
Customized by the software vendor listed above |
|
What is the online data communications protocol used to send the online authorization transaction? |
TCP/IP Berkley Socket Interface |
|
What is the batch data communications protocol used to send the batch file? |
TCP/IP Berkley Socket Interface |
|
What online format will you use to send online authorizations? |
See the discussion about other compatible software in ”BRM Software Compatibility” in BRM Installation Guide for information on the format version currently supported by BRM. |
|
Will you load balance online authorizations (requires leased line) between Paymentech's data centers, or will you use one data center as primary and one as backup? |
Primary and Backup |
|
What batch format will you use to send batch files? |
See the discussion about other compatible software in ”BRM Software Compatibility” in BRM Installation Guide for information on the format version currently supported by BRM. |
|
Will you receive the batch reply file by sending an RFR (Request For Response) record or not? |
1 Call (IA) - No RFR record sent to pick up reply file. |
|
Will you send authorizations separately from deposits OR will you send conditional deposits that will result in a deposit upon authorization approval? |
Separate authorizations and deposits and conditional deposits. |
|
What will the average size of your files be in production? (How many records/transactions?) |
None. This number should be based on your company's projected customer registration growth and billing rate. |
|
What is the projected submission schedule? |
Daily. |
|
Number of times per day? |
Once. |
|
What Paymentech functionality do you intend to test? |
This list reflects a typical pre-paid services company. The first five features require a dedicated connection (leased line)
|
How Paymentech Manager Handles Electronic Check Processing
BRM Paymentech Manager processes all electronic check processing (ECP) transactions in accordance with National Automated Clearing House Association (NACHA) operating rules.
BRM Paymentech Manager provides Account Verification functionality for transactions in batch mode from any custom client to Paymentech. For more on Account Verification functionality and the support for online transactions, see "About Account Verification for Online Processing".
About Electronic Check Processing (ECP) Methods
Valid entries for ECP Authorization Method are:
-
A. Accounts Receivable. When ECP Authorization Method is set to A, values for Check Serial Number, and Image Reference Number are mandatory.
-
I. Internet.
-
P. Point of Purchase. When ECP Authorization Method is set to P, values for Check Serial Number, Terminal City, Terminal State, and Image Reference Number are mandatory.
-
T. Telephone.
-
W. Written.
BRM Paymentech Manager supports these new authorization method values and the corresponding information as required by Paymentech.
If you customize electronic check processing with Paymentech, when ECP Authorization Method is set to A or P:
-
Connection Manager ignores any input you provide in the fields that Paymentech mandates for Check Serial Number, Terminal City, Terminal State, and Image Reference Number.
-
The Check Serial Number, Terminal City, Terminal State, and Image Reference Number mandatory fields are blank in the input BRM Paymentech Data Manager receives from Connection Manager.
In BRM, when you customize electronic check processing for end-to-end payment operations with Paymentech, avoid setting ECP Authorization Method to A or P.
Payment Formats and Batch Processing
Paymentech batch requests/responses support the following.
-
A refund file can be in 120-byte format, even if the corresponding authorization/deposit was completed in 96-byte format.
-
The Request for Response (RFR) header record must be in the same byte format as the response file. That is, to pick up a 96-byte response file, Paymentech expects a 96-byte RFR header record; to pick up a 120-byte response file, Paymentech expects a 120-byte RFR header record
Points to Consider
Consider the following points about batch processing functionality complying with Paymentech Batch Version 3.0.0 Revision 4.2:
-
If you use the 120-byte message format, you must complete the certification for batch processing for Paymentech before you allow customers to log in to the production system.
-
For the UK Domestic Maestro (Switch/Solo) card (MOP = SW) with batch processing functionality complying with Paymentech Batch Version 3.0.0 Revision 4.2, Paymentech expects the card issue date and the issue number (if present) in the UK Domestic Maestro extension record.
-
BRM does not support registration of new subscribers with UK Domestic Maestro (Switch/Solo) card type. For already registered subscribers, transactions other than the refund (Action Code = RF) are not supported.
For more information about Paymentech's 120-byte batch format, view the 120-Byte Batch Processing Format Specification version 3.0.0 - Revision 4.2 document at the Chase Paymentech Web site.
Setting Up Merchants and Payment Processors
Important:
This is a mandatory configuration task if you use Paymentech or another payment processor.You specify merchants and the payment processor vendors that process your BRM-initiated payment transactions for the entire system. You can specify any number of payment processor vendor and merchant pairs.
To specify merchants and vendors, you edit the pin_ach file, then run the "load_pin_ach" utility to load the contents of the file into the /config/ach object in the BRM database.
Important:
The utility needs a configuration (pin.conf) file in the directory from which you run the utility. See ”Creating Configuration Files for BRM Utilities” in BRM System Administrator's Guide.-
Edit the pin_ach file in BRM_Home/sys/data/pricing/example. The pin_ach file includes examples and instructions.
Note:
The default merchant for each payment processor is the first merchant listed for the vendor.The file includes this entry for Paymentech:
fusa 0.0.0.1 /payment -1 test 0where:
-
fusa is the name of the payment processor.
-
0.0.0.1 /payment -1 is a routing POID used to identify the database where the payment processor Data Manager (DM) runs. The object type and ID (/payment -1) are not significant.
-
test is the merchant name.
Edit this field to specify your merchant name. This name must match the merchant name entry in the payment processing data manager (DM) configuration file. For example, if the merchant name in the dm_fusa pin.conf file is mid_ispDealer, the merchant name in pin_ach must be ispDealer.
-
0 is the payment channel ID.
Edit this field to specify the payment channel ID for each vendor. The channel_id value must match a payment channel ID configured in the /strings object. If a payment does not contain a payment channel ID, a value of 0 is saved with the payment by default, which configures it as Unspecified Payment Channel. For more information, see "Configuring Payment Channels".
Caution:
The load_pin_ach utility overwrites existing payment processor and merchant information. If you are updating this information, you cannot load new data only. You must load complete sets of payment processor and merchant entries each time you run the load_pin_ach utility.
-
-
Save the pin_ach file.
-
Use the following command to run the load_pin_ach utility:
load_pin_ach pin_achIf you are not in the same directory as the pin_ach file, include the complete path to the file. For example:
load_pin_ach BRM_Home/sys/data/pricing/example/pin_ach
For more information, see "load_pin_ach".
To verify that the payment processor and merchant information was loaded, you can display the /config/ach object by using the Object Browser, or use the robj command with the testnap utility. See ”Reading an Object and Writing its Contents to a File” in BRM Developer's Guide.
Using More Than One Payment Processor
You can use more than one payment processing Data Manager (DM) simultaneously to collect and validate payments. To use multiple payment processors, you must run the following utilities for each payment processor vendor you use:
-
pin_collect
-
pin_deposit
-
pin_refund
These utilities are typically run by the following billing scripts:
-
pin_bill_day
By default, this script is scheduled to run pin_collect, pin_deposit, and pin_refund.
-
pin_bill_week
By default, this script runs pin_collect.
-
pin_bill_week
By default, this script runs pin_collect.
To modify the pin_bill* scripts to run the collect, deposit, and refund scripts for every payment processor:
-
Go to the BRM_Home/bin directory and open the pin_bill* utility in a text editor.
-
Find the entries for the billing utility and add new entries that specify the additional payment processor vendors.
For example, if you use dm_fusa and another vendor, find these existing entries:
pin_refund -active -pay_type 10003 -vendor fusa
IF %ERR% EQU 0 IF %ERRORLEVEL% NEQ 0 SET ERR=%ERRORLEVEL%
...
pin_collect -inactive -pay_type 10003 -vendor fusa
IF %ERR% EQU 0 IF %ERRORLEVEL% NEQ 0 SET ERR=%ERRORLEVEL%
...
pin_deposit -pay_type 10003 -vendor fusa
IF %ERR% EQU 0 IF %ERRORLEVEL% NEQ 0 SET ERR=%ERRORLEVEL%
...
And add entries to run the utility for each payment processor vendor:
pin_refund -active -pay_type 10003 -vendor fusa
IF %ERR% EQU 0 IF %ERRORLEVEL% NEQ 0 SET ERR=%ERRORLEVEL%
pin_refund -active -pay_type 10003 -vendor new_vendor
IF %ERR% EQU 0 IF %ERRORLEVEL% NEQ 0 SET ERR=%ERRORLEVEL%
...
pin_collect -inactive -pay_type 10003 -vendor fusa
IF %ERR% EQU 0 IF %ERRORLEVEL% NEQ 0 SET ERR=%ERRORLEVEL%
pin_collect -inactive -pay_type 10003 -vendor new_vendor
IF %ERR% EQU 0 IF %ERRORLEVEL% NEQ 0 SET ERR=%ERRORLEVEL%
...
pin_deposit -pay_type 10003 -vendor fusa
IF %ERR% EQU 0 IF %ERRORLEVEL% NEQ 0 SET ERR=%ERRORLEVEL%
pin_deposit -pay_type 10003 -vendor new_vendor
IF %ERR% EQU 0 IF %ERRORLEVEL% NEQ 0 SET ERR=%ERRORLEVEL%
...
Important:
There might be several sets of entries for each vendor. Be sure to add new entries for each set of existing entries.
Connecting Your Payment Processor Data Managers to the BRM Database
You payment processor data managers (DMs) require a connection to the BRM database.
-
Open the Connection Manager (CM) configuration file (BRM_Home/sys/cm/pin.conf).
-
Add a dm_pointer entry for each payment processor vendor DM. Use the following format:
- cm dm_pointer database_number ip host_name port_number
-
Stop and restart the CM. See ”Starting and Stopping the BRM System” in BRM System Administrator's Guide.
Configuring the Connection Manager for Paymentech
The following procedures involve configuring your Connection Manager (CM).
Enabling Direct Debit Processing
Depending on the choices made during installation, the settings for direct debit might not be turned on. (Turned off is the default.)
-
Open the Connection Manager (CM) configuration file (BRM_Home/sys/cm/pin.conf).
-
Change the value of the direct debit entries according to the instructions in the file.
For example:
- fm_pymt_pol dd_validate 1
- fm_pymt_pol dd_revalidation_interval 3600
- fm_pymt_pol dd_collect 1
-
Save the file.
You do not need to restart the CM to enable this entry.
Enabling Credit Card Tokenization
By default, credit card tokenization is disabled. You can enable credit card tokenization by modifying the cc_token_enabled entry in the Paymentech DM configuration file (BRM_Home/sys/dm_fusa/pin.conf).
To enable credit card tokenization:
-
Open the BRM_Home/sys/dm_fusa/pin.conf file in a text editor.
-
Change the value of the cc_token_enabled entry to 1.
For example:
- dm_fusa cc_token_enabled 1
-
Save and close the file.
-
Stop and restart the Paymentech DM. See ”Starting and Stopping the BRM System” in BRM System Administrator's Guide.
For more information on credit card tokenization, see "About Credit Card Tokenization".
Requiring Additional Protection against Credit Card Fraud
Paymentech offers additional fraud prevention using Visa CVV2 numbers and American Express CID numbers.
Customer service representatives (CSRs) can request this information when they use Customer Center to register customers or update credit card information in customer accounts. By default, the CVV2 and CID numbers are considered to be optional when CSRs add or change a customer's credit card information. To require the CVV2 or CID number as part of customer registration, change the following fields in the Connection Manager (CM) configuration file (BRM_Home/sys/cm/pin.conf).
Important:
For security reasons, the CVV2 and CID numbers are stored in BRM with a NULL value. If you have the cvv2_required entry enabled, the information is sent directly to Paymentech for validation without being stored in the database. (Even if your CM does not require this additional fraud prevention, Paymentech still accepts the information if it is sent.)To require Visa CVV2:
-
Open the Connection Manager (CM) configuration file (BRM_Home/sys/cm/pin.conf).
-
Change the value in the following entry from the default, 0, to 1:
- fm_pymt_pol cvv2_required 1 -
Save the file.
You do not need to restart the CM to enable this entry.
To require American Express CID:
-
Open the Connection Manager (CM) configuration file (BRM_Home/sys/cm/pin.conf).
-
Change the value in the following entry from the default, 0, to 1:
- fm_pymt_pol cid_required 1 -
Save the file.
You do not need to restart the CM to enable this entry.
If these entries are missing from the CM configuration file, CVV2 and CID are not required for customer registration. For more information on how BRM handles these numbers, see ”CVV2/CID Fraud Prevention Functionality” in BRM Managing Customers.
Specifying the Maximum Number of Digits Allowed for CVV2 Verification
By default, Customer Center and BRM accept a maximum of three CVV2 digits when validating a customer's credit card.
To change the maximum number of CVV2 digits that can be entered, perform the following:
-
For Customer Center: Use the Configurator application provided with Customer Center SDK to modify the maximum number of CCV2 digits allowed by Customer Center. You enter the information in the CVV2 Number - maximum digits allowed field of the Payment Configurator.
-
For BRM: Customize the PCM_OP_CUST_POL_VALID_PAYINFO policy opcode to validate the number of digits passed in the PIN_FLD_SECURITY_ID input flist field of the PIN_FLD_CC_INFO array.
Disabling Paymentech Real-Time Credit Card Validations
During account creation, credit card information is validated in two phases:
-
BRM calls the PCM_OP_PYMT_VALIDATE opcode to do basic validations, including number sequence validations against the numbers defined in the pin_cc_pattern.h file.
-
BRM sends the credit card information to Paymentech, which does a real-time validation of the credit card number, expiration date, and so on.
For example, suppose you enter credit card information for an account that has a Visa number pattern and a future expiration date; however, the card is actually expired. The BRM validation will pass successfully because the credit card number sequence is valid but the Paymentech validation will fail.
To disable the real-time Paymentech credit card validation:
-
Open the Connection Manager (CM) configuration file (BRM_Home/sys/cm/pin.conf).
-
Change the value in the following entry to 0:
- fm_pymt_pol cc_validate 0 -
Save the file.
-
Stop and restart the CM.See ”Starting and Stopping the BRM System” in BRM System Administrator's Guide.
Configuring the Paymentech Data Manager
Follow these procedures to configure the Paymentech Data Manager (DM):
Specifying Merchant IDs and Merchant Numbers
For information about merchant numbers, see "About Merchant Numbers and Account Identifiers".
-
Open the Paymentech DM configuration file (BRM_Home/sys/dm_fusa/pin.conf).
-
Change the merchant entry. (Merchant must match the entry described in "Setting Up Merchants and Payment Processors".) Use this syntax:
- dm_fusa mid_merchant_ISOcurrency# Merchant_number
For example:
- dm_fusa mid_ispname_840 050505 -
Save and close the file.
-
Stop and restart the Paymentech DM. See ”Starting and Stopping the BRM System” in BRM System Administrator's Guide.
Adding Soft Descriptor Information
You can help your customers understand their credit card and checking account statements by showing your doing-business-as (DBA) name, a recognizable product name, and a customer service number for questions. To add this information:
-
Open the Paymentech DM configuration file (BRM_Home/sys/dm_fusa/pin.conf.)
-
Turn on soft descriptors by changing the descriptor flag value to 1:
- dm_fusa sd_descriptor_flag 1 -
Change the other related entries according to the instructions in the file.
-
Save and close the file.
-
Stop and restart the Paymentech DM. See ”Starting and Stopping the BRM System” in BRM System Administrator's Guide.
For an overview of soft descriptors, see "About Paymentech Soft Descriptor Credit Card and Checking Statement Information" and the Paymentech soft descriptor specifications.
To create multiple DBA names, product names, and phone number entries, you must customize the PCM_OP_PYMT_POL_PRE_COLLECT policy opcode.
Handling Concurrent Online Paymentech Requests
You can increase billing performance by using the fusamux program. Because Paymentech allows only a single connection per customer, the fusamux program takes multiple DM backends and bundles them into a single connection. This enables BRM to process multiple transactions and send them to Paymentech in a single connection as shown in Figure 4-1.
Without fusamux, the Paymentech DM connects directly to Paymentech. When you use fusamux, the Paymentech DM connects to the fusamux application, which in turn connects to Paymentech. When you use fusamux, you must change entries in the Paymentech DM to point to fusamux instead of pointing to Paymentech.
Figure 4-1 Paymentech Requests with or without Fusamux
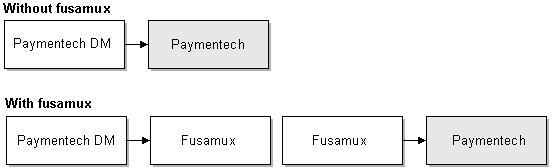
Description of ''Figure 4-1 Paymentech Requests with or without Fusamux''
To configure the fusamux daemon:
-
Open the Paymentech DM configuration file (BRM_Home/sys/dm_fusa/pin.conf).
-
Edit the fusamux entries:
-
Set the fusamux online_port and fusamux online_srvr entries to point to the Paymentech online server IP address and port number.
-
Set the fusamux_port entry to the port on which the fusamux daemon listens.
-
Set the dm_fusa online_port entry to the port on which fusamux listens.
-
Set the dm_fusa online_srvr entry to point to the fusamux IP address.
-
Set the dm_fusa qm_n_be entry to a number between 4 and 8.
-
-
Save the file.
-
Stop and restart the Paymentech DM. See ”Starting and Stopping the BRM System” in BRM System Administrator's Guide.
Increasing Registration Speed When Paymentech Is Offline
If you know that your connection to Paymentech will be offline for a long time, you can speed up registration by not allowing timeouts. Instead, a connection to Paymentech results in a ”no answer” error immediately. By default, registration can occur even though there is a ”no answer” error. Also, a ”no answer” error does not create checkpoint records, so you do not have to resolve the transaction.
You can also create accounts that use the Undefined checkpoint records. For more information, see ”Allowing Registration Without Credit Card Validation” in BRM Managing Customers.
Note:
If you use this option, you cannot process credit card transactions by using the pin_collect or pin_deposit utilities. You must wait and run billing when the Paymentech connection is restored.Tip:
If the credit card payment service is not available and you still want to register customers, you must isolate those accounts for later credit card authorization. Modify the PCM_OP_PYMT_POL_VALIDATE policy source file either to save a list of permissive registrations or to send email to the system administrator. Alternatively, you can write a simple application to periodically check accounts and flag the ones that have been registered without verification.-
Open the Paymentech DM configuration file (BRM_Home/sys/dm_fusa/pin.conf).
-
Edit the online_proto entry:
-
Enter linkdown to disable timeouts and report ”no answer” for all connections.
-
Enter socket to enable the connection to function normally.
-
-
Edit the batch_proto entry:
-
Enter linkdown to disable timeouts and report ”no answer” for all connections.
-
Enter socket to enable the connection to function normally.
-
-
Save the file.
-
Stop and restart the Paymentech DM. See ”Starting and Stopping the BRM System” in BRM System Administrator's Guide.
Setting the Connection Timeout Length and Retries
If you have problems connecting to Paymentech, increase the connection timeout length and number of retries:
-
Open the Paymentech DM configuration file (BRM_Home/sys/dm_fusa./pin.conf).
-
Edit the connect_retrys entry. The default is 2. You can enter any number.
-
Change the timeout value for online attempts and for batch attempts separately:
-
To change the timeout value for online attempts, edit the fusa_timeout entry.
-
To change the timeout value for batch attempts, edit the fusa_batch_timeout entry.
The default for both entries is 600 seconds.
-
-
Save the file.
-
Stop and restart the Paymentech DM. See ”Starting and Stopping the BRM System” in BRM System Administrator's Guide.
Specifying the Batch Mode Encryption Key
If you process multiple credit card transactions at a time, batch mode processing uses temporary send and receive files to capture records to and from Paymentech. To prevent any misuse of the temporary batch files, sensitive data like the credit card and security code is encrypted.
You specify the encryption method and key in the Paymentech configuration file. The encryption method supported is MD5. For more information, see ”About MD5 Encryption” in BRM Developer's Guide.
Tip:
You should change the encryption key regularly. Before changing the encryption key, ensure that all pin_recover operations using the -rfr and -resubmit parameters that depend on the current encryption key are completed.To specify the encryption key:
-
Open the Paymentech DM configuration file (BRM_Home/sys/dm_fusa/pin.conf).
-
Search for the following line:
- crypt -
Do one of the following:
-
To specify the MD5 encryption key, change the line to the following:
- crypt md5| libpin_crypt4qm.so "encryption_key" -
To specify the AES encryption key, change the line to the following:
- crypt aes| libpin_crypt4qm.so "encryption_key"
where encryption_key is the key you generate.
For example:
For MD5:
- crypt md5| libpin_crypt4qm.so "24CFD43E8CE5273B0B7781140CB71B92"
For AES:
- crypt aes| libpin_crypt4qm.so "24CFD43E8CE5273B0B7781140CB71B92"
Tip:
You can copy and paste the key or you can type it. -
-
Save and close the file.
-
Stop and restart the Paymentech DM. See ”Starting and Stopping the BRM System” in BRM System Administrator's Guide.
Using the Paymentech HeartBeat Application
The Paymentech Data Manager is integrated with the Paymentech HeartBeat application and runs the process by default after it is initialized by Paymentech.
To initialize the HeartBeat application, provide Paymentech with the IP address and port number of the machine running the Paymentech Data Manager (dm_fusa). The HeartBeat application will run automatically each time you process BRM-initiated payments.
For more information, see "About the Paymentech HeartBeat Application".
Troubleshooting HeartBeat Errors
The BRM_Home/var/dm_fusa/dm_fusa.pinlog file records the Paymentech HeartBeat request and response message pairs throughout the connection with Paymentech. Each request message must have a response message within 120 seconds to avoid a socket disconnect.
The following entry is a typical HeartBeat request and response pair:
Received (20) chars: Heartbeat request [HO19999999813123258^M]
Sending Heartbeat response [HI19999999813123300^M]
If these entries are missing from the dm_fusa.pinlog file or are not continuous for the duration of the connection with Paymentech, the payment processing company should call Paymentech to troubleshoot why the connection was lost or the HeartBeat application was not enabled from their end.
Note:
If a connection is made between the DM and Paymentech, and Paymentech does not initiate the HeartBeat messages, BRM assumes there is no HeartBeat application support and continues with payment processing as normal.If an error occurs with the HeartBeat application during payment simulation, an error message similar to the following is written to the BRM_Home/apps/fusa_server/answer_s.pinlog file:
Received (20) chars: Heartbeat response Validation failed in process_it() : HI19999999813123300^M
In order for this message to be logged, the payment processing simulator configuration file (BRM_Home/apps/fusa_server/pin.conf) must contain the following entries:
- answer_s loglevel 3
- answer_s logfile answer_s.pinlog
For more information, see "Defining the Credit Card Functionality to Test".
If a socket disconnect occurs with the payment processing simulator and no online transactions are occurring, errors similar to the following are written to the answer_s.pinlog file:
E Tue Aug 08 10:51:24 2006  elm  dm_fusa:2994  qbe_fusa.c(1.13):645 1:elm:dm_fusa:2991:1:0:1155059471:0
Socket read error in dm_fusa_respond_heartbeat() recv() returned (0)
E Tue Aug 08 10:51:24 2006  elm  dm_fusa:2994  qm_back.c(7):299 1:elm:dm_fusa:2991:1:0:1155059471:0
Error(7) processing heartbeat monitor fd(5)
Changing How BRM Handles Paymentech Address Validation Return Codes
Paymentech provides return codes when verifying customer addresses. To change how BRM responds to validation return codes, edit the PCM_OP_PYMT_POL_VALIDATE policy opcode source.
For example, by default a invalid address does not cause a validation failure. You can change the policy to fail validation if the customer's street address is wrong. For example, change the following code:
case PIN_CHARGE_RES_FAIL_ADDR_LOC:
   /* street address failure is acceptable */
   result = PIN_RESULT_PASS;
   descr = "street address not correct";
   break;
To this:
case PIN_CHARGE_RES_FAIL_ADDR_LOC:
   /* street address failure is acceptable */
   result = PIN_RESULT_FAIL;
   descr = "street address not correct";
   break;
For more information about credit card validation, see "About Credit Card Validation and Authorization".
PCM_OP_PYMT_POL_VALIDATE returns the result of validating a credit card transaction in the PIN_FLD_VENDOR_RESULTS field, including a description of that result. You can customize credit card validations based on the response from ACH by passing a PIN_FLD_ VENDOR_RESULTS value in the input flist. For example, you can set the validation to pass or fail, or turn on logging based on the results from the ACH.
PCM_OP_PYMT_VALIDATE calls this policy opcode during customer registration to determine the success or failure of credit card validation.
You can change both the PIN_FLD_RESULT and PIN_FLD_DESCR values to modify BRM responses to validation results returned in PIN_FLD_VENDOR_RESULTS. For example, if your company does not want to proceed with a transaction when the result is PIN_CHARGE_RES_SRV_UNAVAIL, change the PIN_FLD_RESULT_PASS value to PIN_FLD_RESULT_FAIL and change the PIN_FLD_DESCR value to ”Service unavailable”.
If the PIN_FLD_RESULT value passed in on the input flist is NULL, PCM_OP_PYMT_POL_VALIDATE does nothing. Otherwise, the default validation result depends on the PIN_FLD_RESULT value. See Table 2-2, "Result Values for Operation".
Important:
If you add custom result values to your system, do not assign them the following result codes, which are reserved by BRM: 0 - 17, 777, 888, 999, 1000 - 1017, 1777, and 1999.Handling AVS Validations for International Credit Cards
By default, BRM sends a customer's name, address, and ZIP code for validation when processing credit card charges. If you use the Address Verification System (AVS) to validate addresses, only credit cards with addresses in the United States and Canada pass validation.
To change how BRM handles credit card address verifications, do one of the following:
-
Set the cc_validate flag in the CM's pin.conf file to 0. This disables the address validation process by Paymentech for all credit cards, including United States and Canada credit cards.
-
Set the cc_validate flag in the CM's pin.conf file to 1 and modify PCM_OP_PYMT_POL_VALIDATE to ignore all AVS failure response codes for other countries. This changes how BRM responds to Paymentech's validation return codes for countries other than the United States and Canada.
Customizing How the Results of Credit Card Transactions Are Processed
To process the result of a credit card transaction for a specified account, use the PCM_OP_PYMT_POL_COLLECT policy opcode.
PCM_OP_PYMT_POL_COLLECT sets the PIN_FLD_RESULT and PIN_FLD_DESCR values returned in the output flist. It also specifies the actions to be performed on the account based on the results of the credit card transaction by returning a PIN_FLD_ACTIVITIES array.
PCM_OP_PYMT_COLLECT calls this opcode after the credit card has been charged.
The default behavior of PCM_OP_PYMT_POL_COLLECT is determined by the PIN_FLD_RESULT field passed in on the input flist.
-
If the result is successful, PIN_CHARGE_RES_PASS is passed in. Depending on the PIN_FLD_COMMAND passed in on the flist, PCM_OP_PYMT_POL_COLLECT sets the PIN_FLD_DESCR value as shown in Table 4-2:
Table 4-2 Input and Output Values
Input
PIN_FLD_RESULTInput
PIN_FLD_COMMANDOutput
PIN_FLD_RESULTOutput
PIN_FLD_DESCRPIN_CHARGE_RES_PASS
PIN_CHARGE_CMD_AUTH_ONLY
PIN_RESULT_PASS
Authorization successful
PIN_CHARGE_RES_PASS
PIN_CHARGE_CMD_CONDITION
PIN_RESULT_PASS
Authorization & deposit successful
PIN_CHARGE_RES_PASS
PIN_CHARGE_CMD_DEPOSIT
PIN_RESULT_PASS
Deposit successful
PIN_CHARGE_RES_PASS
PIN_CHARGE_CMD_REFUND
PIN_RESULT_PASS
Refund successful
PCM_OP_PYMT_POL_COLLECT then specifies actions to be performed on the account based on the PIN_FLD_COMMAND, the payment amount, and the pending receivable amount as shown in Table 4-3:
Table 4-3 PCM_OP_PYMT_POL_COLLECT Actions
Input PIN_FLD_COMMAND Actions When Payment >= Pending Receivable Action When Payment < Pending Receivable PIN_CHARGE_CMD_AUTH_ONLY
PIN_CHARGE_CMD_CONDITION
PIN_CHARGE_CMD_REFUNDS
-
Clear the pending receivable amount.
-
If the account status is currently set to inactive, change it to active.
-
Set the status flag value to PIN_STATUS_FLAG_DEBT.
-
Credit toward outstanding bill.
PIN_CHARGE_CMD_DEPOSIT
No action specified
No action specified
-
-
If the result is unsuccessful, and PIN_CHARGE_RES_FAIL_CARD_BAD or PIN_CHARGE_RES_FAIL_DECL_HARD are passed in, PCM_OP_PYMT_POL_COLLECT sets the PIN_FLD_RESULT value and the PIN_FLD_DESCR description, and then specifies these actions as shown in Table 4-4:
The PIN_FLD_PAYMENT_REASONS array in the input flist contains a PIN_FLD_PAYMENT_REASONS array, which contains information related to failed payments. These values are recorded in the FAILED_ACCOUNTS array of the /process_audit/billing object.
Note:
If a single payment is submitted for multiple bills, and fails, it is stored as multiple FAILED_ACCOUNTS arrays.The remaining input PIN_FLD_RESULT values are implemented in the same way. PCM_OP_PYMT_POL_COLLECT sets the output PIN_FLD_RESULT value and the PIN_FLD_DESCR description, and then reads the item for the account to determine if there is an amount that is 30 days past due. If so, it specifies the following actions shown in Table 4-5:
Table 4-5 Input and Output Values
| Input PIN_FLD_RESULT |
Output PIN_FLD_RESULT |
Output PIN_FLD_DESCR |
Action |
|---|---|---|---|
|
PIN_CHARGE_RES_FAIL_DECL_SOFT PIN_CHARGE_RES_FAIL_ADDR_AVS PIN_CHARGE_RES_FAIL_ADDR_LOC PIN_CHARGE_RES_FAIL_ADDR_ZIP PIN_CHARGE_RES_FAIL_NO_ANS PIN_CHARGE_RES_SRVC_UNAVAIL |
PIN_RESULT_FAIL |
Credit card operation declined |
|
You can customize PCM_OP_PYMT_POL_COLLECT to specify any of these actions:
-
clear_pending
-
set_status
-
cease_billing
For example, to discontinue billing an account after a determined period of inactivity, specify the cease_billing action. The default implementation does not specify the cease_billing action for any input PIN_FLD_RESULT values.
Changing How BRM Handles Paymentech Authorization Return Codes
The Paymentech authorization codes used by BRM are listed in BRM_Home/sys/dm_fusa/fusa_codes. This file maps Paymentech authorization codes to BRM result codes.
The fusa_codes file is not a complete list, but it includes the most common codes returned by Paymentech. If a Paymentech code is not included in the list, it is mapped to a hard decline.
You can change the mappings or add new mappings by editing the fusa_codes file.
Note:
You can map a Paymentech code to any BRM result code except CHECKPOINT.-
Open BRM_Home/sys/dm_fusa/fusa_codes.
-
Use the instructions in the file to edit the file.
-
Save the file.
-
Stop and restart the Paymentech DM. See ”Starting and Stopping the BRM System” in BRM System Administrator's Guide.
For more information about credit card authorization, see "About Credit Card Validation and Authorization".
Testing Paymentech Credit Card Processing
Paymentech provides connections for testing credit card and direct debit processing, but you must schedule testing times with Paymentech. It can take several weeks to establish a link with Paymentech. You can use the BRM Paymentech simulators to test credit card and direct debit processing without connecting to Paymentech.
Caution:
To test credit card and debit card processing with BRM Paymentech simulators, you must use the account numbers from the test environment only.Use the payment processing simulator to do the following:
-
Test the connections in your payment processing configuration.
-
Test how to handle no response or dropped-line situations.
-
Test any part of your BRM system that includes BRM-initiated payment processing. For example, you can create credit card accounts in Customer Center and use the simulator to charge them.
-
Test how the BRM system responds to credit card validation and authorization. You can also test BRM's response to the Visa fraud prevention system (CVV2). For example, you can test how BRM responds when trying to create an account that uses a invalid credit card.
Note:
The Paymentech simulator does not check for the expiration date of the credit card.
The payment processing simulator is located in BRM_Home/bin. It includes two utilities, answer_s and answer_b.
Caution:
Use the answer_s and answer_b utilities only in the test environment.In the production environment, uninstall these utilities to prevent sensitive data from being used for verification.
-
The answer_s utility simulates online transactions.
Note:
The answer_s utility automatically simulates the Paymentech HeartBeat application during BRM-initiated payment processing. It verifies that the HeartBeat responses from the Paymentech Data Manager (dm_fusa) are on time and in the correct format when sent to the payment processor (which is the answer_s utility in this case). If not, the utility resets itself to a listen state, which the simulator handles as a socket disconnect and writes the errors to the BRM_Home/apps/fusa_server/answer_s.pinlog file, if one is configured. See "Defining the Credit Card Functionality to Test". For information on how to handle the errors, see "Troubleshooting HeartBeat Errors". -
The answer_b utility simulates batch transactions.
Setting Up the Paymentech Simulator
Setting up the Paymentech simulator involves the following tasks:
Defining the Credit Card Functionality to Test
You can define which area of functionality to test with answer_s and answer_b by editing the Paymentech simulator configuration file (BRM_Home/apps/fusa_server/pin.conf). This file includes configuration instructions.
Note:
The entries can be changed interactively because the answer_a and answer_s servers read them from the configuration file at each connection.For information about validation and authorization, see "About Credit Card Validation and Authorization".
-
Open the simulator configuration file (BRM_Home/apps/fusa_server/pin.conf).
-
Change the response and result codes as necessary. For example:
-   answer_s    v_code   100
-   answer_s    avs      I3
-   answer_s    s_code   M
-   answer_b    v_code   100
-   answer_b    avs      I3
-
To write processing information to a log file, add the following entries:
-   answer_s    loglevel 3
-   answer_s    answer_S.pinlog
-   answer_b    loglevel 3
-   answer_b    answer_b.pinlog
-
Save and close the file.
Setting Up the Paymentech DM Configuration File for Testing
-
Open the Paymentech DM configuration file (BRM_Home/sys/dm_fusa/pin.conf)
-
Specify at least two dm_fusa back ends.
-
Change the online_srvr and online_port entries to point to the answer_s utility port number and IP address. By default, the port number is 5678.
-
Change the batch_srvr and batch_port entries to point to the answer_b utility port number and IP address. By default, the port number is 5679.
-
Save and close the file.
-
Stop and restart the Paymentech DM. See ”Starting and Stopping the BRM System” in BRM System Administrator's Guide.
Specifying an IP Address for the Paymentech Simulator
Systems configured with multiple network cards use multiple IP addresses for each network card. You can configure the Paymentech simulator to listen to all IP addresses to determine where to connect, or, if you know the IP address (for example, one provided by Paymentech), you can define it in the answer pin.conf file.
-
Open the simulator configuration file (BRM_Home/apps/fusa_server/pin.conf).
-
Do one of the following:
-
To enable Paymentech to listen to any IP address located on the machine where the answer utility is running, add the following entry to the file:
- answer answer_name - -
To assign a specific IP address for the answer utility, add the following entry to the file:
- answer answer_name IP_address
where IP_address is the IP address of the system running the simulator.
For example:
- answer answer_name 102.13.112.122
-
Running the Paymentech Simulators
The Paymentech simulators are in BRM_Home/bin.
Note:
Start the simulators before you start the Paymentech DM.You can start and stop the simulators through the command line:
start_answer &
stop_answer
Simulating Failed Credit Card Transactions
General soft declines are failures that can be retried later with possible success. This includes reasons like insufficient credit limit and other transitory causes. General hard declines are failures that are unlikely to succeed if retried. These include reasons like lost and stolen credit card and chronic payment failures.
To create a hard or soft decline on a credit card that you can use to test resolving failures, do the following:
-
Create a credit card account.
-
Stop the answer_b utility and the Paymentech DM.
-
Open the answer_b configuration file (BRM_Home/apps/fusa_server/pin.conf) and change the vcode value to 502.
-
Restart the answer_b utility. See "Running the Paymentech Simulators".
-
Restart the Paymentech DM. See ”Starting and Stopping the BRM System” in BRM System Administrator's Guide.
-
Advance the time one month and run pin_bill_day.
-
Verify that the amount due is not collected.
-
Use Event Browser to verify the PIN_FLD_RESULTS value in the /event/billing/payment/cc object is a 7 (soft decline) or an 8 (hard decline).
Resolving Failed Credit Card Transactions
In addition to the regular responses, answer_b also handles request for response (RFR) file requests by returning the contents of the RFR file specified in the answer_b configuration file.
To test recovery of failed transactions:
-
Create a credit card account.
-
If you have not already created failed credit card transactions, do the following to force a transaction failure:
-
Advance the time one month.
-
Run pin_bill_day.
-
Stop the answer_b utility while billing runs.
-
-
Use Event Browser to verify the PIN_FLD_RESULTS value in the /event/billing/payment/cc object is a 6 (service unavailable).
-
Run the pin_clean utility to find transaction IDs for failed transactions.
-
Edit a fusa send file (fusas*). Enter the transaction IDs for the transactions that have checkpoint records. Fusa send files are located in the TEMP directory.
-
Enter the file name of the RFR file in the Paymentech simulator configuration file.
-
Resolve the failed transactions. See "Resolving Failed BRM-Initiated Payment Transactions".
About Paymentech Fraud Prevention Using CID and CVV2
Paymentech offers an additional fraud prevention option for Visa and American Express transactions. Visa and American Express debit and credit cards have a non-embossed identifier. The Visa CVV2 (Card Verification Value 2) number is on the back of the card in the signature panel. The American Express CID (Card identifier) number is on the front of the card. CSRs can request this information when registering customers. For more information, see "About Credit Card Fraud Prevention" and "Requiring Additional Protection against Credit Card Fraud".
About Paymentech Soft Descriptor Credit Card and Checking Statement Information
You can add soft descriptors to customers' credit card or checking-account statements to make charges easier to understand. Soft descriptors are available for Paymentech direct debit and credit card processing. You can add to these statements:
-
Your DBA name
-
Your product name
-
A customer service phone number (instead of your headquarters city)
Visa gives a discount, the Visa PS2000 Direct Marketing interchange rate, to companies that provide a customer service number in this manner.
Use this format for DBA name, product name, and phone entries:
- dm_fusa     sd_merchant_dba          DBA
- dm_fusa     sd_merchant_pdt          ProductName
- dm_fusa     sd_merchant_phone        800-XXXXXXX
The value for merchant is described in "About Merchant Numbers and Account Identifiers".
On the customer's statement, an asterisk is used to separate the DBA name and product name. If the entry is longer than 22 characters (including spaces), it is truncated on the statement. In this 22-character-maximum line, the asterisk delimiter can appear in position 4, 8, or 13.
For example, if the merchant is psi, the DBA name is BRM, the pdt (product) is internetSVC, and customer service number is 800-555-1234, use the following entries:
- dm_fusa        sd_psi_dba       BRM
- dm_fusa        sd_psi_pdt       InternetSVC
- dm_fusa        sd_psi_phone     800-555-1234
For more information on soft descriptors, see "Adding Soft Descriptor Information" and the Paymentech specifications.
To use multiple DBA names, product names, or phone numbers, you must customize the PCM_OP_PYMT_POL_PRE_COLLECT policy opcode.
Implementing a Direct Debit Payment Method
This section explains how to implement a direct debit payment method with BRM.
Direct Debit Options
BRM provides you with the following options for charging customers using a direct debit payment method:
-
A direct debit method using the Paymentech payment processing service. See "Enabling Direct Debit Processing" for details.
-
Tools for creating a direct-debit-processing implementation using the bank of your choice. See "Implementing a Custom Direct Debit Payment Method".
Caution:
To avoid corrupting your database, perform the instructions in this section on a test system. You will re initialize your database with schema changes as the last step of this process.
Direct Debit Installation
Before installation, change the default values for these entries in the BRM_Home/setup/pin_setup.values file before you run the pin_setup script at installation:
$INIT_DDEBIT = "YES";
$SETUP_DROP_ALL_TABLES = "YES";
If you did not set these values when you installed BRM, you must do so and reinstall.
Direct Debit Components
To process Paymentech and BRM payment methods, BRM includes:
-
Objects
-
Opcodes
-
DMs
-
/payinfo storable classes
-
DLLs
-
Entries for the default bill types in the /config/payment storable object
You can add other billing and payment methods that you need for your business, and customize the payment interface for those bill types.
Implementing a Custom Direct Debit Payment Method
This section describes how to add a custom direct debit payment method to your BRM system. See "Direct Debit Installation" for important installation information.
Overview of Adding a Custom Direct Debit Implementation
To implement a payment interface for other bill types:
-
Create /payinfo storable classes as required. See "Creating /payinfo Storable Classes".
-
Modify Customer Center to support communications between Customer Center and the modular payment interface. See "Modifying Customer Center".
-
Create new opcodes as required. See "Creating Opcodes".
-
Create new event storable classes as required. See "Creating Event Storable Classes".
-
Create a Data Manager. See "Creating a Data Manager".
-
Update the /config/payment storable object to support new opcodes. See "Updating the /config/payment Storable Object".
-
View payment information for a custom payment method to see the options. See ”Viewing Payment Information for a Custom Payment Method” in BRM Managing Customers.
Note:
Whenever you add opcodes, opcode flags, or new event types to BRM, you must also then edit the init_objects_ddebit.source file and run the pin_init script.
Creating /payinfo Storable Classes
Your new class is a subclass of the /payinfo storable class with information specific to the new payment method. The information contained in the object instances of your new subclass comes from account creation. For each new payment method:
-
Determine what information you require to bill the customer correctly.
-
Create a storable class to store that information.
For information on creating new subclasses, see ”Creating Custom Fields and Storable Classes” in BRM Developer's Guide.
Modifying Customer Center
To get payment information from and to support data entry for the new payment methods in Customer Center, you must modify Customer Center. See ”Using Customer Center SDK” in BRM Developer's Guide.
Creating Opcodes
To manipulate objects derived from your new storable class, create opcodes and Facilities Modules to implement them. For more information, see ”Writing a Custom Facilities Module” in BRM Developer's Guide.
Creating Event Storable Classes
Your direct debit implementation will probably require you to add information to the existing BRM default /event/billing classes.
This list should cover what you will be adding. Add a subclass if needed:
-
/event/billing/charge
-
/event/billing/payment
-
/event/billing/recover
-
/event/billing/refund
-
/event/billing/validate
For example, to extend /event/billing/charge for a program called my_dd, the class name would be /event/billing/charge/my_dd.
These storable classes are good models for what you'll need. They are used for BRM's default payment methods:
-
/event/billing/charge/cc
-
/event/billing/charge/dd
For information on creating storable classes, see ”Creating Custom Fields and Storable Classes” in BRM Developer's Guide.
Creating a Data Manager
You must create a Data Manager (DM) if collection or validation of your new payment method requires interaction with an external system. For information on creating a DM, see ”Writing a Custom Data Manager” in BRM Developer's Guide.
Updating the /config/payment Storable Object
When you add a new payment method, you must update the /config/payment storable object. See ”Customizing Payment Methods” in BRM Managing Customers.
For information on how to view custom payment information in Customer Center, see ”Viewing Payment Information for a Custom Payment Method” in BRM Managing Customers.