 Understanding UCAS and GTTR Data Processing
This chapter includes all the previous bundle documentation up to Bundle 14.
This chapter provides an overview of Universities and Colleges Admissions Service (UCAS) and Graduate Teacher Training Registry (GTTR) data processing, and discusses how to:
Prepare for UCAS and GTTR data processing.
Process UCAS and GTTR reference data.
Import UCAS and GTTR applications and applicant data.
Review imported UCAS and GTTR applications and applicant data.
Process imported UCAS and GTTR applications and applicant data.
Understanding UCAS and GTTR Data ProcessingUCAS is the UK central body that receives and processes admission applications. Applicants apply to UCAS. UCAS then distributes the applications to the institutions. Institutions communicate the admission decision to UCAS rather than directly to the applicant.
UCAS provides an Open Database Connectivity (ODBC) link to which participating institutions can connect to import applications and send back admission decision details to UCAS. UCAS then communicates the decision details to the applicants. PeopleSoft Campus Solutions enables you to connect to the UCAS database to import full-time undergraduate (FTUG) and GTTR applications, process the imported applications, and send back the admission decision details to UCAS.
UCAS provides database views through which institutions import data. For example, the ivStarA database view contains the applicant's contact details, including address and phone number. Refer to the ODBC-link Technical Manual for information about the database views, its field descriptions, and the transactions that are exchanged between UCAS and the academic institution. This manual is available to UCAS subscribers from the UCAS website.
To import and process UCAS and GTTR applications:
Set up options, including the database link to UCAS.
Import reference data, such as ethnic codes, country codes, and application statuses, from UCAS.
Review the imported reference data.
In some cases, you must map the reference data to the Campus Solutions data, for example, UCAS country codes to Campus Solutions country codes.
Import applications and applicant data from UCAS.
Review and correct errors in the imported applications.
Enter admission decisions for the imported applications.
Communicate the decisions back to UCAS as transactions.
Import any changes to the applicant or applications data maintained by UCAS.
Data changes that you import from UCAS could be offer responses.
Each combination of an institution and a UCAS course is referred to as a choice. This diagram provides an overview of the process:
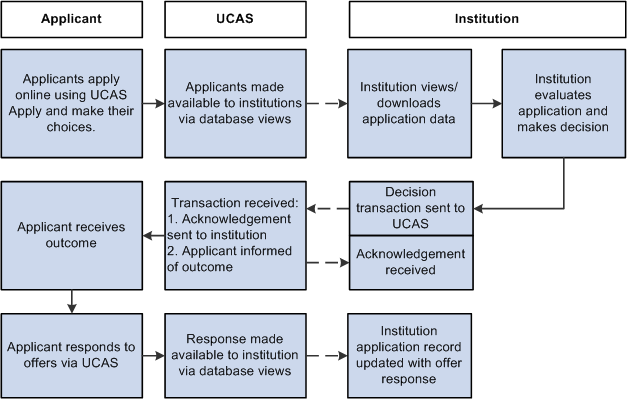
Process flow of importing and processing UCAS applications
When the applicant responds to an offer and when his or her exam results are available, the institution confirms or rejects the conditional offer by comparing the applicant's exam results with the conditions. Campus Solutions enables you to import the exam results, match the results with the offer conditions and process Confirmation decisions.
An applicant who does not have an admission offer becomes eligible for Clearing. Also, an applicant can register with UCAS for Adjustment if he or she wants to apply for another course. Campus Solutions supports Confirmation, Clearing, and Adjustment processing for the 2009 and 2010 admissions cycle.
The UCAS Admissions Guide and Decision Processing Manual provide more information about Confirmation, Clearing, and Extra. This guide and manual are available to subscribers from the UCAS website.
Preparing for UCAS and GTTR Data Processing
Before you can import and process UCAS and GTTR data, you must set up your system as follows:
Enable the UK fields for all institutions.
Enable the UK fields for a specific institution.
Set up UCAS and GTTR options.
Set up UCAS application import defaults.
Set up GTTR application import defaults.
Set up UCAS and GTTR decision approval options.
Set up UCAS program action reasons.
Set up GTTR program action reasons.
Set up UCAS and GTTR program action reasons for Confirmation, Clearing, and Adjustment.
Map UCAS and GTTR entry years and months.
Map UCAS entry points.
Map UCAS attendance types.
Set up UCAS and GTTR user defaults.
Define external systems.
Set up National ID Types for country code GBR.
 Pages Used to Prepare for UCAS and GTTR Data Processing
|
Page Name |
Definition Name |
Navigation |
Usage |
|
SA Features |
SCC_INSTALL_SA2 |
Set Up SACR, Install, Student Admin Installation, SA Features |
Enable the UK-specific fields on the Campus Solutions pages for all institutions. |
|
Academic Institution 6 |
SSR_INST_FEATURES |
Set Up SACR, Foundation Tables, Academic Structure, Academic Institution Table, Academic Institution 6 |
Enable the UK-specific fields on the Campus Solutions pages for a specific institution. |
|
UCAS Configuration |
SAD_UC_CONFIG |
Set Up SACR, Product Related, Recruiting and Admissions, UCAS, UCAS Configuration, UCAS Configuration |
For an institution, set up the UCAS institution code, current admissions cycle year, application import options, address usage value, and link to the UCAS database. |
|
UCAS Application Import |
SAD_UC_CONFIG2 |
Set Up SACR, Product Related, Recruiting and Admissions, UCAS, UCAS Configuration, UCAS Application Import |
For an institution, set up the default values that the import process uses to create the Campus Solutions application records for the ivStarC application data. |
|
GTTR Application Import |
SAD_UC_GT_CONFG |
Set Up SACR, Product Related, Recruiting and Admissions, UCAS, UCAS Configuration, GTTR Application Import |
For an institution, set up the default values that the import process uses to create the Campus Solutions application records for the ivgStarG application data. |
|
UCAS Decision Approval |
SAD_UC_DECN_SETUP |
Set Up SACR, Product Related, Recruiting and Admissions, UCAS, UCAS Configuration, UCAS Decision Approval |
Indicate whether approval is required for UCAS application, Confirmation, and Release into Clearing decisions. |
|
GTTR Decision Approval |
SAD_UC_GDEC_SETUP |
Set Up SACR, Product Related, Recruiting and Admissions, UCAS, UCAS Configuration, GTTR Decision Approval |
Indicate whether approval is required for GTTR application decisions. |
|
UCAS Program Actions |
SAD_UC_UPRG_SETUP |
Set Up SACR, Product Related, Recruiting and Admissions, UCAS, UCAS Configuration, UCAS Program Actions |
Define the program actions and reason values that the system uses when an update to a UCAS application choice requires an update to the program action and action reason values of the corresponding Campus Solutions application record. |
|
GTTR Program Actions |
SAD_UC_GPRG_SETUP |
Set Up SACR, Product Related, Recruiting and Admissions, UCAS, UCAS Configuration, GTTR Program Actions |
Define the program actions and reason values that the system uses when an update to a GTTR application choice requires an update to the program action and action reason values of the corresponding Campus Solutions application record. |
|
UCAS Confirmation |
SAD_UC_CONF_SETUP |
Set Up SACR, Product Related, Recruiting and Admissions, UCAS, UCAS Configuration, UCAS Confirmation |
Define the program actions and reason values that the system uses for UCAS Confirmation, Clearing, and Adjustment. |
|
GTTR Confirmation |
SAD_UC_GCNF_SETUP |
Set Up SACR, Product Related, Recruiting and Admissions, UCAS, UCAS Configuration, GTTR Confirmation |
Define the program actions and reason values that the system uses for GTTR Confirmation processing and for Clearing Elsewhere. |
|
Attendance Type |
SAD_UC_ATTTYPEM |
Set Up SACR, Product Related, Recruiting and Admissions, UCAS, Mappings, Attendance Type |
Map UCAS attendance types to Campus Solutions academic levels. The system uses this mapping when you import ivEducation and ivgEducation data to create Campus Solutions external education records. |
|
Entry Year |
SAD_UC_ENTRYYRM |
Set Up SACR, Product Related, Recruiting and Admissions, UCAS, Mappings, Entry Year |
Map UCAS entry year and month to a Campus Solutions admit term. You can map multiple combinations of entry year and month to a Campus Solutions admit term. You define admit terms on the Term Table page. For information about defining term tables, see PeopleSoft Enterprise Campus Solutions 9.0 Application Fundamentals PeopleBook,"Establishing Terms and Sessions." |
|
Entry Point |
SAD_UC_ENT_PT |
Set Up SACR, Product Related, Recruiting and Admissions, UCAS, Mappings, Entry Point |
Map UCAS entry points to Campus Solutions academic levels and careers. The system uses this mapping when you import UCAS applications and when you create transactions to send to UCAS. |
|
UCAS, GTTR Defaults |
SAD_UC_USR_DEFAULT |
Set Up SACR, User Defaults, UCAS, GTTR Defaults |
Set up user defaults that aid in data entry and search. |
|
External System |
SCC_EXT_SYS_TBL |
Setup SACR, Product Related, Campus Community, Define Campus Community, Set Up, Define External Systems |
Specify the external systems for UCAS. |
|
National ID Type Table |
NID_TYPE_TABLE |
Set Up HRMS, Foundation Tables, Personal, National ID Type |
Assign UCASID and GTTRID national ID types to the country code GBR. |
Enabling the UK Fields for All InstitutionsAccess the SA Features page (Set Up SACR, Install, Student Admin Installation, SA Features).
Select the HESA, UCAS check box to enable UK-specific fields in the system for all academic institutions.
Enabling the UK Fields for a Specific InstitutionAccess the Academic Institution 6 page (Set Up SACR, Foundation Tables, Academic Structure, Academic Institution Table, Academic Institution 6).
Select the HESA, UCAS check box to enable UK-specific fields in the system for a specific institution.
Setting Up UCAS and GTTR OptionsAccess the UCAS Configuration page (Set Up SACR, Product Related, Recruiting and Admissions, UCAS, UCAS Configuration, UCAS Configuration).
|
UCAS Institution Code |
Enter the institution code that UCAS supplied to your institution. |
|
UCAS Cycle |
Enter the admission cycle for which you want to import data from UCAS. The system uses this value to determine the effective term for creating new person residency records for applicants. You must enter the new cycle value when UCAS makes updated views for the new cycle available through the ODBC-link. The system uses this value to determine which new fields must be imported. For example, the system imports the new ivStarK fields added by UCAS for 2010 only if the UCAS cycle is 2010 or greater. |
Application Import
|
HESA Data Import |
Select to indicate how the system should update or add the Instance field values in your database when you import data from ivStarJ and ivgStarJ. Do not select a value if you do not want to update the Instance field values with the imported data. Select Update all values to overwrite Instance field values with the imported values. Select Update only null values to add imported values to Instance fields that do not have any values. |
|
Default Marital Status |
Select the default marital status value that the system should assign to the imported applicant records. |
|
Update Matriculated Students |
Select if you want the system to automatically update Person HESA Data records of matriculated students when you import person data from ivStarA, ivgStarA, ivStarN, and ivgStarN. If you do not select this check box, the system does not update the matriculated student records when you import the person data. |
System Setup
|
Database Link |
Enter the name of the ODBC database link that the system uses to connect to UCAS. You can create a database link to UCAS by running the following command: CREATE PUBLIC DATABASE LINK link name CONNECT TO user_name IDENTIFIED BY password USING 'service_name' link name is the value you enter in the Database Link field of the UCAS Configuration page. UCAS supplies the link name, user_name, password, and service_name values to institutions. Refer to the ODBC-link Technical Manual for more information about connecting to the UCAS database. |
|
UCAS |
Select if you want to import UCAS applicant and application data. If you do not select this check box, the import process does not load the UCAS data into the Campus Solutions tables. The UCAS-specific pages (such as the UCAS Decision Approval page) appear on the UCAS Configuration component only if you select this check box. |
|
GTTR |
Select if you want to import GTTR applicant and application data. If you do not select this check box, the import process does not load the GTTR data into the Campus Solutions tables. The GTTR-specific pages (such as the GTTR Decision Approval page) appear on the UCAS Configuration component only if you select this check box. |
|
Import Live Data from UCAS |
Select if you want to import live data from UCAS or GTTR into the Campus Solutions tables through the staging tables. UCAS data that contains errors will remain in the staging table. If you do not select this check box, the import process posts the data from the staging tables to the Campus Solutions tables. For example, clear this check box if you have corrected the staging data and now you want to load the staging table data into the Campus Solutions tables. |
|
Campus Used |
Select if you have multiple institution campuses for UCAS or GTTR admissions. Clear if you have a single institution campus for UCAS or GTTR admissions. |
|
Disable Decision Link |
Select to disable the Decision Entry link on the UCAS Applicant Summary page (Student Admissions, UCAS Processing, UCAS Applications, UCAS Applicant Summary) and the GTTR Applicant Summary page (Student Admissions, UCAS Processing, GTTR Applications, GTTR Applicant Summary). |
Address Usage
The system uses these values when it imports applicant address data from ivStarA and ivgStarA views.
|
Correspondence Address Type |
Select the address type that you want the import process to assign to the imported correspondence addresses. |
|
Home Address Type |
Select the address type that you want the import process to assign to the imported home addresses. The home and correspondence address values must be different. |
|
Telephone Type |
Select the phone type that you want the import process to assign to the imported telephone numbers. |
|
Mobile Phone Type |
Select the phone type that you want the import process to assign to the imported mobile phone numbers. |
|
Email Type |
Select the email type that you want the import process to assign to the imported email addresses. |
For information about defining address types, see PeopleSoft Enterprise HRMS 9.0 Application Fundamentals PeopleBook, "Setting Up Personal Information Foundation Tables."
Setting Up UCAS Application Import Defaults Access the UCAS Application Import page (Set Up SACR, Product Related, Recruiting and Admissions, UCAS, UCAS Configuration, UCAS Application Import).
When you import ivStarC application data for the first time, the system creates Campus Solutions application records for the imported data. You can use the Maintain Applications component to access the Campus Solutions application records. The import process uses the values you set up on the UCAS Application Import page to create the Campus Solutions application records for the imported ivStarC application data.
|
Initial Action Reason |
Enter the default action reason that you want the import process to assign to the Campus Solutions application records related to the imported ivStarC application data. Define the initial action reasons in the Program Action Table page. Only action reasons mapped with the program action of APPL appear on the UCAS Application Import page. For information about setting up action reasons, see PeopleSoft Enterprise Recruiting and Admissions 9.0 PeopleBook, "Setting Up Admissions Program Actions and Program Action Reasons." |
|
Admit Type |
Enter the admit type that you want the import process to assign to the Campus Solutions application records related to the imported ivStarC application data. Define the admit types in the Admit Type Table page. If you have defined an admit type for a career, ensure that the Admit Type in the UCAS Application Import page matches the career that is associated with the ivStarC application data. |
|
Academic Level |
Select the default academic level that you want the import process to assign to the Campus Solutions application records related to the imported ivStarC application data. Values for this field are delivered with your system as translate values. The import process assigns this default value only if you do not map the academic levels to entry points on the Entry Point Mapping page. |
|
Application Center |
Select the default application center that you want the import process to assign to the Campus Solutions application records related to the imported ivStarC application data. The import process uses this default value only if you do not map application centers to UCAS courses and Campus Solutions careers, programs, and plans on the UCAS Course page. Define the application processing centers in the Application Center Table page. If you have defined an application center for a career, ensure that the application center selected on the UCAS Application Import page matches the career with which the ivStarC application data is associated. |
|
Application Fee Type |
Select the application fee type that you want the import process to assign to the Campus Solutions application records related to the imported ivStarC application data. Values for this field are delivered with your system as translate values. |
|
Application Method |
Select the application method that you want the import process to assign to the Campus Solutions application records related to the imported ivStarC application data. Values for this field are delivered with your system as translate values. |
|
Campus |
Enter the default campus that you want the import process to assign to the Campus Solutions application records related to the imported ivStarC application data. Values for this field are delivered with your system as translate values. The import process assigns the default value only if you do not map a campus to UCAS courses and Campus Solutions careers, programs, and plans on the UCAS Course page. |
|
UCAS Course Code |
Enter the default course code that you want the import process to assign to the imported ivStarC application data. The import process assigns the default value only to imported applications that do not have a course code. |
|
Earliest Application Year |
Enter the application year for which you want the process to import applications. Valid values are 2009 or 2010. If you leave the field blank, the import process may import applications from ivStarC for both previous and current admission cycles depending on timestamp values. Suppose, your institution is implementing Campus Solutions UCAS for the 2010 cycle (the UCAS cycle is 2010 on the UCAS Configuration page). The institution wants to prevent the import of 2009 applications. In this case, enter 2010 in the Earliest Application Year field. |
Note. The import process assigns the academic load of Full time and the notification plan of Regular to the Campus Solutions application records related to the imported ivStarC application data. The values Full time, Part time, and Regular are delivered with your system as translate values.
Setting Up GTTR Application Import DefaultsAccess the GTTR Application Import page (Set Up SACR, Product Related, Recruiting and Admissions, UCAS, UCAS Configuration, GTTR Application Import).
When you import ivgStarG application data for the first time, the system creates Campus Solutions application records for the imported data. You can use the Maintain Applications component to access the Campus Solutions application records. The import process uses the values you set up on the GTTR Application Import page to create the Campus Solutions application records for the imported ivgStarG application data.
|
Initial Action Reason |
Enter the default action reason that you want the import process to assign to the Campus Solutions application records related to the imported ivgStarG application data. If you do not enter an initial action reason, the system creates Campus Solutions application records with an APPL program action and no action reason for the imported ivgStarG application data. Define the initial action reasons in the Program Action Table page. Only action reasons mapped with the program action of APPL appear on the GTTR Application Import page. |
|
Admit Type |
Enter the admit type that you want the import process to assign to the Campus Solutions application records related to the imported ivgStarG application data. Define the admit types on the Admit Type Table page. If you have defined an admit type for a career, ensure that the default Admit Type on the GTTR Application Import page matches the career with which the ivgStarG application data is associated. |
|
Academic Level |
Select the academic level that you want the import process to assign to the Campus Solutions application records related to the imported ivgStarG application data. Values for this field are delivered with your system as translate values. |
|
Application Center |
Select the default application center that you want the import process to assign to the Campus Solutions application records related to the imported ivgStarG application data. The import process uses this default value only if you do not map application centers to GTTR courses and Campus Solutions careers, programs, and plans on the GTTR Course page. Define the application processing centers in the Application Center Table page. If you have defined an application center for a career, ensure that the application center selected in the GTTR Application Import page matches the career with which the ivgStarG application data is associated. |
|
Application Fee Type |
Select the application fee type that you want the import process to assign to the Campus Solutions application records related to the imported ivgStarG application data. Values for this field are delivered with your system as translate values. |
|
Application Method |
Select the application method that you want the import process to assign to the Campus Solutions application records related to the imported ivgStarG application data. Values for this field are delivered with your system as translate values. |
|
Campus |
Enter the default campus that you want the import process to assign to the Campus Solutions application records related to the imported ivgStarG application data. Values for this field are delivered with your system as translate values. The import process assigns the default value only if you do not map a campus to GTTR courses and Campus Solutions careers, programs, and plans on the GTTR Course page. |
|
GTTR Course Code |
Enter the default course code that you want the import process to assign to the imported ivgStarG application data. The import process assigns the default value only to imported applications that do not have a course code. |
|
Earliest Application Year |
Enter the application year for which you want the process to import applications. Valid values are 2009 or 2010. If you leave the field blank, the import process may import applications from ivgStarG for both previous and current admission cycles depending on timestamp values. Suppose, your institution is implementing Campus Solutions GTTR for the 2010 cycle (the UCAS cycle is 2010 on the UCAS Configuration page). The institution wants to prevent the import of 2009 applications. In this case, enter 2010 in the Earliest Application Year field. |
Note. The import process assigns the notification plan of Regular to the Campus Solutions application records related to the imported ivgStarG application data. Additionally, the import process assigns the academic load of Full time or Part Time based on the value of the PartTime field in the imported ivgStarG record. The values Full time, Part time, and Regular are delivered with your system as translate values.
Setting Up UCAS Decision Approval OptionsAccess the UCAS Decision Approval page (Set Up SACR, Product Related, Recruiting and Admissions, UCAS, UCAS Configuration, UCAS Decision Approval).
Select the Interview, Unconditional Offer, Conditional Offer, Rejection, and Withdrawal check boxes to indicate that a user must use one of the UCAS Decision Approval processing pages to review and approve the decisions before the institution communicates the decisions to UCAS.
See Approving or Rejecting a UCAS Decision.
See Approving or Rejecting Multiple UCAS Decisions.
Select the Confirmation Acceptance and Confirmation Rejection check boxes to indicate that a user must use the UCAS Confirmation Approval page or the Quick Confirmation Approval page to review and approve the UCAS Confirmation decision before the institution communicates the decisions to UCAS.
See Approving or Rejecting a Confirmation Decision.
See Approving or Rejecting Multiple Confirmation Decisions.
Select the Release to Clearing check box to indicate that a user must use the UCAS Release Approval page to review and approve the release before the institution communicates the decisions to UCAS.
See Approving or Rejecting the Release into Clearing Decision.
Setting Up GTTR Decision Approval OptionsAccess the GTTR Decision Approval page (Set Up SACR, Product Related, Recruiting and Admissions, UCAS, UCAS Configuration, GTTR Decision Approval).
Select the Interview, Unconditional Offer, Conditional Offer, Rejection, and Withdrawal check boxes to indicate that a user must use the GTTR Decision Approval processing page to review and approve the decisions before the institution communicates the decisions to GTTR. To navigate to the GTTR Decision Approval processing page, select Student Admissions, UCAS Processing, GTTR Decision Approval, Decision Approval.
See Approving or Rejecting a GTTR Decision.
The Confirmation Acceptance and Confirmation Rejection check boxes do not have any impact on the system.
Setting Up UCAS Program Action ReasonsAccess the UCAS Program Actions page (Set Up SACR, Product Related, Recruiting and Admissions, UCAS, UCAS Configuration, UCAS Program Actions).
Institution Decisions
When you generate decision transactions to send to UCAS, the system uses the Institution Decisions group box values to update the Campus Solution application records (related to the imported application data). The following table describes when the system uses the program action and reason values for the institution decisions:
|
Program Action and Action Reason Values For |
Used by the System When |
|
Conditional Offer |
You make a conditional offer. |
|
Amended Conditional Offer |
You amend a decision to conditional offer. This decision is applicable to an LA transaction. |
|
Unconditional Offer |
You make an unconditional offer. |
|
Amended Unconditional Offer |
You amend a decision to unconditional offer. This decision is applicable to an LA transaction. |
|
Rejection |
You reject an application. |
|
Amended Rejection |
You amend a decision to rejection. This decision is applicable to an LA transaction. |
|
Interview |
You enter a decision of interview. |
|
Amended Interview |
You amend a decision to interview. This decision is applicable to an LA transaction. |
|
Course Full |
You enter a decision of course full. |
|
Amended Course Full |
You amend a decision to course full. This decision is applicable to an LA transaction. |
|
Withdrawal |
Your institution withdraws an application. |
|
Amended Withdrawal |
You amend a decision to be withdrawn by the institution. This decision is applicable to an LA transaction. |
|
UF Withdrawal - Institution |
Applicant declines the offer. This decision is applicable to an RW transaction. |
|
UF Amendment |
You amend a course, entry date, or entry point of an applicant who has a conditional offer or who has accepted a Clearing place. This decision is applicable to an RA transaction. |
|
Course Correction |
You correct a course. The system uses this decision to create an LC (Course Correction) transaction to send to UCAS. |
Applicant Replies
The system uses the Applicant Replies group box values when the Reply values you imported change. The following table describes when the system uses the program action and reason values for the applicant reply decisions:
|
Program Action and Action Reason Values For |
Used by the System When |
|
Conditional Firm |
The applicant accepts a conditional offer firmly. |
|
Conditional Insurance |
The applicant accepts a conditional offer as insurance. |
|
Unconditional Firm |
The applicant accepts an unconditional offer firmly. |
|
Unconditional Insurance |
The applicant accepts an unconditional offer as insurance. |
|
Conditional Decline |
The applicant declines a conditional offer. |
|
Unconditional Decline |
The applicant declines an unconditional offer. The applicant declines an unconditional offer made by your institution for an Adjustment choice (Choice Number = 6, Decision = U, Reply = D and Adjustment is not D). |
UCAS Amendments
The system uses the UCAS Amendments group box values when UCAS initiates changes and you import these changes from ivStarC and ivStarK. The following table describes when the system uses the program action and reason values for the UCAS amendments:
|
Program Action and Action Reason Values For |
Used by the System When |
|
Changed Course |
UCAS changes a course. |
|
Changed Campus |
UCAS changes a campus. |
|
Changed Entry Point |
UCAS changes an entry point. |
|
Changed Term |
UCAS changes entry year, entry month, or both, which results in a change of admit term for the applicant. |
|
Cancelled Choice |
UCAS cancels an application choice (in ivStarC, the value of the ChoiceCancelled field is Y). |
|
Withdrawal - UCAS |
UCAS either notifies that the applicant has withdrawn all application choices (in ivStarK, the value of the Withdrawn field is C) or applicant has withdrawn only one choice (in ivStarC, the value of Decision is W). |
|
UF Withdrawal - UCAS |
Applicants with an unconditional firm offer for an application choice notify UCAS that they want to withdraw their applications (in ivStarK, the value of the Withdrawn field is U). |
|
Withdrawal Re-instated |
UCAS notifies that a previously withdrawn application choice can be considered by the institution. The system uses the Withdrawal Re-instated field values when UCAS changes the ivStarC decision value to blank from W. Note that the system does not process the R values for the ivStarK Withdrawn fields. This change is not specific to an application choice; as a consequence, the system does not process this change when you import data. To process this type of change, you must change the decision value to blank from W for an application choice. |
|
Reject by Default |
UCAS rejects the application because your institution did not communicate any decision to UCAS (in ivStarC, the Action field is R). |
|
Decline by Default |
UCAS declines an offer because the applicant did not reply (in ivStarC, the Action field is D). Note that in ivStarC, if the Action field is U (updated from insurance to firm, CI to CF, or UI to UF), then the system picks up the change in the ivStarC Reply value. |
The following scenario shows how Campus Solutions uses the values set up on the UCAS Program Actions page:
On the UCAS Program Actions page, for the Rejection decision enter a program action of DENY and an action reason of R.
Enter a decision of Rejection for a UCAS application on the Initial Decision Entry page. If approval is required, use the UCAS Decision Approval page to approve the Rejection decision.
Select the Generate Transaction check box on the Transaction Processing page and run the Transaction Processing Application Engine (SAD_UC_TRAN) process to generate a transaction for the Rejection decision.
The system sets the program action to DENY and the action reason to R in the Campus Solutions application record of the corresponding UCAS application number.
Setting Up GTTR Program Action ReasonsAccess the GTTR Program Actions page (Set Up SACR, Product Related, Recruiting and Admissions, UCAS, UCAS Configuration, GTTR Program Actions).
Institution Decisions
When you generate GTTR decision transactions, the system uses the Institution Decisions group box values to update the Campus Solution application records (related to the imported GTTR application data). The following table describes when the system uses the program action and the reason values for the institution decisions:
|
Program Action and Action Reason Values For |
Used by the System When |
|
Conditional Offer |
You make a conditional offer. |
|
Amended Conditional Offer |
You amend a decision to conditional offer. This decision is applicable to an LA transaction. |
|
Unconditional Offer |
You make an unconditional offer. |
|
Amended Unconditional Offer |
You amend a decision to unconditional offer. This decision is applicable to an LA transaction. |
|
Rejection |
You reject an application. |
|
Amended Rejection |
You amend a decision to rejection. This decision is applicable to an LA transaction. |
|
Rejection - English |
You enter a decision of Not qualified in English. |
|
Amended Rejection - English |
You amend a decision to Not qualified in English. This decision is applicable to an LA transaction. |
|
Rejection - Maths |
You enter a decision of Not qualified in Mathematics. |
|
Amended Rejection - Maths |
You amend a decision to Not qualified in Mathematics. This decision is applicable to an LA transaction. |
|
Rejection - Science |
You enter a decision of Not qualified in Science. |
|
Amended Rejection - Science |
You amend a decision to Not qualified in Science. This decision is applicable to an LA transaction. |
|
Course Closed |
You enter a decision of Course Closed. |
|
Amended Course Closed |
You amend a decision to Course Closed. This decision is applicable to an LA transaction. |
|
Interview |
You enter a decision of Interview and specify the interview date for the transaction. |
|
Amended Interview |
You amend a decision to Interview and specify the interview date for the transaction. This decision is applicable to an LA transaction. |
|
Withdrawal |
Your enter a decision of Withdrawal. |
|
Amended Withdrawal |
You amend a decision to Withdrawal. This decision is applicable to an LA transaction. |
The UF Withdrawal - Institution field values are not required until RW processing functionality for GTTR is added in a future release.
Applicant Replies
The system uses the Applicant Replies group box values when the Reply values you imported change. The following table describes when the system uses the program action and the reason values for the applicant replies:
|
Program Action and Action Reason Values For |
Used by the System When |
|
Conditional Firm |
The applicant accepts a conditional offer firmly. |
|
Unconditional Firm |
The applicant accepts a unconditional offer firmly. |
|
Conditional Decline |
The applicant declines a conditional offer. |
|
Unconditional Decline |
The applicant declines an unconditional offer. |
GTTR Amendments
The system uses the GTTR Amendments group box values when GTTR initiates changes and you import these changes from ivgStarG and ivgStarK. The following table describes when the system uses the program action and the reason values for the GTTR amendments:
|
Program Action and Action Reason Values For |
Used by the System When |
|
Changed Course |
GTTR changes a course. |
|
Changed Campus |
GTTR changes a campus. |
|
Changed Term |
GTTR changes entry year, entry month, or both, resulting in a change of admit term for the applicant. |
|
Withdrawal - GTTR |
GTTR notifies that the applicant has withdrawn all application choices (in ivgStarK, Withdrawn field is C or in ivgStarG, Decision field is W). |
|
UF Withdrawal - GTTR |
Applicants with an unconditional firm offer for an application choice notify UCAS that they want to withdraw their applications (in ivgStarK, Withdrawn field is U). |
|
Withdrawal Re-instated |
GTTR notifies that a previously withdrawn application choice can be considered by the institution. The system uses the Withdrawal Re-instated field values when GTTR changes the ivgStarG decision value to blank from W. Note that the system does not process the R values for the ivgStarK Withdrawn fields. This change is not specific to an application choice and, as a consequence, the system does not process this change when you import data. To process this type of change, you must change the decision value to blank from W for an application choice. |
|
Reject by Default |
GTTR rejects the application because your institution did not communicate any decision to UCAS (in ivgStarG, Action field is R). |
|
Decline by Default |
GTTR declines an offer because the applicant did not reply (in ivgStarG, Action field is D). |
Setting Up UCAS Program Action Reasons for Confirmation, Clearing,
and AdjustmentAccess the UCAS Confirmation page (Set Up SACR, Product Related, Recruiting and Admissions, UCAS, UCAS Configuration, UCAS Confirmation).
UCAS Confirmation Decisions
When the system generates UCAS confirmation transactions (RD transactions), it uses the UCAS Confirmation Decisions group box values to update the Campus Solutions application records (related to the imported UCAS application data). The following table describes when the system uses the program action and reason values for the UCAS Confirmation decisions:
|
Program Action and Action Reason Values For |
Used by the System When |
|
Accept Firm |
The institution confirms acceptance for a conditional firm application. That is, Decision is A (Accept) and Reply is F (Firm). Also, the system uses this value in ivStarC update processing when the Reply changes to F, the Decision is U, and the application was previously CF. |
|
Accept Insurance |
The institution confirms acceptance for a conditional insurance application. That is, Decision is A and Reply is I (Insurance). |
|
Reject Firm |
The institution confirms rejection for a conditional firm application. That is, Decision is R (Reject) and Reply is F. |
|
Reject Insurance |
The institution confirms rejection of a conditional insurance application. That is, Decision is R and Reply is I. |
|
Amended Confirmation |
You change a Confirmation decision. |
|
Confirmation with Change |
You change Course or Year as part of a Confirmation decision. That is, Decision is C (Conditional Offer) in an RD transaction. |
For an applicant, you can enter the institution decision and view the applicant reply on the Initial Decision Entry page and the Decision Processing page.
See Entering an Initial Admission Decision for a UCAS Application Choice.
See Entering or Updating an Admission Decision for a UCAS Application Choice.
See Entering a Decision for Multiple UCAS Application Choices.
UCAS Confirmation Amendments
When you receive Confirmation amendments from UCAS, the system uses the UCAS Confirmation Amendments group box values to update the Campus Solution application records (related to the imported UCAS application data). The following table describes when the system uses the program action and the reason values for the UCAS Confirmation amendments:
|
Program Action and Action Reason Values For |
Used by the System When |
|
UF Elsewhere |
The applicant is UF (unconditional firm) at another institution and the local choice is UI (unconditional insurance) or CI (conditional insurance). |
|
Clearing Elsewhere |
Another institution has accepted the applicant through Clearing. |
|
Adjustment Decline |
Another institution has accepted the applicant through Adjustment. |
|
UI to UF at Confirmation |
An unconditional insurance offer becomes firm as a result of the applicant's conditional firm choice being rejected at Confirmation. That is, Decision is U, Reply is F, and the previous Reply value was I. |
UCAS Enquiry
During the Clearing and Adjustment processes, the system uses the UCAS Enquiry group box values to create or update the Campus Solutions application records. The following table describes when the system uses the program action and the reason values for the UCAS Clearing and Adjustment decisions:
|
Program Action and Action Reason Values For |
Used by the System When |
|
Adjustment Acceptance |
You import Adjustment applications (for which the institution has sent AD transactions) and the system updates the corresponding Campus Solutions application record. |
|
Clearing Application |
You import Clearing applications and the system creates the corresponding Campus Solutions application records for the imported Clearing applications. |
|
Clearing Acceptance |
You create a RX transaction (with Decision = A) and the system updates the corresponding Campus Solutions application record. You import an accepted Clearing application and the system creates a new Campus Solution application record for the accepted Clearing application (new application). You import an accepted Clearing decision (Result = A) and the system updates the Campus Solution application record with the result (existing application). |
|
Clearing Rejection |
You create a RX transaction (with Decision = R) and the system updates the corresponding Campus Solutions application record. You import a rejected Clearing decision (Result = R) and the system updates the Campus Solution application record with the result (existing application). |
|
Release to Clearing |
You create a RR transaction to notify UCAS that the applicant is released into Clearing and the system updates the corresponding Campus Solutions application record. |
|
RPA Applicant (record of prior acceptance applicant) |
EAS in ivStarK is R, and the system updates the corresponding Campus Solutions application record. |
Scenarios
The following scenarios show how Campus Solutions uses the values set up on the Confirmation page:
Scenario 1: Importing new Clearing applications (that is, application choice number 9 does not exist in the database)
For Clearing Application, enter the program action APPL (Application) and action reason CAP. For Clearing Acceptance, enter the program action ADMT and action reason CAC. For Clearing rejection, enter the program action DENY and action reason CR.
The Import Applicant Data Application Engine (SAD_UC_IMPAP) process imports UCAS Clearing application records from ivStarZ1. The imported UCAS Clearing application records have a choice number of 9.
If the Result value in ivStarZ1 is null for the Clearing application, the system creates a corresponding Campus Solutions application record with a program action of APPL and action reason of CAP.
If the Result value in ivStarZ1 is A for the Clearing application, the system creates a corresponding Campus Solutions application record with a program action of ADMT and action reason of CAC.
If the Result value in ivStarZ1 is R for the Clearing application, the system creates a corresponding Campus Solutions application record with a program action of DENY and action reason of CR.
For the new Clearing Campus Solutions application record that has a program action of APPL, you enter a decision A. After entering the decision you generate the RX transaction. In this case, the system updates the Campus Solutions application record with the program action of ADMT and action reason CAC.
Scenario 2: Confirming offers
For the Accept Firm decision enter a program action of ADMT and action reason of COF.
Click Accept on the UCAS Confirmation page for a UCAS application that has a conditional offer. If required, approve the acceptance of the admission offer.
Select the Generate Transaction check box on the Transaction Processing page and run the Transaction Processing process to generate a transaction for the Confirmation decision.
The system assigns the program action ADMT and action reason COF to the Campus Solutions application record for the corresponding UCAS application.
Scenario 3: Importing Adjustment Applications
For the Adjustment Acceptance decision, enter a program action of ADMT and action reason of ADA.
The Import Applicant Data process imports UCAS adjustment (choice number 6 ) records from ivStarC. For applications, which the institution has already sent AD transactions to UCAS, the incoming decision value is U and reply value is F.
If the incoming decision value is not U, the system creates a corresponding Campus Solutions application record with a program action of APPL and the action reason that you had set up on the UCAS Application Import page.
If the incoming decision value is U and reply is F, the system updates the corresponding Campus Solutions application record with a program action of ADMT and action reason of ADA.
If the incoming decision value is U, reply is D, and Adjustment is not D, the system updates the corresponding Campus Solutions application record with the program action and action reason values that you had set up for Unconditional Decline on the UCAS Program Actions page.
For the new Adjustment Campus Solutions application record that has a program action of APPL, the institution generates an AD transaction. In this case, the system updates the Campus Solutions application record with the program action of ADMT and action reason of ADA.
Scenario 4: An applicant has been accepted by another institution through Adjustment. Your institution previously sent an unconditional offer or a confirmation acceptance to UCAS that the applicant has firmly accepted (the applicant has an application choice with a decision reply value of UF).
For the Adjustment Decline decision, enter a program action of DENY and action reason of ADD.
The Import Applicant Data process imports UCAS choice records from ivStarC.
If the incoming Adjustment value is D for an application choice that exists in your database, the process updates the decision-reply value from UF to UD. Also, the system updates the corresponding Campus Solutions application record with a program action of DENY and action reason of ADD.
Setting Up GTTR Program Action Reasons for Confirmation and Clearing
Elsewhere Access the GTTR Confirmation page (Set Up SACR, Product Related, Recruiting and Admissions, UCAS, UCAS Configuration, GTTR Confirmation)
GTTR Confirmation Decisions
When the system generates GTTR Confirmation transactions, it uses the GTTR Confirmation Decisions group box values to update the Campus Solution application records (related to the imported GTTR application data). The following table describes when the system uses the program action and the reason values for the GTTR Confirmation decisions:
|
Program Action and Action Reason Values For |
Used by the System When |
|
Accept Firm |
The institution confirms acceptance for a conditional firm application (Decision is A and Reply is F). Also, the system uses this action in ivgStarG update processing when you change the Reply to F, the Decision is U, and previously the application was CF. |
|
Reject Firm |
The institution confirms rejection for a conditional firm application (Decision is R, and Reply is F). |
|
Amended Confirmation |
You change a Confirmation decision. |
|
Confirmation with Change |
You change Course, Campus, Modular, Part Time, Entry Year, or Entry Month as part of a Confirmation decision (Decision is C in an RD transaction). |
GTTR Confirmation Amendments
When you receive GTTR Confirmation amendments, the system uses the GTTR Confirmation Amendments group box values to update the Campus Solution application records (related to the imported GTTR application data). The following table describes when the system uses the program action and the reason values for the GTTR Confirmation amendments:
|
Program Action and Action Reason Values For |
Used by the System When |
|
Clearing Elsewhere |
An applicant was accepted through Clearing at another institution. |
Mapping UCAS Attendance TypesAccess the Attendance Type page (Set Up SACR, Product Related, Recruiting and Admissions, UCAS, Mappings, Attendance Type).
Map the UCAS attendance types to Campus Solutions academic load values.
Note. When you import UCAS application data, the system uses the mapped academic load to create the related Campus Solutions application records.
Mapping UCAS and GTTR Entry Years and MonthsAccess the Entry Year page (Set Up SACR, Product Related, Recruiting and Admissions, UCAS, Mappings, Entry Year).
|
Entry Year |
Enter the UCAS entry year in the format YYYY. |
|
Entry Month |
Enter a number between 1 and 12 to indicate the UCAS entry month. For example, if the month is January, enter 1. For non-modular GTTR applications, enter 0. GTTR does not deliver an entry month value for non-modular GTTR applications. If any incoming application does not have an entry month, the import process uses the mapping with 0 as the default. |
|
Default for Term |
If you have mapped multiple combinations of entry year and month to a single admit term, select a default admit term for transactions that you send to UCAS. |
Note. When you import the UCAS application data, the system uses the mapped admit term to create or update the related Campus Solutions application records.
Note. It is recommended that you define entry year mappings for a single career for each combination of institution and UCAS system.
Mapping UCAS Entry PointsAccess the Entry Point page (Set Up SACR, Product Related, Recruiting and Admissions, UCAS, Mappings, Entry Point).
Note. When you import UCAS application data, the system uses the mapped academic level to create the related Campus Solutions application records.
UCAS admission entry points range from 0 for foundation year and 1 through 5 for first through fifth year entry. Entry point is not used in GTTR admissions. Therefore, for GTTR you need not map entry points with academic levels and careers. The system uses the default academic level that you defined on the GTTR Application Import page for GTTR applications.
Defining External SystemsAccess the External System page (Setup SACR, Product Related, Campus Community, Define Campus Community, Set Up, Define External Systems).
Define the following external systems codes listed in the following table.
|
External System Code |
Description |
|
GT |
GTTR Personal ID (GTTRPERID) |
|
ISA |
Ind Safeguarding Auth (ISA) |
|
NIN |
National Insurance No (NIN) |
|
SCN |
Scottish Candidate Number (SCN) |
|
UC |
UCAS Personal ID (UCASPERID) |
|
ULN |
Unique Learner No (ULN) |
You must define the codes as shown in the table but you can modify the description.
The system uses this setup to track applicant IDs imported from UCAS. To view the imported IDs for an applicant, use the External System page (Campus Community, Personal Information, Identification, External System ID).
Setting Up UCAS and GTTR User DefaultsAccess the UCAS, GTTR Defaults page (Set Up SACR, User Defaults, UCAS, GTTR Defaults).
The system uses the defaults that you set up here to populate data in the UCAS pages. The default values that you set up here can be overridden on any page in the system.
Although setting user defaults can save time and minimize data entry errors, doing so is optional.
To set up user defaults for the Academic Institution, Term, Career, and Academic Program fields, select Set Up SACR, User Defaults, User Defaults 1. To set up user defaults for the Application Center field, select Set Up SACR, User Defaults, User Defaults 2.
If your institution does not have HRMS installed, the Decision Maker and Approver lookups do not have access to the database table that differentiates staff members from the other person records (such as students). Therefore, if HRMS is not installed, the lookups will display all employee records. The same logic applies to other pages where Decision Maker or Approver lookups exist (for instance, the UCAS Decision Processing page).
Setting up National ID Types for Country Code GBRAccess the National ID Type Table page (Set Up HRMS, Foundation Tables, Personal, National ID Type).
You must define GTTRID and UCASID as National ID types as described in the following table:
|
NID Type (maximum 6 characters) |
Default |
Description (maximum 30 characters) |
Short Desc (maximum 10 characters) |
National ID Format (maximum 20 characters) |
|
UCASID |
No |
UCAS Personal ID |
UCASPERID |
9999999999 (10 digits) |
|
GTTRID |
No |
GTTR Personal ID |
GTTRPERID |
9999999999 (10 digits) |
The Import Applicant process uses the UCASID and GTTRID NID types to import GTTR and UCAS applications.
Processing UCAS and GTTR Reference Data
This section provides an overview of reference data processing and discusses how to:
Import reference data.
Review and map UCAS courses.
Review and map GTTR courses.
Review and map area of permanent residence.
Review and map disability data.
Review and map ethnicity data.
Review and map residential category data.
Review and map country data.
Review and map nationality data.
Review and map exam level data.
Understanding UCAS and GTTR Reference Data Processing You must process reference data before importing applications. To process reference data, first run the Import Reference Data Application Engine (SAD_UC_IMREF) process to import the reference data. Then. use the Reference Data pages to view the imported reference data in the Campus Solutions tables.
If you selected the Import Live Data from UCAS check box on the UCAS Configuration page, the system loads the data from UCAS into the staging tables and then into the Campus Solutions tables.
If you did not select the Import Live Data from UCAS check box, the system loads the data from the staging tables into the Campus Solutions tables. The following table lists the staging tables that store the reference data:
|
Staging Table |
Stores Data Imported From |
|
PS_SAD_UC_I_INST |
cvInstitution |
|
PS_SAD_UC_I_REGION |
cvnRefRegion |
|
PS_SAD_UC_I_CVCOURSE |
cvCourse |
|
PS_SAD_UC_I_CVGCOURSE |
cvgCourse |
|
PS_SAD_UC_I_KEYWORD |
cvRefKeyword |
|
PS_SAD_UC_I_SCHOOL |
cvSchool |
|
PS_SAD_UC_I_SCHOOLCONT |
cvSchoolContact |
|
PS_SAD_UC_I_SCHOOLTYPE |
cvRefSchoolType |
|
PS_SAD_UC_I_ESTGROUP |
cvRefEstGroup |
|
PS_SAD_UC_I_APR |
cvRefAPR |
|
PS_SAD_UC_I_DIS |
cvRefDis |
|
PS_SAD_UC_I_ETHNIC |
cvRefEthnic |
|
PS_SAD_UC_I_RESCAT |
cvRefResCat |
|
PS_SAD_UC_I_COUNTRY |
cvRefCountry |
|
PS_SAD_UC_I_NATIONLTY |
cvRefNationality |
|
PS_SAD_UC_I_POCC |
cvRefPOCC |
|
PS_SAD_UC_I_SOCCLASS |
cvRefSocialClass |
|
PS_SAD_UC_I_SOCIOECON |
cvRefSocioEconomic |
|
PS_SAD_UC_I_CARE |
cvRefCare |
|
PS_SAD_UC_I_SPONSOR |
cvRefPrepSponsor |
|
PS_SAD_UC_I_SCHOOLYEAR |
cvRefSchoolYear |
|
PS_SAD_UC_I_PARENTHE |
cvRefParentinHE |
|
PS_SAD_UC_I_FEE |
cvRefFee |
|
PS_SAD_UC_I_EBLSUBJ |
cvEBLSubject |
|
PS_SAD_UC_I_AWARDBODY |
cvRefAwardBody |
|
PS_SAD_UC_I_EXAM |
cvRefExam |
|
PS_SAD_UC_I_SUBJ |
cvRefSubj |
|
PS_SAD_UC_I_UNITS |
cvRefUnits |
|
PS_SAD_UC_I_OEQ |
cvRefOEQ |
|
PS_SAD_UC_I_DEGRSUBJ |
cvgRefDegreeSubject |
|
PS_SAD_UC_I_OFFABBR |
cvRefOfferAbbrev |
|
PS_SAD_UC_I_UVOFFABBR |
uvOfferAbbrev |
|
PS_SAD_UC_I_STATUS |
cvRefStatus |
|
PS_SAD_UC_I_OFFERSUBJ |
cvRefOfferSubj |
|
PS_SAD_UC_I_ERROR |
cvRefError |
|
PS_SAD_UC_I_CVAMEND |
cvRefAmendments |
|
PS_SAD_UC_I_CVGAMEND |
cvgRefAmendments |
|
PS_SAD_UC_I_CAREDUR |
cvRefCareDuration |
|
PS_SAD_UC_I_TARIFF |
cvRefTariff |
|
PS_SAD_UC_I_LEA |
cvRefLea |
If you selected both the GTTR and UCAS check boxes on the UCAS Configuration page, the system loads both the UCAS and GTTR reference data.
After loading the reference data, you need to use the Reference Data pages to map the UCAS values to the Campus Solutions values. For example, you must map the UCAS courses to the Campus Solutions careers, programs, and plans. Additionally, you can use the Reference Data pages to review whether the Import Reference Data process imported all the required data.
The Import Reference Data process imports the following data only if the UCAS Cycle value on the UCAS Configuration page is 2010 or greater:
cvRefLea data
CourseType value from cvCourse
For information about the fields on the Reference Data pages that display the imported data, refer to the ODBC-link Technical Manual.
All the Reference Data pages have Active and Imported check boxes. Clear the Active check box to deactivate a manually added reference data record.
The system enables the Active check box for records that you entered manually through the Reference Data pages. However, the system disables the Active check box for imported records.
The Imported check box indicates whether you imported or manually added the reference data. If you manually add the data on a Reference Data page, then the system clears the Imported check box.
Pages Used to Process UCAS and GTTR Reference Data|
Page Name |
Definition Name |
Navigation |
Usage |
|
Import Reference Data |
SAD_UC_IMP_REF_PRC |
Set Up SACR, Product Related, Recruiting and Admissions, UCAS, Import Reference Data |
Import UCAS reference data into your database. |
|
UCAS Courses |
SAD_UC_COURSE |
Set Up SACR, Product Related, Recruiting and Admissions, UCAS, Mappings, UCAS Course |
View the imported cvCourse data or manually enter the UCAS course data into your database. Also, map a UCAS course with a Campus Solutions academic career, program, plan, subplan, application center, and campus. |
|
Area of Permanent Residence |
SAD_UC_APR |
Set Up SACR, Product Related, Recruiting and Admissions, UCAS, Mappings, Area of Permanent Residence |
View the imported cvRefAPR domicile data or manually enter the APR data into your database. Also, map the UCAS domicile to the Campus Solutions country code. |
|
Country |
SAD_UC_CNTRY |
Set Up SACR, Product Related, Recruiting and Admissions, UCAS, Mappings, Country |
View the imported cvRefCountry data or manually enter the UCAS country data into your database. Also, map the UCAS country code to the Campus Solutions country code. |
|
Disability |
SAD_UC_DIS |
Set Up SACR, Product Related, Recruiting and Admissions, UCAS, Mappings, Disability |
View the imported cvRefDis data or manually enter the UCAS disability data into your database. Also, map the UCAS disability code to the Campus Solutions disability code and type of impairment. |
|
Ethnic |
SAD_UC_ETHNIC |
Set Up SACR, Product Related, Recruiting and Admissions, UCAS, Mappings, Ethnic |
View the imported cvRefEthnic data or manually enter the UCAS ethnic data into your database. Also, map the UCAS ethnicity code to the Campus Solutions set ID, regulatory region, and ethnicity group. |
|
Nationality |
SAD_UC_NATION |
Set Up SACR, Product Related, Recruiting and Admissions, UCAS, Mappings, Nationality |
View the imported cvRefNationality data or manually enter the UCAS nationality data into your database. Also, map the UCAS nationality code to the Campus Solutions country and citizenship codes. |
|
Residential Category |
SAD_UC_RESCAT |
Set Up SACR, Product Related, Recruiting and Admissions, UCAS, Mappings, Residential Category |
View the imported cvRefResCat data or manually enter the UCAS residential category data into your database. Also, map the UCAS residential category code to the Campus Solutions residency code. |
|
Import Examination Results |
SAD_UC_EXAM |
Set Up SACR, Product Related, Recruiting and Admissions, UCAS, Mappings, Exam Levels |
View the imported cvRefExam data or manually enter the UCAS exam level data into your database. Also, map the UCAS exam level to the Campus Solutions qualification type. |
|
EBL Subject |
SAD_UC_EBLSUB |
Set Up SACR, Product Related, Recruiting and Admissions, UCAS, Reference Data, EBL Subject |
View the imported cvEBLSubject data or manually enter the UCAS EBL Subject data into your database. |
|
Institution |
SAD_UC_INST |
Set Up SACR, Product Related, Recruiting and Admissions, UCAS, Reference Data, Institution |
View the imported cvInstitution data or manually enter the UCAS institution data into your database. |
|
NHS Region |
SAD_UC_REGION |
Set Up SACR, Product Related, Recruiting and Admissions, UCAS, Reference Data, NHS Region |
View the imported cvnRefRegion data or manually enter the NHS Region data into your database. |
|
Awarding Body |
SAD_UC_AWDBDY |
Set Up SACR, Product Related, Recruiting and Admissions, UCAS, Reference Data, Awarding Body |
View the imported cvRefAwardBody data or manually enter the UCAS awarding body data into your database. |
|
In Care |
SAD_UC_CARE |
Set Up SACR, Product Related, Recruiting and Admissions, UCAS, Reference Data, In Care |
View the imported cvRefCare data or manually enter the UCAS In Care data into your database. |
|
In Care Duration |
SAD_UC_CAREDUR |
Set Up SACR, Product Related, Recruiting and Admissions, UCAS, Reference Data, In Care Duration |
View the imported cvRefCareDuration data or manually enter the UCAS In Care Duration data into your database. |
|
Error Code |
SAD_UC_ERROR |
Set Up SACR, Product Related, Recruiting and Admissions, UCAS, Reference Data, Error Code |
View the imported cvRefError data or manually enter the UCAS Error Code data into your database. |
|
Establishment Group |
SAD_UC_ESTGRP |
Set Up SACR, Product Related, Recruiting and Admissions, UCAS, Reference Data, Establishment Group |
View the imported cvRefEstGroup data or manually enter the UCAS establishment group data into your database. |
|
Fee Payer |
SAD_UC_FEE |
Set Up SACR, Product Related, Recruiting and Admissions, UCAS, Reference Data, Fee Payer |
View the imported cvRefFee data or manually enter the UCAS fee payer data into your database. |
|
Keyword |
SAD_UC_KEY |
Set Up SACR, Product Related, Recruiting and Admissions, UCAS, Reference Data, Keyword |
View the imported cvRefKeyword data or manually enter the UCAS keyword data into your database. |
|
LEA |
SAD_UC_LEA |
Set Up SACR, Product Related, Recruiting and Admissions, UCAS, Reference Data, LEA |
View the imported cvRefLea data or manually enter the LEA codes into your database. |
|
Other Exam Qualifications |
SAD_UC_OEQ |
Set Up SACR, Product Related, Recruiting and Admissions, UCAS, Reference Data, Other Exam Qualifications |
View the imported cvRefOEQ data or manually enter the UCAS Other Exam Qualifications data into your database. |
|
Offer Abbreviation |
SAD_UC_COFABB |
Set Up SACR, Product Related, Recruiting and Admissions, UCAS, Reference Data, Offer Abbreviation |
View the imported cvRefOfferAbbrev data. |
|
Offer Subject |
SAD_UC_OFFSUB |
Set Up SACR, Product Related, Recruiting and Admissions, UCAS, Reference Data, Offer Subject |
View the imported cvRefOfferSubj data or manually enter the UCAS Offer Subject data into your database. |
|
Parent in Higher Education |
SAD_UC_PARHE |
Set Up SACR, Product Related, Recruiting and Admissions, UCAS, Reference Data, Parent in Higher Education |
View the imported cvRefParentinHE data or manually enter the UCAS Parent in Higher Education data into your database. |
|
Parental Occupation |
SAD_UC_POCC |
Set Up SACR, Product Related, Recruiting and Admissions, UCAS, Reference Data, Parental Occupation |
View the imported cvRefPOCC data or manually enter the UCAS Parental Occupation data into your database. |
|
Sponsor |
SAD_UC_PRESPN |
Set Up SACR, Product Related, Recruiting and Admissions, UCAS, Reference Data, Sponsor |
View the imported cvRefPrepSponsor data or manually enter the UCAS sponsor data into your database. |
|
School |
SAD_UC_SCHOOL |
Set Up SACR, Product Related, Recruiting and Admissions, UCAS, Reference Data, School |
View the imported cvSchool and cvSchoolContact data. Click the External Org Details link to update or view the details of the External Organization that is mapped to the school. |
|
School Type |
SAD_UC_SCHTYP |
Set Up SACR, Product Related, Recruiting and Admissions, UCAS, Reference Data, School Type |
View the imported cvRefSchoolType data or manually enter the UCAS school type data into your database. |
|
School Year |
SAD_UC_SCHYR |
Set Up SACR, Product Related, Recruiting and Admissions, UCAS, Reference Data, School Year |
View the imported cvRefSchoolYear data or manually enter the UCAS school year data into your database. |
|
Social Class |
SAD_UC_SOCCLS |
Set Up SACR, Product Related, Recruiting and Admissions, UCAS, Reference Data, Social Class |
View the imported cvRefSocialClass data or manually enter the UCAS social class data into your database. |
|
Socio Economic |
SAD_UC_SOCECO |
Set Up SACR, Product Related, Recruiting and Admissions, UCAS, Reference Data, Socio Economic |
View the imported cvRefSocioEconomic data or manually enter the UCAS Socio Economic data into your database. |
|
Status |
SAD_UC_STATUS |
Set Up SACR, Product Related, Recruiting and Admissions, UCAS, Reference Data, Status |
View the imported cvRefStatus data or manually enter the UCAS status data into your database. |
|
Subject |
SAD_UC_SUB |
Set Up SACR, Product Related, Recruiting and Admissions, UCAS, Reference Data, Subject |
View the imported cvRefSubj data or manually enter the UCAS subject data into your database. |
|
Units |
SAD_UC_UNITS |
Set Up SACR, Product Related, Recruiting and Admissions, UCAS, Reference Data, Units |
View the imported cvRefUnits data or manually enter the UCAS unit data into your database. |
|
Institution Course Keyword |
SAD_UC_CRSKEY |
Set Up SACR, Product Related, Recruiting and Admissions, UCAS, Reference Data, Institution Course Keyword |
View the imported uvCourseKeyword data or manually enter the UCAS Institution Course Keyword data into your database. If required, update or add keywords that users can use to search for the course in the UCAS course web search utility. |
|
Institution Offer Abbreviation |
SAD_UC_UOFABB |
Set Up SACR, Product Related, Recruiting and Admissions, UCAS, Reference Data, Institution Offer Abbreviation |
View the imported uvOfferAbbrev data or manually enter the UCAS Institution Offer Abbreviation data into your database. |
|
Tariff Scores |
SAD_UC_TARIFF |
Set Up SACR, Product Related, Recruiting and Admissions, UCAS, Reference Data, Tariff Scores |
View the imported cvRefTariff data or manually enter the UCAS tariff data into your database. |
|
GTTR Course |
SAD_UC_GCOURSE |
Set Up SACR, Product Related, Recruiting and Admissions, UCAS, Reference Data, GTTR Course |
View the imported cvgCourse data or manually enter the GTTR course data into your database. Also, map a GTTR course with a Campus Solutions academic career, program, plan, sub-plan, application center, and campus. |
|
GTTR Degree Subject |
SAD_UC_GDSUB |
Set Up SACR, Product Related, Recruiting and Admissions, UCAS, Reference Data, GTTR Degree Subject Table |
View the imported cvgRefDegreeSubject data or manually enter the GTTR degree subject data into your database. |
|
Regional |
EXT_ORG_TBL_REG |
Campus Community, Organization, Create/Maintain Organizations, Organization Table, Regional |
View the imported cvSchool data or manually enter the UCAS school data into your database. The system enables the UK UCAS School Data region only if you select the HESA, UCAS check box on the SA Features page. |
Importing Reference DataAccess the Import Reference Data page (Set Up SACR, Product Related, Recruiting and Admissions, UCAS, Import Reference Data).
The Import Reference Data process imports reference data based on UCAS timestamps. After the process runs, you can view the latest timestamp information on the Internal Timestamp page. Refer to the Defining a Timestamp for Re-importing Data topic in this document for more information about the Internal Timestamp page.
|
Import Live Data from UCAS |
Indicates how the Import Reference Data process loads data into the Campus Solutions tables. You cannot select or clear this check box. The system selects this check box if you selected the Import Live Data from UCAS check box on the UCAS Configuration page. If the system selects the check box, the import process loads the data into the staging tables and then into the Campus Solutions tables. If the system does not select the check box, the import process loads the data from the staging tables into the Campus Solutions tables. |
|
Academic Institution |
Enter the academic institution for which you want to import the data. |
|
Create/Update External Org Rec |
Select this check box to instruct the process to create or update an external organization record for the imported school. If you select this option, and if the process does not find a corresponding external organization record for the imported school, it creates an external organization record. You can view this external organization record using the Organization Table page (Campus Community, Organization, Create/Maintain Organizations, Organization Table). If you select this option, and if the process finds a corresponding external organization record that needs to be updated, it creates a new effective dated record in the Organization Table page. For example, suppose a school's contact email ID has changed and the school already has an associated external organization record in Campus Solutions. When you import the school reference data, the process inserts a new record with the new email ID of the contact. If the check box is cleared, the process imports the cvSchool and cvSchoolContact records into the Campus Solutions tables but does not create eternal organization records. Creation of External Org records can cause the process to run slowly. Therefore, you can first run the Import Reference Data process without selecting this check box. Then you can run the process again with the Create/Update External Org Rec check box selected to create the external organization records. |
Reviewing and Mapping UCAS CoursesAccess the UCAS Course page (Set Up SACR, Product Related, Recruiting and Admissions, UCAS, Mappings, UCAS Course).
Note. If the UCAS Campus value in cvCourse is null (that is, the institution does not have separate UCAS campus codes), then the Import Reference Data process imports the value as *. If you are adding course records manually, you need to add either a valid UCAS campus value or *.
|
UCAS Timestamp |
Displays the date and time when UCAS updated the cvCourse view. This field is read-only and only appears for imported records. For manually added records, this field is blank and you do not need to enter a value. |
Mapping
You must map a Campus Solutions academic career, program, and plan for each combination of UCAS course code, entry year and entry month that may exist in an imported application choice. The remaining fields in the Mapping group box are optional. The system uses the mapped values when creating or updating the Campus Solutions application record related to the UCAS application choice.
If you do not map the Application Center and Campus values on this page, then the system uses the default values defined in the UCAS Application Import page.
Reviewing and Mapping GTTR CoursesAccess the GTTR Course page (Set Up SACR, Product Related, Recruiting and Admissions, UCAS, Mappings, GTTR Course).
Note. If the GTTR Campus value in cvgCourse is null (that is, the institution does not have separate GTTR campus codes), then the Import Reference Data process imports the value as *. If you are adding course records manually, you need to add either a valid GTTR campus value or *.
|
UCAS Timestamp |
Displays the date and time when GTTR updated the cvgCourse view. This field is read-only and only appears for imported records. For manually added records, this field is blank and you do not need to enter a value. |
Mapping
You must map a Campus Solutions academic career, program, and plan for each combination of GTTR course code, entry year and entry month that may exist in an imported application choice. The remaining fields in the Mapping group box are optional. The system uses the mapped values when creating or updating the Campus Solutions application record related to the GTTR application choice.
If you do not map the Application Center and Campus values on this page, then the system uses the default values defined in the GTTR Application Import page.
Reviewing and Mapping Area of Permanent ResidenceAccess the Area of Permanent Residence page (Set Up SACR, Product Related, Recruiting and Admissions, UCAS, Mappings, Area of Permanent Residence).
Mapping
In the Country and the State fields, enter the Campus Solutions country and state codes to map to the UCAS domicile code.
Reviewing and Mapping Disability DataAccess the Disability page (Set Up SACR, Product Related, Recruiting and Admissions, UCAS, Mappings, Disability).
Mapping
In the Disability and Type of Impairment fields, enter the Campus Solutions disability and type of impairment codes to map to the UCAS disability code.
Reviewing and Mapping Ethnicity DataAccess the Ethnic page (Set Up SACR, Product Related, Recruiting and Admissions, UCAS, Mappings, Ethnic).
Mapping
In the SetID field, enter the setID of your institution. In the Regulatory Region field, enter the Campus Solutions regulatory region code. In the Ethnic Group field, enter the Campus Solutions ethnic code to map to the UCAS ethnic code.
Reviewing and Mapping Residential Category DataAccess the Residential Category page (Set Up SACR, Product Related, Recruiting and Admissions, UCAS, Mappings, Residential Category).
Mapping
In the Residency field, enter the Campus Solutions residency code to map to the UCAS residential category code.
Reviewing and Mapping Country DataAccess the Country page (Set Up SACR, Product Related, Recruiting and Admissions, UCAS, Mappings, Country).
Mapping
In the Country field, enter the Campus Solutions country code to map to the UCAS country code.
Reviewing and Mapping Nationality DataAccess the Nationality page (Set Up SACR, Product Related, Recruiting and Admissions, UCAS, Mappings, Nationality).
Mapping
In the Country and Citizenship Status fields, enter the Campus Solutions country and citizenship status codes to map to the UCAS nationality code.
Reviewing and Mapping Exam Level DataAccess the Import Examination Results page (Set Up SACR, Product Related, Recruiting and Admissions, UCAS, Mappings, Exam Levels).
Mapping
In the Qualification Type field, enter the Campus Solutions qualification type code to map to the UCAS exam level.
Importing UCAS and GTTR Applications and Applicant Data
This section provides an overview of importing applications and applicant data into your database, and discusses how to:
View the transaction setup.
Define the search/match criteria.
Enter the applicant import parameters.
Review and edit the suspense data.
View, update, and delete application staging data.
Define a timestamp for re-importing data.
Understanding Importing UCAS and GTTR Applications and Applicant DataWhen you import applicant data from UCAS, the system creates new person records in your database or updates details about existing person records. First, you must ensure that you are not going to create any duplicate data by setting up the search/match parameters. Then, you run the Import Applicant Data process to load the application and applicant data into your database. The search/match process determines if the person might already exist in your database. The purpose of the search/match is to prevent duplicate records. You can specify what you want the post process to do when search/match finds a match or multiple matches. It is recommended that you set the status as Suspend when you set up the search/match criteria for multiple matches. Based on the results of the search/match process, the import process can update the record in your database that matches the UCAS data if you are sure that the person in your database is the same person to whom the UCAS data relates.
If you selected the UCAS check box on the UCAS Configuration page, the Import Applicant Data process imports data from the UCAS iv views. If you selected the GTTR check box on the UCAS Configuration page, the Import Applicant Data process imports data from the GTTR iv views. If you selected both the UCAS and GTTR check boxes, the Import Applicant Data process imports data from both the UCAS and GTTR iv views.
If you selected the Import Live Data from UCAS check box on the UCAS configuration page, the system loads the data from UCAS into the Campus Solutions tables through the staging tables.
If you did not select the Import Live Data from UCAS check box because you have data in the staging tables, the system loads the data from the staging tables into the Campus Solutions tables. You can then use the Campus Solutions pages to review the data in the Campus Solutions tables.
You can view, update, or delete the suspended UCAS and GTTR application data in the staging tables using the Staging Data pages. You can search for the suspended data based on various search parameters including import status, application code and personal ID.
The import process creates a corresponding Campus Solutions application record for each imported UCAS application choice. If an applicant has more than one ChoiceNo for an AppCode at your institution, the import process creates a separate Campus Solutions application record for each AppCode and ChoiceNo combination. You can use the Maintain Applications component to access the Campus Solutions application record. Each application record will have an effective date that indicates the date when you imported the application. If you import updates to the same application on different days, the system creates new application records with the different effective dates. If you import updates to the same application multiple times on a particular day, the system updates the Campus Solutions application record for that particular date.
Pages Used to Import UCAS and GTTR Applications and Applicant Data|
Page Name |
Definition Name |
Navigation |
Usage |
|
Transaction Setup |
SCC_TRANSAC_DTLS |
Student Admissions, UCAS Processing, Search/Match Processing, Transaction Setup |
View the delivered UCAS search/match transaction that you can use in the Transaction Search/Match Setup page. If required, create a new search/match transaction. |
|
Transaction Search/Match Setup |
SCC_DATA_IMP_SETUP |
Student Admissions, UCAS Processing, Search/Match Processing, Transaction Search/Match Setup |
Define search and match parameters, which specify what UCAS data the system will append to existing records in your database and which UCAS data the system will suspend or ignore. |
|
Import Applicant Data |
SAD_UC_RUN_CNTL |
Student Admissions, UCAS Processing, Import Applicant Data |
Import the UCAS and GTTR applications and applicant data into your system. Before you import the data, set up the search/match parameters on the Search/Match Processing pages. |
|
Transaction Data |
SCC_TRANSAC_DATA |
Student Admissions, UCAS Processing, Search/Match Processing, Transaction Data |
After you run the Import Applicant Data process, use this page to review the status of a UCAS record with regard to loading, searching/matching, and posting processing. For example, determine if a record is waiting to be processed or if a record caused a new person to be added to your database. |
|
GTTR Offer Staging Data |
SAD_UC_I_GOFFER |
Student Admissions, UCAS Processing, Staging Data, GTTR Offer Staging Data |
View, update, or delete the suspended ivgOffer data stored in the staging tables. |
|
GTTR StarG Staging Data |
SAD_UC_I_IVSTRG |
Student Admissions, UCAS Processing, Staging Data, GTTR StarG Staging Data |
View, update, or delete the suspended ivgStarG data stored in the staging tables. |
|
GTTR StarK Staging Data |
SAD_UC_I_IVGSTK |
Student Admissions, UCAS Processing, Staging Data, GTTR StarK Staging Data |
View, update, or delete the suspended ivgStarK data stored in the staging tables. |
|
StarA Staging Data |
SAD_UC_I_STARA |
Student Admissions, UCAS Processing, Staging Data, StarA Staging Data |
View, update, or delete the suspended ivStarA (UCAS) data and ivgStarA (GTTR) data stored in the staging tables. |
|
StarN Staging Data |
SAD_UC_I_STARN |
Student Admissions, UCAS Processing, Staging Data, StarN Staging Data |
View, update, or delete the suspended ivStarN (UCAS) data and ivgStarN (GTTR) data stored in the staging tables. |
|
UCAS Offer Staging Data |
SAD_UC_I_OFFER |
Student Admissions, UCAS Processing, Staging Data, UCAS Offer Staging Data |
View, update, or delete the suspended ivOffer data stored in the staging tables. |
|
UCAS StarC Staging Data |
SAD_UC_I_IVSTRC |
Student Admissions, UCAS Processing, Staging Data, UCAS StarC Staging Data |
View, update, or delete the suspended ivStarC data stored in the staging tables. |
|
UCAS StarK Staging Data |
SAD_UC_I_IVSTK |
Student Admissions, UCAS Processing, Staging Data, UCAS StarK Staging Data |
View, update, or delete the suspended ivgStarK data stored in the staging tables. |
|
Internal Timestamps |
SAD_UC_TIMESTMP |
Set Up SACR, Product Related, Recruiting and Admissions, UCAS, Timestamps |
For an institution, reset a timestamp to a previous date if you want to re-import UCAS records. See the highest UCAS timestamp when the view was last imported. Additionally, see the number of records that were added, deleted, or amended when the view was last imported. |
Viewing the Transaction SetupAccess the Transaction Setup page (Student Admissions, UCAS Processing, Search/Match Processing, Transaction Setup).
You can use the delivered UCAS transaction for search/match setup. If you want to create a new UCAS search/match transaction for the Import Applicant Data process, ensure that the fields in the Transaction Setup page contain the following values:
Component Name value must be SAD_UC_RUN_CNTL.
Batch Process Name value must be SAD_UC_IMPAP.
Root Package ID value must be SAD_UC_TRANSACTION.
Path value must be TRANSACTION.
Application Class ID value must be UCASTransaction.
Defining the Search/Match CriteriaAccess the Transaction Search/Match Setup page (Student Admissions, UCAS Processing, Search/Match Processing, Transaction Search/Match Setup).
When you add search/match criteria, use the Transaction field to select a transaction defined in the Transaction Setup page and use the Search Parameter field to select the group of predefined search parameters that you want to use for the Import Applicant Data process.
Use the Search Result Field field to select a search result value that you defined in the Search Result page.
It is recommended that you change the Number of Characters of FirstNameSrchRule and LastNameSrchRule to 7 for PSCS_10, PSCS_30, PSCS_40 and PSCS_50 in the Search/Match Rules page. Select Set Up SACR, System Administration, Utilities, Search/Match, Search/Match Rules to navigate to the Search/Match Rules page.
See PeopleSoft Enterprise Campus Community Fundamentals 9.0 PeopleBook, "Setting Up Search/Match" for information about setting up search/match rules, search parameters, and results.
Match(es) Found
This group box contains one row for each search/match criteria order defined by your institution. Define search/match orders on the Search/Match Criteria page.
|
Search Order Nbr (search order number) |
For each order number, select what you want to do with the record if the search/match/post process discovers one or more matching records. |
|
One Match and Multiple Matches |
Select whether you want to add, update, suspend, or ignore matching records: Add: Add a new record to your database using the staging table record. Update: Update the existing record with the data in the staging table record. Suspend: Keep the suspense record back in the staging table. Determine manually whether or not this record matches a record in your database. Ignore: Ignore the staging table record that matched a record in your database. The process marks the record to be purged. |
No Match Found
Select one of the following options to specify what the search/match/post process should do when it does not find a matching record in your database:
Add: Add the unmatched record, including personal data, to your database.
Suspend: Keep the unmatched record in the staging tables to be looked at manually.
Ignore: Ignore the unmatched record completely. The process marks the record to be purged.
Note. You must always select the Realtime option for loading UCAS data.
Note. The Transaction Data Launch Parameters group box is for future use. Do not enter any values in the fields of this group box for loading UCAS data.
Entering the Applicant Import ParametersAccess the Import Applicant Data page (Student Admissions, UCAS Processing, Import Applicant Data).
|
Academic Institution |
Enter the academic institution for which you want to import data. |
|
Import Live |
Indicates how the process loads data into the Campus Solutions tables. You cannot select or clear this check box. The system selects this check box if you selected the Import Live Data from UCAS check box on the UCAS Configuration page. If the system selects this check box, the import process loads the data into the staging tables and then into the Campus Solutions tables. If the system did not select this check box, the import process loads the data from the staging tables into the Campus Solutions tables. |
|
Import Applicants |
Indicates whether the process imports applicant data from UCAS, GTTR, or both. You cannot select or clear these check boxes. The system selects the check boxes if you have selected the UCAS and GTTR check boxes on the UCAS Configuration page. If the system selects the GTTR check box, the process imports applicant data from GTTR ivgStarN, ivgStarA, and ivgStarK views. If the system selects the UCAS check box, the process imports applicant data from UCAS ivStarN, ivStarA, and ivStarK views. Note. Either the UCAS check box or the GTTR check box for Import Applicants must appear as selected for the Import Applicant Data process to run successfully. |
|
Import Biographical Data |
Select the UCAS check box if you want to import application biographical data from the following UCAS views:
Select the GTTR check box if you want to import application biographical data from the following GTTR views:
Select both check boxes if you want to import application biographical data from the GTTR and UCAS views. |
|
Import Examination Results |
Select the UCAS check box if you want to import data from ivStarPQR and ivUnitResults views. |
|
Import Application Choices |
Select the UCAS check box if you want to import application choices from these UCAS views:
Select the GTTR check box if you want to import application choices from the following GTTR views:
Select both check boxes if you want to import application choices from GTTR and UCAS. |
|
Import HESA Data |
Select the UCAS check box if you want to import ivStarj data. Select the GTTR check box if you want to import ivgStarj data. |
Reviewing and Editing the Suspense DataAccess the Transaction Data page (Student Admissions, UCAS Processing, Search/Match Processing, Transaction Data).
Possible values for the Status field include:
Posted Add: The import process added a record with a new ID to your database when the post process was run.
Posted Update: The import process updated an existing ID record with the data from the UCAS record.
S/M Suspend: The import process has completed running the search/match process and indicated that the record should be held for later processing.
Other staging statuses that you can see on the View Transaction Data search page are for future use.
You define the logic to determine the status values in the Transaction Search/Match Setup page. For example, to give the Posted Add status to a record, you may have specified that if the import process does not find a matching record, then add the imported record to the tables.
The Select a Duplicate region displays the single or multiple matching records. The system disables the Add and Update buttons and hides the Select a Duplicate region if the data has been posted. Also, all the fields appear as read-only when the status is Posted Add or Posted Update.
Select a duplicate
Displays a single or multiple matching records for the imported UCAS record.
This region does not appear if no single or multiple matching record exists.
Click the Detail link to navigate to the Add/Update a Person component.
|
Add |
Click to ignore any potential duplicates, manually add a new ID, and post the imported UCAS record to your database. When you click this button, the system posts the record and assigns an employee ID to the person. |
|
Update |
Click to match to an existing record and update the person record selected in the Select a Duplicate region with data from the UCAS record. |
Viewing, Updating and Deleting Application Staging DataUse the Staging Data pages to view, update, or delete the suspense data in the staging tables. The following is an example of a Staging Data page.
The Import Status field displays any one of the following values:
Error: If the Import Applicant Data process cannot load the record into the Campus Solutions tables.
Imported: If the Import Applicant Data process has loaded the record into the Campus Solutions tables.
New: If the Import Applicant Data process has not loaded the record into the Campus Solutions tables.
Pending: If the Import Applicant Data process load is waiting for the creation of a new Employee ID for the applicant.
In the StarA Staging Data search page, the Country Code search field searches both the Correspondence Country and the Home Country values loaded from the StarA views. The search results therefore display records that have a matched search value in either the Correspondence Country field or Home Country field or both fields. For example, if you enter NLD in the Country Code search field, the system displays records that have NLD as either the Home Country or Correspondence Country or both. It is recommended that you use the Contains option when searching using this field.
Defining a Timestamp for Re-importing Data Access the Internal Timestamp page (Set Up SACR, Product Related, Recruiting and Admissions, UCAS, Timestamps).
|
Timestamp |
Displays the highest UCAS timestamp for the view when it was last imported. |
|
Override |
Specify an override date if you want to reload a particular view. After specifying the override date, run the import process. The import process then imports the UCAS view records that have a timestamp of on and after the specified override date. The default system time for the specified override date is 00:00:00. After the import process finishes, the system sets the Override field value to blank. |
|
Last Run Timestamp |
Displays the latest timestamp used by the import process when it was last run. |
|
Records Added |
Displays the number of records that the import process added when the process last ran. |
|
Records Amended |
Displays the number of records that the import process modified when the process last ran. |
|
Records Deleted |
Displays the number of records that the import process deleted when the process last ran. |
The following scenario describes how the Internal Timestamp page displays its field values:
You have already imported records for a view that has UCAS timestamps up to and including July 31, 2008. Therefore, the Timestamp field on the Internal Timestamp page displays the date July 31, 2008.
You now want to re-import data for the view that UCAS has modified and added on or after May 31, 2008, 12 AM.
On August 4, 2008 enter an override date of May 31, 2008 in the Internal Timestamp page and run the Import Applicant Data process.
After the Import Applicant Data process completes importing the data, the system sets the Override date field as blank and sets the Last Run Timestamp field as May 31, 2008 because May 31,2008 was the override timestamp date that the system used when the process was run.
The Internal Timestamp page displays the number of records that the import process added, amended, and deleted on August 4, 2008.
The Timestamp field on the Internal Timestamp page still displays the date July 31, 2008 if no records were found in the UCAS view with timestamps greater than July 31. If the import process imported records in the UCAS view that had a timestamp of August 1, 2008, then the Timestamp field displays the date August 1, 2008.
Reviewing Imported UCAS and GTTR Applications and Applicant Data
This section provides an overview of reviewing the imported admissions data and discusses how to review the imported admissions data.
Understanding Reviewing Imported UCAS and GTTR Applications and Applicant
DataAfter you load the UCAS applicant data into the Campus Solutions tables, use the UCAS Applications and GTTR Applications pages to review the applications and applicant data. Refer to the ODBC-link Technical Manual for information about the fields displayed on the UCAS Applications and GTTR Applications pages.
Pages Used to Review Imported UCAS and GTTR Applications and Applicant
Data|
Page Name |
Definition Name |
Navigation |
Usage |
|
UCAS Applicant Summary |
AD_UC_APPL |
Student Admissions, UCAS Processing, UCAS Applications, UCAS Applicant Summary |
View the imported UCAS applicant record and data from ivStarC and ivStarK application and applicant data. View a summary of the application choices for your institution, application status, and applicant biographical details. |
|
Choices |
SAD_UC_CHOICE_DTL |
Student Admissions, UCAS Processing, UCAS Applications, Choices |
View the applicant's imported application choices (ivStarC data) and the related Campus Solutions application records. |
|
Statements |
SAD_UC_STATEMENTS |
Student Admissions, UCAS Processing, UCAS Applications, Statements |
View the applicant's imported ivStatement data. |
|
References |
SAD_UC_REFERENCES |
Student Admissions, UCAS Processing, UCAS Applications, References |
View the applicant's imported ivReference data. |
|
Qualifications |
SAD_UC_FRMQUAL |
Student Admissions, UCAS Processing, UCAS Applications, Qualifications |
View the applicant's imported ivFormQuals and ivStarPQR data. |
|
Unit Results |
SAD_UC_IVUNRS_SP |
Student Admissions, UCAS Processing, UCAS Applications, Qualifications, Subject Detail, Unit Results |
View the applicant's imported ivUnitResults data. |
|
Qualification Summary |
SAD_UC_QUAL_SUMM |
Student Admissions, UCAS Processing, UCAS Applications, Qualification Summary |
View the applicant's imported ivQualification and ivStarK data. |
|
Education |
SAD_UC_EDUCAT |
Student Admissions, UCAS Processing, UCAS Applications, Education |
View the applicant's imported ivEducation data. |
|
Employment |
SAD_UC_IVEMPL |
Student Admissions, UCAS Processing, UCAS Applications, Employment |
View the applicant's imported ivEmployment data. |
|
Preparatory Activities |
SAD_UC_IVPREP |
Student Admissions, UCAS Processing, UCAS Applications, Preparatory Activities |
View the applicant's imported ivPrepActivities data . |
|
HESA Data |
AD_UC_HESA_DTL |
Student Admissions, UCAS Processing, UCAS Applications, HESA Data |
View the applicant's imported ivStarH and ivStarK HESA details. |
|
GTTR Applicant Summary |
SAD_UC_GTAPPL |
Student Admissions, UCAS Processing, GTTR Applications, GTTR Applicant Summary |
View the imported GTTR applicant record and the imported ivgStarG and ivgStarK application and applicant details. View a summary of the application choices, application status, and applicant biographical details. |
|
Choices |
SAD_UC_CHOICEGT_DT |
Student Admissions, UCAS Processing, GTTR Applications, Choices |
View the applicant's imported application choices (ivgStarG data) and the related Campus Solutions application records. |
|
Statements |
SAD_UC_STATEMENTS |
Student Admissions, UCAS Processing, GTTR Applications, Statements |
View the applicant's imported ivgStatement data. |
|
Qualifications |
SAD_UC_FRMQUAL |
Student Admissions, UCAS Processing, GTTR Applications, Qualifications |
View the applicant's imported ivgFormQuals data. |
|
References |
SAD_UC_REFERENCES |
Student Admissions, UCAS Processing, GTTR Applications, References |
View the applicant's imported ivgReference data. |
|
Degree Details |
SAD_UC_DEG_DTLS |
Student Admissions, UCAS Processing, GTTR Applications, Degree Details |
View the applicant's imported ivgFirstDegree and ivgDegreeContents data. |
|
Work Experience |
SAD_UC_IVGEXP |
Student Admissions, UCAS Processing, GTTR Applications, Work Experience |
View the applicant's imported ivgWorkExperience data. |
|
Other Languages |
SAD_UC_IVGOLN |
Student Admissions, UCAS Processing, GTTR Applications, Other Languages |
View the applicant's imported ivgOtherLanguages data. |
|
Education |
SAD_UC_EDUCAT |
Student Admissions, UCAS Processing, GTTR Applications, Education |
View the applicant's imported ivgEducation data. |
|
HESA Details |
SAD_UC_HESA_GT_DTL |
Student Admissions, UCAS Processing, GTTR Applications, HESA Details |
View the applicant's imported ivgStarH and ivgStarK HESA details. |
|
Biographical Details |
SCC_BIO_DEMO_PERS |
Click the Personal Information link on any page of the UCAS Applications component (SAD_UC_APPL) or the GTTR Applications component (SAD_UC_GTAPP). Campus Community, Personal Information, Add/Update a Person, Biographical Details |
View or update the imported ivStarN, ivStarA, ivgStarA, and ivgStarN applicant biographical data. Biographical data includes details such as applicant name, birth date, marital status, and address. |
|
Application Program Data |
ADM_APPL_PROG_ENT |
Click the Maintain Applications link on the UCAS Applicant Summary page or the GTTR Applicant Summary page. Student Admissions, Application Maintenance, Maintain Applications, Application Program Data |
View or edit the Campus Solutions program and plan data pertaining to the imported application. |
|
External Education |
SAD_EXT_EDUCATION |
Records and Enrollments, Transfer Credit Evaluation, External Education |
View the applicant's school information imported from ivStarK. The imported school record includes the attendance type (academic load). |
Reviewing the Imported UCAS Applications and Applicant DataAccess the UCAS Applicant Summary page (Student Admissions, UCAS Processing, UCAS Applications, UCAS Applicant Summary).
The values in the Application Status and the Biographical Details group boxes come from ivStarK.
Processing Imported UCAS and GTTR Applications and Applicant Data
This section provides an overview of processing the imported admissions data, and discusses how to:
Define conditions for an offer.
Delete incorrect UCAS applicant records.
Enter an initial admission decision for a UCAS application choice.
Enter or update an admission decision for a UCAS application choice.
Enter a decision for multiple UCAS application choices.
Approve or reject a UCAS decision.
Approve or reject multiple UCAS decisions.
Determine whether applicants satisfy the offer conditions.
Enter or update a Confirmation decision.
Enter multiple Confirmation decisions.
Approve or reject a Confirmation decision.
Approve or reject multiple Confirmation decisions.
Enter a decision to release an applicant into Clearing.
Approve or reject the Release into Clearing decision.
Enter Clearing and Adjustment details.
Generate, export, and update UCAS and GTTR transactions
Review UCAS transactions.
Review UCAS Clearing and Adjustment transactions.
Delete incorrect GTTR applicant records.
Enter an initial admission decision for a GTTR application choice.
Enter or update an admission decision for a GTTR application choice.
Approve or reject a GTTR decision.
Review GTTR transactions.
Understanding Processing Imported UCAS and GTTR Applications and Applicant
DataAfter you import and review the applicants and their applications, delete any applicant records that UCAS has sent in error or UCAS has cancelled. The views ivStarW and ivgStarW contain the data related to applicants and application choices that have been sent to UCAS by mistake or subsequently cancelled at UCAS. When you use the Import Applicant Data process to import the applications and applicant data, the import process also imports the data from these two views. Use the Remove Wrong Applicants components to review the ivStarW and ivgStarW data and delete them from your database.
After reviewing and removing incorrect applicant records, use the Decision Processing or Initial Decision Entry pages to enter admission decisions for the remaining applications. The UCAS and GTTR Initial Decision Entry pages require less data entry as compared to the Decision Processing pages for making an admission decision. You can use the Initial Decision Entry pages for the quick entry of standard decisions. If decision approval is set up, use the Decision Approval pages to approve the decision.
Next, your institution communicates the admission decisions and approvals to UCAS. The following steps describe how the Campus Solutions system communicates this data to UCAS:
After entering or updating a decision, run the Transaction Processing process to generate a transaction . If decision approval is set up, use the Decision Approval page to approve the decision before you generate a transaction.
Use the Transaction Processing process to export transactions to the TRANIN view at UCAS and to import error codes once UCAS have processed the transactions. Transactions that the system loads into TRANIN include the transaction ID generated by UCAS and an error code of -1 to indicate that UCAS has not yet processed the transaction. Once UCAS fully processes the transaction, the error code is either 0 (success) or is a code that UCAS defines in the cvRefError reference data view.
UCAS runs a batch process approximately every five minutes to process incoming transactions. As a result, the Campus Solutions system may delay in reading the error codes and return1 value from TRANIN and updating its transaction records.
When you run the Transaction Processing process for UCAS, the process selects each UCAS decision record where the system code equals U, transaction flag equals Y, and the approval status is either Approved or Not Required. For each decision record:
If the latest transaction for an application has a transaction type other than LD, LA, or LC, the process does not generate a transaction. In these cases, you should use the UCAS Transactions page to manually create a transaction.
Note. The generation of transactions other than LD, LA or LC will be covered in a future release.
If there is no previous transaction for an application and you had entered C (Conditional Offer), U (Unconditional Offer), W (Withdrawal) or R (Rejection), the process generates a LD (initial decision) transaction.
If an LD or LA (amended decision) transaction exists for an application and the latest decision value is different from the decision value of the existing LD or LA transaction, the system generates a LA transaction. If you have not changed the decision but the Course, Campus, Entry Year, Entry Month, or Entry Point values in the latest decision record is different from the existing LD or LA transaction, the process generates a LC (course correction) transaction.
If the most recent transaction is LC, the process finds the decision value of the latest LD or LA transaction prior to the LC transaction. If the decision value of the decision record is different from the decision value of the recent LD or LA transaction, the process generates a new LA transaction. If any of the Course, Campus, Entry Year, Entry Month, or Entry Point values from the decision record are different from that of the existing LC transaction, the process generates a new LC transaction. If the process is not able to identify any changes, it does not generate any transaction.
When the process completes processing the decisions, it sets the transaction flag for the decision record to N to indicate that transaction processing has completed.
When you run the Transaction Processing process for GTTR, the process selects each GTTR decision record where the system code equals G, transaction flag equals Y, and the approval status is either Approved or Not Required. For each decision record:
If the latest transaction for an application has a transaction type other than LD or LA, the process does not generate a transaction. In these cases, you should use the GTTR Transactions page to manually create a transaction.
If there is no transaction for an application and you enter I, C, U, W, R, E, M, S, or G decision, the system generates a LD (initial decision) transaction.
If an LD or LA (amended decision) transaction exists for an application and the latest decision value is different from the decision value of the existing LD or LA transaction, the system generates LA transaction. If you have not changed the decision, the system does not generate a transaction.
When the system completes processing the decisions, it sets the transaction flag for the decision record to N to indicate that transaction processing has completed.
When the Transaction Processing process generates a new transaction record, it automatically updates the Campus Solutions application (linked to the UCAS application choice) with the program action and action reason values. For example, if transaction type equals LD and decision is I for a GTTR application, the system looks at the program action reason mapping for the decision Interview you have set up in the GTTR Program Actions page. The system then attaches the program action and action reason to the application.
Use the Standard Offers page to define conditions for an offer to send to UCAS. For example, you can define a condition three A Levels at Grade B that can be used for multiple application decisions. Subsequently, you can enter this condition in the Decision Processing pages when making a conditional offer. When you generate transactions for the conditional offers, the system includes this condition in the transactions to send to UCAS.
The following example is a scenario for UCAS application processing.
Enter a decision and generate a transaction:
Use the Initial Decision Entry pages to enter a decision. For example, enter a decision of unconditional offer.
Run the Transaction Processing process to generate the transaction for the unconditional offer decision. (Select the Generate Transactions check box on the Transaction Processing page.)
Use the UCAS Transactions page to review the transaction. For example, because you entered a decision of Unconditional Offer, the Transaction Details section of the page displays the Transaction Type LD and Decision of U.
Now you want to export this decision to UCAS and also want to know that UCAS has received this transaction.
It is recommended that you first generate transactions, review the sent transactions, and then request UCAS for acknowledgement. Normally, a time delay occurs between Campus Solutions writing the transaction to UCAS and UCAS updating the transaction with an error code. Therefore, we recommend that you do not run the transaction processing process with both the Export Transactions and Update Transactions from UCAS check boxes selected. Run the transaction processing process with the Generate Transaction check box selected first and review the sent transactions. Then, run the transaction processing process with the Update Transactions from UCAS check box selected and review the transaction for acknowledgement.
Run the Transaction Processing process to export the applicant's LD transaction to UCAS (select the Export Transactions check box on the Transaction Processing page.)
In the UCAS Transactions page, review the exported transaction (the Sent check box appears as selected).
Run the Transaction Processing process to receive the acknowledgment from UCAS for the exported transaction (select the Update Transactions from UCAS check box on the Transaction Processing page).
Use the UCAS Transactions page to review the error code for the applicant's LD transaction sent to UCAS. The error code is 0 (success) in the UCAS Transactions page, which indicates that UCAS received the institution's decision.
Finally, to know the applicant's response, complete these steps:
Run the Import Applicant Data process. If the applicant has responded to the offer, the offer response will be in ivStarC.
On import, Campus Solutions sets the Reply as F (for a Firm response) or I (for an Insurance response) on the UCAS Decision Processing page of the applicant if the applicant has accepted the offer. If the applicant has declined the offer, Campus Solutions sets the Reply as D.
When exam results are available, your institution will confirm conditional offers:
Make sure you have imported cvRefTariff data (by running the Import Reference Data process) if you want to use the Results/Offer Matching process to evaluate tariff offers.
Run the Import Applicant Data process to import the exam results.
Compare the applicant exam results with the offer conditions. You can do the comparison manually or run the Results/Offer Matching process.
Use the Quick Confirmation page or the Confirmation Entry page to accept or reject the conditional offer.
Run the Transaction Processing process to generate and export the RD transaction.
The following diagram illustrates the Confirmation process flow:
An applicant who may not have got admission in any institution is eligible for Clearing:
Use the Import Applicant Data to import the Clearing application choices.
Use the UCAS Initial Decision Entry or the UCAS Decision Processing page to enter an admission decision for the Clearing application. To search for the Clearing applications, enter 9 in the UCAS Choice Number field of the decision search page. Note that the decision search pages do not display accepted Clearing applications (that is UCAS applications with choice number = 9 and the decision value = A).
Use the UCAS Enquiry Entry page to create inquiry records and record RQ Clearing transactions to request the details of a Clearing applicant. If your institution wants to offer admission to the Clearing applicant, use the UCAS Enquiry Entry page to record the RX transaction.
Run the Transaction Processing process to generate and export the RQ or RX transaction to UCAS. The RX transaction must have a decision value.
Use the Import Applicant Data process to import the application choices for Clearing if you have sent a RQ transaction.
The following diagram illustrates an example of the Clearing process flow:
![]()
Clearing Processing Flow Example
For processing Adjustment records:
Use the UCAS Enquiry Entry page to create Adjustment records and record RQ or PE transactions. Use this page to record the AD transaction.
Run the Transaction Processing process to generate and export the RQ, PE, or AD transaction to UCAS.
Run the Import Applicant Data process. The process imports the Adjustment application choice if you have sent an AD transaction. If you have sent a RQ or PE transaction, the process imports only Adjustment applicant data such as biographical data, and ivStarN, ivStarA and ivStarK data.
Use the UCAS Release to Clearing page to release an applicant into Clearing.
After your institution has accepted an applicant through Adjustment (that is, your institution has sent an AD transaction), the system updates the application choice to UF. If the applicant subsequently withdraws the applicant, then the institution may either release the application to clearing (RR transaction) or withdraw the applicant (RW transaction). Use the UCAS Release to Clearing page to record the RR transaction or use the UCAS Transactions page to record the RW transaction.
The following diagram illustrates an example of the Adjustment process flow:

Adjustment Processing Flow Example
Pages Used to Process the Imported UCAS and GTTR Applications and Applicant
Data|
Page Name |
Definition Name |
Navigation |
Usage |
|
Standard Offers |
SAD_UC_STD_OFF |
Student Admissions, UCAS Processing , Standard Offers |
Define conditions for an offer that UCAS sends to the applicant. |
|
UCAS Wrong Applicants |
SAD_UC_STARW |
Student Admissions , UCAS Processing, Remove Wrong Applicants, UCAS Wrong Applicants |
Review the imported applicant records from ivStarW and delete records if required. |
|
UCAS Initial Decision Entry |
SAD_UC_DECENTRY |
Student Admissions, UCAS Processing, UCAS Decision Processing, Initial Decision Entry |
Enter an admission decision for a UCAS application choice. |
|
UCAS Decision Processing |
SAD_UC_DECISN |
Student Admissions, UCAS Processing, UCAS Decision Processing, Decision Processing |
Enter or update an admission decision for a UCAS application choice. Find out whether your institution has confirmed the applicant's admission offer or released the applicant into Clearing. |
|
Quick Decision Entry |
SAD_UC_QDEC |
Student Admissions, UCAS Processing, UCAS Decision Processing, Quick Decision Entry |
Enter a decision simultaneously for multiple UCAS applications. |
|
UCAS Decision Approval |
SAD_UC_DECAPR |
Student Admissions, UCAS Processing, UCAS Decision Approval, Decision Approval |
Approve or reject the admission decision for a UCAS application choice. |
|
Quick Decision Approval |
SAD_UC_QDAPR |
Student Admissions, UCAS Processing, UCAS Decision Approval, Quick Decision Approval |
Approve or reject simultaneously the admission decisions for multiple UCAS applications. |
|
Results/Offer Matching Process |
SAD_UC_MATCH_PROC |
Student Admissions, UCAS Processing, UCAS Decision Processing, Result/Offer Matching Process |
Match exam results with conditional offer details for Confirmation. The process determines whether the applicants have satisfied the offer conditions. You can run this process for all applicants in an institution, for all applicants of a particular course, or for specific applicants. This process is optional for confirming conditional offers. You can use the Confirmation Entry page to manually determine whether an applicant has satisfied the offer conditions. |
|
Confirmation Entry |
SAD_UC_CNFDEC |
Student Admissions, UCAS Processing, UCAS Decision Processing, Confirmation Entry |
Accept or reject the conditional offer of an applicant. If you have not run the Results/Offer Matching process for the applicant, manually match the applicant's exam results with the conditional offer details and indicate whether the applicant has satisfied the conditions for admission. |
|
Quick Confirmation |
SAD_UC_QCONF |
Student Admissions, UCAS Processing, UCAS Decision Processing, Quick Confirmation |
Accept or reject the conditional offer of multiple applicants. |
|
Confirmation Approval |
SAD_UC_CNFAPR |
Student Admissions, UCAS Processing, UCAS Decision Approval, Confirmation Approval |
Approve or reject the Confirmation decision for an applicant. |
|
Quick Confirmation Approval |
SAD_UC_QAPR |
Student Admissions, UCAS Processing, UCAS Decision Approval, Quick Confirmation Approval |
Approve or reject the Confirmation decision for multiple applicants. |
|
UCAS Release To Clearing |
SAD_UC_RELDEC |
Student Admissions, UCAS Processing, UCAS Decision Processing, Release to Clearing |
Release an applicant into Clearing. |
|
Release to Clearing Approval |
SAD_UC_RELAPR |
Student Admissions, UCAS Processing, UCAS Decision Approval, Release to Clearing Approval |
Approve or reject an applicant's release into Clearing. |
|
UCAS Enquiry Entry |
SAD_UC_CLEARING |
Student Admissions, UCAS Processing, UCAS Decision Processing, UCAS Enquiry Entry |
Create or update an applicant's Clearing or Adjustment record. Specify whether you want the Transaction Processing process to generate an RX, RQ, PE, or AD transaction. |
|
Transaction Processing |
SAD_UC_TRN_PROC |
Student Admissions, UCAS Processing, Transaction Processing, Transaction Processing |
Generate, export, and update UCAS and GTTR transactions. |
|
UCAS Transactions |
SAD_UC_TRANIN |
Student Admissions, UCAS Processing, Transaction Processing, UCAS Transactions |
Review the UCAS transactions. In addition, manually add or delete transactions and set the hold flag to prevent the system from sending the transactions to UCAS. |
|
UCAS Enquiry Transactions |
SAD_UC_TRANINCLR |
Student Admissions, UCAS Processing, Transaction Processing, UCAS Enquiry Transactions |
Review the UCAS Clearing and Adjustment transactions that the Transaction Processing process has generated. Alternatively, manually add or delete Clearing or Adjustment transactions. Set the hold flag to prevent the system from sending the Clearing or Adjustment transactions to UCAS. |
|
GTTR Wrong Applicants |
SAD_UC_GSTARW |
Student Admissions, UCAS Processing, Remove Wrong Applicants, GTTR Wrong Applicants |
Review the imported applicant records from ivgStarW and delete records if required. |
|
GTTR Initial Decision Entry |
SAD_UC_GTDECENTRY |
Student Admissions, UCAS Processing, GTTR Decision Processing, Initial Decision Entry |
Enter an admission decision for a GTTR application choice |
|
GTTR Decision Processing |
SAD_UC_GTDECISN |
Student Admissions, UCAS Processing, GTTR Decision Processing, Decision Processing |
Enter or update an admission decision for a GTTR application choice. |
|
GTTR Decision Approval |
SAD_UC_GTDECAPR |
Student Admissions, UCAS Processing, GTTR Decision Approval, Decision Approval |
Approve or reject the admission decision for a GTTR application choice. |
|
GTTR Transactions |
SAD_UC_GTTRANIN |
Student Admissions, UCAS Processing, Transaction Processing, GTTR Transactions |
Review GTTR transactions that you have sent or not sent. In addition, manually add or delete transactions and set the hold flag to prevent the system from sending the transactions to UCAS. |
|
ID Delete |
RUNCTL_ID_CHANGE |
Campus Community, Personal Information, ID Management, ID Delete |
Delete an ID from the database after initiating the removal process of the ID in the UCAS Wrong Applicants or the GTTR Wrong Applicants pages. |
Defining Conditions for an OfferAccess the Standard Offers page (Student Admissions, UCAS Processing, Standard Offers).
Deleting Incorrect UCAS Applicant RecordsAccess the UCAS Wrong Applicants page (Student Admissions, UCAS Processing, Remove Wrong Applicants, UCAS Wrong Applicants).
|
Remove Applicant |
Click to delete the UCAS applicant record, UCAS applications of the applicant, and any corresponding non-matriculated Campus Solutions application records. The system enables this button if the status is Pending, Partially Removed, or No Action. When you click the button for a UCAS applicant for whom only specific choices are lost, the system removes the specific lost choices but retains the overall applicant record. |
|
No Action |
Click to change the record status from Pending to No Action. The No Action status indicates that the record need not be removed. |
After clicking the Remove Applicant button, navigate to Campus Community, Personal Information, ID Management, ID Delete to remove the person record of the UCAS wrong applicant.
Entering an Initial Admission Decision for a UCAS Application ChoiceAccess the UCAS Initial Decision Entry page (Student Admissions, UCAS Processing, UCAS Decision Processing, Initial Decision Entry).
The UCAS Initial Decision Entry page does not allow you to modify an admission decision. If you want to modify an admission decision, use the UCAS Decision Processing page. Also, the UCAS Initial Decision Entry page does not allow you to access an application withdrawn at UCAS.
|
Institution Decision |
Select an admission decision. After you enter a decision, run the Transaction Processing process to generate the transaction to send to UCAS. If the choice number is 9 (Clearing), the valid decisions are A (Accept) or R (Rejection). If the choice number is 6 (Adjustment), the valid decision is U (Unconditional Offer). If the choice number is not 9 or 6 (standard application), the valid decisions are C (Conditional Offer), U (Unconditional Offer), R (Rejection), F (Course Full), and I (Interview). The Interview Date and Interview Time fields appear only if you select the Interview decision. |
|
Decision Code |
Optionally, add a standard offer to the decision. |
|
Interview Date |
Select the date on which the interview is to take place. |
|
Interview Time |
Enter the time the interview is scheduled to begin. The time format uses a 24-hour clock. Therefore, for example, if the interview time is 2:30 PM, enter 14:30. This time format rule also applies to the Interview Time fields on the UCAS and GTTR Decision Processing pages and the GTTR Initial Decision Entry page. |
|
Comment |
For all decisions you can add a comment, unless a standard offer is entered. You can enter the reason for a Clearing Rejection in the Comment field. When you generate a RX transaction for the rejection, the system includes the comment text in the Free Format column of the RX transaction. |
Entering or Updating an Admission Decision for a UCAS Application ChoiceAccess the UCAS Decision Processing page (Student Admissions, UCAS Processing, UCAS Decision Processing, Decision Processing).
|
Institution Decision |
Select an admission decision. After you enter or update a decision, if required, use the UCAS Decision Approval page to approve the decision. Then use the Transaction Processing process to generate the decision transaction to send to UCAS. The validations of this field are similar to that of the Institution Decision field on the UCAS Initial Decision Entry page. |
|
Confirmation Decision |
The system automatically selects this check box when you enter a Confirmation decision in the UCAS Confirmation Entry page or the UCAS Quick Confirmation page. |
|
Release to Clearing |
The system automatically selects this check box when you enter a Release into Clearing decision in the UCAS Release to Clearing page. |
|
Decision Code |
Optionally, add a standard offer to the decision. |
|
Comment |
The usage of this field is similar to that of the Comment field on the UCAS Initial Decision Entry page. The only difference is that on this page you can use this field for transaction code. For example, if Interview Date is May 26, 2009 and Interview Time is 9:15 and Comment is Bring your portfolio and you click Letter Text, then the following transaction code appears 260509-0915,'Bring your portfolio' |
The offer details fields are similar to the fields on the Standard Offers page.
Entering a Decision for Multiple UCAS Application ChoicesAccess the Quick Decision Entry page (Student Admissions, UCAS Processing, UCAS Decision Processing, Quick Decision Entry).
The Quick Decision Entry page does not allow you to modify an admission decision. If you want to modify an admission decision, use the UCAS Decision Processing page. The Quick Decision Entry page displays only those choices for which decisions have not been entered.
Approving or Rejecting a UCAS DecisionAccess the UCAS Decision Approval page (Student Admissions, UCAS Processing, UCAS Decision Approval, Decision Approval).
Click Approve or Deny button to indicate whether the admission decision entered in the UCAS Decision Processing or UCAS Initial Decision Entry page is approved or denied.
Approving or Rejecting Multiple UCAS DecisionsAccess the Quick Decision Approval (Student Admissions, UCAS Processing, UCAS Decision Approval, Quick Decision Approval).
Determining Whether Applicants Satisfy the Offer ConditionsAccess the Result/Offer Matching Process page (Student Admissions, UCAS Processing, UCAS Decision Processing, Result/Offer Matching Process).
|
Student Override |
Select if you want to run the process for one or more IDs selected in the EmplID field. If you select the Student Override check box, the process ignores any values entered in the UCAS Course Code field. |
For a student, the process can compare the conditions you generated (Transaction Code) on the UCAS Decision Processing page with the exam results, and determine whether the student has satisfied the conditions.
After running this process, navigate to the UCAS Confirmation Entry page to check whether the applicant has satisfied the conditions. If the process determines that the applicant has satisfied the conditions, the Fulfillment Condition field displays Y on the UCAS Quick Confirmation page, and the Result Matching Text field displays Satisfied on the UCAS Confirmation Entry page.
The following example shows how the Result/Offer Matching process works for a tariff offer:
Use the UCAS Decision Processing page to enter a conditional offer for a student.
Enter abbreviation = TO (Tariff Score) and Grade Mark = 200. This condition is generated: The student must obtain a minimum of 200 UCAS tariff points.
Import the exam results from ivStarPQR.
The student has grade C for GCE A Levels in Maths, General Studies, and English.
Run the Results/Offer Matching process for the student.
The system uses the imported cvRefTariff data to translate the total tariff score to 240 (grade C is equivalent to 80 tariff points).
The UCAS Confirmation Entry page for the student shows that the condition is satisfied.
Entering or Updating a Confirmation DecisionAccess the UCAS Confirmation Entry page (Student Admissions, UCAS Processing, UCAS Decision Processing, Confirmation Entry).
Click the Accept or Reject button to indicate the Confirmation decision.
All application records that are CF or CI (decision is conditional offer, and reply is firm or insurance) appear on the UCAS Confirmation Entry page regardless of whether a confirmation decision is pending or has been entered. You can enter or amend a confirmation decision using this page.
The system automatically selects the Confirmation Decision check box on the UCAS Decision Processing page when you click Accept or Reject.
After you enter a Confirmation decision, if required, use the Confirmation Approval page to approve the decision. Then run the Transaction Processing process to generate the RD transaction to send to UCAS.
If you amend an existing confirmation decision using this page, in most cases, the Transaction Processing process generates another RD transaction with the new Accept or Reject decision. However, in cases where you have already sent an accept decision and a course change is being made, then the process generates a RA transaction.
Entering Multiple Confirmation DecisionsAccess the UCAS Quick Confirmation page (Student Admissions, UCAS Processing, UCAS Decision Processing, Quick Confirmation).
The same rules discussed in the Entering a Confirmation Decision topic in this chapter apply to the UCAS Quick Confirmation page.
You can search for records of a particular course. Also, you can use the same Decision Maker value for all the records that appear in the search results.
When you click Accept or Reject, the system automatically updates the Decision value to A or R, respectively.
Approving or Rejecting a Confirmation DecisionAccess the UCAS Confirmation Approval page (Student Admissions, UCAS Processing, UCAS Decision Approval, Confirmation Approval).
Approving or Rejecting Multiple Confirmation Decisions Access the Quick Confirmation Approval page (Student Admissions, UCAS Processing, UCAS Decision Approval, Quick Confirmation Approval).
You can search for records for a particular course. Also, you can use the same Approver value for all the records that appear in the search results.
Entering a Decision to Release an Applicant into ClearingAccess the UCAS Release to Clearing page (Student Admissions, UCAS Processing, UCAS Decision Processing, Release to Clearing).
The page displays:
Application choices that have a Institution Decision of U (Unconditional), Reply of F (Firm), and the Release to Clearing check box cleared on the Decision Processing page.
All accepted Clearing and Adjustment application choices (that is, application choice number is 6 or 9, decision is A or U, and Reply is not equal to D (declined).
The system automatically selects the Released to Clearing check box on the UCAS Decision Processing page when you click Release to Clearing.
After you enter a decision to release an applicant into Clearing, if required, use the Release to Clearing Approval page to approve the decision. Then run the Transaction Processing process to generate the RR transaction to send to UCAS.
Approving or Rejecting the Release into Clearing DecisionAccess the UCAS Release Approval page (Student Admissions, UCAS Processing, UCAS Decision Approval, Release to Clearing Approval).
Entering Clearing or Adjustment DetailsTo search for only adjustment records, select the Adjustment check box on the search page. To search for only Clearing records, clear the Adjustment check box on the search page.
Access the UCAS Enquiry Entry page (Student Admissions, UCAS Processing, UCAS Decision Processing, UCAS Enquiry Entry).
Use the Transaction Type field to record an RQ, PE, or RX transaction for a Clearing enquiry or the RQ, PE, or AD transaction for an Adjustment enquiry. After you record the Clearing or Adjustment details, run the Transaction Processing process to generate the Adjustment or Clearing transactions to send to UCAS.
If you want to record a PE transaction, the UCAS Personal ID and UCAS Application Code fields are required (UCAS Course Code is optional).
If you want to record a AD transaction, the UCAS Personal ID, UCAS Application Code, UCAS Course Code, Entry Year, and Entry Month fields are required.
The UCAS Course Code field is required for RQ and RX transactions.
Generating, Exporting, and Updating UCAS and GTTR TransactionsAccess the Transaction Processing page (Student Admissions, UCAS Processing, Transaction Processing, Transaction Processing).
Use the check boxes in the UCAS and GTTR regions to generate, export, and update UCAS and GTTR transactions.
|
Generate Transactions |
Select to generate transactions and update the corresponding Campus Solutions application choice records. |
|
Export Transactions to UCAS |
Select to write the transactions to the TRANIN table at UCAS. |
|
Update Transactions from UCAS |
Select to enable the Campus Solutions system to read back error codes from TRANIN at UCAS. |
The system disables the GTTR check boxes on the Transaction Processing page if you clear the GTTR check box on the UCAS Configuration page.
Reviewing UCAS Transactions Access the UCAS Transactions page (Student Admissions, UCAS Processing, Transaction Processing, UCAS Transactions).
You cannot update transactions that the system has already sent to UCAS. The transaction appears in read-only mode if the system has already sent the transaction to UCAS. If the system has not sent the transaction, you can use this page to update, delete, or hold the transaction.
|
Error Code |
Displays the status of a transaction that UCAS sends back to the institution. You import the error codes, descriptions, and error positions from cvRefError view when you import the reference data. An error code of:
|
|
Error Position |
Indicates where the error appears in the transaction code. |
|
Decision |
Select a decision for the transaction of an application choice. |
|
Transaction Code |
Enter the transaction code that you want to send to UCAS. |
|
Auto |
Indicates that the system has automatically generated the transaction. |
|
Sent |
Indicates that the system has sent the transaction to UCAS. |
|
Hold |
Select or clear to indicate whether you want the system to export the transaction to UCAS. |
The following table lists the field values that are mandatory when you create a transaction manually. If you create a transaction manually, you will need to manually update the related Campus Solutions application record.
|
Transaction Type |
Mandatory Field Value |
|
LD (decision) LA (amended decision) RD (confirmation decision) |
Decision |
|
LC (course correction) |
At least one of the following values must be provided:
|
|
RR (release into clearing) |
Transaction Code must contain a value ranging from .R1 to .R8. |
|
PE, RA, or RW |
None |
|
RA, RR, and RW |
Application must be UF. That is, Decision must be U (Unconditional Offer) and Reply must be F (Firm). |
Use the Clearing Transactions page to manually create an RX or RQ transaction.
Reviewing UCAS Clearing and Adjustment TransactionsTo search for only adjustment transactions, select the Adjustment check box on the search page. To search for only Clearing transactions, clear the Adjustment check box on the search page.
Access the UCAS Enquiry Transactions page (Student Admissions, UCAS Processing, Transaction Processing, UCAS Enquiry Transactions).
Most of the fields on the UCAS Enquiry Transactions page are similar to those on the UCAS Transactions page.
Deleting Incorrect GTTR Applicant RecordsAccess the GTTR Wrong Applicants page (Student Admissions, UCAS Processing, Remove Wrong Applicants, GTTR Wrong Applicants).
|
Remove Applicant |
Click to delete the GTTR applicant record, the GTTR applications of the applicant, and any corresponding non-matriculated Campus Solutions application records. The system enables this button if the applicant's status is Pending or Partially Removed. |
After clicking the Remove Applicant button, navigate to Campus Community, Personal Information, ID Management, ID Delete to remove the person record of the GTTR wrong applicant.
Entering an Initial Admission Decision for a GTTR Application ChoiceAccess the GTTR Initial Decision Entry page (Student Admissions, UCAS Processing, GTTR Decision Processing, Initial Decision Entry).
The GTTR Initial Decision Entry page does not allow you to modify an admission decision. If you want to modify a GTTR admission decision, use the GTTR Decision Processing page.
|
Institution Decision |
Select an admission decision. After you enter a decision, if required, use the GTTR Decision Approval page to approve the decision. Then run the Transaction Processing process to generate the decision transaction. |
|
Decision Code |
Optionally, add a standard offer to the decision. |
Entering or Updating an Admission Decision for a GTTR Application ChoiceAccess the GTTR Decision Processing page (Student Admissions, UCAS Processing, GTTR Decision Processing, Decision Processing).
|
Institution Decision |
Select an admission decision. After you enter or update a decision, if required, use the GTTR Decision Approval page to approve the decision. Then run the Transaction Processing process to generate the decision transaction |
|
Decision Code |
Optionally, add a standard offer to the decision. |
Approving or Rejecting a GTTR DecisionAccess the GTTR Decision Approval page (Student Admissions, UCAS Processing, GTTR Decision Approval, Decision Approval).
Click Approve or Deny button to indicate whether the admission decision entered in the GTTR Decision Processing or GTTR Initial Decision Entry page is approved or denied.
Reviewing GTTR Transactions Access the GTTR Transactions page (Student Admissions, UCAS Processing, Transaction Processing, GTTR Transactions).
The functionality of the GTTR transactions page is similar to that of the UCAS Transactions page. Additionally, most of the fields on the GTTR Transactions page are similar to those on the UCAS Transactions page.