| Oracle® Enterprise Manager Administrator's Guide for Software and Server Provisioning and Patching 11g Release 1 (11.1.0.1.0) E16599-05 |
|


 Previous |
 Next |
| Oracle® Enterprise Manager Administrator's Guide for Software and Server Provisioning and Patching 11g Release 1 (11.1.0.1.0) E16599-05 |
|
Previous |
Next |
Before you run any of the Deployment Procedures, meet the infrastructure requirements described in this chapter. This chapter is essentially for administrators or designers who create the infrastructure for provisioning and patching. The requirements described in this chapter have to be performed just once.
This chapter covers the following:
This section describes the mandatory setup requirements you must meet before running any Deployment Procedure. In particular, this section describes the following:
The main users of Deployment Procedures are Designers (Lead Administrators) and Operators. Designers are users who perform design-time activities and Operators are users who perform run-time activities. For more information about these user accounts, see Users of Deployment Procedures.
Before you begin using Deployment Procedures, Oracle recommends you to create these user accounts in Enterprise Manager Grid Control so that Designers have super administrator privileges to perform advanced tasks, and Operators have basic privileges to run Deployment Procedures.
This section describes the following:
|
Note: Even if you do not create the designer or operator user account, you will be allowed to run the Deployment Procedure as long as you have super administrator privileges. |
To create a Designer user account, follow these steps:
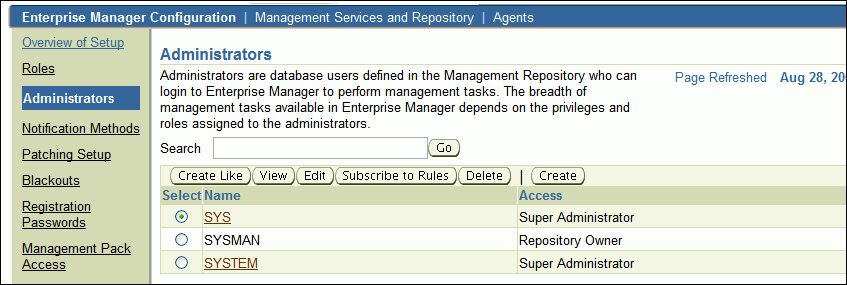
In Grid Control, click Setup.
On the Overview of Setup page, from the vertical menu on the left, click Administrators.
On the Administrators page, click Create.
In the Create Administrator wizard, do the following:
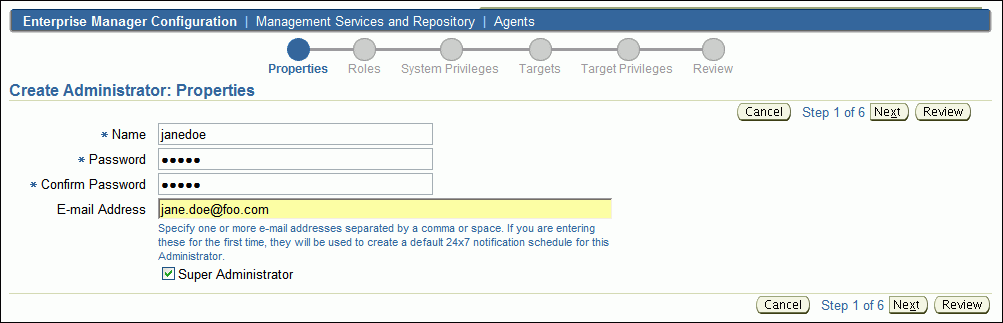
On the Properties page, specify the name Designer, provide a password, check Super Administrator, and click Next.
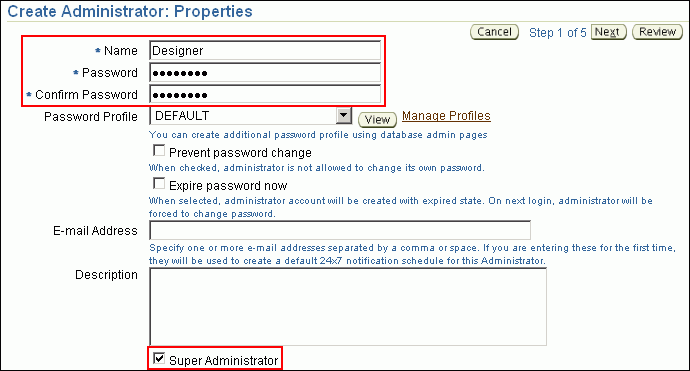
On the Review page, review the information you have provided for this user account, and click Finish.
To create a Operator user account, follow these steps:
In Grid Control, click Setup.
On the Overview of Setup page, from the vertical menu on the left, click Administrators.
On the Administrators page, click Create.
In the Create Administrator wizard, do the following:
On the Properties page, specify the name Operator and provide a password. Leave the other fields blank and click Next.
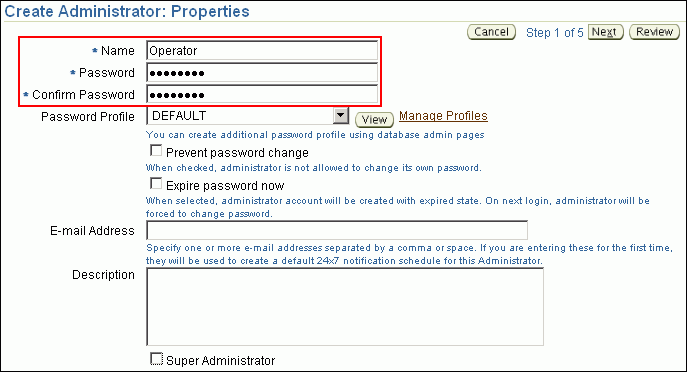
On the Roles page, select Public, and click Next.
On the System Privileges page, select the system privileges that you want to grant to this operator user account.
On the Target Privileges page, select the targets that the operator user account will access.
On the Review page, review the information you have provided for this user account, and click Finish.
Oracle Software Library (Software Library) can be configured on any mounted file system that is readable and writable from Oracle Management Service (OMS).
If you have a single OMS, then you can configure the Software Library either on the host where the OMS is running or in a shared location.
|
Note: If you have plans to have multiple OMSes in the future, then Oracle strongly recommends you to configure the Software Library in a shared location. |
If you configure the Software Library in a shared location, then use the Check Availability feature in the Software Library section in the Administration page to verify that it is accessible by the OMS. For more details, see Appendix C, "Using Oracle Software Library".
Ensure that there is enough space available for the storage of software binaries, and associated scripts for the entities that you want to create and store.
If you have multiple OMSes, then you can configure the Software Library either on one of the hosts where the OMS is running or in a shared location, but you must ensure that the Software Library is accessible by all the OMSes from the configured location.
You can use the Check Accessibility feature in the Software Library section in the Administration page to verify that the Software Library location is accessible by all the OMSes. For more details, see Appendix C, "Using Oracle Software Library".
Ensure that there is at least 1 GB to 2 GB of space available for successfully configuring the Software Library. Understandably, this space requirement increases over a period of time as you create more components and gold images. For example, if you are creating a gold image of a database home of 1 GB, then ensure that you have at least 2 GB of space.
If you want to increase the space available in the Software Library to store entity files or binaries, then do one of the following:
Method A: Manually add more space to that folder or to that shared location where you have configured the Software Library. Ensure that you do not change the Software Library location. After increasing the space manually, go to the Provisioning page, click the Administration tab, and in the Software Library Configuration section, click Refresh.
Method B: Add another Software Library location by clicking Add so that all all the new images, components, and so on are stored in this new location.
To configure the Software Library, follow these steps:
In Grid Control, click Deployments, and then the Provisioning subtab.
There are a number of tabs here for creating components, directives and other entities. You can access some or all of the tabs depending on the privileges assigned to you.
Click the Administration tab. This requires super administrator privileges similar to Designer user account/SYSMAN user.
For information about creating the super administrator, see Creating Super Administrator for Enterprise Manager.
In the Software Library Configuration section of the Administration tab, click Add.
On the Add Software Library Location page, enter the directory location and then click OK.
|
Note: When you add a Software Library location for the first time, the configuration might take some time. While the location is being configured, Enterprise Manager Grid Control displays a progress page that shows information about the PAR files being uploaded. However, this behavior is expected only when the location is being configured for the first time. Subsequently, adding other Software Library locations will be quicker. |
When the Software Library is configured, out-of-box Provisioning Archive files (PAR files) will be deployed. These files contain pre-build entities such as components, directives, and so on for various applications such as bare metal provisioning and patching.
For information about PAR files, see Provisioning Archive (PAR) Files. For more information about Software Library, see Appendix C, "Using Oracle Software Library".
The following are the limitations and known issues related to the Software Library:
Relocation of the Software Library is not supported from the Enterprise Manager Grid Control console. Also see My Oracle Support note 865804.1.
The directory /tmp on Linux and Unix, or C:\TEMP on Microsoft Windows must not be used as the Software Library location.
(For Microsoft Windows Only) In order to have the Software Library configured across multiple OMSes, you must have a disk partition with the same name for all the OMS hosts and have a cluster file system running on the partition. This can be accomplished by installing OCFS via an Oracle CRS version 10.2.0.1 installation.
The OMS service must be configured to login as a domain user account, and the domain user account must have the required permissions for accessing the shared storage locations. All the OMS services must login using the same domain user account.
Apply the patches required for provisioning and patching as described in My Oracle Support note 427577.1.
To view this note, access My Oracle Support at the following URL. On the main page (based on the classic metalink view), from the Quick Find list, select Document ID (Knowledge Base, Forum, or Bug), and quote the note number and click Go.
For more information about these patches, view the ReadMe file associated with the patch.
Before running a provisioning-related Deployment Procedure, ensure that the target hosts are discovered and monitored in Enterprise Manager Grid Control. Similarly, before running a patching-related Deployment Procedure, ensure that the targets you want to patch are discovered and monitored in Enterprise Manager Grid Control.
For this purpose, you require Oracle Management Agent 11g Release 1 (or higher) to be installed on the target hosts where you want to run the procedure. For information about installing Oracle Management Agent 11g Release 1 (or higher), see Oracle Enterprise Manager Grid Control Basic Installation Guide or Oracle Enterprise Manager Grid Control Advanced Installation and Configuration Guide available at:
http://www.oracle.com/technology/documentation/oem.html
In the case of Oracle RAC and Oracle Clusterware, before you run the Deployment Procedures to provision or extend them, ensure that you have cluster-based Oracle Management Agent (Management Agent) on every node of the cluster.
To install cluster-based Management Agent on every node of the cluster, see the Oracle Enterprise Manager Grid Control Advanced Installation and Configuration Guide available at:
If you have standalone Management Agent installed on every node of the cluster, then convert it to cluster-based Management Agent. For instructions to convert, see Appendix I, "Converting Standalone Oracle Management Agent to Cluster Agent".
Ensure that the OMS and the Management Agent are able to communicate with each other. To verify this, check the status of the Management Agent:
Navigate to the Oracle home of the OMS and run the following command to see a message that confirms that OMS is up and running.
$<ORACLE_HOME>/bin/emctl status oms
Navigate to the Oracle home of the Management Agent and run the following command to see a message that confirms that the Management Agent is up and running:
$<ORACLE_HOME>/bin/emctl status agent
In Grid Control, click All Targets. On the All Targets page, search and click the Management Agent, and on the Home page of the Management Agent, check its status.
This section describes the optional setup requirements you may meet before running any Deployment Procedure. In particular, this section describes the following:
Enterprise Manager Grid Control allows you to run Deployment Procedures using authentication utilities such as SUDO, PowerBroker, and so on. This support is offered using the Privilege Delegation mechanism available in Enterprise Manager Grid Control. Privilege Delegation is a framework that allows you to use either SUDO or PowerBroker to perform an activity with the privileges of another user (locked accounts).
For information on how you can customize Deployment Procedures and use SUDO, PowerBroker, or Privilege Delegation settings, see Chapter 31, "Customizing Steps to Run as Another User".
|
Note: The certified SUDO versions are 1.6.7 to 1.6.9. The certified PBRUN versions are 4.0.8 and 5.x. Higher versions of these utilities may continue to work unless some fundamental changes have been introduced to their behavior. |
Enterprise Manager Grid Control can send e-mail notification every time you run a Deployment Procedure. However, by default, Deployment Procedures do not have this feature enabled. To configure them to send e-mail notifications, you must customize the Deployment Procedure.
For information on how you can customize Deployment Procedures and set up e-mail notifications, see Chapter 31, "Setting Up E-Mail Notifications".
Before you run any Deployment Procedure, Oracle recommends you to register the credentials of the host on which you want to provision or the Oracle home that you want to patch, as preferred credentials in Enterprise Manager Grid Control. This section explains how you can set up preferred credentials. In particular, this section explains the following:
To register the credentials of the host (on which you want to provision) as preferred credentials in Enterprise Manager Grid Control, follow these steps:
In Grid Control, from the top-right corner of the page, click Preferences.
On the General page, from the vertical menu pane to the left, click Preferred Credentials.
On the Preferred Credentials page, from the table, for the Host target type, click the Set Credentials icon that is shown in the column Set Credentials.
For example, if you want to provision a database on a host named xyz.server.com, then for Host target type, click the Set Credentials icon.
Enterprise Manager Grid Control displays the <Target Type> Preferred Credentials page.
|
Note: For setting up preferred credentials for virtual server targets, select Oracle VM Server as the target type and click the Set Credentials icon. |
On the <Target Type> Preferred Credentials page, in the Target Credentials section, for the Host target on which you want to provision, specify the user name and password. If you want to use default credentials, then specify the default credentials in the Default Credentials section.
Click Apply.
To register the credentials of the Oracle home (that you want to patch) as preferred credentials in Enterprise Manager Grid Control, run the set_credential verb using the Enterprise Manager Command Line Interface (EM CLI).
|
Note: If the credentials for all the databases and/or hosts are the same, then as an alternative to using the EMCLI verbs, you can register the common credentials of those targets as preferred credentials. This approach is easier than running the EMCLI verbs.To do so, click Preferences from the top-right corner of the console, and from the left menu bar, click Preferred Credentials. On the Preferred Credentials page, register the credentials as preferred credentials. |
set_credential
      -target_type="ttype"
      [-target_name="tname"]
      -credential_set="cred_set"
      [-user="user"]
      -columns="col1:newval1;col2:newval2;..."
      [-input_file="tag1:file_path1;tag2:file_path2;..."]
      [-oracle_homes="home1;home2"]
[ ] denotes that the parameter is optional.
Example 1:
emcli set_credential
      -target_type=oracle_database
      -target_name=myDB
      -credential_set=DBCredsNormal
      -user=admin1
      -column="username:joe;password:newPass;role:newRole"
Example 2:
emcli set_credential
      -target_type=host
      -target_name=host.foo.com
      -credential_set=OHCreds
      -user=admin1
      -column="OHUsername:joe;OHPassword:newPass"
      -oracle_homes="database1;mydb"
|
Note: The preferred credentials set through EM CLI are specific to the Enterprise Manager Grid Control user with which the EM CLI is set up. Therefore, Oracle recommends you to use the central Enterprise Manager Grid Control accounts for this purpose, so the Database Administrators across board or a group can use this.For more information about EM CLI, see Enterprise Manager Command Line Interface Guide available at: |
The following describes the options available for this verb:
Table 3-1 EM CLI Options for set_credential Verb
| Option | Description |
|---|---|
|
target_type |
Type of target. This must be "host" in case the -oracle_homes parameter is specified. |
|
target_name |
Name of the target. Omit this argument to set enterprise preferred credentials. This must be the host name in case the -oracle_homes parameter is specified. |
|
credential_set |
Credential set affected. |
|
user |
Enterprise Manager user whose credentials are affected. If omitted, the current user's credentials are affected. |
|
columns |
Name and new value of the column(s) to set. Every column of the credential set must be specified. Alternatively, a tag from the -input_file argument can be used so that the credential values are not seen on the command line. You can specify this argument more than once. |
|
input_file |
Path of file that has the -columns argument(s). This option is used to hide passwords. Each path must be accompanied by a tag referenced in the -columns argument. You can specify this argument more than once. |
|
oracle_homes |
Name of oracle homes on the target host. Credentials will be added/updated for all specified homes. |
Before you run any Deployment Procedure, Oracle recommends you to refresh the configuration of the hosts. To do so, follow these steps:
In Grid Control, click Deployments.
On the Deployments page, in the Configuration section, click Refresh Host Configuration.
On the Refresh Host Configuration: Select Hosts page, from the Available Hosts pane, select the hosts, which the Deployment Procedure will use, and move them to the Selected Hosts pane.
Click Refresh Hosts.
This section describes the setup requirements for online patching. In particular, this section describes the following:
To patch the targets in online mode, you must set the connection setting in Enterprise Manager Grid Control to Online mode.
|
Note: This is the default mode for patching in Enterprise Manager Grid Control. |
To set the connection setting to Online mode, follow these steps:
In Grid Control, from the top-right corner of the page, click Setup. Enterprise Manager Grid Control displays the Overview of Setup page.
On the Overview of Setup page, from the vertical menu pane to the left, click Patching Setup.
Enterprise Manager Grid Control displays the Patching Setup page with multiple tabs, where My Oracle Support and Proxy Connection tab is selected by default.
On the Patching Setup page, select Online and Offline Settings tab.
On the Online and Offline page, in the Settings section, select Online.
Click Apply.
In an online patching mode, a Refresh From My Oracle Support job is run periodically (either daily or every 24 hours) to automatically download XML files that are required for generating Patch Advisories. Also, the Deployment Procedures automatically download the required patches and patch sets from My Oracle Support every time they are run. For these purposes, Enterprise Manager Grid Control requires credentials to log in to My Oracle Support.
This section provides instructions that help you set up My Oracle Support credentials and proxy server details, if there are any, in Enterprise Manager Grid Control so that it can use these settings to connect to My Oracle Support.
To set up My Oracle Support credentials and proxy connection settings, follow these steps:
In Grid Control, from the top-right corner of the page, click Setup. Enterprise Manager Grid Control displays the Overview of Setup page.
On the Overview of Setup page, from the vertical menu pane to the left, click Patching Setup. Enterprise Manager Grid Control displays the Patching Setup page with multiple tabs, where My Oracle Support and Proxy Connection tab is selected by default.
On the My Oracle Support and Proxy Connection tab, do the following:
In the My Oracle Support section, by default, Patch Search URL displays the URL where the patches will be searched. If you want to verify the connectivity to My Oracle Support, then click Test.
If the credentials are valid and if Enterprise Manager Grid Control is able to connect to My Oracle Support successfully, then a status message is displayed to this effect.
In the My Oracle Support Connection Setting section, do one of the following:
If the host where Enterprise Manager Grid Control is running has a direct connection to Internet, that is, without any proxy server, then select No Proxy.
If the host where Enterprise Manager Grid Control is running has a connection to Internet through a proxy server, then select Manual Proxy Configuration. And, depending on the protocol to be used (HTTP or HTTPS), specify the name of the proxy server, port, realm (if credentials are configured for realm), and credentials (if credentials are required for authentication).
The Connection Configuration subsection shows the default values set for Timeout and Number of Retries. Timeout indicates the time in milliseconds after which it should automatically time out if the connection takes unusually long time to connect to My Oracle Support. Number of Retries indicates the number of times it should retry connecting to My Oracle Support after timing out. Change the default values to higher values only if required.
In the Agent Connection Setting section, select the settings to be considered for all Management Agent-related communications.
If you want to use the settings specified in the My Oracle Support Connection String, then select Use My Oracle Support Connection Settings.
If the host where Management Agent is running has a direct connection to the Internet, that is, without any proxy server, then select No Proxy. The Connection Configuration subsection shows the default values set for Timeout and Number of Retries. Change the default values to higher values only if required.
If the host where Management Agent is running has a connection to Internet through a proxy server, then select Manual Proxy Configuration. And, depending on the protocol to be used (HTTP or HTTPS), specify the name of the proxy server, port, sites for which proxy must not be used, realm (if credentials are configured for realm), and credentials (if credentials are required for authentication).
In the Test URL section, to verify whether the Management Agent is reachable, specify a valid Management Agent URL and click Test. If the URL is valid and if Enterprise Manager Grid Control is able to reach the Management Agent successfully, then a status message is displayed to this effect.
Click Apply.
From the top-right corner of the page, click Preferences. Enterprise Manager Grid Control displays the General page.
On the General page, from the vertical menu pane to the left, click Preferred Credentials. Enterprise Manager Grid Control displays the Preferred Credentials page.
On the Preferred Credentials page, in the My Oracle Support Preferred Credentials section, click Set Credentials.
On the My Oracle Support Preferred Credentials page, set the My Oracle Support credentials and click Apply.
In an online patching mode, a Refresh From My Oracle Support job is run periodically to automatically download XML files that are required for Patch Advisories. Also, the Deployment Procedures automatically download the required patches and patch sets from My Oracle Support every time they are run. For these purposes, Enterprise Manager Grid Control needs to know where the XML files should be stored and the size limit of patch cache up to which it can store the downloaded patches and patch sets.
This section provides instructions that help you set up these online settings.
To set up online settings, follow these steps:
In Grid Control, from the top-right corner of the page, click Setup. Enterprise Manager Grid Control displays the Overview of Setup page.
On the Overview of Setup page, from the vertical menu pane to the left, click Patching Setup.
Enterprise Manager Grid Control displays the Patching Setup page with multiple tabs, where My Oracle Support and Proxy Connection tab is selected by default.
On the Patching Setup page, select Online and Offline Settings tab.
On the Online and Offline page, do the following:
In the Settings section, retain the default connection setting, that is, Online, and set the patch cache size.
Patch Cache is a repository where all downloaded patches are stored. By default, the maximum size or capacity of patch cache is set to 700 MB, which means it can store patches only up to the limit of 700 MB. Once the patch cache reaches this size, all older patches will be automatically deleted to free up some space.
In the Metadata Dump Directory section, retain the default dump directory selection, that is, No.
Dump Directory is a directory where My Oracle Support metadata files can be stored. By default, the dump directory is a temporary storage location on the host where Oracle Management Service is running. The metadata files are XML files required for patch advisories and they are downloaded automatically in an online patching mode.
Click Apply.
This section describes the setup requirements for offline patching. In particular, this section describes the following:
To patch the targets in offline mode, you must set the connection setting in Enterprise Manager Grid Control to Offline mode.
To set the connection setting to Offline mode, follow these steps:
In Grid Control, from the top-right corner of the page, click Setup. Enterprise Manager Grid Control displays the Overview of Setup page.
On the Overview of Setup page, from the vertical menu pane to the left, click Patching Setup.
Enterprise Manager Grid Control displays the Patching Setup page with multiple tabs, where My Oracle Support and Proxy Connection tab is selected by default.
On the Patching Setup page, select Online and Offline Settings tab.
On the Online and Offline page, in the Settings section, select Offline.
Click Apply.
This section explains what you must do to receive patch recommendations automatically. In particular, this section covers the following:
The information about the targets affected by the latest patches and the patch you have to manually download is available in metadata XML files. In an offline mode, you must use another host that has internet connection and manually download these XML files from My Oracle Support.
The following shows the metadata XML files you must download:
Table 3-2 Downloading Metadata XML Files
| Metadata XML File | Location To Download From |
|---|---|
|
aru_product.xml |
https://updates.oracle.com/ARULink/XMLAPI/download_seed_data?table=aru_products |
|
aru_releases.xml |
https://updates.oracle.com/ARULink/XMLAPI/download_seed_data?table=aru_releases |
|
aru_platforms.xml |
https://updates.oracle.com/ARULink/XMLAPI/download_seed_data?table=aru_platforms |
|
aru_languages.xml |
https://updates.oracle.com/ARULink/XMLAPI/download_seed_data?table=aru_languages |
|
aru_product_groups.xm |
https://updates.oracle.com/ARULink/XMLAPI/download_seed_data?table=aru_product_groups |
|
aru_product_releases.xml |
https://updates.oracle.com/ARULink/XMLAPI/download_seed_data?table=aru_product_releases |
|
aru_component_releases.xml |
https://updates.oracle.com/ARULink/XMLAPI/download_seed_data?table=aru_component_releases |
|
patch_recommendations.xml |
https://updates.oracle.com/Orion/Services/search?language_id=0&classification_group=recommended&patch_type=all&group_by=target_type&group_by=release&group_by=platform |
To upload the metadata XML files, follow these steps:
In Grid Control, from the top-right corner of the page, click Setup. Enterprise Manager Grid Control displays the Overview of Setup page.
On the Overview of Setup page, from the vertical menu pane to the left, click Patching Setup.
Enterprise Manager Grid Control displays the Patching Setup page with multiple tabs, where My Oracle Support and Proxy Connection tab is selected by default.
On the Patching Setup page, select Online and Offline Settings tab.
On the Online and Offline Settings page, in the Metadata Cache section, upload the metadata XML files to the Management Repository:
Click Apply.
To extract information from the metadata XML files and display them in Grid Control, you must schedule a job, that is, a "Refresh From My Oracle Support" job.
|
Note:
|
To create "Refresh From My Oracle Support" job, follow these steps:
In Grid Control, click Jobs. Enterprise Manager Grid Control displays the Job Activity page.
On the Job Activity page, from the Create Job list, select Refresh From My Oracle Support and click Go. Enterprise Manager Grid Control displays the Create 'Refresh From My Oracle Support' Job page.
On the Create 'Refresh From My Oracle Support' Job page, specify a name for this job, schedule it to run at a particular time, and grant access to roles that must have access to this job.
Click Submit.
From My Oracle Support, manually download patch 6880880 for the required platform and the version of the target you are patching, and upload it to Oracle Software Library (Software Library). This is a platform-specific patch, so you will have to carefully select the platform while downloading this patch.
For example, if you are patching Oracle Database 11g Release 1 (11.1) that is running on Linux x86, then download patch 6880880 for the Linux x86 platform and for the 11.1.0.0.0 release.
To upload patches to the Software Library, follow these steps:
Ensure that you upload it under the product family "System Management Products and Product - Universal Installer" with the appropriate release and platform details.
In Grid Control, click Deployments. Enterprise Manager Grid Control displays the Deployments page.
On the Deployments page, from the Patching section, click View/Upload Patch. Enterprise Manager Grid Control displays the Patch Cache page.
On the Patch Cache page, for Patch File, click Browse to upload the patch. In the Patch Attributes section, specify details about the patch. Ensure that you upload it under the product family "System Management Products and Product - Universal Installer".
For patching targets in offline mode, you must have already stored the patches in the Software Library so that the Deployment Procedure can retrieve them from there and apply them to the affected targets. For this purpose, you must upload the patches to the Software Library.
To upload a patch to the Software Library:
In Grid Control, click Deployments. Enterprise Manager Grid Control displays the Deployments page.
On the Deployments page, from the Patching section, click View/Upload Patch.
On the View Patches page, click Upload Patch.
On the Upload Patch page, in the Upload Criteria section, do the following:
From the Product Family list, select the product family for which you are uploading the patch. For example, if you want to patch Enterprise Manager Database Control, then select the product family it belongs to, that is, Oracle System Management Products.
From the Product list, select the product for which you are uploading the patch. For example, Enterprise Manager Database Control.
From the Select Type of Patch, select either Patch or Patch Set depending on the type of patch you are uploading.
In the Upload Method section, select the source from where you are uploading the patches.
In the Upload Patch section, click Browse and select the patch you want to upload. You can upload multiple patches simultaneously. The other fields in this section will be prefilled based on the information available in the metadata XML files.
Click Upload.
This section describes the setup requirements for Linux patching. In particular, this section describes the following:
To use the Linux Patching feature, perform these setup activities:
Configure the Software Library as described in Setting Up Oracle Software Library.
Deploy the PAR files from the Oracle home of the OMS:
$ cd $ORACLE_HOME/sysman/prov/paf
emctl partool deploy -parDir . -force
The patch user credentials to be used for patching must have write access under Oracle home directory of the Management Agent.
Operating system credentials used to create groups and set up repository must have SUDO as root privilege.
Following commands must be enabled through SUDO:
/bin/cp
/bin/rm
/bin/chmod
/sbin/chkconfig
yum
up2date
sed
rpm
This section describes how you can set up the RPM repository. In particular, this section describes the following:
Before setting up the RPM repository, meet the following prerequisites:
Identify a Redhat or OEL host, install a Management Agent and point to the OMS. This host must have "sudo" package installed.
Obtain a valid CSI number.
Download the up2date packages corresponding to the host version and release from https://linux.oracle.com/switch.html.
Upload the up2date packages to the Software Library.
First compress up2date and up2date-gname into a zip file and name it as up2date_comp.zip.
Upload the zip file to Deployments > Provisioning > Components > Oracle Components > Stage Server Up2date Component > 10.2.0.4.0 > Linux > UP2DATE_RPM. The Software Library by default has packages for Red Hat Enterprise Linux 4, i386 uploaded.
Ensure that ULN staging host is able to communicate with the ULN network. If proxy is required, up2date from the host needs to be configured as well. The connectivity with ULN will be detrimental for up2date –register –nox command.
Patch user (OS credentials used to setup the Staging server) must have write permission under the agent home. Patch user must also have SUDO privilege.
To set up an RPM Repository that downloads latest RPM packages and Advisories from ULN, follow these steps.
In Grid Control, from the top-right corner of the page, click Setup and select Patching Setup.
In the Linux Patching Setup tab, click the Setup RPM Repository link.
In the Setup Linux RPM Repository section, select the RPM Repository server by clicking the search icon. Select the machine assigned for subscribing to ULN.
In the Credentials section, specify the user name and password to use. Click Apply.
In the Deployment Procedure submission confirmation, click the link "Linux RPM Repository Server Setup." The deployment procedure starts a job to download latest RPM packages and Advisories from the subscribed ULN channels.
(Optional) Set the refresh mode to "30 seconds refresh".
Wait till the step "Installing Up2date" is completed or skipped.
In the Phase Status page, click the link "Register with ULN"and do the following:
Log in to the RPM Repository server machine.
Configure up2date to use a proxy server, if any, by following the instructions at:
https://linux.oracle.com/uln_faq.html - 9
Register the machine to ULN by following the steps at:
https://linux.oracle.com/uln_faq.html - 2
|
Note: While registering, you can choose the user name and password. This credential will be used to log in tohttp://linux.oracle.com |
After registering the host, select the target and click Confirm, and then click Done to go to the main flow.
Click the link "Subscribe to ULN channels". Do the following:
When you register a server, it will be subscribed to a channel that has the latest Enterprise Linux packages for the appropriate architecture. To subscribe to additional channels, log in to http://linux.oracle.com after you register your system. Click on the Systems tab to manage subscriptions for each subscribed server.
Subscribe either to el*_addon channel (this channel contains createrepo) or manually install the createrepo package.
Type the command up2date –nox –show-channels to verify the list of subscribed channels.
Once the deployment procedure completes successfully, go to Setup, select Patching Setup, and then select Manage RPM Repository to verify if the ULN channels are displayed in the Enterprise Manager Console.
In the Manage Repository Home page, check if all the subscribed channels are listed and if all the packages are downloaded.
This section describes how you can set up a Linux Patching group for compliance reporting by associating the group with the RPM Repository (each subscribed ULN channel is a repository) created in Setting Up the RPM Repository.
In particular, this section describes the following:
Before setting up the Linux Patching Group, meet the following prerequisites:
RPM Repository server must be set up or a custom RPM Repository must be set as a channel in Enterprise Manager.
Yum or up2date should be installed in the target machines.
Sudo must be installed on the target machines.
You must have Operator privileges on the hosts that you want to add to the Linux host patching group.
Patch user must have write access under the agent home. Patch user must have sudo privilege.
To set up a Linux patching group, do the following:
In Grid Control, from the top-right corner of the page, click Setup and select Patching Setup.
In the Linux Patching Setup tab, click the Setup Groups link.
In the Setup Groups page, click Create.
In the Create Group: Properties page, specify a unique name for the group. Select the maturity level, Linux distribution, and Linux hosts to be added to the group. Click Next.
In the Create Group: Package Repositories page, select the RPM Repositories to be associated with the group (click the search icon to select repository).
Select Automatically Update Hosts if you want to auto-update the host, that is, to schedule an update job (schedule specified as one of the subsequent step) to update all non-compliant packages from the select package repository.
Under the "Package Compliance" section, choose whether to include "Rogue" packages in compliance reporting or not.
Click Next.
In the Create Group: Credentials page, specify the host credentials or choose to use preferred credentials. Click Next.
If Automatically Update Hosts is not selected, the steps, "Patching Scripts" and "Schedule" pages will be skipped.
In the Patching script page, you can specify any pre/post patching operations to be done. This is not a mandatory step.
In the Schedule Page, select the schedule for the "Update Job". Click Next.
Validate all the parameters in the Review page. Click Finish.
On clicking Finish, three jobs will be submitted if you have not selected the Automatically Update Hosts option. If the option is selected, then four jobs will be submitted. Table 3-3 explains the jobs submitted. Follow the jobs submitted by clicking the job's link.
Go to Deployments > Linux Patching page. Verify the compliance report generated. The group created will have at least one out-of-date package.
Table 3-3 Jobs Submitted for Setting Up Linux Patching Group
| Job | Description |
|---|---|
|
Patching Configuration |
This job configures all the hosts for patching. It creates configuration files to be used by yum and up2date tool. |
|
Compliance Collection |
Compares the packages already installed in the machine with the packages versions in the selected RPM Repositories and generates Compliance Reports. |
|
Package Information |
Collects metadata information from the selected RPM Repositories. |
|
Packages Update |
Updates non-compliant packages. |
To start using guest virtual machines, you will need to perform the following setup activities:
The virtual server will need to be configured before it can be registered with the server pool to enable Enterprise Manager to perform monitoring, administration, and provisioning.
Depending on the Oracle VM version you are using, do one of the following:
For Oracle VM version 2.2 or higher, create a storage repository on the master virtual server as follows:
# /opt/ovs-agent-2.3/utils/repos.py -n example.com:/test
For Oracle VM version 2.1.2 or 2.1.5, create /OVS mount points for shared storage on the Oracle VM server.
No more than 24 Oracle VM servers must be registered and managed with one Oracle Management Agent.
Enterprise Manager supports only Oracle VM server version 2.1.2 or above. All Oracle VM servers version 2.1.2 or above managed by Enterprise Manager should be updated to have OVS agent of version 2.2-70 or higher.
The following ports must be open:
8002,8003,7777,8899,5900-5950,5353,631
To verify which ports are open, use the following command:
service iptables status
If you are migrating from Oracle VM Manager to Enterprise Manager, see Chapter 12, "Migrating from Oracle VM Manager to Enterprise Manager".
If you want to enable High Availability mode, see Chapter 12, "Configuring Oracle VM Servers and Guest Virtual Machines for High Availability".
If a user other than root is used to connect to the virtual server, /etc/sudoers file must be updated to give "sudo all" privilege to this user. To provide sudo privilege for non-root user, add the following entry:
<non-root user> ALL=(ALL) ALL
In addition, comment out the following line:
Defaults requiretty
It is essential that you create a server pool to manage all Oracle VM servers. Server pools can be created with the high-availability option enabled or not. A server pool must have a minimum of one virtual server registered with it.
To create a Virtual Server Pool, do the following:
In Grid Control, click Targets, then click Virtual Servers.
In the Virtualization Central page, select Action as Virtual Server Pool Create Virtual Server Pool and click Go.
In the Create Virtual Server Pool page, provide the values specified in Table 3-4. Click OK to submit the server pool creation job.
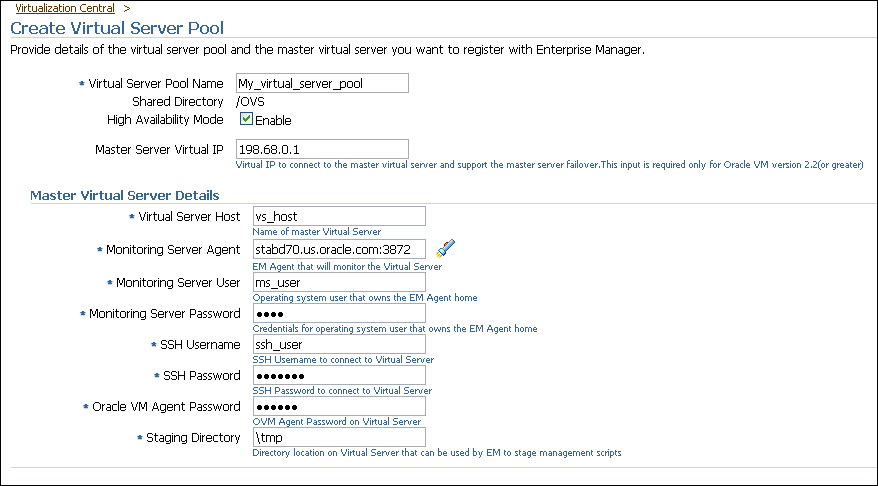
Navigate to Virtualization Central and verify that the status of the server pool you created is Registering.. After the job is completed, the Server Pool must appear in Virtualization Central.
After the job is completed, the server pool must appear in Virtualization Central and status will be Up.
Table 3-4 Virtual Server Pool Configuration Details
| Element | Description |
|---|---|
|
Virtual Server Pool Name |
Specifythe name of the virtual server pool that you are creating. |
|
Shared Directory |
Specifythe directory mounted as the shared directory. This shared directory is the same for all virtual servers within a virtual server pool. For example, |
|
High Availability Mode |
Select Enable if you want the virtual server to participate in high availability. For more information about high availability, see Chapter 12, "High Availability and Fault Tolerance". |
|
Master Server Virtual IP |
If you have chosen to enable high availability mode, optionally specify an unused IP address to support master server failover, and to be used as virtual IP for master server communication. |
|
Virtual Server Host |
Specify either FQDN name or IP address of the master virtual server for the server pool. |
|
Monitoring Server Agent |
Specify the Management Agent that will monitor the virtual server. |
|
Monitoring Server User |
Specify the operating system user that owns the Management Agent home/Management Agent install, and has read and write permission on the Management Agent home directory. |
|
Monitoring Server Password |
Specify the password credentials for the monitoring server user. |
|
SSH Username |
Specify the user on the virtual server who has sudo privileges. |
|
SSH Password |
Specify the password credentials for the SSH user. |
|
Oracle VM Agent Password |
Specify the password of the Oracle VM Agent running on the virtual server. |
|
OVS Proxy Location |
Specify a directory on the virtual server where the scripts required for monitoring and administration are stored when the virtual server is registered with Enterprise Manager Grid Control. |
For Enterprise Manager Grid Control to monitor and manage a virtual server, you must register it with a server pool. Once you create a master virtual server, you can also register other virtual servers to the server pool.
To register virtual servers, follow these steps:
In the Virtualization Central page, select a Server Pool, select Action as Virtual Server - Register Virtual Server and click Go.
In the Register Virtual Server page, specify details of the virtual servers to be registered as shown in Table 3-5. Click Add Another Row to specify multiple virtual servers details.
You can batch assign details to different virtual servers and click Assign to specify common details for multiple virtual servers.
You can add a virtual server from file by clicking Add From File. Select the file from a local machine or a host machine in Enterprise Manager. The file should contain details of the virtual servers in the following format:
<virtualServerName>;<Monitoring Server Name>;<Monitoring Server User>;<SSH User>;<Proxy Location>;<ServerPoolName>
For example:
vs1.xyz.com;abc.xyz.com:4889;oracle;orauser;/tmp;ServerPool1.xyz.com
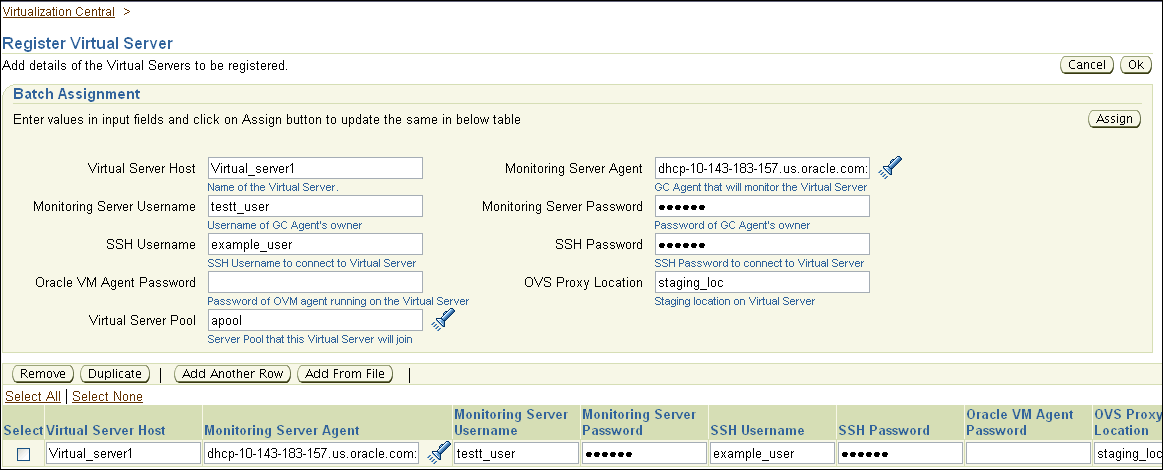
Click OK.
After registering the virtual server, navigate to Virtualization Central and verify that that the virtual server appears under the specific server pool.
Table 3-5 Register Virtual Server Details
| Element | Description |
|---|---|
|
Virtual Server Host |
Specify the name of the master virtual server for the server pool. |
|
Monitoring Server Agent |
Specify the monitoring agent. |
|
Monitoring Server User |
Specify the Operating system user that owns the Management Agent home/Management Agent install, and has read and write permission on agent home directory. |
|
Monitoring Server Password |
Specify the password credentials for the monitoring server user. |
|
SSH Username |
Specify the user on the virtual server who has sudo privileges. |
|
SSH Password |
Specify the password credentials for the SSH user. |
|
Oracle VM Agent Password |
Specify the password of the Oracle VM Agent running on the virtual server. |
|
OVS Proxy Location |
Specify a directory on the virtual server where the scripts required for monitoring and administration are stored when the virtual server is registered with Enterprise Manager. |
|
Virtual Server Pool |
Specify the virtual server pool to which the virtual server will belong. |
This section describes how to set up the infrastructure required to provision bare metal machine. In particular, this section describes the following:
Checklist for Boot Server, Stage Server, RPM Repository, and Reference Host
Setting Up Preferred Credentials for Bare Metal Provisioning in Enterprise Manager
The following steps should be followed for evaluating or using the Bare Metal Provisioning application:
Install or upgrade to the latest Enterprise Manager 11g Grid Control Release 1 (11.1.0.1).
If you are using Enterprise Manager 10g Grid Control version 10.2.0.4 or earlier, then first upgrade it to version 11.1.0.1. Refer to the Enterprise Manager Grid Control 11g Release 1(11.1.0.1) notes available at http://www.oracle.com/technology/documentation/oem.html
Download the agent rpm kit from the following location:
http://www.oracle.com/technology/software/products/oem/htdocs/provisioning_agent.html
Only a user who is a Super Administrator for Enterprise Manager can configure various elements like stage server, boot server etc. for use with the Provisioning Application. Not only that, it is only these users who can actually create assignments for actually provisioning target machines with any image. For more information about assignments, see Assignments.
Follow the steps below to create a user who is a super administrator.
Log into the Enterprise Manager and click on the Setup link on top right hand corner as shown in the picture below.
On the Setup page, click on the Administrators link on the left hand side column.
On the Administrators page, click Create as shown below.
On the Create step that comes up fill up the necessary details as shown and select the Super Administrator check box as shown below. Click Next.
On the Review page, click Finish to complete the user creation.
This section explains how to set up the boot server. Following are the prerequisites:
2 GB RAM for boot server, stage server, and RPM repository server.
Boot server and stage server must be on the same physical machine.
If boot server and stage server reside on different machines, then the boot install directory (/tftpboot/linux-install) should be mounted on the stage server.
If you have the required boot server, stage server, and RPM repository already created, then set up the preferred credentials. For more information on setting up preferred credentials, see Setting Up Preferred Credentials for Bare Metal Provisioning in Enterprise Manager.
Complete the following steps to setup a machine as the boot server:
Install DHCP and TFTP Servers if not already installed.
The two servers could be running either on the same machine, or on different machines. Oracle recommends running the TFTP server on the same host machine as the DHCP server. In case the two servers are installed and configured on different machines, the machine running the TFTP server will be referred to as the boot server.
Configure the TFTP server:
Ensure that the pxelinux boot loader (pxelinux.0) exists in the directory that is configured for your TFTP server (/tftpboot/linux-install in the given examples).
Configure DHCP Server:
Edit the dhcpd.conf (/etc/dhcpd.conf) file. A sample dhcpd.conf file for PXE setup is shown below:
allow booting;
allow bootp;

option domain-name  <domain_name>;
option domain-name-servers dns_servers;
option routers <default_router>;

subnet <subnet-number> netmask <netmask> {
       [ parameters ]
       [ declarations ]
  }
# Group the PXE bootable hosts together

group {

# PXE-specific configuration directives...

 next-server  <TFTP_server_IP_address>;

 filename "linux-install/pxelinux.0";

host <hostname> {
hardware ethernet <MAC address>;
fixed-address <IP address>;
        }
  }
The next-server option in the DHCP configuration file specifies the host name or IP Address of the machine hosting the TFTP server. Oracle recommends running the TFTP Server on the same host machine as the DHCP Server. Therefore, this address should be the IP Address or hostname for the local machine.
The filename option specifies the boot loader location on the TFTP server. The location of the file is relative to the main TFTP directory.
Any standard DHCP configuration file is supported.The sample file format above shows one entry (line 12-15) for each target host. The DHCP service must be restarted every time you modify the configuration file.
Enable the tftp service. Edit the /etc/xinetd.d/tftp file to change the disable flag as no (default=no).
Restart the following services:
service dhcpd restart
service xinetd restart
service portmap restart
Install Oracle Management Agent.
Stage server must meet the following requirements:
Large Storage
The files related to components and directives of an image are first copied to the stage server in preparation for the network installation, and are kept there for future use. The stage server thus acts as a huge cache of files, which requires a large storage.
The stage server can also host the staging storage on Network Attached Storage(NAS). Multiple stage servers can use the same NAS.
High Memory
The stage directives associated with the components and images are directives that are executed during staging phase of a component or Image. They contain commands to unpack and layout the files in order to facilitate the network installation. Depending on the size of the components and images, these commands place high memory requirements on part of the stage server.
Sufficient Bandwidth
Staging process could be very time consuming if the network between the Stage server and software library (on Oracle Management Service or OMS Server) does not have sufficient bandwidth to enable fast transfer of files. Similarly, the link between the stage server and hardware servers should have high bandwidth to make the installation process faster.
NFS or HTTP Support
During the installation, hardware servers mount the stage directory so that all the files required for installation appear as local files. In such a scenario, the stage server functions as the NFS server and the hardware servers as its clients. If the stage server uses NAS for staging storage, the NAS server should have the NFS support.
If the stage server cannot have NFS support, it must be accessible by HTTP.
Follow the instructions listed below to set up a Linux machine as the stage server:
Create a top-level directory.
Create a top-level directory on the stage server where all the files will be stored. In the following steps, STAGE_TOP_LEVEL_DIRECTORY refers to the absolute path of this top-level directory.
You can specify the HTTP or NFS location of agent rpms when you set up a default image in the Provisioning application. Alternatively, you can copy agent rpms to STAGE_TOP_LEVEL_DIRECTORY so that they are picked up automatically. If 11.1 agent rpms are available in STAGE_TOP_LEVEL_DIRECTORY, they will be picked up. Otherwise, depending on the agent rpm versions available in STAGE_TOP_LEVEL_DIRECTORY, the 10.2.0.5 or earlier versions of agent rpms will be picked up. The 32-bit and 64-bit agent rpms will be picked up depending on whether the Linux operating system being provisioning is 32-bit or 64-bit.
To copy agent RPMs to STAGE_TOP_LEVEL_DIRECTORY, do the following:
Download Agent RPMs zip file from the following location:
http://www.oracle.com/technology/software/products/oem/htdocs/provisioning_agent.html
Unzip the agent RPMs zip file into a temporary directory and then copy the agent RPMs from the emagent directory to STAGE_TOP_LEVEL_DIRECTORY.
Configure NFS services.
Perform the following steps on the stage server.
|
Note: If the stage server uses NAS for staging storage, the following steps need to be performed on the NAS server as well. |
Ensure the NFS service is running. One can check this by running service nfs status.
Modify the "/etc/exports" file to have the following entry:
{Directory path} {host_name_or_ip_prefix}* (ro,sync)
For example, /STAGE_TOP_LEVEL_DIRECTORY 10.152.* (ro,sync), if the hardware servers to be provisioned have the IP prefix 10.152.
Or, /STAGE_TOP_LEVEL_DIRECTORY provision-host* (ro,sync), if the hardware servers to be provisioned have names starting with provision-host.
After the modification is made, run the service nfs restart command to make the changes visible to nfs daemons.
Install Enterprise Manager Agent.
Refer to the "Installing Management Agent" chapter in Oracle Enterprise Manager Grid Control Installation Guide to install a 10.2.0.3 or higher version of Management agent on the Stage Server.
|
Note: Ensure that the preferred credentials set for the staging server host has "write" access to the staging storage. |
From Grid Control Console, set the privileged preferred credentials for the stage server. For information about setting preferred credentials in Enterprise Manager, see Setting Up Preferred Credentials for Bare Metal Provisioning in Enterprise Manager.
Oracle recommends that the stage server must have very limited access due to the criticality and sensitivity of the data it hosts. The super administrator can enforce this by creating one account on the stage server, and setting it as the preferred credential, to be used by all the provisioning users in Enterprise Manager. This preferred credential should also be a valid ORACLE_HOME credential (belonging to ORACLE_HOME owner's group).
|
Note: It is recommended that you use RAM of 2 GB. |
RPM Repository is used as the source of Linux and application packages that need to be installed on the newly provisioned bare metal box. For example, an RPM Repository may be created to contain all the 32-bit Linux rpms and another repository may be created to contain Linux x86-64 bit rpms. Two separate Linux images can then be created each based on one of the repositories.
RHEL RPM repository to be used should have the following Red Hat Install tree structure:
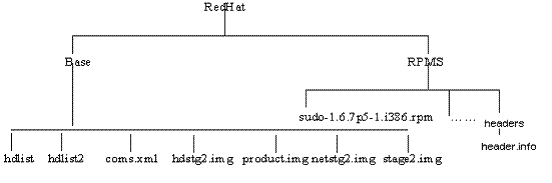
There are multiple ways to create a RPM repository. If Red Hat Enterprise Linux CDs are available, do the following:
Copy all the contents of the first CD to a directory say RPM_REPOS.
Copy all rpms from other CDs to <RPM_REPOS>/Redhat/RPMS. Change directory to the RPMS directory:
cd <RPM_REPOS>/Redhat/RPMS
Add custom RPMs to the repository.
If there are custom RPMs installed on the reference host that need to be provisioned on the bare metal machine, make sure to copy them to the following repository location:
<RPM_REPOS>/Redhat/RPMS
Install anaconda-runtime RPM on the machine hosting the RPM repository. This might require other dependent packages to be installed.
Run the following commands:
cd /usr/lib/anaconda-runtime
./genhdlist --productpath=RedHat --withnumbers --hdlist <RPM_REPOS>/RedHat/base/hdlist <RPM_REPOS>
Run yum-arch :
This should create a headers directory. Make sure this directory contains a header.info file.
If yum is not installed then download it from the Linux Vendor's Web site.
Create a symbolic link in /var/www/html to <RPM_REPOS> directory.
The repository should now be available through http if an apache server is running.
Oracle Enterprise Linux (OEL) RPM repository should have the Install tree structure shown below:
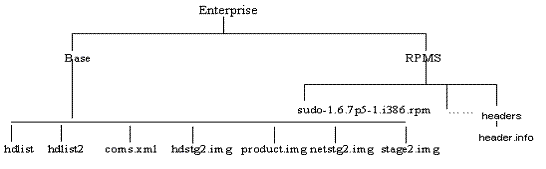
You can set up Oracle Enterprise Linux (OEL) Repository by using the OEL installation media as follows:
Download Oracle Enterprise Linux from http://edelivery.oracle.com/linux.
Copy all the contents of the first CD to a directory say RPM_REPOS.
Copy all rpms from other CDs to <RPM_REPOS>/Enterprise/RPMS. Change directory to the RPMS directory:
cd <RPM_REPOS>/Enterprise /RPMS
Add custom RPMs to the repository.
If there are custom RPMs installed on the reference host that need to be provisioned on the bare metal machine, make sure to copy them to the following repository location:
<RPM_REPOS>/Enterprise/RPMS
Install anaconda-runtime RPM on the machine hosting the RPM repository. This might require other dependent packages to be installed.
Run the following commands:
cd /usr/lib/anaconda-runtime
./genhdlist --productpath=Enterprise --withnumbers --hdlist <RPM_REPOS>/Enterprise/base/hdlist <RPM_REPOS>
Run yum-arch :
This should create a headers directory. Make sure this directory contains a header.info file.
Create a symbolic link in /var/www/html to <RPM_REPOS> directory.
The repository should now be available through http if an apache server is running.
Oracle Enterprise Linux (OEL) RPM repository should have the Install tree structure shown below:
You can set up Oracle Enterprise Linux (OEL) Repository by using the OEL installation media as follows:
Download Oracle Enterprise Linux from http://edelivery.oracle.com/linux.
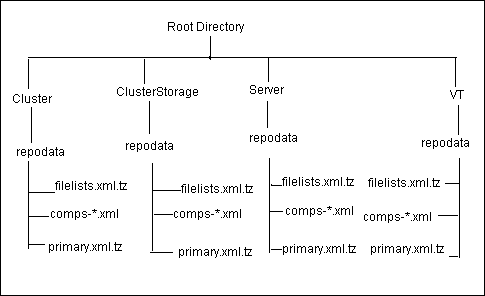
Copy all the contents of the first CD to a directory say Root Directory.
Copy all contents from the Cluster, ClusterStorage, Server, and VT directories in the other CD to the respective directories.
For setting up RPM repository for OVS provisioning, copy RPMs from Oracle, Server, and VT directories to the respective directories.
Run createrepo for all four directories. For example:
createrepo <Root Directory>/cluster
Add custom RPMs to the repository as follows:
If there are custom RPMs installed on the reference host that need to be provisioned on the bare metal machine, make sure to copy them to the directory containing the RPMS, such as Cluster, VT, ClusterStorage, and Server.
Run the createrepo command on this directory. For example:
createrepo ClusterStorage
Create a symbolic link in /var/www/html to <Root Directory> directory.
The repository should now be available through http if an apache server is running.
Software Library should be located in a directory accessible by all OMSes. If there is one OMS the directory can be local. For multiple OMS environments, the directory can be on a Network File Server or a Netapp filer that is accessible from all the OMSes. One has to ensure that there is enough space available on the shared storage to store files that hold the binary data for one's components.
Software components that are generated as part of the default or single-server image creation during the bare metal provisioning process are stored in the Software Library. They are accessible under the Components tab in the Provisioning Application user interface.
Ensure that the shared storage is accessible through NFS mount points to all OMS servers in the environment.
Ensure that the following criteria are met before provisioning:
Table 3-6 Checklist for Boot Server, Stage Server, RPM Repository, and Reference Host
| Resource Name | Checklist |
|---|---|
|
Boot Server |
DHCP server is up and running. The TFTP is up and running. Boot Server is co located on the same machine as Stage Server. If not then Network Install Directory (/tftpboot/linux-install) is exposed to the Staging server for mounting. Boot Server is present in the same subnet where the target machines to be provisioned are present or will be added. Enterprise Manager agent is installed. Boot server machine is visible as a managed target in Enterprise Manager. A brand new PXE box actually detects the boot server and starts to boot it (even if no image is installed yet) |
|
Stage Server |
Stage server is as close as possible to the target servers. Large storage, High Memory and Sufficient Memory. If NAS server is used for storage then it should have NFS support. Enterprise Manager agent is installed. Boot server machine is visible as a managed target in Enterprise Manager. The required agent rpm is staged for installing agents on targets. Preferred Credentials are set. Stage server is reachable from the box to be populated (or the same subnet) |
|
RPM Repository |
Install tree structure is as indicated in Configure RPM repository section. RPM repository is available via HTTP. Provide the exact URL and test the RPM repository access over HTTP |
|
Reference Host |
Agent is installed on local disk and not on NFS mounted directory. Preferred Credentials are set. |
|
Software Library |
Shared storage used for the software library is accessible through NFS mount points to all OMS servers. |
Preferred credentials simplify access to managed targets by storing target login credentials in the Management Repository. With preferred credentials set, users can access an Enterprise Manager target that recognizes those credentials without being prompted to log into the target. Preferred credentials are set on a per user basis, thus ensuring the security of the managed enterprise environment.
Enterprise Manager supports two types of preferred credentials:
Normal Credentials: Are used by Enterprise Manager functions that need operating system access, but do not require administrator privileges.
Privileged Credentials: Are used by functions that need administrator privileges. Credentials for users that have sudo access on the target machine can be used as privileged credentials.
The Provisioning application requires preferred credentials to be setup for machines, which are part of the application.The preferred credentials need to be set for the following machines:
Referenced Installation Host: Privileged credentials are needed to execute the command to get all the available RPMs form this machine. The credentials should also be valid ORACLE_HOME credentials (belonging to ORACLE_HOME owner's group)
Stage Server: You must set the privileged preferred credentials for the stage server. Oracle recommends the stage server to have very limited access due to the criticality and sensitivity of the data it hosts. The super administrator can enforce this by creating one account on the stage server, and setting it as the preferred credential, to be used by all the provisioning users in Enterprise Manager. This preferred credential should also be a valid ORACLE_HOME credential (belonging to ORACLE_HOME owner's group).
Provisioning Targets: In case you are planning to provision existing target machines, ensure the privileged credentials are setup. These credentials are required to clear the boot-sector and reboot the machine.
For details of how to set preferred credentials in Enterprise Manager, see Setting Up Preferred Credentials.
|
Caution: It is recommended that you do not use root as the preferred credentials. |
To access the Bare Metal Provisioning Application, do the following:
Log in to Oracle Enterprise Manager.
The Provisioning application can be accessed by going to the Deployments Tab and then to Provisioning sub tab, as shown below.
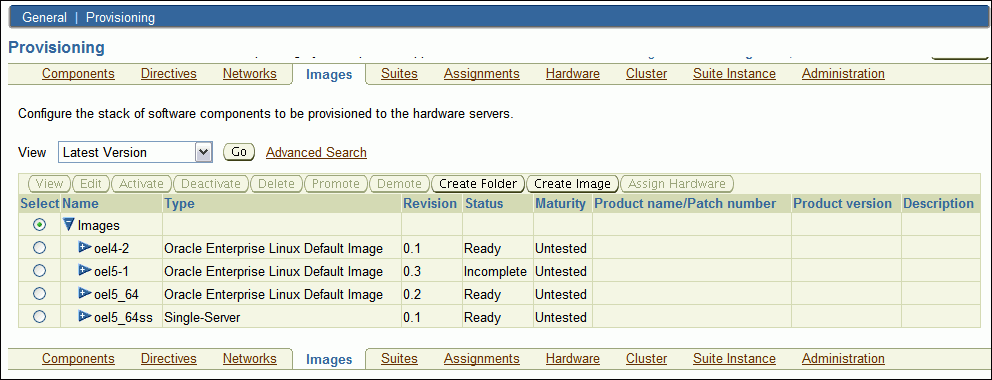
The graphical user interface of the provisioning application shows various tabs for Components, Directives, and Images etc. A user can access all or some tabs shown above depending upon the privileges assigned to him. For example, in the figure below, the Administration and Assignments tabs are disabled for the user. Refer to Creating Super Administrator for Enterprise Manager for creating users that can access the Administration tab.
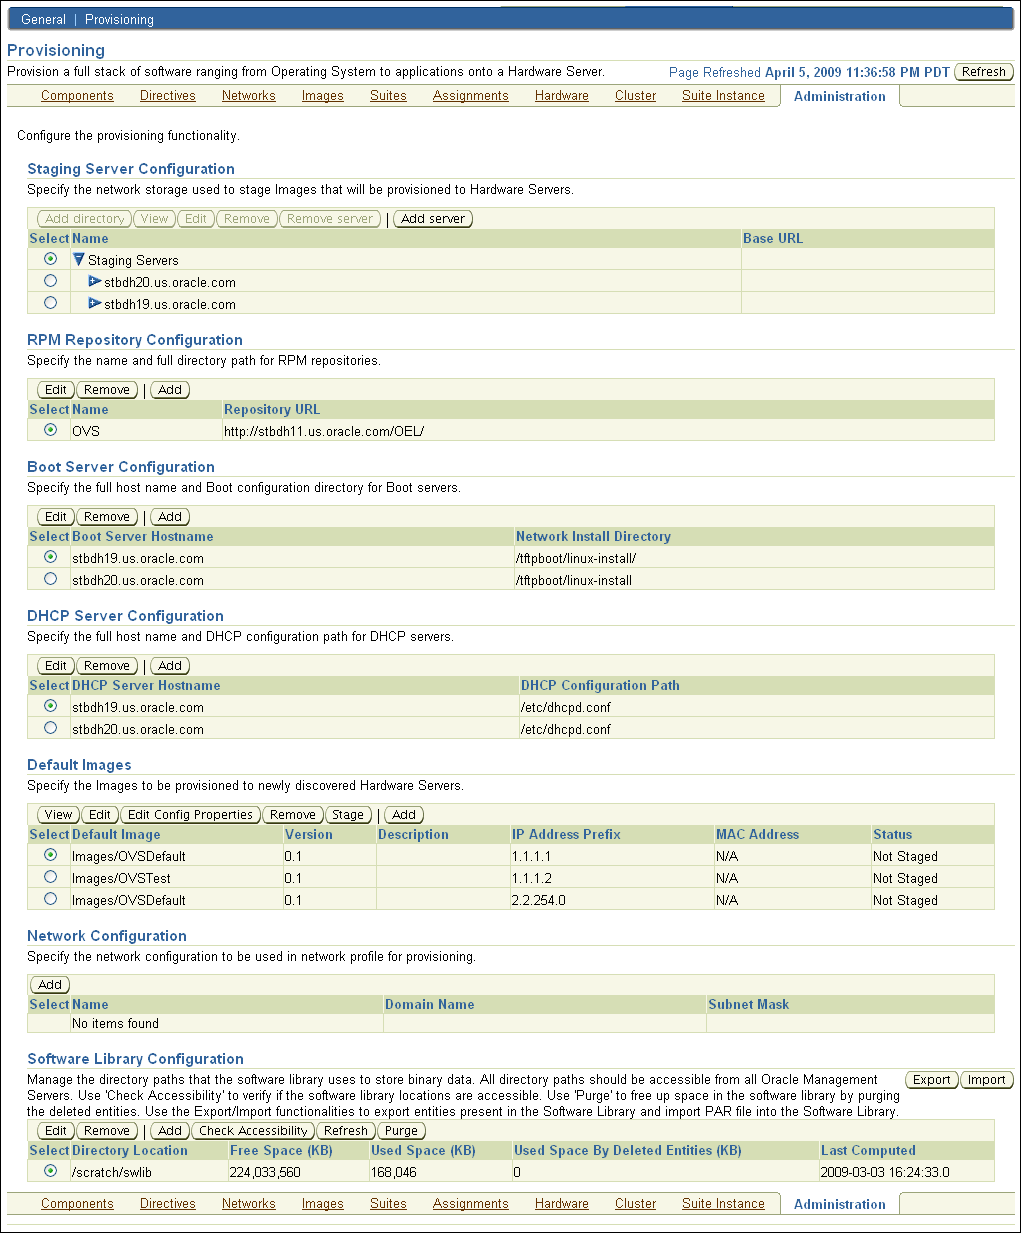
In this section, we will assume that the user has super user privileges and can thus access the administration tab. This tab contains different sections for configuring different elements in the environments.
In this section, it is assumed that the stage server has been created and the necessary setup has been done.
Click Add Server in the Staging Server Configuration section. The following page comes up.
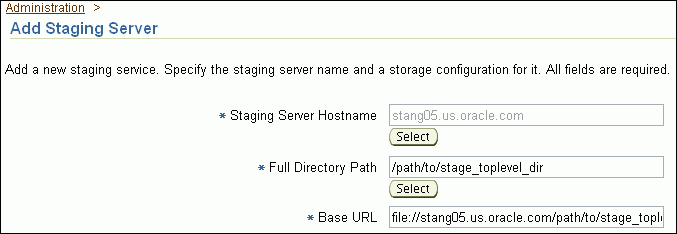
In the above step, enter the following details:
Staging Server Hostname refers to the host name of the stage server. It is recommended that you specify the IP address of the stage server, to avoid DNS resolution problems.
Full Directory Path refers to the top-level directory on the stage server which contains the agent rpm. All the staged files will be stored in this location.
Base URL is used to expose the top-level stage directory to hardware servers being provisioned via NFS.
NOTE: If Stage Server uses NAS then the Base URL should be of the form:
<file>://<NAS_Hostname>/< NAS_DIRECTORY>
Provide the necessary values for all the parameters and click OK to add the stage server.
To configure the RPM repository, the RPM repository must have been created.
Click Add in the RPM Repository Configuration section. The following page is displayed:
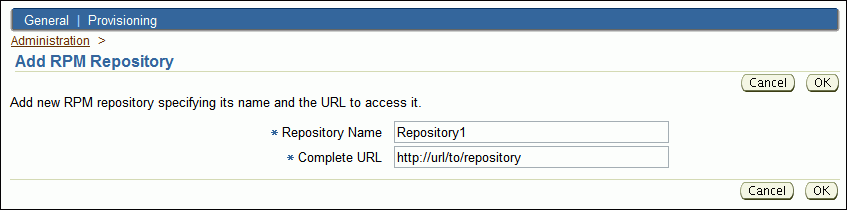
Repository Name Assign a name to the RPM repository that is going to be added.
Complete URL refers to the URL pointing to the directory where the required RPMs are located. For example, http://sample.oracle.com/yum/EnterpriseLinux/EL4/oracle/i386
Provide the necessary values for all the parameters shown in the picture above and click OK to add the RPM repository.
To configure the Boot Server, the Boot Server must have been created.
Click Add in the Boot Server Configuration section. The following page is displayed:
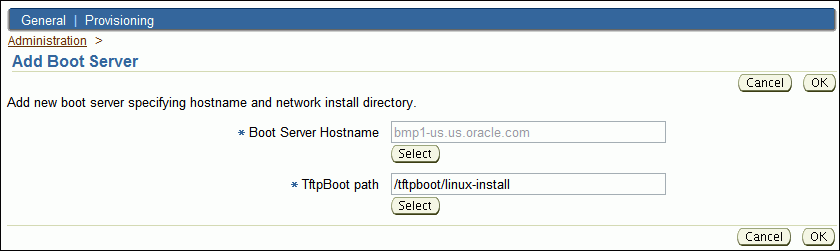
Boot Server Hostname refers to the host on which the boot server is setup.
Network Install Directory refers to the directory on the boot server where the pxelinux.cfg file is located. It is generally /tftpboot/linux-install directory on linux systems.
Provide the necessary values for all the parameters shown in the picture above and click OK to add the Boot Server.
To configure the DHCP server, ensure that the DHCP server is set up as mentioned in Setting Up Boot Server.
To configure the DHCP server, do the following:
In the Administration tab, in the DHCP Server Configuration section, click Add.
In the Add DHCP Server page, select the host on which the DHCP server resides and select the DHCP configuration path as /etc/dhcpd.conf. Click OK.
The DHCP Server is configured and will appear in the Administration page.

To set up and configure the Software Library, see Setting Up Oracle Software Library.
|
 Copyright © 1996, 2012, Oracle and/or its affiliates. All rights reserved. Legal Notices |
|