| Oracle® Communications Converged Application Server Administration Guide Release 5.0 Part Number E17647-03 |
|
|
View PDF |
| Oracle® Communications Converged Application Server Administration Guide Release 5.0 Part Number E17647-03 |
|
|
View PDF |
Note:
The sections that follow provide only general instructions for upgrading Oracle Communications Converged Application Server software to a new Service Pack release. Your service pack or new software may contain additional instructions and tools to help you upgrade the software. Defer to those instructions if they are available.If you are upgrading from one major software release to another (such as upgrading from WebLogic SIP Server 3.x to Converged Application Server), refer to Chapter 10, "Upgrading WebLogic SIP Server 3.x to Converged Application Server 4.0," instead of these instructions.
If you want to upgrade a SIP protocol application or converged HTTP/SIP protocol application, these instructions are not required. See "Steps for Upgrading a Deployed SIP Application" instead.
This chapter describes how to upgrade production Converged Application Server installations to a new Service Pack release of the software:
Because a typical production Converged Application Server installation uses multiple server instances in both the engine and SIP data tiers, upgrading the Converged Application Server software requires that you follow very specific practices. These practices ensure that:
Existing clients of deployed SIP Servlets are not interrupted or lost during the upgrade procedure.
The upgrade procedure can be "rolled back" to a previous state if any problems occur.
The sections that follow describe how to use a configured load balancer to perform a "live" upgrade of the Converged Application Server software on a production installation.
When upgrading the Converged Application Server software (for example, in response to a Service Pack), a new engine tier cluster is created to host newly-upgraded engine tier instances. One-by-one, servers in the engine tier are shut-down, upgraded, and then restarted in the new target cluster. While servers are being upgraded, Converged Application Server automatically forwards requests from one engine tier cluster to the other as necessary to ensure that SIP data tier requests are always initiated by a compatible engine tier server. After all servers have been upgraded, the older cluster is removed and no longer used. After upgrading the engine tier cluster, servers in the SIP data tier may also be upgraded, one-by-one.
To upgrade a production Converged Application Server installation you require:
A compatible load balancer product and administrator privileges for reconfiguring the load balancer virtual IP addresses and pools.
Adequate disk space on the Administration Server machine and on each Managed Server machine for installing a copy of the new Converged Application Server software.
Privileges for modifying configuration files on the Converged Application Server Administration Server machine.
Privileges for shutting down and starting up individual Managed Server instances.
Three or more replicas in each partition of the SIP data tier, in order to upgrade the Converged Application Server software to a new version. With fewer than three replicas in each partition, it is not possible to safely upgrade a production SIP data tier deployment as no backup replica would be available during the upgrade procedure.
Caution:
Before modifying any production installation, thoroughly test your proposed changes in a controlled, "stage" environment to ensure software compatibility and verify expected behavior.Follow these steps to upgrade a production installation of Converged Application Server to a newer Service Pack version of the Converged Application Server software. These instructions upgrade both the SIP Servlet container implementation and the SIP data tier replication and failover implementation.
The steps for performing a software upgrade are divided into several high-level procedures:
Configure the Load Balancer: Define a new, internal Virtual IP address for the new engine tier cluster you will configure.
Configure the New Engine Tier Cluster: Create and configure a new, empty engine tier cluster that will host upgraded engine tier servers and your converged applications.
Define the Cluster-to-Load Balancer Mapping: Modify the SIP Servlet container configuration to indicate the virtual IP address of each engine tier cluster.
Duplicate the SIP Servlet Configuration: Copy the active sipserver.xml configuration file to duplicate your production container configuration.
Upgrade Engine Tier Servers and Target Applications to the New Cluster: Shut down individual engine tier server instances, restarting them in the new engine tier cluster.
Upgrade SIP Data Tier Servers: Shut down individual SIP data tier servers, restarting them with the new SIP data tier software implementation.
Each procedure is described in the sections that follow.
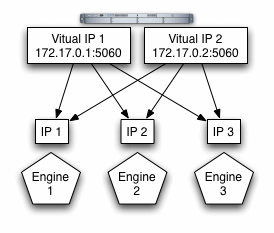
Begin the software upgrade procedure by defining a new internal virtual IP address for the new engine tier cluster you will create in "Configure the New Engine Tier Cluster". The individual server IP addresses (the pool definition) for the new virtual IP address should be identical to the pool definition of your currently-active engine tier cluster. Figure 20-1 shows a sample configuration for a cluster having three engine tier server instances; both virtual IP addresses define the same servers.
See your load balancer documentation for more information about defining virtual IP addresses.
In the next section, you will configure the Converged Application Server domain to identify the virtual IP addresses that map to each engine tier cluster. Converged Application Server uses this mapping during the upgrade procedure to automatically forward requests to the appropriate "version" of the cluster. This ensures that SIP data tier requests always originate from a compatible version of the Converged Application Server engine tier.
Follow these steps to create a new Engine Tier cluster to host upgraded containers, and to configure both clusters in preparation for a software upgrade:
On the Administration Server machine, install the new Converged Application Server software into a new ORACLE_HOME\Middleware home directory. The steps that follow refer to c:\Oraclenew as the ORACLE_HOME\Middleware home directory in which the new software was installed. c:\Oracle refers to the software implementation that is being upgraded.
Log in to the Administration Console for the active Converged Application Server domain.
In the Administration Console, create a new, empty engine tier cluster for hosting the upgraded engine tier servers:
In the left pane, select the Environment node, and then select the Clusters node.
Click New to configure a new cluster.
Enter a name for the new cluster. For example, "NewEngineCluster."
Enter a unicast channel or multicast address and port number for the cluster.
Click OK to create the cluster.
Proceed to "Define the Cluster-to-Load Balancer Mapping".
In this procedure, you configure the cluster-to-load balancer mapping to define the internal, virtual IP address that is assigned to the older and newer engine tier clusters.
To define the cluster-to-load balancer mapping:
Log in to the Administration Console for the active Converged Application Server domain.
In the Administration Console, create a new load balancer map entry for the new cluster you created:
In the left pane, select the SipServer node.
Select Configuration, then select the Loadbalancer Map tab.
Click New to create a new mapping.
Enter the Cluster Name and SIP URI of the new cluster you created in Configure the New Engine Tier Cluster. For example, enter "NewEngineCluster" and "sip:172.17.0.2:5060".
Click Finish to create the new mapping.
Repeat Step 2 to enter a mapping for the older cluster. For example, create an entry for "EngineCluster" and "sip:172.17.0.1:5060".
Note that you must include a mapping for both the older and the newer engine tier cluster. A mapping consists of the internal virtual IP address of the cluster configured on the load balancer, as well as the cluster name defined in the Converged Application Server domain. Example 20-1 shows an entry in the sipserver.xml file for the sample clusters described earlier.
Example 20-1 Sample cluster-loadbalancer-map Definition
<cluster-loadbalancer-map>
      <cluster-name>EngineCluster</cluster-name>
      <sip-uri>sip:172.17.0.1:5060</sip-uri>
   </cluster-loadbalancer-map>
   <cluster-loadbalancer-map>
      <cluster-name>NewEngineCluster</cluster-name>
      <sip-uri>sip:172.17.0.2:5060</sip-uri>
   </cluster-loadbalancer-map>
</sip-server>
Before upgrading individual engine tier servers, you must ensure that the SIP Servlet container configuration and SIP data tier configuration in the new engine tier cluster matches your current production configuration. To duplicate the container configuration, copy your production sipserver.xml and datatier.xml configuration files to the new installation. For example:
cp c:\Oracle\Middleware\user_projects\domains\mydomain\config\custom\*.xml c:\Oraclenew\Middleware\user_projects\domains\mydomain\config\custom
As engine tier servers are restarted in the new engine tier cluster in the next procedure, they will have the same SIP container configuration but will use the new container implementation.
To upgrade individual engine tier servers, you gracefully shut each server down, change its cluster membership, and then restart it. Follow these steps:
Access the Administration Console for your production domain.
Select the first running engine tier server that you want to upgrade:
Select Environment, then select the Servers tab in the left pane.
Select the Control tab in the right pane.
Select the name of the server you want to upgrade.
Select Shutdown, then select When work completes from the table.
The server remains active while clients are still accessing the server, but no new connection requests are accepted. After all existing client connections have ended or timed out, the server shuts down. Other server instances in the engine tier process client requests during the shutdown procedure.
Select Environment, then select the Servers tab in the left pane and verify that the Managed Server has shut down.
Change the stopped server's cluster membership so that it is a member of the new engine tier cluster:
Expand the Environment node, and the select the Clusters tab in the left pane.
Select the name of the active engine tier cluster.
Select Configuration, and then select the Servers tab in the right pane.
Select the checkbox next to the name of the stopped server, and click Remove.
Click Yes to remove the server from the cluster.
Next, expand the Environment node, then slecet the Clusters tab and select the newly-created engine tier cluster ("NewEngineCluster").
Select Configuration, then select the Servers tab in the right pane.
Click Add to add a new server.
Select the name of the stopped server from the drop-down list.
Click Finish.
After adding the first engine tier server to the new cluster, you can now target your own applications to the new cluster.
Note:
Perform this step only once, after adding the first engine tier server to the new cluster:In the left pane, select the Deployments node.
Click Install.
Use the links to select an application to deploy, and click Next.
Select Install this deployment as an application, and click Next.
Select the name of the new engine tier cluster ("NewEngineCluster"). Also ensure that All servers in the cluster is selected.
Click Finish.
Select the checkbox next to the name of the application in the Deployments table.
Click Start, then select Servicing all requests.
Repeat this step to deploy all of your applications to the new cluster. Both the new and old engine tier clusters should be configured similarly.
Restart the stopped managed server to bring it up in the new engine tier cluster:
Access the machine on which the stopped engine tier server runs (for example, use a remote desktop on Windows, or secure shell (SSH) on Linux).
Use the available Managed Server start script (startManagedWebLogic.cmd or startManagedWebLogic.sh) to boot the Managed Server. For example:
startManagedWebLogic.cmd engine-server1 t3://adminhost:7001
In the Administration Console, select Environment, then select the Servers node and verify that the Managed Server has started.
Repeat these steps to upgrade the remaining engine tier servers.
At this point, all running Managed Servers are using the new SIP Container implementation and are hosting your production SIP Servlets with the same SIP Servlet container settings as your old configuration. SIP data tier servers can now be upgraded using the instructions in "Upgrade SIP Data Tier Servers".
Caution:
Your SIP data tier must have three active replicas (three server instances) in each partition in order to upgrade the servers in a production environment. With only two replicas in each partition, a failure of the active replica during the upgrade process will result in the irrecoverable loss of call state data. With only one replica in each partition, the upgrade cannot be initiated without losing call state data.The procedure for upgrading server instances in the SIP data tier simply involves restarting each server, one at a time, to utilize the updated software. Always ensure that the previous server has fully restarted (is in ONLINE state) before restarting the next server.
Caution:
Do not shut down or restart a SIP data tier server instance in a partition unless two additional servers in the same partition are available, and both are in theONLINE state. See the discussion on "Monitoring and Troubleshooting SIP Data Tier Servers" in Chapter 3, "Configuring SIP Data Tier Partitions and Replicas," for information about determining the state of SIP data tier servers.Oracle may occasionally release software patches and updates to address known bugs and limitations in the Converged Application Server software. To upgrade Converged Application Server, you apply patches using the Ant build tool.
The process for applying patches to Converged Application Server is as follows:
The patch, in the form of a JAR file, is provided by Oracle Corporation.
The patch is applied to the original EAR file, which results in a new, patched, EAR. For example, if the original EAR version is 5.0, the version of the new EAR is 5.0_1. A sequence number is always suffixed to make each version unique.
The new EAR file is deployed and the old version is undeployed.
The patched EAR file is deployed.
The syntax of ant is shown below, and the arguments it takes are described in Table 20-1.
ant [patch | printpatches] -Dsrc= -Ddest= -Dversion= -Dpatchdir= -Dpatchfiles=
Table 20-1 Description of the Arguments for the Ant Build Tool
| Argument | Description |
|---|---|
|
|
This target applies a patch. |
|
|
This target displays the currently applied patches. The information displayed by this option includes:
|
|
|
The EAR file to apply the patch to. |
|
|
The EAR file that will contain the patch. |
|
|
The new version for the EAR. Must be different from the original version. |
|
|
The directory containing the patches. The directory paths are relative or absolute. |
|
|
The JAR files that contains the patches. Wild cards are supported. |
To apply pataches with the Ant build tool:
After installing the Converged Application Server software, and configuring the domains for your deployment, run the setDomainEnv.sh (UNIX) or setDomainEnv.cmd (Windows) command located in $DOMAIN_HOME/bin to set the environment. You must set the environment for your deployment prior to using ant to apply patches.
Apply the patch using the ant command. For example, to apply a single patch:
% ant patch -Dsrc=original_filename.ear -Ddest=patched_filename.ear -Dversion=5.0.1 -Dpatchdir=directory -Dpatchfiles=filename.jar
where:
original_filename.ear is the original EAR file to which you are applying the patch.
patched_filename.ear is the EAR file containing the patch.
directory is the directory containing the patch.
filename.jar is the JAR file containing the patch.
The ant build tool applies the patch to the Converged Application Server EAR file.
Verify that the patch was applied properly using the printpatches option to view information about the applied patches.
% ant printpatches -Dsrc=filename.ear
|
Copyright © 2005, 2011, Oracle and/or its affiliates. All rights reserved. Legal Notices |
|