Dynamic User Interfaces
This chapter describes what dynamic user interfaces are, what Ajax is and the role it has in making a user interface dynamic, and the different technologies included in the pack that help you create dynamic user interfaces using Ajax.
Dynamic User Interfaces and Ajax
If you've surfed the web at all lately, most likely you've noticed a general improvement in the responsiveness of web applications and their ability to interact more dynamically with actions you take on their web pages. For example, you might have been entering data into a text field and noticed that it offers a list of suggestions that match what you have typed so far. And you've probably experienced situations in which only the relevant parts of a page rather than an entire page update in response to your interaction. These updates occur asynchronously, meaning that you don't have to wait for a response from the server, and can therefore continue working while the server responds to your requests.
One of the ways that web application developers achieve this highly interactive, dynamic user interface is with the help of Ajax. Using Ajax, developers can increase the speed and usability of an application's web pages by asynchronously updating only part of the page at a time, rather than requiring the entire page to be reloaded after a user-initiated change.
Through the power of Ajax, the pages of your application can exchange small amounts of data with the server without going through a form submit. The Ajax technique accomplishes this by using the following technologies:
JavaScript that allows for interaction with the browser and responding to events
The DOM for accessing and manipulating the structure of the HTML of the page
An XMLHttpRequest object for asynchronously exchanging data between the client and the server. The data can take many forms including XML or JavaScript Object Notation (JSON) format.
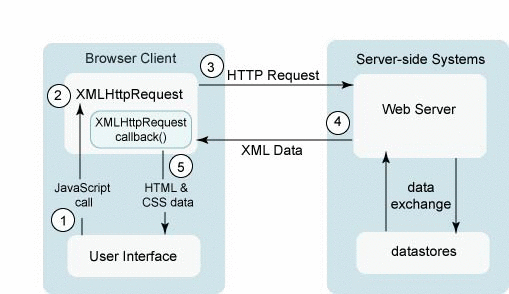
Figure 2-1 shows how these technologies work together to update a piece of a page with new data from the server.
Figure 2-1 General Sequence of an Ajax Request
The user generates an event, such as by clicking a button. This results in a JavaScript call.
An XMLHttpRequest object is created and configured with a request parameter that includes any data needed to get an appropriate response from a server-side object.
The XMLHttpRequest object makes an asynchronous request to the web server. An object (such as a servlet or listener) receives the request, processes it, and stores any data in the request to the data store. In the case of Ajax-aware JavaServer Faces components, the object that processes the request could be a PhaseListener object.
The object that processed the request returns a document containing any updates that need to go to the client. This document is usually in XML format.
The XMLHttpRequest object receives the data, processes it, and updates the HTML DOM representing the page with the new data.
As you can see, Ajax is a powerful new technology, but it has its shortcomings. Because Ajax is new, it has very inconsistent support among browsers. Also, to develop with Ajax, you need to have some knowledge of JavaScript, which is out of reach for many page authors. This chapter gives an overview of some techniques for incorporating Ajax into your applications. It also introduces Project jMaki and Project Dynamic Faces, both of which make development with Ajax easier in the following ways:
Shield the page author from JavaScript code
Encapsulate the Ajax functionality in web components to promote re-use and easy integration into web applications.
Provide flexibility with respect to how you can integrate Ajax into your application
Basic Ajax-Enabled Web Application
This section introduces a simple Ajax-enabled shopping list example that uses a servlet to process the XmlHttpRequest object. The point of this example is to show you how basic Ajax works before introducing you to toolkits and technologies that can make developing an example like this easier.
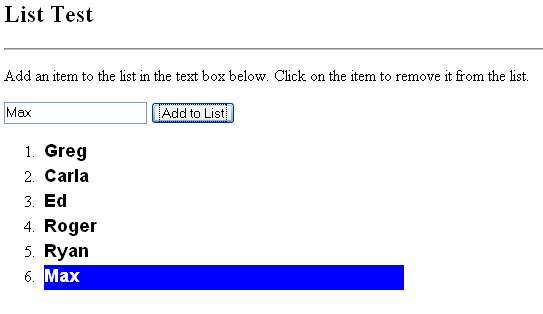
The AjaxList example allows you to add items to a list, remove items from a list, and display the list using Ajax. shows a screen shot of the application. As shown in Figure 2-2, you add an item to the list by entering it in a field and clicking the Add to List button. After you click the button, the item appears in the list. When you move your mouse over an item in the list, a blue highlighted bar appears over it, indicating that you can remove the item from the list by clicking it.
Figure 2-2 The AjaxList Application
The application consists of three parts:
A servlet that contains the code to process a request, update the contents of the list, and send the updated list back to the client.
A JSP page that defines a set of styles, includes HTML form elements, and contains the code to send an Ajax request and update the HTML DOM tree with the results returned by the servlet. In a production-quality application, you would want to separate the styles, the HTML form, and the JavaScript code into separate files.
A web.xml file that maps the servlet to a URL pattern. The XMLHttpRequest object uses this URL pattern when sending an HTTP request to the servlet.
Configuring Your Environment
Before running the AjaxList example, you must have done the following, as described in the Preface:
Installed the Sun Web Developer Pack
Configured the Sun Web Developer Pack with Application Server 9.1
Optionally installed NetBeans IDE 5.5.1 and the Sun Web Developer Pack modules
Building and Running the AjaxList Application
 Building and Running the AjaxList Application in NetBeans IDE 5.5.1
- Select File→Open Project in NetBeans IDE 5.5.1.
- Navigate to swdp.tutorial.home/examples/dynamicUI, select AjaxList, and click Open Project Folder.
- Right-click the AjaxList application in the
Projects pane and select Run Project.
This will compile the classes, package the files into a WAR file, deploy the WAR to your Application Server 9.1 instance, and open a web browser to the following URL:
http://server:server-port/AjaxList/
From this page, you can enter an item in the list and click the button to see it added to the list. You can also remove an item from the list by clicking the item in the displayed list. The dojo.jsp page demonstrates how to use dojo.io.bind to implement the Ajax request mechanism.
 Building and Running the AjaxList Application
with Ant
- Open a terminal prompt and navigate to swdp.tutorial.home/examples/dynamicUI/AjaxList.
- Type ant and press Enter.
This will build and package the AjaxList.war web application.
- Type ant deploy and press Enter.
This will deploy AjaxList.war to Application Server 9.1.
- In a web browser navigate to:
http://server:server-port/AjaxList/
- To undeploy the application, navigate to swdp.tutorial.home/examples/dynamicUI/AjaxList and run ant undeploy.
- To delete the built application, navigate to swdp.tutorial.home/examples/dynamicUI/AjaxList and run ant clean.

 Previous