13 Applying Data Access Security to Repository Objects
Data access security controls rights to view and modify data. You can use several different methods of data access security with Oracle Business Intelligence: row-level security (implemented either in the repository or in the database), object permissions, and query limits. This chapter provides information about the different types of data access security and explains how to set them up.
Other security tasks, including setting up SSL connections, managing users, groups, and application roles, setting up custom LDAP servers, and managing custom authenticators, are covered in Oracle Fusion Middleware Security Guide for Oracle Business Intelligence Enterprise Edition. Note that you must create users and application roles before you can implement data access security.
You should plan to implement data access security in the Administration Tool in online mode. If you must perform data access security tasks in offline mode, be sure to read "About Applying Data Access Security in Offline Mode" first.
Data access security auditing is covered by the Oracle Business Intelligence usage tracking feature. See "Managing Usage Tracking" in Oracle Fusion Middleware System Administrator's Guide for Oracle Business Intelligence Enterprise Edition for more information.
This chapter contains the following topics:
About Data Access Security
After developing your metadata repository, you need to set up your data security architecture to control access to source data. Data access security accomplishes the following goals:
-
To protect business data queried from databases
-
To protect your repository metadata (such as measure definitions)
-
To prevent individual users from hurting overall system performance
Oracle Business Intelligence supports three types of data security: row-level security, object permissions, and query limits (governors). Object permissions and query limits are set up in the repository and are enforced only by the Oracle BI Server. Row-level data security, however, can be implemented and enforced in both the repository, and in the database.
Even if you choose to implement row-level security in the database, you should still set up object permissions and query limits in the repository. Although it is possible to provide database-level object restrictions on individual tables or columns, objects to which users do not have access are still visible in all clients, even though queries against them will fail. It is better to set up object permissions in the repository, so that objects to which users do not have access are hidden in all clients.
Because a variety of clients can connect to the Oracle BI Server, you cannot implement or enforce data security in Oracle BI Presentation Services. Oracle BI Presentation Services provides an extensive set of security controls that let you set up privileges to access functionality in the Oracle Business Intelligence user interface, as well as dashboards and analyses objects. However, Oracle BI Presentation Services does not provide data access security. If you only implement security controls in Oracle BI Presentation Services, you will be exposed to SQL injection hacker attacks and other security vulnerabilities. You must provide object-level security in the repository to create rules that apply to all incoming clients.
See Oracle Fusion Middleware System Administrator's Guide for Oracle Business Intelligence Enterprise Edition for more information about the security controls available in Oracle BI Presentation Services.
Where Do I Find Information About Security Tasks?
Oracle Business Intelligence security tasks are covered in this guide, in Oracle Fusion Middleware Security Guide for Oracle Business Intelligence Enterprise Edition, and in other sources. Table 13-1 summarizes the Oracle Business Intelligence security tasks and where to go for more information.
Table 13-1 Security Tasks in Oracle Business Intelligence
Setting Up Row-Level Security
You can choose to set up row-level security in the repository, or in the database. Implementing row-level security in the repository provides many benefits, including the following:
-
All users share the same database connection pool for better performance
-
All users share cache for better performance
-
You can define and maintain security rules that apply across many federated data sources
Implementing row-level security in the database, in contrast, is good for situations where multiple applications share the same database. Note that even when you design and implement row-level security in the database, you should still define and apply object permissions in the repository.
Although it is possible to set up row-level security in both the repository and in the database, you typically do not enforce row-level security in both places unless you have a particular need to do so.
This section contains the following topics:
Setting Up Row-Level Security (Data Filters) in the Repository
Data filters are a security feature that provide a way to enforce row-level security rules in the repository. Data filters are set up in the repository using the Administration Tool and are applied for a particular application role. You typically do not set up data filters if you have implemented row-level security in the database, because in this case, your row-level security policies are being enforced by the database rather than the Oracle BI Server.
Data filters can be set for objects in both the Business Model and Mapping layer and the Presentation layer. Applying a filter on a logical object impacts all Presentation layer objects that use the object. If you set a filter on a Presentation layer object, it is applied in addition to any filters that might be set on the underlying logical objects.
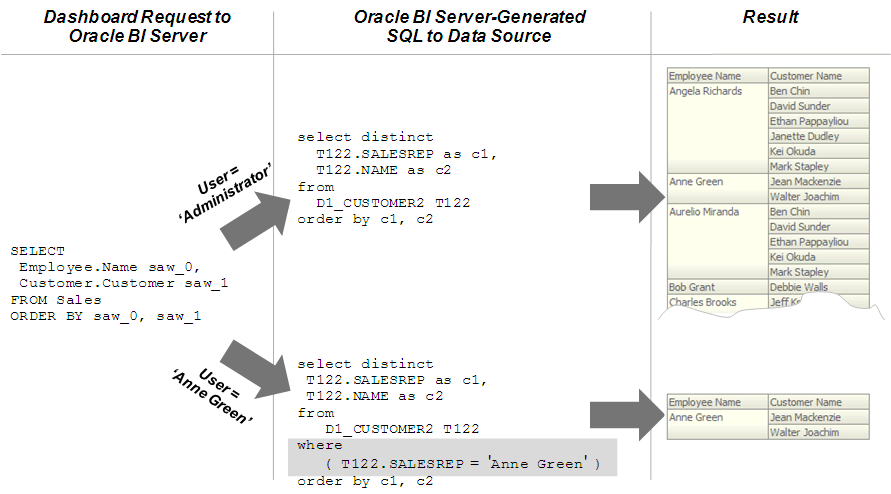
Figure 13-1 illustrates how data filter rules are enforced in the Oracle BI Server. The security rules are applied to all incoming clients and cannot be breached, even when the Logical SQL query is modified.
In this example, a filter has been applied to an application role. When Anne Green, who is a member of that role, sends a request, the return results are limited based on the filter. Because no filters have been applied to the application roles for the Administrator user, all results are returned. The Oracle BI Server-generated SQL takes into account any data filters that have been defined.
Figure 13-1 Row-Level Security Enforcement in the Oracle BI Server
Description of "Figure 13-1 Row-Level Security Enforcement in the Oracle BI Server"
You should always set up data filters for particular application roles rather than for individual users.
To set up data filters to apply row-level authorization rules for queries:
-
Open your repository in the Administration Tool.
-
Select Manage, then select Identity.
-
In the Security Manager dialog, in the tree pane, select BI Repository.
-
In the right pane, select the Application Roles tab, then double-click the application role for which you want to set data filters.
Note that if you are in offline mode, no application roles appear in the list unless you have first modified them in online mode. See "About Applying Data Access Security in Offline Mode" for more information.
-
In the Application Role dialog, click Permissions.
-
In the User/Application Role Permissions dialog, click the Data Filters tab.
To create filters, you first add objects on which you want to apply the filters. Then, you provide the filter expression information for the individual objects.
-
To add objects on which you want to apply filters, perform one of the following steps:
-
Click the Add button. Then, browse to locate the object you want, select it, and then click Select.
-
Click the Name field for an empty row. Then, browse to locate the object you want, select it, and then click Select.
-
-
To enter the filter expression for individual objects, perform one of the following steps:
-
Select the data filter, then click the Expression Builder button. Create the filter expression in Expression Builder, then click OK.
-
Click the Data Filter field for the appropriate filter, then type the filter expression.
For example, you might want to define a filter like
"Sample Sales"."D2 Market"."M00 Mkt Key" > 5to restrict results based on a range of values for another column in the table.You can also use repository and session variables in filter definitions. Use Expression Builder to include these variables to ensure the correct syntax.
-
-
Optionally, select a status for each filter from the Status list. You can choose one of the following options:
-
Enabled: The filter is applied to any query that accesses the object.
-
Disabled: The filter is not used and no other filters applied to the object at higher levels of precedence (for example, through an application role) are used.
-
Ignored: The filter is not in use, but any other filters applied to the object (for example, through a different application role) are used. If no other filters are enabled, no filtering occurs.
-
-
In addition to defining new filters, you can perform other operations in the Data Filters tab. Table 13-2 lists and describes the other buttons and options.
Table 13-2 Data Filters Tab: Buttons and Options
Option Name Description Subject Area
Select a subject area to only view data filters for that individual subject area, or select All to view all filters.
Total Filters
Lists the total number of data filters that have been defined for this particular user or application role.
Add

Click Add to open the Browse dialog to add objects on which you want to apply data filters.
Delete

Select a row and click Delete to remove a filter.
Browse

Select a row and click Browse to change the object on which the filter is applied.
Edit Expression (Expression Builder)

Select a row and click Edit Expression to add or change a filter expression for a particular object. You must first add an object before you can apply a filter expression to the row.
Find

Enter text in the Find field and click Find Down or Find Up to find a particular string.
-
Click OK, then click OK again to return to the Security Manager.
Setting Up Row-Level Security in the Database
To set up Oracle Business Intelligence for row-level security that has been implemented in the database, you can configure your connection pools so that the Oracle BI Server passes the credentials for each user to the database. The database then uses the credentials to apply its own row-level security rules to user queries.
Note that the row-level database security described in this section is different from database authentication, a topic discussed in Oracle Fusion Middleware Security Guide for Oracle Business Intelligence Enterprise Edition. Rather, row-level database security provides database authorization. In other words, it applies access security to particular rows in the database.
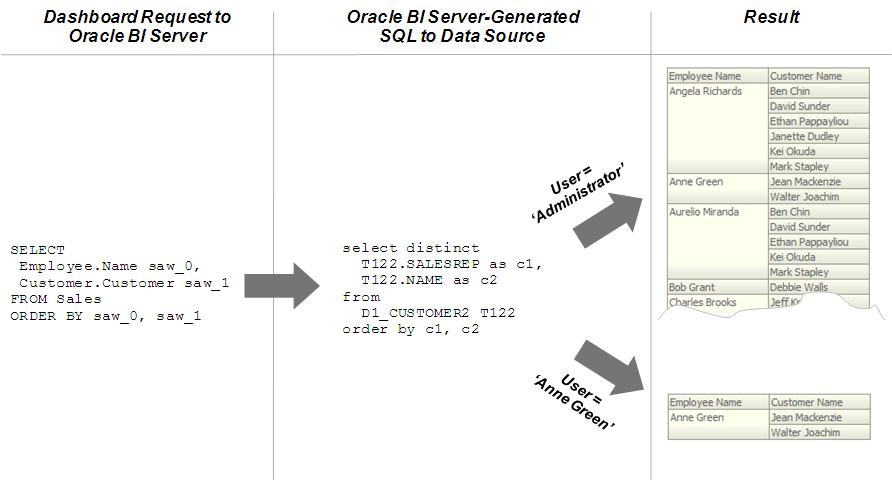
Figure 13-2 illustrates how row-level security is enforced in the database for Oracle Business Intelligence queries. The security rules are applied to all incoming clients and cannot be breached, even when the Logical SQL query is modified. In this example, the results returned are different depending on which user generated the query, even though the SQL query generated by the Oracle BI Server is the same. The returned results are based on rules created and enforced in the database.
Figure 13-2 Row-Level Security Enforcement in the Database
Description of "Figure 13-2 Row-Level Security Enforcement in the Database"
In addition to setting up Oracle Business Intelligence for row-level security in the database, you must define your set of users, permissions, and security policies in the database itself. Refer to your database documentation for more information.
To set up Oracle Business Intelligence for row-level access security in the database:
-
Open your repository in the Administration Tool.
-
Double-click the connection pool associated with the database for which you want to set up database-level security.
-
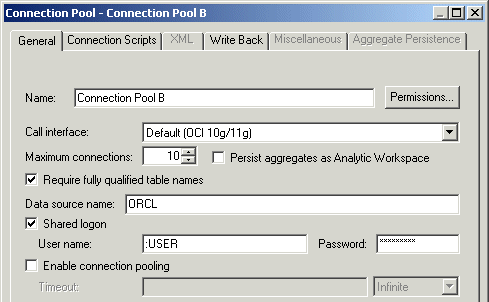
In the General tab of the Connection Pool dialog, select Shared logon, and then enter
:USERand:PASSWORDin the User name and Password fields. The :USERand :PASSWORDsyntax automatically passes the value of user credentials upon login to the database. Note that the:USERand:PASSWORDsyntax does not refer to session variables.Figure 13-3 shows the General tab of the Connection Pool dialog.
Figure 13-3 Entering Credentials for Database-Level Security in the Connection Pool
Description of "Figure 13-3 Entering Credentials for Database-Level Security in the Connection Pool"
Note:
Alternatively, you can use the database session context to pass end user identity to the database. Use a connection pool script to set up session context. Note that this approach does not rely on database authentication. -
Click OK in the Connection Pool dialog.
-
Double-click the database object for which you want to set up database-level security.
-
In the Database dialog, select Virtual Private Database. Selecting this option ensures that the Oracle BI Server protects cache entries for each user.
-
Click OK in the Database dialog.
After you have set up row-level security in the database, you still need to set up object permissions in the repository for Presentation layer or other objects. You can also set query limits (governors). See "Setting Up Object Permissions" and "Setting Query Limits" for more information.
Setting Up Object Permissions
You can set up object permissions in your repository to control access to Presentation layer and Business Model and Mapping layer objects. You set object permissions using the Administration Tool. There are two approaches to setting object permissions: you can set permissions for particular application roles in the Security Manager, or you can set permissions for individual objects in the Presentation layer.
This section explains how to set up object permissions for application roles in the Security Manager. See "Setting Permissions for Presentation Layer Objects" for information about setting object permissions for individual Presentation layer objects.
Setting up object permissions for particular application roles is useful when you want to define permissions for a large set of objects at one time. You should always set up object permissions for particular application roles rather than for individual users.
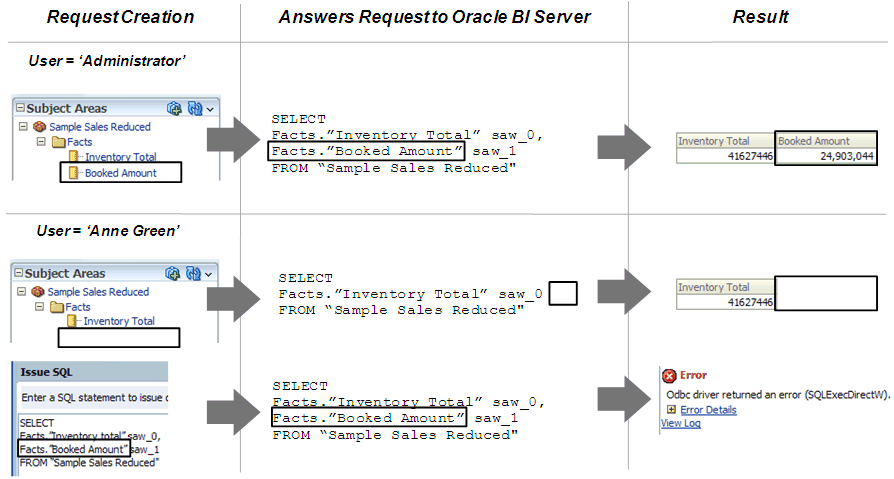
Figure 13-4 shows how object permissions restrict what users can see. The security rules are applied to all incoming clients and cannot be breached, even when the Logical SQL query is modified. In this example, an application role to which the Administrator belongs has been granted access to the Booked Amount column, so the Administrator can view the returned results. The user Anne Green is not a member of an application role with access to this object and cannot see the column in the Subject Area pane in Answers. Even if the request SQL is modified, results are not returned for this column because of the application role-based object permissions that have been set.
Figure 13-4 Object Permission Enforcement in the Oracle BI Server
Description of "Figure 13-4 Object Permission Enforcement in the Oracle BI Server"
Note the following:
-
If an application role is granted or disallowed permissions on an object from multiple sources (for example, explicitly and through one or more additional application roles), the permissions are applied based on the order of precedence.
-
If you explicitly deny access to an object that has child objects, users who are members of the individual application role are denied access to the child objects. For example, if you explicitly deny access to a particular logical table, you are implicitly denying access to all of the logical columns associated with that table.
-
Object permissions do not apply to repository and session variables, so values in these variables are not secure. Anybody who knows or can guess the name of the variable can use it in an expression in Answers or in a Logical SQL query. Because of this, do not put sensitive data like passwords in session or repository variables.
To set up object permissions for individual application roles:
-
Open your repository in the Administration Tool.
-
Select Manage, then select Identity.
-
In the Security Manager dialog, in the tree pane, select BI Repository.
-
In the right pane, select the Application Roles tab, then double-click the application role for which you want to set object permissions.
Note that if you are in offline mode, no application roles appear in the list unless you have first modified them in online mode. See "About Applying Data Access Security in Offline Mode" for more information.
-
In the Application Role dialog, click Permissions.
-
In the User/Application Role Permissions dialog, in the Object Permissions tab, select an object by performing one of the following steps:
-
Click the Add button. Then, browse to locate the object you want, select it, and then click Select.
-
Click the Name field for an empty row. Then, browse to locate the object you want, select it, and then click Select.
-
-
Assign the appropriate permission for each object. You can choose one of the following options:
-
Read: Only allows read access to this object.
-
Read/Write: Provides both read and write access to this object.
-
No Access: Explicitly denies all access to this object.
-
-
Click OK, then click OK again to return to the Security Manager.
About Permission Inheritance for Users and Application Roles
Users can have explicitly granted permissions. They can also have permissions granted through membership in application roles, that in turn can have permissions granted through membership in other application roles, and so on. Permissions granted explicitly to a user have precedence over permissions granted through application roles, and permissions granted explicitly to the application role take precedence over any permissions granted through other application roles.
If there are multiple application roles acting on a user or application role at the same level with conflicting security attributes, the user or application role is granted the least restrictive security attribute. Any explicit permissions acting on a user take precedence over any permissions on the same objects granted to that user through application roles.
Filter definitions, however, are always inherited. For example, if User1 is a member of Role1 and Role2, and Role1 includes a filter definition but Role2 does not, the user inherits the filter definition defined in Role1.
Note that you should always define object permissions for application roles rather than for individual users.
Example 13-1 Permission Inheritance 1
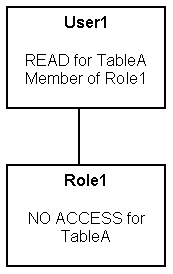
You might have a user (User1) who is explicitly granted permission to read a given table (TableA). Suppose also that User1 is a member of Role1, and Role1 explicitly denies access to TableA. The resultant permission for User1 is to read TableA, as shown in Figure 13-5.
Because permissions granted directly to the user take precedence over those granted through application roles, User1 has the permission to read TableA.
Figure 13-5 User Permissions and Application Role Permissions
Description of "Figure 13-5 User Permissions and Application Role Permissions"
Example 13-2 Permission Inheritance 2
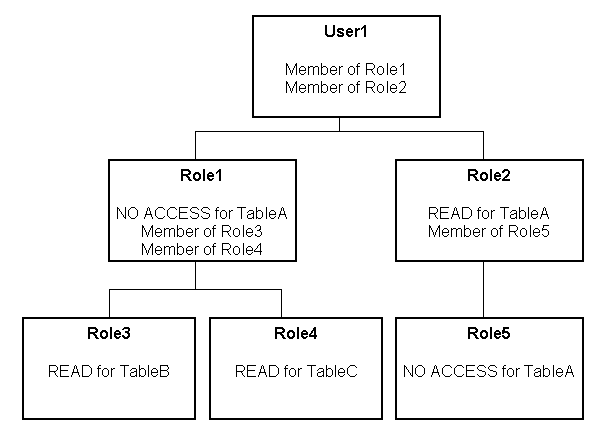
Consider the situation shown in Figure 13-6.
These are the resulting permissions:
-
User1 is a direct member of Role1 and Role2, and is an indirect member of Role3, Role4, and Role5.
-
Because Role5 is at a lower level of precedence than Role2, its denial of access to TableA is overridden by the
READpermission granted through Role2. The result is that Role2 providesREADpermission on TableA. -
The resultant permissions from Role1 are
NO ACCESSfor TableA,READfor TableB, andREADfor TableC. -
Because Role1 and Role2 have the same level of precedence and because the permissions in each cancel the other out (Role1 denies access to TableA, Role2 allows access to TableA), the less restrictive level is inherited by User1. In other words, User1 has
READaccess to TableA. -
The total permissions granted to User1 are
READaccess for TableA, TableB, and TableC.
Setting Query Limits
You can manage the query environment by setting query limits (governors) in the repository for particular application roles. You can limit queries by the number of rows received, by maximum run time, and by restricting to particular time periods. You can also allow or disallow direct database requests or the Populate privilege.
You should always set query limits for particular application roles rather than for individual users.
This section contains the following topics:
-
Accessing the Query Limits Functionality in the Administration Tool
-
Limiting Queries By Maximum Run Time and Restricting to Particular Time Periods
Accessing the Query Limits Functionality in the Administration Tool
Follow the steps in this section to access the Query Limits tab of the User/Application Role Permissions dialog.
To access the query limits functionality in the Administration Tool for a particular application role:
-
Open your repository in the Administration Tool.
-
Select Manage, then select Identity.
-
In the Security Manager dialog, in the tree pane, select BI Repository.
-
In the right pane, select the Application Roles tab, then double-click the application role for which you want to set query limits.
Note that if you are in offline mode, no application roles appear in the list unless you have first modified them in online mode. See "About Applying Data Access Security in Offline Mode" for more information.
-
In the Application Role dialog, click Permissions.
-
In the User/Application Role Permissions dialog, click the Query Limits tab.
Limiting Queries By the Number of Rows Received
You can control runaway queries by limiting queries to a specific number of rows.
To limit queries by the number of rows received:
-
Follow the steps in "Accessing the Query Limits Functionality in the Administration Tool" to access the Query Limits tab.
-
In the Max Rows column, type the maximum number of rows for users to retrieve from each source database object.
-
In the Status Max Rows field, select one of the following options for each database:
-
Enable: This limits the number of rows to the value specified. If the number of rows exceeds the Max Rows value, the query is terminated.
-
Disable: Disables any limits set in the Max Rows field.
-
Warn: Does not enforce limits, but logs queries that exceed the set limit in the Query log.
-
Ignore: Limits are inherited from the parent application role. If there is no row limit to inherit, no limit is enforced.
-
-
Click OK, then click OK again to return to the Security Manager.
Limiting Queries By Maximum Run Time and Restricting to Particular Time Periods
You can forbid queries during certain time periods, or you can specify the maximum time a query can run on a database.
If you do not select a particular time period, access rights remain unchanged. If you allow or disallow access explicitly in one or more application roles, users are granted the least restrictive access for the defined time periods. For example, if a user is a member of an application role that is explicitly allowed access all day on Mondays, but that user also belongs to another application role that is disallowed access during all hours of every day, then the user has access on Mondays only.
To limit queries by maximum run time, or restrict queries to particular time periods:
-
Follow the steps in "Accessing the Query Limits Functionality in the Administration Tool" to access the Query Limits tab.
-
To specify the maximum time a query can run on a database, in the Max Time (Minutes) column, enter the maximum number of minutes you want queries to run on each database object. Then, in the Status Max Time field, select one of the following options for each database:
-
Enable: This limits the time to the value specified.
-
Disable: Disables any limits set in the Max Time field.
-
Warn: Does not enforce limits, but logs queries that exceed the set time limit in the Query log.
-
Ignore: Limits are inherited from the parent application role. If there is no time limit to inherit, no limit is enforced.
-
-
To restrict access to a database during particular time periods, in the Restrict column, click the Ellipsis button. Then, in the Restrictions dialog, perform the following steps:
-
To select a time period, click the start time and drag to the end time.
-
To explicitly grant access, click Allow.
-
To explicitly deny access, click Disallow.
-
Click OK.
-
-
Click OK, then click OK again to return to the Security Manager.
Allowing or Disallowing Direct Database Requests
You can allow or disallow the ability to execute direct database requests for a particular application role. For the selected role, this privilege overrides the property Allow direct database requests by default for the database object in the Physical layer.
To set the ability to execute direct database requests:
-
Follow the steps in "Accessing the Query Limits Functionality in the Administration Tool" to access the Query Limits tab.
-
For each database object, in the Execute Direct Database Requests field, select one of the following options:
-
Allow: Explicitly grants the ability to execute direct database requests for this database.
-
Disallow: Explicitly denies the ability to execute direct database requests for this database.
-
Ignore: Limits are inherited from the parent application role. If there is no limit to inherit, then direct database requests are allowed or disallowed based on the property Allow direct database requests by default for the database object.
-
-
Click OK, then click OK again to return to the Security Manager.
Allowing or Disallowing the Populate Privilege
When a criteria block is cached, the Populate stored procedure writes the Cache/Saved Result Set value to the database. You can grant or deny this privilege to particular application roles. For the selected application role, this privilege overrides the property Allow populate queries by default for the database object in the Physical layer.
Any Oracle Marketing Segmentation user who writes a cache entry or saves a result set must be a member of an application role that has been assigned the POPULATE privilege for the target database. For more information about marketing cache, see the topic about setting up cache for target levels in the documentation for the Oracle Marketing Segmentation application.
To allow or disallow the Populate privilege:
-
Follow the steps in "Accessing the Query Limits Functionality in the Administration Tool" to access the Query Limits tab.
-
For each database object, in the Populate Privilege field, select one of the following options:
-
Allow: Explicitly grants the Populate privilege for this database. For all Marketing data warehouses, select Allow.
-
Disallow: Explicitly denies the Populate privilege for this database.
-
Ignore: Limits are inherited from the parent application role. If there is no limit to inherit, then the Populate privilege is allowed or disallowed based on the property Allow populate queries by default for the database object.
-
-
Click OK, then click OK again to return to the Security Manager.
About Applying Data Access Security in Offline Mode
It is strongly recommended that you perform data access security tasks in the Administration Tool in online mode. If you must apply data access security in offline mode, be aware that users and application roles do not appear in the Administration Tool in offline mode unless you have first modified them in the Administration Tool in online mode.
For example, if you open the Administration Tool in offline mode without first making any changes in online mode, you will see zero users and application roles defined. However, if you first modify the users and application roles in online mode (for example, applying object permissions or setting query limits), they will subsequently be available in the Administration Tool in offline mode.
Setting Up Placeholder Application Roles for Offline Repository Development
Application roles are created and managed in the policy store using the Oracle WebLogic Administration Console and Fusion Middleware Control. These application roles are displayed in the Administration Tool in online mode so that you can use them to set data filters, object permissions, and query limits for particular roles. The application roles in the policy store are retrieved by the Oracle BI Server when it starts.
In some cases, you may want to proceed with setting up data access security in your repository for application roles that have not yet been defined in the policy store. You can do this by creating placeholder application roles in the Administration Tool, then proceeding with setting up data access security in the repository.
If you create placeholder application roles in the Administration Tool, you must eventually add them to the policy store. Run the Consistency Checker to identify application roles that have been defined in the Administration Tool, but that have not yet been added to the policy store. Be sure to use the same name in the policy store that you used for the placeholder role in the Administration Tool.
Note:
Use caution when defining and using placeholder roles. If make changes to a role in offline mode that also exists in the policy store, the changes will be overwritten the next time you connect to the Oracle BI Server.To create placeholder application roles in the Administration Tool:
-
Open your repository in the Administration Tool.
-
Select Manage, then select Identity.
-
In the Security Manager dialog, select Action > New > Application Role.
-
In the Application Role dialog, provide the following information:
-
Name: Provide a name for the role.
-
Description: Optionally, provide a description of this application role.
-
Members: Use the Add and Remove buttons to add or remove users and other application roles as appropriate.
-
Permissions: Set object permissions, data filters, and query limits for this application role as appropriate. Refer to the other sections in this chapter for detailed information.
-
-
Click OK to return to the Security Manager.
To check for application roles that need to be added to the policy store:
-
Open your repository in online mode in the Administration Tool.
-
Select File, then select Check Global Consistency.
-
Note any entries related to application roles, then add the appropriate roles to the policy store as appropriate. See Oracle Fusion Middleware Security Guide for Oracle Business Intelligence Enterprise Edition for information about adding application roles to the policy store.
-
Optionally, select individual rows and click Copy to copy the entries to a text file.
Alternatively, you can check an individual application role by right-clicking the application role in the Security Manager dialog and then selecting Check Consistency.
