16 Managing Oracle BI Repository Files
This chapter provides information about topics related to managing your repository files, including comparing and merging repositories, equalizing objects, and querying and managing metadata.
This chapter contains the following topics:
Comparing Repositories
This section explains how to use the Compare repositories dialog in the Administration Tool. This feature enables you to compare all repository objects in two different repositories.
If you are using an Oracle BI Applications repository and have customized its content, you can use this option to compare your customized repository to a new version of the repository received with Oracle BI Applications.
See "Merging Repositories" for more information about merging your customized Oracle BI Applications repository with a new version of the repository.
-
In the Administration Tool, open a repository in offline mode.
The repository that you open in this step is referred to as the current repository. See "Using Online and Offline Repository Modes" for instructions on opening a repository.
-
From the File menu, select Compare.
-
In the Select Original Repository dialog, select the repository you want to compare to the open repository.
-
In the Open Offline dialog, enter the repository password and click OK.
-
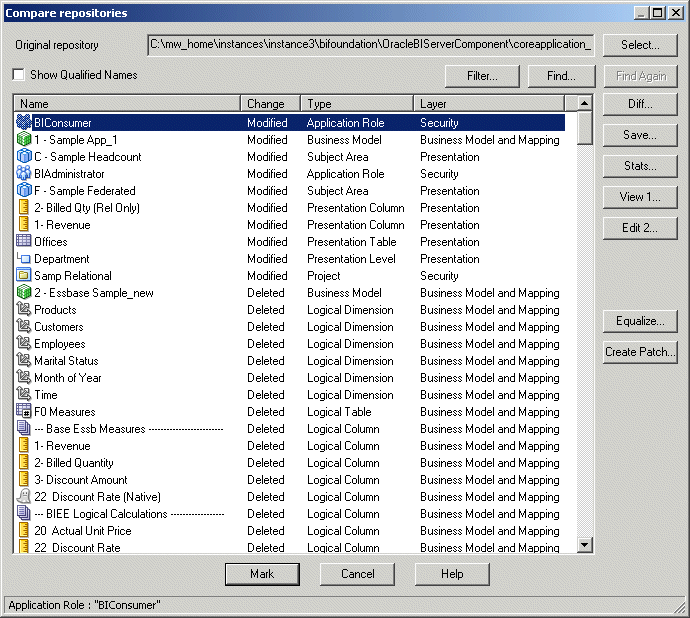
Use the Compare repositories dialog to review the differences between the two repositories. Figure 16-1 shows the Compare repositories dialog.
Table 16-1 lists and describes the values in the Change column.
Table 16-1 Compare Repositories Dialog: Change Column
Change Description Created
Object was created in the current repository and does not exist in the original repository.
Deleted
Object exists in the original repository but has been deleted from the current repository.
Modified
Object exists in the original repository but has been modified in the current repository.
Table 16-2 lists and describes some of the buttons in the Compare repositories dialog.
Table 16-2 Compare Repositories Dialog: Buttons
Button Description Filter
Opens the Comparison Filter dialog to enable you to filter the objects that appear in the Compare repositories dialog by type of change and type of object. You can specify what you want to appear and what you want to be hidden. If you select Group created and deleted objects, the tool filters out the child objects of created and deleted objects, so that only the parent objects are shown. By default, all items are shown.
Find
Search by an object Name and Type (such as Initialization Block).
Select
Enables you to select a repository to compare with the current repository.
Find Again
Search again for the most recent Find value.
Diff
Differences between the current repository and the original repository.
Save
Saves a list of the differences between the two repositories.
Stats
Provides the number of changes by Change type.
View 1
Opens an object in the original repository in read-only mode.
Edit 2
Opens an object in the current repository in read/write mode.
Equalize
Opens the Equalize Objects dialog so that you can model changes to the upgrade ID of the objects. See "Equalizing Objects" for more information.
Create Patch
Creates a patch file that contains the differences between the repositories. See "Performing Patch Merges" for more information.
Mark
Marks the object you select. Boxes appear around created and modified objects. To remove marks, from the File menu, choose Turn off Compare Mode.
Turning Off Compare Mode
This option enables you to remove marks applied to objects while using the Compare Repositories and Merge Repositories options. The Turn off Compare Mode option is only available after you have clicked Mark during the File > Compare action. If no repository object is marked, this option is not available.
To enable the Turn off Compare Mode option:
-
In the Administration Tool, select File, then select Turn off Compare Mode.
Equalizing Objects
If you have objects in two repositories that have the same name but different upgrade IDs, you may want to treat them as the same object. To accomplish this, you can use the equalizerpds utility to equalize the objects by giving them both the same upgrade ID. Alternatively, you can equalize objects as part of the merge process.
You can also use the Equalize Objects dialog (available from the Compare repositories dialog) to preview what the repository will look like after you run the equalizerpds utility.
This section contains the following topics:
About Equalizing Objects
Objects may need to be equalized because the Administration Tool tracks the history of each repository object using the upgrade ID of the object. The upgrade ID is a unique identifier for each object. Sometimes, the upgrade ID can change because of user actions or during merge. When this occurs, and a subsequent comparison is done, the Administration Tool treats the new upgrade ID as a new object, and the missing original upgrade ID as a deleted object.
For example, assume you have two identical repositories. In one repository, delete a presentation column, then re-create it again. When you compare the two repositories using the Compare repositories dialog, there are two entries for the presentation column: one that shows the old object as deleted, and one that shows the new object as created. Without using the Compare repositories dialog, it is hard to tell that this action occurred, because the Administration Tool typically shows only the object name and properties, not the underlying upgrade ID.
It is very useful run the equalizerpds utility on your repositories before merging them to equalize your changes. Equalizing any opposing changes (such as a column that has been duplicated, and then renamed) cleans up the underlying upgrade IDs and prevents unintended renaming during the merge.
When you equalize objects, you can lose track of object renames because legitimate object renames become different objects. In other words, intentional renames you did in the repository might be changed to different upgrade IDs, so subsequent merges erroneously treat the renamed object as a new object. To avoid this situation, enter the before and after names of intentionally renamed objects in a rename map file that you then pass to the utility. The equalizerpds utility uses the information in the file to ensure that the original IDs are used in the renamed current objects.
Tip:
You can view the upgrade ID for repository objects using the Query Repository dialog. To do this, follow these steps:-
Select Tools, then select Query Repository.
-
Run a query. See "Querying and Managing Repository Metadata" for details.
-
Click Columns.
-
Select Upgrade ID from the list. You can use the Find button to help locate the Upgrade ID.
-
Click OK. A new column showing the upgrade IDs appears in the Results list.
Using the Equalize Objects Dialog
The Equalize Objects dialog gives you a preview of what your repository will look like if you run the equalizerpds utility on it. The Equalize Objects dialog provides a convenient way to compare changes related to objects that have the same name, but it does not persist any of the changes. Note that using the Equalize Objects dialog can be a very slow process for larger repositories.
To view and use the Equalize Objects dialog:
-
In the Administration Tool, open your repository in offline mode.
-
From the File menu, select Compare.
-
In the Select Original Repository dialog, select the repository you want to compare to the open repository (typically the original repository).
-
In the Open Offline dialog, enter the repository password and click OK. The Compare repositories dialog is displayed.
-
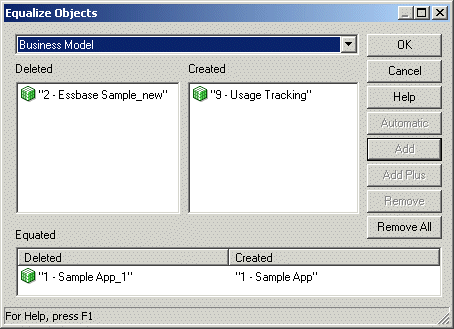
Click Equalize to display the Equalize Objects dialog.
-
The Equalize Objects dialog shows a list of changes where you may want to consider objects with different upgrade IDs to be the same object. You can use the following options to model how the changes might get equalized:
-
Click Automatic to automatically equalize changes related to objects that have the same name. The changes appear in the Equated table.
If no changes can be automatically equalized, nothing appears in the table, and the OK button remains disabled.
-
Select an object in the Deleted list, then select the equivalent object in the Created list and click Add or Add Plus to equate the objects. Add Plus adds the object along with its child objects to the Equated table, while Add simply adds the selected object. For example, if you select a Subject Area and click Add Plus, the underlying Presentation Tables and Presentation Columns are added as well.
After you make a manual selection, the Automatic button is disabled.
-
Select a row in the Equated table and select Remove or Remove All to remove objects from the Equated table. Remove All removes the object along with its child objects, while Remove simply removes the selected object
The Automatic button is enabled after all manual selections are removed.
-
-
When you are finished modeling the changes, click OK. The changes appear in the Compare Repositories dialog, but the changes do not persist after you close the dialog.
Using the equalizerpds Utility
You can use the equalizerpds utility to equalize the upgrade ID of objects in two separate repositories. If objects have the same upgrade ID, they are considered to be the same object. The utility compares upgrade IDs from the first repository (typically the original repository) with upgrade IDs from the second repository (typically the modified repository). Then, the utility equalizes the upgrade IDs of objects with the same name, using the upgrade ID from the original repository.
Before running equalizerpds, you must first run bi-init.cmd (or bi-init.sh on UNIX systems) to launch a command prompt that is initialized to your Oracle instance. You can find this utility in:
ORACLE_INSTANCE/bifoundation/OracleBIApplication/coreapplication/setup
Then, run equalizerpds from the resulting command prompt with the desired options. You can run the utility from this directory with no arguments or parameters to see usage information.
The utility takes the following parameters:
equalizerpds [-B original_repository_password] -C original_repository_name
[-E modified_repository_password] -F modified_repository_name [-J rename_map_file]
[-O output_repository_name] [-Y equalStringSet]
Where:
rename_map_file is a text file containing a list of objects that were renamed and that you want to equalize. The format is a tab-separated file with the following columns:
TypeID Name1 Name2
For example, to include a physical column in the map file that was renamed from Name1 to Name2, provide the following:
3003 "DB"."Catalog"."Schema"."Name1" "DB"."Catalog"."Schema"."Name2"
equalStringSet is a set of characters that you want to treat as equal.
Note that the original_repository_password and modified_repository_password arguments are optional. If you do not provide these password arguments, you are prompted to enter the passwords when you run the command (password1 and password2). To minimize the risk of security breaches, Oracle recommends that you do not provide password arguments either on the command line or in scripts. Note that the password arguments are supported for backward compatibility only, and will be removed in a future release.
For example:
equalizedrpds -C original.rpd -F modified.rpd -O modified_equalized.rpd
password1: my_original_rpd_password
password2: my_modified_rpd_password
In this example, original.rpd is compared with modified.rpd, the upgrade IDs are equalized using the upgrade IDs from original.rpd, and the final result is written to modified_equalized.rpd.
Note:
Be sure to provide the full pathnames to your repository files, both the input files and the output file, if they are located in a different directory.Merging Repositories
You can use the Merge Repository Wizard in the Administration Tool to merge repositories (RPD files). There are three types of merges:
-
Full merges are typically used during development processes, when there are two different repositories that need to be merged. The Administration Tool provides a three-way merge feature that lets you merge two repositories that have both been derived from a third, original repository. Full merges can also be used to import objects from one repository into another.
-
Patch merges are used when you are applying the differential between two versions of the same repository. For example, you might want to use a patch merge to apply changes from the development version of a repository to your production repository, or to upgrade your Oracle BI Applications repository.
-
Multiuser development merges are used when you are checking in projects using a multiuser development environment. See "About the Multiuser Development Merge Process" for more information.
See also Appendix D, "Merge Rules" for additional information about how repository objects are merged.
This section contains the following topics:
Performing Full Repository Merges
You can use the Administration Tool to merge different repositories. This section describes how to use the full (standard) repository merge feature in the Administration Tool.
This section contains the following topics:
About Full Repository Merges
The merge process typically involves three versions of an Oracle BI repository: the original repository, modified repository, and current repository. The original repository is the original unedited file (the parent repository), while the modified and current repository are the two changed files you want to merge. The current repository is the one currently open in the Administration Tool.
During the merge process, the Administration Tool compares the original repository with the modified repository and the original repository with the current repository. Conflicts occur when there are conflicting changes resulting from the two comparisons. For example, a conflict occurs if you rename object A to B in the modified repository, but you rename object A to C in the current repository.
The Merge Repository feature lets you decide on an object-by-object basis which changes you want to keep in the final merged repository. If there are no conflicts, merging is automatic.
There are two types of full merge:
-
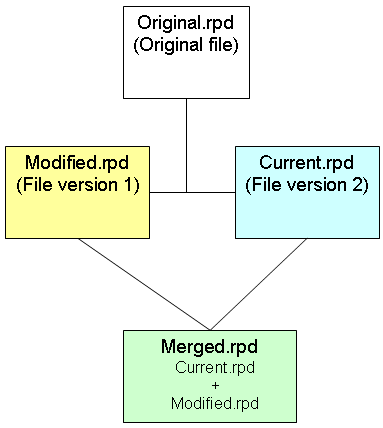
Common Parent. This merge, also called a three-way merge, is useful when you have a common parent repository and two derived repositories (see Figure 16-3). There is a parent (original) RPD, and two derived RPDs (file version 1 and file version 2). After the merge, a fourth merged repository file is created.
Figure 16-3 Full Merge With a Common Parent
Description of "Figure 16-3 Full Merge With a Common Parent"
-
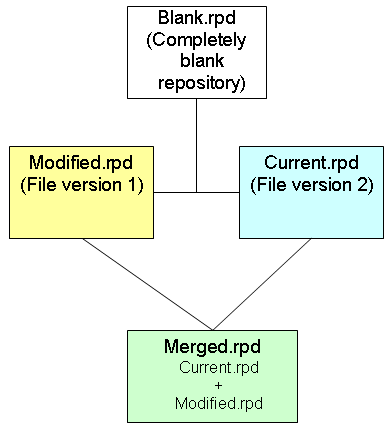
No Common Parent. This merge, also called a two-way merge, is useful when you want to import objects from one repository to another. In this case, objects are merged from two different repositories with no common parent. To accomplish this, you perform a three-way merge in the Administration Tool with a completely blank repository as the original file (see Figure 16-4). This functionality replaces the Import from Repository feature that was deprecated in an earlier release.
Figure 16-4 Full Merge Without a Common Parent
Description of "Figure 16-4 Full Merge Without a Common Parent"
Performing Full Repository Merges With a Common Parent
This section explains how to use the Administration Tool to perform a full repository merge with a common parent. Typically, this approach is used when you have an original parent repository and would like to merge the changes made to objects in two modified repository versions (current and modified). Objects that do not exist in the current repository are created as new objects.
To merge two versions of an Oracle BI repository file with a common parent:
-
In the Administration Tool, open the current repository in offline mode.
-
From the Administration Tool menu, select File, then select Merge. The Merge Repository Wizard appears.
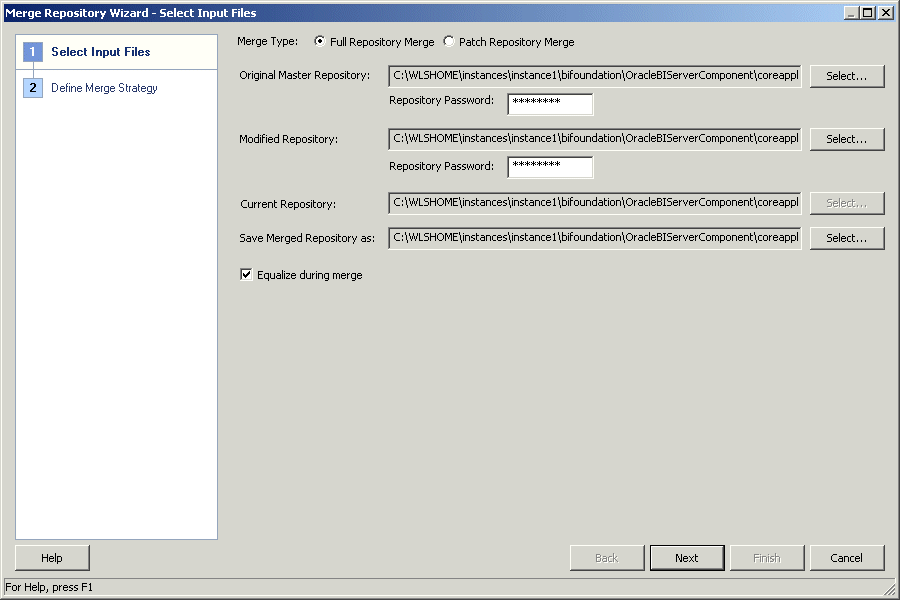
Figure 16-5 shows the Merge Repository Wizard.
Figure 16-5 Merge Repository Wizard: Select Input Files Screen (Full Merge)
Description of "Figure 16-5 Merge Repository Wizard: Select Input Files Screen (Full Merge)"
-
In the Select Input Files screen, for Merge Type, select Full Repository Merge.
-
Select the original parent repository by clicking Select next to Original Master Repository. Browse to select the original repository, then click Open.
-
Provide the password for the original repository in the appropriate Repository Password field.
-
Select the modified repository by clicking Select next to the Modified Repository field. Browse to select the modified repository, then click Open.
-
Provide the password for the modified repository in the appropriate Repository Password field.
-
Optionally, you can change the default name and location of the saved (merged) file by clicking Select next to the Save Merged Repository as field. Provide a new name and location, then click Save.
-
It is a good practice to equalize your changes to clean up underlying object IDs before merging. If you have not yet equalized your changes, select Equalize during merge to equalize objects as part of the merge process. Selecting this option may affect merge performance.
See "Equalizing Objects" for more information about equalizing.
-
Click Next. If there are any conflicts, the Define Merge Strategy screen of the Merge Repository Wizard appears. If there are no conflicts, the Merge Repository Wizard closes.
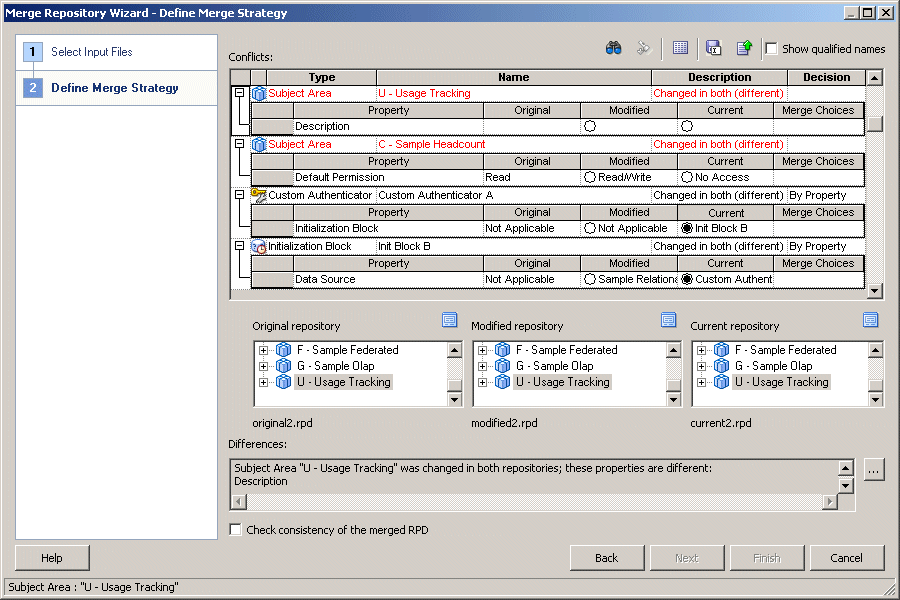
Figure 16-6 shows the Define Merge Strategy screen.
Figure 16-6 Merge Repository Wizard: Define Merge Strategy Screen
Description of "Figure 16-6 Merge Repository Wizard: Define Merge Strategy Screen"
-
The Define Merge Strategy screen displays a decision table that shows conflicts for this merge. See Table 16-3 for details about the elements in this screen.
To make decisions about whether to include or exclude objects from the merged repository, choose Current or Modified from the Decision list. Choose Current to keep the change for the selected object in the current repository, or choose Modified to keep the change for the selected object in the modified repository.
When you select an object in the decision table, the read-only text box below the decision table describes what changes were made to that object in the current repository. In addition, the tree panels at the bottom of the dialog show the affected objects for the selected row. Alternatively, you can select an object in one of the tree views to automatically highlight the corresponding row in the decision table.
The Modified option in the Decision list displays a suffix that indicates whether the object in question will be added to or deleted from the merged repository. Modified (A) indicates that the object will be added, and Modified (D) indicates that the object will be deleted.
The type of conflict is displayed in the Description column of the Conflicts table. The decision choices you can make depend on the type of conflict shown in this column. The following list shows example results for different types of conflicts:
-
Added to Current: Choosing Current keeps the new object in the merged repository. Choosing Modified (D) deletes the new object from the merged repository.
-
Deleted from Current: Choosing Current keeps the repository as it is without adding the object to the merged repository. Choosing Modified (A) adds the object back into the merged repository.
-
Changed in both (different): The object was not added or deleted, but at least one of its properties was modified. Click the plus sign (+) to the left of the row to view the property that was changed, as well as its value in the original, current, and modified versions of the repository. Property values are only shown for small-length strings. Longer-length strings like descriptions, features, and init strings are not shown.
Click the option for the value you want to retain in the merged version of the repository. For some properties, such as aliases, you can choose the Merge Choices option to merge the properties rather than choose one over the other. This option is only available if the properties can be merged.
Note:
You typically do not need to make merge decisions regarding objects that have been added to or deleted from the Modified repository. However, you can view change statistics for this merge to see a summary of changes, including objects that have been added to or deleted from Modified. See Table 16-3 for more information about this feature.
After you make a merge decision, the row for that decision in the table changes from red to black. When all rows have a value in the Decision field, the Finish button is enabled.
-
-
In addition to making merge decisions, you can perform other operations in the Define Merge Strategies screen. See Table 16-3 for details.
Table 16-3 lists and describes the elements in the Define Merge Strategies screen.
Table 16-3 Elements in the Define Merge Strategies Screen
| Element | Description |
|---|---|
|
Conflicts table |
The Conflicts table includes the following columns:
For objects with properties that are modified in each repository, a sub-table (grid) is displayed with details of the changed properties. The grid includes the following columns:
|
|
Show qualified names |
When selected, shows fully qualified names for objects in the decision table (for example, "Paint"..."Month Year Ago fact"). Note: When the Show qualified names option is selected, some of the object names can be too long to fit into the cells of the decision table. Use the mouse to hover over the truncated name to see the full name of the object or property. Alternatively, you can manually resize columns, or double click the column separator to expand the column to the width of the object name. |
|
Check consistency of the merged RPD |
When selected, runs a consistency check before saving the merged file. |
|
|
Saves a file containing interim changes in the Repository subdirectory so that you can stop work on the merge and continue it later. After saving the changes (decisions), close the Merge repositories dialog by clicking Cancel. Note: If there are a large number of decisions, you can save time by saving the merge decisions to a CSV file, opening the file in Excel or a text editor, and then modifying the merge decisions manually. Then, you can load the updated merge decisions file in the Define Merge Strategies screen. |
|
|
Loads a saved decisions file from the Repository subdirectory so that you can continue processing a repository merge. |
|
Find by Name or Type |
Searches by an object Name and Type (such as Initialization Block). |
|
Find Again |
Searches again for the most recent Find value. |
|
View Change Statistics |
Shows statistics for this merge, such as the number of objects deleted from the Modified repository, the number of objects that were changed in both repositories, and so on. |
|
Details |
Shows the text in the read-only text box below the decision table in a separate window. |
|
View Original/Modified/ Current repository |
Shows properties for the affected object in the selected repository. |
Performing Full Repository Merges Without a Common Parent
This section explains how to use the Administration Tool to perform a full repository merge without a common parent. Use this method when you want to import objects from one repository (the modified repository) into another (the current repository).
Note:
In the repository you choose to define as current, make sure that the Presentation layer references any Physical layer or Business Model and Mapping layer objects that you want to keep. Objects like business models, databases, and connection pools in the current repository that are not referenced by any Presentation layer objects are discarded during the merge. If necessary, you might want to add a placeholder subject area that references the objects before you perform the merge to ensure the desired objects are kept.See Appendix D, "Merge Rules" for more information about which objects are retained or discarded during the merge process.
To merge two versions of an Oracle BI repository file without a common parent:
-
If you do not already have a blank repository file to serve as the original repository in the merge, create one, as follows:
-
Close the blank repository.
-
Open the current repository in offline mode. This is the repository that contains the objects you want to import.
-
From the Administration Tool menu, choose File, then select Merge. The Merge Repository Wizard appears.
-
In the Select Input Files screen, for Merge Type, select Full Repository Merge.
-
Click Select next to Original Master Repository. Then, browse to select your blank repository file as the original repository and click Open. Leave the password field blank.
-
Select the destination repository by clicking Select next to the Modified Repository field. Browse to select the modified repository, then click Open. This is the repository into which you want to import objects.
-
Provide a password for the modified repository in the appropriate Password field.
-
Optionally, you can change the default name and location of the saved (merged) file by clicking Select next to the Save Merged Repository as field. Provide a new name and location, then click Save.
-
Click Next. If there are any conflicts, the Define Merge Strategy screen of the Merge Repository Wizard appears. If there are no conflicts, the Merge Wizard continues with the merge process and then closes automatically when finished.
-
The Define Merge Strategy screen displays a decision table that shows conflicts for this merge. To make decisions about whether to include or exclude objects from the merged repository, choose Current or Modified from the Decision list. When you select an object in the decision table, the read-only text box below the decision table describes what changes were made to that object in the current repository.
Refer to Figure 16-6 to see the Define Merge Strategy screen. Refer to Table 16-3 for information about additional options in the Define Merge Strategy screen, such as saving merge decisions to a comma-separated values (.csv) file.
After you make a merge decision, the row for that decision in the table changes from red to black. When all rows have a value in the Decision field, the Finish button is enabled.
-
Click Finish.
Performing Patch Merges
Oracle Business Intelligence provides the capability of generating an XML patch file that contains only the changes made to a repository. This patch can be then applied to the old (original) version of the repository to create the new version. This is very useful for development-to-production scenarios, and can also be used for Oracle BI Applications customers to upgrade their repository.
This section explains how to generate a patch that contains the differences between two repositories, and then apply the patch to a repository file.
This section contains the following topics:
About Patch Merges
In a patch merge, you create a patch that contains the differences between the current repository file and the original repository file. Then, you apply the patch file to the modified repository file.
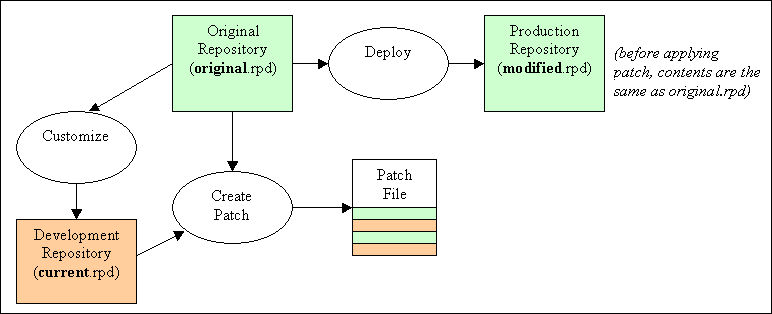
In a development-to-production scenario, you have an original parent file, a current file that contains the latest development changes, and a modified file that is the deployed copy of the original file.
To generate a patch, you open the current file and select the original file, then create the patch. Figure 16-7 shows how to create a patch in a development-to-production scenario.
Figure 16-7 Development-to-Production: Creating the Patch
Description of "Figure 16-7 Development-to-Production: Creating the Patch"
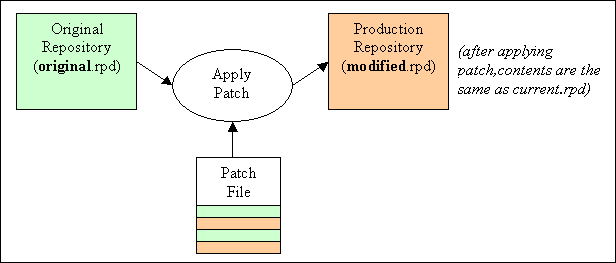
To apply the patch, you open the modified file and select the original file, then apply the patch. Figure 16-8 shows how to apply a patch in a development-to-production scenario.
Figure 16-8 Development-to-Production: Applying the Patch
Description of "Figure 16-8 Development-to-Production: Applying the Patch"
In an Oracle BI Applications repository upgrade scenario, the current file is the latest version of the repository shipped by Oracle, and the original file is the original repository shipped by Oracle. The modified file is the file that contains the customizations you made to the original file.
To generate a patch, you open the current file and select the original file, then create the patch. Figure 16-7 shows how to create a patch in an Oracle BI Applications repository upgrade scenario.
Figure 16-9 Oracle BI Applications Repository Upgrade: Creating the Patch
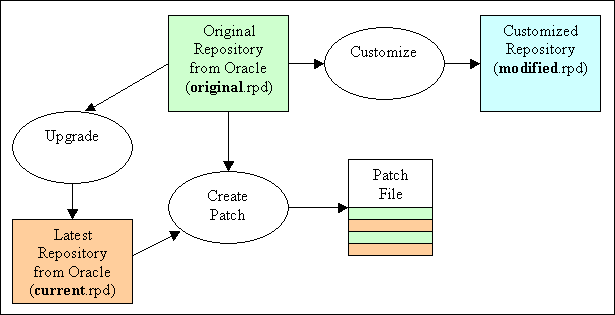
Description of "Figure 16-9 Oracle BI Applications Repository Upgrade: Creating the Patch"
To apply the patch, you open the modified file and select the original file, then apply the patch. Figure 16-10 shows how to apply a patch in an Oracle BI Applications repository upgrade scenario.
Figure 16-10 Oracle BI Applications Repository Upgrade: Applying the Patch
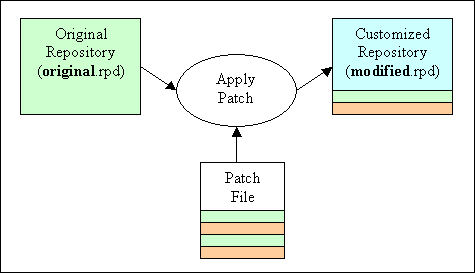
Description of "Figure 16-10 Oracle BI Applications Repository Upgrade: Applying the Patch"
Generating a Repository Patch
Use the Administration Tool to generate a patch that contains the differences between two repositories.
To generate a patch using the Administration Tool:
-
In the Administration Tool, open the current Oracle BI repository in offline mode. In other words, open the updated repository that contains the changes you want to put in the patch.
-
Select File, then select Compare.
-
Select the original Oracle BI repository. When prompted, provide the appropriate password. The Compare repositories dialog appears.
-
It is a good practice to equalize your changes to clean up underlying object IDs before generating a patch. See "Equalizing Objects" for more information.
-
In the Compare repositories dialog, review the changes between the repositories. Then, click Create Patch.
-
In the Create Patch dialog, enter a name for the patch file (for example, my_patch.xml) and click Save.
Applying a Repository Patch
Use the Administration Tool to apply a patch that contains the differences between two repositories.
Note that you can apply patches from a larger multiuser repository to a smaller subset extract repository. In this case, only the changes in the subset are applied from the patch.
To apply a patch:
-
In the Administration Tool, open the modified Oracle BI repository in offline mode. In other words, open the repository on which you want to apply the patch.
-
Select File, then select Merge. The Merge Repository Wizard appears.
Figure 16-11 shows the Merge Repository Wizard.
Figure 16-11 Merge Repository Wizard: Select Input Files Screen (Patch Merge)
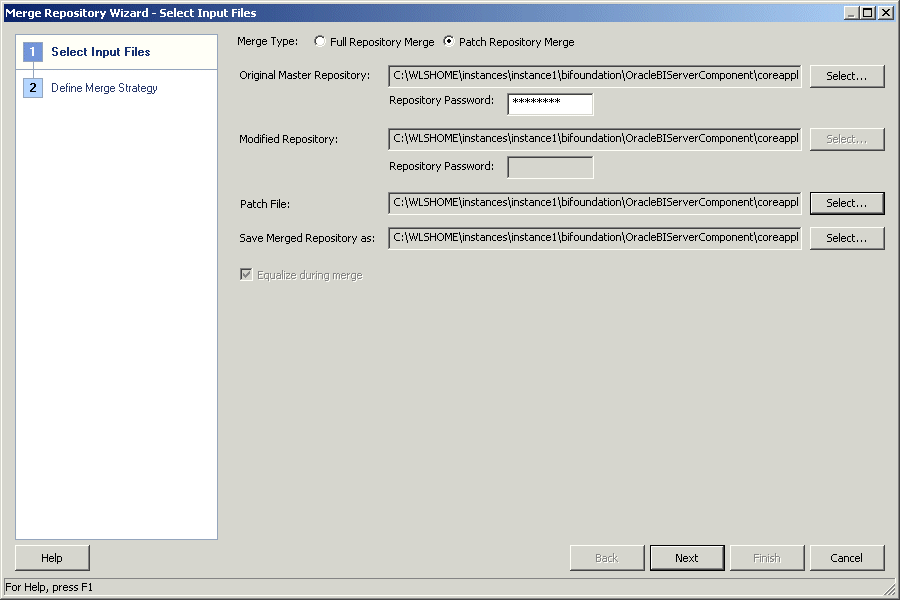
Description of "Figure 16-11 Merge Repository Wizard: Select Input Files Screen (Patch Merge)"
-
For Merge Type, select Patch Repository Merge.
-
Click Select next to Original Master Repository. Browse to select the original repository, then click Open. Note that the original repository cannot be the same as the modified (currently open) repository.
-
Enter the repository password for the original repository.
-
Click Select next to Patch File. Browse to select the patch file you want to apply, then click Open.
-
Optionally, click Select next to Save Merged Repository as, then enter a file name under which the patched repository will be saved and click Save.
-
Click Finish.
Using patchrpd to Apply a Patch
You can also apply a patch using the patchrpd utility. This feature is especially useful when you want to patch repositories on Linux and UNIX systems where the Administration Tool is not available.
Note that unlike the Administration Tool patch feature, patchrpd does not display or resolve conflicts. If a conflict is detected, patchrpd displays a warning and exits.
Before running patchrpd, you must first run bi-init.cmd (or bi-init.sh on UNIX) to launch a command prompt or shell window that is initialized to your Oracle instance. You can find this utility in:
ORACLE_INSTANCE/bifoundation/OracleBIApplication/coreapplication/setup
Then, run patchrpd from the resulting shell window with the desired options, as follows:
patchrpd [-P modified_rpd_password] -C modified_rpd_pathname
[-W original_rpd_password] -G original_rpd_pathname -I xml_patch_file_pathname
-O output_rpd_pathname [-S schema_location] [-8]
Where:
modified_rpd_password is the repository password for the modified repository, also called the customer or customized repository.
The password argument for the modified repository is optional. If you do not provide a password argument for the modified repository, you are prompted to enter a password when you run the command. To minimize the risk of security breaches, Oracle recommends that you do not provide a password argument either on the command line or in scripts. Note that the password argument is supported for backward compatibility only, and will be removed in a future release.
modified_rpd_pathname is the name and location of the modified repository.
original rpd_password is the repository password for the original repository.
The password argument for the original repository is optional. If you do not provide a password argument for the original repository, you are prompted to enter a password when you run the command. To minimize the risk of security breaches, Oracle recommends that you do not provide a password argument either on the command line or in scripts. Note that the password argument is supported for backward compatibility only, and will be removed in a future release.
original_rpd_pathname is the name and location of the original repository.
xml_patch_file_pathname is the name and location of the XML patch file you want to apply.
output_rpd_pathname is the name and location of the RPD output file you want to generate.
schema_location is the name and location of the Oracle BI Server XML schema. If you do not specify a location, patchrpd assumes the schema file is in the default location of ORACLE_HOME/bifoundation/server/bin/xudml1.xsd.
-8 specifies UTF-8 encoding.
For example:
patchrpd -C customer.rpd -G original.rpd -I patch.xml -O patched.rpd
Give password for customer repository: my_modified_rpd_password
Give password for original repository: my_original_rpd_password
This example applies a patch called patch.xml to the customer.rpd repository, and then generates an output repository called patched.rpd.
Querying and Managing Repository Metadata
You can use repository queries to help manage repository metadata in the following ways:
-
Examine and update the internal structure of the repository. For example, you can query for objects in the repository based on name, type (such as Logical Column or Presentation Hierarchy), or on a combination of name and type. You can then edit or delete objects that appear in the Results list. You can also create new objects and view parent hierarchies.
-
Query a repository and view reports that show such items as all tables mapped to a logical source, all references to a particular physical column, content filters for logical sources, initialization blocks, and security and user permissions.
For example, you might want to run a report before making any physical changes in a database that might affect the repository. You can save the report to a file in comma-separated value (CSV) or tab-delimited format.
-
You can save a query to run again later, or save the query results to an external file. When you save to an external file, the encoding options are ANSI, Unicode, and UTF-8.
This section contains the following topics:
Querying the Repository
You can query for objects in the repository using the Query Repository tool. You can also construct a filter to filter the results, save a query, run a previously saved query, or create new repository objects.
To query a repository:
-
In the Administration Tool, open your repository.
-
Select Tools, then select Query Repository.
-
In the Query Repository dialog, complete the query information using Table 16-4 as a guide.
-
Click Query.
Table 16-4 lists the options available in the Query Repository dialog.
Table 16-4 Query Repository Options
| Option | Description |
|---|---|
|
Name |
Use this option to search by object name. You can use an asterisk ( * ) wildcard character to specify any characters. The wildcard character can represent the first or last characters in the search string. Searches are not case sensitive. |
|
Type |
Select a type from the list to narrow your search to a particular type of object, or select All Types to query all objects. The list does not contain objects such as aggregate rules, logical source folders, privilege packages, and other objects that are considered internal objects. |
|
Filter |
Click Filter to create or edit a filter for your query. After you create a filter, the filter criteria appear in the box to the left of the button. See "Constructing a Filter for Query Results" for more information. |
|
Query |
Click Query when you are ready to submit your query. |
|
Save Query As |
Click Save Query As to save your query to run again later. Enter the name of the saved query in the Save query as field, then click Save. |
|
Saved Queries |
Click Saved Queries to view or run previously saved queries. You can also delete saved queries. To run a previously saved query, select the row that contains the query you want to run and click Select, or double-click the row. The Saved Queries option is only available if you have previously saved queries. |
|
Edit |
After executing a query, select an object from the Results list and click Edit to edit an object in the list of query results. Not all repository objects can be edited from the results list (for example, privilege objects and user database sign-on objects). If an object cannot be edited from the results list, Edit is not available. |
|
Delete |
After executing a query, select one or more objects in the Results list and click Delete to delete the objects. After you confirm the deletion, the objects are deleted from your metadata repository. |
|
New |
Use this option to create new repository objects. First, select the type of object you want to create from the Type list, then click New. This option is not available when All Types is selected. The dialogs that appear depend on the object type that you select. For more information, refer to the sections that describe how to create that object. Note that if you choose to create a new logical dimension, you must choose whether to create a dimension with a level-based hierarchy, or a parent-child-hierarchy. |
|
Show Parent |
After executing a query, select an object in the Results list and click Show Parent to view the parent hierarchy of an object. If the object does not have a parent, a message appears. You cannot use Show Parent with users or application roles. In the Parent Hierarchy dialog, you can edit or delete objects. Note that if you delete an object from this dialog, any child objects of the selected object are also deleted. |
|
Mark |
After executing a query, select one or more objects in the Results list and click Mark to mark the selected objects. To unmark the objects, select them and click Mark again. Marking objects makes them easier to visually identify as you develop metadata. |
|
Set Icon |
After executing a query, select one or more objects in the Results list and click Set Icon to select a different icon for the objects. You can set special icons for objects to help visually identify them as having common characteristics. For example, you might want to pick a special icon to identify columns that will be used only by a certain user group. To change the icons back to the original icons, select the objects and click Set Icon again. Then, select Remove associated icon and click OK. |
|
GoTo |
After executing a query, select one or more objects in the Results list and click GoTo to go to the objects in the Administration Tool view of the repository. The selected objects appear highlighted in the Physical, Business Model and Mapping, or Presentation layer. Note that the Query Repository dialog closes when you choose this option. |
|
Save |
After executing a query, click Save to save query results to an external file. Then, in the Save As dialog, provide a name, file type, and encoding value for the file, then click Save. |
|
Columns |
Click Columns to add additional columns of information to the results. Then, select the columns you want from the list and click OK. Note that in the Select Columns dialog, you can re-order the columns by selecting a checked column and clicking Up or Down. |
|
Show Qualified Name |
Use this option to display the fully qualified name of the objects found by the query. For example, if you query for logical columns, the default value in the Name column of the Results list is the column name. However, if you select Show Qualified Names, the value in the Name list changes to |
Constructing a Filter for Query Results
Use the Query Repository Filter dialog to filter the results in the Results list of the Query Repository dialog.
The Query Repository Filter dialog contains five columns: an Item column and its operator or selection column, a Value column and its operator or selection column, and a Delete column that lets you delete the selected filter.
To construct a filter:
-
In the Administration Tool, select Tools, then select Query Repository.
-
In the Query Repository dialog, select an item in the Results list or select an item from the Type list, and then click Filter.
-
In the Query Repository Filter dialog, click the Item field. The Item list contains the items by which you can filter.
-
In the Item list, select the filter that you want to apply to the Results or Type object you selected in Step 2. Then, adjust or enter information in the Value column, as appropriate.
You can construct multiple filters. When you do, the Operator field becomes active. When the Operator field is active, you can set
ANDandORconditions. -
Click OK to return to the Query Repository dialog. The filter appears in the box to the left of the Filter button.
Note:
If you are constructing a complex filter, you might want to click OK after adding each constraint to verify that the filter construction is valid for each constraint.
Example 16-1 and Example 16-2 show how to create different kinds of filters.
Example 16-1 Viewing All Databases Referenced In a Business Model
The following example shows how to create a filter that lets you view all databases referenced in a particular business model.
-
In the Query Repository dialog, select Database from the Type list, and then click Filter.
-
In the Query Repository Filter dialog, click the Item field, and then select Related to.
-
Click the ellipsis button to the right of the Value field, and in the list, choose Select object.
-
In the Select dialog, select the business model by which you want to filter, and then click Select. Your selection appears in the Value field.
-
Click OK to return to the Query Repository dialog. The filter appears in the box to the left of the Filter button.
-
Click Query. The Results list shows the databases referenced by the business model you selected.
Example 16-2 Viewing All Presentation Columns Mapped to a Logical Column
The following example shows how to create a filter that lets you view all presentation columns mapped to a particular logical column.
-
In the Query Repository dialog, select Presentation Column from the Type list, and then click Filter.
-
In the Query Repository Filter dialog, click the Item field, and then select Column.
-
Click the ellipsis button to the right of the Value field, and in the list, choose Select object.
-
In the Select dialog, select the column by which you want to filter, and then click Select. Your selection appears in the Value field.
-
Click OK to return to the Query Repository dialog. The filter appears in the box to the left of the Filter button.
-
Click Query. The Results list shows the presentation columns mapped to the logical column you selected.
The following example shows nested queries, where the filter itself is another query.
-
In the Query Repository dialog, select Logical Column from the Type list, and then click Filter.
-
In the Query Repository Filter dialog, click the Item field, and then select Related to.
-
Click the ellipsis button to the right of the Value field, and in the list, choose Set Condition for Physical Column.
-
In the new Query Repository Filter dialog, click the Item field, and then select Source column.
-
Click the ellipsis button to the right of the Value field, and in the list, choose Select Object.
-
In the Browse dialog, select a source physical column (for example, Column A) and click Select.
-
Click OK in the Query Repository Filter dialog for the subquery condition. This subquery queries all aliases for the source column you selected.
-
In the Query Repository Filter dialog for the main query, click the Item field in the next row and then select Related to.
-
Click the ellipsis button to the right of the Value field, and in the list, choose Select Object.
-
In the Browse dialog, select the same source physical column (for example, Column A) and click Select.
-
Select OR from the Operator drop-down list.
-
Click OK to return to the Query Repository dialog. The filter appears in the box to the left of the Filter button.
-
Click Query. The Results list shows a list of logical columns related to either Column A, or aliases of Column A.
Querying Related Objects
The Query Related Objects feature enables you to query objects related to one or more objects that you select from the Physical, Business Model and Mapping, or Presentation layer.
You can only use this feature with objects selected from the same layer. For example, you cannot query objects related to both a Physical layer object and a Business Model and Mapping layer object.
To query objects related to a selected object:
-
In the Administration Tool, open your repository.
-
Select one or more objects from a single layer (for example, a set of logical columns from the Business Model and Mapping layer). The objects you select must all be of the same type.
-
Right-click the objects and select Query Related Objects.
-
From the right-click submenu, select an object type to narrow your search to a particular type of object, or select All Types to query all objects related to your source objects. If you have previously made queries for this source object type, the three most recent queries are available at the top of the submenu.
After you select an object type, the Query Related Objects dialog is displayed, showing the objects related to your source objects in the Name list.
Table 16-5 lists the options available in the Query Repository dialog.
Table 16-5 Query Related Objects Options
| Option | Description |
|---|---|
|
Mark |
Select one or more objects in the Name list and click Mark to mark the selected objects. To unmark the objects, select them and click Mark again. Marking objects makes them easier to visually identify as you develop metadata. |
|
Set Icon |
Select one or more objects in the Name list and click Set Icon to select a different icon for the objects. You can set special icons for objects to help visually identify them as having common characteristics. For example, you might want to pick a special icon to identify columns that will be used only by a certain user group. To change the icons back to the original icons, select the objects and click Set Icon again. Then, select Remove associated icon and click OK. |
|
Show Qualified Name |
Use this option to display the fully qualified name of the objects found by the query. For example, if you query for logical columns, the default value in the Name list is the column name. However, if you select Show Qualified Names, the value in the Name list changes to |
|
Show Parent |
Select an object in the Name list and click Show Parent to view the parent hierarchy of an object. If the object does not have a parent, a message appears. You cannot use Show Parent with users or application roles. In the Parent Hierarchy dialog, you can edit or delete objects. Note that if you delete an object from this dialog, any child objects of the selected object are also deleted. |
|
GoTo |
Select one or more objects in the Name list and click GoTo to go to the objects in the Administration Tool view of the repository. The selected objects appear highlighted in the Physical, Business Model and Mapping, or Presentation layer. Note that the Query Related Objects dialog closes when you choose this option. |
Changing the Repository Password
Each repository has a password that is used to encrypt its contents. You create the repository password when you create a new repository file, or when you upgrade a repository from a previous release of Oracle Business Intelligence.
You can change the repository password using the Administration Tool in offline mode. You cannot change the repository password when the repository is open in online mode.
After you change the repository password in the Administration Tool, you must also publish the updated repository and specify the new password in Fusion Middleware Control. Specifying the repository password in Fusion Middleware Control enables the password to be stored in an external credential store, so that the Oracle BI Server can retrieve it to load the repository.
To change the repository password in the Administration Tool and Fusion Middleware Control:
-
Open the repository in the Administration Tool in offline mode.
-
Select File, then select Change Password.
-
Enter the current (old) password.
-
Enter the new password and confirm it. The repository password must be longer than five characters and cannot be empty.
-
Click OK.
-
Save and close the repository.
-
Open a Web browser and log in to Fusion Middleware Control from the computer where the updated repository is located.
-
In the navigation tree, expand Business Intelligence and then click coreapplication to display the Business Intelligence Overview page.
-
Display the Repository tab of the Deployment page.
-
Click Lock and Edit Configuration.
-
Click Browse next to Repository File. Then, select the updated repository file and click Open.
-
Enter the new (updated) repository password in the Repository Password and the Confirm Password fields.
Make sure to specify the password that has been set in the repository. If the passwords do not match, the Oracle BI Server fails to start, and an error is logged in nqserver.log.
-
Click Apply, then click Activate Changes.
-
Return to the Business Intelligence Overview page and click Restart.
See "Publishing the Default Metadata Repository" in Oracle Fusion Middleware System Administrator's Guide for Oracle Business Intelligence Enterprise Edition for more information about the repository options in Fusion Middleware Control.
