28 Designing Human Tasks
This chapter describes how to design human tasks. It introduces the Human Task Editor to use for modeling task metadata, routing and assignment policies, escalation policies, expiration policies, and notification settings.
This chapter includes the following sections:
-
Section 28.3, "Creating the Human Task Definition with the Human Task Editor"
-
Section 28.4, "Associating the Human Task Service Component with a BPEL Process"
28.1 Introduction to Human Task Design Concepts
To use the Human Task Editor, you must understand human task design concepts, including the following:
-
The types of users to which to assign tasks
-
The methods by which to assign users to tasks (statically, dynamically, or rule-based)
-
The task participant types available for modeling a task to which you assign users
-
The options for creating lists of task participants
-
The participants involved in the entire life cycle of a task
For information about human task concepts, see Chapter 27, "Getting Started with Human Workflow."
28.2 Introduction to the Modeling Process
Oracle SOA Suite provides a graphical tool, known as the Human Task Editor, for modeling your task metadata. The modeling process consists of the following:
-
Creating and modeling a human task service component in the SOA Composite Editor
-
Associating it with a BPEL process
-
Generating the task form for displaying the human task during runtime in Oracle BPM Worklist.
This section provides a brief overview of these modeling tasks and provides references to specific modeling instructions.
For more information about using the SOA Composite Editor, see Chapter 2, "Developing SOA Composite Applications with Oracle SOA Suite."
For information about available samples, see Section 27.3.2, "Designing a Human Task from Start to Finish."
28.2.1 Create a Human Task Definition
You define the metadata for the human task in either of two ways:
-
By dragging a human task from the Component Palette into a BPEL process in Oracle BPEL Designer and clicking the Add icon in the Create Human Task dialog that automatically is displayed. This displays a dialog for creating the human task service component. When creation is complete, the Human Task Editor is displayed.
-
By dragging a human task service component from the Component Palette into the SOA Composite Editor. This displays a dialog for creating the human task component. When creation is complete, the Human Task Editor is displayed.
The Human Task Editor enables you to specify human task metadata, such as task outcome, payload structure, assignment and routing policy, expiration and escalation policy, notification settings, and so on. This information is saved to a metadata task configuration file with a .task extension. In addition, some workflow patterns may also need to use the Oracle Business Rules Designer to define task routing policies or the list of approvers.
For more information, see Section 28.3, "Creating the Human Task Definition with the Human Task Editor."
28.2.2 Associate the Human Task Definition with a BPEL Process
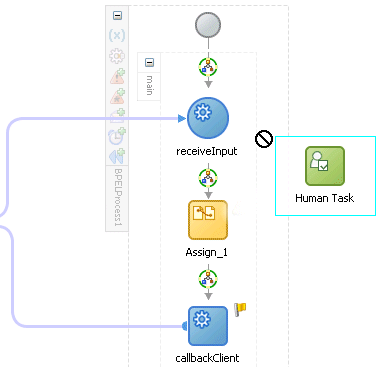
You can associate the .task file that consists of the human task settings with a BPEL process in Oracle BPEL Designer. Association is made with a human task that you drag into your BPEL process flow for configuring, as shown in Figure 28-1.
Figure 28-1 Dragging a Human Task into a BPEL Process
Description of "Figure 28-1 Dragging a Human Task into a BPEL Process"
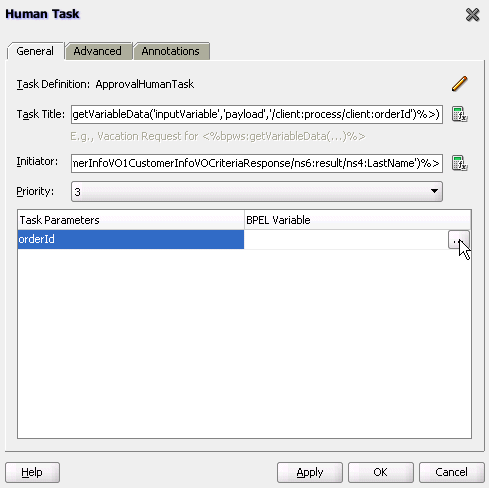
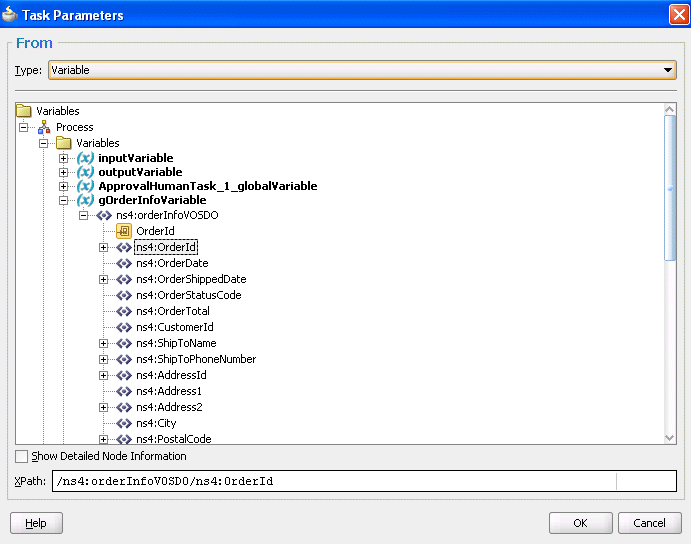
You also specify the task definition, task initiator, task priority, and task parameter mappings that carry the input data to a BPEL variable. You can also define advanced features, such as the scope and global task variables names (instead of accepting the default names), task owner, identification key, BPEL callback customizations, and whether to extend the human task to include other workflow tasks.
When association is complete, a task service partner link is created. The task service exposes the operations required to act on the task.
You can also create the human task as a standalone component only in the SOA Composite Editor and not associate it with a BPEL process. Standalone human task service components are useful for environments in which there is no need for any automated activity in an application. In the standalone case, the client can create the task themselves.
For more information, see Section 28.4, "Associating the Human Task Service Component with a BPEL Process."
28.2.3 Generate the Task Form
You can generate a task form using the Oracle Application Development Framework (ADF). This form is used for displaying the task details on which you act at runtime in Oracle BPM Worklist.
For information on generating the task form, see Chapter 29, "Designing Task Forms for Human Tasks."
28.3 Creating the Human Task Definition with the Human Task Editor
The Human Task Editor enables you to define the metadata for the task. The editor enables you to specify human task settings, such as task outcome, payload structure, assignment and routing policy, expiration and escalation policy, notification settings, and so on.
28.3.1 How to Create a Human Task Service Component
You create a human task service component in the SOA Composite Editor or in Oracle BPEL Designer. After creation, you design the component in the Human Task Editor. The method by which you create the human task service component determines whether the component can be associated later with a BPEL process service component or is a standalone component in the SOA Composite Editor.
To create a human task service component in the SOA Composite Editor:
-
Go to the SOA project in which to create a human task service component in the SOA Composite Editor.
-
From the Component Palette list, select SOA.
The list refreshes to display service components and service adapters.
-
From the list, drag a Human Task into the designer.
The Create Human Task dialog appears.
-
In the Name field, enter a name.
The name you enter becomes the
.taskfile name. -
Note the Create Composite Service with SOAP Bindings checkbox. The selection of this checkbox determines how the human task service component is created.
-
To create a human task service component that you later associate with a BPEL process service component, do not select the Create Composite Service with SOAP Bindings checkbox. The human task service component is created as a component that you explicitly associate with a BPEL process service component. Figure 28-2 provides details.
-
To create the human task service component as a standalone component in the SOA Composite Editor, select the Create Composite Service with SOAP Bindings checkbox. This creates a human task service component that is automatically wired to a Simple Object Access Protocol (SOAP) web service. Figure 28-3 provides details.
Figure 28-3 Standalone Human Task Component

Description of "Figure 28-3 Standalone Human Task Component"
This web service provides external customers with an entry point into the human task service component of the SOA composite application.
-
-
Click OK.
To create a human task in Oracle BPEL Designer:
-
In the Component Palette, expand SOA Components.
-
From the list, drag a Human Task into the designer.
The Create Human Task dialog appears.
-
Click the Add icon to create a human task.
-
In the Name field, enter a name.
The name you enter becomes the
.taskfile name. -
In the Title field, enter a task.
-
Click OK.
The Human Task Editor appears.
Note:
You can also create a human task that you later associate with a BPEL process by selecting New from the File main menu, then selecting SOA Tier > Service Components > Human Task.For more information about creating a human task service component in the SOA Composite Editor, see Chapter 2, "Developing SOA Composite Applications with Oracle SOA Suite."
28.3.2 What Happens When You Create a Human Task Service Component
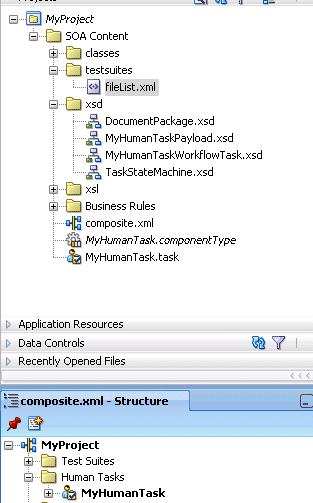
When a human task is created, the following folders and files appear:
-
The human task settings specified in the Human Task Editor are saved to a metadata task configuration file in the metadata service (MDS) repository with a
.taskextension. This file appears in the Application Navigator under SOA_Project_Name > SOA Content. You can re-edit the settings in this file by double-clicking the following:-
The
.taskfile in the Application Navigator in either the SOA Composite Editor or Oracle BPEL Designer -
The human task icon in the SOA Composite Editor or in your BPEL process in Oracle BPEL Designer.
-
-
A Human Tasks folder containing the human task you created appears in the Structure window of the SOA Composite Editor.
Figure 28-4 shows these folders and files.
For information about available samples, see Section 27.3.2, "Designing a Human Task from Start to Finish."
28.3.3 How to Access the Sections of the Human Task Editor
To access the sections of the Human Task Editor:
-
Double-click the Human Task icon in the SOA Composite Editor or double-click the Human Task icon in Oracle BPEL Designer and click the Edit icon in the upper right corner.
The Human Task Editor consists of the main sections shown on the left side in Figure 28-5. These sections enable you to design the metadata of a human task.
Instructions for using these main sections of the Human Task Editor to create a workflow task are listed in Table 28-1.
Section Description See... General
(title, description, outcomes, category, priority, owner, and application context)
Enables you to define task details such as title, task outcomes, owner, and other attributes.
Data
Enables you to define the structure (message elements) of the task payload (the data in the task).
Section 28.3.5, "How to Specify the Task Payload Data Structure"
Assignment
Enables you to assign participants to the task and create a policy for routing the task through the workflow.
Presentation
Enables you to specify the following settings:
-
Multilingual settings
-
WordML and custom style sheets for attachments
Section 28.3.8, "How to Specify Multilingual Settings and Style Sheets"
Deadlines
Enables you to specify the expiration duration of a task, custom escalation Java classes, and due dates.
Notification
Enables you to create and send notifications when a user is assigned a task or informed that the status of the task has changed.
Section 28.3.10, "How to Specify Participant Notification Preferences"
Access
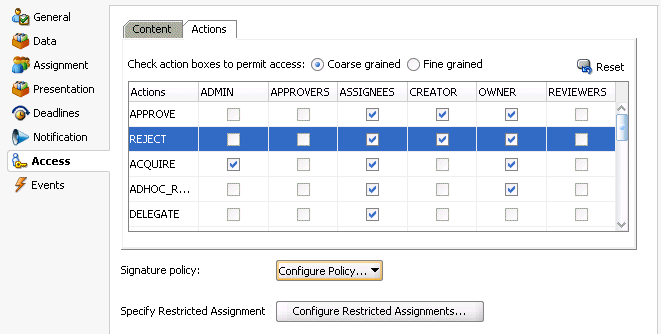
Enables you to specify access rules for task content and task actions, workflow signature policies, and assignment restrictions.
Section 28.3.11, "How to Specify Access Policies and Task Actions on Task Content"
Section 28.3.12, "How to Specify a Workflow Digital Signature Policy"
Section 28.3.13, "How to Specify Restrictions on Task Assignments"
Events
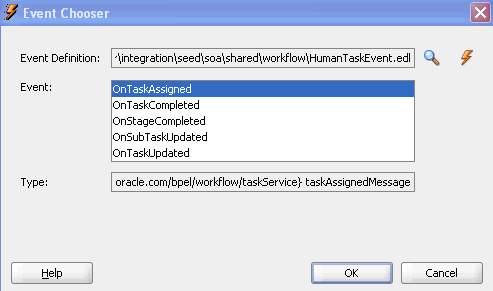
Enables you to specify callback classes and task and routing assignments in BPEL callbacks.
Section 28.3.14, "How to Specify Java or Business Event Callbacks"
-
28.3.4 How to Specify the Title, Description, Outcome, Priority, Category, Owner, and Application Context
To specify the title, description, outcome, priority, category, owner, and application context:
-
Click the General tab.
Figure 28-6 shows the General section of the Human Task Editor.
This section enables you to specify details such as the task title, description, task outcomes, task category, task priority, and task owner.
Figure 28-6 Human Task Editor — General Section

Description of "Figure 28-6 Human Task Editor — General Section"
Instructions for configuring the following subsections of the General section are listed in Table 28-2:
28.3.4.1 Specifying a Task Title
Enter an optional task title. The title defaults to this value only if the initiated task does not have a title set in it. The title provides a visual identifier for the task. The task title displays in Oracle BPM Worklist. You can also search on titles in Oracle BPM Worklist.
-
In the Task Title field of the General section, select a method for specifying a task title:
-
Plain Text: Manually enter a name (for example,
Vacation Request Approved). -
Text and XPath: Enter a combination of manual text and a dynamic expression. After manually entering a portion of the title (for example,
Approval Required for Order Id:), place the cursor one blank space to the right of the text and click the icon to the right of this field. This displays the Expression Builder for dynamically creating the remaining portion of the title. After completing the dynamic portion of the name, click OK to return to this field. The complete name is displayed. For example:Approval Required for Order Id: <%/task:task/task:payload/task:orderId%>
The expression is resolved during runtime with the exact order ID value from the task payload.
If you enter a title in the Task Title field of the General tab of the Create Human Task dialog described in Section 28.4.3.1, "Specifying the Task Title," the title you enter here is overridden.
-
28.3.4.2 Specifying a Task Description
You can optionally specify a description of the task in the Description field of the General section. The description enables you to provide additional details about a task. For example, if the task title is Computer Upgrade Request, you can provide additional details in this field, such as the model of the computer, amount of CPU, amount of RAM, and so on. The description does not display in Oracle BPM Worklist.
28.3.4.3 Specifying a Task Outcome
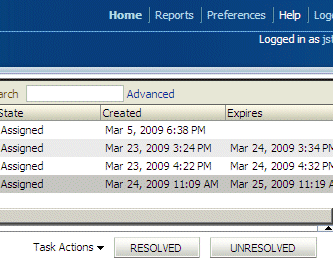
Task outcomes capture the possible outcomes of a task. Oracle BPM Worklist displays the outcomes you specify here as the possible task actions to perform during runtime. Figure 28-7 provides details.
Figure 28-7 Outcomes in Oracle BPM Worklist
Description of "Figure 28-7 Outcomes in Oracle BPM Worklist"
You can specify the following types of task outcomes:
-
Select a seeded outcome
-
Enter a custom outcome
The task outcomes can also have runtime display values that are different from the actual outcome value specified here. This permits outcomes to be displayed in a different language in Oracle BPM Worklist. For more information about internationalization, see Section 28.3.8.2, "Specifying Multilingual Settings."
-
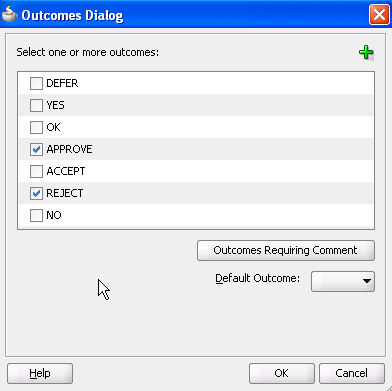
To the right of the Outcomes field in the General section, click the Search icon.
The Outcomes dialog shown in Figure 28-8 displays the possible outcomes for tasks. APPROVE and REJECT are selected by default.
-
Enter the information shown in Table 28-3.
Field Description Select one or more outcomes
Select additional task outcomes or deselect the default outcomes.
Add icon
Click to invoke a dialog for adding custom outcomes.
In the Name field of the dialog, enter a custom name, and click OK. Your outcome displays in the Outcomes field.
Notes: Be aware of the following naming restrictions:
-
Do not specify a custom name that matches a name listed in the Actions tab of the Access section of the Human Task Editor (for example, do not specify
Delete). Specifying the same name can cause problems at runtime. -
Do not specify a custom name with blank spaces (for example,
OnHold). This causes an error when the custom outcome is accessed in Oracle BPM Worklist. If you need to specify an outcome with spaces, use a resource bundle. For more information, see Chapter 32, "Introduction to Human Workflow Services."
Outcomes Requiring Comment
Click to select an outcome to which an assignee adds comments in Oracle BPM Worklist at runtime. The assignee must add the comments and perform the action without saving the task at runtime.
Default Outcome
Select the default outcome for this outcome.
The seeded and custom outcomes selected here display for selection in the Majority Voted Outcome section of the parallel participant type.
-
-
For more information, see Section 28.3.6.2.1, "Specifying the Voting Outcome."
28.3.4.4 Specifying a Task Priority
Specify the priority of the tasks. Priority can be 1 through 5, with 1 being the highest. By default, the priority of a task is 3. This priority value is overridden by any priority value you select in the General tab of the Create Human Task dialog. You can filter tasks based on priority and create views on priorities in Oracle BPM Worklist.
-
From the Priority list in the General section, select a priority for the task.
For more information about specifying a priority value in the Create Human Task dialog, see Section 28.4.3.2, "Specifying the Task Initiator and Task Priority."
28.3.4.5 Specifying a Task Category
You can optionally specify a task category in the Category field of the General section. This categorizes tasks created in a system. For example, in a help desk environment, you may categorize customer requests as either software-related or hardware-related. The category displays in Oracle BPM Worklist. You can filter tasks based on category and create views on categories in Oracle BPM Worklist.
-
Select a method for specifying a task category in the Category field of the General section:
-
By Name: Manually enter a name.
-
By Expression: Click the icon to the right of this field to display the Expression Builder for dynamically creating a category.
-
28.3.4.6 Specifying a Task Owner
The task owner can view the tasks belonging to business processes they own and perform operations on behalf of any of the assigned task participant types. Additionally, the owner can also reassign, withdraw, or escalate tasks. The task owner can be considered the business administrator for a task. The task owner can also be specified in the Advanced tab of the Create Human Task dialog described in Section 28.4.4.2, "Specifying a Task Owner." The task owner specified in the Advanced tab overrides any task owner you enter here.
For more information about the task owner, see Section 27.2.1.3, "Task Stakeholders."
-
Select a method for specifying the task owner:
-
Statically through the identity service user directory or the list of application roles
-
Dynamically through an XPath expression
For example:
-
If the task has a payload message attribute named
powithin which theowneris stored, you can specify an XPath expression such as:/task:task/task:payload/po:purchaseOrder/po:owner -
ids:getManager('jstein', 'jazn.com')The manager of
jsteinis the task owner.
-
-
For more information about users, groups, and application roles, see Section 27.2.1.1.3, "Participant Assignment."
28.3.4.6.1 Specifying a Task Owner Statically Through the User Directory or a List of Application Roles
Task owners can be selected by browsing the user directory (Oracle Internet Directory, Java AuthoriZatioN (JAZN)/XML, LDAP, and so on) or a list of application roles configured for use with Oracle SOA Suite.
To specify a task owner statically through the user directory or a list of application roles:
-
In the first list to the right of the Owner field in the General section, select User, Group, or Application Role as the type of task owner. Figure 28-9 provides details.
Note:
By default, group names in human tasks are case sensitive. Therefore, if you select Group and enter a name in upper case text (for example,LOANAGENTGROUP), no task is displayed under the Administrative Tasks tab in Oracle BPM Worklist. To enable group names to be case agnostic (case insensitive), you must set the caseSensitiveGroups property tofalsein the System MBeans Browser. For information, see Oracle Fusion Middleware Administrator's Guide for Oracle SOA Suite and Oracle BPM Suite.Figure 28-9 Specify a Task Owner By Browsing the User Directory or Application Roles

Description of "Figure 28-9 Specify a Task Owner By Browsing the User Directory or Application Roles"
-
In the second list to the right of the Owner field in the General section, select Static.
-
See the step in Table 28-4 based on the type of owner you selected.
-
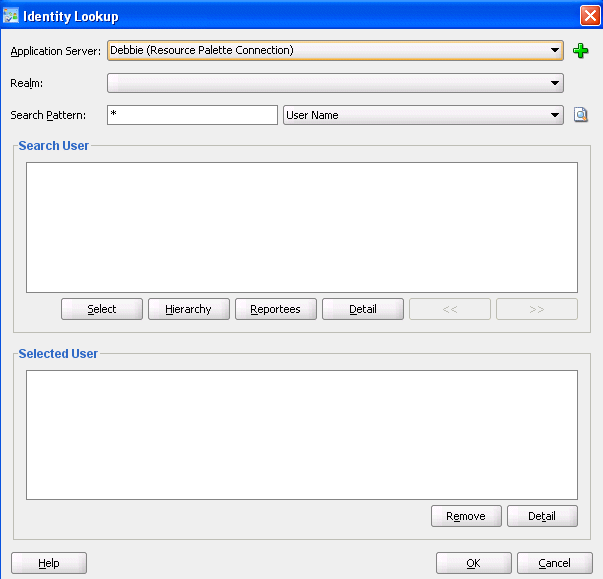
If you selected User or Group, the Identity Lookup dialog shown in Figure 28-10 appears.
To select a user or group, you must first create an application server connection by clicking the Add icon. Note the following restrictions:
-
Do not create an application server connection to an Oracle WebLogic Administration Server from which to retrieve the list of identity service realms. This is because there is no identity service running on the Administration Server. Therefore, no realm information displays and no users display when performing a search with a search pattern in the Identity Lookup dialog. Instead, create an application server connection to a managed Oracle WebLogic Server.
-
You must select an application server connection configured with the complete domain name (for example,
myhost.us.oracle.com). If you select a connection configured only with the hostname (for example,myhost), the Realm list may not display the available realms. If the existing connection does not include the domain name, perform the following steps:-
In the Resource Palette, right-click the application server connection.
-
Select Properties.
-
In the Configuration tab, add the appropriate domain to the hostname.
-
Return to the Identity Lookup dialog and reselect the connection.
-
-
Select or create an application server connection to display the realms for selection. A realm provides access to a policy store of users and roles (groups).
-
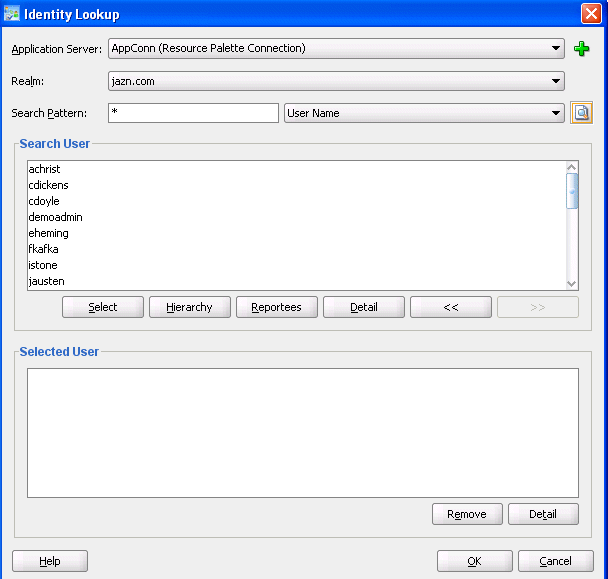
Search for the owner by entering a search string such as
jcooper, j*, *,and so on. Clicking the Lookup icon to the right of the User Name field fetches all the users that match the search criteria. Figure 28-11 provides details. One or more users or groups can be highlighted and selected by clicking Select.Figure 28-11 Identity Lookup with Realm Selected
Description of "Figure 28-11 Identity Lookup with Realm Selected"
-
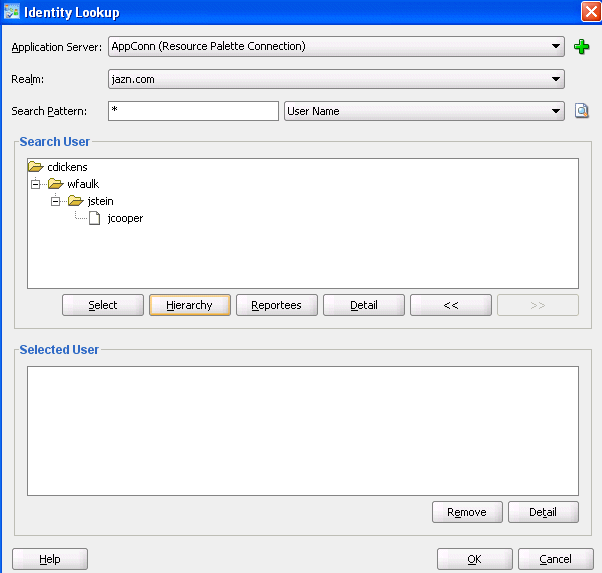
View the hierarchy of a user by highlighting the user and clicking Hierarchy. Similarly, clicking Reportees displays the reportees of a selected user or group. Figure 28-12 provides details.
Figure 28-12 User Hierarchy in Identity Lookup Dialog
Description of "Figure 28-12 User Hierarchy in Identity Lookup Dialog"
-
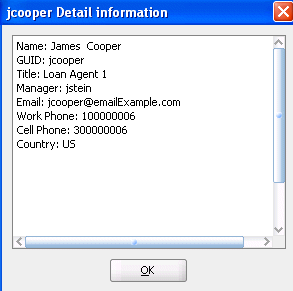
View the details of a user or group by highlighting the user or group and clicking Detail. Figure 28-13 provides details.
-
Click OK to return to the Identity Lookup dialog.
-
Click Select to add the user to the Selected User section.
-
Click OK to return to the Human Task Editor.
Your selection displays in the Owner field.
-
-
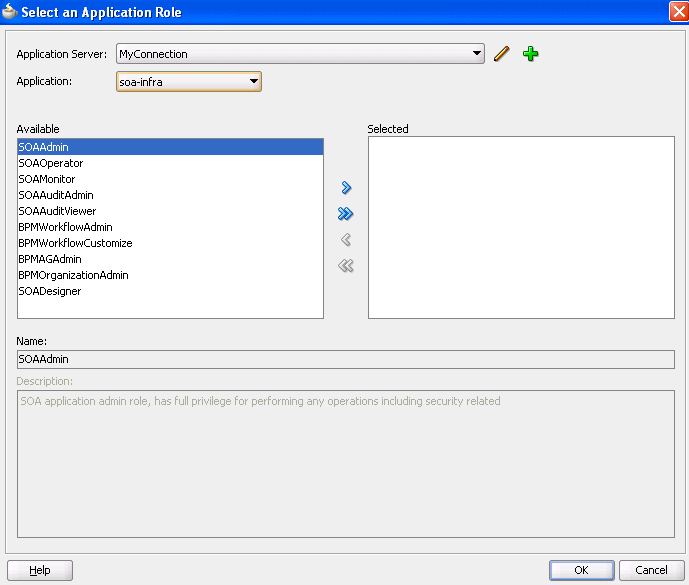
If you selected Application Role, the Select an Application Role dialog appears.
-
In the Application Server list, select the type of application server that contains the application role or click the Add icon to launch the Create Application Server Connection wizard to create a connection.
-
In the Application list, select the application that contains the application roles (for example, a custom application or soa-infra for the SOA Infrastructure application).
-
In the Available section, select appropriate application roles and click the > button. To select all, click the >> button. Figure 28-14 provides details.
-
Click OK.
-
28.3.4.6.2 Specifying a Task Owner Dynamically Through an XPath Expression
Task owners can be selected dynamically in the Expression Builder dialog.
To specify a task owner dynamically:
-
In the first list to the right of the Owner field in the General section, select User, Group, or Application Role as the type of task owner. Figure 28-15 provides details.
Figure 28-15 Specify a Task Owner Dynamically

Description of "Figure 28-15 Specify a Task Owner Dynamically"
-
In the second list to the right of the Owner field in the General section, select XPath.
-
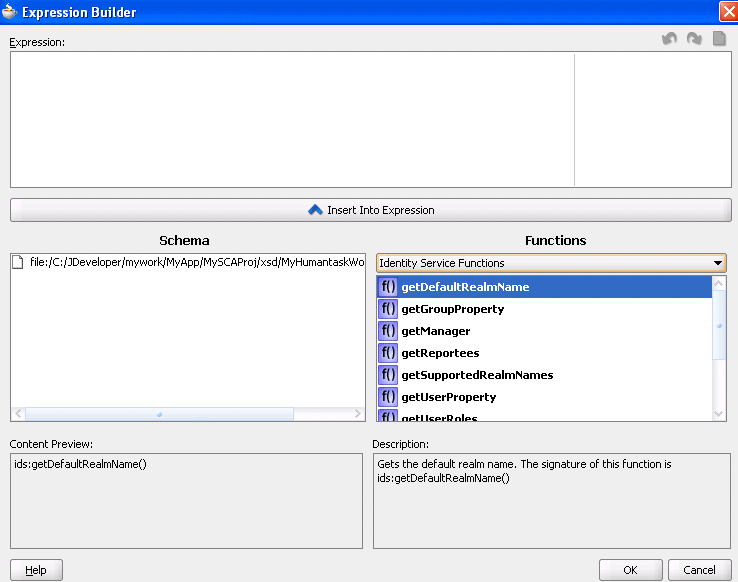
Click the icon to launch the Expression Builder.
This displays the Expression Builder dialog shown in Figure 28-16:
-
Browse the available variable schemas and functions to create a task owner.
-
Click OK to return to the Human Task Editor.
Your selection displays in the Owner field.
For more information, see the following:
-
Click Help for instructions on using the Expression Builder dialog and XPath Building Assistant
-
Appendix B, "XPath Extension Functions" for information about workflow service dynamic assignment functions, identity service functions, and instructions on using the XPath Building Assistant
-
28.3.4.7 Specifying an Application Context
You can specify the name of the application that contains the application roles used in the task. This indicates the context in which the application role operates. If you do not explicitly create a task, but end up having one, you can set up the context.
-
In the Application Context field of the General section, enter the name.
28.3.5 How to Specify the Task Payload Data Structure
Figure 28-17 shows the Data section of the Human Task Editor.
This section enables you to specify the structure (message elements) of the task payload (the data in the task) defined in the XSD file. You create parameters to represent the elements in the XSD file. This makes the payload data available to the workflow task. For example:
-
You create a parameter for an order ID element for placing an order from a store front application.
-
You create parameters for the location, type, problem description, severity, status, and resolution elements for creating a help desk request.
Task payload data consists of one or more elements or types. Based on your selections, an XML schema definition is created for the task payload.
Figure 28-17 Human Task Editor — Parameters Section

Description of "Figure 28-17 Human Task Editor — Parameters Section"
To specify the task payload data structure:
-
Click the Data tab.
-
Click the Add icon and select a payload type:
-
String
-
Integer
-
Boolean
-
Other
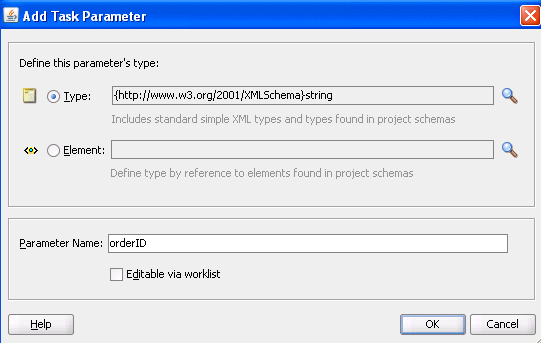
The Add Task Parameter dialog is displayed, as shown in Figure 28-18.
-
-
Enter the details described in Table 28-5:
Table 28-5 Add Task Parameter Dialog Fields and Values
Field Description Parameter Type
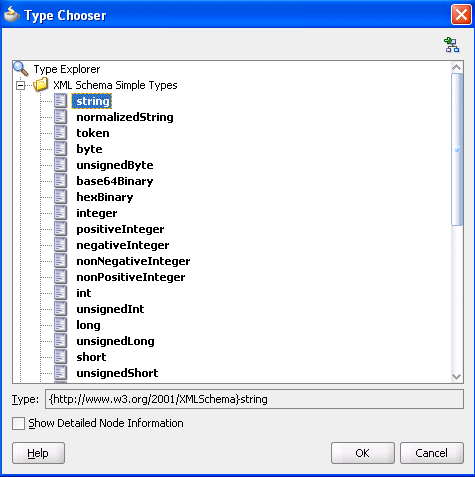
Select Type or Element and click the Search icon to display the Type Chooser dialog for selecting the task parameter.
Parameter Name
Accept the default name or enter a custom name. This field only displays if Type is the selected parameter type.
Editable via worklist
Select this checkbox to enable users to edit this part of the task payload in Oracle BPM Worklist. For example, for a loan approval task, the APR attribute may need to be updated by the user reviewing the task, but the SSN field may not be editable.
You can also specify access rules that determine the parts of a task that participants can view and update. For more information, see Section 28.3.11.1, "Specifying Access Policies on Task Content."
Note:
You can only define payload mapped attributes (previously known as flex field mappings) in Oracle BPM Worklist for payload parameters that are simple XML types (string, integer, and so on) or complex types (for example, a purchase order, and so on). If you must search tasks using keywords or define views or delegation rules based on task content, then you must use payload parameters based on simple XML types. These simple types can be mapped to flex columns in Oracle BPM Worklist. -
Select the type, as shown in Figure 28-19.
-
Click OK to return to the Human Task Editor.
Your selection displays in the Data section.
-
To edit your selection, select it and click the Edit icon in the upper right part of the Data section.
28.3.6 How to Assign Task Participants
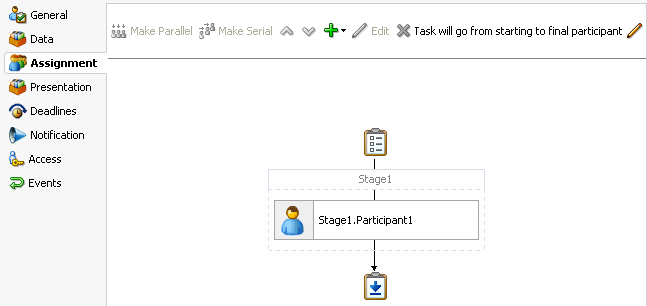
Figure 28-20 shows the Assignment section of the Human Task Editor. This section enables you to select a participant type that meets your business requirements. While configuring the participant type, you build lists of users, groups, and application roles to act upon tasks.
Figure 28-20 Human Task Editor — Assignment Section
Description of "Figure 28-20 Human Task Editor — Assignment Section"
You can easily mix and match participant types to create simple or complex workflow routing policies. You can also extend the functionality of a previously configured human task to model more complex workflows.
A participant type is grouped in a block under a stage (for example, named Stage1 in Figure 28-20). A stage is a way of organizing the approval process for blocks of participant types. You can have one or more stages in sequence or in parallel. Within each stage, you can have one or more participant type blocks in sequence or in parallel. The up and down keys enable you to rearrange the order of your participant type blocks.
For example:
-
You can create all participant type blocks in a single stage (for example, a purchase order request in which the entire contents of the order are approved or rejected as a whole).
-
You can create more complex approval tasks that may include one or more stages. For example, you can place one group of participant type blocks in one stage and another block in a second stage. The list of approvers in the first stage handles line entry approvals and the list of approvers in the second stage handles header entry approvals.
Each of the participant types has an associated editor that you use for configuration tasks. The sequence in which the assignees are added indicates the execution sequence.
To specify a different stage name or have a business requirement that requires you to create additional stages, perform the following steps. Note that creating additional stages is an advanced requirement that may not be necessary for your environment.
For more information about participant types, see Section 27.2.1.1, "Task Assignment and Routing."
To specify a stage name and add parallel and sequential blocks:
The stage is named Stage1 by default. If you want, you can change the name.
-
Double-click the name.
The Edit dialog shown in Figure 28-21 appears.
-
Enter a name, and click OK.
-
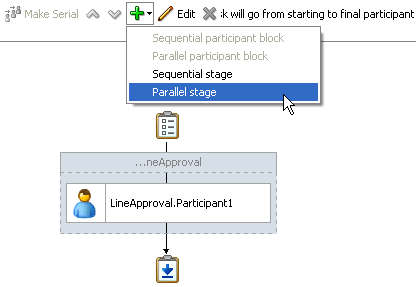
Select the stage and its participant type block, as shown in Figure 28-22.
-
Click the Add icon.
-
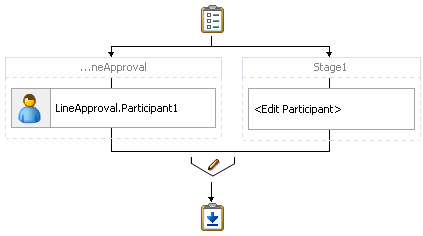
Select an option from the list (for example, Parallel stage).
A second stage is added in parallel to the first stage, as shown in Figure 28-23.
-
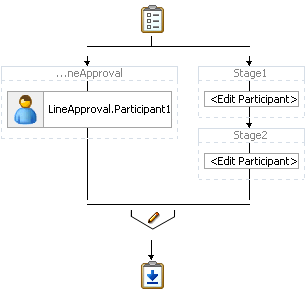
Select the second stage on the right, and click the Add icon. Note that if you do not select the second stage (for this example, named Stage1 in Figure 28-24) and instead select only the participant type block (for example, named Edit Participant in Figure 28-24), all options under the Add icon are disabled.
-
Select Sequential stage.
A sequential stage is added below the selected block.
You create participant types within these blocks.
-
In the Assignment section, perform one of the following tasks:
-
Highlight the block below the stage box and click the Edit icon. The first time you create a task participant, the box is labeled <Edit Participant>.
or
-
Double-click the participant box below the stage box.
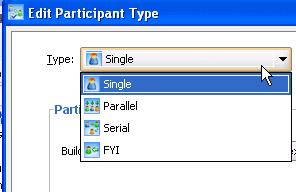
The Edit Participant Type dialog appears. This dialog enables you to select a specific participant type.
-
-
From the Type list, select a participant type shown in Figure 28-25.
-
See the section shown in Table 28-6 based on your selection.
Participant Type For a Description of this Participant Type, See... For Instructions on Configuring this Participant Type, See... -
Single
-
Parallel
-
Serial
-
FYI
Section 28.3.6.1, "Configuring the Single Participant Type"
Section 28.3.6.2, "Configuring the Parallel Participant Type"
-
28.3.6.1 Configuring the Single Participant Type
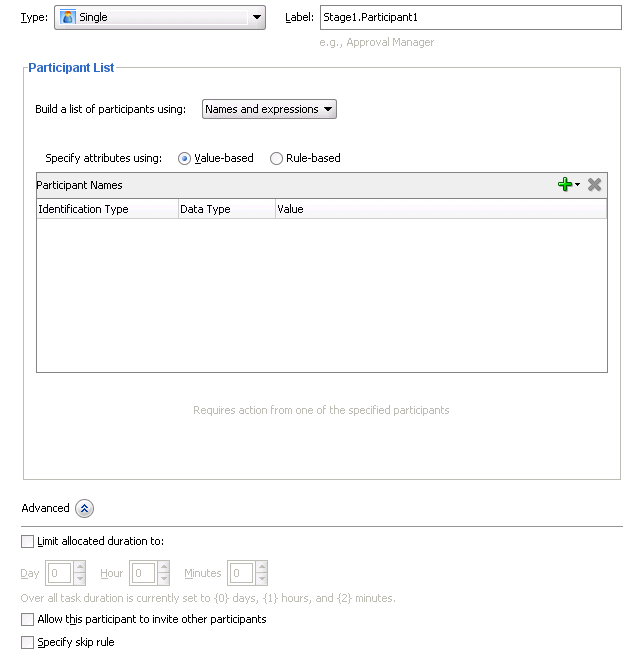
Figure 28-26 displays the Edit Participant Type dialog for the single participant type.
Figure 28-26 Edit Participant Type — Single Type
Description of "Figure 28-26 Edit Participant Type — Single Type"
To configure the single participant type:
-
In the Label field, enter a recognizable label for this participant. This label must be unique among all the participants in the task definition (for example,
Approval Manager,Primary Reviewers, and so on).Instructions for configuring the following subsections of the Edit Participant Type dialog for the single participant type are listed in Table 28-7:
Table 28-7 Edit Participant Type — Single Type
For This Subsection... See... Participant List
Section 28.3.6.1.1, "Creating a Single Task Participant List"
Limit allocated duration to (under the Advanced section)
Section 28.3.6.1.2, "Specifying a Time Limit for Acting on a Task"
Allow this participant to invite other participants (under the Advanced section)
Section 28.3.6.1.3, "Inviting Additional Participants to a Task"
Specify skip rule (under the Advanced section)
28.3.6.1.1 Creating a Single Task Participant List
Users assigned to the list of participants can act upon tasks. In this type of assignment list, only one user is required to act on the task. You can provide either a single user or a list of users, groups, or application roles for this pattern. If a list is specified, then all users are assigned the task; one of them must acquire and act upon the task. When one user acts on it, the task is withdrawn from the task list of other assignees.You can create several types of lists for the single user participant (and also for the parallel, serial, and FYI user participants):
-
Value-based name and expression lists
These lists enable you to statically or dynamically select users, groups, or application roles as task assignees.
-
Value-based management chain lists
Management chains are typically used for serial approvals through multiple users in a management chain hierarchy. Therefore, this list is most likely useful with the serial participant type. This is typically the case if you want all users in the hierarchy to act upon the task. Management chains can also be used with the single participant type. In this case, however, all users in the hierarchy get the task assigned at the same time. As soon as one user acts on the task, it is withdrawn from the other users.
For example, a purchase order is assigned to a manager. If the manager approves the order, it is assigned to their manager. If that manager approves it, it is assigned to their manager, and so on until three managers approve the order. If any managers reject the request or the request expires, the order is rejected if you specify an abrupt termination condition. Otherwise, the task flow continues to be routed.
-
Rule-based names and expression lists and management chain lists
Business rules enable you to create the list of task participants with complex expressions. For example, you create a business rule in which a purchase order request below $5000 is sent to a manager for approval. However, if the purchase order request exceeds $5000, the request is sent to the manager of the manager for approval. Two key features of business rules are facts and action types, which are described in Section 28.3.7.2, "Specifying Advanced Task Routing Using Business Rules."
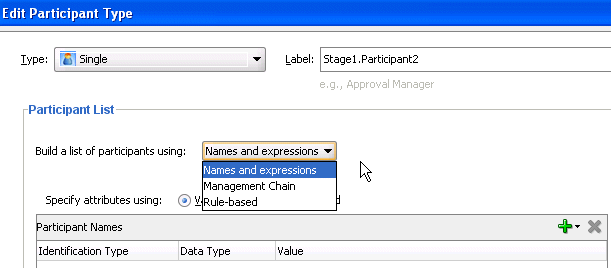
When you select a participant type, the dialog that displays enables you to choose an option for building your list of task participant assignees (users, groups, or application roles), as shown in Figure 28-27. The three selections described above are available: Names and expressions, Management Chain, and Rule-based.
Figure 28-27 Build a List of Participants
Description of "Figure 28-27 Build a List of Participants"
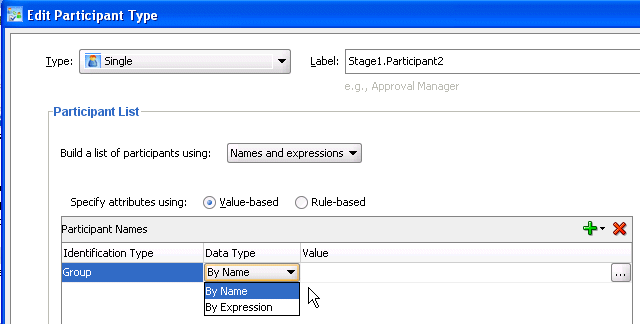
After selecting an option, you dynamically assign task participant assignees (users, groups, or application roles) and a data type, as shown in Figure 28-28.
Figure 28-28 Assignment of Task Assignees
Description of "Figure 28-28 Assignment of Task Assignees"
This section describes how to create these lists of participants.
Creating Participant Lists Consisting of Value-Based Names and Expressions
Select a method for statically or dynamically assigning a user, group, or application role as a task participant.
For conceptual information about the following:
-
Users, groups, or application roles, see Section 27.2.1.1.3, "Participant Assignment."
-
Statically and dynamically assigning task participants, see Section 27.2.1.2, "Static, Dynamic, and Rule-Based Task Assignment."
To create participant lists consisting of value-based names and expressions:
-
From the Build a list of participants using list, select Names and expressions.
-
From the Specify attributes using list, select Value-based.
The dialog refreshes to display the fields shown in Figure 28-29.
Figure 28-29 Value-Based Names and Expressions

Description of "Figure 28-29 Value-Based Names and Expressions"
-
Click the Add icon and select a user, group, or application role as a task participant.
The Identification Type column of the Participant Names table displays your selection of user, group, or application role.
-
To change your selection in the Identification Type column, click it to invoke a dropdown list.
-
In the Data Type column, click your selection to invoke a dropdown list to assign a value:
-
By Name: If your identification type is a user or group, click the Browse icon (the dots) on the right to display a dialog for selecting a user or group configured through the identity service. The identity service enables the lookup of user properties, roles, and group memberships. User information is obtained from an LDAP server such as Oracle Internet Directory. You can use wild cards (*) to search for IDs.
If your selection is an application role, click the Browse icon to display the Select an Application Role dialog for selecting an application role. To search for application roles, you must first create a connection to the application server. When searching, you must specify the application name to find the name of the role. Note that the task definition can refer to only one application name. You cannot use application roles from different applications as assignees or task owners.
-
By Expression: For a user, group, or application role, click the Browse icon to dynamically select a task assignee in the Expression Builder dialog. Use the
bpws:getVariableData(...)expression or theids:getManager()XPath function.
The Value column displays the value you specified.
-
-
To manually enter a value, click the field in the Value column and specify a value.
Creating Participant Lists Consisting of Value-Based Management Chains
Select a method for statically or dynamically assigning management chain parameters as task participants.
For conceptual information about the following:
-
Users, groups, or application roles, see Section 27.2.1.1.3, "Participant Assignment."
-
Statically and dynamically assigning task participants, see Section 27.2.1.2, "Static, Dynamic, and Rule-Based Task Assignment."
-
Management chains, see Section 28.3.6.1.1, "Creating a Single Task Participant List."
To specify participant lists based on value-based management chains:
-
From the Build a list of participants using list, select Management Chain.
-
From the Specify attributes using list, select Value-based.
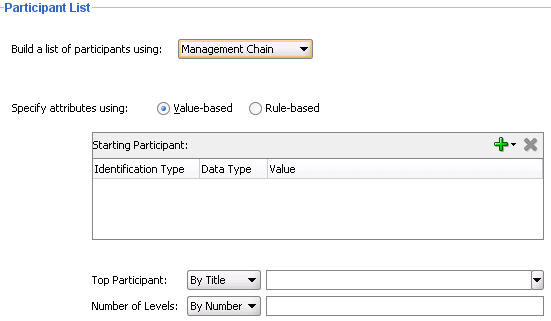
The dialog refreshes to display the fields shown in Figure 28-30.
Figure 28-30 Value-Based Management Chains
Description of "Figure 28-30 Value-Based Management Chains"
-
See Step 3 through Step 6 of Section 28.3.6.1.1, "Creating a Single Task Participant List" for instructions on assigning a user, group, or application role to a list in the Starting Participant table.
-
In the Top Participant list, select a method for assigning the number of task participant levels:
-
By Title: Select the title of the last (highest) approver in the management chain.
-
XPath: Select to dynamically enter a top participant through the Expression Builder dialog.
-
-
In the Number of Levels list, select a method for assigning a top participant:
-
By Number: Enter a value for the number of levels in the management chain to include in this task. For example, if you enter
2and the task is initially assigned to userjcooper, both the userjstein(manager ofjcooper) and the userwfaulk(manager ofjstein) are included in the list (apart fromjcooper, the initial assignee). -
XPath: Select to dynamically enter a value through the Expression Builder dialog.
-
Creating Participant Lists Consisting of Rulesets
A ruleset provides a unit of execution for rules and for decision tables. In addition, rulesets provide a unit of sharing for rules; rules belong to a ruleset. Multiple rulesets can be executed in order. This is called rule flow. The ruleset stack determines the order. The order can be manipulated by rule actions that push and pop rulesets on the stack. In rulesets, the priority of rules applies to specify the order of firing of rules in the ruleset. Rulesets also provide an effective date specification that identifies that the ruleset is always active, or that the ruleset is restricted based on a time and date range, or a starting or ending time and date.
The method by which you create a ruleset is based on how you access it. This is described in the following section.
To specify participant lists based on rulesets:
Business rules can define the participant list. There are two options for using business rules:
-
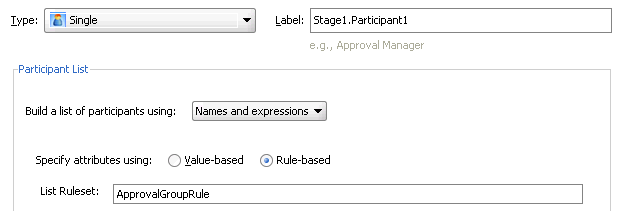
Rules define parameters of a specific list builder (such as Names and Expressions or Management Chain). In this case, the task routing pattern is modeled to use a specific list builder. In the list builder, the parameters are listed as coming from rules. Rules return the list builder of the same type as the one modeled in Oracle JDeveloper.
-
From the Build a list of participants using list, select Names and expressions or Management Chain.
-
From the Specify attributes using list, select Rule-based.
-
In the List Ruleset field, enter a ruleset name.
Figure 28-31 provides details.
-
Click OK.
-
-
Rules define the list builder and the list builder parameters. In this case, the list itself is built using rules. The rules define the list builder and the parameters.
-
From the Build a list of participants using list, select Rule-based.
-
In the List Ruleset field, enter a ruleset name.
Figure 28-32 provides details.
-
Click OK.
-
Both options create a rule dictionary, if one is not already created, and preseed several rule functions and facts for easy specifications of the participant list. In the rule dictionary, the following rule functions are seeded to create participant lists:
-
CreateResourceList -
CreateManagementChainList
The Task fact is asserted by the task service for basing rule conditions.
After the rule dictionary is created, the Oracle Business Rules Designer is displayed.
-
Model your rule conditions. In the action part, call one of the above functions to complete building your lists. Figure 28-33 provides details.
The parameters for the rule functions are similar to the ones in Oracle JDeveloper modeling. In addition to the configurations in Oracle JDeveloper, some additional options are available in the Oracle Business Rules Designer for the following attributes:
-
responseType: If the response type is REQUIRED, the assignee must act on the task. Otherwise, the assignment is converted to an FYI assignment.
-
ruleName: The rule name can create reasons for assignments.
-
lists: This object is a holder for the lists that are built. Clicking this option shows a pre-asserted fact Lists object to use as the parameter.
An example of rules specifying management chain-based participants is shown in Figure 28-34.
If multiple rules are fired, the list builder created by the rule with the highest priority is selected.
-
28.3.6.1.2 Specifying a Time Limit for Acting on a Task
You can specify the amount of time a user, group, or application role receives to act on a task. If the user, group, or role does not act in the time specified, the global escalation and renewal policies that you set in the Deadlines section (known as the routing slip level) of the Human Task Editor are applied. For example, if the global policy is set to escalate the task and this participant does not act in the duration provided, the task is escalated to the manager or another user, as appropriate.
To specify a time limit for acting on a task:
-
Expand the Advanced section of the Edit Participant Type dialog for the single type, as shown in Figure 28-35.
Figure 28-35 Advanced Section of Edit Participant Type — Single Type

Description of "Figure 28-35 Advanced Section of Edit Participant Type — Single Type "
-
Specify the amount of time.
For more information about setting the global escalation and renewal policies in the Deadlines section of the Human Task Editor, see Section 28.3.9, "How to Escalate, Renew, or End the Task."
28.3.6.1.3 Inviting Additional Participants to a Task
You can allow a task assignee to invite other participants into the workflow before routing it to the next assignee in this workflow. For example, assume the approval workflow goes from James Cooper to John Steinbeck. If this option is checked, James Cooper can decide to first route it to Irving Stone before it goes to John Steinbeck.
This is also known as ad hoc routing. If this option is selected, Adhoc Route is added to the Actions list in Oracle BPM Worklist at runtime.
To invite additional participants to a task:
-
Expand the Advanced section of the Edit Participant Type dialog for the single type, as shown in Figure 28-35.
-
Select Allow this participant to invite other participants.
28.3.6.1.4 Bypassing a Task Participant
You can bypass a task participant (user, group, or application role) if a specific condition is satisfied. For example, if a user submits a business trip expense report that is under a specific amount, no approval is required by their manager.
-
Expand the Advanced section of the Edit Participant Type dialog for the single type, as shown in Figure 28-35.
-
Select Specify skip rule.
This action displays an icon for accessing the Expression Builder dialog for building a condition.
The expression to bypass a task participant must evaluate to a boolean value. For example, /task:task/task:payload/order:orderAmount < 1000 is a valid XPath expression for skipping a participant.
For more information about creating dynamic rule conditions, see Section 28.3.7.2, "Specifying Advanced Task Routing Using Business Rules."
28.3.6.2 Configuring the Parallel Participant Type
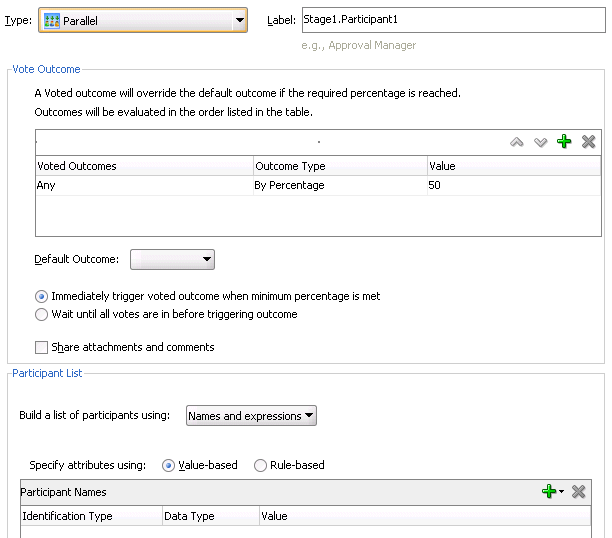
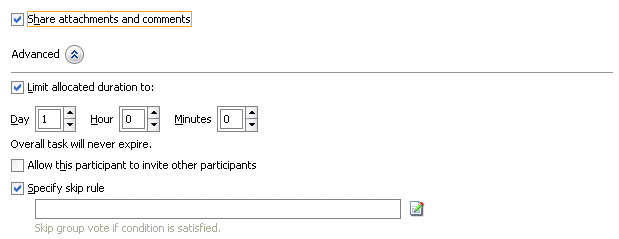
Figure 28-36 and Figure 28-37 display the upper and lower sections of the Parallel dialog.
This participant type is used when multiple users, working in parallel, must act simultaneously, such as in a hiring situation when multiple users vote to hire or reject an applicant. You specify the voting percentage that is needed for the outcome to take effect, such as a majority vote or a unanimous vote.
For example, a business process collects the feedback from all interviewers in the hiring process, consolidates it, and assigns a hire or reject request to each of the interviewers. At the end, the candidate is hired if the majority of interviewers vote for hiring instead of rejecting.
Figure 28-36 Edit Participant Type — Parallel Type (Upper Section of Dialog)
Description of "Figure 28-36 Edit Participant Type — Parallel Type (Upper Section of Dialog)"
Figure 28-37 Edit Participant Type — Parallel Type (Lower Section of Dialog)
Description of "Figure 28-37 Edit Participant Type — Parallel Type (Lower Section of Dialog)"
To assign participants to the parallel participant type:
-
In the Label field, enter a recognizable label for this participant. This label must be unique among all the participants in the task definition (for example,
Approval Manager,Primary Reviewers, and so on).Instructions for configuring the following subsections of the Edit Participant Type dialog for the parallel participant type are listed in Table 28-8:
Table 28-8 Edit Participant Type — Parallel Type
For This Subsection... See... Vote Outcome
Participant List
Section 28.3.6.2.2, "Creating a Parallel Task Participant List"
Limit allocated duration to (under the Advanced section)
Section 28.3.6.2.3, "Specifying a Time Limit for Acting on a Task"
Allow this participant to invite other participants (under the Advanced section)
Section 28.3.6.2.4, "Inviting Additional Participants to a Task"
Specify skip rule (under the Advanced section)
28.3.6.2.1 Specifying the Voting Outcome
You can specify a voted-upon outcome that overrides the default outcome selected in the Default Outcome list. This outcome takes effect if the required percentage is reached. Outcomes are evaluated in the order listed in the table.
To specify group voting details:
-
Go to the Vote Outcome section of the Edit Participant Type dialog for the parallel type.
-
From the list in the Voted Outcomes column, select an outcome for the task (for example, Any, ACCEPT, REJECT, or any other outcome specified in Section 28.3.4.3, "Specifying a Task Outcome").
The Any outcome enables you to determine the outcome dynamically at runtime. For example, if you select Any and set the outcome percentage to
60, then at runtime, whichever outcome reaches 60% becomes the final voted outcome. If 60% of assignees vote to reject the outcome, then it is rejected. -
From the list in the Outcome Type column, select a method for determining the outcome of the final task.
-
By Expression: Dynamically specify the details with an XPath expression.
-
By Percentage: Specify a percentage value that determines when the outcome of this task takes effect.
-
-
From the list in the Value column, specify a value based on your selection in Step 3.
-
If you selected By Expression, click the Browse icon to the right of the field to display the Expression Builder dialog for creating an expression.
-
If you selected By Percentage, enter a percentage value required for the outcome of this task to take effect (for example, a majority vote (
51) or a unanimous vote (100)). For example, assume there are two possible outcomes (ACCEPT and REJECT) and five subtasks. If two subtasks are accepted and three are rejected, and the required acceptance percentage is 50%, the outcome of the task is rejected. Figure 28-38 provides details.Note that this functionality is nondeterministic. For example, selecting a percentage of 30% when there are two subtasks does not make sense.
-
-
Click the Add icon to specify additional outcomes.
-
In the Default Outcome list, select the default outcome or enter an XPath expression for this task to take effect if the consensus percentage value is not satisfied. This happens if there is a tie or if all participants do not respond before the task expires. Seeded and custom outcomes that you entered in the Outcomes dialog in Section 28.3.4.3, "Specifying a Task Outcome" display in this list.
-
Specify additional group voting details:
-
Immediately trigger voted outcome when minimum percentage is met
If selected, the outcome of the task can be computed early with the outcomes of the completed subtasks, enabling the pending subtasks to be withdrawn. For example, assume four users are assigned to act on a task, the default outcome is APPROVE, and the consensus percentage is set at 50. If the first two users approve the task, the third and fourth users do not need to act on the task, since the consensus percentage value has been satisfied.
-
Wait until all votes are in before triggering outcome
If selected, the workflow waits for all responses before an outcome is initiated.
-
-
To share comments and attachments with all group collaborators or workflow participants for a task, select Share attachments and comments. This information typically displays in the footer region of Oracle BPM Worklist.
28.3.6.2.2 Creating a Parallel Task Participant List
Users assigned to the list of participants can act upon tasks. You can create several types of lists:
-
Value-based name and expression lists
-
Value-based management chain lists
-
Rule-based names and expression lists
-
Rule-based management chain lists
-
Rule-based links
For information about creating these lists of participants, see section Section 28.3.6.1.1, "Creating a Single Task Participant List."
28.3.6.2.3 Specifying a Time Limit for Acting on a Task
You can specify the amount of time a user, group, or application role receives to act on a task. If the user, group, or role does not act in the time specified, the global escalation and renewal policies that you set in the Deadlines section (known as the routing slip level) of the Human Task Editor are applied. For example, if the global policy is set to escalate the task and this participant does not act in the duration provided, the task is escalated to the manager or another user, as appropriate.
To specify a time limit for acting on a task:
-
In the Advanced section of the Edit Participant Type dialog for the parallel type, click the Advanced icon to expand the section shown in Figure 28-37.
-
Select Limit allocated duration to.
-
Specify the amount of time.
For more information about setting the global escalation and renewal policies in the Deadlines section of the Human Task Editor, see Section 28.3.9, "How to Escalate, Renew, or End the Task."
28.3.6.2.4 Inviting Additional Participants to a Task
You can allow a task assignee to invite other participants into the workflow before routing it to the next assignee in this workflow. For example, assume the approval workflow goes from James Cooper to John Steinbeck. If this option is checked, James Cooper can decide to first route it to Irving Stone before it goes to John Steinbeck.
28.3.6.2.5 Bypassing a Task Participant
You can bypass a task participant (user, group, or application role) if a specific condition is satisfied. For example, if a user submits a business trip expense report that is under a specific amount, no approval is required by their manager.
-
In the Edit Participant Type dialog for the parallel type, select the Specify skip rule checkbox.
This action displays an icon for accessing the Expression Builder dialog for building a condition. The expression must evaluate to a boolean value.
For information about a valid XPath expression for skipping a participant, see Section 28.3.6.1.4, "Bypassing a Task Participant."
28.3.6.3 Configuring the Serial Participant Type
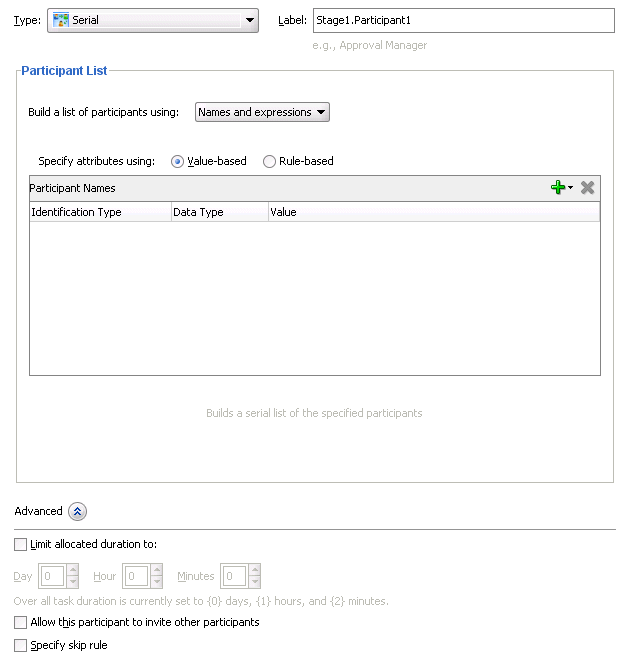
Figure 28-39 displays the Serial dialog.
This participant type enables you to create a list of sequential participants for a workflow. For example, if you want a document to be reviewed by John, Mary, and Scott in sequence, use this participant type. For the serial participant type, they can be any list of users or groups.
Figure 28-39 Edit Participant Type — Serial Type
Description of "Figure 28-39 Edit Participant Type — Serial Type"
To configure the serial participant type:
-
In the Label field, enter a recognizable label for this participant. This label must be unique among all the participants in the task definition (for example,
Approval Manager,Primary Reviewers, and so on).Instructions for configuring the following subsections of the Edit Participant Type dialog for the serial participant type are listed in Table 28-9.
Table 28-9 Edit Participant Type — Serial Type
For This Subsection... See... Participant List
Section 28.3.6.3.1, "Creating a Serial Task Participant List"
Limit allocated duration to (under the Advanced section)
Section 28.3.6.3.2, "Specifying a Time Limit for Acting on a Task"
Allow this participant to invite other participants (under the Advanced section)
Section 28.3.6.3.3, "Inviting Additional Participants to a Task"
Specify skip rule (under the Advanced section)
28.3.6.3.1 Creating a Serial Task Participant List
Users assigned to the list of participants can act upon tasks. You can create several types of lists:
-
Value-based name and expression lists
-
Value-based management chain lists
-
Rule-based names and expression lists
-
Rule-based management chain lists
-
Rule-based lists
See section Section 28.3.6.1.1, "Creating a Single Task Participant List" for instructions on creating these lists of participants.
28.3.6.3.2 Specifying a Time Limit for Acting on a Task
You can specify the amount of time a user, group, or application role receives to act on a task. If the user, group, or role does not act in the time specified, the global escalation and renewal policies that you set in the Deadlines section (known as the routing slip level) of the Human Task Editor are applied. For example, if the global policy is set to escalate the task and this participant does not act in the duration provided, the task is escalated to the manager or another user, as appropriate.
To specify a time limit for acting on a task:
-
In the Advanced section of the Edit Participant Type dialog for the serial type, click the Advanced icon to expand the section shown in Figure 28-39.
-
Click Limit allocated duration to.
-
Specify the amount of time.
For more information about setting the global escalation and renewal policies in the Deadlines section of the Human Task Editor, see Section 28.3.9, "How to Escalate, Renew, or End the Task."
28.3.6.3.3 Inviting Additional Participants to a Task
You can allow a task assignee to invite other participants into the workflow before routing it to the next assignee in this workflow. For example, assume the approval workflow goes from James Cooper to John Steinbeck. If this option is checked, James Cooper can decide to first route it to Irving Stone before it goes to John Steinbeck.
To invite additional participants to a task:
-
In the Advanced section of the Edit Participant Type dialog for the serial type, click the Advanced icon to expand the section (if not already expanded).
-
Select Allow this participant to invite other participants.
Note:
For the serial participant type, additional participants can be invited as follows:-
Globally specifying that the ad hoc participants can be invited at anytime. In this case, even in a sequential workflow, approvers can invite other participants at any level in the sequential workflow.
-
Specifying that an ad hoc invitation of other participants can be done only in specific points in the workflow. In this case, other ad hoc participants are invited only when a serial in complete.
-
28.3.6.3.4 Bypassing a Task Participant
You can bypass a task participant (user, group, or application role) if a specific condition is satisfied. For example, if a user submits a business trip expense report that is under a specific amount, no approval is required by their manager.
-
In the Advanced section of the Edit Participant Type dialog for the serial type, select the Specify skip rule checkbox.
This action displays an icon for accessing the Expression Builder dialog for building a condition. The expression must evaluate to a boolean value.
For more information about a valid XPath expression for skipping a participant, see Section 28.3.6.1.4, "Bypassing a Task Participant."
28.3.6.4 Configuring the FYI Participant Type
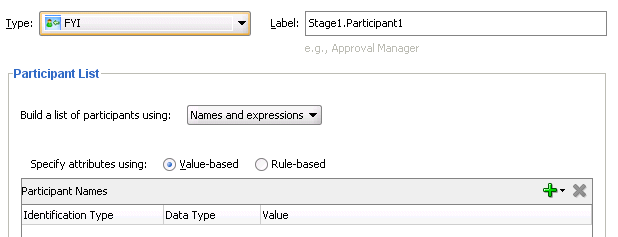
Figure 28-40 displays the Edit Participant Type dialog for the FYI type.
This participant type is used when a task is sent to a user, but the business process does not wait for a user response; it just continues. FYIs cannot directly impact the outcome of a task, but in some cases can provide comments or add attachments.
For example, a magazine subscription is due for renewal. If the user does not cancel the current subscription before the expiration date, the subscription is renewed. This user is reminded weekly until the request expires or the user acts on it.
Figure 28-40 Edit Participant Type — FYI Type
Description of "Figure 28-40 Edit Participant Type — FYI Type"
To configure the FYI participant type:
-
In the Label field, enter a recognizable label for this participant. This label must be unique among all the participants in the task definition (for example,
Approval Manager,Primary Reviewers, and so on).
28.3.6.4.1 Creating an FYI Task Participant List
Users assigned to the list of participants can act upon tasks. You can create several types of lists:
-
Value-based name and expression lists
-
Value-based management chain lists
-
Rule-based names and expression lists
-
Rule-based management chain lists
-
Rule-based lists
See section Section 28.3.6.1.1, "Creating a Single Task Participant List" for instructions on creating these lists of participants.
28.3.7 How to Select a Routing Policy
After you configure a participant type and are returned to the Human Task Editor, click the Task will go from starting to final participant icon, as shown in Figure 28-41.
Figure 28-41 Human Task Editor — Assignment Section

Description of "Figure 28-41 Human Task Editor — Assignment Section"
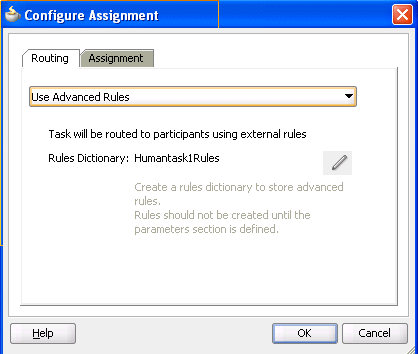
This displays the Configure Assignment dialog shown in Figure 28-42 for specifying a method for routing your task through the workflow.
Table 28-10 describes the routing policy methods provided.
Table 28-10 Routing Policy Method
| Routing Policy Selection | Use This Policy In Environments Where... | Section |
|---|---|---|
|
Route task to all participants, in order specified This selection enables you to specify the following suboptions: |
A task must be routed to each of the participants in the order in which they appear. This is predetermined, default routing. For example, in a hiring process, if three users interview and provide review feedback, then the task is sent to the human resources department. |
Section 28.3.7.1, "Routing Tasks to All Participants in the Specified Order" |
|
A participant can select users or groups as the next assignee (ad hoc) when approving the task. |
Section 28.3.7.1.1, "Allowing All Participants to Invite Other Participants" |
|
A participant in a task can accept or reject it, thus ending the workflow without the task being sent to any other participant. For example, a manager rejects a purchase order, meaning that purchase order is not sent to their manager for review. |
Section 28.3.7.1.2, "Stopping Routing of a Task to Further Participants" |
|
Note: This option is for environments in which you have multiple stages and participants working in parallel. Participants perform subtasks in parallel, and one group's rejection or approval of a subtask does not cause the other group's subtask to also be rejected or approved. |
Section 28.3.7.1.3, "Enabling Early Completion in Parallel Subtasks" |
|
Note: This option is for environments in which you have multiple stages and participants working in parallel. Participants perform subtasks in parallel, and one group's rejection or approval of a subtask causes the other group's subtask to also be rejected or approved. |
Section 28.3.7.1.4, "Completing Parent Subtasks of Early Completing Subtasks" |
|
Use Advanced Rules |
The participants to whom the task is routed are determined by the business rule logic that you model. For example, a loan application task is designed to go through a loan agent, their manager, and then the senior manager. If the loan agent approves the loan, but their manager rejects it, the task is returned to the loan agent. |
Section 28.3.7.2, "Specifying Advanced Task Routing Using Business Rules" |
|
Use External Routing |
The participants in a task are dynamically determined. For example, a company's rules may require the task participants to be determined and then retrieved from a back-end database during runtime. |
|
|
Assignment tab |
A participant is assigned a failed task for the purposes of recovery. |
28.3.7.1 Routing Tasks to All Participants in the Specified Order
You can select to have a task reviewed by all selected participants. This is known as default routing because the task is routed to each of the participants in the order in which they appear. This type of routing differs from state machine-based routing.
To route tasks to all participants in the specified order:
-
In the Assignment section, click the icon to the right of Task will go from starting to final participant.
-
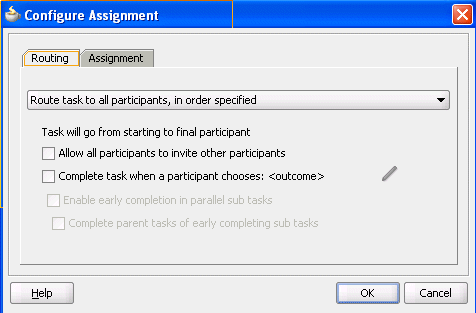
Select Route task to all participants, in order specified from the list shown in Figure 28-43.
Figure 28-43 Route a Task to All Participants
Description of "Figure 28-43 Route a Task to All Participants"
See the following tasks to define a routing policy:
-
Allowing all participants to invite other participants
-
Completing a task when a participant chooses
-
Enabling early completion in parallel subtasks
-
Completing parent subtasks of early completing subtasks
-
28.3.7.1.1 Allowing All Participants to Invite Other Participants
This checkbox is the equivalent of the ad hoc workflow pattern of pre-10.1.3 Oracle BPEL Process Manager releases. This applies when there is at least one participant. In this case, each user selects users or groups as the next assignee when approving the task.
To allow all participants to invite other participants:
-
In the Assignment section, click the icon to the right of Task will go from starting to final participant.
-
Select Route task to all participants, in order specified.
-
Select the Allow all participants to invite other participants checkbox for this task assignee to invite other participants into the workflow before routing it to the next assignee in this workflow.
28.3.7.1.2 Stopping Routing of a Task to Further Participants
You can specify conditions under which to complete a task early, regardless of the other participants in the workflow.
For example, assume an expense report goes to the manager, and then the director. If the first participant (manager) rejects it, you can end the workflow without sending it to the next participant (director).
To abruptly complete a condition:
-
In the Assignment section, click the icon to the right of Task will go from starting to final participant.
-
Select Route task to all participants, in order specified from the list.
-
Select the Complete task when a participant chooses: <outcome> checkbox.
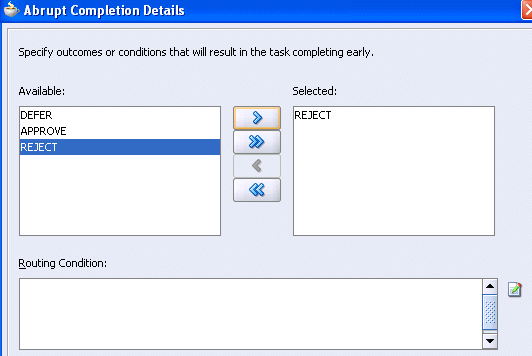
The Abrupt Completion Details dialog appears.
There are two methods for specifying the abrupt completion of a task:
-
Outcomes
-
XPath expression routing condition
If outcomes are specified, any time the selected task outcome occurs, the task completes. If both outcome and routing condition are specified, the workflow service performs a logical
ORoperation on the two. -
-
Select appropriate outcomes and click the > button, as shown in Figure 28-44. To select all, click the >> button.
-
To the right of the Routing Condition field, click the icon to display the Expression Builder dialog for dynamically creating a condition under which to complete this task early. For example, if a user submits a business trip expense report that is under a specific amount, no approval is required by their manager.
Note that an early completion XPath expression is not evaluated until at least one user has acted upon the task.
-
To enable early completion, click Enable early completion in parallel with subtasks. For more information, see Section 28.3.7.1.3, "Enabling Early Completion in Parallel Subtasks."
-
To enable early completion of parent tasks, click Complete parent tasks of early completing subtasks. For more information, see Section 28.3.7.1.4, "Completing Parent Subtasks of Early Completing Subtasks."
-
Click OK to return to the Human Task Editor.
You can click the icon to the right of the Complete task when a participant chooses: <outcome> checkbox to edit this information.
28.3.7.1.3 Enabling Early Completion in Parallel Subtasks
You can use this option in the following environments:
-
Multiple stages and groups of participants perform subtasks in parallel.
-
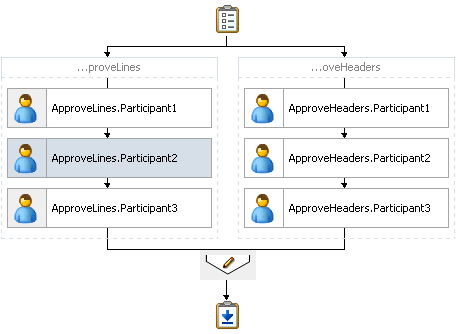
A participant in one group approves or rejects a subtask, which causes the other participants in that same group to stop acting upon the task. However, this does not cause the other parallel group to stop acting upon subtasks. That group continues taking actions on tasks.
For example, assume there are two parallel subgroups, each in separate stages. One group acts upon lines of a purchase order. The other group acts upon headers of the same purchase order. If participant ApproveLines.Participant2 of the first group rejects a line, all other task participants in the first group stop acting upon tasks. However, the second parallel group continues to act upon headers in the purchase order. In this scenario, the entire task does not complete early. Figure 28-45 provides details.
Figure 28-45 Early Completion of Parallel Subtasks
Description of "Figure 28-45 Early Completion of Parallel Subtasks"
28.3.7.1.4 Completing Parent Subtasks of Early Completing Subtasks
You can use this option in the following environments:
-
Multiple stages and groups of participants perform subtasks in parallel.
-
A participant in one group approves or rejects a subtask, which causes the other participants in that same group to stop acting upon the task. This also causes the other parallel group to stop acting upon subtasks.
For example, assume there are two parallel subgroups, each in separate stages, as shown in Figure 28-45. One group acts upon lines of a purchase order. The other group acts upon headers of the same purchase order. If participant ApproveLines.Participant2 of the first group rejects a line, all other task participants in the first group stop acting upon tasks. In addition, the second parallel group stops acting upon headers in the purchase order. In this scenario, the entire task completes early.
28.3.7.2 Specifying Advanced Task Routing Using Business Rules
Use advanced routing rules to create complex workflow routing scenarios. The participant types (single, parallel, serial, and FYI) are used to create a linear flow from one set of users to another with basic conditions such as abrupt termination, skipping assignees, and so on. However, there is often a need to perform more complex back and forth routing between multiple individuals in a workflow. One option is to use the BPEL process as the orchestrator of these tasks. Another option is to specify it declaratively using business rules. This section describes how you can model such complex interactions by using business rules with the Human Task Editor.
28.3.7.2.1 Introduction to Advanced Task Routing Using Business Rules
You can define state machine routing rules using Oracle Business Rules. This action enables you to create Oracle Business Rules that are evaluated:
-
After a routing slip task participant sets the outcome of the task
-
Before the task is assigned to the next routing slip participant
This action enables you to override the standard task routing slip method described in Section 28.3.7.1, "Routing Tasks to All Participants in the Specified Order" and build complex routing behavior into tasks.
Using Oracle Business Rules, you define a set of rules (called a ruleset) that relies on business objects, called facts, to determine which action to take.
28.3.7.2.2 Facts
A fact is an object with certain business data. Each time a routing slip assignee sets the outcome of a task, instead of automatically routing the task to the next assignee, the task service performs the following steps:
-
Asserts facts into the decision service
-
Executes the advanced routing ruleset
Rules can test values in the asserted facts and specify the routing behavior by setting values in a TaskAction fact type.
Table 28-11 describes the fact types asserted by the task service.
Table 28-11 Fact Types Asserted By the Task Service
| Fact Type | Description |
|---|---|
|
|
This fact contains the current state of the workflow task instance. All task attributes can be tested against it. The task fact also contains the current task payload. This fact enables you to construct tests against payload values and task attribute values. |
|
|
This fact describes the previous task outcome and the assignee who set the outcome. The previous outcome fact contains the following attributes:
|
|
|
This fact is not intended for writing rule tests against it. Instead, it is updated by the ruleset, and returned to the task service to indicate how the task should be routed. Rules should not directly update the |
Some fact types can only be used in workflow routing rules, while others can only be used in workflow participant rules. Table 28-12 describes where you can use each type.
| Fact Type | Can Use in Routing Rules? | Can Use in Participant Rules? |
|---|---|---|
|
|
Yes |
Yes |
|
|
Yes |
No |
|
|
Yes |
No |
|
|
No |
Yes |
|
|
No |
Yes |
|
|
No |
Yes |
|
|
No |
Yes |
|
|
No |
Yes |
|
|
No |
Yes |
|
|
No |
Yes |
|
|
No |
Yes |
28.3.7.2.3 Action Types
To instruct the task service on how to route the task, rules can specify one of many task actions. This is done by updating the TaskAction fact asserted into the rule session. However, rules should not directly update the TaskAction fact. Instead, rules should call one of the action RL functions, passing the TaskAction fact as a parameter. These functions handle the actual updates to the fact. For example, to specify an action of go forward, you must add a call GO_FORWARD(TaskAction) to the action part of the rule.
Each time a state machine routing rule is evaluated, the rule takes one of the actions shown in Table 28-13:
Table 28-13 Business Rule Actions
| Action | Description | Parameters |
|---|---|---|
|
|
Goes to the next participant in the routing slip (default behavior). |
None |
|
|
Goes back to the previous participant in the routing slip (the participant before the one that just set the task outcome). |
None |
|
|
Goes to a specific participant in the routing slip. |
A string that identifies the label of the participant (for example, |
|
|
Finishes routing and completes the task. The task is marked as completed, and no further routing is required. |
None |
|
|
Escalates and reassigns the task according to the task escalation policy (usually to the manager of the current assignee). |
None |
28.3.7.2.4 Sample Ruleset
This section describes how to use rules to implement custom routing behavior with a simple example. A human workflow task is created for managing approvals of expense requests. The outcomes for the task are approve and reject. The task definition includes an ExpenseRequest payload element. One of the fields of ExpenseRequest is the total amount of the expense request. The routing slip for the task consists of three single participants (assignee1, assignee2, and assignee3).
By default, the task gets routed to each of the assignees, with each assignee choosing to approve or reject the task.
Instead of this behavior, the necessary routing behavior is as follows:
-
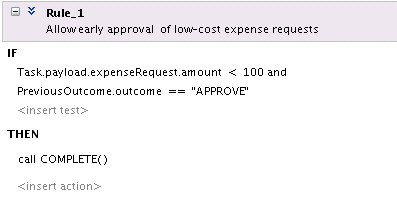
If the total amount of the expense request is less than $100, approval is only required from one of the participants. Otherwise, it must be approved by all three.
-
If an expense request is rejected by any of the participants, it must be returned to the previous participant for re-evaluation. If it is rejected by the first participant, the expense request is rejected and marked as completed.
This behavior is implemented using the following rules. Note that when a rule dictionary is generated for advanced routing rules, it is created with a template rule that implements the default GO_FORWARD behavior. You can edit this rule, and make copies of the template rule by right-clicking and selecting Copy Rule in the Oracle Business Rules Designer.
If the amount is greater than $100 and the previous assignee approved the task, it is not necessary to provide a rule for routing a task to each of the assignees in turn. This is the default behavior that is reverted to if none of the rules in the ruleset are triggered:
-
Early approval rule (Figure 28-46):
-
Push back on the rejected rule (Figure 28-47):
Figure 28-47 Push Back On The Rejected Rule
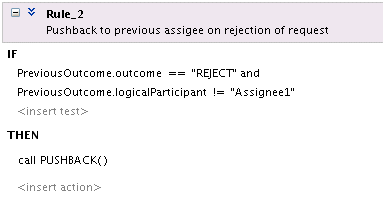
Description of "Figure 28-47 Push Back On The Rejected Rule"
-
Complete the
Assignee1rejected rule (Figure 28-48):Figure 28-48 Completion of the Assignee1 Rejected Rule
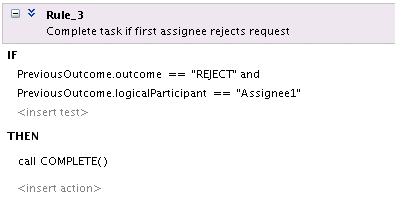
Description of "Figure 28-48 Completion of the Assignee1 Rejected Rule"
For information about iterative design, see the workflow-106-IterativeDesign sample available at the Oracle Technology Network:
https://soasamples.samplecode.oracle.com
28.3.7.2.5 Linked Dictionary Support
For human workflow, business rule artifacts are now stored in two rules dictionaries. This is useful for scenarios in which you must customize your applications. For example, you create and ship version 1 of an application to a customer. The customer then customizes the rulesets in the application with Oracle SOA Composer. Those customizations are now stored in a different rules dictionary than the base rules dictionary. The rules dictionary that stores the customized rulesets links with the rules in the base dictionary. When you later ship version 2 of the application, the base rule dictionary may contain additional changes introduced in the product. The ruleset customization changes previously performed by the customer are preserved and available with the new changes in the base dictionary. When an existing application containing a task using rules is opened, if the rules are in the old format using one dictionary, they are automatically upgraded and divided into two rules dictionaries:
-
Base dictionary
-
Custom dictionary
For more information about customizations, see Chapter 16, "Customizing SOA Composite Applications."
28.3.7.2.6 Creating Advanced Routing Rules
To create advanced routing rules:
-
In the Assignment section, click the icon to the right of Task will go from starting to final participant.
-
Select Use Advanced Rules from the list.
-
To the right of Rules Dictionary, click the Edit icon, as shown in Figure 28-49.
This starts the Oracle Business Rules Designer with a preseeded repository containing all necessary fact definitions, as shown in Figure 28-50. A decision service component is created for the dictionary, and is associated with the task service component.
-
Define state machine routing rules for your task using Oracle Business Rules.
This automatically creates a fully-wired decision service in the human task and the associated rule repository and data model.
For more information about business rules, see the following documentation:
28.3.7.3 Using External Routing
You configure an external routing service that dynamically determines the participants in the workflow. If this routing policy is specified, all other participant types are ignored. It is assumed that the external routing service provides a list of participant types (single approver, serial approver, parallel approver, and so on) at runtime to determine the routing of the task.
Use this option if you do not want to use any of the routing rules to determine task assignees. In this case, all the logic of task assignment is delegated to the external routing service.
Note:
If you select Use External Routing in the Configure Assignment dialog, specify a Java class, and click OK to exit, the next time you open this dialog, the other two selections (Route task to all participants, in order specified and Use Advanced Rules) no longer appear in the dropdown list. To access all three selections again, you must delete the entire assignment.-
In the Assignment section, click the icon to the right of Task will go from starting to final participant.
-
Select Use External Routing from the list.
-
Click the Edit icon, as shown in Figure 28-51.
Figure 28-51 Selection of Use External Routing
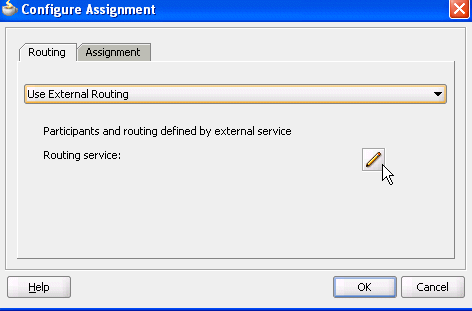
Description of "Figure 28-51 Selection of Use External Routing"
The External Routing dialog appears, as shown in Figure 28-52.
-
In the Class Name field, enter the fully qualified class file name (for example, the
org.mycompany.tasks.RoutingServiceclass name). This class must implement the following interface:oracle.bpel.services.workflow.task.IAssignmentService
-
Add name and pair value parameters by name or XPath expression that can be passed to the external service, as shown in Table 28-14.
-
Click the Add icon to add additional name and pair value parameters.
28.3.7.4 Configuring the Error Assignee
Tasks can error for reasons such as incorrect assignments. When such errors occur, the task is assigned to the error assignee, who can perform corrective actions. Recoverable errors are as follows:
-
Invalid user and group for all participants
-
Invalid XPath expressions that are related to assignees and expiration duration
-
Escalation on expiration errors
-
Evaluating escalation policy
-
Evaluating renewal policy
-
Computing a management chain
-
Evaluating dynamic assignment rules. The task is not currently in error, but is still left as assigned to the current user and is therefore recoverable.
-
Dynamic assignment cyclic assignment (for example, user A > user B > user A). The task is not currently in error, but is still left as assigned to the last user in the chain and is therefore recoverable.
The following errors are not recoverable. In these cases, the task is moved to the terminating state ERRORED.
-
Invalid task metadata
-
Unable to read task metadata
-
Invalid
GOTOparticipant from state machine rules -
Assignment service not found
-
Any errors from assignment service
-
Evaluating custom escalate functions
-
Invalid XPath and values for parallel default outcome and percentage values
During modeling of workflow tasks, you can specify error assignees for the workflow. If error assignees are specified, they are evaluated and the task is assigned to them. If no error assignee is specified at runtime, an administration user is discovered and is assigned the alerted task. The error assignee can perform one of the following actions:
-
Ad hoc route
Route the task to the actual users assigned to the task. Ad hoc routing allows the task to be routed to users in sequence, parallel, and so on.
-
Reassign
Reassign the task to the actual users assigned to this task
-
Error task
Indicate that this task cannot be rectified.
If there are any errors in evaluating the error assignees, the task is marked as being in error.
This dialog enables you to specify the users or groups to whom the task is assigned if an error in assignment has occurred.
To configure the error assignee:
-
In the Assignment section, click the icon to the right of Task will go from starting to final participant.
-
Click the Assignment tab.
-
Click the Add icon to assign reviewers or error assignees, as shown in Figure 28-53.
-
Click the Add icon and select a user, group, or application role to participate in this task.
The Identification Type column of the Starting Participant table displays your selection of user, group, or application role.
-
See Step 4 through 6 of Section 28.3.6.1.1, "Creating a Single Task Participant List" for instructions on selecting a user, group, or application role.
-
If you are using parallel participant types, you can specify where to store the subtask payload with the following options.
-
Use server settings
The SharePayloadAcrossAllParallelApprovers System MBean Browser boolean property in Oracle Enterprise Manager Fusion Middleware Control Console determines whether to share the payload of subtasks in the root task. By default, this property is set to true. If set to true, the All task participants share the same payload (better performance and less storage space) option is used. If this property is set to false, the Each parallel participant has a local copy of the payload option is used. To change this property, perform the following steps:
-
Right-click soa-infra and select Administration > System MBean Browser.
-
Expand Application Defined MBeans > oracle.as.soainfra.config > Server: server_name > WorkflowConfig > human-workflow.
-
Click SharePayloadAcrossAllParallelApprovers.
-
Change this property in the list, and click Apply.
-
-
All task participants share the same payload (better performance and less storage space)
The payload for the subtasks is stored in their root task. This means that the payload of the root task is shared across all its subtasks. Internally, this option provides better performance and storage space consumption. Less storage space is consumed because the payload of the root task is shared across all its subtasks.
-
Each parallel participant has a local copy of the payload
Each subtask has its own copy of the payload. Internally, this option provides lesser performance and storage space consumption because more storage space is consumed.
-
-
Click OK.
For more information about users, groups, or application roles, see Section 27.2.1.1.3, "Participant Assignment."
28.3.8 How to Specify Multilingual Settings and Style Sheets
The Presentation section shown in Figure 28-54 enables you to specify resource bundles for displaying task details in different languages in Oracle BPM Worklist and WordML and custom style sheets for attachments.
28.3.8.1 Specifying WordML and Other Style Sheets for Attachments
To specify WordML style sheets for attachments:
-
In the Stylesheet for Attachments list of the Presentation section, select one of the following options:
-
Word ML: This option dynamically creates Microsoft Word documents for sending as email attachments using a WordML XSLT style sheet. The XSLT style sheet is applied on the task document.
-
Other: This option creates email attachments using an XSLT style sheet. The XSLT style sheet is applied on the task document.
-
-
Click the Search icon to select the style sheet as an attachment.
28.3.8.2 Specifying Multilingual Settings
You can specify resource bundles for displaying task details in different languages in Oracle BPM Worklist. Resource bundles are supported for the following task details:
-
Displaying the value for task outcomes in plain text or with the
message(key)format. -
Making email notification messages available in different languages. At runtime, you specify the
hwf:getTaskResourceBundleString(taskId, key, locale?)XPath extension function to obtain the internationalized string from the specified resource bundle. The locale of the notification recipient can be retrieved with the functionhwf:getNotificationProperty(propertyName).
Resource bundles can also simply be property files. For example, a resource bundle that configures a display name for task outcomes can look as follows:
-
APPROVE=Approve -
REJECT=Reject
To specify multilingual settings:
-
In the Presentation section, click the Add icon across from Resource Bundle.
The Resource Details dialog shown in Figure 28-55 appears.
-
In the Resource Name field, enter the name of the resource used in the resource bundle. This should be a
.properties-based resource bundle file. -
In the Resource Location field, click the Search icon to select the JAR or ZIP resource bundle file to use. The resource bundle is part of your system archive (SAR) file.
If the resource bundle is outside of the composite project, you are prompted to place a local copy in
SCA-INF/lib.If the resource bundle file is not in the composite class loader (directly under
SCA-INF/classesor in a JAR file inSCA-INF/lib), you must specify its location. For example, if the resource bundle is accessible from a location outside of the composite class loader (for example, an HTTP location such ashttp://host:port/bundleApp/taskBundles.jar), then this location must be specified in this field. -
Click OK to return to the Human Task Editor.
For more information, see Section 32.2.6, "How to Configure Notification Messages in Different Languages."
28.3.9 How to Escalate, Renew, or End the Task
Figure 28-56 shows the Deadlines section of the Human Task Editor.
You can specify the expiration duration of a task in this global policy section (also known as the routing slip level). If the expiration duration is specified at the routing slip level instead of at the participant type level, then this duration is the expiration duration of the task across all the participants. However, if you specify expiration duration at the participant type level (through the Limit allocated duration to checkbox), then those settings take precedence over settings specified in the Deadlines section (routing slip level).
Figure 28-56 Human Task Editor — Deadlines Section
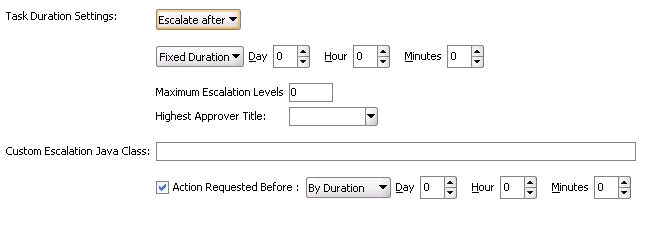
Description of "Figure 28-56 Human Task Editor — Deadlines Section"
28.3.9.1 Introduction to Escalation and Expiration Policy
This section provides an overview of how specifying the expiration duration at this level makes this setting the expiration duration of the task across all the participants.
For example, participant LoanAgentGroup and participant Supervisor have three days to act on the task between them, as shown in Figure 28-57:
If there is no expiration specified at either the participant level or this routing slip level, then that task has no expiration duration.
If expiration duration is specified at any level of the participants, then for that participant, the participant expiration duration is used. However, the global expiration duration is still used for the participants that do not have participant level expiration duration. The global expiration duration is always decremented by the time elapsed in the task.
The policy for interpreting the participant level expiration for the participants is described as follows:
-
Serial
Each assignment in the management chain gets the same expiration duration as the one specified in the serial. Note that the duration is not for all the assignments resulting from this assignment. If the task expires at any of the assignments in the management chain, the escalation and renewal policy is applied.
-
Parallel:
-
In a parallel workflow, if the parallel participants are specified as a resource, a routing slip is created for each of the resources. The expiration duration of each created routing slip follows these rules:
-
The expiration duration equals the expiration duration of the parallel participant if it has an expiration duration specified.
-
The expiration duration that is left on the task if it was specified at the routing slip level.
-
Otherwise, there is no expiration duration.
-
-
If parallel participants are specified as routing slips, then the expiration duration for the parallel participants is determined by the routing slip.
-
Note:
When the parent task expires in a parallel task, the subtasks are withdrawn if those tasks have not expired or completed.28.3.9.2 Specifying a Policy to Never Expire
You can specify for a task to never expire.
To specify a policy to never expire:
-
In the dropdown list in the Deadlines section, as shown in Figure 28-56, select Never Expire.
28.3.9.3 Specifying a Policy to Expire
You can specify for a task to expire. When the task expires, either the escalation policy or the renewal policy at the routing slip level is applied. If neither is specified, the task expires. The expiration policy at the routing slip level is common to all the participants.
To specify for a task to expire:
-
In the dropdown list of the Deadlines section, select Expire after, as shown in Figure 28-58.
-
Specify the maximum time period for the task to remain open.
The expiration policy for parallel participants is interpreted as follows:
-
If parallel participants are specified as resources in parallel elements, there is no expiration policy for each of those participants.
-
If parallel participants are specified as routing slips, then the expiration policy for the routing slip applies to the parallel participants.
Figure 28-58 indicates that the task expires in three days.
-
28.3.9.4 Extending an Expiration Policy Period
You can extend the expiration period when the user does not respond within the allotted time. You do this by specifying the number of times the task can be renewed upon expiration (for example, renew it an additional three times) and the duration of each renewal (for example, three days for each renewal period).
To extend an expiration policy period:
-
In the dropdown list of the Deadlines section, select Renew after, as shown in Figure 28-59.
-
Specify the maximum number of times to continue renewing this task.
In Figure 28-59, when the task expires, it is renewed at most three times. It does not matter if the task expired at the LoanAgentGroup participant or the Supervisor participant.
28.3.9.5 Escalating a Task Policy
You can escalate a task if a user does not respond within the allotted time. For example, if you are using the escalation hierarchy configured in your user directory, the task can be escalated to the user's manager. If you are using escalation callbacks, the task is escalated to whoever you have defined. When a task has been escalated the maximum number of times, it stops escalating. An escalated task can remain in a user inbox even after the task has expired.
-
In the dropdown list of the Deadlines section, select Escalate after, as shown in Figure 28-60.
-
Specify the following additional values. When both are set, the escalation policy is more restrictive.
-
Maximum Escalation Levels
Number of management levels to which to escalate the task. This field is required.
-
Highest Approver Title
The title of the highest approver (for example, self, manager, director, or CEO). These titles are compared against the title of the task assignee in the corresponding user repository. This field is optional.
The escalation policy specifies the number of times the task can be escalated on expiration and the renewal duration. In Figure 28-60, when the task expires, it is escalated at most three times. It does not matter if the task expired at the LoanAgentGroup participant or the Supervisor participant.
-
28.3.9.6 Specifying Escalation Rules
This option allows a custom escalation rule to be plugged in for a particular workflow. For example, to assign the task to a current user's department manager on task expiration, you can write a custom task escalation function, register it with the workflow service, and use that function in task definitions.
The default escalation rule is to assign a task to the manager of the current user. To add a new escalation rule, follow these steps.
-
Implement the following interface:
oracle.bpel.services.workflow.assignment.dynamic.IDynamicTaskEscalationFunction
This implementation must be available in the class path for the server.
-
Log in to Oracle Enterprise Manager Fusion Middleware Control Console.
-
Expand the SOA folder in the navigator.
-
Right-click soa-infra, and select SOA Administration > Workflow Task Service Properties.
The Workflow Task Service Properties page appears.
-
Add a new function. For example:
-
Function name:
DepartmentSupervisor -
Classpath:
oracle.bpel.services.workflow.assignment.dynamic.patterns.DepartmentSupervisor -
Function parameter name
-
Function parameter value
-
-
In the Custom Escalation Java Class field of the Deadlines section, enter the function name as defined in the Workflow Task Service Properties page for the escalation rule.
For more information, see Section 32.3.3, "Custom Escalation Function."
28.3.9.7 Specifying a Due Date
A due date indicates the date by which the task should be completed. Note that the due date is different from the expiration date. When a task expires it is either marked expired or automatically escalated or renewed based on the escalation policy. The due date is generally a date earlier than the expiration date and an indication to the user that the task is about to expire.
You can enter a due date for a task, as shown in Figure 28-56. A task is considered overdue after it is past the specified due date. This date is in addition to the expiration policy. A due date can be specified irrespective of whether an expiration policy has been specified. The due date enables Oracle BPM Worklist to display a due date, list overdue tasks, highlight overdue tasks in the inbox, and so on. Overdue tasks can be queried using a predicate on the TaskQueryService.queryTask(...) API.
-
In the Deadlines section, select the Action Requested Before checkbox.
-
Select By Duration to enter a time duration or select By Expression to dynamically enter a value as an XPath expression.
Note the following details:
-
The due date can be set on both the task (using the Create ToDo Task dialog in Oracle BPM Worklist) and in the
.taskfile (using the Human Task Editor). This is to allow to-do tasks without task definitions to set a due date during initiation of the task. A due date that is set in the task (a runtime object) overrides a due date that is set in the.taskfile. -
In the task definition, the due date can only be specified at the global level, and not for each participant.
-
If the due date is set on the task, the due date in the
.taskfile is ignored. -
If the due date is not set on the task, the due date in the
.taskfile is evaluated and set on the task. -
If there is no due date on either the task or in the
.taskfile, there is no due date on the task.
-
Note:
You cannot specify business rules for to-do tasks.For more information, see Section 30.3.4, "How To Create a ToDo Task."
28.3.10 How to Specify Participant Notification Preferences
Figure 28-61 shows the General tab of the Notification section of the Human Task Editor (when fully expanded).
Notifications indicate when a user or group is assigned a task or informed that the status of the task has changed. Notifications can be sent through email, voice message, instant message, or SMS. Notifications are sent to different types of participants for different actions. Notifications are configured by default with default messages. For example, a notification message is sent to indicate that a task has completed and closed. You can create your own or modify existing configurations.
Note:
Embedded LDAP does not support group email addresses. Therefore, when a task is assigned to a group ID, emails are sent to all of its members instead of to the group email address.Figure 28-61 Human Task Editor — General Tab of Notification Section

Description of "Figure 28-61 Human Task Editor — General Tab of Notification Section"
To specify participant notification preferences:
-
Click the Notification tab (displays as shown in Figure 28-61).
Instructions for configuring the following subsections of the General tab of the Notification section are listed in Table 28-15.
Table 28-15 Human Task Editor — General Tab of Notification Section
For This Subsection... See... Task Status
Recipient
Section 28.3.10.1, "Notifying Recipients of Changes to Task Status"
Notification Header
For information about the notification service, see Section 32.2, "Notifications from Human Workflow."
-
In the Notification section, click the Advanced tab. Figure 28-62 provides details.
Figure 28-62 Notification Section - Advanced Tab
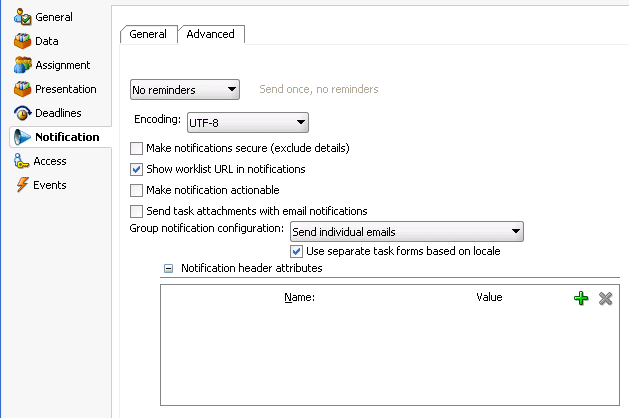
Description of "Figure 28-62 Notification Section - Advanced Tab"
Instructions for configuring the following subsections of the Advanced tab of the Notification section are listed in Table 28-16.
Table 28-16 Human Task Editor — Advanced Tab of Notification Section
For This Subsection... See... Reminders
Encoding
Make notifications secure (exclude details)
Section 28.3.10.5, "Securing Notifications to Exclude Details"
Show worklist URL in notifications
Section 28.3.10.6, "Showing the Oracle BPM Worklist URL in Notifications"
Make notifications actionable
Send task attachments with email notifications
Section 28.3.10.8, "Sending Task Attachments with Email Notifications"
Group notification configuration
Section 28.3.10.9, "Sending Email Notifications to Groups and Application Roles"
Notification header attributes
28.3.10.1 Notifying Recipients of Changes to Task Status
Three default status types display in the Task Status column: Assign, Complete, and Error. You can select other status types for which to receive notification messages.
To notify recipients of changes to task status:
-
In the Notification section, click the General tab.
-
In the Task Status column, click a type to display the complete list of task types:
-
Alerted
When a task is in an alerted state, you can notify recipients. However, none of the notification recipients (assignees, approvers, owner, initiator, or reviewer) can move the task from an alerted state to an error state; they only receive an FYI notification of the alerted state. The owner can reassign, withdraw, delete, or purge the task, or ask the error assignee to move the task to an error state if the error cannot be resolved. Only the error assignee can move a task from an alerted state to an error state.
You configure the error assignee on the Assignment tab of the Configure Assignment dialog under the Task will go from starting to final participant icon in the Assignment section. For more information, see Section 28.3.7.4, "Configuring the Error Assignee."
-
Assign
When the task is assigned to users or a group. This captures the following actions:
-
Task is assigned to a user
-
Task is assigned to a new user in a serial workflow
-
Task is renewed
-
Task is delegated
-
Task is reassigned
-
Task is escalated
-
Information for a task is submitted
-
-
Complete
-
Error
-
Expire
-
Request Info
-
Resume
-
Suspend
-
Update
-
Task payload is updated
-
Task is updated
-
Comments are added
-
Attachments are added and updated
-
-
Update Outcome
-
Withdraw
-
All Other Actions
-
Any action not covered in the above task types. This includes acquiring a task.
-
-
-
Select a task status type.
Notifications can be sent to users involved in the task in various capacities. This includes when the task is assigned to a group, each user in the group is sent a notification if there is no notification endpoint available for the group.
-
In the Recipient column, click an entry to display a list of possible recipients for the notification message:
-
Assignees
The users or groups to whom the task is currently assigned.
-
Initiator
The user who created the task.
-
Approvers
The users who have acted on the task up to this point. This applies in a serial participant type in which multiple users have approved the task and a notification must be sent to all of them.
-
Owner
The task owner
-
Reviewer
The user who can add comments and attachments to a task.
For more information, see Section 32.2.5, "How to Configure the Notification Channel Preferences."
-
28.3.10.2 Editing the Notification Message
A default notification message is available for delivery to the selected recipient. If you want, you can modify the default message text.
To edit the notification message:
-
In the Notification section, click the General tab.
-
In the Notification Header column, click the Edit icon to modify the default notification message.
The Edit Notification Message dialog shown in Figure 28-63 appears.
Figure 28-63 Edit Notification Message Dialog
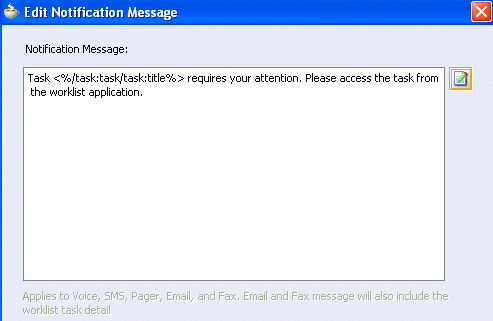
Description of "Figure 28-63 Edit Notification Message Dialog"
This message applies to all the supported notification channels: email, voice, instant messaging, and SMS. Email messages can also include the worklist task detail defined in this message. The channel by which the message is delivered is based upon the notification preferences you specify.
-
Modify the message wording as necessary.
-
Click OK to return to the Human Task Editor.
For more information about notification preference details, see Section 32.2, "Notifications from Human Workflow."
28.3.10.3 Setting Up Reminders
You can send task reminders, which can be based on the time the task was assigned to a user or the expiration time of a task. The number of reminders and the interval between the reminders can also be configured.
-
In the Notification section, click the Advanced tab.
-
From the list, select the number of reminders to send.
-
If you selected to remind the assignee one, two, or three times, select the interval between reminders, and whether to send the reminder before or after the assignment.
For more information, see Section 32.2.12, "How to Send Reminders."
28.3.10.4 Changing the Character Set Encoding
Unicode is a universally-encoded character set that enables information from any language to be stored using a single character set. Unicode provides a unique code value for every character, regardless of the platform, program, or language. You can use the default setting of UTF-8 or you can specify a character set with a Java class.
To change the character set encoding
-
In the Notification section, click the Advanced tab.
-
From the Encoding list, select Specify by Java Class.
-
Enter the Java class to use.
28.3.10.5 Securing Notifications to Exclude Details
To secure notifications, make messages actionable, and send attachments:
-
-
In the Notification section, click the Advanced tab.
-
Select Make notifications secure (exclude details).
If selected, a default notification message is used. There are no HTML worklist task details, attachments, or actionable links in the email. Only the task number is in the message.
For more information, see Section 32.2.10, "How to Send Secure Notifications."
-
28.3.10.6 Showing the Oracle BPM Worklist URL in Notifications
You can configure whether to display the Oracle BPM Worklist URL in email notification messages.
To show the Oracle BPM Worklist URL in notifications:
-
In the Notification section, click the Advanced tab.
-
Select the Show worklist URL in notifications checkbox to display the Oracle BPM Worklist URL in email notification messages. If this checkbox is not selected, the URL is not displayed.
28.3.10.7 Making Email Messages Actionable
To make email messages actionable:
-
In the Notification section, click the Advanced tab.
-
Select Make notification actionable. This action enables you to perform task actions through email.
For more information about additional configuration details, see Section 32.2.7, "How to Send Actionable Messages."
For more information about configuring outbound and inbound emails, see Oracle Fusion Middleware Administrator's Guide for Oracle SOA Suite and Oracle BPM Suite.
28.3.10.8 Sending Task Attachments with Email Notifications
You can send task attachments with email notifications.
To send task attachments with email notifications:
-
In the Notification section, click the Advanced tab.
-
Select Send task attachments with email notifications.
28.3.10.9 Sending Email Notifications to Groups and Application Roles
You can send email notifications to groups and application roles to which tasks are assigned.
To send email notifications to groups and application roles:
-
In the Notification section, click the Advanced tab.
-
From the Group notification configuration list, select one of the following options.
-
Send individual emails
Each user in the group or application role receives an individual email notification. This is the default selection.
In addition, the Use separate task forms based on locale checkbox is automatically selected.
-
When selected, this sends individual emails with a separate task form based on the language locale.
-
When not selected, this sends individual emails and reuses (shares) the task form.
-
-
Send one email containing all user addresses
A shared notification email is generated once for a user locale in a group or application role, thereby saving time in notification email content generation. The email is sent to all users in the group or application role.
Notes:
-
Since all (or a subset of) users receive the same email, the users in the group or application role are expected to have the same privilege. This ensures that the user does not see task details to which they are not entitled.
-
When sending one email to all users, the maximum number of characters allowed in the address field is 2000. If the limit is exceeded, email is sent to only those user addresses contained within the maximum limit.
-
-
28.3.10.10 Customizing Notification Headers
Custom notification headers are used to specify name and value pairs to identify key fields within the notification. These entries can be used by users to define delivery preferences for their notifications. For example:You can set Name to ApprovalType and value to Expense or Name to Priority and value to High.Users can then specify delivery preferences in Oracle BPM Worklist. These preferences can be based on the contents of the notification.
Note that the rule-based notification service is only used to identify the preferred notification channel to use. The address for the preferred channel is still obtained from the identity service.
To customize notification headers:
-
In the Notification section, click the Advanced tab.
-
Expand Notification Header Attributes.
-
Add name and pair value parameters by name or XPath expression.
For more information about preferences, see the following sections:
28.3.11 How to Specify Access Policies and Task Actions on Task Content
You can specify access rules on task content and actions to perform on that content.
28.3.11.1 Specifying Access Policies on Task Content
You can specify access rules that determine the parts of a task that participants can view and update. Access rules are enforced by the workflow service by applying rules on the task object during the retrieval and update of the task.
Note:
Task content access rules and task actions access rules exist independently of one another.28.3.11.1.1 Introduction to Access Rules
Access rules are computed based on the following details:
-
Any attribute configured with access rules declines any permissions for roles not configured against it. For example, assume you configure the payload to be read by assignees. This action enables only assignees and nobody else to have read permissions. No one, including assignees, has write permissions.
-
Any attribute not configured with access rules has all permissions.
-
If any payload message attribute is configured with access rules, any configurations for the payload itself are ignored due to potential conflicts. In this case, the returned map by the API does not contain any entry for the payload. Write permissions automatically provide read permissions.
-
If only a subset of message attributes is configured with access rules, all message attributes not involved have all permissions.
-
Only comments and attachments have add permissions.
-
Write permissions on certain attributes are meaningless. For example, write permissions on history do not grant or decline any privileges on history.
-
The following date attributes are configured as one in the Human Task Editor. The map returned by
TaskMetadataService.getVisibilityRules()contains one key for each. Similarly, if the participant does not have read permissions onDATES, the task does not contain any of the following task attributes:-
START_DATE -
END_DATE -
ASSIGNED_DATE -
SYSTEM_END_DATE -
CREATED_DATE -
EXPIRATION_DATE -
ALL_UPDATED_DATE
-
-
The following assignee attributes are configured as one in the Human Task Editor. The map returned by
TaskMetadataService.getVisibilityRules()contains one key for each of the following. Similarly, if the participant does not have read permissions onASSIGNEES, the task does not contain any of the following task attributes:-
ASSIGNEES -
ASSIGNEE_USERS -
ASSIGNEE_GROUPS -
ACQUIRED_BY
-
-
Mapped attributes do not have individual representation in the map returned by
TaskMetadataService.getVisibilityRules(). -
All message attributes in the map returned by
TaskMetadataService.getVisibilityRules()are prefixed byITaskMetadataService.TASK_VISIBILITY_ATTRIBUTE_PAYLOAD_MESSAGE_ATTR_PREFIX (PAYLOAD).
An application can also create pages to display or not display task attributes based on the access rules. This can be achieved by retrieving a participant's access rules by calling the API on oracle.bpel.services.workflow.metadata.ITaskMetadataService. Example 28-1 provides details.
public Map<String, IPrivilege> getTaskVisibilityRules(IWorkflowContext context,
                                      String taskId)
   throws TaskMetadataServiceException;
For more information about this method, see Oracle Fusion Middleware Workflow Services Java API Reference for Oracle SOA Suite.
28.3.11.1.2 Specifying User Privileges for Acting on Task Content
You can specify the privileges that specific users (such as the task creator or owner) have for acting on specific task content (such as a payload).
To specify user privileges for acting on task content:
-
Click the Access tab.
-
Click the Content tab.
-
Select the task content for which to specify access privileges, as shown in Figure 28-64.
Figure 28-64 Configure Task Content Access
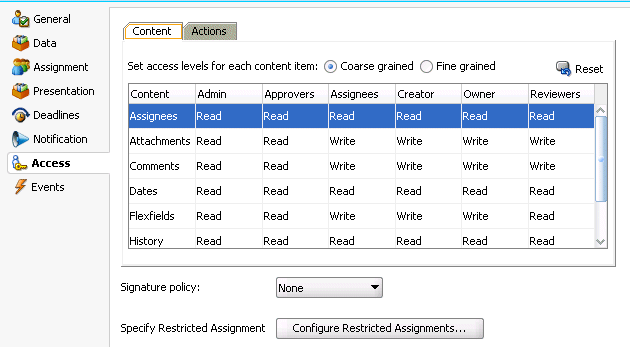
Description of "Figure 28-64 Configure Task Content Access"
-
Assign privileges (read, write, or no access) to users to act upon task content. Note that a user cannot be assigned a privilege above their highest level. For example, an ADMIN user cannot be assigned write access on the PAYLOAD task content. Table 28-17 shows the maximum privilege each user has on task content.
Table 28-17 Highest Privilege Levels for Users of Task Content
Task Content Individual with Read Access Individual with Write Access Assignees
Admin, Approvers, Assignees, Creator, Owner, Reviewers
--
Attachments
Admin, Approvers
Assignees, Creator, Owner, Reviewers
Comments
Admin, Approvers
Assignees, Creator, Owner, Reviewers
Dates
Admin, Approvers, Assignees, Creator, Owner, Reviewers
--
Flexfields
Admin, Approvers, Reviewers
Assignees, Creator, Owner
History
Admin, Approvers, Assignees, Creator, Owner, Reviewers
--
Payload
Admin, Approvers, Reviewers
Assignees, Creator, Owner
Reviewers
Admin, Approvers, Assignees, Creator, Owner, Reviewers
--
Payload elements
Inherited from payload
Inherited from payload
For example, if you accept the default setting of ASSIGNEES, CREATOR, and OWNER with write access, ADMIN, APPROVERS, and REVIEWERS with read access, and PUBLIC with no access to the PAYLOAD task content, the dialog appears as shown in Figure 28-64.
-
Select the method for displaying task content in this dialog. Note that choosing the currently unselected option causes all settings to reset to their default values.
-
Coarse grained (default)
Displays the task content as a whole (for example, displays only one payload or reviewer).
-
Fine grained
Displays the content as individual elements (for example, displays all payloads (such as p1, p2, and p3) and all reviewers assigned to this task (such as jstein, wfaulk, and cdickens).
-
Note:
Access rules are always applied on top of what the system permits, depending on who is performing the action and the current state of the task.28.3.11.1.3 Specifying Actions for Acting Upon Tasks
You can specify the actions (either access or no access) that specific users (such as the task creator or owner) have for acting on the task content (such as a payload) that you specified in the Configure Task Content Access dialog.
To specify actions for acting upon tasks:
-
Click the Access tab.
-
Click the Actions tab.
-
Select the task action for which to specify users, as shown in Figure 28-65.
Figure 28-65 Selection of Add Action Access Rule
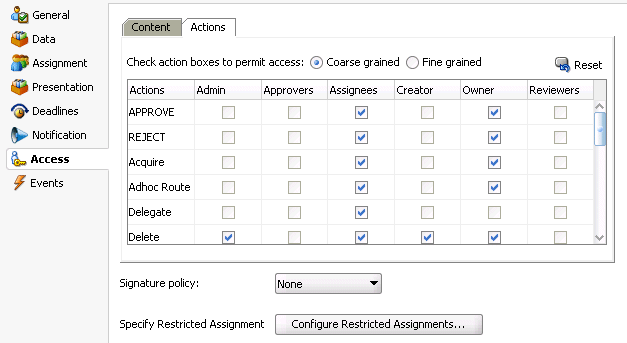
Description of "Figure 28-65 Selection of Add Action Access Rule"
-
Select if participants can or cannot perform the selected actions.
-
Select the method for displaying task actions in this dialog. Note that choosing the currently unselected option causes all settings to reset to their default values.
-
Coarse grained (default)
Displays the task actions as a whole (for example, displays only one approval or rejection).
-
Fine grained
Displays the content actions as individual elements. (for example, displays all approvals or rejections).
-
28.3.12 How to Specify a Workflow Digital Signature Policy
Digital signatures provide a mechanism for the nonrepudiation of digitally-signed human tasks. This ability to mandate that a participant acting on a task signs the details and their action before the task is updated ensures that they cannot repudiate it later.
Note:
If digital signatures are enabled for a task, actionable emails are not sent during runtime. This is the case even if actionable emails are enabled during design time.To specify a workflow digital signature policy:
-
Click the Access tab.
-
From the Signature Policy list, select Configure Policy, as shown in Figure 28-66.
-
Specify the signature policy for task participants to use:
-
No signature required
Participants can send and act upon tasks without providing a signature. This is the default policy.
-
Password required
Participants specify a signature before sending tasks to the next participant. Participants must reenter their password while acting on a task. The password is used to generate the digital signature. A digital signature authenticates the identity of the message sender or document signer. This ensures that the original content of the sent message is unchanged.
-
Digital certificate required
Participants must possess a digital certificate for the nonrepudiation of digitally-signed human tasks. A digital certificate establishes the participant's credentials. It is issued by a certification authority (CA). It contains the following:
-
Your name
-
A serial number
-
Expiration dates
-
A copy of the certificate holder's public key (used for encrypting messages and digital signatures)
-
Digital signature of the certificate-issuing authority so that message authenticity can be established
The CA names and CA CRL and URLs of the issuing authorities must be configured separately.
-
-
-
Click OK.
For more information, see Section 32.1.10, "Evidence Store Service and Digital Signatures."
28.3.12.1 Specifying a Certificate Authority
To use digital signatures, you must specify CAs you consider trustworthy in the System MBean Browser in Oracle Enterprise Manager Fusion Middleware Control Console. Only certificates issued from such CAs are considered valid by human workflow.
To specify a certificate authority:
-
From the SOA Infrastructure menu, select Administration > System MBean Browser.
-
Select Application Defined MBeans > oracle.as.soainfra.config > Server: server_name > WorkflowConfig > human.workflow.
-
Click the Operations tab.
-
Click AddTrustedCA.
-
In the Value fields for CaName and CaURL, specify appropriate values.
-
Click Invoke.
-
Click Return.
You must validate these values before using them.
28.3.13 How to Specify Restrictions on Task Assignments
You can restrict the users to which a task can be reassigned or routed by using a callback class.
The user community seeded in a typical LDAP directory can represent the whole company or division. However, it may be necessary at times to limit the potential list of users to associate with a task based on the scope or importance of the task or associated data. For example, in a large company with thousands of users, only a few people have the ability to approve and create purchase orders. Specifically for such tasks, the users that can be chosen for ad hoc routing and reassignment should not be the whole company. Instead, only a few users who are relevant or have the right privilege should be chosen. This can be achieved by the restricted assignment functionality. This is implemented as a callback class that can implement the logic to choose the right set of users dynamically based on the task object that is passed containing the instance data.
To specify restrictions on task assignments:
-
In the Access section, click Configure Restricted Assignments.
The Configure Restricted Assignment dialog appears.
-
Enter the class name. The class must implement the
oracle.bpel.services.workflow.task.IRestrictedAssignmentCallbackinterface. -
Click the Add icon to add name and value pairs for the property map passed to invoke the callback.
-
Click OK.
28.3.14 How to Specify Java or Business Event Callbacks
You can specify Java or business event callbacks.
28.3.14.1 Specifying Callback Classes on Task Status
You can register callbacks for the workflow service to call when a particular stage is reached during the lifecycle of a task. Two types of callbacks are supported:
-
Java callbacks: The callback class must implement the interface
oracle.bpel.services.workflow.task.IRoutingSlipCallback. Make the callback class available in the class path of the server. -
Business event callbacks: You can have business events raised when the state of a human task changes. You do not need to develop and register a Java class. The caller implements the callback using an Oracle Mediator service component to subscribe to the applicable business event to be informed of the current state of an approval transaction.
To specify callback classes on task status:
-
Click the Events tab.
The following callbacks are available for selection:
-
OnAssigned
Select if the callback class must be called on any assignment change, including standard routing, reassignment, delegation, escalation, and so on. If a callback is required when a task has an outcome update (that is, one of the approvers in a chain approves or rejects the task), this option must be selected.
-
OnUpdated
Select if the callback class must be called on any update (including payload, comments, attachments, priority, and so on).
-
OnCompleted
Select if the callback class must finally be called when the task is completed and control is about to be passed to the initiator (such as the BPEL process initiating the task).
-
OnStageCompleted
Select if the callback class must be called to enable business event callbacks in a human workflow task. When the event is raised, it contains the name of the completed stage, the outcome for the completed stage, and a snapshot of the task when the callback is invoked.
-
OnSubtaskUpdated
Select if the callback class must be called on any update (including payload, comments, attachments, priority, and so on) on a subtask (one of the tasks in a parallel-and-parallel scenario).
-
-
See the following section based on the type of callback to perform.
28.3.14.1.1 Specifying Java Callbacks
-
In the State column of the Events section, select a task state.
-
In the Java Class column, click the empty field to enter a value. This value is the complete class name of the Java class that implements
oracle.bpel.services.workflow.task.IRoutingSlipCallback. Figure 28-67 provides details.Figure 28-67 CallBack Details Dialog with Java Selected
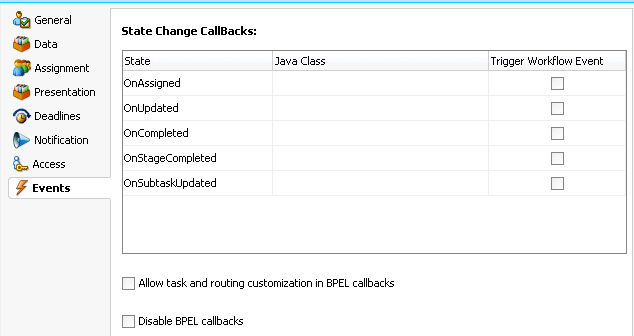
Description of "Figure 28-67 CallBack Details Dialog with Java Selected"
-
Click OK.
28.3.14.1.2 Specifying Business Event Callbacks
To specify business event callbacks:
-
In the State column of the Events section, select a task state.
-
Leave the Java Class field empty.
-
Select the Trigger Workflow Event checkbox. This action disables the Java Class column, as shown in Figure 28-68. Each callback, such as OnAssigned, corresponds to a business event point. When a business event is fired, the event details contain the task object and a set of properties that are populated based on the context of the event being fired.
Figure 28-68 CallBack Details Dialog with Business Events Selected
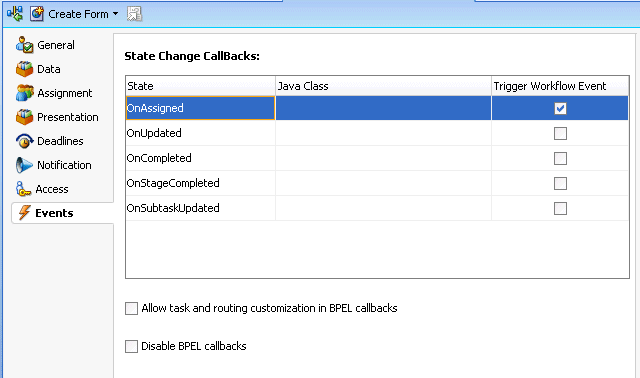
Description of "Figure 28-68 CallBack Details Dialog with Business Events Selected"
A preseeded, static event definition language (EDL) file (
JDev_Home\jdeveloper\integration\seed\soa\shared\workflow\HumanTaskEvent.edl) provides the list of available business events to which to subscribe. These business events correspond to the callbacks you select in the Callback Details dialog. You must now create an Oracle Mediator service component in which you reference the EDL file and subscribe to the appropriate business event.Note:
A file-based MDS connection is required so that the EDL file can be located. The location for the file-based MDS isJDev_Home\jdeveloper\integration\seed. -
Create an Oracle Mediator service component in the same or a different SOA composite application that can subscribe to the event.
-
In the Template list during Oracle Mediator creation, select Subscribe to Events.
-
Click the Add icon to subscribe to a new event.
-
To the right of the Event Definition field, click the Browse icon to select the EDL file.
The SOA Resource Browser dialog appears.
-
Select the previously created file-based MDS connection.
-
From the list at the top, select Resource Palette.
-
Select SOA > Shared > Workflow > HumanTaskEvent.edl.
-
Click OK.
The Event Chooser is now populated with EDL file business events available for selection.
-
In the Event field, select the event to which to subscribe. Figure 28-69 provides details.
You can have multiple human tasks available for subscribing to the event. For example, assume you performed the following:
-
Configured a human task named TaskA to subscribe to the event (for example, OnAssigned)
-
Configured a human task named TaskB to subscribe to the same event
To distinguish between events for TaskA and TaskB and ensure that an event is processed only by the intended Oracle Mediator, you can add a static routing filter:
xpath20:compare(med:getComponentName(), 'TaskA')
This only invokes this routing when the sending component is TaskA.
-
-
If the EDL file was not selected from the file-based MDS connection, accept to import the dependent XSD files when prompted, and click OK. If the EDL file was selected from the file-based MDS connection, you are not prompted.
The Oracle Mediator service component is now populated with the business event to which to subscribe. You can also subscribe to other business events defined in the same EDL file now or at a later time.
See the following documentation for additional details about business events and callbacks:
-
Chapter 39, "Using Business Events and the Event Delivery Network" for specific details about business events
-
Sample workflow-116-WorkflowEventCallback, which is available from the Oracle Technology Network:
https://soasamples.samplecode.oracle.com
28.3.15 How to Specify Task and Routing Customizations in BPEL Callbacks
In general, the BPEL process calls into the workflow component to assign tasks to users. When the workflow is complete, the human workflow service calls back into the BPEL process. However, if you want fine-grained callbacks (for example, onTaskUpdate or onTaskEscalated) to be sent to the BPEL process, you can use the Allow task and routing customization in BPEL callbacks option.
Make sure to manually refresh the BPEL diagram for this callback setting.
To specify task and routing customizations in BPEL callbacks:
-
In the Events section, select the Allow task and routing customization in BPEL callbacks checkbox.
-
Return to Oracle BPEL Designer.
-
Open the task activity dialog.
-
Click OK.
This creates the while, pick, and onMessage branch of a pick activity for BPEL callback customizations inside the task scope activity.
For more information about specifying task and routing customizations, see Section 28.4.5.1, "Invoking BPEL Callbacks."
28.3.16 Disabling BPEL Callbacks
A user talk activity (in Oracle BPEL Designer) has an invoke activity followed by a receive or pick activity. Deselecting the Disable BPEL callbacks checkbox enables you to invoke the task service without waiting for a reply.
-
In the Events section, deselect the Disable BPEL callbacks checkbox.
-
Click OK.
28.3.17 How to Exit the Human Task Editor and Save Your Changes
You can save your human task changes at any time. The task can be re-edited at a later time by double-clicking the metadata task configuration .task file in the Application Navigator.
To exit the Human Task Editor and save your changes:
-
From the File main menu, select Save or click the X sign shown in Figure 28-70 to close the
.taskmetadata task configuration file. -
If you click the X sign, select Yes when prompted to save your changes.
28.4 Associating the Human Task Service Component with a BPEL Process
To associate the human task service component created in the SOA Composite Editor with a BPEL process, follow these instructions. When association is complete, a task service partner link is created in Oracle BPEL Designer. The task service exposes the operations required to act on a task.
For more information about creating a human task, see Section 28.3, "Creating the Human Task Definition with the Human Task Editor."
28.4.1 How to Associate a Human Task with a BPEL Process
There are two ways to associate a human task service component with a BPEL process:
-
If you have created a human task service component in the SOA composite application, drag a human task activity into the BPEL process in Oracle BPEL Designer. Then, select the existing human task service component from the Task Definition list of the Create Human Task dialog. You can then specify the task title, initiator, parameter values, and other values.
-
If you have not created a human task service component, drag the human task activity into the BPEL process in Oracle BPEL Designer Then, click the Add icon to the right of the Task Definition list in the Create Human Task dialog. This action enables you to specify the name of the new human task service component, the parameters, and the outcomes. The Human Task Editor then opens for you to design the remaining task metadata. After design completion, close the Human Task Editor.
To associate a human task with a BPEL process:
-
Go to the SOA Composite Editor.
-
Double-click the BPEL process service component with which to associate the
.taskfile of the human task service component. -
In the Component Palette, expand SOA Components.
-
Drag a new Human Task activity into the BPEL process.
-
Double-click the Human Task activity.
The Human Task dialog appears.
-
From the Task Definition list of the General tab, select the human task, as shown in Figure 28-71.
Figure 28-71 Task Definition List Selection
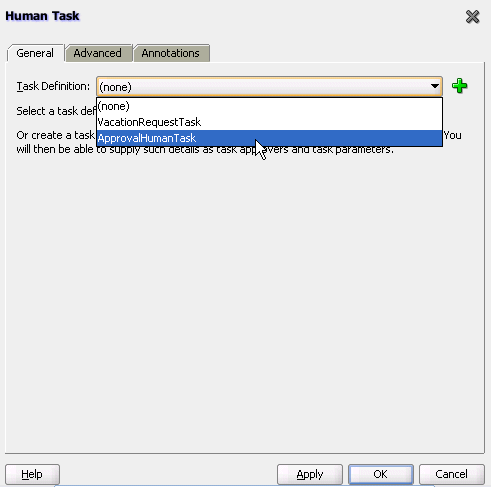
Description of "Figure 28-71 Task Definition List Selection"
The
.taskfile of the human task service component is associated with the BPEL process.Note:
After you complete association of your human task activity with a BPEL process and close the Create Human Task dialog, you can always re-access this dialog by double-clicking the human task activity in Oracle BPEL Designer.
28.4.2 What You May Need to Know About Deleting a Wire Between a Human Task Service Component and a BPEL Process
If you delete the wire between a BPEL process and the human task service component that it invokes, the invoke activity of the human workflow is deleted from the BPEL process. However, the taskSwitch switch activity for taking action (contains the approve, reject, and otherwise task outcomes) is still there. This is by design for the following reasons:
-
The switch activity contains user-entered BPEL code.
-
The switch can be reused if the intention for deleting the wire is only to point to another human task.
-
Deleting the switch is a single-step action.
If you then drag and drop a human task service component into the BPEL process to use the same taskSwitch switch activity, a new taskSwitch switch activity is created. You then have two switch activities in the BPEL process with the same name. To determine which one to delete, you must go into the approve, reject, and otherwise task outcomes of the taskSwitch switch activities to determine which is the older, modified switch and which is the newer switch.
28.4.3 How to Define the Human Task Activity Title, Initiator, Priority, and Parameter Variables
Figure 28-72 shows the General tab that displays after you select the human task.
Figure 28-72 Human Task — General Tab (After Selection)
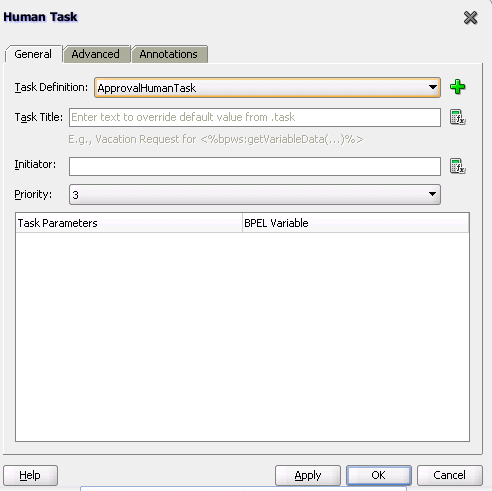
Description of "Figure 28-72 Human Task — General Tab (After Selection)"
The General tab of the Human Task activity enables you to perform the tasks shown in Table 28-18:
Table 28-18 Human Task - General Tab
| For this Field... | See... |
|---|---|
|
Task Title |
|
|
Initiator Priority |
Section 28.4.3.2, "Specifying the Task Initiator and Task Priority" |
|
Task Parameters |
28.4.3.1 Specifying the Task Title
The title displays the task in Oracle BPM Worklist during runtime. This is a mandatory field. Your entry in this field overrides the task title you entered in the Task Title field of the General section of the Human Task Editor described in Section 28.3.4.1, "Specifying a Task Title."
-
In the Task Title field of the General tab, enter the task title through one of the following methods:
-
Enter the title manually.
-
Click the icon to the right of the field to display the Expression Builder dialog to dynamically create the title.
You can also combine static text and dynamic expressions in the same title. To include dynamic text, place your cursor at the appropriate point in the text and click the icon on the right to invoke the Expression Builder dialog.
-
28.4.3.2 Specifying the Task Initiator and Task Priority
You can specify a task initiator. The initiator is the user who initiates a task. The initiator can view their created tasks from Oracle BPM Worklist and perform specific tasks, such as withdrawing or suspending a task.
To specify the task initiator and task priority:
-
To the right of the Initiator field of the General tab, enter the initiator (for example,
jcooper) or click the icon to display the Expression Builder dialog for dynamically specifying an initiator. This field is optional. If not specified, the initiator defaults to the task owner specified on the Advanced tab of the Human Task dialog. The initiator defaults tobpeladminif a task owner is also not specified. -
From the Priority list, select a priority value between 1 (the highest) and 5. This field is provided for user reference and does not make this task a higher priority during runtime. Use the priority to sort tasks in Oracle BPM Worklist. This priority value overrides the priority value you select in the Priority list of the General section of the Human Task Editor.
For more information about specifying the priority in the Human Task Editor, see Section 28.3.4.1, "Specifying a Task Title."
28.4.3.3 Specifying Task Parameters
The task parameter table shown in Figure 28-73 displays a list of task parameters after you complete the Task Title and Initiator fields.
-
In the BPEL Variable column, double-click the dots to map the task parameter to the BPEL variable. You must map only the task parameters that carry input data. For output data that is filled in from Oracle BPM Worklist, you do not need to map the corresponding variables.
The Task Parameters dialog appears.
-
Expand the Variables tree shown in Figure 28-74 and select the appropriate task variable.
-
Click OK.
The Human Task dialog shown in Figure 28-75 appears as follows.
-
To define advanced features for the human task activity, click the Advanced tab and go to Section 28.4.4, "How to Define the Human Task Activity Advanced Features." Otherwise, click OK to close the Human Task dialog.
28.4.4 How to Define the Human Task Activity Advanced Features
Figure 28-76 shows the Advanced tab.
Figure 28-76 Create Human Task — Advanced Tab
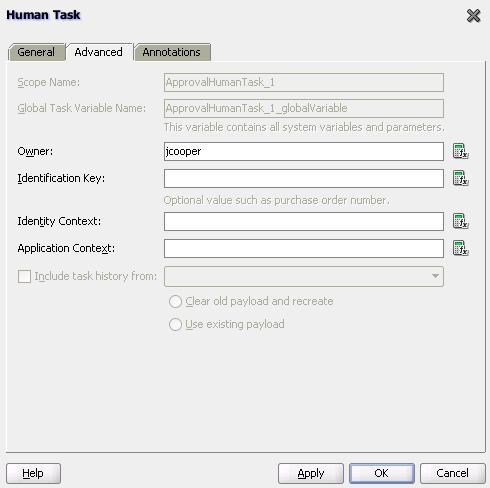
Description of "Figure 28-76 Create Human Task — Advanced Tab"
The Advanced tab of the Human Task activity enables you to perform the tasks shown in Table 28-19:
Table 28-19 Human Task - Advanced Tab
| For this Field... | See... |
|---|---|
|
Scope Name Global Task Variable Name |
Section 28.4.4.1, "Specifying a Scope Name and a Global Task Variable Name" |
|
Owner |
|
|
Identification Key |
|
|
Identity Context |
|
|
Application Context |
|
|
Include task history from |
Section 28.4.4.6, "Including the Task History of Other Human Tasks" |
28.4.4.1 Specifying a Scope Name and a Global Task Variable Name
You are automatically provided with default scope and global task variable names during human task activity creation. However, you can specify custom names that are used to name the scope and global variable during human task activity creation.
To specify a scope name and a global task variable name:
-
In the Scope Name field of the Advanced tab, enter the name for the BPEL scope to be generated.
This BPEL scope encapsulates the entire interaction with the workflow service and BPEL variable manipulation.
-
In the Global Task Variable Name field of the Advanced tab, enter the global task variable name.
This is the name of the BPEL task variable used for the workflow interaction.
28.4.4.2 Specifying a Task Owner
The task owner can view tasks belonging to business processes they own and perform operations on behalf of any of the task assignees. Additionally, the owner can also reassign, withdraw, or escalate tasks.
If you do not specify a task initiator on the General tab of the Human Task dialog, it defaults to the owner specified here.
-
In the Owner field of the Advanced tab, enter the task owner name or click the icon to the right to use the Expression Builder to dynamically specify the owner of this task.
28.4.4.3 Specifying an Identification Key
The identification key can be used as a user-defined ID for the task. For example, if the task is meant for approving a purchase order, the purchase order ID can be set as the identification key of the task. Tasks can be searched from Oracle BPM Worklist using the identification key. This attribute has no default value.
To specify an identification key:
-
In the Identification Key field of the Advanced tab, enter an optional identification key value.
28.4.4.4 Specifying an Identity Context
The identity realm name is used for the task when multiple realms are configured. You cannot have assignees from multiple realms working on the same task. This field is required if you are using multiple realms.
To specify an identity context
-
In the Identity Context field of the Advanced tab, enter a value.
28.4.4.5 Specifying an Application Context
The stripe name of the application contains the application roles used in the task.
To specify an application context
-
In the Application Context field of the Advanced tab, enter a value.
28.4.4.6 Including the Task History of Other Human Tasks
This feature enables one human task to be continued with another human task. There are many scenarios in which you have related tasks in a single BPEL process. For example, assume you have the following:
-
A procurement process to obtain a manager's approval for a computer
-
Several BPEL activities in between
-
Another task for the IT department to buy the computer
The participant of the second task may want to see the approval history, comments, and attachments created when the manager approved the purchase. You can link these different tasks in the BPEL process by chaining the second task to the first task with this option.
For chained tasks, the title of the new task cannot be set from the task metadata (.task file). For example, assume existing Task A is chained with new task Task B, and Task B has a new title set in the Human Task Editor; this title is not recognized. Therefore, if the chained task requires a different title, it must be set in the task instance before calling the task service reinitiate operation. If a BPEL process is initiating the tasks, set the task title before the workflow service APIs are called. If a Java program is calling the workflow APIs programatically, then it must set the title.
To include the task history of other tasks:
-
Select the Include task history from checkbox of the Advanced tab to extend a previous workflow task in the BPEL process. Selecting this checkbox includes the task history, comments, and attachments from the previous task. This provides you with a complete end-to-end audit trail.
When a human task is continued with another human task, the following information is carried over to the new workflow:
-
Task payload and the changes made to the payload in the previous workflow
-
Task history
-
Comments added to the task in the previous workflow
-
Attachments added to the task in the previous workflow
-
Due date
In the Include task history from list, all existing workflows are listed.
-
-
Select a particular human task to extend (continue) the selected human task.
For example, a hiring process is used to hire new employees. Each interviewer votes to hire or not hire a candidate. If 75% of the votes are to hire, then the candidate is hired; otherwise, the candidate is rejected. If the candidate is to be hired, an entry in the HR database is created and the human resources contact completes the hiring process. The HR contact also must see the interviewers and the comments they made about the candidate. This process can be modeled using a parallel participant type for the hiring. If the candidate is hired, a database adapter is used to create the entry in the HR database. After this action, a simple workflow can include the task history from the parallel participant type so that the hiring request, history, and interviewer comments are carried over. This simple workflow is assigned to the HR contact.
-
Select a payload to use:
-
Clear old payload and recreate
This option is applicable when the payload attributes in the XML files of the human tasks involved in this extended workflow are different. For example, the payload attribute for the human task whose history you are including has three extra attributes than the payload of the other human task.
-
Use existing payload
This option is applicable when the payload attributes in the XML files of the human tasks involved in this extended workflow are the same.
-
28.4.5 How to View the Generated Human Task Activity
When you have completed modeling the human task activity, the human task is generated in the designer.
Figure 28-77 shows how a workflow interaction is modeled. Figure 28-77 also illustrates the interaction when no BPEL callbacks are modeled. In this case, after a task is complete, the BPEL process is called back with the completed task. No intermediary events are propagated to the BPEL process instance. It is recommended that any user customizations be done in the first assign, AssignTaskAttributes, and that AssignSystemTaskAttributes not be changed.
Figure 28-77 Workflow Interaction Modeling
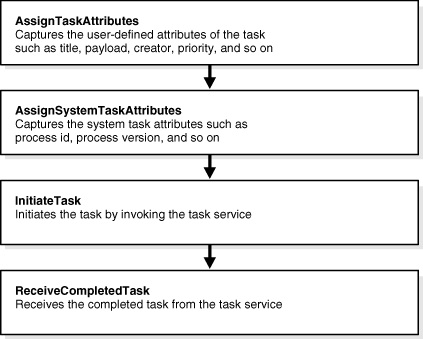
Description of "Figure 28-77 Workflow Interaction Modeling"
Click the Expand icon next to the human task activity in Oracle BPEL Designer to display its contents, as shown in Figure 28-78.
Figure 28-78 Expanding the Human Task Activity

Description of "Figure 28-78 Expanding the Human Task Activity"
28.4.5.1 Invoking BPEL Callbacks
If intermediary events must be propagated to the BPEL process instance, select the Allow task and routing customization in BPEL callbacks checkbox in the Events section of the Human Task Editor. When this option is selected, the workflow service invokes callbacks in the BPEL instance during each update of the task. The callbacks are listed in the TaskService.wsdl file and described as follows:
-
onTaskCompletedThis callback is invoked when the task is completed, expired, withdrawn, or errored.
-
onTaskAssignedThis callback is invoked when the task is assigned to a new set of assignees due to the following actions:
-
Outcome update
-
Skip current assignment
-
Override routing slip
-
-
onTaskUpdatedThis callback is invoked for any other update to the task that does not fall in the
onTaskCompleteoronTaskAssignedcallback. This includes updates on tasks due to a request for information, a submittal of information, an escalation, a reassign, and so on. -
onSubTaskUpdatedThis callback is invoked for any update to a subtask.
Figure 28-79 shows how a workflow interaction with callbacks is modeled. After this task is initiated, a while loop is used to receive messages until the task is complete. The while loop contains a pick with four onMessage branches — one for each of the above-mentioned callback operations. The workflow interaction works fine even if nothing is changed in the onMessage branches, meaning that customizations in the onMessage branches are not required.
In this scenario, a workflow context is captured in the BPEL instance. This context can be used for all interaction with the workflow services. For example, to reassign a task if it is assigned to a group, then you need the workflow context for the reassignTask operation on the task service.
It is recommended that any user customizations be performed in the first assign, AssignTaskAttributes, and that AssignSystemTaskAttributes not be changed.
Figure 28-79 Workflow Interaction Modeling (with Callbacks)
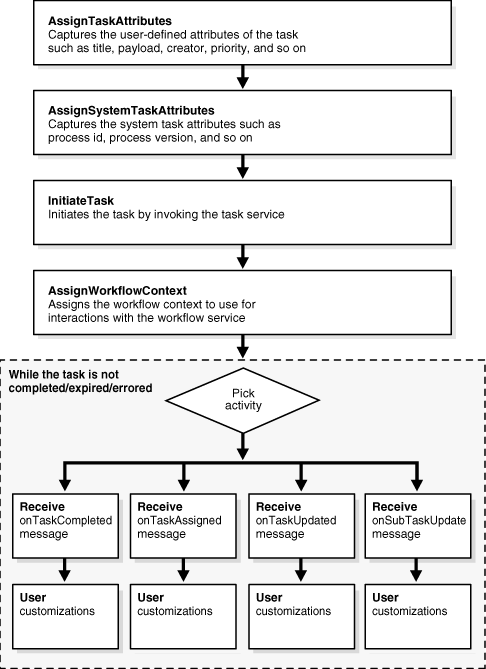
Description of "Figure 28-79 Workflow Interaction Modeling (with Callbacks)"
28.4.6 What You May Need to Know About Changing the Generated Human Task Activity
If you must change a generated human task activity, note the following details:
-
Do not modify the assign tasks that are automatically created in a switch activity when you add a human task to a BPEL process flow. Instead, add a new assign activity outside the switch activity.
-
If the parameter passed into a human task is modified (for example, you change the parameter type in the Edit Task Parameter dialog), you must open the human task activity in the BPEL process flow and click OK to correct the references to the payload variable. Not doing so causes the parameter name to change and become uneditable.
If the task outcomes in the Human Task Editor are modified, you must edit the human task activity and click OK. The switch case is then updated based on the changes to the outcomes.
-
If you make any changes to the translatable strings of the title or category of a task in the resource bundle, those changes do not appear in any instances of that task that are already initiated. However, they do appear in instances of that task that are initiated after you make the changes.
28.4.7 What You May Need to Know About Deleting a Partner Link Generated by a Human Task
Deleting a partner link that was generated by a human task (for example, human_task_name.TaskService in the Partner Links swimlane) causes the human task to become unusable. If you delete the partner link, you must delete the human task activity in Oracle BPEL Designer and start over again.
28.4.8 How to Define Outcome-Based Modeling
In many cases, the outcome of a task determines the flow of the business process. To facilitate modeling of the business logic, when a user task is generated, a BPEL switch activity is also generated with prebuilt BPEL case activities. By default, one case branch is created for each outcome selected during creation of the task. An otherwise branch is also generated in the switch to represent cases in which the task is withdrawn, expired, or in error.
28.4.8.1 Specifying Payload Updates
The task carries a payload in it. If the payload is set from a business process variable, then an assign activity with the name copyPayloadFromTask is created in each of the case and otherwise branches to copy the payload from the task back to its source. If the payload is expressed as other XPath expressions (such as ora:getNodes(...)), then this assign is not created because of the lack of a process variable to copy the payload back. If the payload does not require modification, then this assign can be removed.
28.4.8.2 Using Case Statements for Other Task Conclusions
By default, the switch activity contains case statements for the outcomes only. The other task conclusions are captured in the otherwise branch. These conclusions are as follows:
-
The task is withdrawn.
-
The task is in error.
-
The task is expired.
If business logic must be added for each of these other conclusions, then case statements can be added for each of the preceding conditions. The case statements can be created as shown in the following BPEL segment. The XPath conditions for the other conclusions in the case activities for each of the preceding cases are shown in bold in Example 28-2.
Example 28-2 XPath Conditions for Other Conclusions in the Case Activities
<switch name="taskSwitch">
  <case condition="bpws:getVariableData('SequentialWorkflowVar1',
'/task:task/task:state') = 'COMPLETED' and
bpws:getVariableData('SequentialWorkflowVar1', '/task:task/task:conclusion') = 'ACCEPT'">
    <bpelx:annotation>
      <bpelx:pattern>Task outcome is ACCEPT
      </bpelx:pattern>
    </bpelx:annotation>
      ...
  </case>
  <case condition=
"bpws:getVariableData('SequentialWorkflowVar1', '/task:task/task:state') =
 'WITHDRAWN'">
    <bpelx:annotation>
      <bpelx:pattern>Task is withdrawn
      </bpelx:pattern>
    </bpelx:annotation>
     ...
  </case>
  <case condition=
"bpws:getVariableData('SequentialWorkflowVar1', '/task:task/task:state') =
 'EXPIRED'">
    <bpelx:annotation>
      <bpelx:pattern>Task is expired
      </bpelx:pattern>
    </bpelx:annotation>
     ...
  </case>
  <case condition=
"bpws:getVariableData('SequentialWorkflowVar1', '/task:task/task:state') =
 'ERRORED'">
    <bpelx:annotation>
      <bpelx:pattern>Task is errored
      </bpelx:pattern>
    </bpelx:annotation>
     ...
  </case>
  <otherwise>
    <bpelx:annotation>
      <bpelx:pattern>Task is EXPIRED, WITHDRAWN or ERRORED
      </bpelx:pattern>
    </bpelx:annotation>
      ...
  </otherwise>
</switch>

