3 Creating JD Edwards EnterpriseOne Embedded BI Publisher Objects
This chapter contains the following topics:
-
Section 3.1, "Understanding the BI Publisher Object Repository"
-
Section 3.2, "Uploading, Updating, and Deleting JD Edwards BI Publisher Objects"
3.1 Understanding the BI Publisher Object Repository
The BI Publisher Object Repository (P95600) users to create, upload, update, copy, and delete BI Publisher objects. BI Publisher uses three types of objects:
-
Templates
-
Transformations
-
Translations and localizations
3.1.1 Templates
BI Publisher templates are used to format reports using the data that resides in the JD Edwards EnterpriseOne database. You can create templates using:
-
Microsoft Word (RTF format only)
-
Microsoft Excel (XLS or XSL)
-
Adobe Acrobat (PDF)
This table describes how to create templates.
| Template Type | Method |
|---|---|
| Microsoft Word | Design templates manually using Microsoft Word or Oracle's BI Publisher Template Builder to facilitate template development. |
| Microsoft Excel | Design templates manually using Microsoft Excel. |
| Adobe Acrobat | Design templates manually using the full version of Adobe Acrobat. |
Oracle's BI Publisher Template Builder is an extension to Microsoft Word that simplifies the development of RTF templates. It automates many of the manual steps that you would otherwise have to perform. Use the Template Builder in conjunction with the Oracle Business Intelligence Publisher User's Guide to increase your productivity.
Note:
The BI Publisher Template Builder for Word Add-in includes features to log in to and interact with Oracle Business Intelligence Publisher Enterprise. The following menu items work only with the Oracle BI Publisher Enterprise or Oracle BI Enterprise Edition implementations: Log In, Open, Upload, and Upload Template As. See the Template Builder help for more information.The Template Builder is tightly integrated with Microsoft Word and enables you to perform the following functions. Instructions and tutorials for using the Template Builder are available from the readme and help files delivered with the tool.
-
Insert data fields.
-
Insert data-driven tables.
-
Insert data-driven forms.
-
Insert data-driven charts.
-
Preview your templates with sample XML data.
-
Browse and update the content of form fields.
-
Extract boilerplate text into an XLIFF translation file and test translations.
Manual steps for performing these functions are covered in the Oracle Business Intelligence Publisher User's Guide. Instructions and tutorials for using the Template Builder are available from the readme and help files delivered with the tool.
See Oracle Business Intelligence Publisher User's Guide.
Excel templates must be created manually using Microsoft Excel. To create PDF templates, you must have the full version of Adobe Acrobat.
Note:
For more information about creating templates specifically for JD Edwards EnterpriseOne, see "Creating XML Publisher Templates for JD Edwards EnterpriseOne" available on My Oracle Support.3.1.2 Transformations
BI Publisher transformations are eXtensible Stylesheet Language (XSL) templates that are used to map data and transform an XML file into another XML file with a different format. This is beneficial when, for example, you use a template that was created using different field names and you need to map those field names to JD Edwards EnterpriseOne-specific field names.
3.1.3 Translations and Localizations
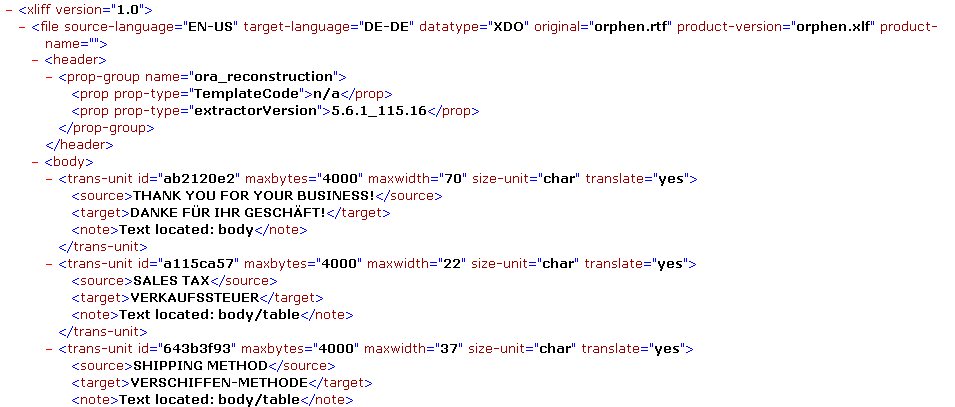
BI Publisher for JD Edwards EnterpriseOne introduces the concepts of localization and translation. Translations are XML files that are created to translate static text of the template into other languages. You can think of translations as a list of words on a template that are translated from one language, typically English, to another language at runtime. Translations are available for RTF templates only.
This is an example of an XML file that translates the static text of an English RTF template to German.
Figure 3-1 German translation of English template

Description of "Figure 3-1 German translation of English template"
By contrast, a localization is a different version of an existing template that not only translates the static text from one language to another, but also includes or excludes specific data elements when compared to the base template. For example, a base template might have a data element that displays salary information. If displaying this information is illegal in a particular country, you can copy the base template and remove the salary data element.
3.2 Uploading, Updating, and Deleting JD Edwards BI Publisher Objects
This section provides overviews of uploading BI Publisher objects, updating BI Publisher objects, and deleting BI Publisher objects and discusses how to:
-
Upload BI Publisher objects.
-
Add translations and localizations.
-
Modify BI Publisher object properties.
-
Modify effective dates.
-
Modify BI Publisher objects.
-
Delete BI Publisher objects.
3.2.1 Understanding BI Publisher Objects
You must upload BI Publisher objects to JD Edwards EnterpriseOne before you can create report definitions for the desired output types. You use BI Publisher Object Repository (P95600) on either the web client or the Microsoft Windows client to upload templates, translations, localizations, and transformations into JD Edwards EnterpriseOne.
To upload BI Publisher objects, you must add a new BI Publisher object to JD Edwards EnterpriseOne. Name the object according to these recommended naming conventions:
-
Use all capital letters.
-
Do not begin the object name with a dash (–).
-
Use a maximum of 50 characters.
Enter a brief but meaningful description of the object. This description should include the purpose of the object.
Identify the BI Publisher object as a specific object type. The following object types are available:
-
eText.
-
PDF.
-
Rich text format (RTF).
-
Extensible stylesheet language (XSL).
-
Transformation.
-
Translation.
After creating a new object in JD Edwards EnterpriseOne, you can search for and select the BI Publisher object that you need to upload. BI Publisher objects are stored in the JD Edwards EnterpriseOne database in the F95600 table.
The file types that you can upload for each BI Publisher object type are shown in this table:
| BI Publisher Object | BI Publisher Object Type | File Type |
|---|---|---|
| Templates | TE | .rtf |
| - | TL | .xls |
| - | TP | |
| - | TR | .rtf |
| - | TS | .xsl |
| Translations | XL | .xml or .xlf |
| Transformations | XF | .xsl |
The recommended maximum default BI Publisher object size is 50MB. You can modify the BI Publisher object size on the Windows client by changing the object size in the INTERACTIVE RUNTIME section of the jde.ini using the following definition:
[INTERACTIVE RUNTIME]
MaxFileUploadSize = 50
Oracle recommends that you use the Windows client to upload BI Publisher objects. However, if the web client is used to upload objects, you can modify the BI Publisher object size in the OWWEB section of the jas.ini using the following definition:
[OWWEB]
MaxFileUploadSize = 50
Note:
You can increase or decrease the default maximum file upload size. The default maximum size is 50MB. If the BI Publisher object exceeds the maximum size definition, an error appears.3.2.1.1 Effective Dates
Effective dates indicate when an object is available for use. If an object will be used indefinitely, you do not need to specify an end date. You can upload additional templates with the same name and give them specific start and end dates as long as the effective dates do not overlap. The version without an end date becomes the default version when none of the other versions' effective dates correspond to the current date.
Effective dates enable a company to have multiple, slightly different versions of the same template. For example, to customize a newsletter with different logos for each month, you can design a master template and upload it to the BI Publisher Object Repository with a start date, but no end date. Then you can create twelve copies of the original template, add a monthly logo to each one, and upload them with the same name as the original template but with different start and end dates for each copy.
3.2.2 Updating BI Publisher Objects
You can update BI Publisher objects that have been uploaded to JD Edwards EnterpriseOne. First, download the BI Publisher object to your local machine. Then make the required modifications to the BI Publisher object. Upload the modified BI Publisher object to JD Edwards EnterpriseOne.
3.2.3 Deleting BI Publisher Objects
You can delete BI Publisher objects that have been uploaded to JD Edwards EnterpriseOne. From the BI Publisher Object Repository application, select the BI Publisher object. Click Delete.
When you select to delete an object, the system displays a Delete BI Publisher Object Warning form. Click OK to delete the object or click Cancel if you do not want to delete the object.
If the object is active when you attempt to delete it, the system displays a Delete Object Violation form. Click OK to close the form and return to the BI Publisher Object Repository. Select the object again and access Effective Dates from the row menu to remove the start and end dates. After removing the effective dates, select the object and click Delete to remove the reporting object.
When you delete a BI Publisher reporting object, the object record is deleted from the F95600 table. In addition, all associations to the deleted reporting object are also deleted. Associations reside in these tables:
-
BI Publisher UBE Associations (F95610)
-
BI Publisher Object Associations (F95611)
3.2.4 Prerequisite
Refer to the Getting Started chapter for a list of implementation steps that you need to perform.
See Chapter 1, "Introduction to BI Publisher for JD Edwards EnterpriseOne".
3.2.5 Forms Used to Upload, Update and Delete BI Publisher Objects
| Form Name | FormID | Navigation | Usage |
|---|---|---|---|
| BI Publisher Object Repository | W95600E | On the EnterpriseOne Menu, select EnterpriseOne Menus, EnterpriseOne Life Cycle Tools, Report Management, BI Publisher, BI Publisher Repository. | Select a BI Publisher object. |
| Add BI Publisher Object to Repository | W95600B | Click Add on the BI Publisher Object Repository form. | Create BI Publisher objects. |
| Update BI Publisher Object in Repository | W95600B | Select a record on the BI Publisher Object Repository form, and click Select. | Modify object description, product code, or product system code for existing BI Publisher objects. |
| Update BI Publisher Object Effective Dates | W95600B | When uploading objects, the form appears after you click Load on the File Upload form. To update effective dates, select a record on the BI Publisher Object Repository form, and select Effective Dates on the row menu. | Modify or delete effective dates for existing BI objects. |
3.2.6 Creating BI Publisher Objects
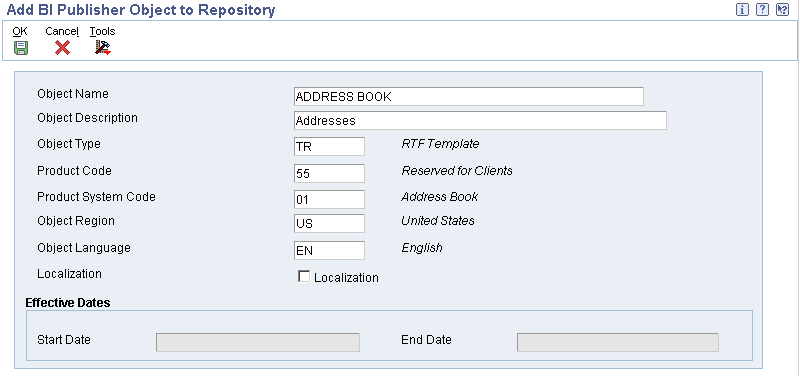
Access the Add BI Publisher Object to Repository form.
Figure 3-2 Add BI Publisher Object to Repository form

Description of "Figure 3-2 Add BI Publisher Object to Repository form"
- Object Name
-
Enter the name of the BI Publisher object.
- Object Description
-
Enter a meaningful description of the object.
- Object Type
-
Select a user-defined code (UDC) (H95|XP) that indicates the object type of the reporting object.
- Product Code
-
Select a product code from the 55–59 client reserved range.
- Product Code Reporting
-
Select a product code that indicates where the reporting data resides.
- Object Region
-
For templates, select a UDC (H95|XC) that indicates the region for which the template was created. For translations, select the region in which the report will be presented. This field is not required if the object type is a transformation.
- Object Language
-
For templates, select the language that is used in the template. For translations, select the language in which the report will be presented. This field is not required if the object type is a transformation.
- Localization
-
Select this option if the object is a localization of an existing template. The localization object must have the same name and document type as the template upon which it is based.
- Start Date
-
After clicking OK and uploading the object, add a start date to indicate when the object is available for use. If an object does not have a start date or if the start date is in the future, the object has an Inactive status.
- End Date
-
Do not enter an end date if the object is to be used indefinitely. Enter an end date only if the object is to be used for a specific period of time.
Note:
The Localization check box is available only when you are adding a localization object with the same name as an uploaded template. The Start Date, and End Date fields are not available until an object has been uploaded into the repository.3.2.7 Uploading BI Publisher Objects
Click OK on the Add BI Publisher Object to Repository form to access the File Upload form.
-
Click Browse to locate the appropriate BI Publisher object.
-
Validate the object type and file extension.
Note:
The system does not allow you to upload a file with an invalid extension. -
On the File Upload form, click Load to upload the BI Publisher object from your local directory to JD Edwards EnterpriseOne.
3.2.8 Adding Translations and Localizations
Access the BI Publisher Object Repository form.
-
Find and select the template to which you want to add a translation or localized template.
-
From the Row menu, select either Add Translation or Add Localization.
-
On either the Add BI Publisher Translation to Repository form or the Add BI Publisher Localized Template to Repository form, complete the following fields and click OK:
-
Description
-
Product Code
-
Product System Code
-
Object Region
-
Object Language
-
-
On the File Upload form, locate the translation or localized template and click Load to upload the file from your local directory to JD Edwards EnterpriseOne.
Note:
You must upload the correct file type or an error message will appear. Translations must be either .xml or .xlf files. Localizations must be .rtf files, the same as the templates on which they are based. -
Enter a start date for the template if you want to make the template active, and an end date if the template is to be used for only a specific period of time.
3.2.9 Modifying BI Publisher Object Properties
Access the Update BI Publisher Object in Repository form.
-
Modify object information and click OK.
-
On the Upload File form, click No in answer to the question "Would you like to upload the file again?"
-
Click Close.
3.2.10 Modifying Effective Dates
Access the Update BI Publisher Object Effective Dates form.
-
Add, modify, or delete the start date.
-
Add, modify, or delete the end date.
-
Click OK.
3.2.11 Modifying BI Publisher Objects
Access the BI Publisher Object Repository form.
-
Select a BI Publisher object.
-
From the Row menu, select Download.
-
On the Microsoft Windows client, the file downloads automatically.
-
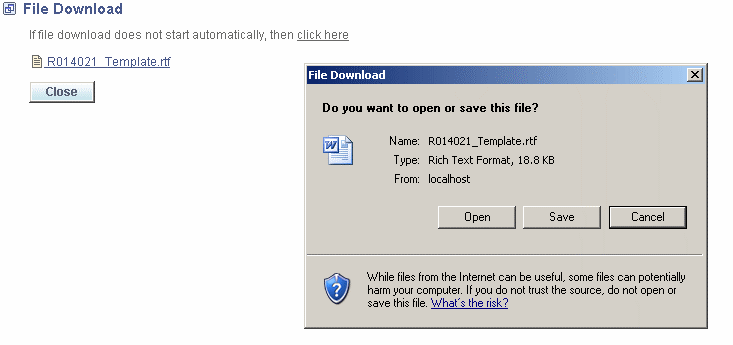
On the web client, select either Open or Save on the File Download form.
Figure 3-4 File Download form on the web client

Description of "Figure 3-4 File Download form on the web client"
Note:
On the web client, when you select Download from the Row menu of the BI Publisher Object Repository form, the BI Publisher object is cached on your machine. As long as the File Download form remains open, you can continue to open and save the object. When you close the File Download form, the cache is cleared.3.2.11.1 Revising BI Publisher Objects
After the file downloads, you can revise the BI Publisher object.
See Oracle Business Intelligence Publisher User's Guide.
-
Modify the BI Publisher object using the appropriate editor, and save the object to your local machine.
-
Close the editor.
-
On the BI Publisher Object Repository form, select the object that you just modified, and click Select.
-
On the Update BI Publisher Object in Repository form, modify the object information and click OK.
-
On the Upload File form, click Yes in response to the question, "Would you like to upload the file again?"
-
Click the BI Publisher object name to upload the modified version.
-
Click Close.
