2 Install the Database for Enterprise Manager
This chapter shows an example of a new installation of Enterprise Manager. For existing installations, refer to the Caution below. After you have reviewed the Caution, existing installations of Enterprise Manager can proceed to Chapter 5, "Import the JD Edwards Application Pack OPAR".
An Oracle database must be installed that is configured expressly for use by Enterprise Manager (see Caution below). For reference purposes, this chapter shows an example of installing the Oracle database for use by Enterprise Manager. However, Oracle strongly recommends that you use the OEM Oracle database installation software instructions under the direction of an Oracle DBA.
Caution:
Both new and existing installation of the Oracle database must perform the procedures in the section of this chapter entitled: Section 2.2, "Post Installation Required Database Configuration".This chapter contains the following topics:
2.1 Running the Oracle Database Installer
Note:
This procedure assumes you have obtained the software component for the Oracle database as described in the chapter of this guide entitled: Section 1.5, "Obtaining Oracle Software Components from the Oracle Software Delivery Cloud".On the machine where you have downloaded the Oracle 11g database installer:
-
Change directory to directory where you downloaded the installer. For example:
cd /u01/downloads/db11gr2/database -
Launch the installer using this command:
./runInstaller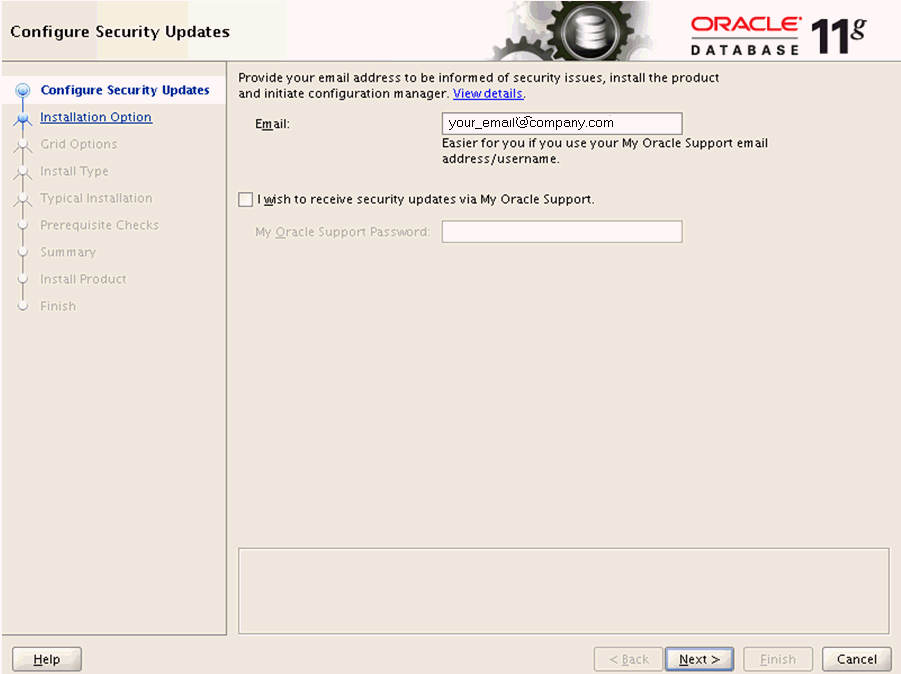
-
On Configure Security Updates, in order to be informed of security issues you must either provide an email address or choose to receive security updates via My Oracle Support. If you have an Oracle Support account, it will be easier if click the checkbox to choose to receive security updates via My Oracle Support.
-
Click the Next button.
-
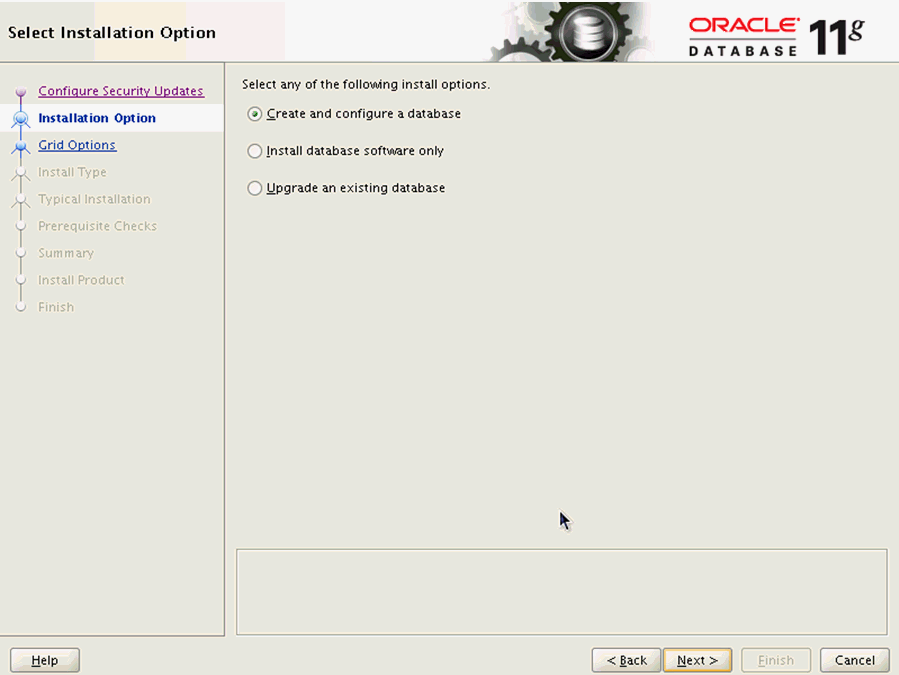
On Select Installation Option, click this radio button:
Create and configure a database
-
Click the Next button.

-
On System Class, click this radio button to install on a server class system.
Server Class
This option allows for more advanced configuration options.
-
Click the Next button.
-
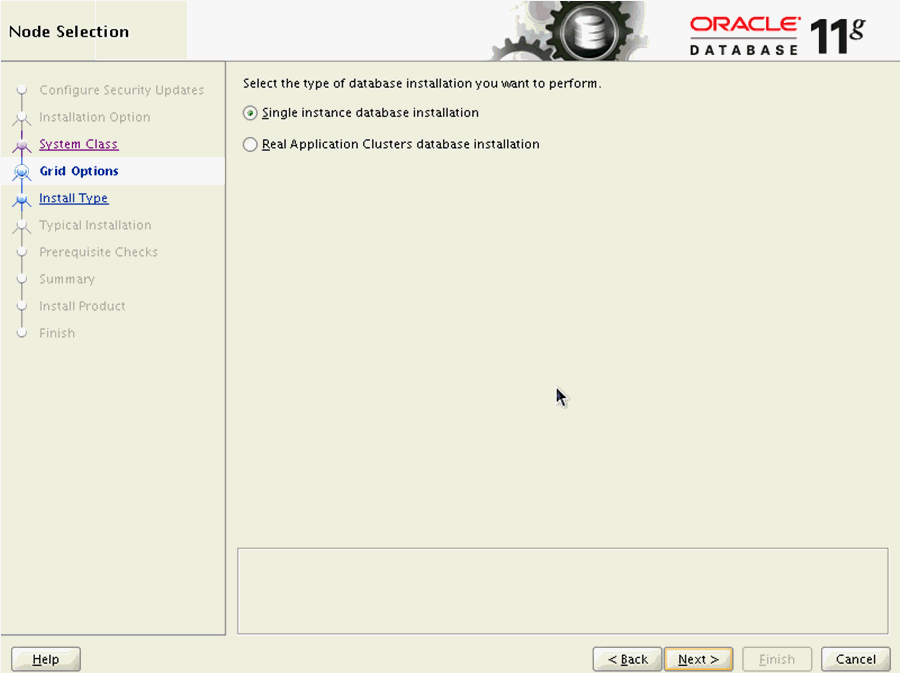
On Node Selection, choose this radio button:
Single instance database installation
-
Click the Next button.
-
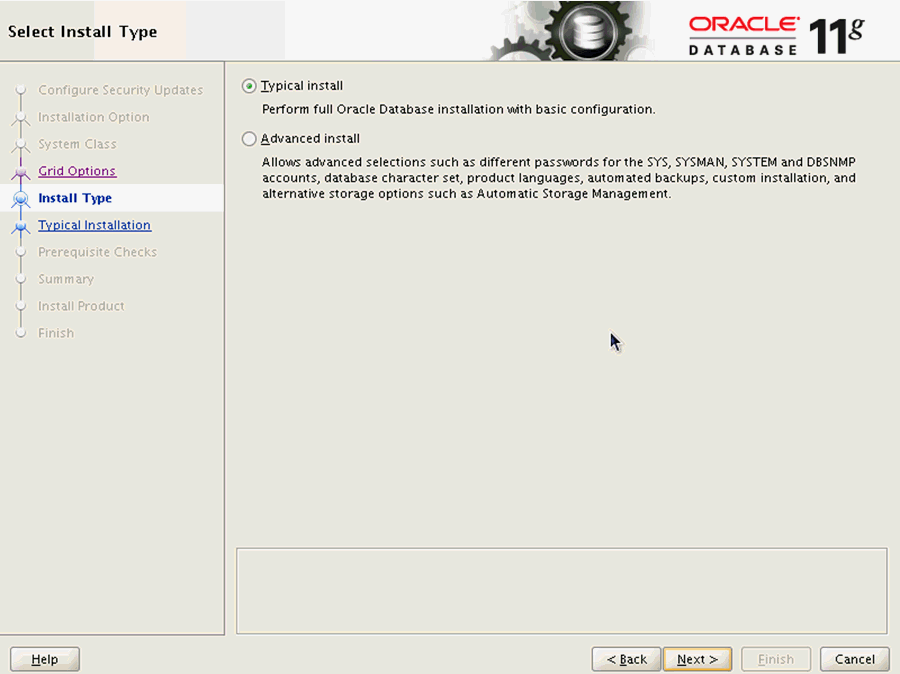
On Select Install Type, click this radio button:
Typical Install
-
Click the Next button.
-
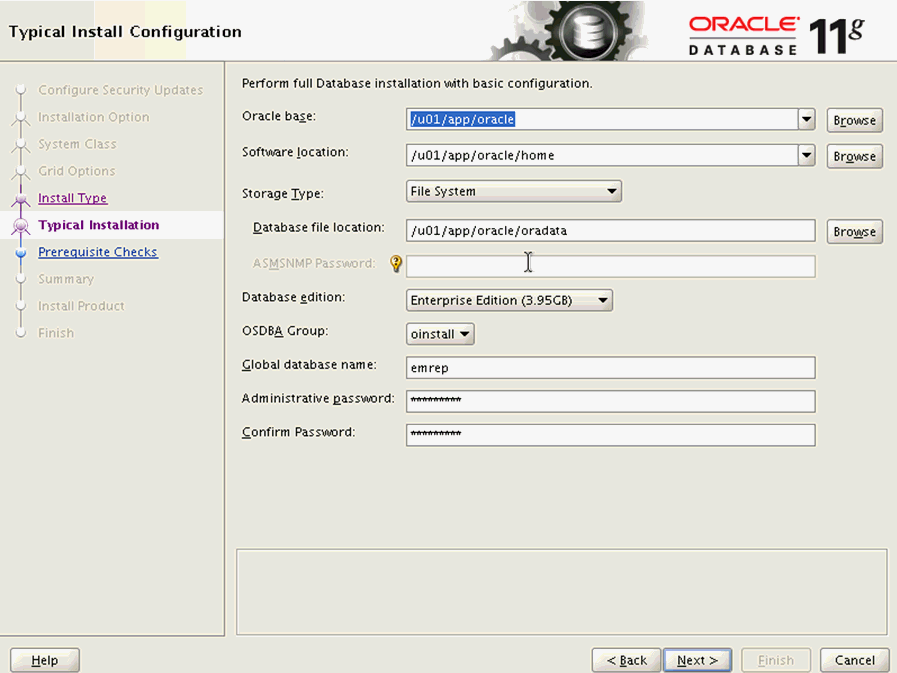
On Typical Install Configuration, complete these fields:
-
Oracle base
Enter your Oracle base location. For example:
/u01/app/oracle -
Software location
Enter or browse to the location of your Oracle base folder. This location must exist and be empty. For example:
/u01/app/oracle/oradata -
Global database name
Enter the global database name. For example:
emrep
-
Administrative Password
Enter the administrative password for the global database.
-
Confirm Password
Reenter the administrative password for the global database.
-
-
Click the Next button.
-
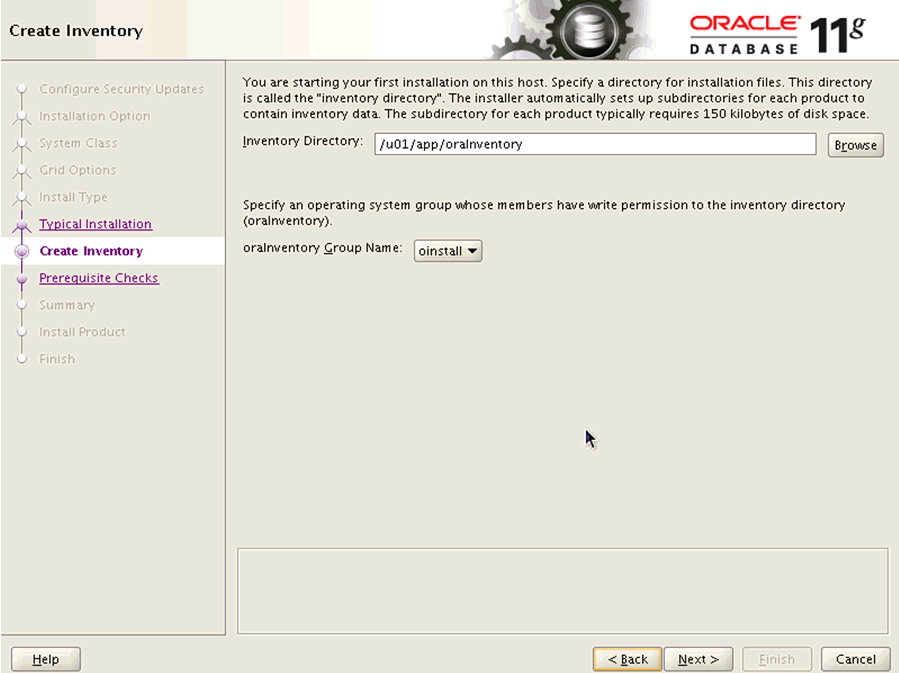
On Create Inventory, if this is your first installation on this host, you are prompted to enter an Inventory Directory. The installer automatically sets up subdirectories for each product to contain inventory data. The subdirectory for each product typically requires 150 KB of disk space. Optionally you can also choose between the available values in the oraInventory Group Name pulldown. For example, your inventory directory might be:
/u01/app/oraInventoryNote:
This directory must exist and be empty. -
Click the Next button.
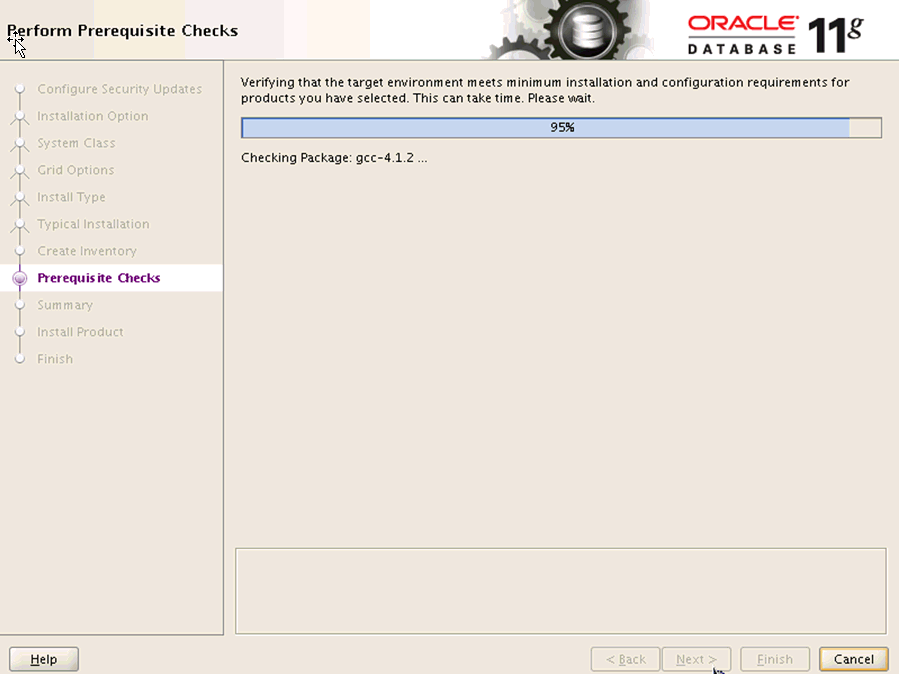
The installer begins the prerequisite check and displays the progress as it verifies that the target environment meets the minimum installation and configuration requirements for products you have selected.
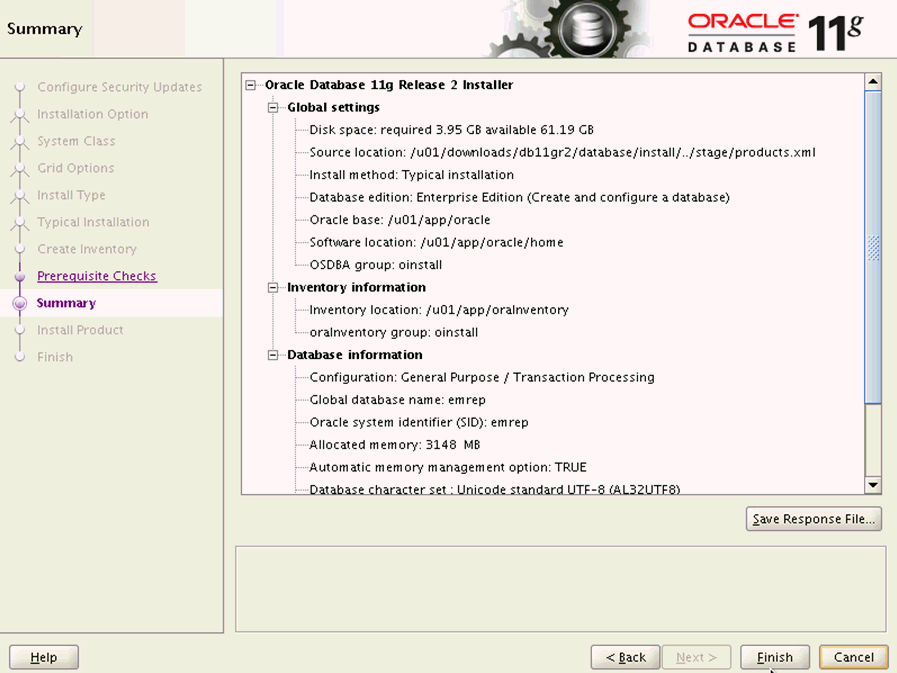
When the requisites check completes, the Summary screen is displayed.
-
On Summary, review the contents. Optionally you can click the Save Response File... button to save the contents of the Summary screen.
-
Click the Finish button to begin the actual installation.
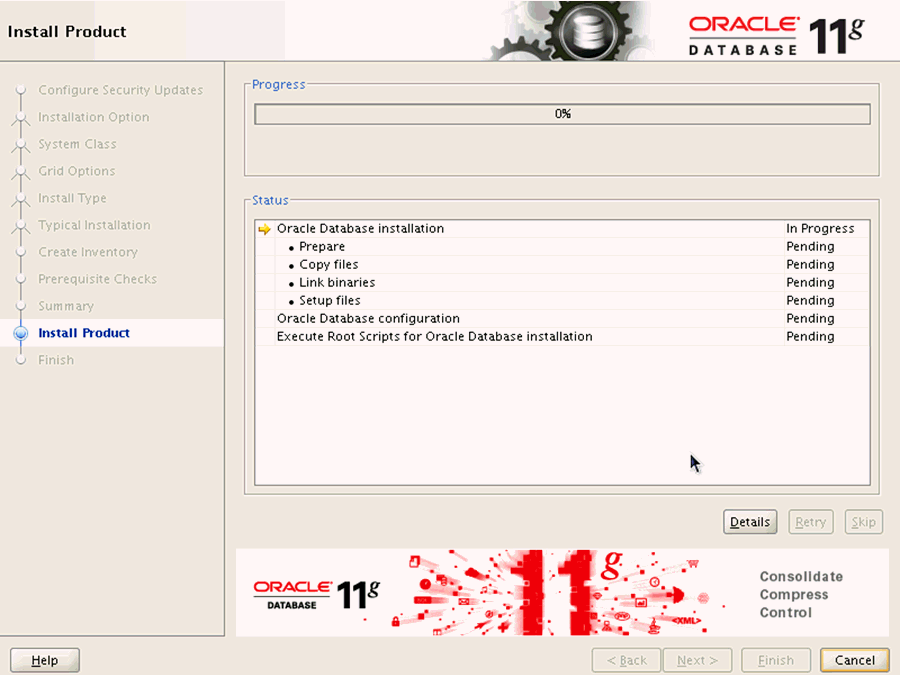
The installer displays a progress bar of In Progress and Pending tasks.
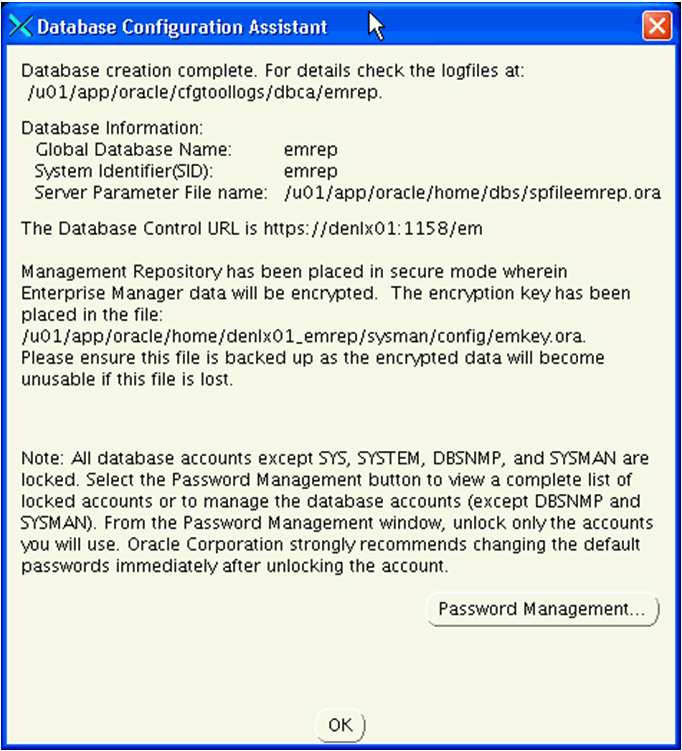
After the point in the installation when the database is successfully created, the installer displays an Xterm window for the Database Configuration Assistant.
Note:
All database accounts except SYS, SYSTEM, DBSNMP, and SYSMAN are locked. Optionally you can click the Password Management... button to view a complete list of locked accounts or manage the database accounts (except DBSNMP and SYSMAN). From the Password Management window, unlock only the accounts you will use. Oracle Corporation strongly recommends changing the default passwords immediately after unlocking the account. -
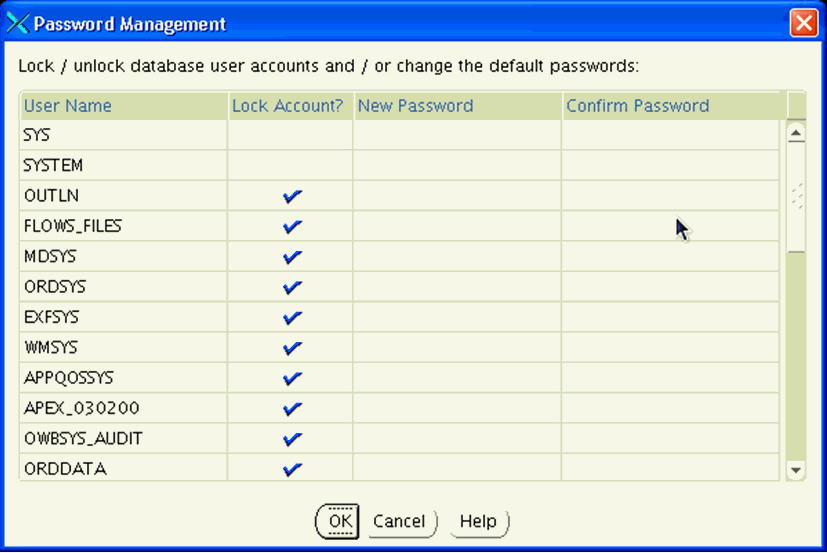
If you clicked the Password Management... button this Xterm window for Password Management is displayed:
-
On Password Management, you can Lock or unlock database user accounts and/or change the default passwords.
If you choose to change accounts settings or passwords, click the OK button. Otherwise, click Cancel to return to the Database Configuration Assistant Xterm window.
-
On Database Configuration Assistant, click the OK button to resume the remaining installer tasks.
-
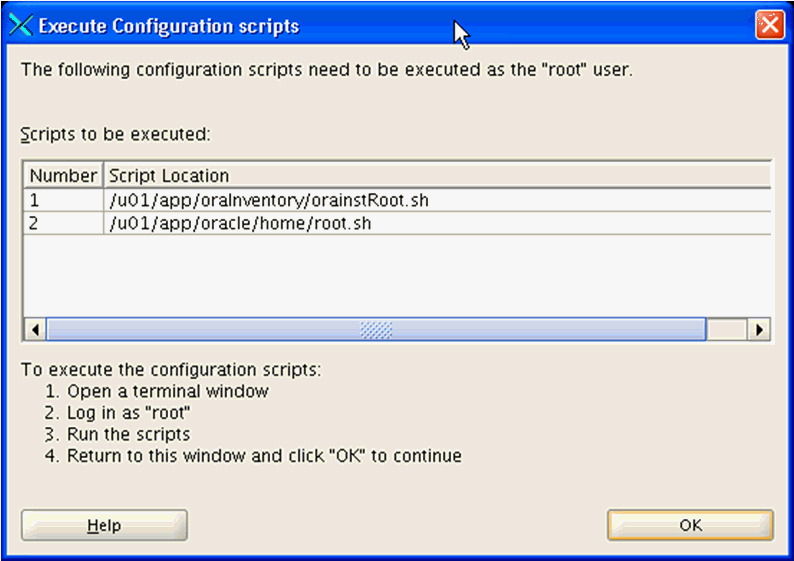
On the Xterm window for Execute Configuration scripts, you must execute the configuration scripts as the "root" user. To execute the configuration scripts:
-
Open a terminal window.
-
Log in as "root".
-
Run the scripts and verify that they ran successfuly.
-
Return to this window.
-
-
On Execute Configuration Scripts, after you have executed the scripts as described in the preceding step, click the OK button to continue.

-
On Finish, verify the installation of the Oracle Database was successful and click the Close button.
2.2 Post Installation Required Database Configuration
After you install a new Oracle database for exclusive use by EMCC 12c, the EMCC documentation recommends you configure your database using this procedure.
-
Drop the management repository using this line command:
emca -deconfig dbcontrol db -repos dropA sample of the resulting console session is shown below.
[oracle@denlx01 bin]$ ./emca -deconfig dbcontrol db -repos drop

STARTED EMCA at Aug 10, 2011 11:44:38 AM
EM Configuration Assistant, Version 11.2.0.0.2 Production
Copyright (c) 2003, 2005, Oracle.  All rights reserved.

Enter the following information:
Database SID: emrep
Listener port number: 1521
Password for SYS user:
Password for SYSMAN user:

Do you wish to continue? [yes(Y)/no(N)]: Y
Aug 10, 2011 11:44:55 AM oracle.sysman.emcp.EMConfig perform
INFO: This operation is being logged at /home/oracle/cfgtoollogs/emca/emrep/emca_2011_08_10_11_44_37.log.
Aug 10, 2011 11:44:55 AM oracle.sysman.emcp.util.DBControlUtil stopOMS
INFO: Stopping Database Control (this may take a while) ...
Aug 10, 2011 11:45:19 AM oracle.sysman.emcp.EMReposConfig invoke
INFO: Dropping the EM repository (this may take a while) ...
Aug 10, 2011 11:47:10 AM oracle.sysman.emcp.EMReposConfig invoke
INFO: Repository successfully dropped
Enterprise Manager configuration completed successfully
FINISHED EMCA at Aug 10, 2011 11:47:14 AM
You have new mail in /var/spool/mail/oracle
[oracle@denlx01 bin]$
-
Per requirements for EMCC, you must change the Oracle database init parameters.
Connected to the Oracle database as sysdba, use this command sequence:
alter system set session_cached_cursors=200 scope=spfile;
alter system set remote_login_passwordfile=SHARED scope=spfile;
alter system set aq_tm_processes=1 scope=spfile;
alter system set processes=500 scope=spfile;
alter system set log_buffer=10485760 scope=spfile;
shutdown immediate
startup