XML Application Integration
This section describes the XML Application Integration (XAI) utility, which enables you to configure your system to receive information from and to send information to external applications using Extensible Markup Language (XML) documents.
Contents
Designing Your XAI Environment
Setting Up Your XAI Environment
Maintaining Your XAI Environment
The XML Application Integration (XAI) module provides the tools and infrastructure that businesses require for integrating their applications with your product. The integration your product with other systems across organizational boundaries or business is made possible, regardless of the platforms or operating system used. XAI provides an integration platform that enables the following:
· Integrate with Customer Relationship Management (CRM) systems
· Provide information feeds for web based customer portals
· Fit seamlessly with web based applications
· Facilitate fast implementation of batch interfaces
· Integrate with other XML compliant enterprise applications
XAI exposes system business objects as a set of XML based web services. The service can be invoked via different methods, e.g., Hypertext Transfer Protocol (HTTP) or Java Message Service (JMS). Consequently, any application or tool that can send and receive XML documents can now access the rich set of system business objects. Business-to-Business (B2B) or Business-to-Consumer (B2C) integration with other enterprise applications as well as the setup of web portals is made very simple and straightforward.
Contents
XAI Architecture
The XAI architecture contains 3 major components:
· The Core Server Component
· The Multi Purpose Listener (MPL)
· The Client Component
Contents
The Multi Purpose Listener (MPL)
The Core Server Component
The core server component is responsible for receiving XML requests, executing the service and returning the response to the requester.
The following diagram shows the XAI tool operating on a web server and providing integration between the system business objects and various external applications.
The core is built in Java, using a layered, scalable architecture. The basic transport protocol supported by the core is SOAP/HTTP.
Refer to SOAP for more information.
The XAI core server provides a Java servlet to process requests through HTTP. You may also use other messaging mechanisms such as message queuing, publish/subscribe or a staging table. The multi-purpose listener processes the messages.
The Multi Purpose Listener (MPL)
The Multi Purpose Listener (MPL) is a multi-threaded Java server that constantly reads XML requests from various external and internal data sources, such as a Java Message Service (JMS) message queue, a JMS topic or system staging tables.
The MPL can be used to process inbound messages (those sent by an external application to invoke a system service), or outgoing messages (those sent by your product to external applications). The MPL uses different receivers to process messages from different data sources.
A receiver is implemented using 3 distinct layers:
· The Receiving Layer
· The Execution Layer
· The Response Layer
Contents
The Receiving Layer
This layer deals with polling various locations to determine if new records, files or incoming requests exist. The various locations include:
· Staging tables, including XAI staging control, XAI upload staging, notification download staging (Oracle Customer Care and Billing only), and outbound message.
· An external directory that contains a file, for example a comma delimited file or an XML file.
· A JMS queue/topic.
A separate receiver is defined to read requests from each of these locations. When the MPL server starts, it looks for all defined active receivers in the XAI Receiver table, and for each receiver it starts a thread that constantly fetches messages from the message source.
Once a request message is read, it is passed to an execution thread that implements the execution layer. Each receiver references an Executer that is responsible for executing the request.
Configuring Multiple MPL Servers
A single MPL server may only run one of each of the above staging table receivers for a given JDBC connection. To enhance the performance of the processing of the staging tables, you may define multiple MPL servers where each one runs the active receivers defined in the receiver table.
To ensure that each staging table receiver processes its own set of records in the staging table, the receiver selects a set number of records (specified as XAI option Number of Records an MPL Receiver Will Process At a Time) and marks those records with the IP address and port number of the MPL.
The Execution Layer
The execution layer sends the XML request to the XAI core server and waits for a response.
Note. Currently the only type of executer supported is the XAI servlet running either on an XAI server or locally under the MPL. However the architecture allows for executing a request on other execution environments.
The executer is invoked and is passed in an XAI Inbound Service that specifies an XML request schema and an adapter. Adapters tell XAI what to do with a request. The adapters point to a specific Java class that renders a service.
For example you can configure an Adapter to invoke any published application object (by pointing it to the appropriate java class). This adapter accesses system objects through the page service. You can think of an adapter as a plug-in component.
Once the executer processes the request and a response is received, it is transferred to the next layer, the response layer.
The Response Layer
The response layer is responsible for "responding" to the execution. The responses are handled by invoking an appropriate sender defined on the receiver's response information. Each sender defined in the system knows how to process its response. For example:
· The JMS queue sender and the JMS topic sender post responses to the appropriate queue / topic.
· The staging control sender handles errors received during the execution of the staging control request.
· The upload staging sender updates the status of the upload staging record based on the success or failure of the staging upload request.
· The download staging sender is a bit unusual because it is helping to build the message being sent (Oracle Customer Care and Billing only).
Note. There are some cases where a response is not applicable. For example, the file scan receiver creates a staging control record to process a file that exists in a directory. There is no "response" applicable for executing this request.
The XAI Client Component
The XAI Client component is the set of on-line control tables and tools used to manage your XAI environment.
The Schema Editor
The Schema Editor is a tool used to create and maintain XAI schemas.
Refer to XAI Schema for more information.
The Registry
The Registry is a term used to refer to all the tables required to “register” a service in the system. It includes the XAI Inbound Service and a set of control tables defining various options.
The Trace Viewer
The Trace Viewer is installed with your XAI client tools and is used to view traces created on the XAI server.
XML Background Topics
The following section introduces some background information related to XML.
XAI Schemas
Business Adapter. The BusinessAdapter adapter supports communication to configuration tool objects: business objects, business services and service scripts through their own schema API. When communicating to these objects, it is not necessary to create XAI schemas for the schemas associated with the objects. As a result, there is no need to use the XAI schema editor when defining XAI Inbound Services for this adapter.
At the core of XAI are XML web services based on XML schemas. XML schemas define the structure of XML documents and are the infrastructure of e-business solutions. They are used to bridge business applications and enable transaction automation for e-commerce applications. Industry standard schemas document common vocabularies and grammars, enhancing collaboration and standardization. Validating XML processors utilize XML schemas to ensure that the right information is made available to the right user or application.
The system exposes its application objects as XML schemas that define the interface to system services. Every service (e.g., CreatePerson or AccountFinancialHistory) is defined using a pair of schemas: the Request Schema and the Response Schema. The request and response schema can be identical.
The Request Schema defines the XML document structure describing the “inputs” for a service.
The Response Schema defines the XML document structure describing the “outputs” of a service.
The Schema Editor
To facilitate the process of exposing business objects as XML schemas, we use the Schema Editor, a graphical tool to create, import and maintain schemas. The Schema Editor provides automated wizards to import schemas residing in existing data structures and documents. The Schema Editor can import schemas from the following sources: system business objects, ODBC data sources, sequential files.
Before the XAI tool can use a service, it must be registered or published.
Refer to Schema Editor and How to Publish an XAI Service for more information.
XSL Transformations
XSL Transformations (XSLT) is a language used to transform an XML document into another XML document or another document format such as HTML. It is part of the Extensible Stylesheet Language (XSL) family of recommendations for defining XML document transformation and presentation. It is defined by the World Wide Web Consortium (W3C) and is widely accepted as the standard for XML transformations. Several tools are available on the market to generate XSLT scripts to transform an XML document defined by a source schema to an XML document defined by a target schema.
Refer to How To Create an XSL Transformation for more information.
In XAI you can use XSL to:
· Transform an inbound message into the structure required by the XAI request schema for that service.
· Transform the response to an inbound message into a format defined by a schema provided by the requesting application.
Refer to XAI Inbound Service for more information.
· Transform an outgoing message before it is sent out.
Refer to XAI Route Type for more information.
· Transform data from an external source before it is loaded into the staging upload table.
Refer to XAI Inbound Service Staging for more information.
SOAP
SOAP stands for Simple Object Access Protocol. The SOAP “Envelope” is the wrapping element of the whole request document that may be used by messages going through the XAI tool.
The following diagram shows a simple XML request using the SOAP standard.
Refer to How to Build the XML Request Document for more information about building a request using the SOAP standard.
XPATH
The XML Path Language (XPath) is an expression language used by XSLT to access or refer to parts of an XML document. It is part of the XSL recommendations maintained by the W3C. XPath provides the syntax for performing basic queries upon your XML document data. It works by utilizing the ability to work with XML documents as hierarchically structured data sets.
In the following XML document, some examples of XPath references are:
· authors/author/name
· authors/*/name
· authors/author[nationality]/name
· authors/author[nationality='Russian']/name
· authors/author[@period="classical"]
In the XAI tool, XPath is used to construct outgoing messages.
Server Security
XAI server security supports the basic HTTP authentication mechanism as well as web service security (WS-Security) to authenticate the user requesting service. When authenticating using WS-Security, the SOAP header contains the authenticating information.
The base package provides two XAI server URLs, one that uses basic HTTP authentication (‘/classicxai’) and another that supports both methods (‘/xaiserver’). Regardless of which authentication method is practiced, it is the latter you should expose as your main XAI server. The main XAI servlet gathers authentication information from the incoming request (HTTP or SOAP header) and further calls the internal (“classic”) servlet for processing.
The “classic” XAI server security uses the basic HTTP authentication mechanism to authenticate the user requesting service. It assumes the requester has been authenticated on the Web server running the XAI servlet using the standard HTTP (or HTTPS) basic authentication mechanism. The authenticated user-id is passed to the application server, which is responsible for enforcing application security. This requires the system administrator to enable basic authentication for the Web server running the XAI servlet. To enable HTTP basic authentication, the XAI server ‘/classicxai’ should be defined as a url-pattern in the web resource collection in the web.xml file. When the XAI server is not enabled for basic authentication, it transfers the user-id specified on the Default User XAI option to the application server.
By default, the system would always attempt to further authenticate using SOAP header information. This is true even if the request has already been authenticated via the Web server. Use the Enforce SOAP Authentication XAI Option to override this behavior so that a request that has been authenticated already by the Web server does not require further authentication by the system.
If SOAP authentication information is not provided, the system attempts to authenticate this time using information on the HTTP header. You can force the system to solely use SOAP authentication using the Attempt Classic Authentication XAI Option.
Currently the system only supports the standard Username Token Profile SOAP authentication method where “Username”, “Password” and “Encoding” information is used to authenticate the sender’s credentials. The following is an example of a Username Token Profile in a SOAP header:
<SOAP-ENV:Envelope xmlns:SOAP-ENV =
"urn:schemas-xmlsoap-org:envelope">
<SOAP-ENV:Header xmlns:wsse ="http://www.w3.org/2001/XMLSchema-instance">
<wsse:Security>
<wsse:UsernameToken>
<wsse:Username>MYUSERID</wsse:Username>
<wsse:Password Type =
"PasswordText">MYPASSWORD</wsse:Password>
</wsse:UsernameToken>
</wsse:Security>
<SOAPActionVersion>2.0.0</SOAPActionVersion>
</SOAP-ENV:Header>
<SOAP-ENV:Body>
…
</SOAP-ENV:Body>
</SOAP-ENV:Envelope>
By default both user and password are authenticated. You can use the System Authentication ProfileXAI Option to change this.
Custom authentication. You can override the base package user credentials authentication logic using the System Authentication Class XAI Option.
Inbound Messages
Inbound messages are XML messages sent by an external application to invoke a system service. Inbound messages can be sent one at a time or in batches of several messages in a file. Third party integration points can import web services for inbound service calls. The standard method of doing this is by publishing a WSDL (Web Service Definition Language) definition for each exposed service.
Contents
Inbound Message Error Handling
Synchronous Messages
Synchronous service requests are sent using the HTTP protocol to the XAI servlet, which runs under a web application server such as WebLogic.
· The service request XML document must conform to the request schema that defines the service.
· The XAI servlet on the web server receives the service request XML document and based on the service name in the document identifies the appropriate XAI Inbound Service. Once the service is identified, the XAI servlet accesses the XAI Inbound Service record to find out the properties of the service.
· Based on the service properties, the XAI module loads the request and response schemas from the schemas repository (and caches them in memory).
· Based on the Adapter referenced by the service, it calls the appropriate adapter. The adapter performs most of the work to service the request.
· The adapter connects to the application server, based on the connection information in the registry control tables.
· It then parses the request document using the request schema.
· Once the request document has been validated, the adapter converts the XML request document into a call to the application server.
· The response returned by the application server is then converted into a service response XML document, based on the response schema.
· The XML response document is shipped back to the caller over HTTP.
Using HTTP for Synchronous Service Execution
Invoking a service is not much different from sending a regular HTTP request. Here the HTTP request contains the XML as a parameter. The XAI server handling requests via the HTTP protocol is implemented using a Java servlet running on the web server.
Microsoft Visual Basic/C Example
Microsoft provides an easy way to send XML requests over HTTP. To send and receive XML data over HTTP, use the Microsoft XMLHTTP object
set xmlhttp = createObject("Microsoft.XMLHTTP")
xmlhttp.Open "POST", http://Localhost:6000/xaiserver, false
xmlhttp.Send XMLRequest
XMLResponse = xmlhttp.ResponseText
Here http://localhost:6000/xaiserver is the URL of the XAI server. XMLRequest contains the XML request to be processed by XAI and XMLResponse contains the XML response document created by the XAI runtime.
Java Example
Java provides a very simple way to send a request over HTTP. The following example shows how a request can be sent to XAI from an application running under the same WebLogic server as the one XAI runs. In this example, we use the “dom4j “ interface to parse the XML document.
import com.splwg.xai.external.*;
import org.dom4j.*;
String xml;
xml = "<XML request>”;
XAIHTTPCallForWebLogic httpCall = new XAIHTTPCallForWebLogic();
String httpResponse = httpCall.callXAIServer(xml);
Document document = DocumentHelper.parseText(httpResponse);
Asynchronous Messages
Various types of receivers running under the MPL server (rather than the XAI server) handle asynchronous inbound messages from several sources.
Requests may be received via the following:
· MQSeries, TIBCO or any JMS compatible messaging system
· The XAI Upload Staging table
The response is returned to the JMS queue/topic or to the staging table.
Refer to Designing XAI Receivers for more information about the different receivers provided by the product for the different data sources.
The following diagram shows the flow for asynchronous inbound messages.
Contents
Using JMS
Java Message Services (JMS) is a standard Java 2 Platform, Enterprise Edition (J2EE) protocol to send/receive asynchronous messages using a queue or topic message protocol.
XML messages may be received and sent via JMS using either a JMS Queue or JMS Topic. In order to access a JMS provider such as MQSeries, TIBCO or WebLogic, the MPL must first connect to the appropriate server using a JMS Connection.
The following diagram depicts a message sent and received through a JMS Queue.
Contents
JMS Queues are used to receive and send messages using the message queue protocol. Products that support this protocol include MQSeries.
The following describes events that take place when a JMS queue is used:
· The requester places the XML request message on a JMS queue. The request contains both the XML message and the name for the reply queue.
· The JMS Queue Receiver waits for messages on that queue. When the message arrives it is selected from the queue and executed using the adapter for the requested service.
· The XML response message is placed on the reply queue specified in the request. It is the requester’s responsibility to fetch the response message from the queue.
The MPL uses a JNDI server to locate the queue resource.
Refer to Designing XAI JMS Queues for more information.
JMS Topics are used to send and receive messages using the publish/subscribe messaging model. Products that support this protocol include TIBCO, MQSeries and WebLogic.
The MPL uses a JNDI server to locate the topic resource.
· Define a JMS Topic receiver, listening to a predefined JMS Topic.
· The other application builds an XML message based on the schema defined for that service.
· It sends the XML request to the predefined topic and specifies the reply topic name.
· The MPL reads the message from the Topic, executes the service and returns the response to the reply topic specified in the inbound message.
Refer to Designing XAI JMS Topics for more information.
Staging Upload
The system provides a staging table, where an interface can store XML requests to perform a service in the system.
Some external systems interfacing with the system are not able to produce XML request messages. Or you may have external systems that produce XML messages but the messages are sent in a batch rather than real time. The system provides the capability to read an external data source containing multiple records, map the data to an XML request and store the request on the XAI upload staging table. These records may be in XML requests, sequential input files or database tables.
The XAI upload staging table may be populated in one of the following ways:
· When a collection of messages in a file or database table must be uploaded, a staging control record should be created for each file/database table. The Staging Control Receiver processes each file or database table and creates records in the XAI upload staging table for each message.
· The XML File Receiver creates records directly in the XAI upload staging table. Note, in addition, the XML File Receiver creates a staging control record to group together these records.
· XAI creates records in the XAI upload staging table for inbound messages in error that are configured to post the error.
· It is possible that when a response to a notification download staging message is received (Oracle Customer Care and Billing only), the response requires some sort of action. If this is the case, the system creates an XAI upload staging record (and an XAI staging control record) for the response.
Contents
Once the XML requests are in the staging table, the Staging Upload Receiver reads the requests from the XAI upload staging table and invokes the XAI server (via the executer) with the appropriate XAI inbound service. Inbound service records typically point to the core adapter used to invoke system services.
The staging upload sender handles "responses" to the execution of the message in XAI upload staging. If the execution is successful, the sender updates the status of the upload staging record to complete. If the execution is unsuccessful, the sender updates the status to error and creates a record in the XAI upload exception table.
Configuration required. The above explanation assumes that you have correctly configured your upload staging receiver to reference the upload staging sender. Refer to Designing Responses for a Receiver for more information.
Staging Control
The staging control table is used to indicate to XAI that there is a file or table with a collection of records to be uploaded. The special Staging Control Receiver periodically reads the staging control table to process new records.
The XAI staging control table may be populated in one of the following ways:
· To process a specific sequential input file, manually create a staging control record and indicate the location and name of the file and the XAI inbound service to use for processing. Use this mechanism to process ad-hoc uploads of files.
· If a file is received periodically, you may define a File Scan Receiver, which periodically checks a given file directory for new files. The file scan receiver creates a new staging control record to process this file.
· The XML File Receiver processes a file containing a collection of XML messages to be uploaded. The XML file receiver creates a staging control record and creates records directly into the XML upload table. The staging control record is automatically set to a status of Complete and is used to group together the XML upload records. Refer to Processing Staging Upload Records for a Staging Control for more information.
· To upload records from a database, manually create a staging control record and indicate an appropriate XAI inbound service, which contains the information needed by the system to access the appropriate table. Use this mechanism to process ad-hoc uploads of files.
Note. To upload records from a database table, you must create a staging control record. There is no receiver that periodically looks for records in a database table.
· To upload records from a Lightweight Directory Access Protocol (LDAP) store, use the LDAP Import page to select users or groups to process. Uploading records from this page causes a staging control record to be created. In addition, you may manually create a staging control record to upload data from an LDAP store and indicate the appropriate file to import. Refer to How Does LDAP Import Work for more information.
· Whenever an XAI upload staging record is created, an XAI staging control record is created as well.
Refer to Batch scenarios for more information about configuring the system to populate the staging control with requests from external files.
Contents
Processing Staging Upload Records for a Staging Control
Processing Staging Records in Sequential Order
The Staging Control Receiver processes staging control records and invokes XAI (via the executer) to execute the request. The executer uses the appropriate adapter to generate records in the XAI Upload Staging table – one for reach record in the file or table.
The diagram below illustrates the information used by the staging control receiver to load data onto the staging table from a sequential input file.
The staging control adapter does the actual work. It reads the individual records in the input file and applies the XSL transformation script indicated on the XAI inbound service record to the input data to produce an XML request in the XAI upload staging table.
Processing Staging Upload Records for a Staging Control
In some cases, a process may populate records directly into the XML staging upload table. An example of such a process is the XML File Receiver. In this case, a staging control record is also created and used to group together the staging upload records.
The staging control contains information needed to process a group of staging upload records:
· The user related to these records. This user is for application security purposes. The user indicated here must have the proper rights for the application service and transaction type to be executed by XML upload records processed for this staging control.
· An indication of whether or not the records should be processed sequentially.
Processing Staging Records in Sequential Order
In some cases, a collection of messages uploaded together in a file must be processed in the order the messages are received. For example, if messages to add a person and add an account for this person are received together, the message to add the person must be processed before the message to add the account.
If messages received in a file must be processed sequentially, turn on the Sequential Execution switch on the staging control record. When the staging control receiver creates records in the XML upload table, the identifier of each record is built as a concatenation of the staging control record and a sequential number. If your staging control record indicates that the XML upload records should be processed in sequential order, the records are processed in primary ID order.
Non-sequential processing. If your staging control does not indicate that the related XML records should be processed in sequential order, the records are processed by the staging control receiver using a random, multi-threaded mechanism.
If you have defined a receiver to periodically search for files and populate records in the staging control table, you may turn on the Sequential Execution switch on the receiver. This ensures that records processed as a result of this receiver are executed in sequential order.
If your staging control accesses the data from a database table, you have the capability of defining the selection criteria. XAI inbound services that reference the CISStagingUpload adapter may contain a collection of fields that are used in an SQL WHERE clause. When adding a new XAI Staging Control record, you can define the values for the WHERE clause.
For example, imagine that you have a work management system where new premises are defined. Rather than waiting for this system to “push” new data to you, you design the interface to have the system “pull” the new data by looking directly at the “new property” database table.
The Request XML for your XAI service contains SQL statements used to access the data. You could define a Staging Control Parameter of “Add Date”. When creating your staging control, you may enter a parameter value of today’s date. When this record is processed, it only retrieves new properties from this work management table whose Add Date is today.
The following example shows part of the Request XML schema for an XAI Service that SELECTs premises based on postal code.
The postal code value to substitute into the WHERE clause is defined on the individual XML Staging Control records.
Refer to Creating a Schema for a Database Extract and XAI Staging Controlfor more information.
Before the staging control receiver invokes the executer, it changes its status to complete, assuming that there will be no problems. If the executer detects an error condition, the staging control sender updates the status of the staging control record to error and removes any XAI upload staging records that may have been created.
Configuration required. The above explanation assumes that you have correctly configured your staging control receiver to reference the staging control sender. Refer to Designing Responses for a Receiver for more information.
Inbound Message Error Handling
For messages that are processed using the staging upload table, application errors that prevent XAI from successfully processing the message cause the staging record to be marked in error and highlighted via a To Do entry.
For messages that are not processed via staging upload, your implementation should consider what should happen to application errors. If the origin of the message is able to handle an immediate error returned by XAI, then no special configuration is needed. An example of this is an HTTP call to our system where the originator of the message is waiting for a real-time response.
Otherwise, for messages where errors should not be returned to the originator, but should be highlighted in this system for resolution, be sure to mark the Post Error switch on the XAI inbound service. When this switch is turned on and an application error is received by XAI when processing the message an XAI upload staging record is created (along with a staging control record) and marked in error.
For example, if a message is received via a JMS queue, application errors that prevent XAI from processing the message should not be returned to the queue because there is no logic to route the error to the sending system.
Integration Scenarios
Contents
Integration Using an EAI (or Hub)
Integration Using an EAI (or Hub)
It is possible for your various systems to be integrated with each other using a hub. The hub is implemented using an Enterprise Application Integration (EAI) tool provided by a third party vendor. Most hubs support HTTP and/or JMS and can work with XML schemas or document type definitions (DTDs).
· XAI services are presented to the EAI tool as schemas or as DTDs, immediately making the system callable from the hub.
· Integration scripts or workflow processes are defined in the EAI tools.
· At run time the hub uses HTTP or JMS to access the system using inbound messages.
· Outgoing messages are used to notify the hub about events occurring in the system. The messages are sent using HTTP or JMS.
Batch Scenarios
Messages may be sent in batch files, or may be retrieved from a database. In all cases, the system needs to be able to read the file and identify each individual message in order to create an XML request that can be processed by the XAI server. Once each individual message is identified, a request is stored on the XAI Staging Upload table for later execution.
Contents
It is possible for you to receive a file containing a collection of XML messages. The system identifies each separate message within the file and creates an entry for each message on the XAI upload staging table. It also creates a staging control record to group together each newly created XAI upload record. This staging control is created in Complete status and is not processed by the staging control receiver.
Since external applications may send messages in a format unknown to XAI, the system needs a mechanism for identifying the messages and mapping them to an XAI service.
Contents
First the system associates the entire XML file with an XAI Group. You can think of the XAI Group as a categorization of the collection of messages. For example, you may have a separate XAI Group for each third party who sends you a collection of XML messages.
The system uses an XPath and XPath value to identify the correct XAI Group for the XML file.
After identifying the appropriate group to which an XML file belongs, the system takes each message in the file and applies the appropriate XSL transformation to the message to produce a record on the upload staging table.
To process the messages in a file, the system needs to know how to identify each message in a file containing multiple messages. A file may use the same root element for each message or different root elements for different types of messages. For each XAI group, you must indicate the root element(s) that identifies a message by defining one or more attachments. Each attachment defines a root element, which tells the system when a new message begins.
Once the system has identified each separate message in the file, it must determine the correct XSL transformation script to apply. Once again the system uses an XPath and XPath value to identify the correct XSL to apply. For each XAI group, you define one XAI rule for every possible type of message you may receive in the file. Each XAI rule defines an XPath, XPath value and XSL transformation script.
Note you may assign a priority to each of your rules. The rules for more common messages may be assigned a higher priority. This enhances performance by ensuring that rules for more common messages are processed before rules for less common messages.
Include parent elements. If the XML message includes parent elements (such as a transmission id or a date/time) that are needed for any of the separate child messages that are posted to the upload staging table, you can configure the appropriate attachment to include parent elements.
Refer to Designing an XML File Receiver for more information about defining receivers that process XML files.
You may receive messages in a sequential input file, such as a comma-delimited file.
Refer to Creating an XML Schema for a Sequential Input File for more information about creating schemas for this type of file.
The following steps should be performed when configuring the system to enable data to be uploaded from an input file into the staging upload table:
1. Create an XML Schema that describes the records in the sequential input file.
2. Create the XSLT transformation that maps a record in the input file to an XML service request in your product.
3. Create an XAI service representing the batch process that loads the input file into the staging table.
4. If desired, create a new file scan receiver, which waits for an input file to appear in a particular directory. (If you do not take this step, then you need to create a staging control when you want a file to be processed.)
Character Encoding. If the file is encoded with a specific character encoding, you may indicate the encoding as part of the file name to be uploaded. If the file name ends with ?enc=?x, where x is the file character encoding, the adapter processes the file accordingly. For example, the file name may be specified as premiseUpload.csv?enc=?UTF-8. If the encoding is not specified as part of the file name and the file is in UTF-16 or UTF-8 with byte order mark, then the adapter can recognize the encoding.
It is possible for you to define an interface where inbound messages are retrieved by reading records in a database table.
The following steps should be performed when configuring the system to enable data to be uploaded from a database table into the staging upload table:
· Create an XML Schema that describes the records in the database table.
· Create the XSLT transformation that maps a record in the database table to an XML service request in your product.
· Create an XAI service representing the process that loads the records from the database table into the staging table.
Refer to Importing Users and Groups for information about using XAI to import user and user group definitions from a Lightweight Directory Access Protocol (LDAP) store.
WSDL Catalog
Web Service Definition Language (WSDL) is a language for describing how to interface with XML-based services. It acts as a “user’s manual” for Web services, defining how service providers and requesters communicate with each other about Web services.
The base package provides the ability to publish a WSDL definition for each service exposed as an XAI Inbound Service. Refer to the WSDL link on the XAI Inbound Service page. The URL http://$host:$port/XAIApp/xaiserver?WSDL returns a simple XML document containing a catalog of all the XAI Inbound Services and a link to each WSDL.
Outgoing Messages
"Outgoing messages" is the term used to describe messages that are initiated by our system and sent to an external system. Messages may be sent real time or near real time. The system provides two mechanisms for communicating messages to external systems.
· Outbound messages. This method allows implementers to use configurable business objects to define the message format and to use scripts to build the message. If sent near real-time the message is posted to the outbound message table waiting for MPL to poll the records, apply the XSL and route the message. If sent real time, the message dispatcher routes the message immediately.
· Notification download staging (NDS) messages. Using this method near real-time, a record is written to the NDS staging table referencing only key fields. MPL then polls the records, invokes a service to build the message, applies the XSL and routes the message. If sent real-time, no record is posted to the staging table but rather the message dispatcher routes the message immediately.
The following sections describe the outbound messages mechanism in more detail.
For NDS, refer to Oracle Customer Care and Billing help, Workflow and Notifications, Notification and XAI.
Contents
Near Real Time Messages
This section describes the capability to send outgoing messages from the system to another application in "near real time" using Outbound Messages and XAI. The process is referred to as "near real time" because an appropriate MPL receiver is continuously checking for new records in the outbound message table for processing.
For each outbound message that your implementation must initiate you define a business object for the outbound message maintenance object. Using the business object's schema definition, you define the fields that make up the XML source field. These are the fields that make up the basis for the XML message (prior to XSL transformation).
For each external system that may receive this message, you configure the appropriate message XSL and routing information.
Because the outbound message type is associated with a business object, your implementation can easily create outbound message records from a script using the Invoke business object step type. Such a script would
· Determine the appropriate outbound message type and external system based on business rules
· Access the data needed to populate the message detail
· Populate the fields in the schema and use the Invoke business object script step type for the outbound message type's business object to store the outbound message.
· The resulting outbound message ID is returned to the script and the scriptwriter may choose to design a subsequent step to store that ID as an audit on the record that initiated this message (for example store a case long entry or a field activity log entry)
The remaining points describe how the outbound message record is further processed.
Contents
Outbound Message Error Handling
Outbound Message Schema Validation
Outbound Message Receiver
The outbound message receiver processes records in the outbound message table that have a processing method flag equal to XAI and a status of pending and changes the status to in progress. The receiver then retrieves the message XSL and the XAI sender defined for the external system / outbound message type.
Template external system. If the outbound message's external system references a template external system, the outbound message type configuration for the template external system is used.
It applies the message XSL (if supplied). If the option to validate outbound message schemas is turned on, the schema validation is performed.
Refer to Outbound Message Error Handling for information about error handling.
If no errors are received, control is turned over to the outbound message sender for routing.
Initialization of receiver. During the initialization of this receiver (for example if there is a problem with MPL and it is restarted) any records that are found to be in progress are changed to pending so that those messages are sent properly.
Lifecycle of Outbound Message
The outbound message receiver processes outbound message records based on their status. The following diagram describes the lifecycle of an XAI type outbound message.
· Records are created in pending status.
· The outbound message receiver processes pending records and changes the status to in progress.
· If the message is sent successfully the system changes the status to complete.
· If there was a problem sending the message the system changes the status to error.
· When the user resolves the error they can change the status back to pending.
· A user can change the status of a pending or error record to canceled.
· For the rare cases where there is a problem with MPL and a message is left in the status in progress, users may manually change the status to canceled. In addition the outbound message receiver includes a step at startup to find in progress messages and change them to pending.
Outbound Message Sender
The outbound message sender is responsible for routing the message to the XAI sender determined by the receiver. If the routing is successful the outbound message status is marked complete. If the routing is unsuccessful, the status is marked in error.
Refer to Outbound Message Error Handling for information about error handling.
Automatic Resend. If you have configured the system for automatic resend and the system detects that the error is due to the sender being unavailable, the message remains in pending status.
Configuration required. The above explanation assumes that you have correctly configured your outbound message receiver to reference the outbound message sender. Refer to Designing Responses for a Receiver for more information.
Outbound Message Error Handling
If the outbound message receiver or the outbound message sender detects an error while attempting to process the outbound message, it marks the message in error, captures the error message and its parameter values and creates a To Do entry using the To Do type specified in the XAI option To Do Type for Outbound Message Errors.
A separate background process F1-DTDOM is responsible for completing To Do entries for outbound messages no longer in Error.
Batch Message Processing
Your implementation may be required to send messages to the same destination as a single XML file with multiple messages include. The following points describe this logic:
· The individual messages that should be grouped together must have a processing method of batch on the external system / outbound message type record. The appropriate batch code that is responsible for grouping the messages must also be provided.
· A separate "consolidated message" outbound message type should be configured for the external system with a processing method of XAI and an appropriate XAI sender.
· When outbound message records are created for the individual messages, the batch code and current batch run number are stamped on the record.
· When the batch process runs it is responsible for building the XML file that is a collection of the individual messages. This batch process should include the following steps:
· Format appropriate header information for the collection of messages
· Apply the individual message XSL to each message before including the message
· Insert a new outbound message for the external system with the "consolidated message" outbound message type. This consolidated message is routed to the appropriate sender via XAI.
No process provided. The system does not supply any sample batch job that does the above logic.
Outbound Message Schema Validation
The outbound messages that are generated by the system should be well formed and valid so that they do not cause any issues in the external system. To ensure this validity you may configure the system to validate messages before they are routed to their destination.
· Define a directory where the valid W3C schemas are located using the XAI option Outbound Message Schema Location
· Each external system message must indicate the appropriate W3C schema to validate against
You may turn on or off this validation checking using an XAI option Schema Validation Flag.
Automatic Resend
If a system error is received by the MPL when attempting to route the message to a sender, (using the outbound message method or the NDS message method), the system marks the appropriate table in error. This is true even if the reason for the error is that the connection to the sender is unavailable. When the connection is restored, a user must change the status of the appropriate record to pending (for outbound messages) or retry (for NDS messages) in order for the message to be resent.
Alternatively, you can configure your system to attempt to automatically resend the message. This section describes the logic available for auto resend. To enable automatic resend, you must set the flag Automatically Attempt Resending to Unavailable Senders on XAI option appropriately.
If an error is received by the MPL when it attempts to invoke a sender and the auto resend option is on, the system does not mark the record in error. It continues to attempt sending messages to the sender until the number of errors has reached a predefined maximum error number (defined as an XAI option). When the maximum is reached, the sender is marked as unavailable and an MPL log entry is created. The MPL ignores messages for unavailable senders.
The system tries to resend messages to this sender the moment the sender is reset to be available. The following points describe how a sender becomes available:
· MPL attempts to retry sending messages to unavailable senders every X minutes, where X is defined on XAI option.
· On MPL startup all senders are marked as available
· A user may navigate to the XAI Command page and issue a command MPL Refresh Sender to refresh the cached information for a particular sender
Real Time Messages
The system supports the ability to make web service calls, i.e. sending real time messages, to an external system. The configuration of real time messages is similar to the configuration of near real-time ones, with the following exceptions:
· The processing method defined for the outbound message type and an external system must be Real-time.
· The XAI sender defined for the outbound message type and an external system has to be set up with Real-time invocation type.
Just like near real-time messages, you can easily create outbound message records from a script. When a real time message is added, the system immediately routes it to the external system. If the external system provided a response message back, the system captures the response on the outbound message. If the outbound message type for the external system is associated with a response XSL it is applied to transform the response. In this case the system captures the raw response as well on the outbound message.
Any error (that can be trapped) causes the outbound message to be in a state of Error. It is the responsibility of the calling process to check upon the state of the outbound message and take a programmatic action. When the outbound message state is changed back to Pending the message will be retried.
The base package provides a business service called “Outbound Message Dispatcher (F1-OutmsgDispatcher)” that further facilitates making web service calls, allowing the calling script to configure the following behavior:
· Whether or not the sent message is captured as an actual outbound message record.
· Whether or not exceptions encountered while sending the message are trapped. Trapping errors allows the calling script to interrogate any errors encountered and take some other programmatic action.
Refer to the description of the business service for a better understanding on how it works.
HTTP Sender. In the current release of the product, only senders that communicate via HTTP are supported.
This section guides you through the steps required to design the tables that control your XAI processing.
Contents
Designing XAI Inbound Services
Designing Your Registry Options
How To Design Outgoing Messages
Installation
The XAI server is installed with default configuration. This section describes how you may customize the XAI server configuration.
Startup parameters are defined in two parameters files
· The XAIParameterInfo.xml file is used by the XAI HTTP server. This file is found within the XAI directory in the path (…\splapp\xai).
· The MPLParameterInfo.xml file is used by the MPL server. This file is found within the XAI directory in the path (…\splapp\mpl).
Both files store the parameters as XML files with the following elements (sections):
· Source
· ParameterVariables
· AdHocParameters
Contents
The Parameter Variables Section
The XAI Source Section
The XAI tool accesses XAI registry information through the standard system programs. The <Source> section in the XAIParameterInfo.xml file tells XAI the user ID for accessing the registry information. It contains the following attributes:
|
Attribute Name |
Description |
|
Source Type |
This should be set to CorDaptix, which tells XAI to access the registry through the standard access to system programs. |
|
CorDaptixUser |
The user ID to use when accessing the registry data. |
The MPL Source Section
The <Source> section in the MPLParameterInfo.xml file defines the database connection information used to connect to the database storing the XAI table information. It contains the following attributes:
|
Attribute Name |
Description |
|
Source Type |
Defines the source of the data, for example ORACLE or DB2. |
|
jdbcURL |
The URL used to connect to the product database. For example: jdbc:oracle:thin:@//server-name:1234/DBNAME |
|
databaseUser |
The Oracle User Id used to connect to the database. For example: sysuser |
|
databaseUserPassword |
The Oracle password used to connect to the database. For example: sysuserpassword |
The Parameter Variables Section
When defining values for fields in certain control tables in the registry, you may reference substitution variables that point to the <ParameterVariables> section of the installation files. Substitution variables provide for dynamic substitution of values based on parameters provided at server startup.
To specify a substitution parameter in a string value you enter the name of the substitution parameter enclosed with ‘@’.
For example if you have a field in the XAI control tables that should contain the URL for the XAI HTTP servlet, you could enter the value in the following way: http://@HOST@:@PORT@/xaiserver.
In the parameters section, define the appropriate values for these parameters, for example:
<ParameterVariables>
<ParameterVariable name="HOST" value="localhost" />
<ParameterVariable name="PORT" value="8001" />
</ParameterVariables>
At run time, the system builds the URL to be http://localhost:8001/xaiserver.
Every substitution parameter is defined using an <ParameterVariable> element with the following attributes:
|
Attribute Name |
Description |
|
Name |
The name of the substitution parameter |
|
Value |
The value to replace an occurrence of the substitution parameter in an XAI control table field |
Substitution parameters can only be used for string fields, and not for fields that are foreign keys to other objects.
The AdHoc Parameters Section
The <AdHocParameters> section is used to provide registry definitions that override the existing ones. Unlike the <ParameterVariables> section, a whole registry object definition can be specified in this section. When the XAI server starts, it first reads the registry definitions from the database and then it reads the <AdhocParameters> section. If it finds an object definition in this section, it uses it to replace the one read from the database.
|
Attribute Name |
Description |
|
Object Name |
The object name may be one of the following objects: Option Receiver Sender |
|
Object Attributes |
The attributes of the object. Each object type has it own set of attributes: |
|
‘Option’ object attributes |
|
|
name |
The option flag. Must be defined in the OPTION_FLG table |
|
value |
The value for that option |
|
‘Receiver’ object attributes |
|
|
name |
The receiver ID |
|
Class |
The JMS provider. May be ‘MQ’ |
|
TargetClient |
The client type writing/reading to the JMS queue/topic. May be ‘JMS’ or ‘MQ’. Only relevant for interfacing with MQSeries |
|
JMSProvider |
The JMS provider. May be ‘MQ’ |
|
TargetClient |
The client type writing/reading to the JMS queue/topic. May be ‘JMS’ or ‘MQ’. Only relevant for interfacing with MQSeries |
|
Executer |
The XAI Executer ID for this receiver |
|
‘Sender’ object attributes |
|
|
Class |
The JMS provider. May be ‘MQ’ |
|
JMSProvider |
The JMS provider. May be ‘MQ’ |
|
TargetClient |
The client type writing/reading to the JMS queue/topic. May be ‘JMS’ or ‘MQ’. Only relevant for interfacing with MQSeries |
LDAP Import Mapping. If your organization integrates with an LDAP store, you must define your LDAP import mapping and create a reference to this mapping in the ad-hoc parameters section. Refer to Including Your LDAP Import Mapping in the XML Parameter Information File for more information.
Designing XAI Inbound Services
When designing your XAI environment, you should first identify the services that you would like to perform. Determining your services facilitates your design for the other registry options.
To design your inbound services,
· Determine each service that needs to be performed
· Determine the correct adapter that is needed by your service.
· Determine the required layout of the request and response messages and specify the request schema and response schema.
· If a transformation of the data is required, you need to design the appropriate request XSL and response XSL transformation scripts.
· If the service references the staging upload adapter, determine the staging file type and design the record XSL transformation script. In addition, determine if you want to enter an input file name and interface name. Finally, determine whether or not you need to indicate a special JDBC connection.
· As new releases of the system are installed, it may be necessary to modify your service for the new release. If this is the case, you need to design separate versions of the inbound service.
Refer to XAI Inbound Services for more information.
Designing XML Schemas
You need XML schemas for the services you designed in Designing XAI Inbound Services.
For each message, identify what service you need to invoke and what action you need to perform. If you have multiple actions that you may need to perform for the same service, you may choose to create a single generic XML schema or you may choose to create multiple schemas, which are more specific. For generic messages, the transaction type, indicating the action to perform would be passed in on the XML request document to indicate what must be done. For more specific messages, you may be able to indicate the transaction type directly on the schema and it would not need to be overwritten at run time.
You need to create a response schema for each request schema. It is possible for you to use the same schema for both functions.
Refer to Schema Editor and How To Create XML Schemas for more information.
Designing XSL Transformations
You need an XSL transformation script for each service you designed in Designing XAI Inbound Services, where you determined a transformation is necessary. In addition, you need XSLT scripts for your outgoing messages. Each sender, which receives a message, probably requires a transformation of the message into a local format. Refer to How To Design Outgoing Messages for more information.
For each message requiring transformation, determine the format used by the external system. In most cases, it is not the same format recognized by the system. For each case, you must create an XSL transformation, which maps the message format from the external format to one expected by your product or from your product format to one expected by the external system.
When identifying the required XSL transformations, remember to take into consideration the data that is processed by the staging control table. This service reads data stored in a file or database table and uses the Record XSL to map the individual records to an individual service request.
Refer to How To Create an XSL Transformation and XAI Inbound Service for more information.
Designing Your Registry Options
The XAI registry is a set of control tables that is used to store service definitions as well as various system information required by the XAI and MPL servers. The following sections describe each table in the registry.
Contents
Designing XAI JDBC Connections
Designing XAI JNDI Servers
The XAI tool, including receivers and senders, uses a Java Name Directory Interface (JNDI) server to locate resources on the network. JDBC connections, JMS connections, JMS queues and JMS topics should be defined on the JNDI server. In addition, adapters that need to access your product information reference the JNDI server to determine where your product is running.
Design your JNDI server values as follows:
· Define a JNDI server that indicates where the system is running.
· If you are using JMS resources, such as JMS Queue or JMS Topic, and these are located in a server other than the one where the system is running, define the server where these resources are located.
· If you are using LDAP Import, define a JNDI server that points to the LDAP server.
· If there are any other resources that may be needed by XAI, define a JNDI server to indicate where these are located.
The product is shipped with a JNDI server running under the same Weblogic server used for the system.
When defining the URL, you may use substitution parameters such as those shown in the example below. XAI uses the parameter variables section of your start up parameters to build the appropriate URL. Refer to Installation for more information
|
JNDI Server |
Description |
Provider URL |
|
WLJNDI |
Weblogic JNDI Server |
t3://@WLHOST@:@WLPORT@ |
|
ACTDIR |
Active Directory Server |
ldap://@LDAPHOST@:@LDAPPORT@ |
Designing XAI JDBC Connections
If you need to access a database table to process your messages, XAI needs to know the location of the database and how to access it. If the tables are located in the same database used for the system (defined in your Installation), then you do not need to enter any extra JDBC Connections. If you need to access data that lives in another database, design the additional JDBC Connections and determine the type of connection and connection information.
Refer to XAI JDBC Connections for more information about defining XAI JDBC Connections.
Designing XAI JMS Connections
If you are using JMS to send and receive messages, then you must define a JMS Connection to indicate the JNDI server to use to locate these resources. For each JMS connection defined, the MPL server creates a pool of connections that are later shared by multiple threads.
Refer to XAI JMS Connections for more information about defining XAI JMS Connections.
Designing XAI JMS Queues
If your business uses JMS Queues to send and receive messages, then you need to add an entry on the XAI JMS Queue page, defining the JNDI server and Queue Name.
Designing XAI JMS Topics
If your business uses JMS Topics to send and receive messages, then you need to add an entry on the XAI JMS Topic page, defining the JNDI server and Topic Name.
Designing XAI Formats
The Formats section of the registry is used to define data formats. Data formats can be used in schema definitions to specify data transformations. To determine what data formats you need to define for your XAI environment, you must review the expected format of data that you will be exchanging and determine whether or not data transformation is required.
The following sections describe the four different types of formats and some guidelines in their use.
Contents
Date Formats
Date formats may be specified using any valid Java format supported by the java.text.SimpleDateFormat class.
To specify the time format use a time pattern string. For patterns, all ASCII letters are reserved. The following usage is defined:
|
Symbol |
Meaning |
Presentation |
Example |
|
G |
era designator |
Text |
AD |
|
y |
year |
Number |
1996 |
|
M |
month in year |
Text & Number |
July & 07 |
|
d |
day in month |
Number |
10 |
|
h |
hour in am/pm (1~12) |
Number |
12 |
|
H |
hour in day (0~23) |
Number |
0 |
|
m |
minute in hour |
Number |
30 |
|
s |
second in minute |
Number |
55 |
|
S |
millisecond |
Number |
978 |
|
E |
day in week |
Text |
Tuesday |
|
D |
day in year |
Number |
189 |
|
F |
day of week in month |
Number |
2 (2nd Wed in July) |
|
w |
week in year |
Number |
27 |
|
W |
week in month |
Number |
2 |
|
a |
am/pm marker |
Text |
PM |
|
k |
hour in day (1~24) |
Number |
24 |
|
K |
hour in am/pm (0~11) |
Number |
0 |
|
z |
time zone |
Text |
Pacific Standard Time |
|
' |
escape for text |
Delimiter |
|
|
'' |
single quote |
Literal |
' |
Currency Formats
Currency formats are used to specify formatting for elements representing currencies. They may include the following:
|
Symbol |
Meaning |
|
# |
number place holder |
|
, |
thousands separator |
|
. |
decimal point |
|
$ |
currency sign |
For example to define the currency format for US dollar, indicate: $#,#.00
Phone Formats
Phone formats can be used to specify formats for telephone numbers. The supported format specification is limited to the following format characters:
|
Symbol |
Meaning |
|
0 |
number place holder |
|
\0 |
0 |
Any other character appearing in the formatting expression is a placeholder for that character. To specify the ‘0’ character, use ‘\0’.
Phone Format Example: (000) 000-0000
Text Formats
Text formats are used to specify formats for character string attributes. The following expressions are supported:
|
Symbol |
Meaning |
|
\cUpperCase |
Translate the string to upper case. |
|
\cLowerCase |
Translate the string to lower case. |
|
\cProperCase |
Translate the string to proper case. The first character of every word is translated to uppercase. The remaining characters are translated to lowercase. |
Refer to XAI Format to define your XAI Formats.
Designing XAI Adapters
The product provides a set of adapters to process your XML requests. The adapters point to a specific Java class that renders a service. If you find that you need to use a protocol, which is not supported by the adapters provided, you will need to add a new XAI Class (which points to a Java class) and a new XAI Adapter. It is recommended that your implementers contact customer support. The following adapter classes are provided.
· BASEADA: This is the core adapter class that provides access to any published system service. This adapter accesses system objects through the page server. Services with this adapter need to indicate the object (application service), which should be invoked.
· BUSINESSADA: This is the core adapter class that provides access to schema-based objects. This adapter accesses business objects, business services and service scripts through their schema API. Services with this adapter need to indicate the schema of the object, which should be invoked. When communicating to these objects, it is not necessary to create XAI schemas for the schemas associated with the objects. XAI is able to directly communicate with these objects using their existing schema definitions. As a result, there is no need to use the XAI schema editor when defining XAI Inbound Services for this new adapter.
· STGUPADA: This staging upload adapter class is used when an extra step is required prior to using a service with the core adapter. For example, perhaps you need to read a file, which is not in XML format, and convert it to an XML format recognized by the system. Services with this type of adapter do not need to indicate an application service but must indicate information about the file to be converted. Refer to XAI Staging Control for more information.
· LDAPIMPRTADA: This is a special adapter that is used when importing Lightweight Directory Access Protocol (LDAP) objects into the system. If your organization uses LDAP, you can import your existing LDAP users and groups into your product, so that you do not need to define them twice. The adaptor can process search, validate and import XML requests. Refer to Importing Users and Groups for more information.
· XAICMNDADA: This is an internal adapter. It is used to send commands to the XAI Server.
· SIEBELADA: This adapter acts as a gateway between Siebel Virtual Business Components (VBC) and the system XAI services. The adapter understands the Siebel XML Gateway Message format, translates the message into an XAI message, executes the request and translates the result into a message format expected by the Siebel XML Gateway.
Note. Due to the limitations of Siebel VBC, this adapter is more suited for accessing simple List and Search services, or the main row of a Page maintenance service. It cannot be used to access nested components in a system business service.
Note. The Siebel VBC structure must exactly match the elements in the corresponding XAI service. For more information about using an XAI service as a Siebel VBC, refer to Creating a Siebel VBC Definition based on a schema.
Designing XAI Executers
The executer is responsible for executing messages received through a message receiver. The product provides an executer, which uses the XAI server; however the architecture allows for implementing additional execution classes. If you require a different executer and therefore a different execution class, it is recommended that your implementers contact customer support.
Refer to XAI Executer for more information.
Designing XAI Senders
XAI senders are responsible for define outgoing message destinations and for "responding" to the XAI executer.
· For NDS messages, the sender to use is defined on the XAI route type for the notification download profile.
· For outbound messages, the sender to use is defined on the external system / outbound message type collection.
· For responding to the XAI executer, the sender to use is defined on the receiver.
For each sender, you must reference an appropriate XAI class. The information in this section describes the sender classes that are provided with the system.
You must create senders to "respond" to the various staging table receivers in the system.
· Create a sender to be used for "responses" to messages processed by the staging control receiver. You should create one sender, which points to the XAI Class UPLDERRHNDLR. Refer to Staging Control Sender for more information about this sender.
· Create a sender to be used for "responses" to messages processed by the upload staging receiver. You should create one sender, which points to the XAI Class STGSENDER. Refer to Staging Upload Sender for more information about this sender.
· Create a sender to be used for messages processed by the download staging receiver. You should create one sender, which points to the XAI Class DWNSTGSNDR. (Applicable to Oracle Utilities Customer Care and Billing only).
· Create a sender to be used for messages processed by the outbound message receiver. You should create one sender, which points to the XAI Class OUTMSGSNDR. Refer to Outbound Message Sender for more information about this sender.
Sample Data for Initial Install. When first installing the system, sample XAI senders for each of the above "response" conditions are provided. Your implementation may use these records or remove them and create your own.
Next, design the senders for "responses" to other receivers, for example the JMS queue receiver or JMS topic receiver. The system provides XAI classes to use for these senders. Use the class JMSSENDER for a JMS queue sender and TPCSNDR for a JMS topic sender.
Finally, review all your outgoing messages and determine the mechanism for communicating with the target system for each message.
· For all senders that are used for real time messages, define a context entry with a context type of Response Time Out to define the amount of time the system should wait for a real time response.
The topics below describe configuration required for senders that route a message via an HTTP sender, a flat file sender or an email sender.
Contents
Adding an HTTP Sender
An HTTP sender is one that sends messages to an HTTP server using the HTTP protocol. HTTP senders should reference an XAI Class of HTTPSNDR.
Various parameters are required to establish a session with the target HTTP server. You specify these parameters by defining a collection of context values for the sender. A set of context types related to HTTP variables is provided with the product. The following section describes the context types and where appropriate, indicates valid values.
Before defining the HTTP sender, you need to find out how the HTTP server on the other side expects to receive the request, and in particular, to answer the following questions:
· What is the address of the HTTP server?
· Is the HTTP server using a POST or GET HTTP method?
· If the server is using POST, how are message contents passed? Does it use an HTTP FORM or does it pass the data in the body of an XML message?
|
Context Type |
Description |
Values |
|
HTTP URL1 – URL9 |
Used to construct the URL of the target HTTP server. Since the URL may be long and complex, you can break it into smaller parts, each defined by a separate context record. The MPL server builds the full URL by concatenating the values in URL1 through URL9. You may use substitution variables when entering values for URL parts. |
|
|
HTTP Method |
The HTTP method used to send the message. |
POST or GET |
|
HTTP Proxy Host |
If connecting to the remote system requires using an HTTP Proxy, then this context field can be used to configure the HTTP Proxy Host. If the Proxy Host is set, the Sender class must use the value specified to connect to the remote system via a proxy. |
|
|
HTTP Proxy Port |
If connecting to the remote system requires using an HTTP Proxy, then this context field can be used to configure the HTTP Proxy Port. If the Proxy Port is set, the Sender class must use the value specified to connect to the remote system via a proxy. If the HTTP Proxy Host is not set, HTTP Proxy Port is ignored and the connection will be made directly to the remote system. |
|
|
HTTP Transport Method |
Specifies the type of the message. You can either send the message or send and wait for a response. |
Send or sendReceive |
|
HTTP Form Data |
Used when the message is in the format of an HTML Form (Content-Type: application/x-www-form-urlencoded). This context specifies the form parameters (data) that should be passed in the HTTP message. Since a form may have multiple parameters, you should add a context record for each form parameter. The value of a form parameter takes the format of x=y where x is the form parameter name and y is its value. If y contains the string @XMLMSG@ (case sensitive) then this string is replaced by the content of the service response XML message. If a context record of this type is defined for a sender, the sender uses the HTML Form message format to send the message even if @XMLMSG@ is not specified in one of the context records. If a context record of this type is not defined for a sender, then the XML is sent with Content-Type: text/plain. When using POST it is put in the HTTP message body. Always required when using the GET method. If you are using the GET method and do not specify a Form Data context record, no message is transferred to the HTTP server. The MPL server builds formData by concatenating the individual parts. You may use substitution variables when entering values for Form Data. |
|
|
HTTP Login User |
The HTTP server may require authentication. Add a context record of this type to specify the login user to use. |
|
|
HTTP Login Password |
The HTTP server may require authentication. Add a context record of this type to specify the login password to use. |
|
|
HTTP Header |
Sometimes the HTTP server on the other side may require the addition of HTTP headers to the message. For each HTTP header that has to be specified you should add a context record with a value having the following format x:y where x is the header name and y is the value for the header |
|
|
Character Encoding |
Indicates if the message should be encoded. The sender will add to the HTTP's content type header the string ;charset=x where x is the value of this context and when sending the message it will encode the data in that encoding. |
UTF-8 or UTF-16 |
Example 1
This is an example of an HTTP sender definition that connects to an external HTTP Inbound Server. The HTTP server on the other side expects a POST with some form parameters and the XML message specified in the SWEExtData form parameter. Note that @XMLMSG@ is used for the SWEExtData form parameter.
|
Context Type |
Context Value |
|
HTTP URL1 |
http://<Web Server>/esales/start.swe |
|
HTTP Method |
POST |
|
HTTP Transport Method |
sendReceive |
|
HTTP Form Data |
SWEExtSource=<Source Name> |
|
HTTP Form Data |
SWEExtCmd=<Execute> |
|
HTTP Form Data |
SWEExtData=@XMLMSG@ |
|
HTTP Form Data |
UserName=SADMIN |
|
HTTP Form Data |
Password=SADMIN |
Example 2
This is an example of an HTTP sender definition that connects to a third party web service.
|
Context Type |
Context Value |
|
HTTP Header |
Content-Type:text/xml |
|
HTTP Header |
SOAPAction:http://mwm.splwg.com/WebServices/Submit |
|
HTTP Method |
POST |
|
HTTP Transport Method |
sendReceive |
|
HTTP URL1 |
http://10.10.17.138/SPLMWMService |
|
HTTP URL2 |
/SPLMWMService.asmx |
Adding a Flat File Sender
This sender is used when you want XML messages to be written to a flat file. For example, it can be used in the notification download process to write a response message to a flat file. Flat file senders should reference an XAI Class of FLATFILESNDR. In addition, the following context records should be defined for senders of this type.
|
Context Type |
Description |
Values |
|
Flat file output directory |
Directory in the file system where to write the file |
|
|
Flat file filename pattern |
The name of the output file. The file name may be a literal constant, or generated dynamically. To create a dynamic filename use <file name>$$ID, where $$ID is replaced at run time by the ID of the NDS message that triggered the response message. If no file name is defined for the sender, the XAI server generates a file name with the following format ‘XAI$$ID.xai’. |
|
|
Append data to file |
This parameter controls whether the content of the response message is appended to an existing file, or a new file is created (possibly replacing an existing one). |
YES or NO |
|
Character Encoding |
Indicates if the message should be sent with character encoding. The sender will write the content of the file with encoding specified in the context value. If no value is specified, the sender uses the default Java system encoding, which is determined according to the operating system locale. |
UTF-8 or UTF-16 |
Adding an Email Sender
The email sender allows for XML messages to be sent as email messages through an SMTP server. It can be used in notification download processes to send a response as an email message. The email sender supports standard email functionality such as "CCs" and attachments.
The content of the email message is controlled by the XSL script defined in the XAI route type of the NDS message. The XSL script has access to all context records of the NDS message as well as the input XAI message that was created by processing the NDS.
An email sender must point to the XAI Class EMAILSENDER. In addition, the following context records should be defined for senders of this type.
|
Context Type |
Description |
Values |
|
SMTP Host name |
The SMTP server host name. |
|
|
SMTP Username |
The user ID used to access the SMTP server. |
|
|
SMTP Password |
The password used to access the SMTP server. |
|
Refer to How an Email Message is Constructed for more information.
Designing XAI Groups
XAI groups are used by the system to process an XML file containing multiple messages to be uploaded into the system. One or more groups may be defined for an XML file receiver.
Refer to XML Message File for more information about how groups are used to process an XML file.
When setting up your XAI environment, identify the interfaces that require uploading an XML file containing multiple XML messages into the system through XAI.
First you need to categorize the XML files that you may receive. Define an XAI Group for each logical categorization. For example, you may want to define a separate XAI Group for each third party who may send you a collection of XML messages. Or, if all third party service providers send direct access messages in a standard format, you may want to define a single XAI Group for direct access messages.
For each group, you need to identify the root elements that indicate when a new message is starting. This collection of unique root elements for a group is called the attachments.
For each group, you must identify every possible message that may be sent. For every message, define an XAI Rule. The rule indicates the XSL transformation script to be executed along with the XPath and XPath value that the system uses to identify each message.
Refer to XAI Group to define groups, their attachments and their rules.
Designing XAI Receivers
Receivers define small pieces of code that wait for requests to be received through various sources. Each receiver references an XAI class where the small piece of code is defined. The following receiver classes are provided:
· STGRCVR The receiver that references this class polls the XAI upload staging table for new inbound requests.
· STGCTLRCVR: The receiver that references this class polls the XAI staging control table for new upload processes.
· DWNSTGRCVR: The receiver that references this class polls the notification download staging table (NDS) for new messages. (Applicable to Oracle Utilities Customer Care and Billing only).
· OUTMSGRCVR: The receiver that references this class polls the outbound message table for new messages.
· JMSRCVR: Receivers that reference this class receive requests through a message queue that supports the JMS Queue interface, such as IBM MQSeries.
· TPCRCVR:Receivers that reference this class receive requests through a publish/subscribe model, such as TIBCO, or any system supporting the JMS Topic interface.
· FILESCANRCVR: Receivers that reference this class poll a given directory for files with a given file name pattern.
· XMLFILERCVR: Receivers that reference this class poll a given directory for XML files with a given file name pattern.
Multiple receivers may be defined for these receiver classes. For example, the XML file receiver defines the scan directory. If you have multiple directories that contain files to be uploaded, define a receiver for each directory.
All types of receivers reference an XAI Class and XAI Executer. If you require a new XAI Class or Executer because you use a protocol that is not currently supported, it is recommended that your implementers contact customer support.
Contents
Designing Responses for a Receiver
Designing Receivers that Poll Staging Tables
Designing a JMS Queue Receiver
Designing a JMS Topic Receiver
Designing a File Scan Receiver
Designing an XML File Receiver
Designing Responses for a Receiver
Once a request has been sent for execution to the XAI server (via the executer), the response layer processes the response. For some receivers, a response may not be applicable. For example, a file scan receiver reads flat files in a given directory and posts records to the XAI staging control table. Responses are not applicable for this type of receiver.
The response may be conditional on the outcome of the request and may be sent to more than one destination (sender). To design your receiver responses, determine the conditions under which a response should be sent for each request processed by each receiver:
· Never send a response
· Send a response if the request was successful
· Send a response if the request was unsuccessful due to a system error
· Send a response if the request was unsuccessful due to an application error
Once you determine when to send a response, you must determine where to send the response. Responses for different conditions may be sent to different XAI Senders or to the same XAI Sender.
Designing Receivers that Poll Staging Tables
The following receivers are needed to poll the various system staging tables.
· Create a staging upload receiver that references the XAI Class STGRCVR. For responses, All Events should reference the staging upload sender.
· Create a staging control receiver that references the XAI Class STGCTLRCVR. For responses, All Events should reference the staging control sender.
· If your implementation uses the NDS message method of communicating outgoing messages (applicable to Oracle Utilities Customer Care and Billing only), create a staging download receiver that references the XAI Class DWNSTGRCVR. For responses, All Events should reference the download staging sender.
· If your implementation uses the outbound message method of communicating outgoing messages, create an outbound message receiver that references the XAI Class OUTMSGRCVR. For responses, All Events should reference the outbound message sender.
For all the above receivers, if you need to access multiple environments, simply create receivers for each JDBC connection. Note that you should not add more than one of each of the above receivers pointing to the same JDBC connection. To improve performance for a single JDBC connection you may configure multiple MPL servers.
Sample Data for Initial Install. When first installing the system, records for each of the above receivers are provided. Your implementation may use these records or remove them and create your own.
Designing a JMS Queue Receiver
If you need to receive messages through a JMS compatible queue, you need to define a JMS Queue receiver. When designing a JMS Queue receiver you first need to design a JMS Connection and a JMS Queue.
If you would like to post responses back to the JMS queue, you may create an XAI sender to send the response to the JMS queue.
Designing a JMS Topic Receiver
If you need to receive messages through a JMS Topic using the publish/subscribe model, you need to define a JMS Topic receiver, which receives messages published under a specific topic. When designing a JMS Topic receiver you first need to design a JMS Connection and a JMS Topic.
If you would like to post responses through a JMS Topic using the publish/subscribe model, you may create an XAI sender to send the response to the JMS topic.
Designing a File Scan Receiver
The file scan receiver constantly looks in a given directory for files with a given pattern. When it finds a matching file, it creates a record in the staging control table to upload the contents of the file into the upload staging table.
When setting up your XAI environment, identify the interfaces that require uploading a file from a directory into the system through XAI. For each unique file, define a file scan receiver. For each receiver record, indicate the Scan Directory, where new files will be placed, the Scan File, which is the naming pattern to look for and the XAI Inbound Service to use for mapping the data into a system service.
In addition, if you want to specify a character encoding, the following Context record should be defined.
|
Context Type |
Description |
Values |
|
Character Encoding |
Indicates that the message is character encoded. When the receiver creates a staging control entry for a file, it will add ?enc=?x to the name of the file in the table where x is the value of this parameter. Refer to Sequential Input File for more information. |
UTF-8 or UTF-16 |
Designing an XML File Receiver
The XML file receiver constantly looks in a given directory for XML files with a given pattern. When it finds a matching file, it goes through steps to identify each separate message in the file, determine the appropriate XSL transformation and create a record in the staging upload table.
Refer to XML Message File for more information.
When setting up your XAI environment, identify the interfaces, which require uploading an XML file containing multiple XML messages into the system through XAI. For each unique file, define an XML file receiver. For each receiver record, indicate the Scan Directory, where new files will be placed, the Scan File, which is the naming pattern to look for and the collection of XAI groups. XAI groups are used by the system to identify each separate message in the file and to determine the appropriate XSL transformation for each message.
Refer to Designing XAI Groups for more information.
How To Design Outgoing Messages
The following sections walk you through configuring your system to communicate messages to external systems based on how your implementation communicates.
Contents
Configuring the System for Outbound Messages
Configuring the System for NDS Messages
Configuring the System for Outbound Messages
The following sections describe the setup required when using outbound messages to communicate with an external system. The configuration walks you through the steps to configure a single external system and all its messages.
Contents
Define the Outbound Message Type
Define the External System and Configure the Messages
Define the Outbound Message Type
For each outbound message that must be sent to an external system, create a business object for the outbound message maintenance object. Using the business object's schema definition, your implementation defines the fields that make up the XML source field. These are the fields that are the basis for the XML message. XSL transformations may be applied to this XML source to produce the XML message.
Once you have your business object and schema, define an outbound message type for each unique outbound message.
Define the XAI Sender
When messages are routed to an external system via XAI, each message must be associated with an XAI Sender, which tells the system how to send the message.
Define the External System and Configure the Messages
Define an external system and configure the valid outgoing messages and their method of communication (XAI, Batch, or Real Time). Refer to Batch Message Processing for more information. Refer to Real Time Messages for more information.
Configuring the System for NDS Messages
Configuring the System for NDS Messages is specific to Oracle Tax and Utilities Customer Care and Billing.
The Schema Editor is a Graphical User Interface (GUI) tool to create XML schemas. The tool provides wizards to generate schemas from various sources.
Contents
System Wide Functions for Schema Editor
Opening the Schema Editor
After launching the schema editor, you are asked to connect to a database. On the Connect dialog:
· Select an ODBC data source pointing to the desired database.
· Enter the data source, user ID, password and database owner required to log on to that database.
· Click Connect.
After connecting, the schema editor appears.
Use the File/Open dialogue to select a schema from the schema directory. Refer to The Options Menu for information about setting the default schema directory.
Note. When opening a schema, the schema editor validates the schema and any errors are displayed. Refer to Validating a schema for more information.
Schema Editor Window
The following window shows how the schema editor looks when a schema has been displayed and a specific attribute in the schema has been selected.
Description of Page
Refer to System Wide Functions for Schema Editor for information about the various menu options available for the schema editor.
The Service Name indicates the name of the application service
Service Name Enter the name of the service to be created in the service name text box. This is the name of the first element under the Body element in the XML document.
Important! If you introduce new schemas, you must prefix the Service Name with CM. If you do not do this, there is a slight possibility that a future release of the application could introduce a new schema with the name you allocated.
Adapter The adapter used to process services using this schema.
Internal Service Name If the schema is for an adapter that should invoke a system service, this is the internal name of the service.
Transaction Type Select the transaction type performed by the service. The available values are Read, Add, Change, Update, Delete, List and Search.
Note. The difference between Change and Update is that for Change, all field values must be passed in with the request. Field values that are not passed in to the request are set to null. For Update, you need only pass the primary key field values and the values of the fields to be updated. All other fields retain their existing values.
Left Panel
The left panel of the schema editor displays a tree view of the hierarchical elements in the schema. The (+) expands a node, the (-) collapses a node.
Right Panel
The following attributes appear on the right panel of the Schema Editor. Some fields cannot be modified in the schema editor. The field description indicates when the field is protected.
Tag Name The XML element tag name. This field is protected, but you may modify this attribute to give the element a self-explanatory name by right-clicking on the element name in the left tree-view.
MetaInfo Name Maps the element to a fully qualified field name in the service, for example PER_ID. This field is protected.
Internal Type This property is populated automatically when you generate the schema from your product. The values further define elements and attributes. The values are page, pageBody, list, listHeader, listBody, searchHeader, codeTableDesc, Private. The values of codeTableDesc and Private are used to define special types of attributes. Refer to How to Create Code Description Attribute and How to Create a Private Attribute for more information.
Private attribute A field that does not exist on the server side, but one that you still want to have in the schema. Refer to How to Create a Private Attribute for more information.
Description A description of this field.
Content The element type. This field is only available for elements. Possible values are eltOnly - element may contain only other elements and no text, TextOnly - element may only contain text.
Search Type Services, which perform a Search, may allow searching based on different criteria. The values are taken from the system meta information when the schema is generated. The possible values are Main, Alternate1, Alternate2, Alternate3, Alternate4, Alternate5 and Alternate6.
Note, typically you would not modify this value because it corresponds to a value in the meta information. However, the value is modifiable to accommodate the rare case where a service may change in a new release. In this scenario, you may prefer to update the schema manually rather than regenerate a new schema for the new version.
Is Part of Primary Key Used to indicate to the XAI server whether or not this field makes up part of the primary key of the record. The values are taken from the metadata information when the schema is generated. Value may be true or false.
Note, typically you would not modify this value because it corresponds to a value in the meta data information. However, the value is modifiable to accommodate the rare case where a service may change in a new release. In this scenario, you may prefer to update the schema manually rather than regenerate a new schema for the new version.
Min Occurs This field is available for elements only and is used for repeating elements. It defines the minimum number of occurrences for an element. Value may be 0 or 1.
Schema Max Occurs This field is available for elements only and is used for repeating elements. It defines the maximum number of occurrences for an element. Value may be 0, 1 or *.
Limit Number of occurrences This field is available for elements only and is used for repeating elements. If the Schema Max Occurs field has been set to ‘*’, define the number of max occurrences here.
XML Data Type The data type for the attribute. Possible values are number, string, decimal, date, dateTime, and boolean.
Server Data Type Indicates the data type of this attribute on the server. This field is protected.
Server Format The format expected by the service. At runtime, XAI converts the Tag format to the Service Format before executing the request. Formats are defined in XAI Format.
Tag Format The format used to format an element/attribute in the schemas. Formats are defined in XAI Format.
Min Length Use this property to define the minimum length of the attribute, if applicable.
Max Length Use this property to define the maximum length of the attribute, if applicable.
Precision This is used for decimal attributes to define the maximum number of digits.
Scale This field is used for decimal attributes to define the number of digits at the right of the decimal point.
Required A value of Y indicates that the element must appear in XML document. A value of N indicates that the element is optional.
Default value Default value to be used for Request schema, when the element is not supplied as part of the XML request document.
Fixed Value Fixed value to be used for Request schema. This value is used regardless of the value supplied in the request document.
Code Table Field This property is used for attributes that are descriptions of a code table, where the description is not automatically returned by the system service. Use this property to indicate the code whose description should be retrieved by the XAI server. Refer to How to Create Code Description Attribute for more information.
Code Table Program This property is used for attributes that are descriptions of a code table, where the description is not automatically returned by the system service. Use this field to indicate the program that XAI should call to access the description for the Code Table Field. Refer to How to Create Code Description Attribute for more information.
Creating a Schema
Usually you do not create schemas from scratch; rather you use Schema Creation Wizards to import existing data structure definitions from a variety of data sources:
· System services
· Comma Delimited Files (CSV)
· Database Extract
· Any XML document
· Siebel Virtual Business Components
· Siebel Integration Objects
Refer to How to Create XML Schemas for detail about each creation wizard.
Once a schema is created based on the existing data structure, it is displayed in a TreeView on the left panel. Once the imported schema has been edited, it serves as the basis for creating the request and response schemas. When imported, the schema exposes all fields defined in the service. You may want to remove some attributes/elements from the request or response schema.
Note. Although the main purpose of the editing process in the creation of the request and response schemas is the elimination of elements, which makes the schema shorter and more understandable, it is not required for processing purposes. Therefore, if you don’t mind that you have not used elements in your schemas, you could stay with one schema, which serves as both the request and response schema.
1. Save the Schema as a Request schema with an appropriate name, for example PersonInfoRequestSchema.xml
2. To create the Response schema, which is identical to the request schema, use the Save As Response menu option. This renames the top element of the schema to ServiceNameResponse, for example PersonInfoResponse and save the schema under a different name i.e. PersonInfoResponseSchema.xml. Note that if the request and response schemas are identical then one schema may be used for both and there is no need to create separate schemas.
3. Read in the Request Schema (File/Open) and modify its structure. Depending on the service type, you’ll have to modify the contents of the Request Schema. This is usually required when the service is an “Info” service, which requires very few input elements. In such cases you’ll delete most of the elements on the schema and only leave the necessary elements required to invoke the service. For example: in the PersonInfo request, you only need the PersonId and the Company elements in the request schema.
4. Read in the Response Schema (File/Open) and Modify its structure. Depending on the service type, you’ll want to modify the contents of the Response Schema. This is usually required when the service is an “Add” or “Delete” service, which returns very few input elements. In such cases you’ll delete most of the elements on the response schema and only leaves the necessary elements required by the requester of the service.
Adding an Element/Attribute
Usually, you won’t have to add element or attributes to a schema. However if the schema already exists and you want to add an element/attribute, you can follow this procedure. Be aware that any element/attribute added here must also exist on the xml metainfo.
· Select the element’s node on the TreeView.
· Right click on it and select the ‘Add Element’ or ‘Add Attribute’ option in the pop up menu
· Enter the element/attribute name in the prompt dialog box and click OK.
Removing Elements/Attributes
When generating a schema using one of the wizards, the generated schema may contain information that you do not want to publish as part of the service, or is not required for a particular service. You can remove elements/attributes from the schema, and though these elements/attributes may still exist on the service they are not seen by the XAI service using this schema. To remove an element or attribute:
· Select the node to be removed.
· Right click and select “Delete” from the popup menu.
Renaming an Element
To rename an element:
· Select the element’s node on the TreeView.
· Right click it and select the Rename option in the pop up menu
· Enter the new name in the prompt dialog box and click OK.
Note. The information in this table is cached by the XAI server and by the MPL server. Changes to values in this table do not affect the runtime copy of these servers. Refer to XAI Command for information about refreshing a schema.
Validating a Schema
Although a schema is validated against the metainfo xml file
when it is read into the editor or before it is saved, you can perform the
validation at any time while the schema is being edited. To validate a schema,
click on the Toolbar “Validate” button ![]() . If the schema fails to validate the
schema errors dialog is displayed.
. If the schema fails to validate the
schema errors dialog is displayed.
Schema Validation Errors
When the editor fails to validate a schema against the xml metainfo file, it pops up a dialog that lists the errors found in the schema definition. These errors may be of two types:
· An element or attribute in the schema could not be found in the xml metainfo file. You can click Remove to remove the element from the schema.
· The data type of an attribute does not match the one defined in the metainfo file. You can click Correct, and the editor fixes the data type so it does match.
The Correct All button can be used to correct all fields that have data types that do not match the one in the XML metainfo file.
Note that correcting errors does not save the schema definition into a file. You have to save it manually.
If you Exit without correcting the errors, the schema displays with the mismatch information highlighted in red.
Registering a Service
Before a service can be used it must be defined in the XAI Inbound Service table in the XAI registry. A service can be registered in the XAI registry directly from the schema editor. Go to the menu item ‘Register Service’ in the ‘Schemas’ menu. The Register service UI page appears. Fill in the required fields.
The registry entry for the service can be later modified using the XAI Inbound Service page.
Testing a Schema
The schema editor provides a testing option. Refer to Testing a Schema Using the Schema Editor for more information.
Testing in your product. You may also test your schemas and your services using either XAI Submission or XAI Dynamic Submission.
System Wide Functions for Schema Editor
Because the schema editor is in an application outside of the standard products, this section introduces some general functions related to the application.
Contents
Application Standards
· The schema editor is a Multiple Document Interface (MDI) windows application. It may contain multiple active windows. You may jump from one window to the other using the Window menu option.
· The Editor window is always active. Closing the schema editor window quits the application.
· In the Editor window, a splitter bar is available to resize the schema tree view horizontally.
· Actions may be performed using menu items or by clicking on toolbar buttons.
· All messages are displayed on a status bar at the bottom of the screen. Some may also be displayed using message boxes.
The File Menu
Use the File menu to open existing schemas and to save a schema to a file.
Connect
Connects to the database.
Open - Loading an existing schema into the editor
You can read an existing schema into the editor.
1. Click on the Open toolbar button or select the File/Open menu option.
2. A file selection dialog is shown. Select the schema file name.
3. The editor first validates the schema against the xml metainfo file. If it fails to validate it shows the Schema Validation Errors dialog.
Save
Save the current schema to a file. Using the current file name.
To save a Schema, click on the Save tool bar button, or select the File/Save menu option. When you save a schema, the editor first attempts to validate the schema. If it fails to validate it against the XML Metainfo file, you are prompted to save it with inconsistency errors or to return to the editor.
Save As
Save the current schema to a file. Use a different file name.
Save As Response
Save a copy of the current schema to a file as a response schema. Use a different file name.
The View Menu
Use the view menu to perform actions on the Tree View nodes or to view errors. The following menu options are available:
Expand All
Expand all nodes in the Tree View
Collapse All
Collapse all nodes in the Tree View
Expand Branch
Expand the selected node and all the node’s children
Search (CTRL-F)
Find a node with a node name containing a given string
Search Again (F3)
Find the next node with containing the search string
View Schema Errors
Display the Schema Validation Errors dialog.
Web Browser
Display the current schema definition on a web browser page
The Schemas Menu
Use the Schemas menu to create, test, validate and register schemas.
· To create schemas from various sources use the Create menu.
· To validate a schema select the Validate option (Ctrl+V).
· To create a sample instance and test the schema, select the Test option (Ctrl+T).
· To create an entry in the service registry for a service represented by the current schema, select the Register Service option (Ctrl+R). Refer to Registering a Service for more information.
The Export Menu
Siebel Integration Object
Use this option when you are ready to export a Siebel Integration Object definition created based on an XAI schema.
Siebel VBC
Use this option when you are ready to export a Siebel VBC definition created based on a schema.
The Options Menu
Always Save As W3C
Turn on this option to save schemas in W3C format by default instead of XDR format.
Always Save As DTD
Turn on this option to save schemas in DTD format by default instead of XDR format.
Preferences
The following options may be set on the preferences dialog (Select Options and then Preferences):
· The Default Date Time Format – used for schema date fields
· The default Schema Directory – used to read/save schemas
· The default Metainfo Directory - used to create/validate schemas
· The XAI Servlet URL – used when executing requests from the test schema dialog.
· The Default Account Id - used when generating sample instances of a schema
· Language - used to access language specific data
The Tools Menu
Schemas tools can be invoked from the Schema Editor Tools menu.
Converting Schemas to a W3C compatible schema
Schemas generated in the Microsoft BizTalk compatible format (XDR format) may be saved in a format compatible with the October 2000, W3C XML schema standard. To save a schema in a W3C format:
· Select Convert to W3C from the Tools menu. The Convert to W3C dialog box appears.
· Select the schema/s to be converted. Multiple schemas may be converted in a single step.
· The name of the W3C schema is the same name as the schema with an .xsd file extension and they are saved to the same directory where the original schemas are.
· Click Convert.
Converting Schemas to a DTD
Schemas generated in the Microsoft BizTalk compatible format (XDR format) may be saved as a DTD.
· Select the Convert to DTD option from the Tools menu. The convert DTD dialog box appears.
· Select the schema/s to be converted. Note that multiple schemas may be converted in a single step.
· The name of the W3C schema is the same name as the schema with a .dtd file extension and they are saved to the same directory where the original schemas are.
· Click Convert.
Validating multiple schemas
The schema validation tool can be used to validate the correctness of an XAI schema when compared to the metainfo xml definition used to generate the schema. For each validated schema, the validation tool scans the list of elements/attributes and compares them with those defined in the XML metainfo file. Select the ‘Validate Schemas’ in the ‘Tools’ menu.
· The Validate Schema dialog box appears.
· The left list box is used to select the directory where the schemas to be validated are stored. By default this is the Schema Directory as defined in the preferences.
· On the right, the list of schemas is displayed on a grid.
· Multiple schemas may be validated in a single step.
· To select a schema click on the left button (the first column in the row).
· To select multiple schemas, hold the CTRL key and select the required schemas.
· Click Validate Schemas.
· The schema grid is updated. When an attribute defined in the schema is missing from the metainfo file or when the properties of the element do not match defined in the metainfo, a button is displayed at the right of the schema name. Clicking on the edit button, loads the schema into the editor, and displays the Schema Validation Errors dialog for that schema. You can correct the schema and save it.
This section describes the control tables available to administer your XAI environment.
Contents
Defining Outbound Message Types
XAI Class
The XAI Classes are references to actual Java classes. The XAI Class defines the Java class used to implement Receivers, Senders, Adapters and Executers. This information is provided with the system and does not need to be modified for a specific installation.
To view an XAI class, open Admin Menu, XAI Class.
Description of Page
The XAI Class and Description are unique identifiers of the XAI Class. The Class Definition indicates the Java class, implementing the adapter, receiver, sender or executer.
Owner indicates if this XAI class is owned by the base package or by your implementation (Customer Modification). The system sets the owner to Customer Modification when you add an XAI class. This information is display-only.
Where Used
Follow this link to open the data dictionary where you can view the tables that reference CI_XAI_CLASS.
XAI Envelope Handler
To view your envelope handlers, open Admin Menu, XAI Envelope Handler. This information is provided with the system and does not need to be modified for a specific installation.
Description of Page
Enter a unique XAI Envelope Handler ID and Description.
Indicate whether the Envelope Type is Default (no SOAP environment), Siebel Integration Message, Siebel VBC or SOAP Envelope.
When the envelope type is SOAP Envelope, indicate the Envelope URI.
Owner indicates if this XAI envelope handler is owned by the base package or by your implementation (Customer Modification). The system sets the owner to Customer Modification when you add an XAI envelope handler. This information is display-only.
Setting Up Your Registry
The following section describes the control tables that are logically considered part of the XAI Registry.
Contents
XAI Option
The XAI Options page defines various system settings used by the XAI and MPL servers. To define options for your environment, open Admin Menu, XAI Option.
Description of Page
Define the following information for your XAI and MPL servers.
|
Option |
Description |
MPL / XAI Option Name |
|
Attempt Classic Authentication |
Authentication information may be sent across in the SOAP header or in the HTTP header (Classic). When set to Y, the system first attempts to authenticate using information on the SOAP header. If none provided, the system attempts to authenticate this time using information on the HTTP header. This is the default option. When set to N, the system solely uses the authenticate information provided on the SOAP header. |
attemptClassicAuthentication |
|
Automatically Attempt Resending to Unavailable Senders (Y/N) |
Set to Y if you wish to enable Automatic Resend. Set to N if you wish to log errors when the system fails to send an outgoing message. |
shouldAutoResend |
|
Default Response Character Encoding |
Determines the character encoding to be used when a response is sent. For example, you may specify UTF-8 or UTF-16. If no value is specified then the default is UTF-8. If no special encoding should be done, then enter the value none. |
defaultResponseEncoding |
|
Default User |
The default user is used by XAI to access your product when no other user is explicitly specified. Refer to Server Security for more information. Additionally, the Default User is used for MPL transactions where there is no facility to provide a User ID. For example, no facility exists to provide a user id when reading messages from a JMS Queue. In these messaging scenarios, the system will use the Default User for authorization purposes. |
defaultUser |
|
Email Attachment File Location |
This is the default location of e-mail attachment files. If not specified, the e-mail service provided with the product assumes a full path is provided with each attachment file. |
emailAttachmentFileLocation |
|
Email XSL File Location |
This is the default location of e-mail XSL files. If not specified, the e-mail service provided with the product assumes a full path is provided to an XSL file as part of an e-mail request. |
emailXSLFileLocation |
|
Enforce SOAP Authentication |
By default, even if the container has already authenticated a web service request, the system would further attempt to authenticate it using SOAP header information. Set this option to N if you want to not re-authenticate a request already authenticated by the container. By default, if SOAP authentication information is not available, the system attempts to further authenticate using basic HTTP authentication. Refer to the Attempt Classic Authentication XAI option for more information. |
enforceSOAPAuthentication |
|
JDBC Connection Pool Max size |
The MPL uses a pool of JDBC connections to connect to the database. This option determines the maximum number of JDBC connections that can be opened in the pool. The default value is 100. |
JDBCConnPoolMaxSize |
|
Maximum Errors for a Sender |
This value is required if you have enabled Automatic Resend. It defines how many errors you receive from a sender when attempting to send an outgoing message before you mark the sender unavailable. |
maxSendingErrors |
|
Messages JDBC Connection |
Specifies the JDBC connection that XAI uses to read the text for its messages. |
messagesJDBCConnection |
|
Messages Language |
The default language to use for the messages. |
language |
|
MPL Administrator Port |
The port number to be used for receiving MPL operator commands. |
adminPort |
|
MPL HTTP Server Authentication Method |
This setting, along with the MPL HTTP Server User and Password are used to secure commands received by your MPL (such as those issued via XAI Command) through HTTP. Currently only BASIC authentication is supported. |
MPLHTTPAuthMethod |
|
MPL HTTP Server User |
This setting, along with the MPL HTTP Server Authentication Method and Password are used to secure commands received by your MPL (such as those issued via XAI Command) through HTTP. |
MPLHTTPAuthUser |
|
MPL HTTP Server Password |
This setting, along with the MPL HTTP Server Authentication Method and User are used to secure commands received by your MPL (such as those issued via XAI Command) through HTTP. The password should be in encrypted form, using the same encryption that is used for the database password. |
MPLHTTPAuthPassword |
|
MPL Log File |
The MPL Log File setting is used to specify the name of the file where MPL log information is to be written. The log contains technical information about the operation of the MPL. |
MPLLogFile |
|
MPL Trace File |
The MPL Trace File setting is used to specify the name of the file where MPL trace information is to be written. |
MPLTraceFile |
|
MPL Trace Type |
The MPL Trace Type is used to enable or disable tracing of the MPL. The possible values are FULL - All trace messages are written to the log file and NOLOG - No information is written to the log file. |
MPLTraceType |
|
Number of Records an MPL Receiver Will Process At a Time |
If your implementation has configured multiple MPL servers, indicate the number of records that each MPL receiver should process. |
Not currently used |
|
Outbound Message Schema Location |
Enter the full path of the virtual directory where valid W3C schemas are stored if your implementation wants to validate outbound message schemas. For example: http:/localhost/cisxai/schemas. |
xaiOuboundSchemaLoc |
|
Schema Directory |
The full path of the virtual directory where XML schemas are stored. For example: http:/localhost/cisxai/schemas. If this option is not specified, the XAI uses the current directory, from where it is being run, to locate schemas. |
schemaDir |
|
Schema Validation Flag |
Enter Y to turn on schema validation for outbound messages. Enter N to turn this off. |
xaiSchemaValidationCheck |
|
Seconds to Wait Before Marking a Sender Available |
This value is required if you have enabled Automatic Resend. It defines how many minutes to wait after marking a sender unavailable before you mark the sender available again (and retry sending messages to it). |
senderWaitTime |
|
Send SOAP Fault as HTTP 500 |
Enter Y to ensure that a SOAP error is reported as an HTTP 500 "internal server error". |
sendErrorAsHttp500 |
|
System Authentication Class |
Use this option to override the base product's default authentication method. Value must be a valid XAI Class that implements the base package WSAuthentication javainterface. |
systemAuthenticationClass |
|
System Authentication Profile |
This option enforces the mode in which user credentials are sent to the system. When set to USER only the user name is authenticated. When set to FULL, user and password are authenticated. This is the default value. |
systemAuthenticationProfile |
|
System Error JDBC Connection |
When a request fails to execute due to a system error, the MPL retries its execution several times. The MPL registers the system error in a table and uses this table for the retries. This setting specifies the JDBC connection required to access this table. Only enter a value in this field if it is different from the database environment used to read the XAI registry. |
systemErrorTableJDBCConnection |
|
System Error Max Retry |
When a request fails to execute due to a system error, the MPL retries its execution several times until a maximum number of retries is reached. This option specifies the maximum number of retries. |
systemErrorMaxRetries |
|
System Error Retry Interval |
When a request fails to execute due to a system error, the MPL retries its execution several times. This option specifies the number of seconds the MPL server waits between retries. |
systemErrorRetryInterval |
|
Thread Pool Initial Size |
The MPL uses a thread of pools to enhance performance. The MPL starts with a minimum number of threads and grows/shrinks the pool based on the MPL system load. This option specifies the initial number of threads in the thread pool. The minimum number of threads is 12. |
threadPoolInitialSize |
|
Thread Pool Max Size |
This option specifies the maximum number of threads in the thread pool. |
threadPoolMaxSize |
|
Thread Pool Non Activity Time |
This option specifies how long a thread in the pool may be inactive before it is timed out and released from the pool. |
poolNoneActivityTime |
|
To Do Type for Outbound Message Errors |
To Do type for outbound message errors. The outbound message receiver uses this To Do type when creating To Do entries for outbound messages that cannot be successfully processed. The system provides the To Do type F1-OUTMS that may be used here. |
outboundErrorTodo |
|
XAI Authentication Password |
The multi-purpose listener uses this field in combination with the XAI Authentication User when attempting to communicate with the XAI server over HTTP, which is running on a secured servlet and requires authentication. |
HTTPBasicAuthPassword |
|
XAI Authentication User |
The multi-purpose listener uses this field in combination with the XAI Authentication Password when attempting to communicate with the XAI server over HTTP, which is running on a secured servlet and requires authentication. |
HTTPBasicAuthUser |
|
XAI Trace File |
The full path name for the file, where the XML messages should be written. For example: c:\inetpub\wwwroot\cisxai\xai.log. |
traceFile |
|
XAI Trace Type |
Use this option to specify the level of logging. The possible values are FULL - All XML messages are written to the log file and NOLOG – No information is written to the log file. Refer to Server Trace for more information about tracing. |
traceType |
|
XSL Directory |
The full path of the virtual directory where XSL transformation scripts are located. XSL transformation scripts can be defined for each service. By default, this is the same directory as the schemas directory. |
XSLDir |
Where Used
Used by the XAI tool to obtain various required settings and locations.
Note. The information in this table is cached by the XAI server and by the MPL server. Changes to values in this table do not affect the runtime copy of these servers. Refer to How to Refresh the Runtime Copy of the Registry for steps required to ensure that the servers use the most current data.
XAI JNDI Server
To define a new JNDI Server, open Admin Menu, XAI JNDI Server.
Description of Page
Enter a unique XAI JNDI Server and Description.
Indicate the Provider URL, which is the URL of the JNDI server.
Indicate the Initial Context Factory, which is a Java class name used by the JNDI server provider to create JNDI context objects.
Where Used
Follow this link to open the data dictionary where you can view the tables that reference CI_XAI_JNDI_SVR.
Note. The information in this table is cached by the XAI server and by the MPL server. Changes to values in this table do not affect the runtime copy of these servers. Refer to How to Refresh the Runtime Copy of the Registry for steps required to ensure that the servers use the most current data.
XAI JDBC Connection
To enter or view an XAI JDBC Connection, open Admin Menu, XAI JDBC Connection.
Description of Page
Enter a unique XAI JDBC Connection and Description.
Use the Connection Type to indicate how the JDBC connects to a database. The following connection types are valid:
· Oracle Defined Connection indicates the connection is to an Oracle database through a JNDI entry.
· DB2 Defined Connection indicates the connection is to a DB2 database through a JNDI entry.
· JNDI Defined Connection indicates the connection is using the MQ series classes implementing JMS.
· Determined by parameter file indicates that the connection information should be determined by looking at the parameters defined at Installation.
For connection types of Oracle or DB2, use the JDBC URL to indicate URL of the database connection to be initialized at XAI/MPL startup time. Indicate the Database User and Database Password required for accessing the database. The JDBC connection URL can either be a Type 2 or a Type 4. For example:
· Type 2: jdbc:oracle:oci8:@CD200ODV
· Type 4: jdbc:oracle:thin:@myhost:1521/ CD200ODV
For a connection type of Determined by parameter file, indicate the parameter substitutions, which should be accessed from the parameter file for the JDBC URL, database user and database password, for example, @JDBCURL@, @DBUSER@ and @DBENCPASS@.
When the connection type is JNDI, indicate the XAI JNDI Server and the JNDI Data Source name as defined in the JNDI.
Where Used
Follow this link to open the data dictionary where you can view the tables that reference CI_XAI_JDBC_CON.
Note. The information in this table is cached by the XAI server and by the MPL server. Changes to values in this table do not affect the runtime copy of these servers. Refer to How to Refresh the Runtime Copy of the Registry for steps required to ensure that the servers use the most current data.
XAI JMS Connection
To define a JMS Connection, open Admin Menu, XAI JMS Connection.
Description of Page
Enter a unique XAI JMS Connection and Description.
Indicate the XAI JNDI Server to be used. Refer to XAI JNDI Server for more information.
Use the JNDI Connection Factory to indicate the lookup keyword in the JNDI server used to locate the JMS connection.
Where Used
Follow this link to open the data dictionary where you can view the tables that reference CI_XAI_JMS_CON.
Note. The information in this table is cached by the XAI server and by the MPL server. Changes to values in this table do not affect the runtime copy of these servers. Refer to How to Refresh the Runtime Copy of the Registry for steps required to ensure that the servers use the most current data.
XAI JMS Queue
To define your JMS Queue values, open Admin Menu, XAI JMS Queue.
Description of Page
Enter a unique XAI JMS Queue and Description.
Enter the Queue Name as defined in the JNDI server. This is the JNDI lookup name identifying the queue.
Use the Target Client Flag to indicate whether or not the target client is JMS or MQ.
Select the XAI JNDI Server where the queue is defined. Refer to XAI JNDI Server for more information.
Where Used
Follow this link to open the data dictionary where you can view the tables that reference CI_XAI_JMS_Q.
Note. The information in this table is cached by the XAI server and by the MPL server. Changes to values in this table do not affect the runtime copy of these servers. Refer to How to Refresh the Runtime Copy of the Registry for steps required to ensure that the servers use the most current data.
XAI JMS Topic
To define your JMS Topic values, open Admin Menu, XAI JMS Topic.

XAI JMS Topic - Main
Description of Page
Enter a unique XAI JMS Topic and Description.
Select the XAI JNDI Server where the topic is defined. Refer to XAI JNDI Server for more information.
Enter the Topic Name as defined in the JNDI server. This is the JNDI lookup name identifying the topic.
Where Used
Follow this link to open the data dictionary where you can view the tables that reference CI_XAI_JMS_TPC.
Note. The information in this table is cached by the XAI server and by the MPL server. Changes to values in this table do not affect the runtime copy of these servers. Refer to How to Refresh the Runtime Copy of the Registry for steps required to ensure that the servers use the most current data.
XAI Format
Open Admin Menu, XAI Format to define the various formats.
Description of Page
For each new format, specify a unique XAI Format name and Description.
Indicate whether the Format Type is a Currency formatting string, a Date/Time formatting string, a Phone formatting string or a Text formatting string.
Finally, indicate the Format Expression, which defines the formatting pattern to be applied.
Owner indicates if this format is owned by the base package or by your implementation (Customer Modification). The system sets the owner to Customer Modification when you add an XAI format. This information is display-only.
Where Used
Follow this link to open the data dictionary where you can view the tables that reference CI_XAI_FORMAT.
Note. The information in this table is cached by the XAI server and by the MPL server. Changes to values in this table do not affect the runtime copy of these servers. Refer to How to Refresh the Runtime Copy of the Registry for steps required to ensure that the servers use the most current data.
XAI Adapter
To define a new adapter, open Admin Menu, XAI Adapter.
Description of Page
Indicate a unique Adapter Name and Description.
Indicate the XAI Class, which is the name of the Java class, implementing the adapter. The class should be one that is defined for an adapter. The adapter classes provided with the product are BASEADA – Core Adapter, BUSINESSADA - Business Requests Adapter, LDAPIMPRTADA - LDAP Adapter, SIEBELADA – Siebel XML Gateway Adapter, STGUPADA – Staging Upload Adapter, XAICMNDADA – XAI Command Adapter.
Refer to XAI Class for more information.
The following fields are not applicable for the BusinessAdapter adapter.
Use the XAI JNDI Server to indicate the name of the WebLogic JNDI server running your product. Refer to XAI JNDI Server for more information.
Indicate the Default User to be passed to your product server when this adapter is executed.
Note. If the XML request is sent over an HTTP connection, which has been authenticated, the authenticated User Id is passed to your product.
The Default Date format and the Default DTTM (date / time) Format specify date and date/time formats to use when a schema does not explicitly indicate formats.
Owner indicates if this XAI adapter is owned by the base package or by your implementation (Customer Modification). The system sets the owner to Customer Modification when you add an XAI adapter. This information is display-only.
Where Used
Follow this link to open the data dictionary where you can view the tables that reference CI_XAI_ADAPTER.
Note. The information in this table is cached by the XAI server and by the MPL server. Changes to values in this table do not affect the runtime copy of these servers. Refer to How to Refresh the Runtime Copy of the Registry for steps required to ensure that the servers use the most current data.
XAI Executer
To define a new Executer, open Admin Menu, XAI Executer.
Description of Page
Enter a unique Executer ID and Description.
Indicate the XAI Class for this executer. The class should be one that is defined for an executer. The executer class provided with the product is XAIURLEXEC – XAI Executer.
Indicate the appropriate Executer URL.
Owner indicates if this XAI executer is owned by the base package or by your implementation (Customer Modification). The system sets the owner to Customer Modification when you add an XAI executer. This information is display-only.
Where Used
Follow this link to open the data dictionary where you can view the tables that reference CI_XAI_EXECUTER.
Note. The information in this table is cached by the XAI server and by the MPL server. Changes to values in this table do not affect the runtime copy of these servers. Refer to How to Refresh the Runtime Copy of the Registry for steps required to ensure that the servers use the most current data.
XAI Sender
Contents
XAI Sender - Main
To define a new sender, open Admin Menu, XAI Sender.
Description of Page
Enter a unique XAI Sender and Description.
Use Invocation Type to define whether the sender is a Real-time sender or called by MPL to route near real-time messages. The default is MPL.
Indicate the XAI Class for this sender. The class should be one that is defined for a sender. The sender classes are DWNSTGSNDR – Download Staging sender, EMAILSENDER – Email sender, FLATFILESNDR – Flat file sender, HTTPSNDR – HTTP sender, JMSSENDER – JMS Queue sender, STGSENDER – Staging Upload sender, TPCSNDR – JMS Topic sender and UPLDERRHNDLR – Upload Error Handler.
Indicate whether or not this sender is currently Active.
Indicate whether the MSG Encoding is ANSI message encoding or UTF-8 message encoding.
If the XAI Class is JMSSENDER or TPCSNDR indicate the appropriate XAI JMS Connection
Refer to XAI JMS Connection for more information.
If the XAI Class is JMSSENDER, use the XAI JMS Queue to define where the response is to be sent.
Refer to XAI JMS Queue for more information.
If the XAI Class is TPCSNDR, use the XAI JMS Topic to define where the response is to be sent.
Refer to XAI JMS Topic for more information.
If the XAI class for this sender is STGSENDER indicate the XAI JDBC Connection.
Refer to XAI JDBC Connection for more information.
XAI Sender - Context
The sender may require context information to define additional information needed by XAI to successfully send outgoing messages. Open Admin Menu, XAI Sender and navigate to the Context tab.
Description of Page
Define the Context Type and Context Value, which contain parameters for senders when more information is required. For example, flat file senders need to indicate the file path and name. Email senders need to indicate a server, user name and password.
Refer to Designing XAI Senders for more information about the various senders that may require context information.
Note. The values for the Context Type field are customizable using the Lookup table. This field name is SENDER_CTXT_FLG.
Where Used
Follow this link to open the data dictionary where you can view the tables that reference CI_XAI_SENDER.
Note. The information in this table is cached by the XAI server and by the MPL server. Changes to values in this table do not affect the runtime copy of these servers. Refer to How to Refresh the Runtime Copy of the Registry for steps required to ensure that the servers use the most current data.
XAI Group
XAI groups are used to process XML files, which contain a collection of XML messages to be uploaded in batch.
Contents
XAI Group - Main
To define your XAI groups, open Admin Menu, XAI Group.
Description of Page
Enter a unique Group and Description for the XAI Group.
Indicate the Parser used for this group. Possible values are Dom Parser and StAX Parser.
Note that Dom Parser reads the full XML document into memory and therefore is not ideal for larger XML documents.
Indicate the XPath and XPath Value, which an XML file receiver uses to identify which group a given XML file belongs to.
· For StAX Parsers the XPath is limited to the root element.
· For Dom Parsers, the XPath supports defining elements at a lower level than the root element.
XAI Group - Attachments
Open Admin Menu, XAI Group and navigate to the Attachments tab to define attachments for your group.
Description of Page
For each entry in the attachments collection, indicate the Sequence and the Root Element. Use Include Elements to indicate if Parent elements should be included along with the current element when applying the XAI rules.
Refer to XML Message File for more information about how this is used.
XAI Group - Rules
Open Admin Menu, XAI Group and navigate to the Rules tab to define rules for your group.
Description of Page
For each entry in the rules collection, indicate the Sequence, the Priority, the XPath name and XPath Value and the XSL File Name.
Include Parent. If your attachment indicates that Parent elements should be included, be sure that the parent element is included in the XPath defined here.
Refer to XML Message File for more information about how this is used.
Where Used
Follow this link to open the data dictionary where you can view the tables that reference CI_XAI_RGRP.
XAI Receivers
Contents
XAI Receiver - Main
To define your XAI receivers, open Admin Menu, XAI Receiver.
Description of Page
Enter a unique Receiver ID and Description for the XAI Receiver.
Indicate the XAI Class for this receiver. The class should be one that is defined for a receiver. The receiver classes are DWNSTGRCVR – Download Staging receiver, FILESCANRCVR – Upload Files from a directory, JMSRCVR – JMS Queue receiver, OUTMSGRCVR - Outbound Message receiver, STGCTLRCVR – Staging Control receiver, STGRCVR - Staging Upload Receiver and TPCRCVR – JMS Topic receiver, XMLFILERCVR - XML File receiver.
For more information, refer to Designing XAI Receivers about different types of receivers.
Indicate whether or not this receiver is currently Active.
Identify the Executer ID. For more information, refer to XAI Executer.
Indicate whether the MSG Encoding is ANSI message encoding or UTF-8 message encoding.
The Read Interval indicates the number of seconds between read cycles.
Start At Time and Duration are not currently in use.
If the XAI class for this receiver is FILESCANRCVR, STGRCVR, STGCTLRCVR or XMLFILERCVR, indicate the XAI JDBC Connection.
Refer to XAI JDBC Connection for more information.
Turn on Sequential Execution if the received requests should be processed in sequential order (instead of multithreaded). If this value is turned on then XAI staging control records created by this receiver are marked for sequential execution.
JMS Information
The following information is only available if the XAI Class is JMSRCVR or TPCRCVR.
Indicate the appropriate XAI JMS Connection
Refer to XAI JMS Connection for more information.
Indicate the appropriate XAI JMS Queue.
Refer to XAI JMS Queue for more information.
Indicate the appropriate and XAI JMS Topic.
Refer to XAI JMS Topic for more information.
File Information
The following information is only available if the XAI Class is FILESCANRCVR or XMLFILERCVR.
Use the Scan Directory to indicate where to look for new files.
In Scan File,indicate the file pattern. All files with names matching the pattern are uploaded into the staging upload table. For each file found, a record in the staging control table is created.
WARNING. MPL expects all files conforming to the Scan File pattern to be complete. If a file is in the process of being copied into the scan directory and its name conforms to the naming pattern, MPL still attempts to process it and may issue an error for the incomplete file. It is suggested that files first be copied into the scan directory with a different name that does not conform to the naming pattern, for example filename.xml.inprocess. Once the file copy/transfer is complete, rename the file to one that conforms to the naming pattern, for example, filename.xml.
The following information is only available if the XAI Class is FILESCANRCVR.
Use the XAI In Service Name to indicate how the records in the file are mapped and how they are transformed to match a system service request structure.
XAI Receiver - Context
Open Admin Menu, XAI Receiver and navigate to the Context tab to define context for your receiver.
Description of Page
The Context collection enables you to define a collection of Context Types and Context Values defining. Use this collection when you need to store an attribute of a receiver that is not catered for in the current table.
Note. The values for the Context Type field are customizable using the Lookup table. This field name is RCVR_CTXT_FLG.
XAI Receiver - Response
Open Admin Menu, XAI Receiver and navigate to the Response tab to define where to send responses to requests made by this receiver. Refer to Designing Responses for a Receiver for more information.
Description of Page
The response collection enables you to define the destination (XAI Sender) where responses to a request may be sent under various circumstances (Event). The events currently defined with the product are All events, Message executed OK, Application Error, System Error.
Note. The values for this field are customizable using the Lookup table. This field name is ON_EVENT_FLG.
XAI Receiver - Groups
Open Admin Menu, XAI Receiver and navigate to the Groups tab to the valid XAI groups for an XML file receiver.
Description of Page
This collection is only available if the XAI Class is XMLFILERCVR.
For each entry in the Group collection, indicate the Priority and the Group. Refer to XAI Groups for more information about defining groups.
Where Used
Receivers are used by the XAI server and by the MPL server to process messages sent to the system from various sources.
Note. The information in this table is cached by the XAI server and by the MPL server. Changes to values in this table do not affect the runtime copy of these servers. Refer to How to Refresh the Runtime Copy of the Registry for steps required to ensure that the servers use the most current data.
Service Program
This transaction defines services available in the system. These include user interface services as well as stand-alone XAI services. A service may be invoked by XAI and as such may be referenced by an XAI Inbound Service. Use this transaction to introduce a new stand-alone XAI service.
Select Admin Menu, Service Program to maintain service programs.
Description of Page
Define a Service Name for your new service.
Important! If you introduce new services, you must prefix them with CM. If you do not do this, there is a possibility that a future release of the application could introduce a new service name with the name you allocated.
Owner indicates if this service is owned by the base package or by your implementation (Customer Modification). The system sets the owner to Customer Modification when you add a service. This information is display-only.
Description describes the service.
Service Type indicates whether the service is a Java Based Service or a Cobol Based Service.
This Program Component grid shows the list of program user interface components associated with the service. For a stand-alone XAI service this list is optional.
Where Used
Follow this link to open the data dictionary where you can view the tables that reference CI_MD_SVC.
XAI Inbound Services
The XAI Inbound Services section in the registry is the main section of the registry. It is used to define the service characteristics. Basically, a service is defined by an Adapter responsible for executing the service, a pair of XML schemas and connection attributes. The Adapter defines the interface with the target application server, while the schemas define the structure of the request XML document expected by the service and the structure of the response XML document generated by the service.
Contents
XAI Inbound Service - Parameters
XAI Inbound Service - Main
To create or update an inbound service, open Admin Menu, XAI Inbound Service.
Important! If you introduce new inbound services, you must prefix the XAI In Service Name with CM. If you do not do this, there is a slight possibility that a future release of the application could introduce a new XAI inbound services with the name you allocated.
Description of Page
Define a unique XAI In Service Name. This information is used in the system to identify the service. The service name is also the first XML element after the <Body> element in the XML request/response document. The system generates a unique XAI Service ID, which serves as the primary key.
Owner indicates if this XAI inbound service is owned by the base package or by your implementation (Customer Modification). The system sets the owner to Customer Modification when you add an XAI inbound service. This information is display-only.
Indicate the Adapter, which defines the interface with the target application server.
Refer to XAI Adapter for more information.
If adapter for this service should invoke a system service, then indicate the appropriate Service Name.
Refer to Service Program for more information about defining services.
If adapter is the base package Business Adapter then Service Name does not appear. Instead, use Schema Type to indicate the type of object this service invokes and Schema Name to reference the object to invoke. Using this adapter, you may set up service to invoke business objects, business services and service scripts.
Refer to Designing XAI Adapters for more information about the Business Adapter.
Use the Description and Long Description to describe the service.
Check the Active switch if this service is enabled and available for execution. If this switch is unchecked, then the service is defined in the registry, but not yet available for public use.
Check the Post Error switch to support inbound message error handling for messages that are not processed via the staging upload table.
Check the Trace switch if you would like the trace to be on for this particular service. If the general trace option is not activated, you can force a trace for a particular service.
Refer to Server Trace for more information about trace functionality.
When the Debug switch is checked, debug information is generated on the XAI console when this service is executed. The debug information can be useful to resolve problems.
Schemas Definitions
Note. Request Schema and Response Schema are not applicable to services invoking schema-based objects. They do not appear when the Business Adapter is used.
The next two properties define the request and response XML schemas. The schemas were created using the Schema Editor and are SOAP compatible. The schema XML files are expected to be stored in the Schemas Directory on the Web server running the XAI server.
The Request Schema is the XML schema defining the service request. The request sent to the server must adhere to the schema definition.
The Response Schema is the XML schema defining the service response. The response generated by the XAI server corresponds to the response schema definition.
The same service may perform several actions on a business object. Use the Transaction Type to define the default action performed by a service. The transaction type can be provided when invoking a service, by dynamically specifying a transaction type attribute on the Service element of the XML request. This field may take the following values: Read, Add, Change, Update, Delete, List and Search.
Note. The difference between Change and Update is that for Change, all field values must be passed in with the request. Field values that are not passed in to the request are set to null. For Update, you need only pass the primary key field values and the values of the fields to be updated. All other fields retain their existing values.
Services, which perform a Search, may allow searching based on different criteria. When the Transaction Type value is Search, use the Search Type to define the default search criteria. The possible values are Main, Alternate1, Alternate2, Alternate3, Alternate4, Alternate5 and Alternate6.
Note. This is a default definition only and it may be overridden at run time when the service is invoked. To override the search type at run time, you should specify the searchType attribute on the Service element of the XML request.
XSL Transformation Definitions
Sometimes, the XML request document does not conform to the request schema, or the response document expected by the service requestor is not the one generated by the adapter. In such cases the request and/or the response documents must be transformed. The XAI server supports transformation through XSL transformation scripts. Transformation scripts may be applied to the request before it is passed to the adapter or applied to the response document before it is sent to the service requestor.
The Request XSL is the name of the XSL transformation to be applied to the request document before processing it. The transformation is usually required when the incoming document does not correspond to the XAI service request schema therefore it has to be transformed before it can be processed by the adapter.
The Response XSL is the name of the XSL transformation to be applied to the response document when the requester of the service expects the response to have a different XML document structure than the one defined by the response schema for the service.
Click the WSDL hyperlink to view the WSDL definition for the inbound service. Refer to WSDL Catalog for more information on how to obtain the WSDL catalog for all XAI Inbound Services.
XAI Inbound Service - Staging
The staging tab is used to define parameters for services that use the Staging Upload adapter.
Refer to XAI Upload Staging for more information.
Open Admin Menu, XAI Inbound Service and navigate to the Staging tab to define attributes for your upload staging adapters.
Description of Page
Indicate the Staging File Type to be processed by the staging upload service. Possible values are Comma Delimited file, Database Extract and Sequential file.
The format of the records in the input file are not in an XML format and do not correspond to an XAI service schema. As a result, the input record must be transformed into an XML message that conforms to an XAI service request schema. Enter the Record XSL, which indicates the XSL transformation script used to transform the input record into the appropriate XML message.
For sequential files and Comma delimited files, indicate the Input File Name to be processed.
Note that this parameter can be overridden in the Staging Control table, when a request to execute such a service is made.
When the service takes its input from a Database extract, indicate the JDBC Connection used to connect to the database that contains the input data.
Note that if this value is not populated, XAI uses the default JDBC connection, which is the current product database.
Refer to XAI JDBC Connection for more information about defining these values.
Use the Interface Name to provide a description of the interface being implemented through this service.
XAI Inbound Service - Parameters
This tab enables you to define parameters that are used as selection criteria by the DB Extract staging upload service.
Open Admin Menu, XAI Inbound Service and navigate to the Parameters tab.
Description of Page
The Parameters that were defined under the Request element in the schema are displayed here. They are used to drive the extraction process. This tab only displays the list of parameters. The values for these parameters can later be entered when the control record to invoke this service is created.
Refer to Staging Control Parameters for more information.
Owner indicates if this XAI inbound service is owned by the base package or by your implementation (Customer Modification). The system sets the owner to Customer Modification when you add an XAI inbound service. This information is display-only.
Where Used
Follow this link to open the data dictionary where you can view the tables that reference CI_XAI_IN_SVC.
Note. The information in this table is cached by the XAI server and by the MPL server. Changes to values in this table do not affect the runtime copy of these servers. Refer to XAI Command for information about refreshing a service.
XAI Route Type
XAI Route Type is specific to Oracle Tax and Utilities Customer Care and Billing.
Defining Outbound Message Types
Use this page to define basic information about an outbound message type. Open this page using Admin Menu, Outbound Message Type.
Note. This page is not available if the Outbound Message module is turned off.
Description of Page
Enter a unique Outbound Message Type and Description. Use the Detailed Description to describe the outbound message type in detail.
Indicate the Business Object that defines business rules and the schema for outbound messages of this type.
Indicate the relative Priority for processing outbound message records of this type with respect to other types.
This bottom of this page contains a tree that shows the various objects linked to the outbound message type. You can use this tree to both view high-level information about these objects and to transfer to the respective page in which an object is maintained.
Where Used
Follow this link to open the data dictionary where you can view the tables that reference F1_OUTMSG_TYPE.
External Systems
Use this page to define an external system and define the configuration for communication between your system and the external system.
Contents
External System - Template Use
External System - Main
Open this page using Admin Menu, External System.
Note. This page is not available if both the Outbound Message and the Open Market Interchange modules are turned off.
Description of Page
Enter a unique External System and Description.
Use the field Our Name In Their System to specify the identity of your organization (i.e., your external system identifier) in the external system.
If this external system sends inbound communications through notification upload staging, the type of workflow process that is created is controlled by the sender’s W/F (Workflow) Process Profile.
If you send notifications to this external system, select a Notification DL (download) Profile that is used to define the configuration of the outgoing messages (Oracle Customer Care and Billing only).
Note. The workflow process profile and notification download profile are not visible if Open Market Interchange module is turned off.
Note. The remaining fields are not visible if the Outbound Message module is turned off.
Set Usage to Template External System for external systems whose outbound message type configuration is inherited by other external systems.
If the outbound message type configuration should be inherited from a template external system, define the Template External System. If this field is specified, the outbound message type collection displays the data defined for the template system as display-only.
The Outbound Message Type accordion contains an entry for every type of outbound message defined for this external system. For each type of outbound message identify its Outbound Message Type.
Define the Processing Method for messages of this type. If the value is XAI, indicate the appropriate XAI Sender. If the value is Batch, indicate the appropriate Batch Control.
The Message XSL is the schema used to transform information from the format produced by the system to a format understood by the sender, who receives a message of this type.
Enter the file name of the appropriate W3C Schema if you want to validate the message built for outbound messages for this external system / outbound message type prior to being routed to their destination. Refer to Outbound Message Schema Validation for more information.
Response XSL will have the same search service as is used for the existing Message XSL field. This field will only be displayed when the processing method is Real-time. Refer to Outgoing Messages for more information on how it is used.
External System - Template Use
If you are viewing an external system whose usage is a Template External System, use this page to view the other external systems that reference this one. Open this page using Admin Menu, External System and then navigate to the Template Use tab.
Description of Page
The tree shows every external system that references this external system as its template.
This section describes various tools provided to enable your XAI administrators to more easily maintain your XAI environment.
Contents
XAI Submission
This page exists for testing purposes. It allows you to create an XML request document and submit it to the system, to ensure that the XML has been built correctly.
Contents
XAI Submission - Main
To submit an XML document for testing, navigate to Admin Menu, XAI Submission and navigate to the main tab.
Description of Page
This page is used to test XML schemas, which are defined for the XAI tool. Enter an appropriate XML document in the XML Request field. Typically, you define the XML schema using the schema editor in the XAI application. Then you would copy and paste the document here, then modify the schema to enter actual data for testing purposes.
When you have entered the document, choose Save to submit this document to the system. Note that this request information is not saved anywhere. It simply calls the system with the appropriate service name and executes the XML request.
Navigate to the Response tab to view the response.
XAI Submission - Response
To view the response to a XML document for testing, navigate to the response tab.
Description of Page
After choosing Save on the main tab to submit a test for an XML request, the response to your request is displayed in the XML Response text box.
XAI Dynamic Submission
This page exists for testing purposes. It is similar to the XML Submission page, but it dynamically builds your XML document based on a selected XAI service and data that you enter.
Contents
XAI Dynamic Submission - Response
XAI Dynamic Submission - Main
To create and submit an XML document for testing, navigate to Admin Menu, XAI Dynamic Submission and navigate to the main tab.
Description of Page
Select the XAI In Service Name, which identifies the XAI Inbound Service called by the XAI tool to load/update the system data. After selecting, click Load UI. This button causes the system to read the XML schema associated with the service and build the screen with the associated prompts and fields, which enables a user to enter data.
Testing schema. This page tests submitting the schema referenced on an XAI inbound service. If your service references an XSL transformation script, that information is ignored. This page tests post-XSL transformation.
Select the Transaction Type associated with this XML request. The valid values are Add, Change, Delete, List, Read, Search and Update. This information is built into the XML request document.
Set the Trace option to yes to request level tracing to be executed inside the XAI tool. This results in information written to a file, which may be useful in debugging.
The bottom portion of the screen contains field prompts and input fields for the data associated with the XML request linked to this service. The system dynamically builds this portion of the page by reading the XML Request associated with the service. You can enter data in the displayed fields.
Note that this page also generates other tabs dynamically for any collections that exist for the service being displayed. These tabs vary based on the service. The response tab is the only other tab that is always present.
Enter values in the appropriate fields. You need to have some knowledge of what information is needed based on the service and transaction type. For example, if your service is accessing the account record and you want to read the record, you only need to provide the account id. However, if your transaction type is add, you need to fill in all the fields necessary for adding an account. If you have not entered values correctly, you receive an error in the Response.
When finished entering values in the fields, click Show XML to see the XML request built based on the schema and the values of the fields entered.
If everything looks OK, click Submit to execute the XML request. Note that this request information is not saved anywhere. It simply calls the system with the appropriate service name and executes the XML request.
You are brought to the Response tab, where you may view the response.
XAI Dynamic Submission - Response
To view the response to the XML document submitted for testing, navigate to the response tab.
Description of Page
After choosing Submit on the main tab to submit a test for the XML request built dynamically, the response to your request is displayed in the XML Response text box.
Additional XAI Tools
This section introduces some additional tools to help you maintain your XAI environment.
Contents
XAI Service Export
The service export page allows you to export the definition of an XAI Inbound Service to a file. This function may be helpful if you need to copy the definition of this service to a separate environment. To export a service, open Admin Menu, XAI Service Export.
Description of Page
Upon entry into this page, you are provided with the current list of XAI Inbound Services and their Descriptions. Use the XAI In Service Name search field to find the XAI service that you would like to export.
Use the Export? column to indicate which XAI service(s) you would like to export. Once you have selected your services, choose Save.
Note. If multiple services are selected, they are exported together into the same output file.
You are presented with the standard File Download dialogue where you can open or save the file.
XAI Service Import
The service import page allows you to import the definition of an XAI Inbound Service from a file into the XAI service table. This function may be helpful if you need to copy in the definition of this service from a separate environment. To import a service, open Admin Menu, XAI Service Import.
Description of Page
Upon initial entry into this page, you are provided with an input field, where you can enter the file name to import. Click Browse to search for the desired file in a directory.
Once the file is identified, click Read File, to read in the contents of the file.
Note. The format of the file must include tags indicating the column names for XAI Inbound Service table along with the values of the columns. For an example of how the format should be, simply go to the XAI Service Export page, export a Service and view the format of the resulting file.
Once the file has been read in, the list of XAI services found defined within the file is displayed in the Import grid, identified by their XAI In Service Name and Description. In the Import? column, indicate which services to import.
If a service with this service name already exists in the table, you must check the Overwrite Existing switch in order to indicate that the imported file information should replace the current service. An XAI Inbound Service that is provided as part of the system (i.e., with an owner of Base Product) may not be overwritten.
Click Save to proceed with the import. If any problems are found, information is displayed in the Message Text column.
XAI Command
Use the XAI Command page to send commands to the XAI and MPL server. To execute a command, open Admin Menu, XAI Command.
Description of Page
The following operator commands may be sent to the XAI server. For each of these commands, you may check Also Sent to MPL URL, in which case, the command is also sent to the MPL server. You need to indicate the URL of the MPL server.
Display Registry Use this command to display the current registry information that the XAI instance is running with.
Refresh Code and Description This is related to an attribute in the schema editor where you may indicate that the description of a control table code should be returned along with the code itself. This information is kept in cache memory in the server. As a result, changes made to descriptions have no effect on the runtime server. This command clears the cache of control table codes and descriptions accessed by the server. Refer to How to Create Code Description Attribute for more information.
Refresh Registry The registry contents are kept in cache memory in the server. As a result, making changes to the registry control tables has no effect on the runtime server. Use this command to refresh the contents of the registry cache with the new values in the registry control tables. The command reloads all registry control table data into the server.
Refresh Schema Schema definitions are stored in cache memory on the XAI server. As a result, modifying a schema definition has no effect on the runtime server. To refresh schema definitions, use the Refresh Schemas command.
Refresh Service Service definitions are stored in cache memory on the XAI server. As a result, modifying an XAI inbound service definition has no effect on the runtime server. To refresh service definitions, use the Refresh Service command. You are prompted to indicate which service to refresh.
Refresh XSL XSL Transformation script definitions are stored in cache memory on the XAI server. As a result, modifying an XSL transformation definition has no effect on the runtime server. To refresh XSL transformation definitions, use the Refresh XSL command.
Trace On Use this command to start the XAI server trace.
Trace Off Use this command to stop the XAI server trace.
XAI Trace Clear Use this command to clear the contents of the trace file.
XAI Trace Swap Use this command to rename the current trace file by appending the date and time to the end. A new trace file is then created with the name as defined in the XAI option page.
The following operator commands can be sent to the MPL server. You must set the URL of the MPL server first.
MPL Refresh Executer Executer definitions are stored in cache memory. As a result, adding or modifying executer definitions has no effect on the runtime server. Use this command to refresh executer definitions. You are prompted to indicate the executer to refresh.
MPL Refresh Receiver Receiver definitions are stored in cache memory. As a result, adding or modifying receiver definitions has no effect on the runtime server. Use this command to refresh receiver definitions. You are prompted to indicate the receiver to refresh.
MPL Refresh Sender Sender definitions are stored in cache memory. As a result, adding or modifying sender definitions has no effect on the runtime server. Use this command to refresh sender definitions. You are prompted to indicate the sender to refresh.
MPL Start Receiver Use this command to start a particular receiver. You are prompted to indicate the receiver to start.
MPL Stop Use this command to stop all MPL activity. It stops all receivers and waits for all executers and senders to complete.
MPL Stop Receiver Use this command to stop a particular receiver. You are prompted to indicate the receiver to stop.
MPL Trace On Use this command to start the MPL server trace.
MPL Trace Off Use this command to stop the MPL server trace.
When you have chosen the appropriate command and indicated any extra information, click Send Command to send the command to the server(s).
If you have sent a command to the XAI Server, then the bottom portion of the screen displays the response in the XAI Response. If you have sent a command to the MPL Server, then the bottom portion of the screen displays the response in the MPL Response. If you have sent a command to both servers, the bottom portion of the screen displays both responses.
MPL Exception
The MPL Exception table is used by the MPL to keep information about requests that resulted in a system error. These are errors that occurred inside the MPL. For example, if the MPL fails to send a request to XAI (maybe WebLogic is down), this is a system error, which would be logged in the MPL exception table.
There are errors that are defined recoverable. This means that the MPL will retry the action that failed, according to the parameters it received.
Server Trace
The XAI server traces every request and response. The requests/responses are written to a trace file on the server. The trace file may be viewed using the Trace Viewer.
Contents
Starting the Trace
The log starts automatically based on definitions in the XAI Options in the traceType and traceFile options. To manually start the trace:
· Navigate to Admin Menu, XAI Command
· Select the Start Trace command from the command dropdown
· Click Send Command
Stopping the Trace
· Navigate to Admin Menu, XAI Command
· Select the Stop Trace command from the command dropdown
· Click Send Command
Trace Viewer
Use the Trace Viewer utility to view the log file. The Trace Viewer is installed when you install the XAI client tools. It can be found in the XAI program group under Start/Programs.
Contents
Main Page
When the Trace Viewer starts, select a trace file to view. A trace file may be opened in one of two ways:
· To open a trace file directly from its location on the web application server, use the File, Open HTTP menu item and provide the appropriate URL.
· To open a trace file on the local/network file system use the File, Open menu item
Description of Page
Once a trace file is opened, it displays a list of all the requests on the left side including the Service Name, the Start Time and the End Time.
To display the XML contained in the request and response entries for a displayed request, select a request entry.
Filtering Options
Since the trace file may contain a very large number of messages, the trace viewer limits the number of messages that can be displayed. It does that by displaying messages traced within the last x number of Minutes, Hours or Days.
Use the Max Messages to limit the number of messages displayed.
Default Note. By default, the Trace viewer displays the first 200 messages in the trace file.
To view only errors in the trace, check the Show only Errors option.
Refresh Display.
After changing any of the above filtering options, click the refresh
button ![]() in order to redisplay the request
entries based on the new options.
in order to redisplay the request
entries based on the new options.
The First Message Found field indicates the date and time of the earliest entry in the trace file.
Viewing as Text
To view the trace file as text rather than viewing each entry in its XML format, use the View, As Text menu option. The contents of the trace file are displayed in text format in a separate window.
Statistics Page
Use the View, Statistics menu item to view the statistic page, which displays performance statistics about the XAI services that were executed in the XAI trace file.
For each type of XAI Service and transaction type, it displays the following information based on the requests traced in the XAI trace file:
· The Service Name with the transaction type in parentheses
· The Number of calls for this service in the listed trace records
· The Average duration Time (in seconds)
· The Maximum duration Time (in seconds)
· The Minimum duration Time (in seconds)
Requests Included in Statistics. Only requests falling in the time selection criteria and listed on the main log viewer are processed for calculating the statistics.
To display a Duration Chart for a particular service, check the Service. A chart such as the one below is displayed.
Contents
How to Build the XML Request Document
Structure of an XML Response Document
Testing a Schema Using the Schema Editor
How To Create Code Description Attribute
How To Create a Private Attribute
How To Create an XSL Transformation
How an Email Message is Constructed
How to Refresh the Runtime Copy of the Registry
How to Build the XML Request Document
To execute a service, an application sends an XML request document over HTTP or to one of the XAI defined receivers. The request document must be built according to the request schema defined for that service. In addition, it is recommended that request documents adhere to the SOAP protocol. For these cases, a SOAP envelope must wrap the request document.
A request document contains the following elements:
SOAP-ENV:Envelope
SOAP-ENV:Body
Inbound Service Name
Service Element
[Service Header]
[Service Details]
The Service Header and the Service Details elements are optional (unless specified otherwise in the request schema) but at least one of the service header or details element must appear in the request. For retrieval service, usually the Header is enough, for maintenance service the Details element is enough. All other elements are mandatory.
The following XML document shows a simple request adhering to the SOAP standard.
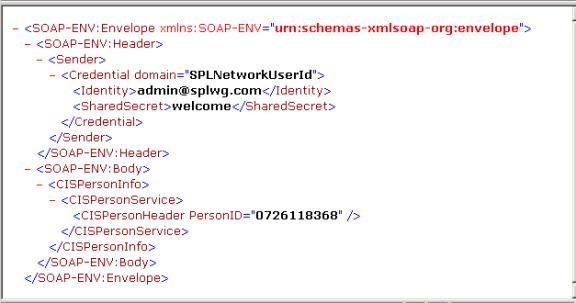
Contents
Constructing Requests to Access Your Product
SOAP Envelope
The soap envelope is the wrapping element of the whole request document.
The root of the request document is always the SOAP-ENV:Envelope element. The namespace attribute (xmlns=…) must be the same as the one defined in the SOAP Envelope Handler in the XAI Envelope Handler page.
Example for SOAP 1.0
<SOAP-ENV:Envelope xmlns:SOAP-ENV="urn:schemas-xmlsoap-org:envelope">
Example for SOAP 1.1
<SOAP-ENV:Envelope xmlns:SOAP-ENV="http://schemas.xmlsoap.org/soap/envelope/">
Note. If XAI cannot identify an appropriate envelope handler, it assumes that the root node is the service.
Header
The Envelope element may optionally be followed by the ‘Header’ element, which may contain the following optional elements:
The SoapActionVersion element
Multiple versions of a schema may exist for the same service. The SoapActionVersion element in the header defines which version of the schema is to be used for the service.
For example, if the service requires a request schema name AccountRequestSchema and the version element on the soap header is <SoapActionVersion>1.2</SoapActionVersion>, then the server attempts to use a schema with the name AccountRequestSchema.V1.2.xml.
When the version element is not present in the request, the server uses the default version as defined for that service in the XAI Inbound Service page.
The CorrelationId element
The CorrelationId element can be used by the sender to match an XML response to an XML request. When a CorrelationId is specified in the header of the request document, the XAI server copies this CorrelationId header element as is into the XML response document.
Document Body
The Body element (<SOAP-ENV:Body>) contains the Service information itself. The content of the Body element is an XML document based on the service request schema.
Service Name
The first element following the Body element must be the XAI service name. (i.e. CISPersonInfo). We refer to this element as the XAI Service Element. The XAI server uses the tag name to locate the service in the XAI Inbound Service.
Transaction Type
The service element may contain the optional attribute transactionType. For services that represent page maintenance services in the system, the transaction type (Read, Add, Update, Change, Delete) is defined in the XAI Inbound Service. An optional attribute may be specified in the first element to override the transaction type of the service. This allows using the same service definition to perform various transaction types.
Example 1. This service is used to perform an add of a record.
Example 2. This service is used to perform an update to a record.
Search Type
Search services may provide one or more type of searches, each using a different set of search fields. The default search type (MAIN, ALT, ALT1-ALT9) is defined in the XAI Inbound Service. However you may want to use various search types for the same service. To do so, you specify the searchType attribute on the service name element of the request.
For example the CDxAccountSearch service, provides the ability to search for accounts by AccountID (the MAIN search type) or to search accounts using an EntityName (the ALT searchType). The service is defined in the XAI Inbound Service as using the default searchType=MAIN.
Example. The following request searches by account ID
This one searches by EntityName.
Trace
Traces are available at multiple levels in XAI.
System Level – All requests/responses are traced.
Service Level – All request/responses of a particular service type are traced.
Request Level – Trace only this request.
The trace attribute in the service element may be used to activate tracing for a particular request. This is useful if the XAI server trace option was not set and you want to trace a particular request without tracing all other requests. The trace attribute may take yes/no values.
Example:
Delete Unspecified Rows
The attribute deleteUnspecifiedRows, may be used on the list elements in request documents, to delete all rows in the list that were not referenced explicitly in the request. This attribute is applicable to services executed with transactionType=’UPDT’. This is useful when one wants to replace all rows in a list with a new set of rows without having to explicitly reference all existing rows in the list. This attribute may take the following values:
· yes – All rows in the list are deleted prior to applying the rows specified in the request.
· no (default) - rows in the list are not deleted.
Following the Body element is the Main service element. This might be a page, list or search element.
For page services, following the main service element, there is one header element and one detail element. The header element only contains attributes. The details element may contain attributes and nested lists.
For list or search services, following the main service element, there is one header element and one row element. The header element only contains attributes. The row element may contain attributes and nested lists.
Constructing Requests to Access Your Product
Constructing XML requests for the system is not different than doing it for other adapters, however the following guideline should be followed when constructing XML requests containing lists.
Contents
Page Services
Requests to access system Page services contain the following elements:
Contents
To read a page, build a request that only contains the page header and use transactionType=’READ’.
Do not add the PageDetails element and underlying elements to the request. The request works but it adds unnecessary XML processing overhead on the server side.
To add or update a page service, the page details element is mandatory. Underlying elements may also be required depending on the service.
Page services may contain Lists hanging off the service details element. I.e. the account maintenance service contains several lists under the service details element.
Contents
Performing an Action on a Specific Row
Performing an Action on the Entire List
Performing an Action on a Specific Row
Some request schemas may contain lists. Actions such as Add, Delete, and Update may be performed on list items (rows). An action on a list item is specified using the “rowAction” attribute on a list item. The rowAction attribute may take the following values:
|
Row Action |
Description |
|
Add |
Add the row to the list. |
|
Change |
Change the row. The row to be updated is identified using the attributes that have been defined in the schema as primary key fields. |
|
UpAdd |
The row to be updated is identified using the attributes that have been defined in the schema as primary key fields. If the row can be found then it is updated, if not it is added to the list. |
|
Delete |
Delete the row. The row to be deleted is identified using the attributes that have been defined in the schema as primary key fields. |
When the rowAction attribute is not provided for a list item, it defaults to the transaction type of the service. I.e. if the service is defined with transaction type=”Add” then rowAction defaults to “Add”.
Performing an Action on the Entire List
The following attributes can be specified in the List element:
getAllRows: By default XAI retrieves all rows that can fit in the buffer. However you may want to limit the number of rows that are returned.
To limit the number of rows specify: getAllRows=’false’ as an attribute in the List element.
DeleteUnspecifiedRows: Sometimes you want to replace all rows in a list with a new set of rows (not necessarily the same number of rows). Instead of having to read the list first, delete the unnecessary rows one by one and then add the new one, XAI provide an attribute that first deletes all rows in the list and then applies the rows that were explicitly specified in the list.
List Services
List services can only retrieve data and therefore are much simpler. To build a request for a list service, you only have to provide the list header (with the required attributes).
Do not send the ListBody element in the request as it adds processing overhead on the server side
Search Services
Search services are very similar to list services, except that you can apply various search criteria using the searchType attribute on the service element.
Do not send the ListBody element in the request as it adds processing overhead on the server side
Structure of an XML Response Document
Contents
Normal Response
When the service executes successfully, the SOAP envelope is returned as is. The response Body is built according to the response schema.
The XML document that is returned to the requester is as follows:
· SOAP Envelope
· Response Body
Fault Response
When an error occurs while executing a service, the XML document returned as the response is built according to the SOAP fault protocol. The first element following the Body element is the <Fault> element. The detail element contains detailed explanation of the error.
· ResponseStatus
· ResponseCode
· ResponseText
How To Create XML Schemas
This section explains how to create different types of schemas.
Contents
Creating a Schema for a System Service
Creating a Schema From an XML Instance Document
Creating an XML Schema for a Sequential Input File
Creating a Schema for a Database Extract
Creating a Schema for a System Service
This section explains how to create an XML schema for a system service.
In the Schema Editor, select the Schemas/Create/Service menu option. The ‘Generate Schema for a Service’ Dialog Box appears. Fill in the following fields:
Service Name Enter the name of the service to be created in the service name text box. This is the name of the first element under the Body element in the XML document. Clicking on the selection button at the right of this text box displays a selection list of available services in the system. The selection list is built out of the metadata tables in the system.
MetaInfo Directory/File The product uses XML MetaInfo files internally to describe a service. The Schema Editor uses this file to convert it to a valid XML Schema. Enter the name of the XML file defining the service. This file is used to generate the XML schema for the service.
Transaction Type Select the transaction type performed by the service. The available values are Read, Add, Change, Update, Delete, List and Search.
Note. The difference between Change and Update is that for Change, all field values must be passed in with the request. Field values that are not passed in to the request are set to null. For Update, you need only pass the primary key field values and the values of the fields to be updated. All other fields retain their existing values.
To generate the Schema, click OK.
Creating a Schema From an XML Instance Document
Often it is required to create an XSL transformation between two XML documents, one representing an XAI service and the other a document in another application. Although XSL scripts can be written manually (very tedious and erroneous process), we recommend using mapping tools such as the Microsoft BizTalk Mapper to create transformation scripts. The BizTalk Mapper requires XML schemas in order to graphically design the transformation. While schemas for system services are available, schemas might not be available for the other XML document. Provided that you have an instance of the other XML document, the Schema Editor can be used to generate a schema based on that instance.
To create a schema based on any XML document:
· Select Schemas/Create/XML Instance option from the menu.
· Enter the service name to be created in the Service name textbox.
· Enter the file name for the XML document to be imported.
· Click Generate.
Creating an XML Schema for a Sequential Input File
The input data file may be:
· A file where each record is described using a COBOL copybook.
· A comma delimited file (CSV).
Contents
Creating a Schema for a File Described by a COBOL Copybook
Creating a Schema for a Comma Delimited Input File
Creating a Schema for a File Described by a COBOL Copybook
To create a schema for a file described by a COBOL Copybook, you use the Import COBOL copybook Wizard in the Schema Editor.
· Select Schemas/COBOL Copybook from the menu. The Generate Schema for a Cobol CopyBook dialog appears.
· Enter a unique Service Name and enter the name of the COBOL Copybook, for example: MtrUpld.cbl. (Clicking the … button displays a file selection dialog box.)
· Click Generate to generate the XML schema.
· A schema is generated in the schema editor. You may now use the Schema Editor to edit the schema as with any other type of schema.
· Save the Schema with an appropriate name, for example: CustomerContactsUploadSchema.xml
Example:
If the Cobol copybook looks like:

Then the generated Schema looks like this:
Creating a Schema for a Comma Delimited Input File
To create a schema for a comma-delimited file, use the Import CSV Wizard in the Schema Editor.
· Select Schemas/ CSV (Comma Delimited File) from the menu. The Generate Schema for a CSV File dialog appears.
· Enter a unique Service Name and the name of the CSV File. (Clicking the … button displays a file selection dialog box.)
· If the sample CSV file contains field headers in the first row, check the First Row contains column headers check box. The field headers are used to create the attributes in the schema. Otherwise the attribute names are FIELD1, FIELD2, etc..
· Click Generate.
· A schema is generated in the schema editor. You may now use the Schema Editor to edit the schema as with any other type of schema.
Creating a Schema for a Database Extract
Use the DB extract, when the data to be loaded on the staging table resides on a relational database.
· A schema for a database extract describes how and what data is extracted from the database. An extract may extract data from several tables.
· Each table is represented by a node on the tree on the left hand side, under the ‘Response’ element.
· The first element under the response element is the driving table and for each row retrieved from that table a record is written to the staging table.
· Each response node may contain child nodes allowing a hierarchical extraction process. For example, we may want to extract accounts and their linked persons. For this case, we have an Account node and a child node under Account.
· A special node on the left hand side is the ‘Request’ node. The Request node does not represent any particular table. It contains a list of fields that are used as selection criteria, mainly used to extract data from the main table.
Consider the following example: You have account information on a legacy system and you want to migrate that data into the system. The legacy system has an ACCOUNTS tables and an ACCOUNT_PERSON table. You want to migrate all ACCOUNTS in the legacy system, which have a given Customer Class. You want to be able to upload data each time with various Customer Class values. Therefore the first SQL statement retrieves data from the ACCOUNTS table and uses external criteria for the customer class. The second SQL statement retrieves data from the ACCOUNT_PERSONS table and uses the ACCOUNT_ID from the main record set.
To create a schema for a database extract, use the Import Database extract Wizard in the Schema Editor.
· Select Schemas/Database Extract from the menu. The following Connection dialog appears.
· Indicate the database, which contains the tables required for the extract. This might be the same database as your product or a different one. Click Connect.
· You are prompted to indicate whether to create a new schema or to open an existing one. When you create a new schema, the Editor starts a Wizard that guides you through the schema definition process.
· First, you’re prompted to enter the service name for this schema. This is the root element name of the schema.
· Next, you are prompted to enter the list of request attributes to be used by the main SQL. Each attribute has a name, a data type and a maximum length. On the right side you can see the list of defined request attributes. You use the left side to add or modify attributes. After you have entered the request attributes, click OK.
· Next you’re prompted to enter the name of the root SQL element.
· The table selection list dialog appears. Select a table from the table list box. This table is used by the root SQL element.
· Once you select the table, the full screen appears. On the left side there is a tree representing the schema. On the right there is a tabbed dialog used to define the response elements. Each response node represents an SQL statement.
· Navigate to the Select tab to define the list of columns to be retrieved in this SQL. They are used to build the SELECT clause of the SQL statement. Each selected column is defined as an attribute of that response element in the schema. On the left you have the list of available columns. On the right you see the list of selected columns.
· Navigate to the Where tab to define the selection criteria for this SQL statement. Use the bottom frame to define criteria. Criteria are defined by a column, an operator and a value. The value may be a constant or a reference to an attribute in a parent element. In our example we’ll use the request attribute CustClass as the value.
· When you’ve completed the definition of a response element, click OK. This generates the SQL statement for that element and stores it on the schema.
· Now add another response element, called “AccountPersons”. It is used to retrieve all persons linked to an account. Select the “Accounts” element on the left and click Add (located under the Tree View). Repeat steps described above for the new response element. Enter “AccountPersons” as the element name, select ACCT_PER as the table name and define the Select and Where clauses. This time use an attribute of the “Accounts” element to build the criteria for the “AccountPerson”. This means that for each record returned by the root element, an SQL statement is generated to access the ACCT_PER table using the current ACCT_ID in Accounts.
·
You have now completed the definition of the schema.
Click on the toolbar “Test” button ![]() . When you test a DB extract schema, the
editor prompts you for every attribute in the request element. It replaces
every reference to a request attribute with the value you provide for the
relevant SQL statement. In our example we only have one request attribute, the
CustClass. Enter “I” for industrial customers.
. When you test a DB extract schema, the
editor prompts you for every attribute in the request element. It replaces
every reference to a request attribute with the value you provide for the
relevant SQL statement. In our example we only have one request attribute, the
CustClass. Enter “I” for industrial customers.
· The response tab is now active and it shows the response document built as a result of executing the test.
You can now save the schema by clicking Save.
How to Publish an XAI Service
The system is distributed with a limited number of XAI inbound services. However implementers may want to access system services that were not published with the base product. The following section provides a quick guide for publishing system business object as an XML based Web service.
· Select the system business object to be exposed
· Create the Request/Response XML schemas using the Schema Editor
· Register the service by creating an XAI Inbound Service record
· Test the Service
Contents
Define the Request/Response Schemas
Select the Business Object
The first step is to select the system business object to be exposed as an XML based message. The following section describes how a business object is selected.
In your product, business objects are implemented as services. For each service, there exists a metadata definition of its input and output data called the “metainfo” file. While this metadata is most commonly used to construct the content of online pages, another use of this metadata is XAI, which can expose the same underlying service as an XML service. A tool exists that makes this possible. The Schema Editor reads the metainfo file corresponding to a service and generates an XML schema document describing the structure of the service when exposed as an XML service.
If the system does not provide a service that meets your needs, your implementation must define its own page service.
Define the Request/Response Schemas
Once the business object has been identified, we have to expose it as a pair of request/response XML schemas. The XML schemas are the foundation of the product APIs. They define both the structure of the documents that are exchanged between a service requester and the system and the internal mapping between the XML documents and the implementation of the business object in the system
Every service is defined by a pair of XML Schemas: the request and response schemas. The schemas contain additional information that maps the XML elements to the service. The request/response schemas are usually different, but in some cases may be the same schema.
Contents
The Request Schema
The request schema defines the XML document structure describing the “inputs” required by a service. Inputs may consist of a single element such as Person ID to implement the PersonInfo service or multiple elements that describe a Person to implement the PersonAdd service.
Refer to How to Build the XML Request Document for more information.
The Response Schema
The response schema defines the XML document structure describing the “outputs” of a service. The XML elements that are defined in the response schema are the ones that are returned to the service requester upon execution of the service.
Refer to Structure of an XML Response Document for more information.
Register the Service
For a service to be available, it must be registered by creating an XAI Inbound Service record. The XAI inbound service is used at run time to determine how a request is to be processed. The inbound service contains various parameters that control the execution of the service.
For more information, refer to Registering a Service.
Test the Service. Once the schemas have been created and the service has been registered, you should test the schema and the service.
Testing a Schema Using the Schema Editor
The following section explains how to test a schema using the ‘Test Schema’ option in the schema editor Tools menu. Use this option when a schema is being edited.
Before a schema can be tested, a service using this schema must have been registered.
You need to create an ‘instance’ XML document (a document with test data plugged in) based on the schema. The Test schema dialog provides the tools to create the instance, edit it, execute it and save it for future use.
Creating the request document
The first thing you have to do when you invoke the Test Schema Dialog is to create an initial instance of the request document, based on the schema currently being edited.
1. Select the transactionType: The transaction type combo displays a list of possible transactions for this service, depending on the service type (page, list or search).
2. When the transaction type is SRCH and more than one search type is available, the search type combo displays the list of available search types for this service, based on the schema definition. You must choose the search option. The combo on the right shows which fields are required by each search type.
3. Click Create. A tree representation of the request instance is displayed on the left TreeView.
Viewing/Editing the request instance
The tree view only displays elements of the request
document. To display the list of
attributes for an element, click that element. The attributes are displayed on
the grid on the right. You may
modify the value directly on the grid. If you need to enter a long textual
value, click the button ![]() at the right of the attribute.
at the right of the attribute.
By default the editor provides predefined values for ‘commonly’ used attributes such as AccountID, PersonID, PremiseID, BillID and SAID. These values are the one for Account Mark Brazil shipped on the demo database. You may change them directly on the grid.
The request can be viewed on the tree or as text on a
browser page. Use the ![]() toolbar button to switch between modes.
toolbar button to switch between modes.
Saving the request instance
To save a request instance, click Save. A save dialog box is displayed.
Executing the request
Once you’ve finished editing the request, you can execute it (send it using HTTP to the XAI servlet).
1. Enter the URL address of the XAI servlet. It appears at the right of the Execute button.
2. Click Execute to send the request.
3. The response is displayed on the Response tab.
Viewing the response
The response received as a result of executing the request,
is displayed on the ‘response’ tab. It can be shown in a tree mode, similar to
the request, or on a Web browser page. Use the ![]() toolbar button to switch between modes.
toolbar button to switch between modes.
Saving the response
You can save the response to an XML file.
1. Click Save to File.
2. Select a file name from the file dialog
How To Create Code Description Attribute
Many product tables contain fields that represent codes in a control table. Sometime the service contains the description for the code as well. This occurs if the user interface associated with the service uses a go look button to provide help in entering a valid value for that field. If the user interface associated with the service uses a dropdown list box as a mechanism for entering a valid value, then the description of the code is not included in the system service.
For the cases when the description of the code is not included in the system service, you may use special logic provided by the schema editor to include a description, if needed.
· Select the code attribute whose description should be included. Right click on the attribute and select Add Code Description Attribute in the pop-up window.
· A dialogue box appears asking for the label to use for this new attribute. The label defaults to the label of the code with Description appended at the end. Choose an appropriate label and click OK.
· Next, you are asked for the Code table program to be used by XAI to retrieve the description of the code at runtime.
After clicking OK, select the new attribute and view its properties.
How To Create a Private Attribute
Private attributes are attributes in your schema that do not correspond to any attributes in the system service. The schema editor ignores private attributes when validating a schema against a system service. The XAI server ignores private attributes when accessing system services.
To create a private attribute:
· Select any existing attribute and right click on the attribute. Select Add Private Attribute in the pop-up window.
· A dialogue box appears asking for the label to use for this new attribute. Enter an appropriate label and click OK.
· Your new attribute is created. Select the attribute and enter the other properties for this attribute.
How To Create an XSL Transformation
When the service data schema is different from an external data schema received from or being sent to an external system, we must map the data in the external schema to the service schema. To achieve this task we use a mapping tool.
In the following example, we are using the Microsoft BizTalk Mapper to create an XSL Transformation (XSLT) script that describes the transformation; however, other transformation tools available on the market can be used. This example assumes that there is a file with customer contact information to be uploaded into the Oracle Utilities Customer Care and Billing customer contact table. It assumes that XML schemas for the input file and for the customer contact service already exist.
· Launch the Microsoft BizTalk Mapper.
· Enter the name of the input schema file as the source, e.g., CustomerContactsUploadSchema.xml.
· Enter the name of the service schema file as the target (e.g., CustomerContactAddRequestSchema.xml).
· BizTalk Mapper allows you to drag elements from the source XML to the target XML.
· When you are finished mapping elements, compile the transformation map.
· Save the transformation script with an appropriate name, e.g., CustomerContactsUpload.xsl.
· After saving the XSL script you need to edit it in Notepad and save it in ANSI encoding.
This XSL transformation script is now available for use as the Record XSL on the XAI Inbound Service – Staging page.
Contents
Substitution Parameters For NDS Messages
XSL Transformation with W3C
XAI W3C schemas (.xsd) use a namespace to qualify the elements in the schema. Each schema has a target namespace named after the service name. For example, if the service name is CDxAccountMaintenance then the target namespace for the schema would be: http://splwg.com/CDxAccountMaintenance.xsd.
When using an XSL transformation with system W3C schemas (.xsd), the XSL transformation needs to explicitly qualify the elements in the schema with the schema namespace. Following is an example:
Substitution Parameters For NDS Messages
You may configure your system to use notification download tables to interface outgoing messages via XAI. When creating notification download staging records, you may use the context collection to define extra information about the NDS.
Context variables are exposed to the XSL transformation script as script parameters. Each context variable can be referred to using a parameter name having the same name as the context variable. The following XSL example shows how it is done for creating an email, but the same concept can be used for any XSL script used in a route type. In this example XPER and OHAD are context variables of the notification download record.
<xsl:stylesheet xmlns:xsl='http://www.w3.org/1999/XSL/Transform' xmlns:msxsl='urn:schemas-microsoft-com:xslt' xmlns:var='urn:var' xmlns:user='urn:user' exclude-result-prefixes='msxsl var user' version='1.0'>
<xsl:output method='xml' omit-xml-declaration='yes' />
<xsl:param name="XPER"></xsl:param>
<xsl:param name="OHAD"></xsl:param>
<xsl:template match='/'>
<xsl:apply-templates select='CDxPersonMaintenance'/>
</xsl:template>
<xsl:template match='CDxPersonMaintenance'>
<EmailMessage>
<To>
<InternetAddress address="ohad_anyone@splwg.com" personal="àäã ùðé" charset="Windows-1255" />
<InternetAddress1>
<!-- Connection from source node "EmailID" to destination node "address" -->
<xsl:attribute name='address'><xsl:value-of select='CDxPersonMaintenanceService/CDxPersonMaintenanceDetails/@EmailID'/></xsl:attribute>
</InternetAddress1>
</To>
<BCC1><InternetAddress address="ohad_anyone@splwg.com" /></BCC1>
<Subject charset="Windows-1255">
<!-- Connection from source node "EntityName" to destination node "Subject" -->
<xsl:value-of select='CDxPersonMaintenanceService/CDxPersonMaintenanceDetails/@EntityName'/>
Mark Brazil
</Subject>
<MessageText charset="Windows-1255">
<!-- Connection from source node "Description" to destination node "MessageText" -->
<xsl:value-of select='CDxPersonMaintenanceService/CDxPersonMaintenanceDetails/@Description'/>
<xsl:value-of select="$XPER"/>
<xsl:value-of select="$OHAD"/>
This is text of the email message.
</MessageText>
<Attachment1 fileName="d:\cdx\test\test.pdf" contentId="fl3">
</Attachment1>
</EmailMessage>
</xsl:template>
</xsl:stylesheet>
How an Email Message is Constructed
You may define an email sender in order to send notification download staging (NDS) record information by email to a destination. This section describes how the email is constructed.
An Email may consist of the following parts:
· Address information (such as the From, To, CCs)
· Subject
· Message Text
· Attachments
The following diagram describes the method by which the system constructs an email message.
· To construct the Email message, the sender requires an XML file defined based on the following schema provided by the base product: CDxEmailSchema.xml.
· The XSL transformation linked to the XAI route type does the work of transforming the information retrieved by the XAI inbound service defined on the NDS Type and mapping it to the CDxEmailSchema.xml schema.
· The XSL script also receives all the Context records linked to the NDS record as parameters to the script when the script is invoked.
· The XSL script basically maps the Context fields and fields from the XAI service into the Email XML document. The XAI sender then uses the XML Email document (the result of the transformation) to actually build the Email to be sent.
· The resulting Email XML document should contain the Elements as shown in the window below.
How to Refresh the Runtime Copy of the Registry
As explained above, the registry is read into cache memory when the XAI server starts. If the registry is modified and you want to immediately apply the changes on a running server, you have to manually refresh the registry.
To manually refresh the registry:
· Navigate to Admin Menu, XAI Command
· Select the Refresh Registry command from the command dropdown.
· If you want to also refresh the MPL server, check the Also Send to MPL URL check box.
· Click Send Command
· The refresh command is sent to the XAI server and the response is displayed in the response textbox.
Siebel Integration
The system offers an out of the box solution for integration with Siebel. In addition, XAI provides tools for an easy integration with Siebel EAI.
· XAI can process inbound messages coming from Siebel directly; in particular, it provides a special adapter that understands the Siebel Virtual Business Component (VBC) over the XMLGateway protocol.
· Automatic creation of Siebel integration objects and Siebel VBCs based on XAI schemas.
The Schema Editor provides several tools to facilitate the integration with Siebel. The following sections describe the available features.
Contents
Creating a Siebel VBC Definition based on a Schema
Creating a Siebel Integration Object based on a Schema
Creating a Siebel VBC Definition based on a Schema
Siebel Virtual Business Components (VBC) can use the Siebel XML Gateway service to access objects in other applications. The XAI server provides a special adapter, that automatically maps Siebel XML Gateway messages to XAI messages and vice versa. The automatic mapping works, provided that the Siebel VBC is defined based on an XAI schema definition. To facilitate the definition of Siebel VBC and to minimize errors, the schema editor can be used to generate a VBC definition, which can be directly imported into the Siebel Repository. Once the VBC is defined in the Siebel repository, it can be used to build Siebel applets.
Note that VBC have some structural limitations and therefore cannot be used to represent all types of XAI services. VBC can only map a flat structure and therefore are a better fit for accessing search and list services. They are not very good for accessing complex hierarchical XAI services such as page maintenance services. In the case of page maintenance services, only the first level of the page details is accessible through the VBC; any lists underneath the first level are not accessible.
The process of creating a VBC, which maps an XAI service, is as follow:
· In the XAI schema editor, open the schema for the service you want to invoke from Siebel.
· Select Export/Siebel VBC from the menu. The Export Siebel VBC dialog appears.
· In the Siebel SIF file text box, enter the name of the file that should be generated. This file contains the VBC object definition.
· Click Generate.
· To import the VBC definition into Siebel, refer to the ‘Siebel Tools Guide’ in the Siebel documentation.
Creating a Siebel Integration Object based on a Schema
Siebel Integration Objects are used within the Siebel EAI to integrate Siebel with other applications. To facilitate the integration with Siebel, the Schema Editor can be used to create Siebel Integration Object definitions based on an XAI schema. This feature saves both time and errors.
The process of creating an Integration Object that maps an XAI service is as follow:
· Read a Schema into the Schema Editor
· Select Export/Siebel Integration from the menu. The Export Siebel Integration Object dialog appears.
· Enter the Siebel Project name in which the Integration object should be created.
· In the Siebel SIF file text box, enter the name of the file to be generated. This file contains the VBC object definition
· Click Generate
· To import the integration object definition into Siebel, refer to the ‘Siebel Tools Guide’ in the Siebel documentation.