Defining Script Options
We use the term "script" to define processing rules that your implementation sets up to control both front-end and back-end processing:
· Rules that control front-end processing are defined using Business Process Assistant (BPA) scripts. For example, your implementation could set up a BPA script to guide a user through your organization's payment cancellation process.
· Rules that control back-end processing are defined using Server-based scripts. For example, your implementation could set up a server-based script to control the processing that executes whenever a given type of adjustment is canceled.
The topics in this section describe how to configure your scripts.
Contents
The Big Picture Of BPA Scripts
The Big Picture Of Server-Based Scripts
How To Copy A Script From The Demonstration Database
This section describes features and functions that are shared by both BPA scripts and server-based scripts.
Contents
Scripts Are Business Process-Oriented
Designing And Developing Scripts
A Script May Declare Data Areas
You Can Import Sample Scripts From The Demonstration Database
Scripts Are Business Process-Oriented
To create a script, you must analyze the steps used to implement a given business process. For example, you could create a “stop autopay” BPA script that:
· Asks the user to select the customer using Control Central
· Asks the user to define the date on which the customer would like to stop making automatic payments
· Invokes a server-based script that populates the end-date on the account's latest automatic payment instructions.
After you understand the business process, you can set up a script to mimic these steps. If the business process is straightforward (e.g., users always perform the same steps), the script configuration will be straightforward. If the business process has several logic branches, the composition of the script may be more challenging.
Refer to Examples of BPA Scripts for examples.
A Script Is Composed Of Steps
A script contains one or more steps. For example, a “stop autopay” BPA script might have three steps:
· Ask the user to select the customer using Control Central
· Ask the customer the date on which they’d like to stop making automatic payments (and default the current date)
· Invoke a server-based script that, in turn, updates the account's autopay options.
Each step references a step type. The step type controls what happens when a step executes. It might be helpful to think of a script as a macro and each step as a “line of code” in the macro. Each step’s step type controls the function that is executed when the step is performed.
Refer to How To Set Up Each Step Type for a detailed description of all available step types and how to set them up.
Designing And Developing Scripts
Constructing a script is similar to writing a computer program. We recommend that you follow the approach outlined below when you construct scripts:
· Thoroughly understand the business process to be scripted
· Thoroughly understand how the transactions and services that your script uses work
· Design the steps for the script “on paper”
· Determine the most maintainable way to set up your scripts. Rather than creating complex, monolithic scripts, we recommend dividing scripts into smaller sections. For example:
· For BPA scripts,
· Determine if several scripts have similar steps. If so, set up a script that contains these common steps and invoke it from the main scripts. For example, if the main script were a BPA script, this would be invoked via a Perform script step.
· Determine if a large script can be divided into logical sections. If so, set up a small script for each section and create a “master script” to invoke each. For example, if the main script were a BPA script, this would be invoked via a Transfer control step.
· For server-based script, you can segregate reusable steps into "service scripts" and then use Invoke service script steps to execute the common logic.
· Add the script using Script Maintenance
· Thoroughly test the script
A Script May Declare Data Areas
Both BPA and server-based scripts may have one or more data areas:
· If the script contains steps that exchange XML documents, you must declare a data area for each type of XML document. For example, if a BPA script has a step that invokes a service script, the BPA script must declare a data area that holds the XML document that is used to pass information to and from the service script.
· You can use a data area as a more definitive way to declare your temporary storage. For example, you can describe your script's temporary storage variables using a stand-alone data area schema and associate it with your script.
Various step types involve referencing the script's data areas as well as support the ability to compare and move data to and from field elements residing in the data areas.
An Edit Data step supports the syntax to dynamically declare data areas as part of the step itself. This technique eliminates the need to statically declare a data area. Refer to Designing Generic Scripts for an example of when this technique may be useful.
Designing Generic Scripts
Scripts may be designed to encapsulate an overall procedure common across different business objects.
For example, BPA scripts may implement a standard procedure to maintain business entities in which the first step obtains the entity’s data, the second step presents its associated UI map to the user for update, and the last step updates the entity. Notice that in this case the only difference from one object to another is the data to capture. Rather than designing a dedicated BPA script with static data areas and invocation steps for each business object, you can design a single generic script that dynamically invokes a business object and its associated UI map.
This functionality is available only within an Edit Data step. With this technique, the name of the schema-based object is held in a variable or an XPath schema location and is used to both declare and invoke the object.
Tips. Refer to the tips context zone associated with the script maintenance page for more information on edit data commands and examples.
Securing Script Execution
The system supports the ability to secure the execution of scripts by associating the script with an Application Service. Refer to The Big Picture of Application Security for more information. Application security is optional and applies to service scripts and user-invocable BPA scripts only. If a script is not associated with an application service, all users may execute the script. Otherwise, only users that have Execute access to the application service may execute the script.
You Can Import Sample Scripts From The Demonstration Database
Because each implementation has different business processes, each implementation will have different scripts. Sample scripts are supplied in the demonstration database that is delivered with your product. If you’d like to import any of these samples into your implementation refer to How to Copy a Script from the Demonstration Database for the details.
Refer to The Big Picture Of Scripts to better understand the basic concept of scripts.
Users may require instructions in order to perform certain tasks. The business process assistant allows you to set up scripts that step a user through your business processes. For example, you might want to create scripts to help users do the following:
· Add a new person to an existing account
· Set up a customer to pay automatically
· Modify a customer who no longer wants to receive marketing information
· Modify a customer’s web password
· Record a trouble order
· Merge two accounts into one account
· Fix a bill with an invalid rate
· … (the list is only limited by your time and imagination)
Users execute these scripts via the business process assistant (BPA). Users can also define their favorite BPA scripts in their user preferences. By doing this, a user can execute a script by pressing an accelerator key (Ctrl+Shift+a number).
Don’t think of these scripts as merely a training tool. BPA scripts can also reduce the time it takes to perform common tasks. For example, you can write a script that reduces the “number of clicks” required to add a new person to an existing account.
Future upgrade issues. Although we make every effort not to remove fields or tab pages between releases, there may be times when changes made by the base-package will necessitate changes to your scripts. Please refer to the release notes for a list of any removed fields or tab pages.
Scripts are not a substitute for end-user training. Scripts minimize the steps required to perform common tasks. Unusual problems (e.g., a missing meter exchange) may be difficult to script as there are many different ways to resolve such a problem. However, scripts can point a user in the right direction and reduce the need to memorize obscure business processes.
The topics in this section describe background topics relevant to BPA scripts.
Contents
Developing and Debugging Your BPA Scripts
Launching A Script From A Menu
Launching A Script When Starting The System
Executing A Script When A To Do Entry Is Selected
The Big Picture Of Script Eligibility Rules
How To Invoke Scripts
Refer to Initiating Scripts for a description of how end-users initiate scripts.
Developing and Debugging Your BPA Scripts
You may find it helpful to categorize the step types into two groups: those that involve some type of activity in the script area, and those that don’t. The following step types cause activity in the script area: Height, Display text, Prompt user, Input data, Input Map, Set focus to a field. The rest of the step types are procedural and involve no user interaction. For debugging purposes, you can instruct the system to display text in the script area for the latter step types. Also note, for debugging purposes, you can display an entire data area (or a portion thereof) in the script area by entering %+…+% where … is the name of the node whose element(s) should be displayed.
Please see the Examples of BPA Scripts for ideas that you can use when you create your own BPA scripts.
Time saver. When you develop a new BPA script, change your user preferences to include the script as your first “favorite”. This way, you can press Ctrl+Shift+1 to invoke the script (eliminating the need to select it from the script menu).
Launching A Script From A Menu
You can create menu items that launch BPA scripts rather than open a page. To do this, create a navigation option that references your script and then add a menu item that references the navigation option.
If the navigation option is referenced on a context menu and the navigation option has a "context field", a temporary storage variable will be created and populated with the unique identifier of the object in context. For example, if you add a "script" navigation option to the bill context menu and this navigation option has a context field of BILL_ID, the system will create a temporary storage variable called BILL_ID and populate it with the respective bill id when the menu item is selected.
Launching A Script When Starting The System
You can set the system to launch a script upon startup.
For example, imagine that through an interactive voice response system, a customer has keyed in their account ID and has indicated that they would like to stop an automatic payment. At the point when the IVR system determines that the customer must speak to a user, the interface can be configured to launch the application. When launched it passes the script name and account ID. It can also pass a navigation option to automatically load the appropriate page (if this information is not part of the script).
To do this, parameters are appended to the standard system URL. The following parameters may be supplied:
· script=<scriptname>
· ACCT_ID=<account id>
· location=<navigation option>
Parameters are added to the standard system URL by appending a question mark (?) to the end and then adding the "key=value" pair. If you require more than one parameter, use an ampersand (&) to separate each key=value pair.
For example, the following URLs are possible ways to launch the StopAutoPay script at startup, assuming your standard URL for launching the system is http://system-server:1234/cis.jsp:
· http://system-server:1234/cis.jsp?script=StopAutoPay
· http://system-server:1234/cis.jsp?script=StopAutoPay&ACCT_ID=1234512345
· http://system-server:1234/cis.jsp?script=StopAutoPay&ACCT_ID=1234512345&location=accountMaint
It doesn't matter in which order the parameters are provided. The system processes them in the correct order. For example, the following examples are processed by the system in the same way:
· http://system-server:1234/cis.jsp?ACCT_ID=1234512345&script=StopAutoPay&location=accountMaint
· http://system-server:1234/cis.jsp?ACCT_ID=1234512345&location=accountMaint&script=StopAutoPay
These parameters are kept in a common area accessible by any script for the duration of the session. To use these parameters on a script you may reference the corresponding %PARM-<name> global variables. In this example, after the system is launched any script may have access to the above account ID parameter value by means of the %PARM-ACCT_ID global variable. Also note, these parameters are also loaded into temporary storage (to continue the example, there'd also be a temporary storage variable called ACCT_ID that holds the passed value).
Executing A Script When A To Do Entry Is Selected
The system creates To Do entries to highlight tasks that require attention (e.g., bills in errors, accounts without bill cycles, etc.). Users can complete many of these tasks without assistance. However, you can set up the system to automatically launch a script when a user selects a To Do entry. For example, consider a To Do entry that highlights a bill that's in error due to an invalid mailing address. You can set up the system to execute a script when this To Do entry is selected by a user. This script might prompt the user to first correct the customer's default mailing address and then re-complete the bill.
The following points provide background information to help you understand how to implement this functionality:
· Every To Do entry references a To Do type and a message category and number. The To Do type defines the category of the task (e.g., bill errors, payment errors, accounts without bill cycles, etc.). The message number defines the specific issue (e.g., a valid address can't be found, the rate is invalid, etc.). Refer to The Big Picture of System Messages for more information about message categories and numbers.
· When a user drills down on a To Do entry, either a script launches OR the user is transferred to the transaction associated with the entry's To Do type. You control what happens by configuring the To Do type accordingly:
· If you want to launch a script when a user drills down on an entry, you link the script to the To Do type and message number. Keep in mind that you can define a different script for every message (and some To Do types have many different messages).
· If the system doesn't find a script for an entry's To Do type and message number, it transfers the user to the To Do type's default transaction.
How do you find the message numbers? We do not supply documentation of every To Do type's message numbers (this list would be impossible to maintain and therefore untrustworthy). The best way to determine which message numbers warrant a script is during pre-production when you're testing the system. During this period, To Do entries will be generated. For those entries that warrant a script, simply display the entry on To Do maintenance. On this page, you will find the entry's message number adjacent to the description.
· These types of scripts invariably need to access data that resides on the selected To Do entry. Refer to How To Use To Do Fields for the details.
The Big Picture Of Script Eligibility Rules
You can limit the number of scripts that a user sees in the script menu and in the Eligible Scripts Dashboard Zone by placing eligibility criteria on the scripts. For example, you could indicate a script should only appear on the script menu if the account’s customer class is residential and the user belongs to the level 1 CSR group. By doing this, you avoid presenting the user with scripts that aren’t applicable to the current customer or the user’s role.
The topics in this section describe eligibility rules.
Contents
Script Eligibility Rules Are Not Strictly Enforced
You Can Mark A Script As Always Eligible
You Can Mark A Script As Never Eligible
Criteria Groups versus Eligibility Criteria
Examples Of Script Eligibility Rules
Script Eligibility Rules Are Not Strictly Enforced
The script menu gives a user a choice of seeing all scripts or only scripts that are eligible (given the customer and their user profile). This means that it’s possible for a script that isn’t eligible for a given customer / user to be executed via this menu. In other words, the system does not strictly enforce a script’s eligibility rules.
It might be more helpful to think of eligibility rules as “highlight conditions”. These “highlight conditions” simply control whether the script appears in the script menu when a user indicates they only want to see eligible scripts. However, in the Eligible Scripts Zone, only eligible scripts are listed.
You Can Mark A Script As Always Eligible
If you don’t want to configure eligibility rules, you don’t have to. Simply indicate that the script is always eligible.
You Can Mark A Script As Never Eligible
If you have scripts that you do not want a user to select from the script menu, indicate that it is never eligible. An example of a script that you wouldn't want a user to select from the menu is one that is launched when a To Do entry is selected. These types of scripts most likely rely on data linked to the selected To Do entry. As a result, a user should only launch scripts of this type from the To Do entry and not from the script menu.
Criteria Groups versus Eligibility Criteria
Before we provide concrete examples of eligibility criteria, we need to explain two concepts: Criteria Groups and Eligibility Criteria. A script’s criteria groups control whether a user is eligible to choose a script. At a high level, it works like this:
· A criteria group has one or more eligibility criteria. A group’s criteria control whether the group is considered true or false.
· When you create a group, you define what should happen if the group is true or false. You have the following choices:
· The user is eligible to choose the script
· The user is not eligible to choose the script
· The next group should be checked
We’ll use the following example to help illustrate these points. Assume a script is only eligible if:
· The customer has electric service and the user belongs to user group A, B or C
· OR, the customer has gas service and the user belongs to user group X, Y or A
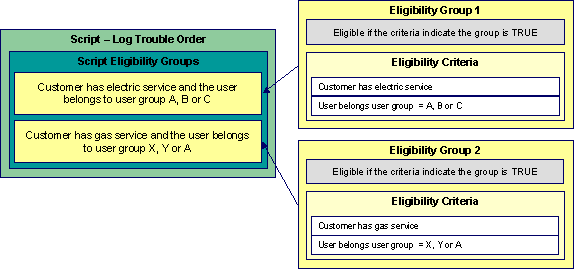
This script requires two eligibility groups because it has two distinct conditions:
· If (Customer has electric service AND (User belongs to user group A, B or C))
· If (Customer has gas service AND (User belongs to user group X, Y or A))
If either condition is true, the script is eligible.
You would need to set the following criteria groups in order to support this requirement:
|
Group No. |
Group Description
|
If Group is True |
If Group is False |
|
1 |
Customer has electric service and the user belongs to user group A, B or C |
Eligible |
Check next group |
|
2 |
Customer has gas service and the user belongs to user group X, Y or A |
Eligible |
Ineligible |
The following criteria are required for each of the above groups:
|
Group 1: Customer has electric service and the user belongs to user group A, B or C |
||||
|
Seq |
Logical Criteria |
If Eligibility Criteria is True |
If Eligibility Criteria is False |
If Insufficient Data |
|
10 |
Customer has electric service |
Check next condition |
Group is false |
Group is false |
|
20 |
User belongs to user group A, B or C |
Group is true |
Group is false |
Group is false |
|
Group 2: Customer has gas service and the user belongs to user group X, Y or A |
||||
|
Seq |
Logical Criteria |
If Eligibility Criteria is True |
If Eligibility Criteria is False |
If Insufficient Data |
|
10 |
Customer has gas service |
Check next condition |
Group is false |
Group is false |
|
20 |
User belongs to user group X, Y or A |
Group is true |
Group is false |
Group is false |
The next section describes how you might configure the specific logical criteria in each of the groups.
Defining Logical Criteria
When you set up an eligibility criterion, you must define two things:
· The field to be compared
· The comparison method
You have the following choices in respect of identifying the field to be compared:
· You can choose a characteristic linked to the current account, person or premise.
· You can execute an algorithm to retrieve a field value from somewhere else in the system. This is a very powerful feature, but it’s not terribly intuitive. We’ll present a few examples later in this section to illustrate the power of this approach.
You have the following choices in respect of identifying the comparison method:
· You can choose an operator (e.g., >, <, =, BETWEEN, IN, etc.) and a comparison value.
· You can execute an algorithm that performs the comparison (and returns True, False or Insufficient Data). This is also a very powerful feature, but it’s not terribly intuitive. We’ll present a few examples later in this section to illustrate the power of this approach.
The Examples Of Script Eligibility Rules provide examples to help you understand this design.
Examples Of Script Eligibility Rules
The topics in this section provide examples about how to set up script eligibility rules.
A Script With A Time Span Comparison
A Script With Service Type Comparison
A Script With A Time Span Comparison
A script that is only eligible for senior citizens has the following eligibility rules:
· Customer class = Residential
· Birth date equates to that of a senior citizen
These rules require only one eligibility group on the script. It would look as follows:
|
Group No. |
Group Description
|
If Group is True |
If Group is False |
|
1 |
Residential and Senior Citizen |
Eligible |
Ineligible |
The following criteria will be required for this group:
|
Group 1: Residential, Calif, Senior |
|||||
|
Seq |
Field to Compare |
Comparison Method |
If True |
If False |
If Insufficient Data |
|
10 |
Algorithm: retrieve account’s customer class |
= R |
Check next condition |
Group is false |
Group is false |
|
30 |
Person characteristic: Date of Birth |
Algorithm: True if senior |
Group is true |
Group is false |
Group is false |
The first criterion is easy; it calls an algorithm that retrieves a field on the current account. This value, in turn, is compared to a given value. If the comparison results in a True value, the next condition is checked. If the comparison doesn’t result in a True value, the Group is false (and, the group indicates that if the group is false, the script isn’t eligible). Refer to SECF-ACCTFLD in the product documentation for an example of an algorithm type that retrieves a field value from an account.
The last criterion contains a time span comparison. Time span comparisons are used to compare a date to something. In our example, we have to determine the age of the customer based on their birth date. If the resultant age is > 65, they are considered a senior citizen. To pull this off, you can take advantage of a comparison algorithm supplied with the base script as described below.
· Field to Compare. The person characteristic in which the customer’s birth date is held is selected.
· Comparison Method. We chose a comparison algorithm that returns a value of True if the related field value (the customer’s date of birth) is greater than 65 years (refer to SECC-TIMESPN for an example of this type of algorithm).
You’ll notice that if a value of True is returned by the True if senior algorithm, the group is true (and we’ve set up the group to indicate a true group means the script is eligible).
The time span algorithm can be used to compare days, weeks, months, etc. Refer to SECC-TIMESPN for more information about this algorithm.
A Script With Service Type Comparison
Imagine a script that is only eligible if the current customer has gas service and the user belongs to user groups A, B or C. This script would need the following eligibility rules:
· Customer has gas service
· User belongs to user group A, B or C
These rules require only one eligibility group on the script. It would looks as follows:
|
Group No. |
Group Description
|
If Group is True |
If Group is False |
|
1 |
Has gas service and user is part of user group A, B or C |
Eligible |
Ineligible |
The following criteria are required for this group:
|
Group 1: Has gas service and user is part of user group A, B or C |
|||||
|
Seq |
Field to Compare |
Comparison Method |
If True |
If False |
If Insufficient Data |
|
10 |
Algorithm: check if customer has gas service |
= True |
Check next condition |
Group is false |
Group is false |
|
20 |
Algorithm: check if user belongs to user group A, B or C |
= True |
Group is true |
Group is false |
Group is false |
Both criteria are similar – they call an algorithm that performs a logical comparison. These algorithms are a bit counter intuitive (but understanding them provides you with another way to implement complex eligibility criteria):
The first criterion works as follows:
· Field to Compare. We chose a “field to compare” algorithm that checks if the current account has service agreements that belong to a given set of service types. It returns a value of True if the customer has an active service agreement that matches one of the service types in the algorithm. In our example, the “check if customer has gas service” algorithm returns a value of True if the customer has at least one active service agreement whose SA type references the gas service type. The “check if customer has electric service” algorithm is almost identical, only the service type differs. If you are running Oracle Utilities Customer Care and Billing, refer to SECF-SVCTYP for an example of this type of algorithm.
· Comparison Method. We simply compare the value returned by the algorithm to True and indicate the appropriate response.
The second criterion works similarly:
· Field to Compare. We chose a “field to compare” algorithm that checks if the user belongs to any user group in a set of user groups. It returns a value of True if the user belongs to at least one user group defined in parameters of the algorithm. Refer to SECF-USRNGRPfor an example of this type of algorithm.
· Comparison Method. We simply compare the value returned by the algorithm to True and indicate the appropriate response.
Bottom line. The “field to compare” algorithm isn’t actually returning a specific field’s value. Rather, it’s returning a value of True or False. This value is in turn, compared by the “comparison method” and the group is set to true, false or check next accordingly.
Examples of BPA Scripts
The topics that follow provide examples of BPA scripts related to several business processes. Use the information in this section to form an intuitive understanding of scripts. After attaining this understanding, you’ll be ready to design your own scripts.
Importing sample scripts. We have supplied sample scripts in the demonstration database that’s shipped with the base product. You can import these samples into your implementation if necessary. Refer to How to copy a script from the demonstration database for the details.
Contents
Set Up / Change Customer Web Self-Service Password
Create A Trouble Order Without An Account
Add A New Person To An Account
Reprint A Bill - Short Version
Set Up / Change Customer Web Self-Service Password
The following is an example of the steps necessary to implement a script that transfers a user to the page on which they can set up / change a customer’s web self-service password.
|
Step No |
Step Type |
Text Displayed In Script Area |
Additional Information On The Step |
|
10 |
Perform script |
Press OK after the dashboard contains the person in question |
Subscript: CI_FINDCUST Note, this step performs a script that contains the steps that ask the user to find the customer on control central. |
|
20 |
Move data |
|
Source Field Type: Predefined Value Source Field Value: %CONTEXT-PERSONID (note, this is a global variable that contains the ID of the current person) Destination Field Type: Page Data Model Destination Field Name: PER_ID |
|
30 |
Navigate to a page |
|
Navigation Option: Person – Web Self Service (update) |
|
40 |
Set focus to a field |
Press continue after changing the customer’s self service values and saving the changes |
Destination Field Name: WEB_PASSWD |
|
50 |
Perform script |
|
Subscript: CI_SAVECHECK Note, this step checks if the user remembered to save their changes
|
|
60 |
Display text |
Script complete |
|
Note the following about this script:
· Step 10 invokes a "subscript" that asks the user to let the script know when the dashboard contains the person in question.
· Step 20 and 30 are examples of steps step that navigate a user to a specific tab on the person transaction for the person currently displayed. This works because the system automatically passes the person ID from the current page to the destination page.
· Step 40 is an example of a step that moves the insertion point into a field on a page. It also asks the user to save the person. While it’s possible to introduce a step that pushes the save button for the user, we recommend that you ask the user to do this. Why? Because validation logic occurs whenever you save an object and this could result in a pop-up if errors or warnings are issued. We feel that it’s better for the user to understand why this window is popping up (because they pushed the save button) rather than have the pop-up appear out of thin air.
· Step 50 invokes a "subscript" that reminds the user to save their changes (in case they didn't do this).
· Step 60 is simply good practice. It lets the user know that the script is complete.
Create A Trouble Order Without An Account
The following is an example of the steps necessary to implement a script that creates a trouble order when the user does not know the customer. We have assumed the following about such trouble orders:
· Your organization does not integrate with the outage management integration module. That module describes a different mechanism for handling this logic.
· An open customer contact will be created for a “dummy” person that has been set up to record such problems.
· Characteristics on the customer contact will be used to record pertinent issues about the problem (e.g., weather condition, symptom, public danger exists, etc.). These characteristics and their values are defaulted from the customer contact type control table.
· This customer contact will have a log entry that triggers the creation of To Do entry for the central dispatching area. Note, it would be a good idea to schedule the background process that creates such To Do entries (TD-CCCB) to run fairly frequently as the trigger date on the customer contact is set to the current date (i.e., we’d like the To Do entry created the next time TD-CCCB runs).
|
Step No |
Step Type |
Text Displayed In Script Area |
Additional Information On The Step |
|
10 |
Navigate to a page |
|
Navigation Option: Customer Contact – Main (add) Note, we use characteristics to define the trouble order’s symptom and danger level. Rather than hardcode these characteristic types and values in the script, we take advantage of the fact that a customer contact type can have default characteristics. These values default onto a customer contact when a customer contact type is populated. Defaulting only occurs when a User Interface Field is populated (as opposed to when a Page Data Model field is populated when no defaulting takes place). In order to populate a User Interface Field, the user must be positioned on the page on which the field is located. And this is why this script initially transfers the user to the Main tab on the customer contact page. If we didn’t need to take advantage of defaulting, this script could have navigated to the Characteristics tab (the fields on the other tabs could have been populated even when the Characteristics tab is given focus by simply defining them as Page Data Model fields). We mention this as any page you can avoid navigating to will speed up the execution of the script. |
|
20 |
Input data |
Please describe the problem |
Destination Field Type: User Interface Field Destination Field Name: DESCR254 |
|
30 |
Move data |
|
Source Field Type: Predefined Value Source Field Value: 1234567890 (note, this is the ID of the “dummy” person under which this type of customer contact is stored) Destination Field Type: User Interface Field Destination Field Name: PER_ID |
|
40 |
Move data |
|
Source Field Type: Predefined Value Source Field Value: TRUE Destination Field Type: Page Data Model Destination Field Name: W_CC_STATUS_SW (Note, this is a switch on Customer Contact - Main that a user turns on if they want to indicate a customer contact is open). When you move TRUE to a switch, it turns it on. When you move FALSE to a switch, it turns it off. |
|
50 |
Move data |
|
Source Field Type: Predefined Value Source Field Value: TO (note, this is the customer class code for this customer contact) Destination Field Type: User Interface Field Destination Field Name: CC_CL_CD |
|
60 |
Move data |
|
Source Field Type: Predefined Value Source Field Value: NOACCT (note, this is the customer contact type for this customer contact) Destination Field Type: User Interface Field (note, it’s important to use this field type rather the Page Data Model. This is because we want the characteristics associated with this customer contact type to default onto the Characteristics tab page and defaulting only happens when User Interface Fields are populated) Destination Field Name: CC_TYPE_CD |
|
70 |
Move data |
|
Source Field Type: Predefined Value Source Field Value: Generated by trouble order without account script Destination Field Type: User Interface Field Destination Field Name: CC_LOG:0$CC_LOG_CONTENT |
|
80 |
Move data |
|
Source Field Type: Predefined Value Source Field Value: 20 (note, this is the flag value for Send to Role) Destination Field Type: User Interface Field Destination Field Name: CC_LOG:0$CC_REMINDER_FLG |
|
90 |
Move data |
|
Source Field Type: Predefined Value Source Field Value: TOWOACCT (note, this is the To Do role that will receive the To Do entry informing them of this trouble order) Destination Field Type: User Interface Field Destination Field Name: CC_LOG:0$ROLE_ID |
|
100 |
Move data |
|
Source Field Type: Predefined Value Source Field Value: %CURRENT-DATE Destination Field Type: User Interface Field Destination Field Name: CC_LOG:0$TRIGGER_DT |
|
110 |
Navigate to a page |
|
Navigation Option: Customer Contact – Characteristics (update) |
|
120 |
Set focus to a field |
Press <i>Continue</i> after confirming the characteristic values and saving the customer contact |
Destination Field Name: CC_CHAR:0$CHAR_TYPE_CD |
|
130 |
Move data |
|
Source Field Type: Predefined Value Source Field Name: %SAVE-REQUIRED Destination Field Type: Temporary Storage Destination Field Name: SAVE_NEEDED |
|
140 |
Conditional Branch |
|
Compare Field Type: Temporary Storage Compare Field Name: SAVE_NEEDED Condition: = Comparison Field Type: Predefined Value Comparison Field Name: FALSE If TRUE, Go to step: 160 If FALSE, Go to step: 140 |
|
150 |
Set focus to a field |
<font color=red>You have not saved this information!</font> Press <i>Continue</i> after saving. |
Destination Field Name: IM_SAVE (note, this positions the cursor on the save button) |
|
160 |
Go to a step |
|
Next step: 120 |
|
170 |
Display text |
Script complete |
|
|
180 |
Height |
|
Script Window Height: 0 Height Unit: Pixels |
Note the following about this script:
· Step 10 navigates the user to the customer contact page in add mode.
· Step 20 causes a user to be prompted to enter a description of the problem. This description is stored in the customer contact’s description field.
· Steps 30 through 50 populate fields on Customer Contact – Main with “hard-coded” values (thus saving the user the effort of effort of entering this information). Take special note of step 50 - we are taking advantage of the fact that a customer contact type’s default characteristics are copied to a customer contact when a user specifies a given contact type. It’s important to note that defaulting only happens when you populate a User Interface Field (as opposed to a Page Data Model field).
· Steps 60 through 90 populate fields in the log grid on the same tab page.
· Steps 100 and 110 transfer users to Customer Contact – Characteristics where they are prompted to confirm the characteristics that were defaulted when the customer contact type was populated.
· Steps 120 through 160 are the same as the previous example.
Add A New Person To An Account
The following is an example of the steps necessary to implement a script that adds a new person to an existing account. This is a sophisticated script as it contains examples of populating scrolls and grids as well as using multiple transactions to implement a business process.
|
Step No |
Step Type |
Text Displayed In Script Area |
Additional Information On The Step |
|
5 |
Label |
|
Identify the correct account |
|
10 |
Prompt user |
Is the existing account currently displayed in the dashboard? |
Prompt Type: Button(s) First Prompt Value - Text: Yes, Next Step: 40 Second Prompt Value - Text: No, Next Step: 20 |
|
20 |
Navigate to a page |
|
Navigation Option: Control Central - Main |
|
30 |
Set focus to a field |
Press <i>Continue</i> after you've selected the customer (note, see How To Use HTML Tags And Spans In Text for more information about the <i> notation) |
Destination Field Name: ENTITY_NAME |
|
40 |
Move data |
|
Source Field Type: Predefined Value Source Field Value: %CONTEXT-ACCOUNTID (note, this is a global variable that contains the ID of the current account) Destination Field Type: Temporary Storage Destination Field Name: SAVED_ACCT_ID |
|
50 |
Conditional Branch |
|
Compare Field Type: Temporary Storage Compare Field Name: SAVED_ACCT_ID Condition: = Comparison Field Type: Predefined Value Comparison Field Name: %BLANK If TRUE, Go to step: 60 If FALSE, Go to step: 80 |
|
60 |
Display text |
<font color=red>Please select a customer, the dashboard isn't populated with an account</font> (note, see How To Use HTML Tags And Spans In Text for more information about the <font> notation) |
|
|
70 |
Go to a step |
|
Next step: 20 |
|
80 |
Display text |
You will be adding a new customer to account %SAVED_ACCT_ID |
|
|
85 |
Label |
|
Enter the Person's name and primary ID |
|
90 |
Navigate to a page |
|
Navigation Option: Person –Main (add) |
|
100 |
Move data |
|
Source Field Type: Predefined Value Source Field Value: FALSE Destination Field Type: Page Data Model Destination Field Name: ADD_ACCT_SW (Note, this is a switch on Person - Main that a user turns on if they want to both add a person AND an account when they save the new person - we don’t want to add an account when we add the new person so we set it to FALSE (i.e., we turn the switch off.) |
|
110 |
Input data |
Enter the new person’s name in the format “Last Name,First Name” (e.g., Smith,Patricia) |
Destination Field Type: User Interface Field Destination Field Name: PER_NAME:0$ENTITY_NAME |
|
120 |
Input data |
Enter the new person's Social Security Number in the format 999-99-9999 |
Destination Field Type: User Interface Field Destination Field Name: PER_IDENTIFIER:0$PER_ID_NBR Note, this step works because the identifier type was defaulted from the installation record and therefore this step only requires the user to enter the person’s social security number. Also note, the user doesn’t have to enter the SSN in the format shown because this step populates a User Interface Field, which automatically applies the formatting for the respective ID type. |
|
125 |
Label |
|
Enter one or more phone numbers |
|
130 |
Prompt user |
Would you like to define a phone number? |
Prompt Type: Button(s) First Prompt Value - Text: Home Phone (default) Next Step: 140 Second Prompt Value - Text: Business Phone, Next Step: 180 Third Prompt Value - Text: Finished Entering Phone Numbers, Next Step: 220 |
|
140 |
Press a button |
|
Button Name: PER_PHONE:0$pPhones_ADD_BUTTON (note, this causes the add button to be pressed for the first row in the phone grid) |
|
150 |
Move data |
|
Source Field Type: Predefined Value Source Field Value: HOME Destination Field Type: User Interface Field (Note, we used this data type rather than Page Data Model because we want to trigger the defaulting that takes place when a phone type is selected on the user interface (i.e., the phone format is shown on the page)). Destination Field Name: PER_PHONE:x$PHONE_TYPE_CD Note, the “x” notation indicates the current row in the array will be populated. |
|
160 |
Input data |
Enter the new person’s home phone number in the format (415) 345-2392 |
Destination Field Type: User Interface Field Destination Field Name: PER_PHONE:x$PHONE Note, because a User Interface Field is populated, the default logic associated with this field will be triggered. The default logic for this field formats the input phone number using the algorithm defined on the phone type. This means the user doesn’t have to enter the phone number in the designated format, they could enter all numbers and let the system format it. |
|
170 |
Go to a step |
|
Next step: 130 (this loops to ask them if they want to add another phone number) |
|
180 |
Press a button |
|
Button Name: PER_PHONE:0$pPhones_ADD_BUTTON (this causes the add button to be pressed for the first row in the phone grid) |
|
190 |
Move data |
|
Source Field Type: Predefined Value Source Field Name: not applicable Source Field Value: BUSN Destination Field Type: User Interface Field Destination Field Name: PER_PHONE:x$PHONE_TYPE_CD (Note, the “x” notation indicates the current row in the array will be populated) |
|
200 |
Input data |
Enter the new person’s business phone number in the format (415) 345-2392 |
Destination Field Type: User Interface Field Destination Field Name: PER_PHONE:x$PHONE |
|
210 |
Go to a step |
|
Next step: 130 (this loops to ask them if they want to add another phone number) |
|
220 |
Press a button |
|
Button Name: PER_PHONE:0$pPhones_DEL_BUTTON (Note, this removes the blank row from the person phone grid so we don’t get a validation error) |
|
225 |
Label |
|
Enter the Person's correspondence info |
|
230 |
Navigate to a page |
|
Navigation Option: Person –Correspondence Info (update) |
|
240 |
Set focus to a field |
Press <i>Continue</i> after defining correspondence information for the new person (if any). Don't forget to <font color=red>SAVE</font> the new person (note, see How To Use HTML Tags And Spans In Text for more information about the <i> and <font> notations) |
Destination Field Name: OVRD_MAIL_NAME1 |
|
250 |
Conditional Branch |
|
Compare Field Type: Page Data Model Compare Field Name: PER_ID Condition: = Comparison Field Type: Predefined Value Comparison Field Name: %BLANK If TRUE, Go to step: 260 If FALSE, Go to step: 280 |
|
260 |
Display text |
<font color=red>The new person hasn't been added, please press the save button to add the new person</font> |
|
|
270 |
Go to a step |
|
Next step: 240 |
|
275 |
Label |
|
Store person, navigate to account page and link to account |
|
280 |
Move data |
|
Source Field Type: Page Data Model Source Field Name: PER_ID Destination Field Type: Temporary Storage Destination Field Name: NEW_PERSON_ID Note, we are saving the person ID as we’ll need to populate it on the account / person information later in the script. |
|
290 |
Move data |
|
Source Field Type: Temporary Storage Source Field Name: SAVED_ACCT_ID Destination Field Type: Page Data Model Destination Field Name: ACCT_ID Note, this step is done in anticipation of the following step that transfers the user to the account page. This step simply moves the account ID saved above to some place on the page. The name of the receiving field is important; it must be the same as one of the fields defined on the Navigation Option used to transfer to the destination transaction (this navigation option is defined on the next step). To find the appropriate field name for any transaction, display the navigation option in question. |
|
300 |
Navigate to a page |
|
Navigation Option: Account – Persons (update) |
|
310 |
Press a button |
|
Button Name: IM_Sect2_AddButton |
|
320 |
Move data |
|
Source Field Type: Temporary Storage Source Field Name: NEW_PERSON_ID Destination Field Type: User Interface Field Destination Field Name: ACCT_PER$PER_ID |
|
330 |
Set focus to a field |
Press <i>Continue</i> after defining the new person's relationship type. Don't forget to <font color=red>SAVE</font> the changes to the account |
Destination Field Name: ACCT_PER$ACCT_REL_TYPE_CD |
|
340 |
Move data |
|
Source Field Type: Predefined Value Source Field Name: %SAVE-REQUIRED Destination Field Type: Temporary Storage Destination Field Name: SAVE_NEEDED |
|
350 |
Conditional Branch |
|
Compare Field Type: Temporary Storage Compare Field Name: SAVE_NEEDED Condition: = Comparison Field Type: Predefined Value Comparison Field Name: FALSE If TRUE, Go to step: 380 If FALSE, Go to step: 360 |
|
360 |
Set focus to a field |
<font color=red>You have not saved this information!</font> Press <i>Continue</i> after saving. |
Destination Field Name: IM_SAVE (note, this positions the cursor on the save button) |
|
370 |
Go to a step |
|
Next step: 340 |
|
380 |
Display text |
Script complete |
|
|
390 |
Height |
|
Script Window Height: 0 Height Unit: Pixels |
Note the following about this script:
· Steps 10 through 70 are a technique to make sure the user has selected an account.
· Step 80 is subjective (but it demonstrates How To Substitute Variables In Text).
· In step 90, we navigate to Person - Main in add mode.
· Steps 130 through 220 illustrate a technique that can be used to capture phone numbers. A much easier method would be to use a Set focus step and ask the user to fill in the applicable phone numbers.
· Steps 230 through 240 transfer the user to the next tab on the person page where they are prompted to enter additional correspondence information.
· Step 280 saves the new person ID in temporary storage. This is done so that we can populate it when we return to the account page. Refer to How To Name Temporary Storage Fields for more information.
· Step 290 and 300 illustrates the technique used to navigate to a page (see the note in the step for more information).
· Steps 310 and 320 populate the recently added person ID in the account – person scroll.
· Step 330 asks the user to define additional account / person information. You could use several steps to do this as you could walk the user through each field. See Payment Extensions for an example of a script that walks a user through the fields on a page.
· Steps 340 through 390 are classic end-of-script steps.
Reprint A Bill - Long Version
The following is an example of a script that causes a bill to be reprinted. This script prompts the user to select a bill and then sets up a new bill routing to cause it to be reprinted. This script contains examples of:
· Transferring to a page where the transfer may cause a search window to appear. In this example, we transfer the user to the bill page and if the account has multiple bills, the search page appears; if they have only one bill, the bill is automatically selected.
· Populating information that resides in a scroll (as opposed to a grid).
· Concatenating information into a message.
We have also supplied an alternate version of this script that has fewer steps (see Reprint A Bill - Short Version). Take the time to contrast these two versions before you decide how to construct your scripts.
|
Step No |
Step Type |
Text Displayed In Script Area |
Additional Information On The Step |
|
5 |
Label |
|
Identify the correct account |
|
10 |
Prompt user |
Is the customer associated with the bill currently displayed in the dashboard? |
Prompt Type: Button(s) First Prompt Value - Text: Yes (default turned on), Next Step: 40 Second Prompt Value - Text: No, Next Step: 20 |
|
20 |
Navigate to a page |
|
Navigation Option: Control Central - Main |
|
30 |
Set focus to a field |
Press <i>Continue</i> after you’ve selected the customer |
Destination Field Name: ENTITY_NAME |
|
40 |
Move data |
|
Source Field Type: Predefined Value Source Field Value: %CONTEXT-ACCOUNTID (note, this is a global variable that contains the ID of the current account) Destination Field Type: Temporary Storage Destination Field Name: SAVED_ID |
|
50 |
Conditional Branch |
|
Compare Field Type: Temporary Storage Compare Field Name: SAVED_ID Condition: = Comparison Field Type: Predefined Value Comparison Field Name: %BLANK If TRUE, Go to step: 60 If FALSE, Go to step: 90 |
|
60 |
Display text |
<font color=red>The dashboard isn't populated with an account.</font> Please select a customer before continuing. |
|
|
70 |
Go to a step |
|
Next step: 20 |
|
75 |
Label |
|
Navigate to Bill Routing page and select desired bill |
|
90 |
Move data |
|
Source Field Type: Temporary Storage Source Field Name: SAVED_ID Destination Field Type: Page Data Model Destination Field Name: ACCT_ID Note, this step is done in anticipation of a subsequent step that transfers the user to the bill page. This step simply moves the account ID saved above to some place on the page. The name of the receiving field is important; it must be the same as one of the fields defined on the Navigation Option used to transfer to the destination transaction (this navigation option is defined on the next step). To find the appropriate field name for any transaction, display the navigation option in question. |
|
100 |
Navigate to a page |
|
Navigation Option: Bill - Routing (update) |
|
110 |
Prompt user |
Press <font color=orange>OK</font> after a bill has been selected |
Prompt Type: Button(s) First Prompt Value - Text: OK, Next Step: 120 |
|
115 |
Label |
|
User should confirm the bill routing details and Save. |
|
120 |
Move data |
|
Source Field Type: Page Data Model Source Field Name: ENDING_BAL Destination Field Type: Temporary Storage Destination Field Name: ENDING_BALANCE |
|
130 |
Move data |
|
Source Field Type: Page Data Model Source Field Name: COMPLETE_DTTM Destination Field Type: Temporary Storage Destination Field Name: COMPLETION_DTTM |
|
140 |
Press a button |
|
Button Name: IM_ScrollCtrl_addBtn |
|
150 |
Set focus to a field |
This bill for %ENDING_BALANCE was completed on %COMPLETION_DTTM. <br>Please confirm / change the name and address of the bill. |
Destination Field Name: BILL_RTGS$ENTITY_NAME1 |
|
160 |
Set focus to a field |
Press the Save button (Alt-S) to save the bill routing information |
Destination Field Name: IM_SAVE |
|
165 |
Label |
|
Verify Save |
|
170 |
Move data |
|
Source Field Type: Predefined Value Source Field Name: %SAVE-REQUIRED Destination Field Type: Temporary Storage Destination Field Name: SAVE_NEEDED |
|
180 |
Conditional Branch |
|
Compare Field Type: Temporary Storage Compare Field Name: SAVE_NEEDED Condition: = Comparison Field Type: Predefined Value Comparison Field Name: FALSE If TRUE, Go to step: 210 If FALSE, Go to step: 190 |
|
190 |
Set focus to a field |
<font color=red>You have not saved this information!</font> Press <i>Continue</i> after saving. |
Destination Field Name: IM_SAVE (note, this positions the cursor on the save button) |
|
200 |
Go to a step |
|
Next step: 170 |
|
205 |
Label |
|
Display confirmation |
|
210 |
Move data |
|
Source Field Type: Page Data Model Source Field Name: BILL_RTG$BATCH_CD Destination Field Type: Temporary Storage Destination Field Name: BATCH_CODE |
|
220 |
Display text |
Script complete. The bill will be sent to the recipient the next time the %BATCH_CODE process executes |
|
Reprint A Bill - Short Version
The following is an example of a script that causes a bill to be reprinted. This script prompts the user to select a bill and then sets up a new bill routing to cause it to be reprinted. This script is an alternate version of Reprint A Bill - Long Version. Take the time to contrast these two versions before you decide how to construct your scripts.
|
Step No |
Step Type |
Text Displayed In Script Area |
Additional Information On The Step |
|
5 |
Label |
|
Prompt user for account whose bill should be reprinted. |
|
10 |
Prompt user |
Select an option and then press <font color=red>Continue</font> |
Prompt Type: Dropdown First Prompt Value - Text: View bills for the customer in the dashboard (default turned on), Next Step: 20 Second Prompt Value - Text: View bills for a different customer, Next Step: 40 |
|
20 |
Move data |
|
Source Field Type: Predefined Value Source Field Value: %CONTEXT-ACCOUNTID (note, this is a global variable that contains the ID of the current account) Destination Field Type: Page Data Model Destination Field Name: ACCT_ID Note, this step is done in anticipation of step 50, which transfers the user to the bill page. This step simply moves the account ID saved above to some place on the page. The name of the destination field is important; it must be the same as one of the fields defined on the Navigation Option used to transfer to the destination transaction (this navigation option is defined on step 50). To find the appropriate field name for any transaction, display the navigation option in question. |
|
30 |
Go to a step |
|
Next step: 50 |
|
40 |
Move data |
|
Source Field Type: Predefined Value Source Field Value: %BLANK (note, this is a global variable that contains the a blank value) Destination Field Type: Page Data Model Destination Field Name: ACCT_ID Note, this step is done in anticipation of the following step that transfers the user to the bill page. This step simply resets the account ID that will be passed to the bill search page. The name of the destination field is important; it must be the same as one of the fields defined on the Navigation Option used to transfer to the destination transaction (this navigation option is defined on the next step). To find the appropriate field name for any transaction, display the navigation option in question. |
|
45 |
Label |
|
Navigate to Bill Routing page and select desired bill |
|
50 |
Navigate to a page |
|
Navigation Option: Bill - Routing (update) |
|
60 |
Prompt user |
Press <font color=orange>OK</font> after a bill has been selected |
Prompt Type: Button(s) First Prompt Value - Text: OK, Next Step: 70 |
|
65 |
Label |
|
User should confirm the bill routing details and Save. |
|
70 |
Move data |
|
Source Field Type: Page Data Model Source Field Name: ENDING_BAL Destination Field Type: Temporary Storage Destination Field Name: ENDING_BALANCE |
|
80 |
Move data |
|
Source Field Type: Page Data Model Source Field Name: COMPLETE_DTTM Destination Field Type: Temporary Storage Destination Field Name: COMPLETION_DTTM |
|
90 |
Press a button |
|
Button Name: IM_ScrollCtrl_addBtn |
|
100 |
Set focus to a field |
This bill for %ENDING_BALANCE was completed on %COMPLETION_DTTM. <br>Please confirm / change the name and address of the bill. |
Destination Field Name: BILL_RTGS$ENTITY_NAME1 |
|
110 |
Set focus to a field |
Press the Save button (Alt-S) to save the bill routing information |
Destination Field Name: IM_SAVE |
|
115 |
Label |
|
Verify Save |
|
120 |
Move data |
|
Source Field Type: Predefined Value Source Field Name: %SAVE-REQUIRED Destination Field Type: Temporary Storage Destination Field Name: SAVE_NEEDED |
|
130 |
Conditional Branch |
|
Compare Field Type: Temporary Storage Compare Field Name: SAVE_NEEDED Condition: = Comparison Field Type: Predefined Value Comparison Field Name: FALSE If TRUE, Go to step: 160 If FALSE, Go to step: 140 |
|
140 |
Set focus to a field |
<font color=red>You have not saved this information!</font> Press <i>Continue</i> after saving. |
Destination Field Name: IM_SAVE (note, this positions the cursor on the save button) |
|
150 |
Go to a step |
|
Next step: 120 |
|
205 |
Label |
|
Display confirmation |
|
160 |
Move data |
|
Source Field Type: Page Data Model Source Field Name: BILL_RTG$BATCH_CD Destination Field Type: Temporary Storage Destination Field Name: BATCH_CODE |
|
170 |
Display text |
Script complete. The bill will be sent to the recipient the next time the %BATCH_CODE process executes |
|
Payment Extensions
The following is an example of a script that guides a user through the payment plan options. This script executes the following rules:
· If the customer’s customer class is R (residential)
· If their credit rating is <= 600, they must pay immediately; no payment extensions are allowed
· Else, the user is given the choice of setting up a payment arrangement or extending the customer’s next credit review date (i.e., the date on which the account debt monitor will review the customer’s debt)
· If the customer’s customer class is not R (residential)
· If their credit rating is <= 700, they must pay immediately; no payment extensions are allowed
· Else, the user is given the choice of setting up a pay plan or extending the customer’s next credit review date (i.e., the date on which the account debt monitor will review the customer’s debt)
|
Step No |
Step Type |
Text Displayed In Script Area |
Additional Information On The Step |
|
10 |
Perform script |
|
Subscript: CI_FINDCUST Note, this step performs a script that contains the steps that ask the user to find the customer on control central. |
|
20 |
Invoke function |
|
Function: GETCCCR (retrieves an account's customer class and credit rating) If Successful, Go To Step: 40 If Error, Go To Step: 30 Send Field: Temporary Storage / SAVED_ACCT_ID Receive Field 1: Temporary Storage / CUST_CL_CD Receive Field 2: Temporary Storage / TOT_CR_RATING_PTS Note, this step invokes a function that returns the account's credit rating and customer class. |
|
30 |
Transfer control |
|
Subscript: CI_FUNCERR Note, this step transfers control to a script that displays the error information and stops. |
|
40 |
Mathematical operation |
|
Base Field Type: Temporary Storage Base Field Name: TOT_CR_RATING_PTS Math Operation: + Math Field Type: Predefined Value Math Field Value: 0 Note, this step converts the credit rating held in string into a number so that it can be used in later mathematical operations that compare the credit rating to threshold values. |
|
50 |
Conditional Branch |
|
Compare Field Type: Page Data Model Compare Field Name: CUST_CL_CD Condition: = Comparison Field Type: Predefined Value Comparison Field Name: R If TRUE, Go to step: 110 If FALSE, Go to step: 250 |
|
60 |
Conditional Branch |
|
Compare Field Type: Page Data Model Compare Field Name: TOT_CR_RATING_PTS Condition: <= Comparison Field Type: Predefined Value Comparison Field Name: 600 If TRUE, Go to step: 120 If FALSE, Go to step: 140 |
|
70 |
Label |
|
Residential Customer, Credit Rating <= 601 |
|
120 |
Display Text |
<font color=red>This customer's credit rating is less than or equal to 600 and therefore payment is due immediately (no payment extensions are possible)</font> |
|
|
130 |
Go to a step |
|
Next step: 400 |
|
140 |
Prompt user |
Choose between extending the date on which the system will examine this customer's debt OR adding a payment arrangement |
Prompt Type: Button(s) First Prompt Value - Text: Extend collection date (default value), Next Step: 150 Second Prompt Value - Text: Setup a payment arrangement, Next Step: 180 |
|
145 |
Label |
|
Postpone the credit review date |
|
150 |
Navigate to a page |
|
Navigation Option: Account – C&C (update) |
|
151 |
Move data |
|
Source Field Type: Predefined Value Source Field Value: %CURRENT-DATE Destination Field Type: User Interface Field Destination Field Name: POSTPONE_CR_RVW_DT Note, the next step will add 5 days to this field value (thus setting the review date to 5 days in the future). |
|
152 |
Mathematical operation |
|
Base Field Type: User Interface Field Base Field Name: POSTPONE_CR_RVW_DT Math Operation: + Math Field Type: Predefined Value Math Field Value: 5 days |
|
160 |
Set focus to a field |
Please review the new credit review date and then save the change |
Destination Field Name: POSTPONE_CR_RVW_DT |
|
170 |
Go to a step |
|
Next step: 400 |
|
175 |
Label |
|
Create payment arrangement. |
|
180 |
Navigate to a page |
|
Navigation Option: Payment Arrangement - Main (add) |
|
190 |
Set focus to a field |
Select the debt to be transferred to the payment arrangement. You do this by turning on the checkboxes adjacent to the <font color=red>Arrears Amounts</font> FOR EACH <font color=red>CANDIDATE SA</font> IN THE SCROLL |
Destination Field Name: SA_ARREARS:x$CHECKED_FOR_PA_SW |
|
200 |
Set focus to a field |
Press <i>Continue</i> after you've considered the debt on each service agreement in the scroll |
Destination Field Name: IM_SectArrow_RtArrow |
|
209 |
Move data |
|
Source Field Type: Predefined Value Source Field Value: 6 Destination Field Type: User Interface Field Destination Field Name: INSTALLMENT Note, this step defaults a value of 6 in the Installments field. Because we used the User Interface Field type, the payment amount is automatically calculated for the user as this is the default logic for this field on this page. If we’d used a field type of Page Data Model, the default logic would not execute. |
|
210 |
Set focus to a field |
Select the number of installments (a value of <font color=red>6</font> was defaulted) |
Destination Field Name: INSTALLMENT |
|
220 |
Move data |
|
Source Field Type: Predefined Value Source Field Value: CA Destination Field Type: User Interface Field Destination Field Name: CIS_DIVISION |
|
225 |
Set focus to a field |
Specify an SA Type for the payment arrangement |
Destination Field Name: SA_TYPE_CD |
|
230 |
Set focus to a field |
Press the Create button to create a new payment arrangement service agreement and transfer the selected debt to it |
Destination Field Name: CREATE_SW |
|
240 |
Go to a step |
|
Next step: 400 |
|
245 |
Label |
|
Non-residential customer with credit rating less than or equal to 700 must pay now. If the CR is over 700, choose between extending date and creating a pay plan. |
|
250 |
Conditional Branch |
|
Compare Field Type: Page Data Model Compare Field Name: TOT_CR_RATING_PTS Condition: <= Comparison Field Type: Predefined Value Comparison Field Name: 700 If TRUE, Go to step: 260 If FALSE, Go to step: 280 |
|
260 |
Display Text |
This customer’s credit rating is less than or equal to 700 and therefore payment is due immediately (no pay plan is possible) |
|
|
270 |
Go to a step |
|
Next step: 400 |
|
280 |
Prompt user |
You can choose between extending the date on which the system will examine this customer's debt OR creating a pay plan |
Prompt Type: Button(s) First Prompt Value - Text: Extend collection date, Next Step: 290 Second Prompt Value - Text: Setup a pay plan, Next Step: 320 |
|
285 |
Label |
|
Postpone the credit review date |
|
290 |
Navigate to a page |
|
Navigation Option: Account – C&C (update) |
|
300 |
Set focus to a field |
Please enter the new credit review date (set it up to 5 days in the future) and then save the change |
Destination Field Name: POSTPONE_CR_RVW_DT |
|
310 |
Go to a step |
|
Next step: 400 |
|
315 |
Label |
|
Add a payment plan |
|
320 |
Navigate to a page |
|
Navigation Option: Pay Plan - Main (add) |
|
330 |
Set focus to a field |
Select the Pay Plan Type |
Destination Field Name: PP_TYPE_CD |
|
340 |
Prompt User |
Who is responsible for making these payments? |
Prompt Type: Button(s) First Prompt Value - Text: Customer, Next Step: 370 Second Prompt Value - Text: Third party, Next Step: 350 |
|
350 |
Move data |
|
Source Field Type: Predefined Value Source Field Value: TRUE (note, this is how you turn a checkbox on) Destination Field Type: User Interface Field Destination Field Name: THRD_PTY_SW |
|
360 |
Set focus to a field |
Select the Pay Plan Type |
Destination Field Name: THRD_PTY_PAYOR_CD |
|
370 |
Set focus to a field |
Select a Pay Method |
Destination Field Name: PAY_METH_CD |
|
380 |
Set focus to a field |
Enter one or more scheduled payments. <font color=red>The Total Amount of the scheduled payments should cover the customer's Delinquent Debt if you want the pay plan to protect the customer from additional credit and collection activity.</font> |
Destination Field Name: PPS:x$PP_SCHED_DT |
|
390 |
Set focus to a field |
Press the Save button (Alt-S) to save the pay plan |
Destination Field Name: IM_SAVE |
|
395 |
Label |
|
Confirm save |
|
400 |
Move data |
|
Source Field Type: Predefined Value Source Field Name: %SAVE-REQUIRED Destination Field Type: Temporary Storage Destination Field Name: SAVE_NEEDED |
|
410 |
Conditional Branch |
|
Compare Field Type: Temporary Storage Compare Field Name: SAVE_NEEDED Condition: = Comparison Field Type: Predefined Value Comparison Field Name: FALSE If TRUE, Go to step: 440 If FALSE, Go to step: 420 |
|
420 |
Set focus to a field |
<font color=red>You have not saved this information!</font> Press <i>Continue</i> after saving. |
Destination Field Name: IM_SAVE (note, this positions the cursor on the save button) |
|
430 |
Go to a step |
|
Next step: 400 |
|
440 |
Navigate to a page |
|
Navigation Option: Control Central – Pay Pan (update) |
|
450 |
Display text |
Script complete, please confirm the customer’s credit and collection’s information |
|
Refer to The Big Picture Of Scripts to better understand the basic concept of scripts.
Server-based scripts allow an implementation to configure backend business processes. The system supports two types of server-based scripts, Plug-In scripts and Service scripts.
· Plug-in scripts allow an implementation to develop routines that are executed from the system's various plug-in spots without coding. For example, an implementation could configure a plug-in script that is executed every time an adjustment of a given type is frozen.
· Service scripts allow an implementation to develop common routines that are invoked from both front-end and back-end services. For example, an implementation could create a service script that terminates an account's automatic payment preferences. This service script could be invoked from a BPA script initiated by an end-user when a customer asks to stop paying automatically, and it could also be executed from a plug-in script if a customer fails to pay their debt on time.
The topics in this section describe background topics relevant to server-based scripts.
Contents
Debugging Server-Based Scripts
Plug-In Scripts
Note. This section assumes you are familiar with the notion of plug-in spots (algorithm entities) and plug-ins. Refer The Big Picture Of Algorithms to for more information.
Rather than write a java program for a plug-in spot, you can create a plug-in using the scripting "language". In essence, this is the only difference between a program-based plug-in and a script-based one. Obviously, this is a significant difference as it allows you to implement plug-ins without programming (and compilers).
The following topics describe basic concepts related to plug-in scripts.
Contents
A Plug-In Script's API
Like program-based plug-ins, plug-in scripts:
· Run on the application server
· Have their API (input / output interface) defined by the plug-in spot (i.e., plug-in scripts don't get to declare their own API)
· Can only be invoked by the “plug-in spot driver”
The best way to understand a plug-in script's API is to use the View Plug-In Script Data Area hyperlink on Script - Data Area to view its parameters data area schema.
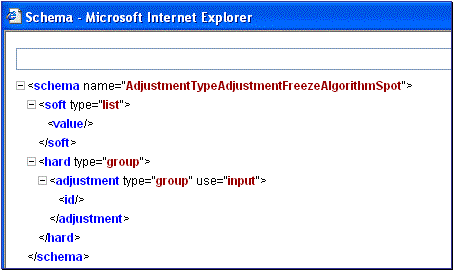
Plug-In Data Area
Notice the two groups: soft and hard. If you are familiar with plug-in spots, you'll recognize these as the classic soft and hard parameters:
· The soft parameters are the values of the parameters defined on the algorithm. Notice they are not named - if you want to reference them in your plug-in script, you must do it by position (this is equivalent to what a Java programmer does for plug-ins written in Java).
· The hard parameters are controlled by the plug-in spot (i.e., the algorithm entity). Notice that this plug-in spot has a single input parameter called "adjustment/id". Also notice the use= attribute - this shows that this parameter is input-only (i.e., you can't change it in the plug-in script).
XPath. You can click on an element name to see the XPath used to reference the element in your script.
Setting Up Plug-In Scripts
You can write plug-in scripts for all plug-in spots that have been Java-enabled. The following points describe how to implement a plug-in script:
· Compose your plug-in script, associating it with the appropriate algorithm entity (plug-in spot).
· Create a new algorithm type for the respective algorithm entity, referencing your plug-in script as the program to carry out the algorithm type's function. Only plug-in scripts associated with the algorithm entity may be referenced on the algorithm type.
· Set up an algorithm for the respective algorithm type and plug it in where applicable. Refer to Setting Up Algorithm Types for more information.
Note. No plug-in scripts are shipped with the base-package.
Service Scripts
BPA scripts run on the client’s browser and guide the end-users through business processes. Service scripts run on the application server and perform server-based processing for BPA scripts, zones and more. You may want to think of a service script as a common routine that is set up via the scripting (rather than programming).
The following topics describe basic concepts related to service scripts.
A Service Script's API
As with any common routine, a service script must declare its input / output parameters (i.e., its API). A service script's API is defined on its schema.
Schema Definition Tips. A context sensitive "Script Tips" zone appears when you open the Script page to assist you with the schema definition syntax. The zone provides a complete list of the XML nodes and attributes available to you when you construct a schema.
Invoking Service Scripts
Any type of script may invoke a service script:
· A BPA script may invoke a service script to perform server-based processing.
· Plug-in scripts may invoke a service script (like a “common routine”).
· A service script may call another service script (like a "common routine").
Map zones may be configured to invoke service scripts to obtain the data to be displayed. Refer to Map Zones for more information.
XAI incoming messages support interaction with service scripts allowing the outside world to interact directly with a service script.
You can also invoke a service script from a Java class.
Debugging Server-Based Scripts
The server can create log entries to help you debug your server scripts. These logs are only created if you do the following:
· Start the system in ?debug=true mode
· Turn on the Global debug checkbox in the upper corner of the browser. When you click this check box, a pop-up appears asking you what you want to trace - make sure to check box that causes script steps to be traced.
The logs contain a great deal of information including the contents of the referenced data area for Move data, Invoke business object, Invoke business service and Invoke service script steps.
You can view the contents of the logs by pressing the Show User Log button appears at the top of the browser.
Please note that all log entries for your user ID are shown (so don't share user id's!).
How To Copy A Script From The Demonstration Database
Warning! If you are not familiar with the concepts described in the ConfigLab chapter, this section will be difficult to understand. Specifically, you need to understand how a Compare database process is used to copy objects between two databases. Please take the time to familiarize yourself with this concept before attempting to copy a script from the demonstration database.
The demonstration database contains several sample scripts. The topics in this section describe how to copy any / all of the demonstration scripts to your implementation’s database.
If You Work In A Non-English Language
One Time Only - Set Up A DB Process To Copy Scripts
Run The Copy Scripts DB Process
If You Work In A Non-English Language
The demonstration database is installed in English only. If you work in a non-English language, you must execute the NEWLANG background process on the demonstration database before using it as a Compare Source environment. If you work in a supported language, you should apply the language package to the demonstration database as well.
If you don’t execute NEWLANG on the demonstration database, any objects copied from the demonstration database will not have language rows for the language in which you work and therefore you won’t be able to see the information in the target environment.
One Time Only - Set Up A DB Process To Copy Scripts
You need a “copy scripts” database process (DB process) configured in the target database (i.e., your implementation’s database). This DB process must have the following instructions:
· A primary instruction for the script maintenance object (MO)
· A child instruction for each MO referenced as a foreign key on a script (i.e., algorithm, navigation option, and icon reference)
The demonstration database contains such a DB process; it’s called CI_COPSC. In order to copy scripts from the demonstration database, you must first copy this DB process from the demonstration database.
Warning! The remainder of this section is confusing as it describes a DB process that copies another DB process. Fortunately, you will only have to do the following once. This is because after you have a “copy scripts” DB process in your target database, you can use it repeatedly to copy scripts from the demonstration database.
You can copy the CI_COPSC DB process from the demonstration database by submitting the CL-COPDB background process in your target database. When you submit this process, you must supply it with an environment reference that points to the demonstration database. If you don’t have an environment reference configured in your target database that references the demonstration database, you must have your technical staff execute a registration script that sets up this environment reference. Refer to Registering ConfigLab Environments for more information.
CL-COPDB is initially delivered ready to copy every DB process that is prefixed with CI_ from the source database (there are numerous sample DB processes in the demonstration database and this process copies them all). If you only want to copy the CI_COPSC DB process, add a table rule to the primary instruction of the CL-COPDB database process to only copy the CI_COPSC DB process. The remainder of this section assumes you have added this table rule.
When the CL-COPDB process runs, it highlights differences between the “copy scripts” DB process in your source database and the target database. The first time you run this process, it creates a root object in the target database to indicate the CI_COPSC DB process will be added to your target database. You can use the Difference Query to review these root objects and approve or reject them.
Automatic approval. When you submit CL-COPDB, you can indicate that all root objects should be marked as approved (thus saving yourself the step of manually approving them using Difference Query).
After you’ve approved the root object(s), submit the CL-APPCH batch process to change your target database. You must supply the CL-APPCH process with two parameters:
· The DB Process used to create the root objects (CL-COPDB)
· The environment reference that identifies the source database (i.e., the demonstration database)
Run The Copy Scripts DB Process
After you have a “copy scripts” DB process in the target database, you should add a table rule to its primary instruction to define which script(s) to copy from the demonstration database. For example, if you want to copy a single script called CI_WSS, you’d have a table rule that looks as follows
· Table: CI_SCR
· Override Condition: #CI_SCR.SCR_CD='CI_WSS'
If you do not introduce this table rule to the primary instruction of the DB process, ALL scripts in the demonstration database will be copied to the target database (and this may be exactly what you want to do).
Tables rules are WHERE clauses. A table rule is simply the contents of a WHERE clause except the tables names are prefixed with #. This means that you can have table rules that contain LIKE conditions, subqueries, etc.
At this point, you’re ready to submit the background process identified on your “copy scripts” DB process. This background process highlights the differences between the scripts in the demonstration database and the target database (the target database is the environment in which you submit the background process).
The background process you submit is typically named the same as the DB process that contains the rules. If you used the CL-COPDB background process to transfer the “copy scripts” DB process from the demo database, it will have also configured a batch control and linked it to the “copy scripts” DB process. This batch control has the same name as its related DB process (this is just a naming convention, it’s not a rule). This means that you’d submit a batch control called CI_COPSC in order to execute the CI_COPSC DB process.
When you submit the CI_COPSC background process, you must supply it with an environment reference that points to the source database (i.e., the demonstration database).
When the CI_COPSC process runs, it simply highlights differences between the scripts in your source database and the target database. It creates a root object in the target database for every script that is not the same in the two environments (actually, it only concerns itself with scripts that match the criteria on the table rule described above). You can use the Difference Query to review these root objects and approve or reject them.
Auto approval. When you submit CI_COPSC, you can indicate that all root objects should be marked as approved (thus saving yourself the step of manually approving them).
After you’ve approved the root object(s) associated with the script(s) that you want copied, submit the CL-APPCH batch process to cause your target database to be changed. You must supply the CL-APPCH process with two parameters:
· The DB process of the “copy scripts” DB process (i.e., CI_COPSC)
· The environment reference that identifies the source database (i.e., the demonstration database)
The script maintenance transaction is used to maintain your scripts. The topics in this section describe how to use this transaction.
Refer to The Big Picture Of Scripts for more information about scripts.
Contents
Script - Main
Use this page to define basic information about a script. Open this page using Admin Menu, Script.
Script Tips. A context sensitive "Script Tips" zone is associated with this page. The zone provides useful tips on various topics related to setting up scripts.
Description of Page
Enter a unique Script code and Description for the script. Ownerindicates if the script is owned by the base package or by your implementation (Customer Modification).
Important! If you introduce a new script, carefully consider its naming convention. Refer to System Data Naming Convention for more information.
Script Type indicates if this is a BPA Script, Plug-In Script or Service Script. Refer to The Big Picture Of BPA Scripts and The Big Picture Of Server Based Scripts for more information.
Invocation Option appears only for BPA scripts. Rather than creating monolithic scripts, we recommend dividing scripts into sections. Refer to Designing And Developing Scripts for more information. If you follow this advice, then for BPA scripts you will create scripts that are never invoked directly by users (i.e., you'll have BPA scripts that are only invoked by other BPA scripts). Use Invocation Option to define if the script is User Invocable or Not User Invocable. BPA Scripts that are Not User Invocable do not appear on the script menu and cannot be selected as one of a user's favorite scripts.
Enter an Application Serviceif the execution of the script should be secured. Refer to Securing Script Execution for more information.
Algorithm Entity appears only for plug-in scripts. Use this field to define the algorithm entity into which this script can be plugged in.
Business Object appears only for business object related plug-in scripts. Enter the Business Object whose elements are to be referenced by the plug-in script.
Script Engine Version defines the version of the XML Path Language (XPath) to be used for the script.
Click on the View Script Schema to view the script's data areas on the schema viewer window.
The tree summarizes the script’s steps. You can use the hyperlink to transfer you to the Step tab with the corresponding step displayed.
Script - Step
Use this page to add or update a script’s steps. Open this page using Admin Menu, Script and then navigate to the Step tab.
Time saver. You can navigate to a step by clicking on the respective node in the tree on the Main tab.
Description of Page
The Steps accordion contains an entry for every step linked to the script. When a script is initially displayed, its steps are collapsed. To see a step's details, simply click on the step's summary bar. You can re-click the bar to collapse the step's details. Please see accordions for the details of other features you can use to save time.
Select the Step Type that corresponds with the step. Refer to How To Set Up Each Step Type for an overview of the step types.
Warning! The Step Type affects what you can enter on other parts of this page. The remainder of this section is devoted to those fields that can be entered regardless of Step Type. The subtopics that follow describe those fields whose entry is contingent on the Step Type.
StepSequence defines the relative position of this step in respect of the other steps. The position is important because it defines the order in which the step is executed. You should only change a Step Sequence if you need to reposition this step. But take care; if you change the Step Sequence and the step is referenced on other steps, you’ll have to change all of the referencing steps.
Leave gaps in the sequence numbers. Make sure you leave space between sequence numbers so that you can add new steps between existing ones in the future. If you run out of space, you can use the Renumber button to renumber all of the steps. This will renumber the script’s steps by 10 and change all related references accordingly.
Display Step is only enabled on BPA scripts for step types that typically don’t cause information to be displayed in the script area (i.e., step types like Conditional Branch, Go to a step, Height, etc). If you turn on this switch, information about the step is displayed in the script area to help you debug the script.
Warning! Remember to turn this switch off when you’re ready to let users use this script.
Note. If Display Step is turned on and the step has Text, this information will be displayed in the script area. If Display Step is turned on and the step does NOT have Text, a system-generated messages describing what the step does is displayed in the script area.
Display Icon controls the icon that prefixes the Text that’s displayed in the script area. Using an icon on a step is optional. This field is only applicable to BPA scripts.
Text is the information that displays in the script area when the step executes. You need only define text for steps that cause something to display in the script area.
Refer to How To Substitute Variables In Text for a discussion about how to substitute variables in a text string.
Refer to How To Use HTML Tags And Spans In Text for a discussion about how to format (with colors and fonts) the text that appears in the script area.
The other fields on this page are dependent on the Step Type. The topics that follow briefly describe each step type’s fields and provide additional information about steps.
Click on the View Script Schema hyperlink to view the script's data areas. Doing this opens the schema viewer window.
The View Script As Text hyperlink appears for server-based scripts only. Click on this link to view on a separate window the internal scripting commands underlying your script steps. The presented script syntax is completely valid within edit data steps.
Contents
How To Set Up Each Step Type
The contents of this section describe how to set up each type of step.
Contents
Common Step Types To All Script Types
Step Types Applicable to BPA Scripts only
Common Step Types To All Script Types
The contents of this section describe common step types applicable to all script types.
Contents
How To Set Up Conditional Branch Steps
How To Set Up Invoke Business Object Steps
How To Set Up Invoke Business Service Steps
How To Set Up Invoke Service Script Steps
How To Set Up Conditional Branch Steps
Conditional branch steps allow you to conditionally jump to a different step based on logical criteria. For example, you could jump to a different step in a script if the customer is residential as opposed to commercial. In addition, several fields are required for Conditional Branch steps:
Compare Field Type and Compare Field Name define the first operand in the comparison. The Field Type defines where the field is located. The Field Name defines the name of the field. The following points describe each field type:
· Current To Do Information. Use this field type when the field being compared resides on the current To Do entry. Refer to How To Use To Do Fields for instructions on how to define the appropriate Field Name.
· Data Area. Use this field type when the field being compared is one that you put into one of the scripts data areas in an earlier step. Field Name must reference both a data area structure name as well as the field, for example "parm/charType". Refer to How To Reference Fields In Data Areas for instructions on how to construct the appropriate Field Name.
· Page Data Model. Use this field type when the field being compared resides on one of the tab pages in the object display area. Refer to How To Find The Name Of Page Data Model Fields for instructions on how to find the appropriate Field Name.
· Predefined Value. Use this field type when the field being compared is a global variable.
· Temporary Storage. Use this field type when the field being compared is one that you put into temporary storage in an earlier step. The Field Name must be the same as defined in an earlier step.
· User Interface Field. Use this field type when the field being compared resides on the currently displayed tab page. Refer to How To Find The Name Of User Interface Fields for instructions on how to find the appropriate Field Name.
Condition defines the comparison criteria:
· Use >, <, =, >=, <=, <> (not equal) to compare the field using standard logical operators. Enter the comparison value using the following fields.
· Use IN to compare the first field to a list of values. Each value is separated by a comma. For example, if a field value must equal 1, 3 or 9, you would enter a comparison value of 1,3,9.
· Use BETWEEN to compare the field to a range of values. For example, if a field value must be between 1 and 9, you would enter a comparison value of 1,9. Note, the comparison is inclusive of the low and high values.
Comparison Field Type, Comparison Field Name and Comparison Value define what you’re comparing the first operand to. The following points describe each field type:
· Current To Do Information. Use this field type when the comparison value resides on the current To Do entry. Refer to How To Use To Do Fields for instructions on how to define the appropriate Field Name.
· Data Area. Use this field type when the comparison value resides in one of the scripts data areas. Field Name must reference both a data area structure name as well as the field, for example "parm/charType". Refer to How To Reference Fields In Data Areas for instructions on how to construct the appropriate Field Name.
· Page Data Model. Use this field type when the comparison value resides on one of the tab pages in the object display area. Refer to How To Find The Name Of Page Data Model Fields for instructions on how to find the appropriate Field Name.
· Predefined Value. Use this field type when the field being compared is a constant value defined in the script. When this field type is used, use Comparison Value to define the constant value. Refer to How To Use Constants In Scripts for instructions on how to use constants.
· Temporary Storage. Use this field type when the comparison value is a field that you put into temporary storage in an earlier step. The Field Name must be the same as defined in an earlier step.
· User Interface Field. Use this field type when the comparison value resides on the currently displayed tab page. Refer to How To Find The Name Of User Interface Fields for instructions on how to find the appropriate Field Name.
Conditional field types. The field types Current To Do Information, Page Data Model and User Interface Field are only applicable to BPA scripts.
The above fields allow you to perform a comparison that results in a value of TRUE or FALSE. The remaining fields control the step to which control is passed given the value:
· If TRUE, Go to defines the step that is executed if the comparison results in a TRUE value.
· If FALSE, Go to defines the step that is executed if the comparison results in a FALSE value.
Numeric Comparison.
Comparison of two values may be numeric or textual (left-to-right).
Numeric comparison takes place only when values on both side of the comparison
are recognized as numeric by the system. Otherwise, textual comparison is used.
Fields for Current To Do Information,
Data Area, Page Data Model and User Interface Field types are explicitly
associated with a data type and therefore can be recognized as numeric or not.
This is not the case for fields residing in Temporary
Storage or those set as Predefined
Values. A Temporary Storage field is considered numeric
if it either holds a numeric value moved to it from an explicitly defined numeric
value (see above) or it is a resultant field of mathematical operation. A Predefined Value field is considered numeric
if the other field it is compared to is numeric. For example, if a numeric
field is compared to a Predefined Value
the latter is considered numeric as well resulting in numeric value comparison.
However, if the two fields are defined as Predefined
Values the system assumes their values are text strings and
therefore applies textual comparison.
Edit data steps provide a free format region where you can specify commands to control your script processing.
In general, the syntax available within edit data mimics the commands available within the explicit step types. However, there are a few commands that are available only within edit data. For example, the two structured commands: For, and If.
For server-based scripts, you may find it useful to create a few explicit step types and then use the View Script as Text hyperlink on the Script - Step page to better understand the edit data syntax.
Note. Not all BPA step types are supported using the edit data syntax.
Tips. Refer to the tips context zone associated with the script maintenance page for more information on edit data commands and examples.
Additional field required for Edit data steps:
Enter your scripting commands in the Edit Data Text field.
Go to steps allow you to jump to a step other than the next step. Additional fields required for Go To steps:
Next Step defines the step to which the script should jump.
How To Set Up Invoke Business Object Steps
Invoke business object steps allow you to interact with a business object in order to obtain or maintain its information.
The following additional fields are required for Invoke business object steps:
Use Warning Level to indicate whether warnings should be suppressed and if not, how they should be presented to the user. By default, warnings are suppressed. If Warn As Popup is used, the warning is displayed using the standard popup dialog. If Warn As Error is used processing is directed to the If Error, Go To step. This field is only applicable to BPA scripts.
Group Name references the data area to be passed to and from the server when communicating with the Business Object. Indicate the Action to be performed on the object when invoked. Valid values are Add, Delete, Fast Add (No Read), Fast Update (No Read), Read, Replace, Update.
Performance note. The actions Fast Add and Fast Update should be used when the business object's data area does not need to be re-read subsequent to the Add or Update action. In other words, the Add and Update actions are equivalent to Fast Add + Read and Fast Update + Read.
The business object call will either be successful or return an error. The next two fields only appear when the call is issued from a BPA script, to determine the step to which control is passed given the outcome of the call.
If Success, Go To defines the step that is executed if the call is successful. This field is only applicable to BPA scripts.
If Error, Go To defines the step that is executed if the call returns on error. Please note that the error information is held in global variables. This field is only applicable to BPA scripts.
Error technique. Let's assume a scenario where a business object is invoked from a BPA script and the call returned an error. If the BPA script is configured to communicate with the user using a UI map, you may find it useful to invoke the map again to present the error to the user. Alternatively, you may invoke a step that transfers control to a script that displays the error message information and stops. The demonstration database contains samples of these techniques.
How To Set Up Invoke Business Service Steps
Invoke business service steps allow you to interact with a business service.
The following additional fields are required for Invoke business service steps:
Use Warning Level to indicate whether warnings should be suppressed and if not, how they should be presented to the user. By default, warnings are suppressed. If Warn As Popup is used, the warning is displayed using the standard popup dialog. If Warn As Error is used processing is directed to the If Error, Go To step. This field is only applicable to BPA scripts.
Group Name references the data area to be passed to and from the server when the Business Service is invoked.
The business service call will either be successful or return an error. The next two fields only appear when the call is issued from a BPA script, to determine the step to which control is passed given the outcome of the call.
If Success, Go To defines the step that is executed if the call is successful. This field is only applicable to BPA scripts.
If Error, Go To defines the step that is executed if the call returns on error. Please note that the error information is held in global variables. This field is only applicable to BPA scripts.
Error technique. Let's assume a scenario where a business service is invoked from a BPA script and the call returned an error. If the BPA script is configured to communicate with the user using a UI map, you may find it useful to invoke the map again to present the error to the user. Alternatively, you may invoke a step that transfers control to a script that displays the error message information and stops. The demonstration database contains samples of these techniques.
How To Set Up Invoke Service Script Steps
Invoke service script steps allow you to execute a service script.
The following additional fields are required for Invoke service script steps:
Use Warning Level to indicate whether warnings should be suppressed and if not, how they should be presented to the user. By default, warnings are suppressed. If Warn As Popup is used, the warning is displayed using the standard popup dialog. If Warn As Error is used processing is directed to the If Error, Go To step. This field is only applicable to BPA scripts.
Group Name references the data area to be passed to and from the server when the Service Script is invoked.
The service script call will either be successful or return an error. The next two fields only appear when the call is issued from a BPA script to determine the step to which control is passed given the outcome of the call.
If Success, Go To defines the step that is executed if the call is successful. This field is only applicable to BPA scripts.
If Error, Go To defines the step that is executed if the call returns on error. Please note that the error information is held in global variables. This field is only applicable to BPA scripts.
Error technique. Let's assume a scenario where a service script is invoked from a BPA script and the call returned an error. If the BPA script is configured to communicate with the user using a UI map, you may find it useful to invoke the map again to present the error to the user. Alternatively, you may invoke a step that transfers control to a script that displays the error message information and stops. The demonstration database contains samples of these techniques.
Label steps allow you to describe what the next step(s) are doing. Steps of this type are helpful to the script administrators when reviewing or modifying the steps in a script, especially when a script has many steps. When designing a script, the label steps enable you to provide a heading for common steps that belong together. The script tree displays steps of this type in a different color (green) so that they stand out from other steps.
There are no additional fields for Label steps.
Move data steps allow you to move data (from a source to a destination). The following additional fields are required for Move data steps:
Source Field Type, Source Field Name and Source Field Value define what you’re moving. The following points describe each field type:
· Current To Do Information. Use this field type when the source value resides on the current To Do entry. Refer to How To Use To Do Fields for instructions on how to define the appropriate Field Name.
· Data Area. Use this field type when the field being compared is one that you put into one of the scripts data areas in an earlier step. Field Name must reference both a data area structure name as well as the field, for example "parm/charType". Refer to How To Reference Fields In Data Areas for instructions on how to construct the appropriate Field Name.
· Page Data Model. Use this field type when the source value resides on any of the tab pages in the object display area (i.e., the source field doesn’t have to reside on the currently displayed tab page, it just has to be part of the object that’s currently displayed). Refer to How To Find The Name Of Page Data Model Fields for instructions on how to find the appropriate Field Name.
· Predefined Value. Use this field type when the source value is a constant value defined in the script. When this field type is used, use Source Field Value to define the constant value. Refer to How To Use Constants In Scripts for instructions on how to use constants.
Concatenating fields together. You can also use Predefined Value if you want to concatenate two fields together. For example, let's say you have a script that merges two persons into a single person. You might want this script to change the name of the person being merged out of existence to include the ID of the person remaining. In this example, you could enter a Source Field Value of %ONAME merged into person %PERID (where ONAME is a field in temporary storage that contains the name of the person being merged out of existence and PERID contains the ID of the person being kept). Refer to How To Substitute Variables In Text for a description of how you can substitute field values to compose the field value.
· Temporary Storage. Use this field type when the source value is a field that you put into temporary storage in an earlier step. The Field Name must be the same as defined in an earlier step.
· User Interface Field. Use this field type when the source value resides on the currently displayed tab page. Refer to How To Find The Name Of User Interface Fields for instructions on how to find the appropriate Field Name.
Destination Field Type and Destination Field Name define where the source field will be moved. The Field Type defines where the field is located. The Field Name defines the name of the field. The following points describe each field type:
· Data Area. Use this field type when the destination field resides on one of the scripts data areas. Field Name must reference both a data area structure name as well as the field, for example "parm/charType". Refer to How To Reference Fields In Data Areas for instructions on how to construct the appropriate Field Name.
· Page Data Model. Use this field type when the destination field resides on any of the tab pages in the object display area (i.e., the field populated doesn’t have to reside on the currently displayed tab page, it just has to be part of the object that’s currently displayed). Refer to How To Find The Name Of Page Data Model Fields for instructions on how to find the appropriate Field Name.
· Temporary Storage. Use this field type when the destination field resides in temporary storage. Use Field Name to name the field in temporary storage. Use Field Name to name the field in temporary storage. Refer to How To Name Temporary Storage Fields for more information.
· User Interface Field. Use this field type when the destination field resides on the currently displayed tab page. Refer to How To Find The Name Of User Interface Fields for instructions on how to find the appropriate Field Name.
Conditional field types. The field types Current To Do Information, Page Data Model and User Interface Field are only applicable to BPA scripts.
Terminate steps cause a server-based script to end processing successfully or issue an error.
The following additional fields are required for Terminate steps:
Error indicates whether an error should be thrown or
not. If error, Error Data Text
must be specified, indicating the error message and any message substitution
parameters. Refer to the tips zone associated with the Script page
for the actual syntax of initiating an error message.
Note. The ability to terminate a step in error is only supported for server-based scripts.
Step Types Applicable to BPA Scripts only
The contents of this section describe step types that are only applicable to BPA scripts.
Contents
How To Set Up Display Text Steps
How To Set Up Input Data Steps
How To Set Up Invoke Function Steps
How To Set Up Invoke Map Steps
How To Set Up Mathematical Operation Steps
How To Set Up Navigate To A Page Steps
How To Set Up Perform Script Steps
How To Set Up Press A Button Steps
How To Set Up Prompt User Steps
How To Set Up Set Focus To A Field Steps
How To Set Up Transfer Control Steps
How To Set Up Display Text Steps
Display text steps cause a text string to be displayed in the script area. Steps of this type can be used to provide the user with guidance when manual actions are necessary. In addition, they can be used to provide confirmation of the completion of tasks.
The information you enter in the Text field is displayed in the script area when the step is executed.
The text string can contain substitution variables and HTML formatting commands. Also note, for debugging purposes, you can display an entire data area (or a portion thereof) by entering %+…+% where … is the name of the node whose element(s) should be displayed.
Conditional step type. This step type is only applicable to BPA scripts.
Height steps are used to change the height of the script area to be larger or smaller than the standard size.
The following additional fields are required for Height steps:
Script Window Height defines the number of Pixels or the Percentage (according to the Height Unit) that the script window height should be adjusted. The percentage indicates the percentage of the visible screen area that the script area uses. For example, a percentage value of 100 means that the script area will use the entire area.
Standard Number of Pixels. The default number of pixels used by the script area is 75.
Adjust script height in the first step. If you want to adjust the height of the script area, it is recommendation to define the height step type as your first step. Otherwise, the script area will open using the standard height and then readjust, causing the screen to redisplay.
Hide script area. You could use this type of step to set the height to 0 to hide the script area altogether. This is useful if the script does not require any prompting to the user. For example, perhaps you define a script to take a user to a page and with certain data pre-populated and that is all.
Automatically close script area. If you want the script area to close when a script is completed, you could define the final step type with a height of 0.
Conditional step type. This step type is only applicable to BPA scripts.
How To Set Up Input Data Steps
Input data steps cause the user to be prompted to populate an input field in the script area. The input value can be saved in a field on a page or in temporary storage. A Continue button always appears adjacent to the input field. You may configure steps of this type to display one or more buttons in addition to the Continue button. For example, you may want to provide the ability for the user to return to a previous step to fix incorrect information. The user may click on any of these buttons when ready for the script to continue.
The following additional fields are required for Input Data steps:
Destination Field Type and Destination Field Name define where the input field will be saved. The Field Type defines where the field is located. The Field Name defines the name of the field. The following points describe each field type:
· Page Data Model. Use this field type to put the input field into a field that resides on any of the tab pages in the object display area (i.e., the field populated doesn’t have to reside on the currently displayed tab page, it just has to be part of the object that’s currently displayed). Refer to How To Find The Name Of Page Data Model Fields for instructions on how to find the appropriate Field Name.
· Temporary Storage. Use this field type to put the input field into temporary storage. Use Field Name to name the field in temporary storage. Refer to How To Name Temporary Storage Fields for more information.
· User Interface Field. Use this field type to put the input field into a field that resides on the currently displayed tab page. Note, if you want to execute underlying default logic, you must populate a User Interface Field. Refer to How To Find The Name Of User Interface Fields for instructions on how to find the appropriate Field Name.
The Prompt Values grid may be used to define additional buttons. A separate button is displayed in the script area for each entry in this grid.
· Prompt Text is the verbiage to appear on the button. Refer to How To Substitute Variables In Text for a description of how you can substitute field values into the prompts.
· Sequence controls the order of the buttons.
· Next Script Step defines the step to execute if the user clicks the button.
Conditional step type. This step type is only applicable to BPA scripts.
How To Set Up Invoke Function Steps
Invoke function steps are used to retrieve or update data independent of the page currently being displayed. For example, if you design a script that takes different paths based on the customer’s customer class, you could invoke a function to retrieve the customer’s customer class. Doing this is much more efficient than the alternative of transferring to the account page and retrieving the customer class from the Main page.
You must set up a function before it can be referenced in a script. Refer to Maintaining Functions for the details.
The following additional fields are required for Invoke Function steps:
Function defines the name of the function. The function's Long Description is displayed below.
When a function is invoked, it will either be successful or return an error. The next two fields control the step to which control is passed given the outcome of the function call:
· If Success, Go to defines the step that is executed if the function is successful.
· If Error, Go to defines the step that is executed if the function returns on error. Refer to How To Use Constants In Scripts for a list of the global variables that are populated when a function returns an error.
Error technique. If a function returns an error, we recommend that you invoke a step that transfers control to a script that displays the error message information and stops (note, the error information is held in global variables). You would invoke this script via a Transfer Control. The demonstration database contains a sample of this type of script - see CI_FUNCERR.
The Send Fields grid defines the fields whose values are sent to the function and whose field value source is not Defined On The Function. For example, if the function receives an account ID, you must define the name of the field in the script that holds the account ID.
· Field contains a brief description of the field sent to the function.
· Source Field Type and Mapped Field / Value define the field sent to the function. Refer to the description of Source Field under How To Set Up Move Data Steps for a description of each field type.
· Comments contain information about the field (this is defined on the function).
The Receive Fields grid defines the fields that hold the values returned from the function. For example, if the function returns an account's customer class and credit rating, you must set up two fields in this grid.
· Field contains a brief description of the field returned from the function.
· Destination Field Type and Mapped Field define the field returned from the function. Refer to the description of Destination Field under How To Set Up Move Data Steps for a description of each field type.
· Comments contain information about how the field (this is defined on the function).
Conditional step type. This step type is only applicable to BPA scripts.
How To Set Up Invoke Map Steps
Invoke map steps are used to invoke a UI Map to display, capture and update data using an HTML form. You may configure steps of this type to display one or more buttons in addition to the Continue button. For example, you may want to provide the ability for the user to return to a previous step to fix incorrect information. The user may click on any of these buttons when ready for the script to continue.
The following additional fields are required for Invoke map steps:
Group Name references the data area to be passed to and from the server when rendering the HTML form associated with the Map.
Use Target Area to designate where the map will be presented.
· Select BPA Zone if the map should be presented within the script area.
· Select Page Area if the map should be presented in the object display area, i.e. the frame typically used to house a maintenance page.
· Select Pop-up Window if the map should be launched in a separate window.
The Returned Values grid contains a row for every action button defined on the map.
· Returned Value is the value returned when the user clicks the button.
· Use as Default can only be turned on for one entry in the grid. If this is turned on, this value's Next Script Step will be executed if the returned value does not match any other entry in the grid. For example, if the user closes a pop-up (rather than clicking a button), the default value will be used.
· Next Script Step defines the step to execute if the user clicks the button.
Conditional step type. This step type is only applicable to BPA scripts.
How To Set Up Mathematical Operation Steps
Mathematical operation steps allow you to perform arithmetic on fields. You can also use this type of step to add and subtract days from dates. For example, you could calculate a date 7 days in the future and then use this value as the customer's next credit review date. The following additional fields are required for Mathematical Operation steps:
Base Field Type and Base Field Name define the field on which the mathematical operation will be performed. The Field Type defines where the field is located. The Field Name defines the name of the field. The following points describe each field type:
· Page Data Model. Use this field type when the field resides on any of the tab pages in the object display area. Refer to How To Find The Name Of Page Data Model Fields for instructions on how to find the appropriate Field Name.
· Temporary Storage. Use this field type when the field resides in temporary storage. You must initialize the temporary storage field with a Move Data step before performing mathematical operations on the field. Refer to How To Set Up Move Data Steps for more information.
· User Interface Field. Use this field type when the field resides on the currently displayed tab page. Refer to How To Find The Name Of User Interface Fields for instructions on how to find the appropriate Field Name.
Math Operation controls the math function to be applied to the Base Field. You can specify +, -, /, and *. Note, if the base field is a date, you can only use + or -.
Math Field Type, Math Field Name and Math Field Value define the field that contains the value to be added, subtracted, divided, or multiplied. The following points describe each field type:
· Current To Do Information. Use this field type when the value resides on the current To Do entry. Refer to How To Use To Do Fields for instructions on how to define the appropriate Field Name.
· Page Data Model. Use this field type when the value resides on any of the tab pages in the object display area. Refer to How To Find The Name Of Page Data Model Fields for instructions on how to find the appropriate Field Name.
· Predefined Value. Use this field type when the value is a constant. When this field type is used, use Source Field Value to define the constant value. Refer to How To Use Constants In Scripts for more information. Note, if you are performing arithmetic on a date, the field value must contain the number and type of days / months / years. For example, if you want to add 2 years to a date, the source field value would be 2 years.
· Temporary Storage. Use this field type when the value is a field that you put into temporary storage in an earlier step. The Field Name must be the same as defined in an earlier step.
· User Interface Field. Use this field type when the value resides in a field on the current tab page. Refer to How To Find The Name Of User Interface Fields for instructions on how to find the appropriate Field Name.
Conditional step type. This step type is only applicable to BPA scripts.
How To Set Up Navigate To A Page Steps
Navigate to a page steps cause a new page (or tab within the existing page) to be displayed in the object display area. Steps of this type are a precursor to doing anything on the page. The following additional field is required for Navigate to a page steps:
Navigation Option defines the transaction, tab, access mode (add or change) and any context fields that are passed to the transaction in change mode. For example, if you want a script to navigate to Person - Characteristics for the current person being displayed in the dashboard, you must set up an appropriate navigation option. Refer to Defining Navigation Options for more information.
Navigating to a page in update mode. Before you can navigate to a page in change mode, the page data model must contain the values to use for the navigation option’s context fields. If necessary, you can move values into the page data model using a Move Data step first. For example, before you can navigate to a page in change mode with an account ID in context, you may need to move the desired account ID into the ACCT_ID field in the page data model. The actual field name(s) to use are listed as context fields on the navigation option.
Sample scripts.
Refer to the scripts in the demonstration database for many examples of
navigation options. Refer to sample scripts for examples of
scripts and their use of navigation options.
Conditional step type. This step
type is only applicable to BPA scripts.
How To Set Up Perform Script Steps
Perform script steps cause another BPA script to be performed. After the performed script completes, control is returned to the next step in the original script. You might want to think of the scripts referred to on steps of this type as "subroutines". This functionality allows you to encapsulate common logic in reusable BPA scripts that can be called from other BPA scripts. This simplifies maintenance over the long term.
The following additional field is required for Perform script steps:
Subscript is the name of the script that is performed.
Conditional step type. This step type is only applicable to BPA scripts.
How To Set Up Press A Button Steps
Press a button steps cause a button to be pressed in the object display area or in the button bar. For example, you could use this type of step to add a new row to a person’s characteristic (and then you could use a Move Data step to populate the newly added row with a given char type and value). The following additional fields are required for Press a button steps:
Button Name is the name of the button to be pressed. This button must reside on the currently displayed tab page (or in the action bar at the top of the page). Refer to How To Find The Name Of A Button for more information.
Conditional step type. This step type is only applicable to BPA scripts.
How To Set Up Prompt User Steps
Prompt user steps cause the user to be presented with a menu of options. The options can be presented using either buttons or in the contents of a drop down. You can also use steps of this type to pause a script while the user checks something out (and when the user is ready to continue with the script, they are instructed to click a prompt button). The following additional fields are required for Prompt User steps:
Prompt Type controls if the prompt shown in the script area is in the form of Button(s) or a Dropdown. Note, if you use a Dropdown, a Continue button appears adjacent to the dropdown in the script area when the step executes. The user clicks the Continue button when they are ready for the script to continue.
The Prompt Values grid contains a row for every value that can be selected by a user. Note, if you use a Prompt Type of Button(s), a separate button is displayed in the script area for each entry in this grid.
· Prompt Text is the verbiage to appear on the button or in the dropdown entry. Refer to How To Substitute Variables In Text for a description of how you can substitute field values into the prompts.
· Sequence controls the order of the buttons or dropdown entries.
· Use As Default can only be turned on for one entry in the grid. If this is turned on for a dropdown entry, this value is defaulted in the grid. If this is turned on for a button, this button becomes the default (and the user should just have to press enter (or space) rather than click on it).
· Next Script Step defines the step to execute if the user clicks the button or selects the dropdown value.
Conditional step type. This step type is only applicable to BPA scripts.
How To Set Up Set Focus To A Field Steps
Set focus to a field steps cause the cursor to be placed in a specific field on a page. A Continue button always appears in the script area when this type of step executes. The user may click the Continue button when they are ready for the script to continue. You may configure steps of this type to display one or more buttons in addition to the Continue button. For example, you may want to provide the ability for the user to return to a previous step to fix incorrect information. The user may click on any of these buttons when ready for the script to continue.
The following additional fields are required for Set focus to a field steps:
Destination Field Name defines the field on which focus should be placed. This field must reside on the currently displayed tab page. Refer to How To Find The Name Of User Interface Fields for instructions on how to find the appropriate Field Name.
The Prompt Values grid may be used to define additional buttons. A separate button is displayed in the script area for each entry in this grid.
· Prompt Text is the verbiage to appear on the button. Refer to How To Substitute Variables In Text for a description of how you can substitute field values into the prompts.
· Sequence controls the order of the buttons.
· Next Script Step defines the step to execute if the user clicks the button.
Conditional step type. This step type is only applicable to BPA scripts.
How To Set Up Transfer Control Steps
Transfer control steps cause the current BPA script to terminate and the control to pass to another BPA script. You might want to construct a BPA script with steps of this type when the script has several potential logic paths and you want to segregate each logic path into a separate BPA script (for ease of maintenance).
The following additional fields are required for Transfer control steps:
Subscript is the name of the script to which control is transferred.
Conditional step type. This step type is only applicable to BPA scripts.
Additional Topics
The contents of this section provide additional information about steps.
Contents
How To Find The Name Of User Interface Fields
How To Find The Name Of Page Data Model Fields
How To Find The Name Of A Button
How To Substitute Variables In Text
How To Use HTML Tags And Spans In Text Strings and Prompts
How To Use Constants In Scripts
How To Name Temporary Storage Fields
How To Reference Fields In Data Areas
How To Find The Name Of User Interface Fields
Follow these steps to find the name of a field that resides on a page:
· Navigate to the page in question.
· Right click in the body of the page (but not while the pointer is in an input field). Note, if the field in question resides in a grid, you must right click while the pointer is in the section that contains the grid (but not while the pointer is in an input field in the grid) – this is because there’s a separate HTML document for each grid on a page.
· Select View Sourcefrom the pop-up menu to display the source HTML.
· Scroll to the Widget Info section (towards the top of the HTML document). It contains a list of all of the objects on a page. For example, the following is an example from the Account – Main page:
The field names that you’ll reference in your scripts are defined on the left side of the HTML (e.g., ENTITY_NAME, ACCT_ID, CUST_CL_CD, etc.).
The names of fields that reside in scrolls are in a slightly different format. The following is an example of the HTML for the persons scroll that appears on Account – Person. Notice that the fields in the scroll are prefixed with the name of the scroll plus a $ sign. For example, the person’s ID is called ACCT_PER$PER_ID.
The names of fields that reside in grids are in a slightly different format. The following is an example of the HTML for the names grid that appears on Person - Main. Notice that the fields in the grid are prefixed with the name of the grid plus a :x$. For example, the person’s name is called PER_NAME:x$ENTITY_NAME. When you reference such a field in your script, you have the following choices:
· Substitute x with the row in the grid (and keep in mind, the first row in a grid is row 0 (zero); this means the second row is row 1).
· If you want to reference the “current row” (i.e., the row in which the cursor will be placed), you can keep the x notation (x means the “current row”).

How To Find The Name Of Page Data Model Fields
You find the name of a Page Data Model field in the same way described under How To Find The Name Of User Interface Fields. The only restriction is that you cannot refer to hidden / derived fields. However, you can refer to ANY of the object’s fields regardless of the tab page on which they appear. For example, if you position the object display area to the Main tab of the Account transaction, you can reference fields that reside on all of the tab pages.
Warning! If you populate a Page Data Model field, none of the underlying default logic takes place. For example, if you populate a customer contact’s contact type, none of the characteristics associated with the customer contact type are defaulted onto the customer contact. If you want the underlying defaulting to take place, you must populate a User Interface Field.
How To Find The Name Of A Button
If you want a Press a button step to press a button in the button bar, use one of the following names:
· IM_GOBACK
· IM_HISTORY
· IM_GOFORWARD
· IM_SAVE
· IM_REFRESH
· IM_CLEAR
· IM_COPY
· IM_DELETE
· IM_ScrollBack
· IM_ScrollForward
· IM_menuButton
· IM_CTRL_CENT
· IM_CTRL_CENTAI
· IM_USER_HOME
· IM_TO_DO
· IM_PrevTo Do
· IM_NextTo Do
· IM_CurrentTo Do
· IM_MY_PREF
· IM_helpButton
· IM_aboutButton
· IM_CTI
· IM_MINIMIZE_DASHBOARD. Pressing this will collapse the dashboard.
· IM_MAXIMIZE_DASHBOARD. Pressing this will uncollapse the dashboard.
Can’t push the BPA button. You’ll notice that the BPA Scripting button is missing. This is deliberate! Don’t run a script from within a script!
Follow these steps to find the name of other buttons that reside in the object display area:
· Navigate to the page in question.
· Right click in the body of the page (but not while the pointer is in an input field). Note, if the field in question resides in a grid, you must right click while the pointer is in the section that contains the grid (but not while the pointer is in an input field in the grid) – this is because there’s a separate HTML document for each grid on a page.
· Select View Sourcefrom the pop-up menu to display the source HTML.
· Scroll to the Widget Info section (towards the top of the HTML document). It contains a list of all of the objects on a page, including buttons.
· Iconized buttons (e.g., search buttons) are represented as HTML images and their field names are prefixed with IM. The following is an example of the HTML on the Bill – Main page (notice the IM fields for the iconized buttons).

· Transaction-specific actions buttons (e.g., the buttons use to generate and cancel a bill) are represented as switches. The following is an example of the HTML on the Bill – Main page (notice the SW fields for the action buttons). Note, if you want to Set focus to such a field, you would move a Predefined Value of TRUE to the switch.
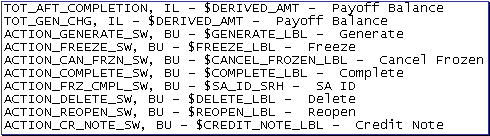
How To Substitute Variables In Text
You can substitute field values into a step’s text string. You do this by prefixing the field name whose value should be substituted in the string with a %. For example, the message, “On %COMPLETION_DTTM this bill was completed, it’s ending balance was %ENDING_BALANCE” contains two substitution variables (the bill’s completion date / time and the bill’s ending balance).
To substitute the value of an element from a data area you need to reference its XPath location as follows: %=XPath=%. If you want to substitute the whole XML node, not just the value, you need to reference it as follows %+XPath+%.
Only fields linked to the current To Do and fields that reside in temporary storage and global variables can be substituted into a text string.
Note. You can substitute fields that reside in the User Interface or Page Data Model by first moving them into temporary storage (using a Move data step).
You can also substitute field values into the verbiage displayed in prompts using the same technique.
How To Use HTML Tags And Spans In Text Strings and Prompts
You can use HTML tags in a step’s text string. For example, the word “Continue” will be italicized in the following text string "Press<i>Continue</i> after you've selected the customer” (the <i> and </i> are the HTML tags used to indicate that the surrounded text should be italicized).
The following are other useful HTML tags:
· <br> causes a line break in a text string. If you use <br><br> a blank line will appear.
· <font color=red>text</font> causes the surrounded text to be colored as specified (in this case, red). You can also use hex codes rather than the color name.
Please refer to an HTML reference manual or website for more examples.
You can also use “spans” to customize the look of the contents of a text string. For example, your text string could be “Press <span style="font-family:Courier; font-size:large; font-weight:bold;”>Continue</span> after you've selected the customer” . This would make the word “Continue” appear as large, bold, Courier text. Please refer to a Cascading Style Sheets (CSS) reference manual or website for more examples.
How To Use Constants In Scripts
Some steps can reference fields called Predefined Values. For example, if you want to compare an input value to the letter “Y”, the letter Y would be defined as a Predefined Value’s field value.
Special constants are used for fields defined as switches. When you move TRUE to a switch, it turns it on. When you move FALSE to a switch, it turns it off.
You can use a global variable as a Predefined Value. For example, if you wanted to move the current date to a field, you’d indicate you wanted to move a Predefined Value named %CURRENT_DATE.
How To Use Global Variables
As described above, some steps can reference fields called Predefined Values. In addition to referencing an ad hoc constant value (e.g., the letter Y), you can also reference a global variable in such a field value. A global variable is used when you want to reference system data. The following global variables exist:
· %PARM-<name> is the value of a parameter of that name passed in to the application when launched via the standard system URL. Refer to Launching A Script When Starting the System for more information on these parameters.
· %PARM-NOT-SET is to be used to compare against %PARM-<name> parameters to check if the parameter has been set or not when the application was launched. A parameter that has not been set would test as equal to this global variable. It is recommended to test parameters against this global variable before using them for the first time.
· %CONTEXT-PERSONID is a constant that contains the ID of the current person
· %CONTEXT-ACCOUNTID is a constant that contains the ID of the current account
· %CONTEXT-PREMISEID is a constant that contains the ID of the current premise
· %BLANK is a constant that contains a blank value, i.e. no value
· %SPACE is a constant that contains a single space value
· %CURRENT-DATE is the current date (as known by the browser, not the server)
· %SAVE-REQUIRED is a flag that contains an indication of whether the data on a page has been changed (and this requires saving). You may want to interrogate this flag to force a user to save their work before executing subsequent steps. This flag will have a value of TRUE or FALSE.
· %NEWLINE is a constant that contains a new line character (carriage return). Upon substitution, a line break is inserted in the resultant text.
Note. The constant %NEWLINE does not have the desired effect when the resultant text is HTML. For example, a step's text and prompt strings. This is because HTML ignores special characters such as new lines. Refer to How To Use HTML Tags And Spans In Text to learn how to cause a line break in an HTML text.
In addition, if an Invoke Function step returns an error, the following global variables contain information about the error:
· %ERRMSG-CATEGORY and %ERRMSG-NUMBER contain the unique identifier of the error message number.
· %ERRMSG-TEXT contains the brief description of the error.
· %ERRMSG-LONG contains the complete description of the error.
How To Name Temporary Storage Fields
Input Data and Move Data steps can create fields in temporary storage. You specify the name of the temporary storage field in the step’s Field Name. The name of the field must NOT begin with % and must not be named the same as the global variables. Besides this restriction, you can use any Field Name that’s acceptable to JavaScript (i.e., you can name a field in temporary storage almost anything). Keep in mind that field names are case-sensitive.
How To Work With Dates
Before we discuss how to work with dates in your scripts, we need to point out that there are two types of date fields: date-only and date-time. Date-only fields only contain a date. Date-time fields contain both a date and a time. The following topics describe how to work with dates on the various step types.
Note. If you're working with a field that resides on the database (as opposed to a temporary storage field), the database field name will tell you what type of date it is: date-only fields are suffixed with DT, and date-time fields are suffixed with DTTM.
Contents
If you intend to use a Move data step to populate a date-time field, please be aware of the following:
· If the destination field resides in the page data model, the source field value must be in the format YYYY-MM-DD-HH.MM.SS or YYYY-MM-DD. If the field is in the format YYYY-MM-DD, the time of 12:00 am will be defaulted.
· If the destination field resides in the user interface, you must use two steps if you want to populate both date and time. To explain this, we'll assume the field you want to populate is called EXPIRE_DTTM:
· First, you populate the date portion of the field. To do this, you'd move a date (this value can be in any valid date format that a user is allowed to enter) to a field called EXPIRE_DTTM_FWDTTM_P1. In other words, you suffix _FWDTTM_P1 to the field name.
· If you want to populate the time, you'd move the time (again, the field value can be in any format that a user could use to enter a time) to a field called EXPIRE_DTTM_FWDTTM_P2. In other words, you suffix _FWDTTM_P2 to the field name.
If you intend to use a Move data step to populate a date-only field, please be aware of the following:
· If the destination field resides in the page data model, the source field value must be in the format YYYY-MM-DD.
· If the destination field resides in the user interface, the source field can be in any valid date format that a user is allowed to enter.
%CURRENT-DATE. Keep in mind that the global variable %CURRENT-DATE contains the current date and you can move this to either a page data model, user interface, or temporary storage field. If you move %CURRENT-DATE to a temporary storage fields, it is held in the format YYYY-MM-DD.
If you intend to use a Mathematical operation step to calculate a date, you can reference both date-only and date-time fields. This is because mathematical operations are only performed against the date portion of date-time fields.
Mathematical operations are limited to adding or subtracting days, months and years to / from a date.
Note. A useful technique to perform date arithmetic using the current date is to move the global variable %CURRENT-DATE to a temporary storage field and then perform the math on this field.
If you intend to use an Input data step on a date-time field, please be aware of the following:
· If the field resides in the page data model, the user must enter a value in the format YYYY-MM-DD-HH.MM.SS (and therefore we do not recommend doing this).
· If the field resides in the user interface, you must use two steps if you want to populate both date and time. To explain this, we'll assume the field you want to populate is called EXPIRE_DTTM:
· First, you populate the date portion of the field. To do this, you'd input the date (this value can be in any valid date format that a user is allowed to enter) in a field called EXPIRE_DTTM_FWDDTM_P1. In other words, you suffix _FWDDTM_P1 to the field name.
· If you want to populate the time, you'd input the time (again, the field value can be in any format that a user could use to enter a time) in a field called EXPIRE_DTTM_FWDTTM_P2. In other words, you suffix _FWDDTM_P2 to the field name.
If you intend to use an Input data step to populate a date-only field, please be aware of the following:
· If the field resides in the page data model, the user must enter a value in the format YYYY-MM-DD (and therefore we do not recommend doing this).
· If the field resides in the user interface, the user can enter any valid date format.
How To Use To Do Fields
As described under Executing A Script When A To Do Entry Is Selected, you can set up the system to automatically launch a script when a user selects a To Do entry. These types of scripts invariably need to access data that resides on the selected To Do entry. The following points describe the type of information that resides on To Do entries:
· Sort keys. These values define the various ways a To Do list’s entries may be sorted. For example, when you look at the bill segment error To Do List, you have the option of sorting the entries in error number order, account name order, or in customer class order. There is a sort key value for each of these options.
· Message parameters. These values are used when the system finds %n notation within the message text. The %n notation causes field values to be substituted into a message before it's displayed. For example, the message text The %1 non-cash deposit for %2 expires on %3 will have the values of 3 fields merged into it before it is displayed to the user (%1 is the type of non-cash deposit, %2 is the name of the customer, and %3 is the expiration date of the non-cash deposit). Each of these three values is stored as a separate message parameter on the To Do entry.
· Drill keys. These values are the keys passed to the page if a user drilled down on the entry (and the system wasn't set up to launch a script). For example, a To Do entry that has been set up to display an account on the account maintenance page has a drill key of the respective account ID.
· To Do ID. Every To Do entry has a unique identifier referred to as its To Do ID.
You can access this information in the following types of steps:
· Move Data steps can move any of the above to any data area. For example, you might want to move a To Do entry's drill key to the page data model so it can be used to navigate to a specific page.
· Conditional Branch steps can perform conditional logic based on any of the above. For example, you can perform conditional logic based on a To Do entry's message number (note, message numbers are frequently held in sort keys).
· Mathematical Operation steps can use the above in mathematical operations.
A To Do entry's sort key values are accessed by using a Field Type of Current To Do Information and a Field Name of SORTKEY[index]. Note, you can find an entry's potential sort keys by displaying the entry's To Do type and navigating to the Sort Keys tab. If you want to reference the first sort key, use an index value of 1. If you want to use the second sort key, use an index value of 2 (and so on).
A To Do entry's drill key values are accessed by using a Field Type of Current To Do Information and a Field Name of DRILLKEY[index]. Note, you can find an entry's potential drill keys by displaying the entry's To Do type and navigating to the Drill Keys tab. If you want to use the first drill key, use an index value of 1. If you want to use the second drill key, use an index value of 2 (and so on).
A To Do entry's message parameters are accessed by using a Field Type of Current To Do Information and a Field Value of MSGPARM[index]. Note, because a To Do type can have an unlimited number of messages and each message can have different parameters, finding an entry's message parameters requires some digging. The easiest way to determine these values is to display the To Do entry on To Do maintenance. On this page, you will find the entry's message category / number adjacent to the description. Once you know these values, display the message category / number on Message Maintenance. You'll find the message typically contains one or more %n notations (one for each message parameter). For example, the message text The %1 non-cash deposit for %2 expires on %3 has 3 message parameters. You then need to deduce what each of the message parameters are. You do this by comparing the message on the To Do entry with the base message (it should be fairly intuitive as to what each message parameter is). If we continue using our example, %1 is the non-cash deposit type, %2 is the account name, and %3 is the expiration date. You can access these in your scripts by using appropriate index value in MSGPARM[index].
A To Do entry's unique ID is accessed by using a Field Type of Current To Do Information and a Field Value of TD_ENTRY_ID.
In addition, any of the above fields can be substituted into a text string or prompt. Simply prefix the To Do field name with a % as you would fields in temporary storage. For example, assume you want your script to display the following text in the script area: "ABC Supply does not have a bill cycle" (where ABC Supply is the account's name). If the first sort key linked to the To Do entry contains the account's name, you'd enter a text string of %SORTKEY[1] does not have a bill cycle.
How To Reference Fields In Data Areas
Various step types involve referencing field elements residing in the script's data areas. To reference an element in a data area you need to provide its absolute XPath notation starting from the data area name. For example, use "CaseLogAdd/caseID" to reference a top-level "caseID" element in a script data area called "CaseLogAdd".
You don't have to type in long XPath notions. Use the View Script Schema hyperlink provided on the Script - Step tab page to launch the script's data areas schema.
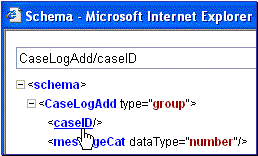
Schema Viewer
Doing this opens the schema viewer window where you can:
· Click on the field element you want to reference in your script step. The system automatically populates the text box on the top with the element's absolute XPath notation.
· Copy the element's XPath notation from the text box to your script.
You can also use the View Data Area, View Service Script Data Area, or View Plug-In Script Data Area links on Script - Data Area to the same effect. These open up the schema viewer for a specific data area respectively.
Script - Data Area
Use this page to define the data areas used to pass information to and from the server or any other data area describing your temporary storage. Open this page using Admin Menu, Script and then navigate to the Data Area tab.
Description of Page
The grid contains the script’s data areas declaration. For steps that invoke an object that is associated with a schema, you must declare the associated schema as a data area for your script. In addition, if you have defined one or more data areas to describe the script's temporary storage, you need to declare them too. The following bullets provide a brief description of each field on a script data area:
· Schema Type defines the type of schema describing the data area's element structure.
· The data area's schema is the one associated with the referenced Object. Only objects of the specified Schema Type may be selected.
· Data Area Name uniquely identifies the data area for referencing purposes. By default, the system assigns a data area with the associated object name.
· Click on the View Data Area link to view the data area's schema in the schema viewer window.
The View Service Script Data Area link appears for service scripts only. Use this link to view the script's parameters data area schema in the schema viewer window.
The View Plug-In Script Data Area link appears for plug-in scripts only. Use this link to view the script's parameters data area schema in the schema viewer window.
Refer to A Script May Declare Data Areas for more information on data areas.
Script - Schema
Use this page to define the data elements passed to and from a service script. Open this page using Admin Menu, Script and then navigate to the Schema tab.
Conditional tab page. This tab page only appears for service scripts.
Description of Page
The contents of this section describe the zones that are available on this portal page.
The General Information zone displays the script name and description.
The Schema Editor zone allows you to edit the service script's parameters schema. The purpose of the schema is to describe the input and output parameters used when invoking the script.
Script Definition Tips. A context sensitive "Script Tips" zone is associated with this page. The zone provides a complete list of the XML nodes and attributes available to you when you construct a schema as well as other useful information assisting with setting up scripts.
The Schema Usage Tree zone summarizes all cross-references to this schema. These may be other schemas including this schema in their structure definition, scripts and XAI Inbound Services. For each type of referencing entity, the tree displays a summary node showing a total count of referencing items. The summary node appears if at least one referencing item exists. Expand the node to list the referencing items and use their description to navigate to their corresponding pages.
Script - Eligibility
Use this page to define a script’s eligibility rules. Open this page using Admin Menu, Script and then navigate to the Eligibility tab.
Conditional tab page. This tab page only appears for BPA scripts.
Description of Page
Use the Eligibility Option to indicate whether the script is Always Eligible, Never Eligible or to Apply Eligibility Criteria. The remaining fields on the page are only visible if the option is Apply Eligibility Criteria.
Warning! The following information is not intuitive; we strongly recommend that you follow the guidelines under The Big Picture Of Script Eligibility before attempting to define this information.
The Eligibility Criteria Group scroll contains one entry for each group of eligibility criteria. The following fields may be defined for each group:
· Use Sort Sequence to control the relative order in which the group is executed when the system determines if the script should appear in the script menu.
· Use Description and Long Description to describe the criteria group.
· Use If Group is True to define what should happen if the eligibility criteria (defined in the following grid) return a value of True.
· Choose Eligible if this script should appear.
· Choose Ineligible if this script should not appear.
· Choose Check Next Group if the next criteria group should be checked.
· Use If Group is False to define what should happen if the eligibility criteria (defined in the following grid) return a value of False.
· Choose Eligible if this script should appear.
· Choose Ineligible if this script should not appear.
· Choose Check Next Group if the next criteria group should be checked.
The grid that follows contains the script’s eligibility criteria. Think of each row as an “if statement” that can result in the related eligibility group being true or false. For example, you might have a row that indicates the customer is eligible for the script if their customer class is residential. The following bullets provide a brief description of each field on an eligibility criterion. Please refer to Defining Logical Criteria for several examples of how this information can be used.
· Use Sort Sequence to control the order in which the criteria are checked.
· Use Criteria Field to define the field to compare:
· Choose Characteristic if you want to compare a characteristic value that resides on the current person, premise or account to a given value. Use the adjacent fields to define the object on which the characteristic resides and the characteristic type.
· Choose Algorithm if you want to compare anything other than a characteristic. Push the adjacent search button to select the algorithm that is responsible for retrieving the comparison value. Click here to see the algorithm types available for this plug-in spot.
· Use Criteria Comparison to define the method of comparison:
· Choose Algorithm if you want an algorithm to perform the comparison and return a value of True, False or Insufficient Data. Push the adjacent search button to select the algorithm that is responsible for performing the comparison. Click here to see the algorithm types available for this plug-in spot.
· Choose any other option if you want to compare the Criteria Field using a logical operator. The following options are available:
· Use >, <, =, >=, <=, <> (not equal) to compare the Criteria Field using standard logical operators. Enter the comparison value in the adjacent field.
· Use IN to compare the Criteria Field to a list of values. Each value is separated by a comma. For example, if a field value must equal 1, 3 or 9, you would enter a comparison value of 1,3,9.
· Use BETWEEN to compare the Criteria Field to a range of values. For example, if a field value must be between 1 and 9, you would enter a comparison value of 1,9. Note, the comparison is inclusive of the low and high values.
· The next three fields control whether the related logical criteria cause the eligibility group to be considered true or false:
· Use If True to control what happens if the related logical criterion returns a value of True. You have the options of Group is true, Group is false, or Check next condition. If you indicate Group is true or Group is false, the script is judged Ineligible or Eligible based on the values defined above in If Group is False and If Group is True.
· Use If False to control what happens if the related logical criterion returns a value of False. You have the options of Group is true, Group is false, or Check next condition. If you indicate Group is true or Group is false, the script is judged Ineligible or Eligible based on the values defined above in If Group is False and If Group is True.
· Use If Insufficient Data to control what happens if the related logical criterion returns a value of “Insufficient Data”. You have the options of Group is true, Group is false, or Check next condition. If you indicate Group is true or Group is false, the script is judged Ineligible or Eligible based on the values defined above in If Group is False and If Group is True.
Use the Script Merge page to modify an existing script by copying steps from other scripts. The following points summarize the many diverse functions available on the Script Merge transaction:
· You can use this transaction to renumber steps (assign them new sequence numbers).
· You can use this transaction to move a step to a different position within a script. When a step is moved, all references to the step are changed to reflect the new sequence number.
· You can use this transaction to delete a step.
· You can use this transaction to copy steps from other scripts. For example,
· You may want to create a script that is similar to an existing script. Rather than copying all the information from the existing script and then removing the inapplicable steps, this page may be used to selectively copy steps from the existing script to the new script.
· You may have scripts that are very similar, but still unique. You can use this transaction to build large scripts from smaller scripts. In this scenario, you may choose to create special ‘mini’ scripts, one for each of the various options that may make a script unique. Then, you could use the script merge page to select and merge the mini scripts that are applicable for a main script.
The target script must exist prior to using this page. If you are creating a new script, you must first create the Script and then navigate to the merge page to copy step information.
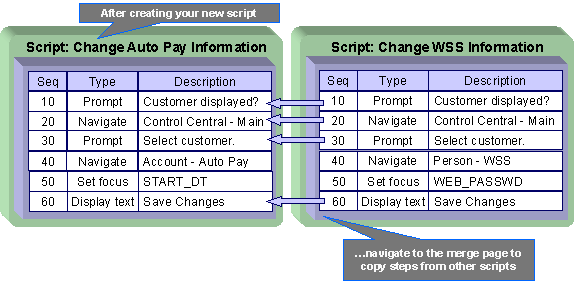
Duplicate versus Merge. The Script page itself has duplication capability. You would duplicate a script if you want to a) create a new script AND b) populate it with all the steps from an existing script.
Contents
Removing an Uncommitted Step from a Script
Script Merge
Open Admin Menu, Script Merge to open this page.
Description of Page
For Original Script, select the target script for merging steps.
For Merge From Script, select the template script from which to copy the steps.
Note. You may only copy steps from one Merge From script at a time. If you want to copy steps from more than one script, select the first Merge From script, copy the desired steps, save the original script, and then select the next Merge From script.
The left portion of the page displays any existing steps for the Original Script. The right portion of the page displays the existing steps for the Merge From Script.
You can use the Copy All button to copy all the steps from the Merge From script to the Original script. If you use Copy All, the steps are added to the end of the original script.
Each time you save the changes, the system renumbers the steps in the original script using the Start From Sequence Number and Increment By.
Merge Type indicates Original for steps that have already been saved in the original script or Merge for steps that have been merged, but not yet saved. The Sequence, Step Type and Description for each step are displayed.
The topics that follow describe how to perform common maintenance tasks:
Resequencing Steps
If you need to resequence the steps:
· Use the up and down arrows in the Original Script grid to reorder the steps.
· Make any desired changes to the Start From Sequence Number or Increment By.
· Click Save.
The steps are given new sequence numbers according to their order in the grid.
Refer to Editable Grid in the system wide standards documentation for more information about adding records to a collection by selecting from a list and repositioning rows within a grid.
Removing a Step from Script
If you want to remove a record linked to the Original script, click the “–” button to the left of the record.
For example, to remove the Navigate to a page step, use the “–”.

After removal, the grid displays:

Note. You cannot delete a step that is referenced by other steps unless you also delete the referencing steps, such as Go to step or Prompt type steps. The system informs you of any missing referenced steps when you attempt to save the original script.
Adding a Step to a Script
You can move any of the steps from the Merge From script to the original script by clicking the left arrow adjacent to the desired step. Once a record is moved it disappears from the Merge From information and appears in the Original information with the word Merge in the Merge Type column.
For example, to copy the Prompt user step, click the left arrow.

The step is moved to the left portion of the page.
![]()
Note. If you add a step, such as Go to step or Prompt type steps, that references other steps, you must also add the referenced steps. The step references are updated to use the new sequence numbers when you save the original script. The system informs you of any referenced steps that haven’t been added when you attempt to save the original script.
Removing an Uncommitted Step from a Script
If you have moved a row to the original script by mistake, you can remove it by clicking the right arrow adjacent to the appropriate record.

Invoke function steps are used to retrieve or update data independent of the page currently being displayed. For example, if you design a script that takes different paths based on the customer’s customer class, you could invoke a function to retrieve the customer’s customer class. Doing this is much more efficient than the alternative of transferring to the account page and retrieving the customer class from the Main page.
An Invoke function step retrieves or updates the relevant data by executing a service (on the server). These types of steps do not refer to the service directly. Rather, they reference a “function” and the function, in turn, references the application service. This means that before your scripts can invoke application services, you must set up functions.
Functions are abstractions of services. A function is nothing more than meta-data defining the name of a service and how to send data to it and retrieve data from it. Functions allow you to define a scriptwriter’s interface to services. They also allow you to simplify a scriptwriter’s set up burden as functions can handle the movement of data into and out of the service’s XML document.
The topics in this section describe how to set up a function.
You can retrieve data from all base-package objects. If you know the name of the base-package “page” application service used to inquire upon an object, you can retrieve the value of any of its fields for use in your scripts. To do this, set up a function that sends the unique identifier of the object to the service and retrieves the desired fields from it.
Contents
Function - Main
Use this page to define basic information about a function. Open this page using Admin Menu, Function.
Description of Page
Enter a unique Function code and Description for the function.
Use the Long Description to describe, in detail, what the function does.
Define the Internal Service that the function invokes.
Note. In this release, only page services can be invoked.
Click the View XML hyperlink to view the XML document used to pass data to and from the service. Doing this causes the XML document to be displayed in the Application Viewer.
XML document may not be viewable. If you create a new page service and do not regenerate the application viewer, you will not be able to view its XML document.
The tree summarizes the following:
· The fields sent to the application service. You can use the hyperlink to transfer to the Send Fields tab with the corresponding field displayed.
· The fields received from the application service. You can use the hyperlink to transfer to the Receive Fields tab with the corresponding field displayed.
· Scripts that reference the function. You can use the hyperlink to transfer to the script page.
Function - Send Fields
Use this page to add or update the fields sent to the service. Open this page using Admin Menu, Function and then navigate to the Send Fields tab.
Displaying a specific field. Rather than scrolling through each field, you can navigate to a field by clicking on the respective node in the tree on the Main tab. Also note, you can use the Alt-right arrow and Alt-left arrow accelerator keys to quickly display the next and previous entry in the scroll.
You're defining the application service's input fields. On this tab, you define which fields are populated in the XML document that is sent to the service. Essentially, these are the service's input fields.
Description of Page
Use Sequence to define the order of the Send Fields.
Enter a unique Function Field Name and Description for each field sent to the application service. Feel free to enter Comments to describe how the field is used by the service.
Use Field Value Source to define the source of the field value in the XML document sent to the service:
· If the field's value is the same every time the function is invoked, select Defined On The Function. Fields of this type typically are used to support "hard-coded" input values (so that the scriptwriter doesn't have to populate the field every time they invoke the function). Enter the "hard-coded" Field Value in the adjacent field.
· If the field's value is supplied by the script, select Supplied By The Invoker. For example, if the function retrieves an account's customer class, the script would need to supply the value of the account ID (because a different account ID is passed each time the function is invoked). Turn on Required if the invoker must supply the field's value (it's possible to have optional input fields).
Regardless of the Field Value Source, use XML Population Logic to define the XPath expression used to populate the field's value in the XML document sent to the service.
Usability suggestion. You populate a field's value in an XML document by specifying the appropriate XPath expression for each field. Rather than referring to an XPath manual, the system can create the XPath expression for you. To do this, click the adjacent View XML hyperlink. This will display the XML document used to communicate with the Service defined on the Main page. After the XML document is displayed, click the XPath hyperlink adjacent to the desired field to see how the XPath expression looks. You can then cut / paste this XPath expression into the XML Population Logic Field.
Function - Receive Fields
Use this page to add or update the fields received from the service. Open this page using Admin Menu, Function and then navigate to the Receive Fields tab.
Displaying a specific field. Rather than scrolling through each field, you can navigate to a field by clicking on the respective node in the tree on the Main tab. Also note, you can use the Alt-right arrow and Alt-left arrow accelerator keys to quickly display the next and previous entry in the scroll.
You're defining the application service's output fields. On this tab, you define which fields are populated in the XML document that is received from the service. Essentially, these are the service's output fields.
Description of Page
Use Sequence to define the order of the Receive Fields.
Enter a unique Function Field Name and Description for each field received from the service. Feel free to enter Comments to describe the potential values returned from the service.
Turn on Required if the invoker must use the field.
Regardless of the Field Value Source, use XML Population Logic to define the XPath expression used to retrieve the field's value from the XML document received from the service.
Usability suggestion. You retrieve a field's value in an XML document by specifying the appropriate XPath expression for the field. Rather than referring to an XPath manual, the system can create the XPath expression for you. To do this, click the adjacent View XML hyperlink. This will display the XML document used to communicate with the Service defined on the Main page. After the XML document is displayed, click the XPath hyperlink adjacent to the desired field to see how the XPath expression looks. You can then copy / paste this XPath expression into the XML Population Logic Field.