7 Update Profiles and Policies
Update profiles and policies assist you in managing OS updates to your Oracle Solaris and Linux systems consistently. Update policies and procedures are not available for Windows updates.
This section discusses update profiles and policies and how the software uses them.
About Update Profiles and Policies
Profiles specify which components to install and which are not allowed, and actions to perform on a system. You use profiles to configure and maintain the systems that you want to manage.
Policies define how an update job should be performed. Policies help in automating the update jobs without user interaction, allowing you to specify which update tasks you want to be notified about and which tasks can be performed without additional confirmation.
Update Profiles
An update profile defines the component configuration of the systems that you want to manage. Update profiles specify which components are to be installed and which are prohibited, and any additional actions to be performed on an Oracle Solaris or Linux OS.
Use profiles to accomplish the following:
-
Manage multiple systems in a consistent manner
-
Automate repetitive administration jobs
-
Record the requirements of your enterprise
-
Automatically configure servers and workstations
-
Manage dependencies and ensure consistency
The profile settings Required, Not Allowed, and Upgrade affect a managed host only during the actual deployment of that profile. At any time you can run a job that contradicts the settings of a previously used profile, therefore you should thoroughly understand your system settings and requirements.
Predefined profiles are provided to perform common system-wide checks and to automate the operating system updates. These profiles cannot be edited or deleted.
The following predefined profiles are available:
-
Check Bugs Fix – Checks every bug fix patch known to the Enterprise Controller of the selected distribution to see whether the patch applies to the installed components.
-
Check Security – Checks every security update known to the Enterprise Controller of the selected distribution to see whether the update applies to the installed components.
-
Check System – Installs or upgrades missing dependent components according to the rules that are set in the satellite local services of the selected distribution.
-
Check Withdrawn Patches – Checks all installed patches to find out whether any patches have been withdrawn. If any patches are withdrawn, the profile either upgrades to a newer patch or downgrades to a supported version.
-
Local Software Review – Checks local components against the Enterprise Controller of the selected distribution. This profile helps to locate uncertified versions of software packages. If you confirm the actions of this profile, the currently installed version is replaced with a certified version.
-
Perform Reboot – Restarts the selected system.
-
Perform Reboot + Reconfigure – Restarts the selected system and performs specific post-installation configurations.
-
Upgrade All Components – Checks all the installed components of the selected distribution to see if any of those components can be upgraded.
Creating an OS Update Profile
You must have the Admin role to create update profiles in Ops Center. An OS update job requires one profile and one policy. Profiles cannot be nested or combined, except as noted below. When the job is submitted a component called the Dependency Resolver (DR) attempts to find a series of actions that can be performed on the target which satisfy the the requirements of the Profile and any conditions imposed by the Policy.
It is important to note that a Profile is not limited to a set of actions for a single operating system; it can contain actions for one or more different operating systems, but each action is OS-specific. When the profile is applied on the target system, actions which do not apply to the target OS are disregarded without informing the user. Thus a job containing a profile which has no actions applicable to the target OS will take no action and will report a successful run.
The options associated with Update Profiles will be disabled if no distributions are activated. This can happen if you have selected not to configure the Software Update Service from the initial configuration wizard of the Enterprise Controller. Similarly, profiles can only be created for active distributions. To resolve these issues select an existing asset of the required OS type and manage it.
Note:
The process of managing an asset and activating its distribution takes few minutes to complete.-
Select Plan Management from the Navigation pane.
-
Select Update Profiles from the Profiles and Policies tree.
-
Select New Profile from the Actions pane.
The New OS Update Profile window is displayed.
-
Enter a profile name and brief description of the profile.
-
(Optional) Select a Profile Type. Valid types include Upgrade, Install and Script. The default type is Unknown. The profile type is simply a tag to assist when creating deployment plans.
-
Install indicates that new components to be installed
-
Upgrade indicates that existing components are upgraded
-
Script indicates that action scripts are executed.
Note:
It is possible to create profiles that do all the actions of the profile type, or to tag a profile with a type inconsistent with its actions. The tag is used for filtering the required profiles in deployment plans. See Complex Plan Management for more information.
-
-
For each OS that the profile applies to, select the Distribution from the drop-down list. (For example, SOLARIS10_X86)
-
Locate and select a Component from the Component tree. You can locate the component by clicking the Expand ( + ) icon, or by entering any part of the component name in the search. If a component cannot be found, check whether the selected Distribution is correct.
-
If required, select the check box to specify that the component should be added to all applicable distributions.
Note:
This only applies to distributions that are active at the time the profile is created. As new distributions are activated you must edit the profile to explicitly add any components for those distributions. -
Specify whether the action is Required, Upgrade, or Uninstall.
Note:
Some actions might not apply. For example, a component cannot be Required if the system does not have the information about how to obtain the component. -
(Optional) You can repeat the preceding actions to select multiple components for the same or different operating systems.
-
When you are finished, click Save as Named Profile. If a profile of that name exists you will be asked to confirm that it is to be replaced.
Note:
You cannot replace system-defined profiles.
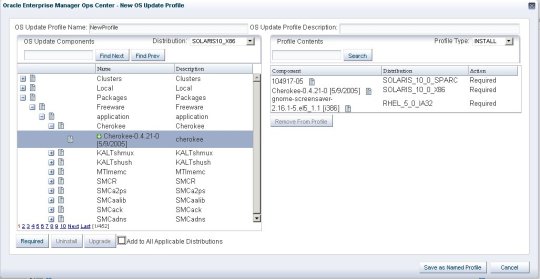
As components are added to the profile, Profile Contents shows the Component Name, Distribution, and type of action. To remove a component from the list, select the component from Profile Contents list and click Remove from Profile.
The UI will not allow you to select contradicting combination of actions. For example, you cannot mark the same package as both Required and Uninstalled, or request multiple versions of the same component. However, this does not guarantee that the set of actions in the Profile has a valid solution. The UI does not check for dependencies or conflicts, this is handled by the Dependency Resolver on the target when the job is processed.
As stated earlier, profiles cannot be nested or combined. You can import the actions from another profile by selecting the profile and clicking Required. This causes the actions from the profile to be copied into the current profile. Any future edits to the profile will not affect the current profile.
For example, you can import the actions of Profile A and create another profile B. If you edit Profile A, it will not be modified in Profile B.
Editing an OS Update Profile
Check for roles and permission to edit an update profile. You must have edit permission to modify the profiles. You cannot alter the system-defined profiles.
When you change the name of the profile, a new profile is created. The existing profile is not modified for other changes and retained.
-
Select Plan Management from the Navigation pane.
-
Select Update Profiles from the Profiles and Policies tree. The system-defined and use-defined profiles are listed in the center pane.
-
Select a profile from the user-defined profiles list.
-
Click the Edit Profile icon.
-
The Edit OS Update Profile window is displayed.
-
Edit the profile details as required. You can add or remove Components and change profile settings, such as the name, description, or type.
-
Click Save as Named Profile to save the changes made to the profile. If you changed the profile name the system will save the profile under the new name and the old version will be unaffected. If you did not change the profile name, or changed it to match an existing profile, the system will warn you before you overwrite the existing version.
Exporting an OS Update Profile
If you have the Admin role, you can export user-defined profiles one profile at a time. System-defined profiles cannot be exported. The exported profile is in an XML-style format which can be read and copied easily. You can edit the profile with any standard text editor.
To Export an OS Update Profile
-
Select Plan Management section from the Navigation pane.
-
Select Update Profiles from the Profiles and Policies tree. The system-defined and user-defined profiles are listed in the center pane.
-
Select a user-defined profile.
-
Click the Export Profile icon in the center pane. Depending on your browser, you will get a pop-up window from which you can either open the file or save the file to a disk.
-
Click either Open or Save to disk, then click OK.
Importing an OS Update Profile
Once a profile has been exported, you can import it into a different environment. In this release, the profile might not contain any components for distributions which are not activated; attempting to do so will result in an error. (A solution is to manually edit the profile to remove any such entries). Additionally, any profile entries referring to 'NCOs', such as local content, are silently removed during the import process.
To Import an OS Update Profile
-
Select Plan Management section from the Navigation pane.
-
Select Update Profiles from the Profiles and Policies tree.
-
Click on the Import Profile icon in the center pane. An Import OS Update Profile window is displayed.
-
Enter the file name or click Browse to locate the file to be imported.
-
Click Import Profile. If the import is successful, the Edit Profile window is displayed. See Editing an OS Update Profile for more information.
-
Review the profile and make changes, as appropriate.
-
Save the profile to the database.
Note:
If you do not save the profile, it is discarded.Deleting an OS Update Profile
You can delete profiles that you have created. You cannot delete a system-defined profile or profiles created by other users.
-
Select Plan Management from the Navigation pane.
-
Select Update Profiles from the Profiles and Policies tree. The system-defined and user-defined profiles are listed in the center pane.
-
Select the user-defined profile that you want to delete from the list.
-
Click the Delete Profile icon.
-
Click Yes to confirm the delete action.
Note:
This marks the profile as deleted in the database; it can no longer be accessed through the UI and will not appear in the lists. Completely removing the profile, or recovering a deleted profile, is a task for a database administrator and is beyond the scope of these instructions.Update Policies
When an OS Update job is executed, the dependency resolver examines the profile to determine what actions to take and in what order. Often there will be dependencies on other components, actions that must be performed in single user mode, a requirement to reboot the target operating system, etc. By default the user will be prompted to confirm or reject each of these steps during a question and answer exchange. The user can provide answers to the questions in advance by supplying a policy.
A policy is a list of actions that are explicitly approved or denied. They can be created by the user in advance of submitting a job; alternatively the question and answer exchange when a job is executed can be saved as a policy for future re-use.
As with profiles, policies can contain actions relating to more than one operating system. There are a number of system policies which can be used to automate the update jobs.
Policy settings are hierarchical; if there is not a policy setting for a component then the policy for that component's parent applies. For example, it is possible to create a policy that allows the system to install a given component but prohibits installation of certain specific versions of that component.
Note:
The policy only applies to actions that are implicitly generated by the dependency resolver. If a conflict occurs between a profile and policy, the profile overrides the policy.The update policy is not applicable to Windows OS.
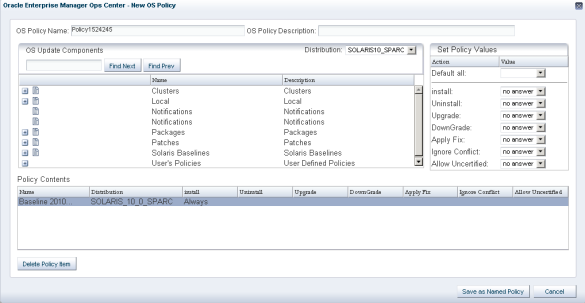
Creating an OS Update Policy
Policies focus on the component level. Depending on the selected distribution, OS Update Components categories may include:
-
Oracle Solaris Baselines
-
Packages or Software
-
Patches
-
Clusters
-
Notifications
There is also a category of User's Policies, which allows existing policy definitions to be merged into the current policy.
You can select a single component within a category, such as the latest Oracle Solaris baseline, or an entire category. You can set the following policy actions for the selected component:
-
Install
-
Uninstall
-
Upgrade
-
Downgrade
-
Apply Fix
-
Ignore Conflict
-
Allow Uncertified
If the selected component is a category or a package group, the setting applies to all the packages in the category or package group. Once you select the component and OS distribution, you can define the policy actions. The Policy Component and Action Settings are described below.
-
Install or Uninstall
-
Ask Me – Pause the job for confirmation before installing or uninstalling the selected component.
-
Yes – Install or uninstall the selected component automatically, as required by solution.
-
No – Find a solution that does not install or uninstall the selected component.
-
-
Upgrade from or Downgrade from
-
Ask Me – Pause the job for confirmation before changing the version of the selected component.
-
Yes – Upgrade or downgrade the selected component automatically, as required by solution.
-
No – Find a solution that does not upgrade or downgrade the selected component.
-
-
Apply Fix
-
Ask Me – Pause the job for confirmation before fixing dependency, security, or bug issues on selected component.
-
Yes – Automatically apply the fix.
-
No – Find a solution that does not apply a fix on the selected component.
-
-
Ignore File Conflict A file conflict will occur if the selected component provides a file that cannot be installed on a system with a file provided by another component that is already installed. If both components are certified, the rules of the knowledge base handle deployment without conflicts. If one or both are local components that are not in the knowledge base, the conflict will cause the job to fail.
Note:
Do not set the Ignore File Conflict setting to Yes unless you know the conflict.-
Ask Me – Pause the job for confirmation, so you see the conflict and decide at run-time whether to ignore it and continue the job, or to fail the job.
-
Yes – The conflict is understood and known to be unimportant. Continue the job without pause.
-
No – Find a solution that does not allow for any file conflicts.
-
-
Allow Uncertified Allow the agent to install an uncertified Object, one that is not officially recognized by the software update service.
-
Ask Me – Pause the job for confirmation before installing the object.
-
Yes – Install the object automatically, as required by the solution.
-
No – Look for a solution that does not depend on the uncertified object.
-
If a policy has the Ask Me action, the job pauses for confirmation before continuing. The user will receive a notification that there is a job waiting for an answer. Click Jobs to view the job status. If a job is paused, the Waiting User Input icon appears in the status column. Click the icon to answer the questions.
This procedure enables you to create an OS policy that you can use in update jobs. All user roles can create an OS Policy. Other users see the policies as read-only and can use or copy your policies, but they cannot edit or delete them.
-
Select Plan Management section from the Navigation pane.
-
Select Update Policies from the Profiles and Policies tree. A list of existing policies is displayed in the Summary tab.
-
Click New Policy in the Actions pane or click New Policy icon in the Summary tab.
The New OS Policy window is displayed.
-
A default policy name is provided. Edit the policy name and add a brief OS Policy Description.
-
Select the distribution from which you want to select a component.
-
Select a category or component. Expand a category to display the available components.
-
Click on the component for which you want to specify policy values
-
Set the policy values for each action. Once an action has been set for a component that component will appear in the Policy Contents area.
-
Repeat for additional components.
-
Click Save as Named Policy. The policy appears in the OS Update Policies Summary page.
Note:
It is important to know that policy value changes apply to the component currently selected in the component tree. To make additional changes to a component, it is necessary to find that component in the tree again. Selecting the entry under Policy Contents has no effect.Editing an OS Update Policy
You can edit the user-defined policies that you have created. You have read-only option for policies created by other users.
-
Select Plan Management section from the Navigation pane.
-
Select Update Policies from the Profiles and Policies tree. A list of policies is displayed in the center pane.
-
Select a policy from the user-defined policies list.
-
Click the Edit Policy icon in the center pane. The Edit OS Policy window is displayed. You can change the name, description, and policy settings.
-
Click Save as Named Policy to save the changes. If you changed the policy name the system will save the policy under the new name and the old version will be unaffected. If you did not change the policy name, or changed it to match an existing policy, the system will warn you before you overwrite the existing version.
Exporting an OS Update Policy
You can export only the user-defined policies, not the system-defined policies. You can export policies one at a time. The exported policy is in an XML-style format which can be read and copied easily. It can also be edited with any standard text editor.
-
Select Plan Management section from the Navigation pane.
-
Select Update Policies from the Profiles and Policies tree.
-
Select a policy from the user-defined policies table in the center pane.
-
Click the Export Policy icon in the center pane. Depending on your browser, you will get a pop-up window from which you can either open the file or save the file to a disk.
-
Click either Open or Save to disk, then click OK.
Importing an OS Update Policy
A policy that has been exported can be imported into a different environment. Unlike Profiles, the policy might contain components for distributions which are not activated; however the UI will be unable to display these correctly. They will appear as "System Policy Item" and the Distribution will appear as "Unknown". You can delete them, but you cannot edit them. Additionally, any policy entries referring to NCO, such as local content, are silently removed during the import process.
-
Select Plan Management section from the Navigation pane.
-
Select Update Policies from Profiles and Policies tree.
-
Click on the Import Policy icon in the center pane. An Import OS Update Policy window is displayed.
-
Enter the file name or click Browse to locate the file to be imported.
-
Click Import Policy.
If the import is successful, the Edit Policy window is displayed. You can review the policy, making changes as appropriate, before saving it to the database.
Note:
If you do not save the policy, it will be discarded.Deleting an OS Update Policy
You can delete the policies that you have created. You cannot delete the policies created by other users.
Note:
This marks the policy as deleted in the database. It can no longer be accessed through the UI and will not appear in the lists. Completely removing the policy, or recovering a deleted policy, is a task for a database administrator and is beyond the scope of these instructions.-
Select Plan Management section from the Navigation pane.
-
Select Update Policies from the Profiles and Policies tree. A list of policies is displayed in the center pane.
-
Select a policy from the user-defined policies list.
-
Click the Delete Policy icon.
-
Click Yes to confirm the delete action.
Example – Solaris Update Profile and Policy
This example describes to create an update profile for a Solaris Baselines and update policy for applying the Solaris baselines.
If the Enterprise Controller is in disconnected mode, see the Knowledge Base and Connection Modes to obtain the latest Knowledge Base bundle.
To Create an Update Profile for Solaris Baselines
-
Select Plan Management section from the Navigation pane.
-
Select Update Profiles from the Profiles and Policies tree.
-
Choose New Profile from the Actions pane. The New OS Update Profile window displays.
-
Enter the name for the profile as Baseline09.
-
Select Solaris Baselines from the OS Update Component list.
-
Expand the list of Solaris baselines. The baselines that are released are listed according to the date of release.
-
Select the latest baseline from the list.
-
Select the Recommended set from the baseline list.
-
Click Required to add to the Profile Contents.
-
Select the Profile Type as Install to install the selected baselines.
-
Click Save as Named Profile to save the profile. The new profile will be listed in the User-defined profiles list.
To Create an Update Policy for Solaris Baselines
-
Select Plan Management section from the Navigation pane.
-
Select Update Policies from the Profiles and Policies tree.
-
Choose New Policy from the Actions pane. The New OS Policy window displays.
-
Enter the name for the policy as Baseline09Policy.
-
Select Solaris Baselines from the OS Update Component list.
-
Expand the list of Solaris baselines. The released baselines are listed according to the date of release.
-
Select the latest baseline from the list.
-
Select the Recommended set from the baseline list.
-
Select the following policy values for the actions:
-
Install – Always
-
Uninstall – Never
-
Upgrade – Always
-
Downgrade – Never
-
Apply Fix – no answer
-
Ignore Conflict – Ask
-
Allow Uncertified – Never
-
-
Click Save as Named Policy to save the policy. The new policy will be listed in the User-defined policies list.