8 Firmware and OS Update Reports
A number of firmware compliance, and OS update reports are available. Enterprise Manager Ops Center provides reports that are very specific to Oracle Solaris such as Baseline Analysis Report. There are reports that are more commonly used for the compliance status of the OS.
Reports are grouped in the UI in the following way:
-
OS Reports – Includes Oracle Solaris and Linux OS Updates and Windows Updates Reports.
-
System Information Report – Provides report for different assets such as OS, server, and chassis.
-
Problem Reports – See Oracle Enterprise Manager Ops Center User's Guide for more information.
-
Additional Reports – Includes reports such as Distribution Update, Service Pack Compliance, Oracle Solaris Update Compliance, and Package Compliance.
Enterprise Manager Ops Center provides option to save the report parameters which can be used for later use. It provides interactive result viewer to view the report results in interactive mode which provides option to make the targets compliant.
You also have option to view and save the results in CSV or PDF formats.
Note:
Large reports can consume significant disk space. Report PDF and CSV files are stored in the/var/opt/sun/xvm/reports directory. You can relocate this directory to a dedicated disk. To free up disk space, remove old report results.Using the Firmware Compliance Report
The Firmware Report feature compares the firmware images specified in a firmware profile to the firmware images installed on one or more hardware assets. The report indicates whether the firmware on the asset complies with the profile's specifications. You have the option of updating the firmware on any non-compliant assets by clicking the Make Targets Compliant button in the Interactive report.
-
Expand Reports in the Navigation pane.
-
Select Firmware Reports.
-
Select Create Firmware Report from the Actions pane. The Create Firmware Report wizard is displayed.
-
Specify the name and a description for the report.
-
If you do not plan to create this report routinely, clear the Create Schedule checkbox.
-
By default, the report is created in PDF format and CSV format. Clear the checkbox for the type of file format you do not want to create.
-
Select the firmware profile and click Next. You can select a profile for a service processor or for a storage component, such as a RAID controller, expander, or disk.
-
Select the targets you want to test against the profile. Select the asset from the Available Items hierarchy and click Add to Target List. When you have selected all the targets, click Next.
-
If you plan to create the report routinely, define the schedule. You can choose to run the report immediately, at a set date, or routinely at a set time.
-
Review the summary and click Run Report to create the report job. You also have the option of saving the report as a template for subsequent reports. The report job starts at the time you specified and compares the values in the profile to the existing values on the targets you selected.
The report shows whether a target asset is compliant, not compliant, or not applicable:
-
A compliant asset has the firmware images specified in the profile.
-
A non-compliant asset does not have the same firmware images as specified in the profile. You can update the firmware on the asset, by either clicking the Make Targets Compliant button in the Interactive report or using the procedure in Updating Firmware.
-
A non-applicable asset indicates that a firmware image in the profile does not match the model of service processor in the asset. This condition can occur when either the profile does not recognize the model that the service processor is reporting or the profile includes firmware images that are not designed for the service processor.
-
Compare the model of the service processor displayed in the asset's Summary tab with the model of the service processor included in the profile. If they are different, add the name in the profile to the asset's data.
See Oracle Enterprise Manager Ops Center Administration Guide for information about adding a product alias.
-
When the firmware profile was created, only images that matched the service processor could be included. However, if the service processor did not report all the firmware types it supported, an image that did not match the service processor could have been included in the profile. To update the Enterprise Manager Ops Center software with all the service processor's supported firmware types, use the Refresh action to update the information about the service processor. When the job is completed, view the service processor's Summary tab to see all firmware types.
-
Repeat the procedure to create a firmware report.
-
Using the Solaris OS Update Reports
Solaris OS Update reports enable you to check for new patches and security advisories. You can get a general report, or test a system or installed package for available fixes. For auditing purposes, you can create a change history report.
When you create a report, you select the criteria that are relevant to your data center, such as a list of targets that have a specific patch or a list of targets that do not have a specific patch. The CVE Compliance report enables you to search for specific Solaris patches by their CVE IDs.
Reports like Baseline Analysis are exclusive for Solaris OS which generates compliance reports for released Solaris baselines.
The following topics are covered in this section:
Creating a Baseline Analysis Report
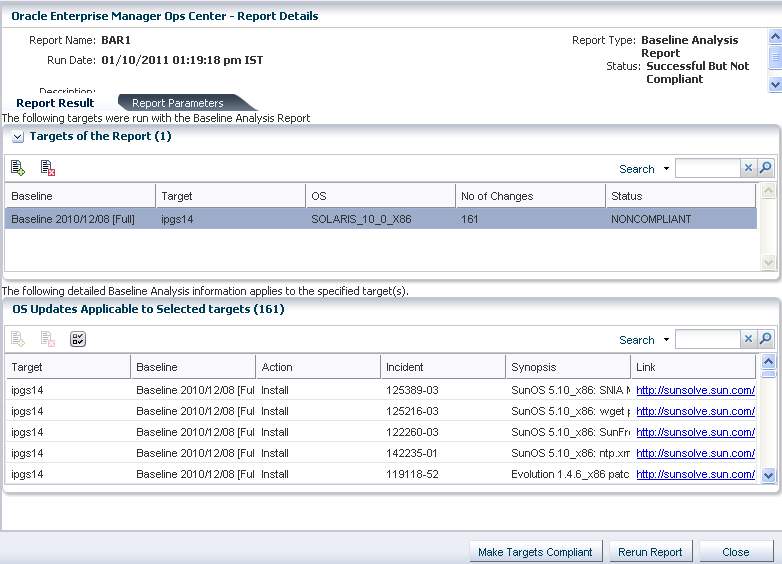
The Baseline Analysis Report (BAR) enables you to determine whether your managed system is compliant with recently released Solaris baselines. Baselines pertain only to Solaris systems. This section describes Solaris baselines, white list, black list, and how to run a Baseline Analysis report in connected and disconnected mode of the Enterprise Controller.
A Solaris baseline is a dated collection of Solaris patches, patch metadata, and tools. Oracle releases Solaris baselines on a monthly basis. When you install the patches of a baseline on a host, that system is considered to be compliant with that baseline.
Each dated baseline contains these patch sets:
-
Full – Includes all Solaris patches
-
Recommended – Includes Solaris recommended patches and security patches
-
Security – Includes only Solaris security patches
All baselines include patches for a specific time frame. However, the Full baseline often contains Solaris OS patches that are not included in the Recommended baseline. The Full baseline includes additional patches based on feedback from various customer support groups within Oracle. These patches are not always included in the Recommended baseline.
To install the Recommended and Security baselines, you must either deploy two jobs or have a job that includes multiple tasks. This might result in multiple reboots, for example, if both tasks (baselines) include patches that have Single User mode requirements.
Enterprise Manager Ops Center's Knowledge Base (KB) is updated with the information about the baselines. This is done a few days after the official release of baselines by Oracle.
Note:
The Solaris 8 OS was placed into End of Service Live (EOSL) on March 31, 2009. Solaris 8 OS baselines are available through March 2009. The KB might contain artificial baselines after that date. Do not use baselines dated after March 2009.Using Solaris baselines enables you to easily identify the patch level of your hosts. For example, you install some test hosts with a particular baseline. Then, you test these hosts for a period to see whether the patches in this baseline are stable enough to be used on your production hosts. When the testing reveals that this baseline is stable, you can install the same baseline on your production hosts.
Solaris baselines are available as a component in the recommended component list. It contains a list of dated baselines.
The Baseline Analysis report helps to verify the compliance of your system against the newly released baselines (as and when they are available in Knowledge Base).
A white list is the list of patches that you want to install in addition to the patches in the baseline. To establish a white list, create a profile using the Required setting. You can also specify a white list when generating a Baseline Analysis report. Select the white list either from the created profile or enter the patch IDs separated by new lines.
For example, baseline B includes patches X, Y, and Z, and the white list has patches U, V, and W. When your Baseline Analysis report is created, the host is marked compliant only when all six patches X, Y, Z, U, V, and W are present.
A black list is a list of patches that you do not want installed. You create a black list by creating a policy with the specified action for the patches. You can select a black list option when you create a Baseline Analysis report. Select the black list either from the created policy or enter the patch IDs separated by new lines.
If a particular patch in the profile is set with the policy component setting as Never for an install action, then the patch is not installed. If the patch is already installed, it will not be uninstalled or removed.
For example, if baseline A has patches X, Y, and Z, and the black list specifies only Y and Z, the system is compliant if X is installed. If the patches Y and Z are already installed, they will not get uninstalled if you run a compliance job from the report results. If Y and Z are not installed, they will not be listed in the non compliant result and will not be added in the compliance job.
This section describes how to generate a BAR. The report gives the compliance status of the managed system with the selected Solaris baseline that was released.
You can generate two types of BARs:
-
Agent-based BAR
-
Database-based BAR
In an agent-based BAR, a simulated job is executed against the managed hosts. This type of report takes time to complete because it checks for dependent components and missing dependencies, and then downloads the patches that must be installed. When you run a compliance job from this report result, the job is completed quickly because the patches are already downloaded. However, to improve the report performance of a BAR, you can skip the downloads in a simulated job by clearing the check box that is provided for this purpose.
In a database-based BAR, the report is run against the database of the management server, the selected baselines are broken down into individual patch IDs, and then formed into an incidents list. The report is generated based on the information that are available on the database. Based on the report result, you can run a compliance job.
To Generate a Baseline Analysis Report
This report provides information about the hosts that are compliant with a baseline OS.
-
Select Reports from the Navigation pane.
-
Select Solaris/Linux OS Updates from the Reports section.
-
Select Create Baseline Report from the Actions pane. The Create Baseline Analysis Report wizard is displayed.
-
Define the report parameters:
-
Report Name – Name of the report.
-
Description – The description of the report.
-
Schedule – Select Create Schedule to schedule the report.
-
Output Format – Select the output format of the report result. CSV and PDF formats are available.
-
Select Targets – Add the targets by selecting them from the list of Available Items and clicking Add to Target List
-
-
Click Next to select the Solaris baselines.
-
In Select Baseline(s), select the following options:
Figure 8-1 Selecting Baselines for Baseline Analysis Report
Description of "Figure 8-1 Selecting Baselines for Baseline Analysis Report"
-
Select either Run Against Database or Run Against Agent.
-
Select Download for Run Against Agent to download the patches that must be installed on the target.
-
Select the distribution type and select the baselines from the list. You can select targets of multiple distribution. For each distribution, select the corresponding baselines. A warning message is displayed if you have not selected baselines for a distribution.
Note:
If you have multiple distributions, then you must select baselines for at least one distribution to continue further in the wizard. If you have not selected baselines for a distribution, then the targets of that distribution will not be in the report result. -
Click Add or click Add All to select all the baselines.
-
-
Click Next to modify the patch lists that are applied to the report.
-
Select a White List option:
-
None – No white list.
-
Manual Input – Enter a list of patches.
-
Specify with Profile – Select a profile to import as a white list.
-
-
Select a black list option:
-
None – No black list.
-
Manual Input – Enter a list of patches.
-
Specify with Policy – Select a policy to import as a black list.
-
-
Click Next to schedule the report.
-
Select a schedule for the report. You can schedule the report to run:
-
Immediately.
-
On a start date and time – Select a date and time to generate the report.
-
On a recurring schedule – Select the month and day when you want to generate the report. Select the Start Time, End Time and Number of Hours between runs. This is to set the number of times the report generated between the specified start and end time. For example, if you set the start time at 6.00 a.m, end time at 12.00 a.m and the number of hours between runs as 2, then the report is run at 6.00 a.m, 8.00 a.m, 10.00 a.m and 12.00 a.m.
-
-
Click Next to view the summary of the report.
-
Review the report parameters and select one of the options as required:
-
Save Template and Close – Saves the report as a template and closes the wizard. You can use the report template to generate reports later.
-
Run and Close – Runs the report and closes the wizard window.
-
The report result is displayed under the Report Results in the center pane. See Viewing and Exporting Report Results for more information about viewing a report result and generating a compliance job from the result.
Creating a Baseline Analysis Report in Disconnected Mode
During the initial Enterprise Controller configuration, you have the option to set up Enterprise Manager Ops Center in disconnected mode. If your system is not in disconnected mode, you must specifically switch to disconnected mode. To run a BAR in disconnected mode, you must upload the appropriate month's EIS-DVD to Enterprise Manager Ops Center. Another option is to include the baselines in the KB bundle that is generated by the harvester script. With this option, you do not have to upload the EIS-DVD to Enterprise Manager Ops Center.
To Create a Baseline Analysis Report in Disconnected Mode
-
Generate a KB bundle. See Obtaining a KB Bundle With the Harvester Script for more information.
-
Select Administration from the Navigation pane.
-
Select Setup Disconnected Mode from the Actions pane.
-
Specify a KB bundle and click Load KB Bundle.
-
Select Switch to Disconnected Mode. You must first load a bundle or you will be unable to switch.
-
Upload the EIS-DVD contents.
-
Run the Baseline Analysis Report. See Creating a Baseline Analysis Report for the detailed procedure.
-
View the report result and initiate a compliance job to install the latest patches.
Creating a Change History Report (Solaris)
The Change History report provide a detailed history of the install and uninstall actions taken on an asset managed by Enterprise Manager Ops Center. This report also shows which user made the deployments, enabling you to track a team of operators. After your report criteria is selected, you can generate a report and save it as a template. The saved report template enables you to run the report again with the same specified parameters for the targeted systems, install actions, and time period.
To Generate a Change History Report for Solaris OS
-
Select Reports from the Navigation pane.
-
Select Solaris/Linux OS Updates from the Reports section.
-
Select Create Change History Report from the Actions pane.
The Create Change History Report wizard is displayed.
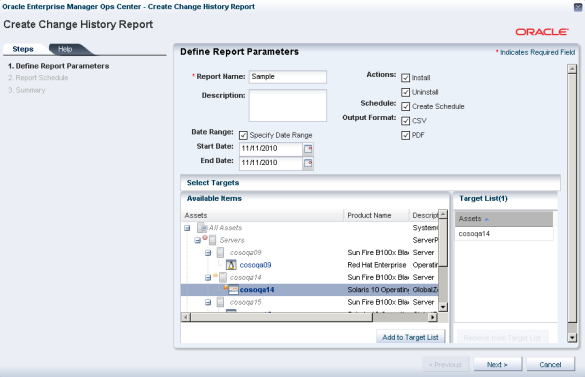
Figure 8-2 Defining Report Parameters for Change History Report
Description of "Figure 8-2 Defining Report Parameters for Change History Report"
-
Define the report parameters:
-
Report Name – The name of the report.
-
Description – A description of the report.
-
Date Range – Specify the start date and end date between which the report will cover.
-
Actions – Select the actions that you want to be reported. You can select Install, Uninstall or both.
-
Schedule – Select Create Schedule to schedule the report.
-
Output Format – Select the output format of the report result. CSV and PDF formats are available.
-
Select Targets – Add the targets by selecting them from the list of Available Items and clicking Add to Target List.
-
-
Click Next to schedule the report.
-
Select a schedule for the report. You can schedule the report to run:
-
Immediately.
-
On a start date and time – Select a date and time to generate the report.
-
On a recurring schedule – Select the month and day when you want to generate the report. Select the Start Time, End Time and Number of Hours between runs. This is to set the number of times the report generated between the specified start and end time. For example, if you set the start time at 6.00 a.m, end time at 12.00 a.m and the number of hours between runs as 2, then the report is run at 6.00 a.m, 8.00 a.m, 10.00 a.m and 12.00 a.m.
-
-
Click Next to view the summary of the report.
-
Review the report parameters and select one of the options as required:
-
Save Template and Close – Saves the report as a template and closes the wizard. You can use the report template to generate the report later.
-
Run and Close – Runs the report and closes the wizard window.
-
The report result is displayed under the Report Results in the center pane. See Viewing and Exporting Report Results for more information about viewing a report result.
Creating a CVE Report (Solaris)
The CVE report provides information about incidents that are related to specific CVE IDs and the systems that must have these incidents installed. Common Vulnerability and Exposure Identifiers (CVE IDs) are unique, common identifiers for publicly known security vulnerabilities. The patches and packages from a list of vendors are published as common vulnerabilities and security exposure incidents. CVEs are identified by a candidate ID (CAN ID).
To Generate a CVE Report for Solaris OS
-
Select Reports from the Navigation pane.
-
Select Solaris/Linux OS Updates from the Reports section.
-
Select Create CVE Report from the Actions pane. The Create CVE Report wizard is displayed.
-
Define the report parameters. They include:
-
Report Name – The name of the report.
-
Description – A description of the report.
-
Compliance – Select either compliant or non-compliant report.
-
Schedule – Select Create Schedule to schedule the report.
-
Output Format – Select the output format of the report result. CSV and PDF formats are available.
-
Select Targets – Add the targets by selecting them from the list of Available Items and clicking Add to Target List.
-
-
Click Next to select the CAN IDs.
-
Select one or more CAN IDs and click Add or click Add All to select all the available CAN IDs.
Figure 8-3 Selecting CAN IDs in CVE Report
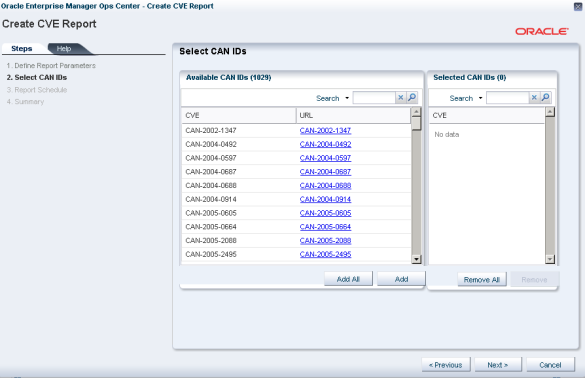
Description of "Figure 8-3 Selecting CAN IDs in CVE Report"
-
Click Next to schedule the report.
-
Select a schedule for the report. You can schedule the report to run:
-
Immediately.
-
On a start date and time – Select a date and time to generate the report.
-
On a recurring schedule – Select the month and day when you want to generate the report. Select the Start Time, End Time and Number of Hours between runs. This is to set the number of times the report generated between the specified start and end time. For example, if you set the start time at 6.00 a.m, end time at 12.00 a.m and the number of hours between runs as 2, then the report is run at 6.00 a.m, 8.00 a.m, 10.00 a.m and 12.00 a.m.
-
-
Click Next to view the summary of the report.
-
Review the report parameters and select one of the options as required:
-
Save Template and Close – Saves the report as a template and closes the wizard. You can use the report template to generate the report later.
-
Run and Close – Runs the report and closes the wizard window.
-
The report result is displayed under the Report Results in the center pane. See Viewing and Exporting Report Results for more information about viewing a report result and generating a compliance job from the result.
Creating a Distribution Update Report (Solaris)
The Distribution Update report provides a mapping between selected updates, packages, and CVEs and selected distributions so that you can find out whether the updates are installed. This report shows whether a specific distribution has been updated with specific updates, packages, or CVEs.
To Generate a Distribution Update Report for Solaris OS
-
Select Reports from the Navigation pane.
-
Select Additional Reports from the Reports section.
-
Select Distribution Update Report from the Actions pane. The Distribution Update Report Creation Wizard is displayed.
-
Specify the report parameters:
-
Name – The name of the report.
-
(Optional) Description – A description of the report.
-
Category – Select one or more of the following:
-
Security
-
Bug fix
-
Enhancement
-
Service pack
-
Solaris update
-
CD
-
-
Type – Select package, update or both.
-
Release Date – Select a start date and end date between which the update was released.
-
-
Click Next to specify the distribution. The Specify Distributions page is displayed.
-
Select the distributions by clicking them and clicking Add or by clicking Add All, then click Next. The Select Updates page is displayed.
-
Select the updates by clicking them or clicking Select All, then click Next. The Select Packages page is displayed.
-
Select the packages by clicking them or clicking Select All, then click Next. The Select CVE page is displayed.
-
Select one or more CVEs by clicking them or clicking Select All, then click Next. The Summary page is displayed.
-
(Optional) Click Save Report to save the report for future use. This returns you to the Reports tab, where you can run the report by selecting it from the Saved Reports section and clicking Re-run Report.
-
Click Run Report. The report result is displayed.
-
(Optional) Click Export to CSV to export the report result.
-
Click Done to close the report.
Creating a Host Compliance Report (Solaris)
You can run a host compliance report to determine whether the hosts are complaint with security and bug fix incidents.
To Generate a Host Compliance Report for Solaris OS
-
Select Reports from the Navigation pane.
-
Select Solaris/Linux OS Updates from the Reports section.
-
Select Create Host Compliance Report from the Actions pane. The Create Host Compliance Report wizard is displayed.
-
Define the report parameters:
-
Report Name – The name of the report.
-
Description – A description of the report.
-
Update Level – Select whether you want the compliant status for Security and Bug Fixes or for only Security Updates.
-
Compliance – Select either Compliant or Non-Compliant.
-
Schedule – Select Create Schedule to schedule the report.
-
Output Format – Select the output format of the report result. CSV and PDF formats are available.
-
Select Targets – Add the targets by selecting them in the list of Available Items and clicking Add to Target List.
-
-
Click Next to schedule the report.
-
Select a schedule for the report. You can schedule the report to run:
-
Immediately.
-
On a start date and time – Select a date and time to generate the report.
-
On a recurring schedule – Select the month and day when you want to generate the report. Select the Start Time, End Time and Number of Hours between runs. This is to set the number of times the report generated between the specified start and end time. For example, if you set the start time at 6.00 a.m, end time at 12.00 a.m and the number of hours between runs as 2, then the report is run at 6.00 a.m, 8.00 a.m, 10.00 a.m and 12.00 a.m.
-
-
Click Next to view the summary of the report.
-
Review the report parameters and select one of the options as required:
-
Save Template and Close – Saves the report as a template and closes the wizard. You can use the report template to generate the report later.
-
Run and Close – Runs the report and closes the wizard window.
-
The report result will be displayed under the Report Results in the center pane. See Viewing and Exporting Report Results for more information about viewing a report result and generating a compliance job from the result.
Creating an Incident Compliance Report (Solaris)
Incidents are the patches that are available for an application or feature. Incidents apply to one or more packages or RPMs.
You can run an incident compliance report to determine whether the incidents on the managed hosts are compliant with the latest released version.
To Generate an Incident Compliance Report for Solaris OS
-
Select Reports from the Navigation pane.
-
Select Solaris/Linux OS Updates from the Reports section.
-
Select Create Incident Report from the Actions pane. The Create Incident Compliance Report wizard is displayed.
-
Define the report parameters:
-
Report Name – The name of the report.
-
Description – A description of the report.
-
Criteria – Select the criteria for selecting the patches that are used as a comparison. Depending on the selection of criteria the wizard steps vary. You can select Select Updates or Filter Updates.
-
Compliant – Select either Compliant or Non-compliant for compliance status.
-
Schedule – Select Create Schedule to schedule the report.
-
Output Format – Select the output format of the report result. CSV and PDF formats are available.
-
Select Targets – Add the targets by selecting them from the list of Available Items and clicking Add to Target List.
-
-
Click Next to select the updates.
-
If you have selected Select Updates in the previous step, the list of available incidents is displayed.
Figure 8-4 Selecting Incidents for Incident Compliance Report

Description of "Figure 8-4 Selecting Incidents for Incident Compliance Report"
-
Select the incidents and click Add or click Add All to select all the listed incidents.
-
If you have selected Filter Updates in the first step, then select the following:
-
Select Packages – You can select the packages based on the category, update type and releases date. Select the packages and click Add or click Add All to select all the packages in the Available Packages list. Click Next to select the CAN IDs.
-
Select CAN IDs – Select from the list of Available CAN IDs. Click Add or Add All as required.
-
-
Click Next to schedule the report.
-
Select a schedule for the report. You can schedule the report to run:
-
Immediately.
-
On a start date and time – Select a date and time to generate the report.
-
On a recurring schedule – Select the month and day when you want to generate the report. Select the Start Time, End Time and Number of Hours between runs. This is to set the number of times the report generated between the specified start and end time. For example, if you set the start time at 6.00 a.m, end time at 12.00 a.m and the number of hours between runs as 2, then the report is run at 6.00 a.m, 8.00 a.m, 10.00 a.m and 12.00 a.m.
-
-
Click Next to view the summary of the report.
-
Review the report parameters and select one of the options as required:
-
Save Template and Close – Saves the report as a template and closes the wizard. You can use the report template to generate the report later.
-
Run and Close – Runs the report and closes the wizard window.
-
The report result will be displayed under the Report Results in the center pane. See Viewing and Exporting Report Results for more information about viewing a report result and generating a compliance job from the result.
Creating a Package Compliance Report (Solaris)
The Package Compliance report provides details pertaining to the selected packages on the managed system and shows whether the system is compliant with the latest recommended available version.
To Generate a Package Compliance Report for Solaris OS
-
Select Reports from the Navigation pane.
-
Select Additional Reports from the Reports section.
-
Select Package Compliance Report from the Actions pane. The Package Compliance Report Creation Wizard is displayed.
-
Specify the report parameters:
-
Name – The name of the report.
-
Description – A description of the report.
-
Status – Select either Compliant or Not Compliant.
-
Level – Select Security Updates or Security and Bug Updates.
-
-
Click Next to select the targets for which you want to run the report. The Select Targets page is displayed.
-
Add the targets by selecting them from the list on the left and clicking Add to Target List, then click Next. The Select Packages page is displayed.
-
Select the packages by clicking them or click Select All, then click Next. The Summary page is displayed.
-
(Optional) Click Save Report to save the report for future use. This returns you to the Reports tab, where you can run the report by selecting it from the Saved Reports section and clicking Re-run Report.
-
Click Run Report. The report is displayed.
-
(Optional) Select the packages by clicking them or by clicking Select All, then click Install Package(s) to start a job to install them on the target.
-
(Optional) Click Export to CSV to export the report result.
-
Click Done to close the report.
Creating a Profile Report (Solaris)
The Profile report provides information about the system compliance with the OS Update Profiles that are defined in Enterprise Manager Ops center. The update profiles include both the system-defined and user-defined profiles in Enterprise Manager Ops Center.
Note:
You can avoid running reports for system-defined profiles like Perform Reboot+Reconfigure and Perform Reboot as these profiles do not contain any patches.You can modify the patch list that is applied to generate the report by selecting a white list and a black list.
A white list is the list of patches that you want to install. To establish a white list, create a profile using the Required setting. Select the white list either from the created profile or enter the patch IDs separated by new lines.
For example, baseline B includes patches X, Y, and Z, and the white list has patches U, V, and W. When your Baseline Analysis Report is created, the host is marked compliant only when all six patches (X, Y, Z, U, V, and W) are present.
A black list is a list of patches that you do not want them to be installed. You create a black list by creating a policy with the specified action for the patches. Select the black list either from the created policy or enter the patch IDs separated by new lines.
If a particular patch in the profile is set with the policy component setting as Never for the install action, then the patch is not installed. If the patch is already installed, it is not uninstalled or removed.
For example, if baseline A has patches X, Y, and Z, and the black list specifies only Y and Z, the system is compliant if X is installed. Even if the patches Y and Z are installed, they will not be uninstalled if you run a compliance job from the report results.
To Generate a Profile Report for Solaris OS
-
Select Reports from the Navigation pane.
-
Select Solaris/Linux OS Updates from the Reports section.
-
Select Create Profile Report from the Actions pane. The Create Profile Report wizard is displayed.
-
Define the report parameters:
-
Report Name – The name of the report.
-
Description – A description of the report.
-
Schedule – Select Create Schedule to schedule the report.
-
Output Format – Select the output format of the report result. CSV and PDF formats are available.
-
Select Targets – Add the targets by selecting them from the list of Available Items and clicking Add to Target List.
-
-
Click Next to select the profiles.
-
Select the profiles from the list and click Add or click Add All to select all the available profiles.
Figure 8-5 Selecting Profiles for Profile Analysis Report
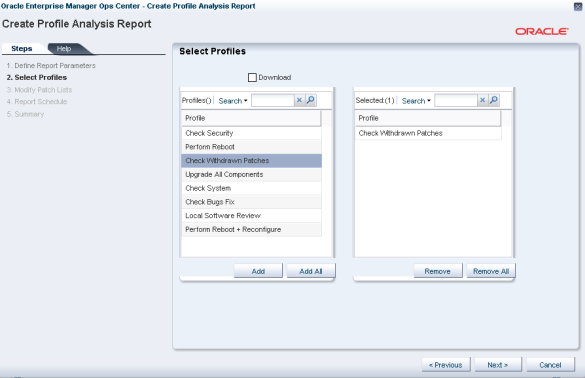
Description of "Figure 8-5 Selecting Profiles for Profile Analysis Report"
-
Select the Download option to download the patches that must be installed for the system compliance.
-
Click Next to modify the patch lists that are applied to the report.
-
Select a White List option:
-
None – No white list.
-
Manual Input – Enter a list of patches.
-
Specify with Profile – Select a profile to import as a white list.
-
-
Select a black list option:
-
None – No black list.
-
Manual Input – Enter a list of patches.
-
Specify with Policy – Select a policy to import as a black list.
-
-
Click Next to schedule the report.
-
Select a schedule for the report. You can schedule the report to run:
-
Immediately.
-
On a start date and time – Select a date and time to generate the report.
-
On a recurring schedule – Select the month and day when you want to generate the report. Select the Start Time, End Time and Number of Hours between runs. This is to set the number of times the report generated between the specified start and end time. For example, if you set the start time at 6.00 a.m, end time at 12.00 a.m and the number of hours between runs as 2, then the report is run at 6.00 a.m, 8.00 a.m, 10.00 a.m and 12.00 a.m.
-
-
Click Next to view the summary of the report.
-
Review the report parameters and select one of the options as required:
-
Save Template and Close – Saves the report as a template and closes the wizard. You can use the report template to generate the report later.
-
Run and Close – Runs the report and closes the wizard window.
-
The report result will be displayed under the Report Results in the center pane. See Viewing and Exporting Report Results for more information about viewing a report result and generating a compliance job from the result.
Creating a Recommended Software Configuration Report (Solaris)
The Recommended Software Configuration (RSC) report provides information about the system compliance for installing a specific application. The Knowledge Base provides a list of application configuration requirements with which you can check your system compliance status.
For example, you can check the system compliance status of Solaris OS for installing Oracle 11g Database. The report provides information about the packages and patches that must be installed, uninstalled, or upgraded for installing the Oracle database.
For a Solaris OS, you cannot upgrade a package component from the existing lower version to the recommended higher version. Such instances will be marked as Error in the RSC report result. In such scenarios, you cannot make the target system fully compliant with the recommended software components by the report.
You can generate different types of RSCs:
-
Agent-based
-
Database-based
In an agent-based RSC, the report is generated based on the information from the target system. The dependencies for the updates are checked and can be downloaded if required. This report takes time to generate because it checks dependencies and downloads patches that must be installed. In a database-based RSC, the report is generated based on the target system information that is available on the database of the Enterprise Controller. The dependencies are not checked and required patches are not downloaded. This type of report is generated quickly.
To Generate a Recommended Software Configuration Report
This report provides information about the system compliance for installing a specific application.
-
Select Reports from the Navigation pane.
-
Select Solaris/Linux OS Updates from the Reports section.
-
Select Create Recommended Software Configuration Report from the Actions pane. The Create Recommended Software Configuration Report wizard is displayed.
-
Define the report parameters:
-
Report Name – The name of the report.
-
Description – A description of the report.
-
Schedule – Select Create Schedule to schedule the report.
-
Output Format – Select the output format of the report result. CSV and PDF formats are available.
-
Select Targets – Add the targets by selecting them from the list of Available Items and clicking Add to Target List
-
-
Click Next to select the recommended software configurations.
-
In Select Recommended Software Configurations, select the following options:
-
Select either Run Against Database or Run Report Against Agent.
-
Select Download for Run Report Against Agent to download the patches that must be installed on the target.
-
Select the Distribution type.
-
Select the recommended software component from the list and select the required configuration. The recommended configuration describes the prerequisite list of patches and packages for the selected application. You can select targets of multiple distribution. For each distribution, select the corresponding RSCs. A warning message is displayed if you have not selected RSCs for a distribution.
Note:
If you have multiple distributions, then you must select RSCs for at least one distribution to continue further in the wizard. If you have not selected RSCs for a distribution, then the targets of that distribution will not be in the report result.
-
-
Click Next to schedule the report.
-
Select a schedule for the report. You can schedule the report to run:
-
Immediately.
-
On a start date and time – Select a date and time to generate the report.
-
On a recurring schedule – Select the month and day when you want to generate the report. Select the Start Time, End Time and Number of Hours between runs. This is to set the number of times the report generated between the specified start and end time. For example, if you set the start time at 6.00 a.m, end time at 12.00 a.m and the number of hours between runs as 2, then the report is run at 6.00 a.m, 8.00 a.m, 10.00 a.m and 12.00 a.m.
-
-
Click Next to view the summary of the report.
-
Review the report parameters and select one of the option as required:
-
Save Template and Close – Saves the report as a template and closes the wizard. You can use the report template to generate the report later.
-
Run and Close – Runs the report and closes the wizard window.
-
The report result will be displayed under the Report Results in the center pane. See Viewing and Exporting Report Results for more information about viewing a report result and generating a compliance job from the result.
Creating a Solaris Update Compliance Report
The Solaris Update Compliance report enables you to determine whether a specific Solaris system is compliant with a particular released Update.
To Generate a Solaris Update Compliance Report
-
Select Reports from the Navigation pane.
-
Select Additional Reports from the Reports section.
-
Select Solaris Update Compliance from the Actions pane. The Solaris Update Compliance Report wizard is displayed.
-
Specify the report parameters:
-
Name – The name of the report.
-
(Optional) Description – A description of the report.
-
Status – Select either Compliant or Not Compliant.
-
Updates – Select an update release against which the target asset is to be compared.
-
-
Click Next to select the target asset. The Select Targets page is displayed.
-
Add the targets by selecting them from the list on the left and clicking Add to Target List, then click Next. The Summary page is displayed.
-
(Optional) Click Save Report to save the report for future use. This returns you to the Reports tab, where you can run the report by selecting it from the Saved Reports section and clicking Re-run Report.
-
Click Run Report. The report is displayed.
-
(Optional) Click Export to CSV to export the report result.
-
Click Done to close the report.
Creating a Service Pack Compliance Report (Solaris)
The Service Pack Compliance report provides information about incidents created by the publication and release of a service pack by a vendor. This helps to determine whether the systems have the latest service packs that were released by the vendor.
To Generate a Service Pack Compliance Report for Solaris OS
-
Select Reports from the Navigation pane.
-
Select Additional Reports from the Reports section.
-
Select Service Pack Compliance from the Actions pane.
The Service Pack Compliance Report Creation Wizard is displayed.
-
Specify the report parameters:
-
Name – The name of the report.
-
(Optional) Description – A description of the report.
-
Status – Select either Compliant or Not Compliant.
-
Services – The services to be covered in the report.
-
-
Click Next.
The Select Targets page is displayed.
-
Add the targets by selecting them from the list and clicking Add to Target List, then click Next.
The Summary page is displayed.
-
(Optional) Click Save Report to save the report for future use. This returns you to the Reports tab, where you can run the report by selecting it from the Saved Reports section and clicking Re-run Report.
-
Click Run Report.
The report result is displayed.
-
(Optional) Click Export to CSV to export the report results.
-
Click Done to close the report.
Using the Linux OS Update Reports
Linux OS update reports enable you to check for new patches and security advisories. You can get a general report, or test a system or installed package for available fixes. For auditing, you can create a Change History report.
When you create a report, you select the criteria that are relevant to you, such as a list of hosts that have a specific patch or a list of hosts that do not have a specific patch.
You can generate the following reports for a Linux OS in Enterprise Manager Ops Center:
Creating a Change History Report (Linux)
The Linux OS Change History report provides a history of the install and uninstall actions taken on systems throughout Enterprise Manager Ops Center. This report also shows which user made the deployments, enabling you to track a team of operators. After your report criteria is selected, you can generate a report and save it as a template. The saved report template enables you to run the report again with the same specified parameters for the targeted systems, installation actions, and time period.
To Generate a Change History Report for Linux OS
-
Select Reports from the Navigation pane.
-
Select Solaris/Linux OS Updates from the Reports section.
-
Select Create Change History Report from the Actions pane. The Create Change History Report wizard is displayed.
-
Define the report parameters:
-
Report Name – The name of the report.
-
Description – A description of the report.
-
Date Range – Enter the start date and end date for the report.
-
Actions – Select the actions that you want to be reported. You can select install, uninstall, or both.
-
Schedule – Select Create Schedule to schedule the report.
-
Output Format – Select the output format of the report result. CSV and PDF formats are available.
-
Select Targets – Add the targets by selecting them from the list of Available Items and clicking Add to Target List.
-
-
Click Next to schedule the report.
-
Select a schedule for the report. You can schedule the report to run:
-
Immediately.
-
On a start date and time – Select a date and time to generate the report.
-
On a recurring schedule – Select the month and day when you want to generate the report. Select the Start Time, End Time and Number of Hours between runs. This is to set the number of times the report generated between the specified start and end time. For example, if you set the start time at 6.00 a.m, end time at 12.00 a.m and the number of hours between runs as 2, then the report is run at 6.00 a.m, 8.00 a.m, 10.00 a.m, and 12.00 a.m.
-
-
Click Next to view the summary of the report.
-
Review the report parameters and select one of the options as required:
-
Save Template and Close – Saves the report as a template and closes the wizard. You can use the report template to generate the report later.
-
Run and Close – Runs the report and closes the wizard window.
-
The report result is displayed under the Report Results in the center pane. See Viewing and Exporting Report Results for more information about viewing a report result.
Creating a CVE Report (Linux)
The CVE report provides information about incidents that are related to specific CVE IDs and the systems that must have these incidents installed. Common Vulnerability and Exposure Identifiers (CVE IDs) are unique, common identifiers for publicly known security vulnerabilities. The patches and packages from a list of vendors are published as common vulnerabilities and security exposure incidents. CVEs are identified by a candidate ID (CAN ID).
To Generate a CVE Report for Linux OS
-
Select Reports from the Navigation pane.
-
Select Solaris/Linux OS Updates from the Reports section.
-
Select Create CVE Report from the Actions pane. The Create CVE Report wizard is displayed.
-
Define the report parameters:
-
Report Name – The name of the report.
-
Description – A description of the report.
-
Compliance – Select either compliant or non-compliant report.
-
Schedule – Select Create Schedule to schedule the report.
-
Output Format – Select the output format of the report result. CSV and PDF formats are available.
-
Select Targets – Add targets by selecting them from the list of Available Items and clicking Add to Target List.
-
-
Click Next to select the CAN IDs.
-
Select the CAN IDs and click Add or click Add All to select all the available CAN IDs.
-
Click Next to schedule the report.
-
Select a schedule for the report. You can schedule the report to run:
-
Immediately.
-
On a start date and time – Select a date and time to generate the report.
-
On a recurring schedule – Select the month and day when you want to generate the report. Select the Start Time, End Time and Number of Hours between runs. This is to set the number of times the report generated between the specified start and end time. For example, if you set the start time at 6.00 a.m, end time at 12.00 a.m and the number of hours between runs as 2, then the report is run at 6.00 a.m, 8.00 a.m, 10.00 a.m, and 12.00 a.m.
-
-
Click Next to view the summary of the report.
-
Review the report parameters and select one of the options as required:
-
Save Template and Close – Saves the report as a template and closes the wizard. You can use the report template to generate the report later.
-
Run and Close – Runs the report and closes the wizard window.
-
The report result is displayed under the Report Results in the center pane. See Viewing and Exporting Report Results for more information about viewing a report result and generating a compliance job from the result.
Creating a Distribution Update Report (Linux)
The Distribution Update report provides a mapping between selected updates, packages, and CVEs and selected distributions so that you can find out whether the updates are installed. This report shows whether a specific distribution has been updated with specific updates, packages, or CVEs.
To Generate a Distribution Update Report for Linux OS
-
Select Reports from the Navigation pane.
-
Select Additional Reports from the Reports section.
-
Select Distribution Update Report from the Actions pane. The Distribution Update Report Creation Wizard is displayed.
-
Specify the report parameters:
-
Name – The name of the report.
-
(Optional) Description – A description of the report.
-
Category – Select one or more of the following:
-
Security
-
Bug fix
-
Enhancement
-
Service pack
-
Solaris update
-
CD
-
-
Type – Select package, update or both.
-
Release Date – Select a start date and end date between which the update was released.
-
-
Click Next to specify the distribution. The Specify Distributions page is displayed.
-
Select the distributions by clicking them and clicking Add or by clicking Add All, then click Next. The Select Updates page is displayed.
-
Select the updates by clicking them or clicking Select All, then click Next. The Select Packages page is displayed.
-
Select the packages by clicking them or clicking Select All, then click Next. The Select CVE page is displayed.
-
Select the CVEs by clicking them or clicking Select All, then click Next. The Summary page is displayed.
-
(Optional) Click Save Report to save the report for future use. This returns you to the Reports tab, where you can run the report by selecting it from the Saved Reports section and clicking Re-run Report.
-
Click Run Report. The report result is displayed.
-
(Optional) Click Export to CSV to export the report result.
-
Click Done to close the report.
Creating a Host Compliance Report (Linux)
You can run a host compliance report to check whether the systems are complaint with security and bug fix incidents.
To Generate a Host Compliance Report for Linux OS
-
Select Reports from the Navigation pane.
-
Select Solaris/Linux OS Updates from the Reports section.
-
Select Create Host Compliance Report from the Actions pane. The Create Host Compliance Report wizard is displayed.
-
Define the report parameters:
-
Report Name – The name of the report.
-
Description – A description of the report.
-
Update Level – Select whether you want the compliant status for Security and Bug Fixes or for only Security Updates.
-
Compliance – Select either Compliant or Non-Compliant.
-
Schedule – Select Create Schedule to schedule the report.
-
Output Format – Select the output format of the report result. CSV and PDF formats are available.
-
Select Targets – Add the targets by selecting them from the list of Available Items and clicking Add to Target List.
-
-
Click Next to schedule the report.
-
Select a schedule for the report. You can schedule the report to run:
-
Immediately.
-
On a start date and time – Select a date and time to generate the report.
-
On a recurring schedule – Select the month and day when you want to generate the report. Select the Start Time, End Time and Number of Hours between runs. This is to set the number of times the report generated between the specified start and end time. For example, if you set the start time at 6.00 a.m, end time at 12.00 a.m and the number of hours between runs as 2, then the report is run at 6.00 a.m, 8.00 a.m, 10.00 a.m, and 12.00 a.m.
-
-
Click Next to view the summary of the report.
-
Review the report parameters and select one of the options as required:
-
Save Template and Close – Saves the report as a template and closes the wizard. You can use the report template to generate the report later.
-
Run and Close – Runs the report and closes the wizard window.
-
The report result is displayed under the Report Results in the center pane. See Viewing and Exporting Report Results for more information about viewing a report result and generating a compliance job from the result.
Creating an Incident Compliance Report (Linux)
Incidents are the patches that are available for an application or feature. Incidents apply to one or more RPMs.
You can run an incident compliance report to check whether the incidents on the managed assets are compliant with the latest released version.
To Create an Incident Compliance Report for Linux OS
-
Select Reports from the Navigation pane.
-
Select Solaris/Linux OS Updates from the Reports section.
-
Select Create Incident Report from the Actions pane. The Create Incident Compliance Report wizard is displayed.
-
Define the report parameters:
-
Report Name – The name of the report.
-
Description – A description of the report.
-
Criteria – Select the criteria for selecting the patches that will be used as a comparison. Depending on the selection of criteria the wizard steps vary. You can select Select Updates or Filter Updates.
-
Compliant – Select either Compliant or Non-compliant for compliance status.
-
Schedule – Select Create Schedule to schedule the report.
-
Output Format – Select the output format of the report result. CSV and PDF formats are available.
-
Select Targets – Add the targets by selecting them from the list of Available Items and clicking Add to Target List.
-
-
Click Next to select the updates.
-
If you have selected Select Updates in the previous step, the list of available incidents is displayed. Select the incidents and click Add or click Add All to select all the listed incidents.
-
If you have selected Filter Updates in the first step, then select the following:
-
Select Packages – You can select the packages based on the Category, Update Type and Releases date. Select the packages and click Add or click Add All to select all the packages in the Available Packages. Click Next to select the CAN IDs.
-
Select CAN IDs – Select from the list of Available CAN IDs. Click Add or Add All as required.
-
-
Click Next to schedule the report.
-
Select a schedule for the report. You can schedule the report to run:
-
Immediately.
-
On a start date and time – Select a date and time to generate the report.
-
On a recurring schedule – Select the month and day when you want to generate the report. Select the Start Time, End Time and Number of Hours between runs. This is to set the number of times the report generated between the specified start and end time. For example, if you set the start time at 6.00 a.m, end time at 12.00 a.m and the number of hours between runs as 2, then the report is run at 6.00 a.m, 8.00 a.m, 10.00 a.m, and 12.00 a.m.
-
-
Click Next to view the summary of the report.
-
Review the report parameters and select one of the options as required:
-
Save Template and Close – Saves the report as a template and closes the wizard. You can use the report template to generate the report later.
-
Run and Close – Runs the report and closes the wizard window.
-
The report result is displayed under the Report Results in the center pane. See Viewing and Exporting Report Results for more information about viewing a report result and generating a compliance job from the result.
Creating a Package Compliance Report (Linux)
The Package Compliance report provides information about the selected packages on the managed system and shows whether the system is compliant with the latest recommended version available.
To Generate a Package Compliance Report for Linux OS
-
Select Reports from the Navigation pane.
-
Select Additional Reports from the Reports section.
-
Select Package Compliance Report from the Actions pane. The Package Compliance Report Creation Wizard is displayed.
-
Specify the report parameters:
-
Name – The name of the report.
-
Description – A description of the report.
-
Status – The compliance status that the report will cover. Select either Compliant or Not Compliant.
-
Level – Select Security Updates or Security and Bug Updates.
-
-
Click Next to select the targets for which you want to run the report. The Select Targets page is displayed.
-
Add the targets by selecting them from the list on the left and clicking Add to Target List, then click Next. The Select Packages page is displayed.
-
Select the packages by clicking them or click Select All, then click Next. The Summary page is displayed.
-
(Optional) Click Save Report to save the report for future use. This returns you to the Reports tab, where you can run the report by selecting it from the Saved Reports section and clicking Re-run Report.
-
Click Run Report. The report is displayed.
-
(Optional) Select the packages by clicking them or by clicking Select All, then click Install Package(s) to start a job to install them on the target.
-
(Optional) Click Export to CSV to export the report result.
-
Click Done to close the report.
Creating a Profile Report (Linux)
The Profile report provides information about the system compliance with the OS Update Profiles that are defined in Enterprise Manager Ops center. The Update Profiles include both the system-defined and user-defined profiles in Enterprise Manager Ops Center.
Note:
You can avoid running reports for system-defined profiles like Perform Reboot+Reconfigure and Perform Reboot as these profiles do not contain any RPMs.You can modify the RPM list that are applied to generate the report by selecting a white list and a black list.
A white list is the list of RPMs that you want to install. To create a white list, create a profile using the Required setting. Select the white list either from the created profile or enter the RPMs separated by new lines.
A black list is a list of RPMs that you do not want them to be installed. You create a black list by creating a policy with the specified action for the RPMs. Select the black list either from the created policy or enter the RPMs separated by new lines.
If a particular RPM in the profile is set with the policy component setting as Never for the install action, then the RPM will not be installed. If the RPM is already installed, it will not be uninstalled or removed.
To Generate a Profile Report for Linux OS
-
Select Reports from the Navigation pane.
-
Select Solaris/Linux OS Updates from the Reports section.
-
Select Create Profile Report from the Actions pane. The Create Profile Report wizard is displayed.
-
Define the report parameters:
-
Report Name – The name of the report.
-
Description – A description of the report.
-
Schedule – Select Create Schedule to schedule the report.
-
Output Format – Select the output format of the report result. CSV and PDF formats are available.
-
Select Targets – Add the targets by selecting them from the list of Available Items and clicking Add to Target List.
-
-
Click Next to select the profiles.
-
Select the profiles from the list and click Add or click Add All to select all the available profiles.
-
Select the Download option to download the RPMs that must be installed for the system compliance.
-
Click Next to modify the RPM lists that are applied to the report.
-
Select a White List option:
-
None – No white list.
-
Manual Input – Enter the list of RPMs.
-
Specify with Profile – Select a profile to import as a white list.
-
-
Select a black list option:
-
None – No black list.
-
Manual Input – Enter the list of RPMs.
-
Specify with Policy – Select a policy to import as a black list.
-
-
Click Next to schedule the report.
-
Select a schedule for the report. You can schedule the report to run:
-
Immediately.
-
On a start date and time – Select a date and time to generate the report.
-
On a recurring schedule – Select the month and day when you want to generate the report. Select the Start Time, End Time and Number of Hours between runs. This is to set the number of times the report generated between the specified start and end time. For example, if you set the start time at 6.00 a.m, end time at 12.00 a.m and the number of hours between runs as 2, then the report is run at 6.00 a.m, 8.00 a.m, 10.00 a.m, and 12.00 a.m.
-
-
Click Next to view the summary of the report.
-
Review the report parameters and select one of the options as required:
-
Save Template and Close – Saves the report as a template and closes the wizard. You can use the report template to generate the report later.
-
Run and Close – Runs the report and closes the wizard window.
-
The report result is displayed under the Report Results in the center pane. See Viewing and Exporting Report Results for more information about viewing a report result and generating a compliance job from the result.
Creating a Recommended Software Configuration Report (Linux)
The Recommended Software Configuration (RSC) report provides information about the system compliance for installing a specific application. The Knowledge Base provides a list of application configuration requirements for which you can check your system compliance status.
For example, you can check the system compliance status of Oracle Linux OS for installing Oracle 11g Database. The report provides information about the RPMs that must be installed, uninstalled or upgraded for installing Oracle Database.
You can generate different types of RSCs:
-
Agent-based
-
Database-based
In an agent-based RSC, the report is generated based on the information from the actual target system. The dependencies for the updates are verified and can be downloaded if required. This report takes time to generate because it checks for dependencies and downloads RPMs that must be installed. In a database-based RSC, the report is generated based on the target system information that is available on the database of the Enterprise Controller. The dependencies are not verified and required RPMs are not downloaded. This type of report is generated quickly.
To Generate a Recommended Software Configuration Report
This report provides information about the system compliance for installing a specific application.
-
Select Reports from the Navigation pane.
-
Select Solaris/Linux OS Updates from the Reports section.
-
Select Create Recommended Software Configuration Report from the Actions pane. The Create Recommended Software Configuration Report wizard is displayed.
-
Define the report parameters:
-
Report Name – The name of the report
-
Description – A description of the report
-
Schedule – Select Create Schedule to schedule the report
-
Output Format – Select the output format of the report result. CSV and PDF formats are available.
-
Select Targets – Add the targets by selecting them from the list of Available Items and clicking Add to Target List
-
-
Click Next to select the recommended software configurations.
-
In the Select Recommended Software Configuration(s) step, select the following options:
-
Either Run Against Database or Run Report Against Agent.
-
Download for Run Report Against Agent to download the RPMs that must be installed on the target.
-
The Distribution type.
-
The recommended software component from the list and select the required configuration. The recommended configuration describes the prerequisite list of RPMs for the selected application. You can select targets of multiple distribution. For each distribution, select the corresponding RSCs. A warning message is displayed if you have not selected RSCs for a distribution.
Note:
If you have multiple distributions, then you must select RSCs for at least one distribution to continue further in the wizard. If you have not selected RSCs for a distribution, then the targets of that distribution will not be in the report result.
-
-
Click Next to schedule the report.
-
Select a schedule for the report. You can schedule the report to run:
-
Immediately.
-
On a start date and time – Select a date and time to generate the report.
-
On a recurring schedule – Select the month and day when you want to generate the report. Select the Start Time, End Time and Number of Hours between runs. This is to set the number of times the report generated between the specified start and end time. For example, if you set the start time at 6.00 a.m, end time at 12.00 a.m and the number of hours between runs as 2, then the report is run at 6.00 a.m, 8.00 a.m, 10.00 a.m, and 12.00 a.m.
-
-
Click Next to view the summary of the report.
-
Review the report parameters and select one of the options as required:
-
Save Template and Close – Saves the report as a template and closes the wizard. You can use the report template to generate the report later.
-
Run and Close – Runs the report and closes the wizard window.
-
The report result is displayed under the Report Results in the center pane. See Viewing and Exporting Report Results for more information about viewing a report result and generating a compliance job from the result.
Creating a Service Pack Compliance Report (Linux)
This report provides information on incidents created by the publication and release of a service pack by a vendor. This helps to determine whether the systems have the latest service packs that were released by the vendor.
To Generate a Service Pack Compliance Report for Linux OS
-
Select Reports from the Navigation pane.
-
Select Additional Reports from the Reports section.
-
Select Service Pack Compliance from the Actions pane.
The Service Pack Compliance Report Creation Wizard is displayed.
-
Specify the report parameters. They include:
-
Name – A name for the report.
-
(Optional) Description – A description of the report.
-
Status – The compliance status that the report will cover. Select either Compliant or Not Compliant.
-
Services – The services to be covered in the report.
-
-
Click Next.
The Select Targets page is displayed.
-
Add one or more targets by selecting them in the list and clicking Add to Target List, then click Next.
The Summary page is displayed.
-
(Optional) Click Save Report to save the report for future use. This returns you to the Reports tab, where you can run the report by selecting it from the Saved Reports section and clicking Re-run Report.
-
Click Run Report.
The report result is displayed.
-
(Optional) Click Export to CSV to export the report results.
-
Click Done to close the report.
Windows OS Update Reports
Compliance reports provide information about Windows systems that are compliant with the Windows updates incidents. You can get a report on the number of applicable Windows updates for each system. You can also get a report that shows the number of systems to which the selected Windows updates apply.
When you create a report, you select the criteria that are relevant to you, such as Category, Severity, Superseded, and Release Date of the update patches. You can also select specific updates on which to run the compliance reports.
You can create a Windows update job from the results of the compliance reports. See Creating an Update Job for Windows OS for information about how to create an update job from the report results.
The following reports are available:
-
Creating a Windows Host Compliance Report – Provides information about the applicable Windows updates.
-
Creating a Windows Incident Compliance Report – Provides information about the number of systems to which the selected Windows updates apply.
Creating a Windows Host Compliance Report
The Host Compliance Report provides information about whether your systems are compliant with the Windows updates incidents. This report shows the number of Windows updates that are applicable to each system, and whether the updates are already installed or must be installed to make the system compliant. You can also create a Windows update job based on the results of a Host Compliance Report.
To Create a Host Compliance Report for Windows Updates
-
Select Reports from the Navigation pane.
-
Select Windows Host Compliance Report from the Actions pane. The Windows Host Compliance Report wizard is displayed.
-
Specify the report parameters. They include:
-
Report Name – A name for the report.
-
(Optional) Description – A description of the report.
-
Specify the Windows OS updates on which to run the report. You can specify filter criteria such as Category, Severity, Superseded, and Release Date for Windows OS updates, or you can select specific Windows OS updates to run the report.
-
-
Click Next. Based on your selection in Step 4, either the Define Updates Filter window is displayed or the Select Updates window is displayed. If the Define Updates Filter window is displayed, go to Step 6. If the Select Updates window is displayed, proceed to Step 7.
-
Make your selections in the Define Updates Filter screen. They include:
-
Category – Includes Application, Critical Updates, Definition Updates, Drivers, Service Packs, Security Updates, Tools, Update Rollups, and WSUS Infrastructure Updates. You can select either All available updates under all category or Selected categories only. Use the Control key on the keyboard to select multiple items in the list under Selected category only.
-
Severity – Includes Critical, Important, Moderate, Low, and Default. You can select either All updates with any severity or Selected severities only. Use the Ctrl key on the keyboard to select multiple items in the list under Severity.
-
Superseded – Enables you to select all or just the most recent updates.
-
Release Date – Refers to the date that the update patches were released. You can select the range of release dates that you want to include in your report by filling in the From and To fields. Click Next. Go to Step 8.
-
-
Make your selections in the Select Updates window. Under Search, Select All enables you to include a bulletin ID, article ID, and title in your search, or you can select specific fields to narrow your search. Use the Control key on the keyboard to make multiple selections in the list under Available Windows Software Updates. Click Add to Updates List, then. Click Next.
-
Add the targets by selecting them from the list of Available Items. Click Add to Target List, then click Next. The Summary page is displayed.
-
(Optional) Click Save as Template to save the parameters of the report as a template for future use. After you click Save as Template, you will not have the option of returning to the previous steps. The Save as Template button and the Previous button will be grayed, and the only two options that you will have is to either click Finish or Cancel. After a template is saved, you can view, delete, edit, or run the report from Report Templates.
-
Click Finish to run the report. The results of the report are displayed under Report Results list.
Creating a Windows Incident Compliance Report
The Incident Compliance Report provides information about whether your systems are compliant with the Windows updates incidents. This report shows the number of systems to which the selected Windows updates apply, how many systems have the updates installed, and how many systems require the updates to be installed to make the systems compliant. You can create a Windows update job based on the results of an Incident Compliance Report.
To Create an Incident Compliance Report for Windows Updates
-
Select Reports from the Navigation pane.
-
Select Windows Incident Compliance Report from the Actions pane. The Windows Incident Compliance Report wizard is displayed.
-
Specify the report parameters. They include:
-
Report Name – The name of the report.
-
(Optional) Description – A description of the report.
-
Specify the Windows OS updates on which to run the report – You can specify filter criteria such as Category, Severity, Superseded, and Release Date for Windows OS updates, or you can select specific Windows OS updates to run the report.
-
-
Click Next. Based on your selection in Step 4, either the Define Updates Filter window is displayed or the Select Updates window is displayed. If the Define Updates Filter window is displayed, go to Step 6. If the Select Updates window is displayed, go to Step 7.
-
Make your selections in the Define Updates Filter screen. They include:
-
Category – Includes Application, Critical Updates, Definition Updates, Drivers, Service Packs, Security Updates, Tools, Update Rollups, and WSUS Infrastructure Updates. You can select either All available updates under all category or Selected categories only. Use the Control key on the keyboard to select multiple items in the list under Selected category only.
-
Severity – Includes Critical, Important, Moderate, Low, and Default. You can select either All updates with any severity or Selected severities only. Use the Ctrl key on the keyboard to select multiple items in the list under Severity.
-
Superseded – Enables you to select all or just the most recent updates.
-
Release Date – Refers to the date that the update patches were released. You can select the range of release dates that you want to include in your report by filling in the From and To fields. Click Next. Go to Step 8.
-
-
Make your selections in the Select Updates window. Under Search, Select All enables you to include a bulletin ID, article ID, and title in your search, or you can select specific fields to narrow your search. Use the Control key on the keyboard to make multiple selections in the list under Available Windows Software Updates. Click Add to Updates List, then. Click Next.
-
Add the targets by selecting them in the list of Available Items. Click Add to Target List, then click Next. The Summary page is displayed.
-
(Optional) Click Save as Template to save the parameters of the report as a template for future use. After you click Save as Template, you will not have the option of returning to the previous steps. The Save as Template button and the Previous button will be grayed, and the only two options that you will have is to either click Finish or Cancel. After a template is saved, you can view, delete, edit, or run the report from Report Templates.
-
Click Finish to run the report. The results of the report are displayed under the Report Results list.
Creating a System Information Report
You can run a system information report to obtain the information about different resource types such as OS, server, chassis, logical domains, global zone, non-global zone, and M-Series server.
To Generate a System Information Report
-
Select Reports from the Navigation pane.
-
Select System Information Reports from the Reports section.
-
Select Create System Information Report from the Actions pane. The Create System Information Report wizard is displayed.
-
Define the report parameters. They include:
-
Report Name – A name for the report.
-
Description – A description of the report.
-
Resource Type – Select a resource type from the list. You can select the following types:
-
Operating system
-
Non-global zone
-
Server
-
Chassis
-
M-Series server
-
Global zone
-
Logical domain
-
-
Schedule – Select Create Schedule to schedule the report.
-
Output Format – Select the output format of the report result. The CSV and PDF formats are available.
-
Select Targets – Add one or more targets by selecting them in the list of Available Items and clicking Add to Target List.
-
-
Click Next to select the attributes. Depending on the type of resource selected in the previous step, the resource attributes are listed.
-
Select one or more attributes from the list and click Add or click Add All to choose all the attributes listed.
-
Click Next to set filters for the attributes.
-
Select the attribute for which you want to set the filter and specify the condition for the attribute. The attribute filter is taken care when generating the report.
-
Click the Add icon to set filters for other attributes.
-
Click Next to schedule the report.
-
Select a schedule for the report. You can schedule the report to run:
-
Immediately.
-
On a start date and time – Select a date and time to generate the report.
-
On a recurring schedule – Select the month and day when you want to generate the report. Select the Start Time, End Time and Number of Hours between runs. This is to set the number of times the report generated between the specified start and end time. For example, if you set the Start Time at 6.00 AM, End Time at 12.00 AM and the Number of hours between runs as 2, then the report is run at 6.00 AM, 8.00 AM, 10.00 AM and 12.00 AM.
-
-
Click Next to view the summary of the report.
-
Review the report parameters and select one of the option as required:
-
Save Template and Close – Saves the report as a template and closes the wizard. You can use the report template to generate the report later.
-
Run and Close – Runs the report and closes the wizard window.
-
The report result will be displayed under the Report Results in the center pane. Refer to Viewing and Exporting Report Results for more information about viewing a report result and generating a compliance job from the result.
Viewing and Exporting Report Results
Enterprise Manager Ops Center provides an interactive result viewer to view the results. The generated report results are displayed under the Report Results in the All Reports page. All the reports results are displayed. Select the report for which you want to view the result.
You can view and save the report results in CSV or PDF formats.
Viewing the Report Result
-
Select Reports in the Navigation pane. The All Reports page in the center pane displays all the report templates and report results.
-
Select a report result under the Report Result section in the center pane.
-
Click the Interactive icon to view the report result. The Interactive Result viewer opens the report result and displays the following information:
-
Report details – The name, type, run time and the status of the report are displayed.
-
Report Result – The targets on which the report was run and the corresponding OS updates applicable are displayed.
-
Report Parameters – The parameters that were used to generate the report are displayed.
-
Saving the Report Result
-
Select Reports in the Navigation pane. The All Reports page in the center pane displays all the report templates and report results.
-
Select a report result under the Report Result section in the center pane.
-
Click the View CSV or View PDF icon. You can save or open the report in CSV or PDF formats.
Adding a Summary Row to a Black List
-
Select Reports in the Navigation pane. The All Reports page in the center pane displays all the report templates and report results.
-
Select a report result under the Report Result section in the center pane.
-
Click the Interactive icon to view the report result.
-
Select a target from the list of targets on which the report was run.
-
Click the Add Summary Row to Black List icon. The target and the applicable updates for the corresponding target are strike out from the list. Also, this list will be excluded from the OS update job that is initiated from the result using the Make Targets Compliant option.
Adding a Detail Row to a Black List
-
Select Reports in the Navigation pane. The All Reports page in the center pane displays all the report templates and report results.
-
Select a report result under the Report Result section in the center pane.
-
Click the Interactive icon to view the report result.
-
Select a target from the list of targets on which the report was run. The corresponding applicable OS updates are listed.
-
Select the updates that you want to exclude from the list. Use the Shift and Ctrl keys to select multiple updates.
-
Click the Add Detail Row to Black List icon. The selected targets are strike out from the list and will be excluded from the OS update job that is initiated from the result using the Make Targets Compliant option.
Removing a Summary or Details Row From a Black List
-
Select Reports in the Navigation pane. The All Reports page in the center pane displays all the report templates and report results.
-
Select a report result under the Report Result section in the center pane.
-
Click the Interactive icon to view the report result.
-
Select the black listed target or the updates.
-
Click the Remove Summary Row From Black List or Remove Detail Row From Black List icon. The strike outs on the target or updates are removed.
Managing Report Templates
Enterprise Manager Ops Center enables you to manage the saved templates of the reports:
-
You can edit a report template.
-
You can run a report from a template.
-
You can delete a report template
This sections describes how to edit, run and delete a report from a report template.
Editing a Report Template
-
Select Reports from the Navigation pane.
-
Select a saved report template from the center pane.
-
Click the Edit View icon to edit the selected report template. The corresponding report wizard is displayed.
-
Edit the report parameters as required in the wizard.
-
Either click Run and Close to run the report or click Save Template and Close to save the report template. When you click Run and Close, the report is generated but the edits for the report are not saved.
Generating a Report from Report Template
-
Select Reports from the Navigation pane.
-
Select a saved report template from the center pane.
-
Click the Generate Report icon to run the report. The corresponding report is generated and the results will be displayed under Report Results.