Release 12.1 (12.1.1)
Part Number E12842-04
Contents
Previous
Next
| Oracle E-Business Suite Installation Guide: Using Rapid Install Release 12.1 (12.1.1) Part Number E12842-04 | Contents | Previous | Next |
Certain tasks are necessary to finish a new installation, an upgrade, or a technology stack installation for Oracle E-Business Suite Release 12. There are also other tasks that may be required only for systems with specific functionality. This chapter discusses required and conditional tasks.
This chapter covers the following topics:
The tasks in this section are required to complete the installation process that was started by running Rapid Install. You must complete every task in this section.
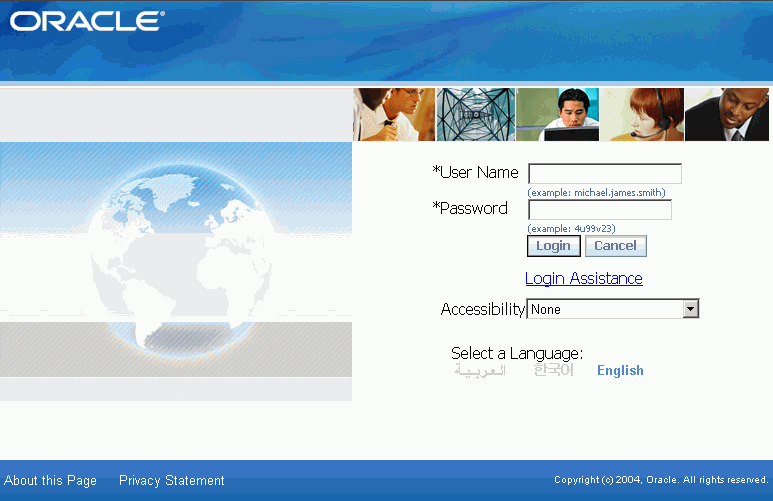
You log in to Oracle E-Business Suite by specifying the Oracle E-Business Suite Login page URL in a web browser and supplying the relevant credentials.
Important: The Rapid Install Portal is obsolete. Its features are all still available via other routes; for example, you can access Oracle Applications Manager (OAM) functions by selecting the System Administrator responsibility.
From the Oracle E-Business Suite Login page, you can access the E-Business Suite Home Page, which provides a single point of access to HTML-based applications, forms-based applications, and Business Intelligence applications. You access the Oracle E-Business Suite Login page from the following URL:
http://<host name>.<domain name>:<HTTP port>/OA_HTML/AppsLoginFor example:
http://apps1.company.com:8000/OA_HTML/AppsLoginOnce the connection has been made, the Oracle E-Business Suite Login page appears. Enter a suitable username and password. For example, SYSADMIN is a privileged account that has System Administrator responsibility. The default password for this account is also SYSADMIN. Then and click Login.
Oracle E-Business Suite Login Page
After your credentials have been validated, the Oracle E-Business Suite Home Page Oracle appears. From this page you can access responsibilities for any of the individual Oracle E-Business Suite products your organization has licensed.
Oracle E-Business Suite Home Page
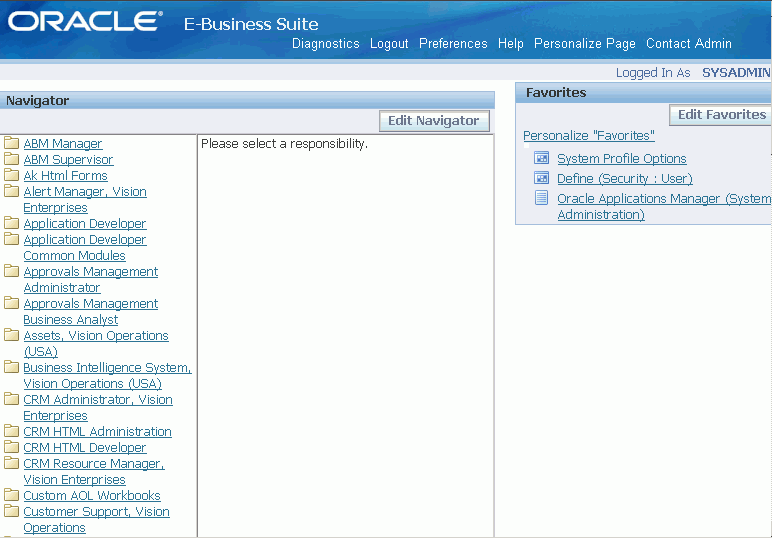
The system administrator should log in using the SYSADMIN account mentioned above, and use the System Administrator responsibility to launch an Applications Forms session and perform further implementation steps.
Note: See Oracle E-Business Suite System Administrator’s Guide - Security for details.
The default passwords for the SYSTEM and SYS accounts for the Oracle E-Business Suite database are manager and change_on_install, respectively. To maintain database security and restrict access to these accounts, you should change these passwords without delay, ensuring that your choices meet your organization's security requirements. The password for both SYS and SYSTEM in the Vision Demo is manager.
You should also change the default passwords for the Oracle E-Business Suite product accounts in your production and test databases.
Note: See Applications DBA Duties in Oracle E-Business Suite System Administrator’s Guide - Configuration.
The current init<SID>.ora default settings allow for a maximum of 100 connections. However, after the standard setup is complete, only a few users can be connected because of the connections used by the concurrent managers, AQ workers, and job queues.
The relevant database initialization parameters are listed in My Oracle Support Knowledge Document Note 396009.1, Database Initialization Parameters for Oracle Applications Release 12. Refer to this document when planning to update parameter settings to meet the specific requirements of your system.
Important: This post-installation task applies both to new Release 12.1.1 customers and customers upgrading to this release.
Review My Oracle Support Knowledge Document 437878.1, Upgrading OracleAS 10g Forms and Reports in Oracle E-Business Suite Release 12, and compare your Oracle Application Server 10g (10.1.2.3) opatch inventory with the patches listed in Step 2.1.2, Download Additional Patches of Section 2, Pre-Installation Steps in that document.
Most of the patches listed in that step are included with the Release 12.1.1 Rapid Install. However, some recently-added patches are not included. You should apply any missing patches manually, and perform the tasks listed in Section 4, Post-Installation Steps, of the same document. You are also advised to review Section 5, Known Issues.
In addition to these steps, you should also redeploy the formsapp.ear file by following the instructions given in My Oracle Support Knowledge Document 397174.1, Deploying a New Forms EAR File in Oracle Applications Release 12.
Critical Patch Update (CPU) content is included with Oracle E-Business Suite Release 12.1.1 Rapid Install as follows:
| Product | Critical Patch Update (Quarter) | My Oracle Support Knowledge Document |
|---|---|---|
| Oracle Database 11g Release 1 (11.1.0.7) | January 2009 | 738923.1 |
| Oracle Application Server 10g Release 2 (OracleAS 10.1.2.3) | October 2008 | 738921.1 |
| Oracle Application Server 10g Release 3 (OracleAS 10.1.3.4) | October 2008 | 738921.1 |
| Oracle E-Business Suite Release 12.1.1 | April 2009 | 787703.1 |
Important: Oracle strongly recommends that you apply the latest available CPU patches for each product after you install Oracle E-Business Release 12.1.1.
As well as applying the appropriate patches, you should also review the recommended security practices described in My Oracle Support Knowledge Document 403537.1, Best Practices for Securing Oracle E-Business Suite Release 12.
In particular, if you have any computers that require direct access to the Oracle E-Business Suite database, but are not registered nodes in AutoConfig (such as OAM clients), you must explicitly grant access as described in the Oracle TNS Listener Security chapter of that document.
The temporary directory on your database server for log and output files from PL/SQL concurrent programs is set to /usr/tmp (UNIX) or C:\TEMP (Windows) by default. This value is specified in the utl_file_dir parameter of the database initialization file, and assigned to the APPLPTMP environment variable. As the temporary files placed in this directory may contain sensitive information, it should have suitably restricted access, such as read and write access for the account that owns the database.
Enter your choice of directory as the new value for utl_file_dir in the database initialization parameter file. Then use the edit AutoConfig parameters feature of Oracle Applications Manager to update the APPLPTMP variable in the Applications context file with the new utl_file_dir directory location. Finally, run AutoConfig to recreate the environment files.
Depending on which products or country-specific functionality you plan to use in your installation, you may need to perform additional tasks or apply additional patches. Refer to the individual product or country-specific implementation manuals, user’s guides, or My Oracle Support for details.
The connection between the client and the E-Business Suite forms is provided through an applet in the client Web browser.
Note: For a list of Web browsers supported for use with Oracle E-Business Suite Release 12, see My Oracle Support Knowledge Document 389422.1, Recommended Browsers for Oracle Applications 12.
Instead of using the browser’s own JVM, Oracle E-Business Suite Release 12 uses the Sun Java Runtime Engine (JRE). This component is invoked when a user accesses a function that requires it, such as running a form. If the JRE Plug-in has not already been installed, the browser prompts the user to download the required installation executable. JRE replaces Oracle JInitiator, which was used in Release 11i.
Note: For further details of using JRE with Oracle E-Business Suite, see My Oracle Support Knowledge Document 393931.1, Upgrading JRE Plugin with Oracle Applications R12.
To register printers in the Printers form of Oracle E-Business Suite, the system administrator must know each printer’s operating system name. To determine the names, do the following:
At the command prompt, enter:
$ lpstat -pClick on Printers and Faxes in the Start menu.
The concurrent manager starts by default under the internal SYSTEM account. This account does not have access to network printing devices. To run reports using the concurrent manager, complete the following steps:
Log in to a user account that has administrative privileges.
From the Services menu, highlight the Oracle Concurrent Manager service (OracleConcMgr<SID>, where <SID> is the database SID), and click Startup. In the Log in As section, select This Account, and enter the username and password used to start the concurrent manager. Then click OK.
Repeat the actions in Step 2 for the Oracle TNS Listener service.
Using the Add Printer option, define a printer for the account that was used in Steps 2 and 3.
Reboot the system to allow the changes to take effect.
Note: For more information about setting up printers, see Oracle E-Business Suite System Administrator’s Guide - Configuration.
You should be familiar with all the relevant sections of the three-volume Oracle E-Business Suite System Administrator’s Guide. This set of books contains important information about Oracle E-Business Suite.
You should be familiar with the information in Oracle E-Business Suite Maintenance Utilities and Oracle E-Business Suite Maintenance Procedures. Both these books contain important information about administration utilities and maintenance tasks. In addition, you should refer to Oracle E-Business Suite Patching Procedures for details of recommended patching strategies and practices.
You may need to carry out some of the tasks in this section to meet site or product-specific requirements. Perform all that apply to your newly installed Oracle E-Business Suite system.
You will need to increase the size of your database to meet the specific requirements of your system. The increase will in part depend on the products you have licensed and the additional features (such as multiple languages or multiple organizations) you configure in your installation.
Parallel Concurrent Processing allows you to distribute concurrent managers across multiple nodes. If you chose to enable load balancing for Concurrent Processing servers during the Rapid Install process, you must complete additional setup steps. For more information, see Managing Parallel Concurrent Processing in Oracle E-Business Suite System Administrator’s Guide - Configuration.
By default, Oracle E-Business Suite Release 12.1.1 supports Oracle Forms 10g in servlet mode, which facilitates use of firewalls, load balancing, proxies, and other networking options. The use of socket mode is also supported, however, and can be enabled by following the instructions in My Oracle Support Knowledge Document 384241.1, Using Forms Socket Mode with Oracle E-Business Suite Release 12.
In Oracle E-Business Suite Release 12.1.1, Rapid install only installs American English. If you plan to use languages other than American English in your installation, read the information in the Oracle E-Business Suite NLS Release Notes, and complete the necessary steps for installing the translated software.
Important: You must complete the tasks in the Oracle E-Business Suite NLS Release Notes before using your Oracle E-Business Suite products in a language other than American English.
To use additional languages, you must first activate the additional languages via the License Manager utility (within Oracle Applications Manager), and, if required, change the base language.
After this, the multilingual tables must be updated for the activated languages. Go to the AD Administration main menu, choose the 'Maintain Applications Database Entities' submenu, and run the 'Maintain Multi-lingual Tables' task.
Note: For details of running the AD Administration utility, see Oracle E-Business Suite Maintenance Utilities.
You now need to install the relevant NLS software for all the active languages, to lay down the NLS translated files into the APPL_TOP.
After this, you should use the Translation Synchronization Patch Utility to synchronize the languages with the American English patch level. This step is needed in case any American English patches were applied after Rapid Install was run.
Note: For further details of using additional languages, see My Oracle Support Knowledge Document 393320.1, Internationalization Update Notes for Release 12. For details of translation scope, see My Oracle Support Knowledge Document 405992.1, Oracle Applications Release 12 Translation Scope and Availability.
As standard, Oracle E-Business Suite Release 12.1.1 supports the following languages and associated language codes:
| Language | Language Code |
|---|---|
| Arabic | AR |
| Brazilian Portuguese | PTB |
| Canadian French | FRC |
| Croatian | HR |
| Czech | CS |
| Danish | DK |
| Dutch | NL |
| French | F |
| Finnish | SF |
| German | D |
| Greek | EL |
| Hebrew | IW |
| Hungarian | HU |
| Italian | I |
| Japanese | JA |
| Korean | KO |
| Latin American Spanish | ESA |
| Norwegian | N |
| Polish | PL |
| Portuguese | PT |
| Romanian | RO |
| Russian | RU |
| Simplified Chinese | ZHS |
| Slovak | SK |
| Slovenian | SL |
| Spanish | E |
| Swedish | S |
| Thai | TH |
| Traditional Chinese | ZHT |
| Turkish | TR |
Regardless of the languages installed, you may need to complete additional steps if you use a supported Unicode character set, such as AL32UTF8, in the database tier. In addition, be aware that supplementary characters are not supported.
If you customize seed data, your changes may be overwritten during an upgrade. This also applies to any changes to translations of seed data made using the globe icon.
Note: See Oracle E-Business Suite System Administrator's Guide - Configuration for language setup details, and My Oracle Support Knowledge Document 393861.1, Oracle Applications Globalization Support Guide (Release 12), for further details of languages and character sets.
Before you can send Oracle Workflow email notifications and Oracle Alert email alerts, you must complete the Workflow Notification Mailer configuration, using the Notification Mailer configuration wizard in Oracle Applications Manager.
From the Applications Dashboard of Oracle Applications Manager, select Workflow Manager from the "Navigate to" pull-down menu, and click on the Go button.
In the Workflow System region, click the Notification Mailers status icon to navigate to the Service Components page for notification mailers. At this point, the Notification Mailers status icon should be showing the status Down.
In the Service Components page, select the Workflow Notification Mailer service component and click the Edit button to navigate to the Notification Mailer configuration wizard.
In the Outbound Email Account (SMTP) region, enter the name of the outbound SMTP mail server.
If you want to enable inbound email processing, select the Inbound Processing parameter in the Inbound Email Account (IMAP) region, and enter the name of the inbound IMAP mail server, the username and password of the email account that the Notification Mailer uses to receive email messages, and the reply-to address of the email account that receives incoming messages, to which notification responses should be sent.
Click Apply.
Return to the Service Components page, and verify that the status of the Workflow Notification Mailer service component is now Running.
Note: For more information, see: Notification Mailers in Oracle Workflow Administrator's Guide.
If you have licensed Oracle Embedded Data Warehouse (EDW), you must complete additional setup and implementation steps before using this product.
To set up and implement the Discoverer End User Layer, follow the instructions documented in My Oracle Support Knowledge Document 373634.1, Using Discoverer 10.1.2 with Oracle E-Business Suite Release 12 .
To set up and begin using Demand Planning, you must perform the implementation tasks outlined in the Oracle Demand Planning Installation and Configuration Guide.
Rapid Install sets up products for commercial or for-profit use. To convert your system to use public sector, education, or not-for-profit products after the installation is complete, use License Manager to register public sector or not-for-profit products. See Oracle E-Business Suite Maintenance Utilities for information on registering products.
The Rapid Install Vision Demo database is enabled for Multiple Organizations. However, the production and test databases are not. If you want the Multiple Organizations architecture in the production or test environments, refer to the instructions for converting to Multiple Organizations in Oracle E-Business Suite Maintenance Procedures.
Note: For more information, see Multiple Organization Architecture in Oracle E-Business Suite Concepts.
After installation is complete, your operating system administrator should back up the Oracle E-Business Suite product files, including the Oracle Application Server technology stack components. Your database administrator should back up the Oracle E-Business Suite database components.
Subsequently, you should establish a backup policy that meets your organization's needs, balancing the overhead of carrying out the chosen backup type and frequency against the need to be able to recover from a variety of types of system failure. The backup procedures should be tested periodically.
![]()
Copyright © 2000, 2009, Oracle and/or its affiliates. All rights reserved.