Release 12.1
Part Number E12895-03
Contents
Previous
Next
| Oracle Diagnostics Framework User's Guide Release 12.1 Part Number E12895-03 | Contents | Previous | Next |
Oracle Diagnostics Framework pages are available through the Applications Diagnostics responsibility. From this responsibility, you can access three types of functions:
In addition, profile options used by Oracle E-Business Suite are described at the end of this chapter.
Oracle Diagnostics Framework provides several methods for running diagnostic tests: executing a single test, executing a test set, or scheduling a test through Standard Request Submission. Tasks include:
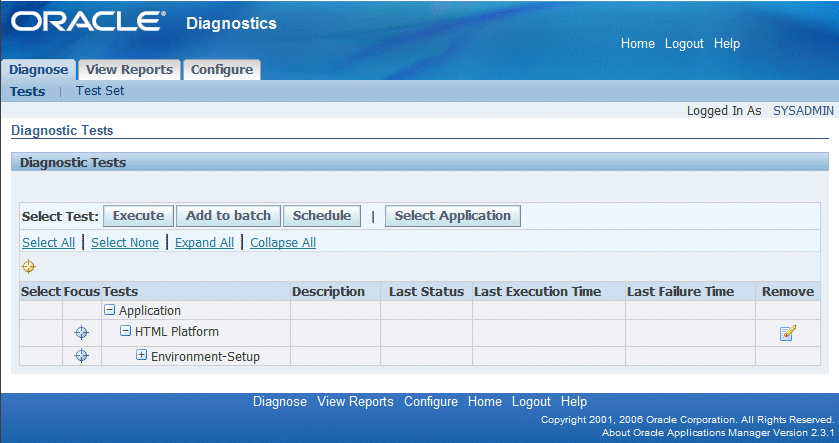
You can select diagnostic tests to execute using the Diagnostics Tests page.
Note: Only tests which you have permissions to execute will be listed in the HGrid table.
Click on the Select Application button to populate the HGrid table with registered applications. To find an application, enter an application name or partial application name with wildcard(s) and click the Go button. Alternatively you can search on "Application Short Name". Multiple application names or short names are allowed, but must be separated by commas.
Each registered test will show a Select check box to be used when selecting a test to execute.
Click on Focus to drill down on an application or group.
Additional details are shown:
The Tests column shows the application name, group name, and related tests that are available to execute.
Descriptions of the tests are given with input parameters, if any.
The Last Status column indicates whether the tests completed successfully or with errors. A check mark represents that the test completed successfully, while a box/square indicates that the test is pending, and an X mark indicates that the test completed with warnings and possible errors.
Last Execution Time shows the date and time when the test was last executed.
Last Failure Time shows the date and time of the last failed execution.
Click on the Execute button to execute one or more tests. If multiple tests are selected and the Execute button is clicked, the action is treated as clicking the Add to batch button
Click on the Add to batch button to execute one or more tests or to create a test set.
To run the test with pre-configured inputs, select the test and click Add to batch. Click on the Test Inputs link and select the pre-configured inputs.
Click on the Schedule button to schedule the execution of a test using concurrent manager scheduling. Only one test can be scheduled at a time.
Click on Select All to select all tests shown for an application.
Click on the Select None to deselect all tests selected for an application.
Click on Expand All to view all tests for the queried application.
Click on Collapse All to view no tests for the queried application.
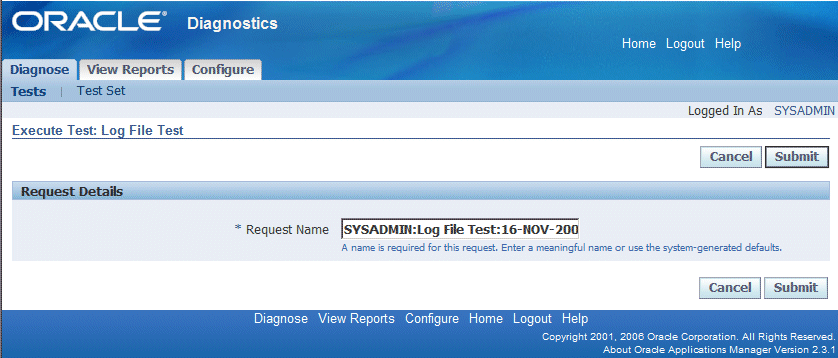
Execute a test using this page.
You can choose to accept the defaulted request name or enter another request name.
You can check the Generate downloadable report box if you want a downloadable report. This check box does not appear for legacy tests where HTML is the only supported format.
If the Generate downloadable report box is checked, select the download format from the list. If the test requires Inputs this page prompts you to enter the input parameters.
Click the Cancel button to cancel the execution of a test.
Click the Submit button to execute the test.
Execute test sets using this page.
The Request Details region includes the following options:
Request Name - Accept the default request name or enter your own request name.
Generate Downloadable Report - When this box is checked, the report becomes available for download and you can select the format of the downloaded report.
The Selected Tests region includes the following options:
Remove button - Select the tests to be removed from the test set execution.
Add more tests button - Add additional tests to the test set execution.
Select All - Select all tests in a test set.
Select None - Deselect all tests in a test set.
Application - The applications for the test set execution.
Group - The relevant groups for the test set execution.
Test - The Names of tests in a test set execution.
Download Format - This option appears if you checked "Generate downloadable report" above. Select the format for the report.
Test Input - This option appears for tests that require input. Click on the Input icon to enter your input parameters.
Inputs Available - This option appears for tests that require input. Two possible icons are shown; an icon of an X indicates that input parameters are required and an icon of a check mark indicates that the test input parameters have been entered.
Click Cancel to cancel your changes and return to the Select Test page.
Click Save Test Set to save the test set in the resulting page. You will be prompted for the name and description of the test and to save the test set to your local file system.
Click Submit to execute the test set.
You can configure your test set input using this page.
The Test Details region includes:
Application - the application name associated with the test.
Test - the name of the test.
Group - name of the group with which the test is associated.
Test Executable - the name of the test executable.
The Pre-Configured Inputs region shows all input parameters with the exception of Confidential Inputs.
The Custom Inputs region shows all input parameters that can be entered; mandatory input parameters are prefixed with an asterisk.
You can click on the Add another row button to add input parameters.
You can click on the Remove button to delete configured inputs.
Use the Cancel button to return to the Execute Test Set page.
Use the Apply button to save the inputs you entered.
You can Save Test Sets using this page.
Enter the following information:
Test Set Name
Test Set Description
Click the Apply button to save the Test Set.
You can click the Cancel button to return to the Execute Test Set Page.
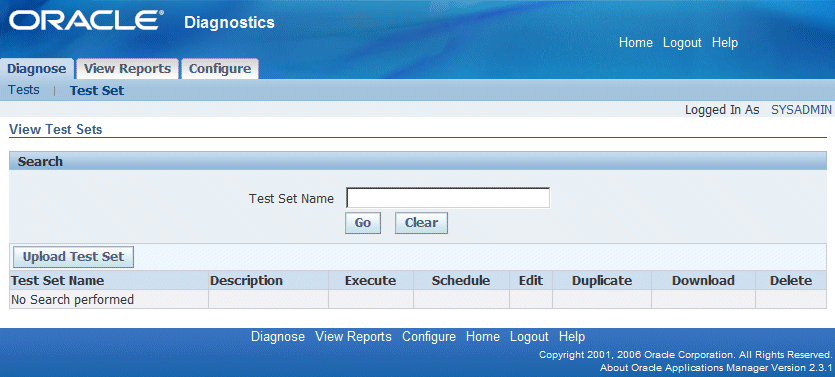
View test sets using this page.
You can search for a test set by entering a specific Test Set Name or by entering part of a Test Set Name with a wild character as prefix or a suffix.
The results region includes the following:
Test Set Name - the user-entered test set name.
Description - the user-entered description of the test set.
Click on the Execute icon to submit a Test Set.
Click on the Schedule icon to schedule a Test Set.
Click on the pencil icon to edit a Test Set.
Click on the Duplicate icon to copy a Test Set.
Click on the Download icon to save a Test Set to a local file system.
Click on the Trash Can icon to delete a Test Set.
Click on the Upload Test Set button to upload a test set from a local file system into the database.
You can upload a test set using this page.
Click on the Browse button to search for the test set in your local file system. Once you select the test set, you can upload it to the Diagnostics database so it will be available for execution.
Click on the Upload button to save the test set from a local file system into the database
Click on the Cancel button to return to View Test Set page.
Schedule a diagnostic test to run using Standard Request Submission (SRS).
You can choose to accept the defaulted Request Name or enter another request name
The Downloadable Format option will be displayed for both tests and test sets that have implemented the new reporting libraries. By default the check box for Generate downloadable format is checked.
For individual tests, you can use the list to choose the desired format. Alternatively, you can deselect the box and skip the download option all together.
For Test Sets the download format selection is available at the individual test level during scheduling.
You can schedule a test set like you would a single test. For more information on test sets, see: Diagnosing an Issue.
You can schedule a test set from the Diagnose tab, Test Set subtab. Search for the test set you want, then click on the Schedule icon for that test set. You can then schedule the test set to run using Standard Request Submission (SRS). See Schedule Diagnostics Test for more information.
You can view reports and test results using these pages:
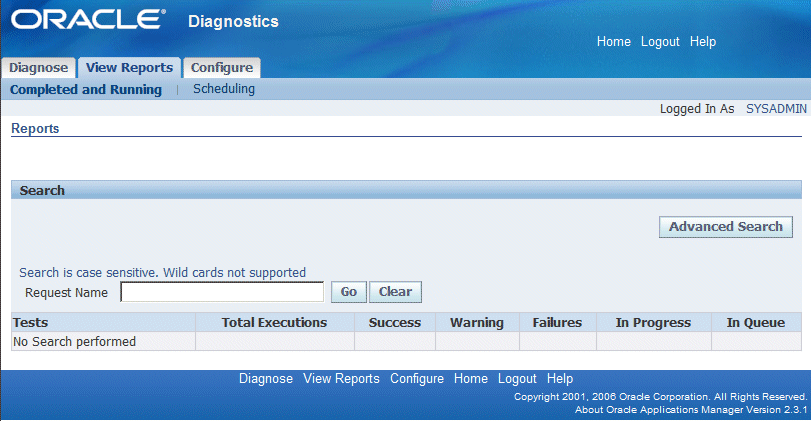
You can search for reports using this page.
Search on the request name to show the report details. Note that the request name is case-sensitive and searching with wildcard characters is not supported.
Click the Go button to retrieve the report for the request name entered.
Click the Advanced Search button to increase your search options to find a report. Search options include:
Application: search for all the tests that have been executed for a specific application.
Group: search for all the tests that have been executed for a specific group.
Test Executable Name: search for all the tests that have been executed for a specific test execution name.
You can search on the Test Execution Status in combination with an Application, Group, Test Execution Name, From Date, and To Date. You can also search for only those executions in the current session to retrieve tests with statuses of Success, Failure, Warning, In Progress, In Queue, or All Statuses.
Additional search criteria are:
From Date
To Date
You can click on the check box to view only the test executions within a current session.
Click the Go button to retrieve the report(s) for the advanced search option used.
Within the Results region, you can:
Click on Expand All to view the reports as a result of the search entered.
Click on Collapse All to minimize the viewing of reports.
Click on Focus to drill down on an application or group.
Click on All Applications to remove the focus and view all applications as a result of the search criteria Tests shows the application name, group name, and related tests as a result of the search criteria. Applications and Groups can be collapse or expanded.
In addition, the following details are shown:
Tests shows the application, group name, and related tests as a result of the search criteria. Applications and Groups can be collapsed or expanded.
Total Executions shows the number of times a test has been executed as a result of the search criteria. If the count is greater than zero then you can drill down to view the individual reports.
Success shows the number of times a test has completed without warnings or failures. If the count is greater than zero then you can drill down to view the individual reports.
Warnings shows the number of times a test has completed with warnings. If the count is greater than zero then you can drill down to view the individual reports.
Failures shows the number of times a test has completed with failures. If the count is greater than zero then you can drill down to view the individual reports.
In Progress shows the number of tests whose execution is in progress or whose downloadable report generation is in progress. You can drill down on the number only if the test(s) have completed execution.
In Queue shows the number of tests that are in the queue and scheduled to execute.
You can download the report of an entire request if you had searched for it using the request name.
You can use the Refresh button to refresh the data on the page.
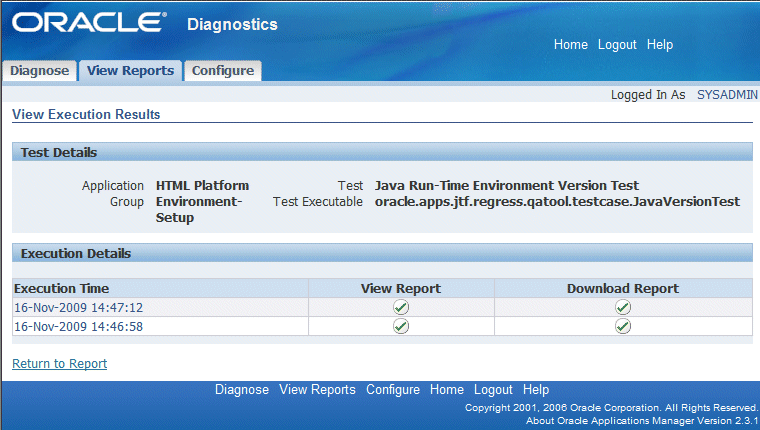
View test results using this page.
View Execution Results shows the Request Name.
The Test Details region includes:
Application - the application name associated with the test
Test - the name of the test
Group - the name of the group the test is associated with
Test Executable - the name of the test executable
The Request Details region includes:
Submitted On - the date and time the test was submitted.
Status - the current status of test (Running, Completed).
Last Refreshed On - the date and time when the page was refreshed for the last time.
Elapsed Time - how long the test took.
Execution Details region includes:
Execution Time - the date and time the test was executed.
View Report - shows a check mark if the report is available to view, shows a clock if the test is still executing, or shows an 'X' meaning the test completed with warnings and/or errors. Once the report is available to view, you can click on the check or 'X' icon to get details.
Download Report - shows a check mark if the report is available to download, shows a clock if the test is still being formatted for download, or shows an 'X' meaning no downloadable report available. Once the report is available to download, you can click on the check icon to download it.
The Execution Details region includes test inputs with the exception of confidential inputs.
The Return to Select Test button - takes you back to the tests selection page
The Refresh button is used to refresh the page with the latest status of the execution and report generation.
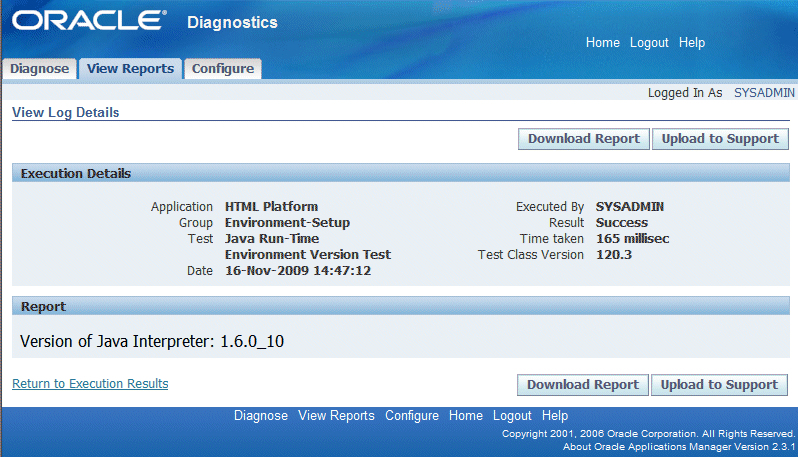
You can view the report of a specific execution of a test using this page.
The Execution Details region includes:
Application - the application name associated with the test.
Executed by - the name of user who submitted the test.
Group - the name of the group with which the test is associated.
Result - the result of the diagnostic test, that is, success or failure.
Test - the name of the test.
Time Taken - the total elapsed time for the test execution.
Date - the date and time the test was executed.
Test Class Version - the version of the test.
The Inputs region lists all of the input parameters used to execute the test.
The Report region shows all details of the report.
The Return to Execution Results link returns you back to the View Reports page.
Use the Download Report button to download the report to your local PC. If the report generation is still in progress, a Refresh button appears instead. Refresh the page to check the report generation status.
Use the Upload to Support button to upload the report to Oracle Support. You will be prompted to enter a My Oracle Support Service Request Number and to upload the downloaded report from your PC.
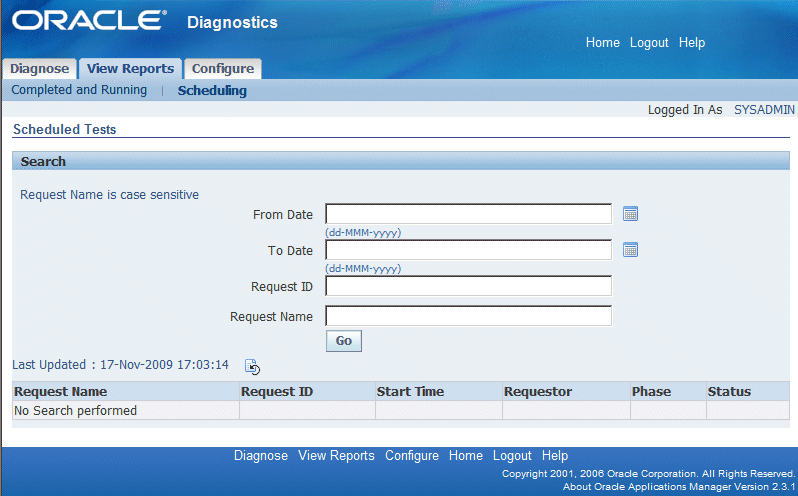
You can view the Scheduled Tests using this page.
You can search for a test using the Request Name (with wildcard support with "%"), the Request ID, or the date submitted.
The Diagnostics Concurrent Request region includes the following information.
The Request Name shows all requests that have been executed, running, or scheduled. Information shown includes the request name, the requestor, test name, date & time, and request ID. Clicking on the request name takes you to the View Report screen.
The Request ID is the concurrent request ID assigned to the scheduled test. Clicking on the request ID link takes you to a concurrent manager request summary screen which allows you to review the concurrent processing log file.
In addition, the following information is shown:
Start Time shows the date and time a test is scheduled to start.
Requestor shows the user ID of the person who scheduled the test.
Phase shows the concurrent manager phase (pending, running, and so on).
Status shows the concurrent manager status (scheduled, normal, and so on).
Use these pages to configure your Oracle E-Business Suite Diagnostics tests:
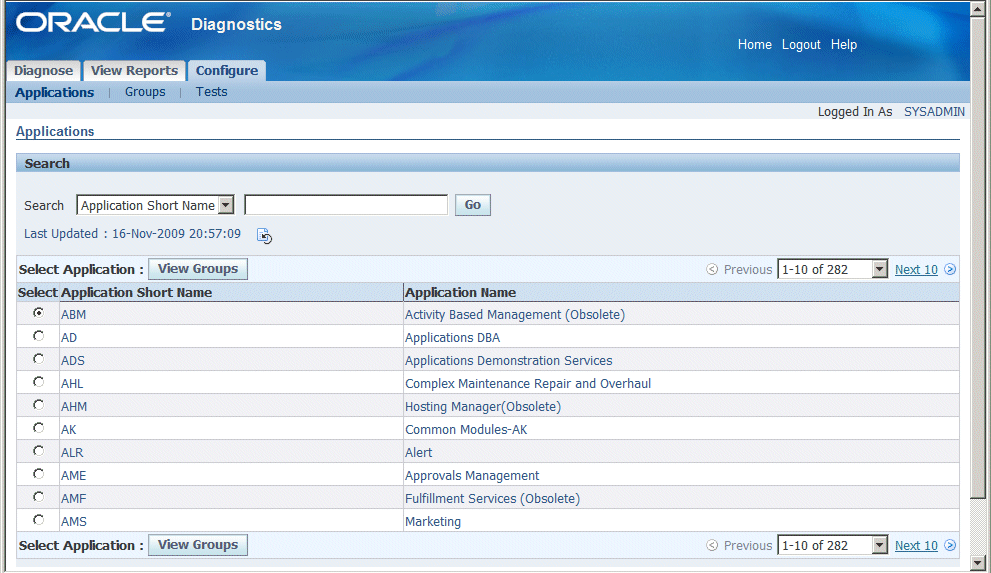
You can view all the applications registered under Oracle E-Business Suite Diagnostics in this page.
Search can be conducted based on application short name or application name.
Select an application and click on the View Groups button to view the groups under each application.
Click the Register button to register any new application. This action is restricted to only those users who have configuration privileges.
You can register a new application in this page. The list of unregistered applications will be displayed in the list of values.
Click the Apply button to register a new application.
You can click the Cancel button to cancel registering application.
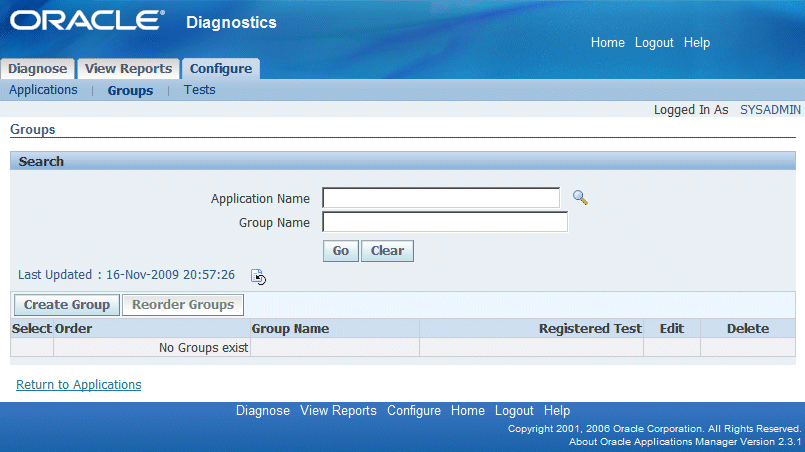
You can view all the groups registered under an application using this page.
If you have come to this page from the View Registered Applications page, then the selected application will be shown in the LOV field.
Alternatively, you can come directly to this page through the Groups subtab.
A search can be conducted using the application name and group name. If the group name is left blank all the groups under the application will be displayed.
Details shown include the number of registered test under each group.
Click on the Update icon to update the details of the group. This action is restricted to only those users who have configuration privileges.
Click on the Delete icon to delete the group. This action is restricted to only those users who have configuration privileges
Click on the Reorder button to change the order in which the groups are organized under the parent application. This action is restricted to only those users who have configuration privileges.
Click on the Create Group button to create a new group. This action is restricted to only those users who have configuration privileges.
Click on the View Tests button to view all the tests registered under this group.
Note: Seeded groups cannot be edited or deleted by end users.
Create groups using this page.
Select the application name using the list of values.
Enter the new group name.
You can choose to accept the auto-generated order sequence or select a previously-used user-defined sequence number.
Click Cancel to cancel the group creation process.
Click Apply to save your work.
You can change the name of a group.
You can change the placement of a given group in the group order of its parent application.
You can reorder groups using this page.
Select the group to change the order in which the groups are organized under the parent application.
Select a group and click on the "Move to the top" icon to move the selected group to the top of the list.
Select a group and click on the Up icon to move the selected group up one in the list.
Select a group and click on the Down icon to move selected group down one in the list.
Select a group and click on the "Move to the bottom" icon to move the selected group to the bottom of the list.
Click Cancel to cancel the reordering of the groups.
Click Apply to commit the reordering of the groups.
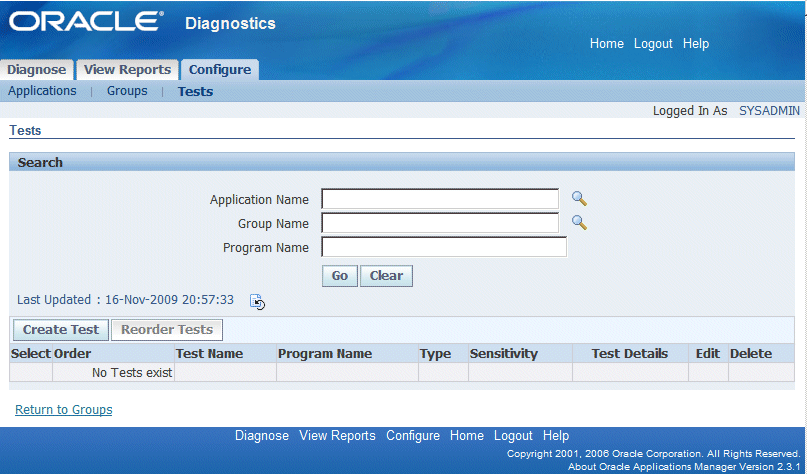
You can view all the tests registered under a group.
If you have navigated to this page from the View Groups page, then the selected application and group will be shown in the LOV field.
You can directly navigate to this page through the Tests subtab.
A search can be conducted using the Application name and Group name. If the program name field is left blank, then all the program names under the group will be displayed.
Click on the View Input values button to view current input values and to add additional rows. This button will be enabled only if the user has permission to execute the test.
Click on the Create Test button to create a new test. This action is restricted to only those users who have configuration privileges.
Click on the Reorder Tests button to change the order in which the tests are organized under the group. This action is restricted to only those users who have configuration privileges.
Details shown include:
Number of registered tests under each group.
Radio button to view input values for tests with inputs
Order indicates the test sequence number within a group.
The user-friendly test name.
The program name associated with the test.
The test type, either Java, PL/SQL, XML, or Declarative.
The sensitivity associated to a specific test.
The following are actions that are restricted to only those users with configuration privileges.
Click on the eyeglasses icon to view test details.
Click on the pencil icon to edit a test.
Click on the Delete icon to delete the test.
Note: Seeded tests cannot be edited or deleted by end users.
You can view all registered applications valid for a test.
Details shown include:
The name of the application for which the test is registered.
The name of the group for which the test is registered.
The program name associated with the registered test.
The test type, which is either Java, PL/SQL, XML, or Declarative.
The sensitivity associated with the specific test.
The order indicates the test sequence number within a group.
In addition, the following information is shown:
Valid applications for the registered test, listed by application short name and application name.
You can view or add input values using this page.
Details shown include:
Name of the application for which the test is registered.
Group for which the test is registered.
Registered test name.
Program name associated with the registered test.
Click on the Add another row button to add additional inputs.
Click on the Remove button to delete configured inputs.
Click on the Cancel button to cancel any changes.
Click on the Apply button to save your changes.
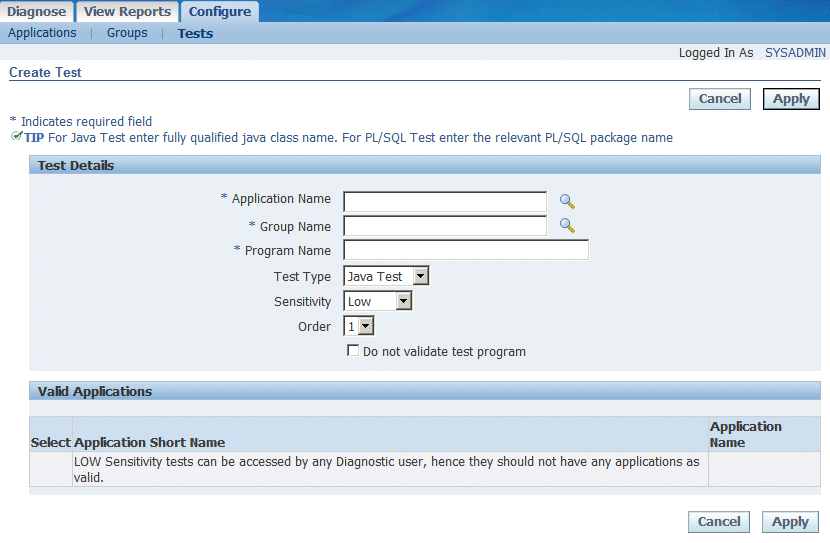
Create diagnostic tests using this page.
Select the Application Name using the LOV.
You can change the Group Name using the LOV.
Enter a Program Name:
For a Java Test by entering the fully-qualified Java class name.
For a PL/SQL Test, the package must be in the APPS schema.
For an XML Test, the XML file must reside in the JAVA_TOP in the corresponding product folder. Example:
oracle/apps/fnd/oam/diagnostics/tests/sampleXMLTest.xmlNote: This placement is similar to that for registering a Java test except the forward slash (/) must be used as the separator.
Select the Test Type that matches the corresponding program name. Valid test types are Java, PL/SQL, XML, or Declarative.
You can optionally check the Do Not Validate test program box. If checked, the framework will not try to validate the executable; otherwise the framework will try to load the test and see if it is adhering to diagnostics standards.
Select the Sensitivity Type of low, medium, or high depending on the sensitivity of a test.
You can accept the default order test sequence number or select a previously-used order test sequence number.
Click on the Cancel button to cancel your changes.
Click on the Apply button to save your changes.
Edit a test using this page.
The following fields are shown:
The name of the application for which the test is registered.
The name of the group for which the test is registered.
The registered test name.
The program name associated with the registered test.
The type of test: PL/SQL, Java, XML, or Declarative.
Click on Order in the action list to change the order of the test within the group.
Click on Sensitivity in the action list to change the security sensitivity of the test.
You can reorder tests using this page.
Select the test and change the order in which the tests are organized under a group. Only user-defined groups can be changed.
Select a test and click on the Up icon to move selected items to the top of the list.
Select a test and click on the Up icon to move selected items up one in the list.
Select a test and click on the Down icon to move selected items down one in the list.
Select a test and click on the Down icon to move selected items to the bottom of the list.
Click on the Cancel button to cancel your changes.
Click on the Apply button to commit your changes.
You can configure your system with the following profile options. After changing the values, you must sign out and clear the cache. All these profiles are at the site level. User-level profiles are not supported currently.
The Preference profile options are:
The Favorite Application profile option allows users to set a default application; once set the default application will show on the Diagnose page. Only one favorite application is supported. The Favorite Application profile option for Oracle Diagnostics is case sensitive and expects upper case.
The internal name is OAM_DIAG_FAVOURITE_APPLICATION.
Valid values are application short names.
The Default Reporting Format profile option feature allows users to set a default report format. Valid values are:
'excel' - Microsoft Excel spreadsheet format
'html' - Hyper Text Markup Language format
'pdf' - Portable Document Format
'rtf' - Rich Text Format
Note that the values for Default Reporting Format are case-sensitive and the profile expects lowercase.
The internal name is OAM_DIAG_DEFAULT_REPORT_FORMAT.
The performance-related profile options are:
The Collection Threshold profile option allows users to set the number of reports nodes that must be kept in memory before being saved to the database. This threshold helps support huge volume diagnostic reports. If the number of components in the report exceeds this threshold, then the report is moved to the database to free up memory.
Set this profile to the threshold number of components before saving to the database.
The internal name is OAM_DIAG_COLLECTION_THRESHOLD.
The SQL Block Size profile option allows users to set the number of records that are fetched from the database in executing a query. This limit is used while displaying tabular data. Fetching all the data and keeping it in memory will cause performance issues.
Set this profile to the desired maximum number of rows fetched by any SQL query.
The internal name is OAM_DIAG_SQL_BLOCK_SIZE.
The Worker Thread Count profile option allows users to increase the number of concurrent threads used by the executing engine to execute a request.
The internal name is OAM_DIAG_WORKER_THREAD_COUNT.
![]()
Copyright © 2002, 2009, Oracle and/or its affiliates. All rights reserved.