Release 12.1
Part Number E13433-07
Contents
Previous
Next
| Oracle Warehouse Management User's Guide Release 12.1 Part Number E13433-07 | Contents | Previous | Next |
Warehouse managers use warehouse planning to group and plan the work in a warehouse. Warehouse planning tasks include:
Selecting and grouping orders for fulfillment.
Checking material availability for fulfillment.
Performing labor planning to fulfill orders.
Monitoring the progress of the orders during order fulfillment.
Warehouse planning includes wave planning which enables you to group orders and lines for better visibility and control during order fulfillment. Wave planning provides real-time monitoring and exception reporting and flexibility during the order fulfillment process. Using wave planning, you can:
Create, plan, and release a wave in one step or multiple steps.
Schedule the entire wave planning process to be run at certain intervals based on specified criteria.
Monitor and correct exceptions that may occur (exception handling).
The wave planning process consists of the following steps:
Creating a Wave
When you create a wave, you select the criteria that determines the orders to include in the wave. For example, you can create a wave that enables you to pick all orders with a dock appointment within the next x number of hours, all UPS orders, or all high priority orders.
Planning a Wave
Planning the wave involves determining the item availability and labor requirements for the wave. You can select the default actions to occur when unexpected events happen, for example, when stock is not available to fulfill orders. You can also add and remove lines from a wave during the planning phase if the fill rate or labor requirements do not match your expectation or for any other reason. Optionally, you can re-plan it later. A warehouse manager can plan a wave multiple times. Multiple people can plan waves, and orders can be included in multiple waves during the planning process.
Releasing a Wave
When you release the wave, the pick release process is initiated and material is allocated to orders.
Monitoring a Wave
You view a wave (and related wave activity) before and after it is released:
Use the Wave Workbench window to view order and order line level details, track progress of orders in the warehouse, manage tasks, review labor planning criteria, and manage exceptions.
Use the Wave Dashboard window to search for waves by wave number or other criteria, view high-level summary information about waves, monitor all picking activity in a warehouse, view automatic and recurring requests, and view the wave status for specific dates.
Note: You cannot monitor progress for individual waves in the Wave Dashboard window.
Related Topics
Viewing Waves Using the Wave Dashboard
Viewing Waves Using the Wave Workbench
Setting Up Task Release Options
Using Concurrent Requests with Wave Planning
Creating a wave involves selecting the criteria that determines the orders to include in the wave. You can select simple criteria to create waves based on order, customer, carrier, item, trip and delivery information. For example, you could create a wave that picks all orders with dock appointments within the next x number of hours, all UPS orders, or all high priority orders.
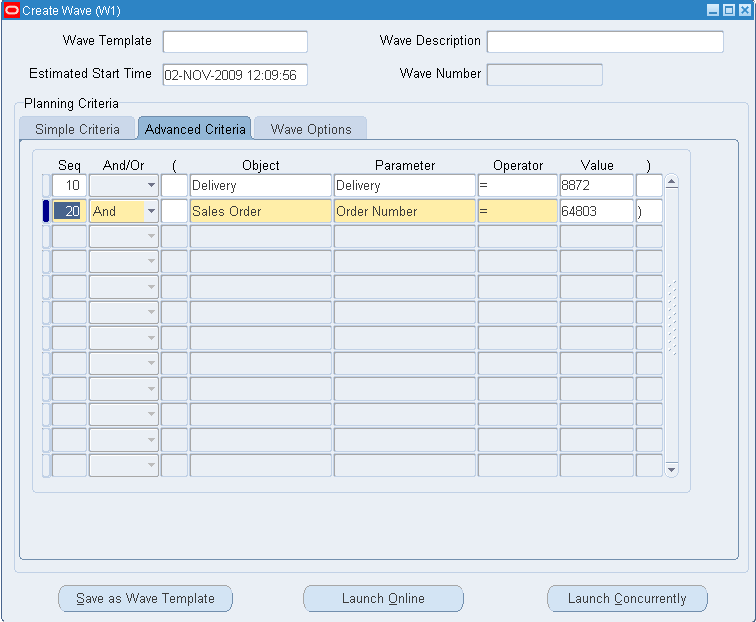
If desired, you can also select advanced criteria for releasing waves. For example, you can select criteria to pick all single line orders or pick orders when a total tare weight or dollar value is greater than a specific threshold.
You can create one or more waves, compare them, and then after you run the planning process, decide which wave(s) to release. You can also automate the process.
To create a wave
Navigate to the Create Wave window.
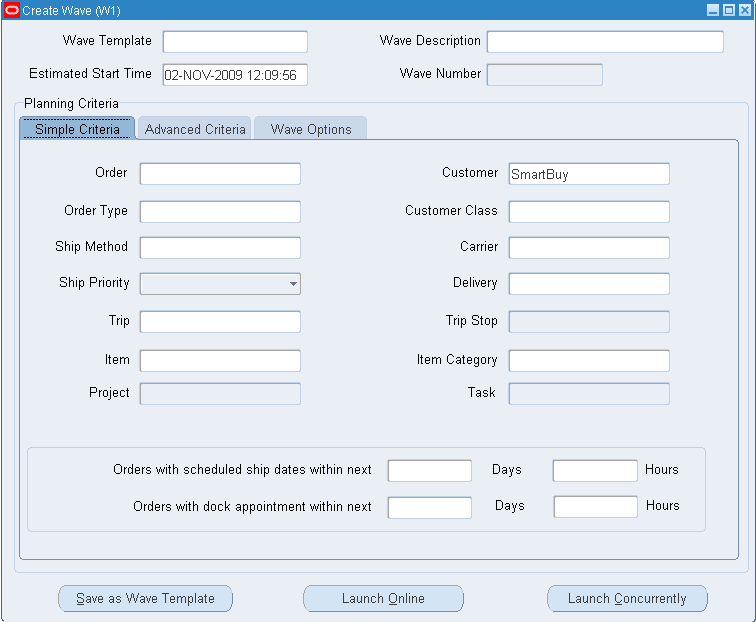
In the Wave Template field, you can query an existing wave template, or create and save a new template to be reused. For more information, see To create a wave template.
Estimated Start Date: This date is used during labor planning to plan resources and tasks and to determine a target completion date. When the wave is created, the system uses the current system date as the default value for the Estimated Start Time. However, you should enter a date later than the current system date because to plan the wave, the estimated start time must be later than the current system date.
The estimated wave start date cannot be changed after you create the wave.
The Wave Planning Release Wave concurrent request can also release a wave based on an estimated start time.
In the Simple and Advanced Criteria tabs, enter the criteria to create the wave:
Simple Criteria tab: Define the criteria for waves based on order, customer, carrier, item, trip and delivery information.
Advanced Criteria tab: Select criteria that defines rules that must be fulfilled to create a wave (similar to defining rules in the WMS Rules window). Multiple rules within a template can be linked using and/or conditions. For example, the wave can be created if the delivery value is 755091 AND the sales order number is 16446.
Note: The system creates waves for order fulfillment across all booked sales orders.
Click the Wave Options tab.
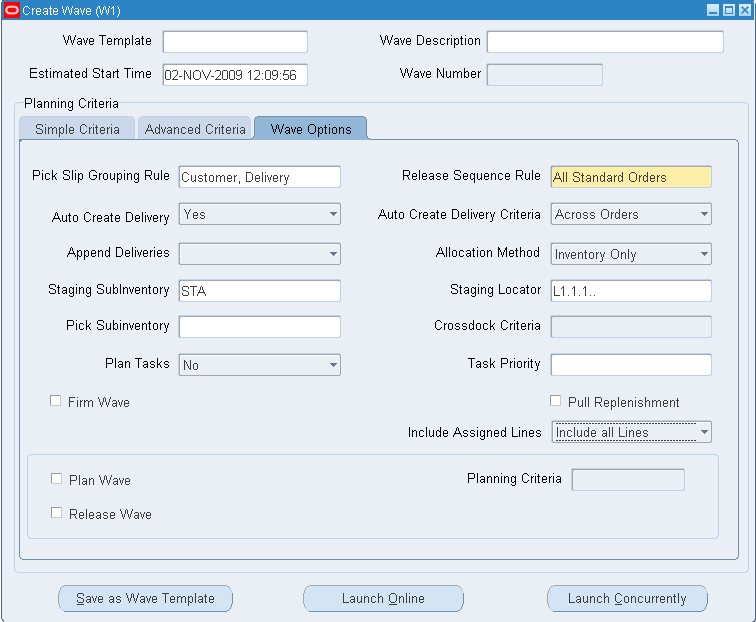
On the Wave Options tab, you can select the criteria to define the planning criteria for the wave, determine the pick slip grouping rule, and the release sequence rule to use when creating the wave. You can also choose to auto create deliveries for the wave. For example, if the orders are going to the same customer, you can choose to auto create a delivery across orders.
Auto Create Delivery: Select Yes to auto-create a delivery based on the delivery grouping criteria that you select.
Append Deliveries: Appends the order lines to an existing delivery based on the delivery grouping criteria that you specify. For more information, see the Oracle Shipping Execution User's Guide.
Crossdock Criteria: Enable cross-docking by selecting the crossdock criteria option.
Note: Ensure that you have already created the crossdocking setups. For more information, see Oracle Warehouse Management Crossdocking.
Pull Replenishment: During pick release, pull replenishment is initiated when there is not enough on-hand quantity in the lower-level pick area to fulfill demand. If you select Pull Replenishment, then pick release automatically generates the replenishment task after pick release if a shortfall in the forward pick area is detected.
Note: If you select Pull Replenishment, verify that all replenishment setups have been completed. (There are multiple replenishment types and pull replenishment is one type.) For more information on pull replenishment, see the section Oracle Warehouse Management Outbound Logistics.
Include Assigned Lines: Choose either to include all lines or to exclude lines assigned to a delivery.
Plan Wave: This option is selected by default if a template was defined for the wave in the Plan Wave window.
Release Wave: This option is selected by default if the Plan Wave option and Release Wave options were selected in the Plan Wave window.
To create the wave, choose one of the following options:
Click the Launch Online button to create the wave. If you select this option, the wave is created immediately but you will be unable to complete other activities on your terminal until the process has completed.
Click Launch Concurrently to run the Wave Planning Initiate Process concurrent request that creates the wave. The concurrent request runs in the background so you can run other processes while the request is running.
After you have created the wave, you can review it in the Wave Workbench window, select wave planning criteria in the Plan Wave window, and then release the wave. You can also create or update planning criteria in the Wave Workbench window and then re-plan the wave (before releasing the wave).
Note: If the Plan Wave box is selected, then the wave will already be planned. If desired, you can replan the wave.
To create a wave template that can be reused
Enter a name and description for the wave template.
Enter your criteria for creating the wave.
Click Save as Wave Template to save the template.
Related Topics
Viewing Waves Using the Wave Dashboard
Viewing Waves Using the Wave Workbench
Setting Up Task Release Options
Using Concurrent Requests with Wave Planning
After the wave is created, you can plan it using the Plan Wave window. Planning a wave involves selecting the criteria that further defines the fulfillment process. For example, you can set default actions to occur when stock is unavailable, or reserve material so it is not allocated or promised to other orders.
Note: You reserve material and then allocate it. The material is allocated only after the wave is released.
You can create and plan multiple waves until you achieve the optimum labor and fulfillment conditions.
Note: You can also re-plan the fulfillment and labor planning criteria on the Wave Workbench window.
Additional Considerations
The following table describes how setups in the Create Wave window can affect wave and release planning:
| If this option is selected in the Create Wave window: | Then the following conditions apply in the Wave Workbench window: |
|---|---|
| The Release Wave check box is selected. | When you click either the Release Online or Release Concurrently button, the wave will be released. |
| Plan Wave option is selected. | The wave will be planned automatically; otherwise, you can plan the wave. |
To plan a wave
Navigate to the Wave Dashboard window.
Search for the wave that you want to plan. Enter a number in the Wave Number field to search by wave number, then click Find.
From the navigation tree, click the plus sign next to the Waves item, then select the desired wave number.
On the Wave Attributes tab, you can review information about the wave such as the number of orders in the wave, total number of lines, and the release information used to create the wave.
Click the Orders tab to review the status of the order, for example, Ready to Release.
Click the Plan Wave button to display the Plan Wave window.
To enter fulfillment planning criteria in the Plan Wave window
Select the planning criteria, or query an existing template that contains the desired planning criteria. Alternatively, you can enter new planning criteria and save it as a template. For more information, see To create a planning criteria template.
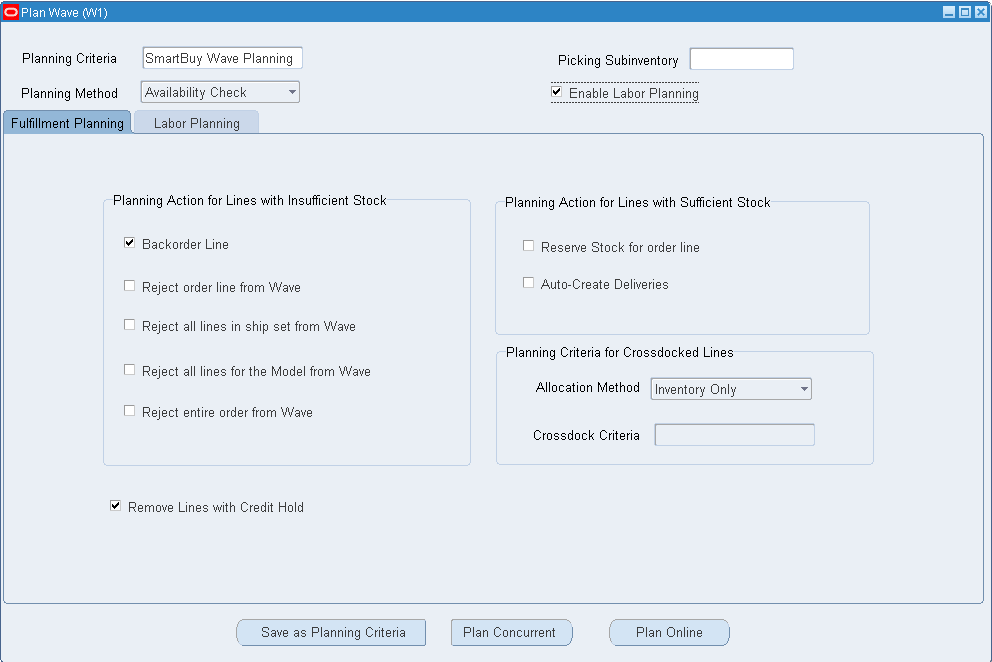
Select the Picking Subinventory such as Storage Subinventory.
Select a planning method:
Availability Check: The system considers the total on-hand availability of an item when performing fulfillment and labor planning. It does not consider existing low-level reservations.
Rule Based Planning: The system runs a simulation of the material allocation process and simulates the WMS rules engine to determine planned fill rate. If you select rule based planning, then crossdocking criteria will also be considered in planning.
(Optional step.) Select the Enable Labor Planning check box to enable the Labor Planning tab where you can define labor planning requirements.
In the Planning Action for Lines with Insufficient Stock in Inventory region, select the planning actions to occur when there is insufficient stock in inventory. When stock is unavailable, you can select a default action such as back ordering the line, or removing it from the wave.
In the Planning Action for Lines with Sufficient Stock in Inventory region, select the default planning action(s) when there is sufficient stock in inventory:
Reserve Stock for order line: Creates reservations when you plan the wave. After the wave ids firmed, reserved material cannot be allocated to other orders.
Note: Although you can plan and re-plan the wave multiple times, you should select the Reserve Stock for order line option only during the final planning of the wave. For more information, see also the Oracle Inventory User's Guide, On-hand and Availability, and Item Reservations.
Auto-Create Deliveries: Select this option to auto-create deliveries.
Select crossdock options on the Planning Criteria for Crossdocked Lines region:
Note: If availability check is selected as the planning method, it will not plan the labor for the wave but it will consider the following: a) only the high level material available for the wave 2) inbound cross-docked material at an organization level.
Allocation Method: Select from Inventory Only, CrossDock Only, Prioritize Inventory, or Prioritize CrossDock.
Crossdock Criteria: Select the crossdock criteria.
Note: The fulfillment rates for crossdock tasks also appear on the Wave Workbench window.
For more information on crossdocking, see Oracle Warehouse Management Crossdocking.
Select the Remove Lines with Credit Hold check box to remove any order lines from the wave if a credit hold exists on the customer.
To enter labor planning criteria
Click the Labor Planning tab.
Warehouse managers can use labor planning to estimate the labor required to fulfill picking tasks before the tasks are released to the warehouse. For example, if there are not enough operators available, the warehouse manager can change the wave to match labor availability:
Select the Bulk Labor Planning check box to plan the orders in bulk for the wave. Bulk Planning is available for both availability check and rules-based planning. This plans for bulking of items during the wave fulfillment process.
In the Department field, select a department such as Picking.
Note: Labor resources, and picking departments must be set up before they can be selected from this window. For labor planning to work, you must specify the shift (if you are not operating on a 24-hour shift) or the instance (if you are operating in a 24-hour environment). You need to set up resource, shift, and capacity information. For more information on setting up shifts, see the Oracle Bills of Material User's Guide, Using the Workday Calendar.
Select the staging subinventory.
Select the time unit-of-measure (UOM) that defines how time is measured for picking such as in minutes or seconds. For more information, see the Oracle Inventory User's Guide, Defining Units of Measure.
Important: The Pick UOM may differ depending on the planning method that you have selected:
If the planning method of availability check is selected, then the system uses the pick UOM for the subinventory.
If rule based planning is selected, then the system considers the rules allocation methods.
Select the labor setup mode to plan based on either subinventory or zone. Planning based on zones provides more detailed control over the picking process:
Subinventory to Subinventory (default value): Enables you to select the source and destination subinventory for picking.
Zone-to-Zone: Enables you to select the source and destination zones for picking. Zones consist of locators but can contain an entire subinventory. For more information on setting up zones in the Zones Summary window, see Setting Up Locator Zones, Oracle Warehouse Management Implementation Guide.
In the Labor Planning region, select your planning options:
Item Category: Select an item category to determine the type of items to pick. Selecting an item category can also help reduce the amount of labor required to perform the pick. For example, it may take an operator longer to pick material from the HAZMAT item category than picking items from the NAILS item category (although both categories may exist in the forward picking area).
Operation Plan: This option is available only if rule based planning is selected as the planning method. Select one of the following standard eight outbound operation plans to be automatically included in the planning calculations:
LPN-based consolidation in staging lane within delivery.
Direct consolidation in staging lane across deliveries.
Direct consolidation in staging lane within delivery.
LPN-based consolidation in consolidation locator, across deliveries in staging lane.
LPN-based consolidation in consolidation locator within delivery within delivery in staging lane.
LPN-based consolidation in staging lane across deliveries.
Locator based consolidation in consolidation locator, across deliveries in staging lane.
Locator based consolidation in consolidation locator within a staging lane.
Source Type: Select the source of the material from which you will pick the order: Crossdock or Inventory. Crossdock is available only as the initial choice.
Source: Select the location from which you will pick inventory. If the Source Type is Subinventory, then this will be a subinventory. If the source type is Zone, then this will be a zone.
Destination: Select the destination which is either a subinventory or a zone (depending upon the source type selected). For example, the destination could be the packing zone, or the staging subinventory.
Note: The destination subinventory does not always have to be the staging subinventory.
Pick Uom: Select the pick unit of measure.
Resource: Select a resource.
Transaction Time (per Pick UOM): Defines the picking time required (per the pick unit of measure selected).
Travel Time: Specifies the time it takes to get from the source subinventory to the destination subinventory.
Processing Overhead Duration: Optionally, enter a value that defines the amount of time required to perform additional transactions such as packing, consolidation, and staging.
Example of Planning Setup Values in the Labor Planning tab
The following example shows what values could be selected for a typical labor planning setup:
Bulk Labor Planning: Selected
Department: Picking
Time Uom: Min
Staging Subinventory: STA
In the Labor Planning region (Labor Planning tab), you could select the following values to define labor planning criteria (Source Type: Inventory; Operation Plan: not entered):
| Item Category | Source | Destination | Pick Uom | Resource | Transaction Time | Travel Time | Processing Overhead Duration |
|---|---|---|---|---|---|---|---|
| COMPUTER.NOTEBOOK | EACH | STA | EA | EACH_EMP | 7 | 20 | 7 |
| COMPUTER.MISC | CASE | STA | C10 | CASE_EMP | 6 | 25 | 5 |
| NEW.MISC | BULK | STA | EA | BULK_EMP | 5 | 30 | 9 |
Click the Fulfillment Planning tab to choose one of the following options:
Click Plan Concurrently to run a concurrent program to plan the wave. The system runs the concurrent request in the background so you can run other processes while the request is running.
Click the Plan Online button to plan the wave. If this option is selected, the wave planning process is performed immediately but you will be unable to complete other activities on your terminal until the process has completed.
Note: The Plan Online button is grayed out when Rule Based Planning is selected.
After the wave planning has completed successfully, you can preview the wave to review the expected fill rate and labor criteria. Then you can release the wave which releases the orders for picking and pull replenishment (pull replenishment is one of many replenishment types).
To create a planning criteria template
In the Planning Criteria field, enter a name for the template.
Define your planning criteria in the Fulfillment Planning tab, and optionally, labor requirements in the Labor Planning tab.
Click Save as Planning Criteria to save the planning criteria.
Related Topics
Viewing Waves Using the Wave Dashboard
Viewing Waves Using the Wave Workbench
Setting Up Task Release Options
Using Concurrent Requests with Wave Planning
Oracle Inventory User's Guide, On-hand and Availability and Item Reservations
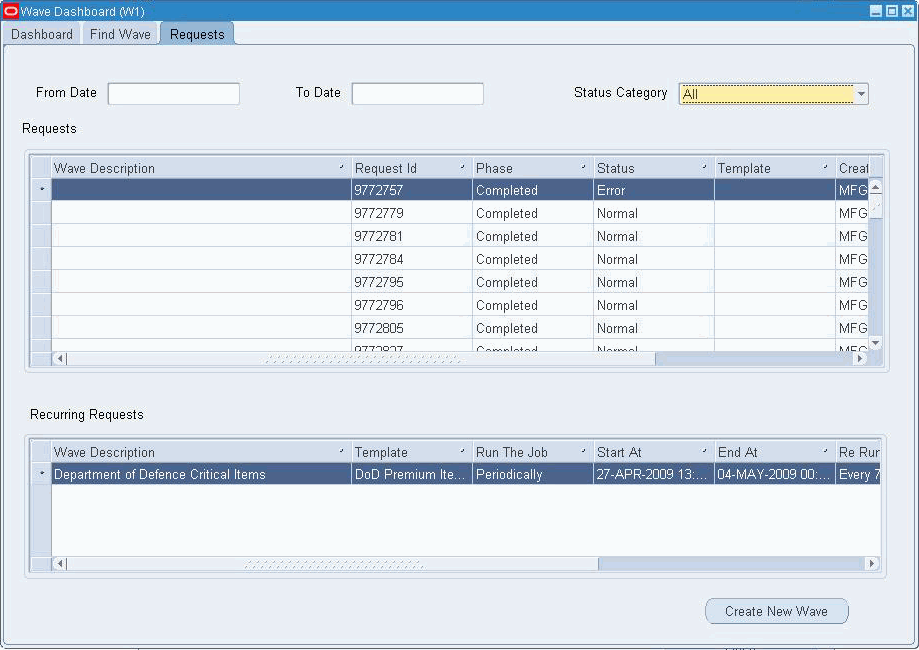
Use the Wave Dashboard window to view an overall summary of waves and wave activity for created, planned, or released waves. You can find any wave, or view multiple waves based on search criteria such as completion dates or wave status. For example, you can view released waves that have a target completion of today's date.
You can also view all picking activity in the warehouse, view a specific wave, or review waves for a given time period. On the Requests tab, you can view recurring requests or automatic concurrent requests such as requests that have been run overnight.
To view waves using the wave dashboard
Navigate to the Wave Dashboard window.
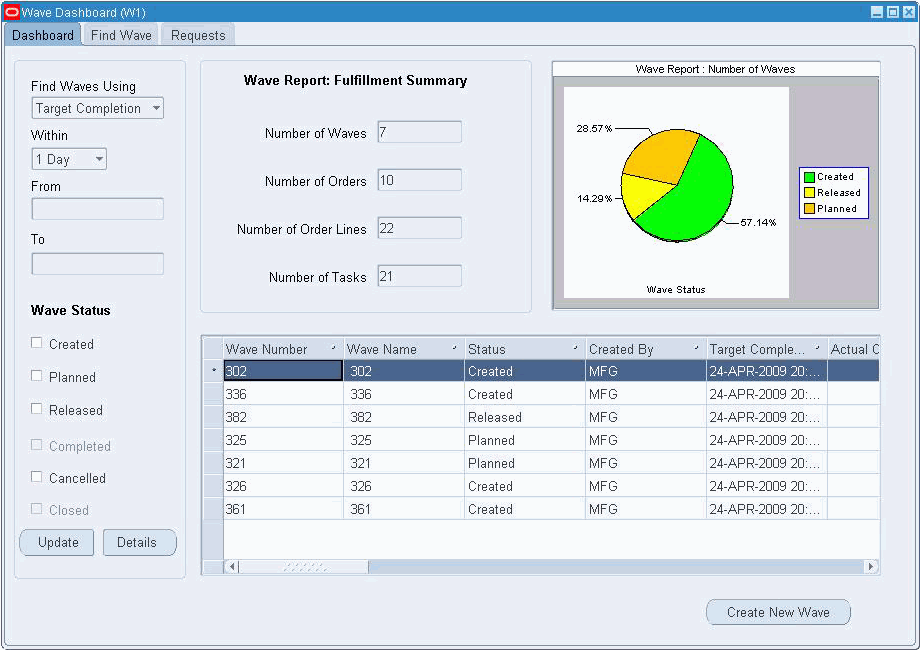
On the Find Wave tab, enter your search criteria to find individual or multiple waves. For example, you can choose to view all released waves for a customer SmartBuy that are being shipped by the carrier DHL.
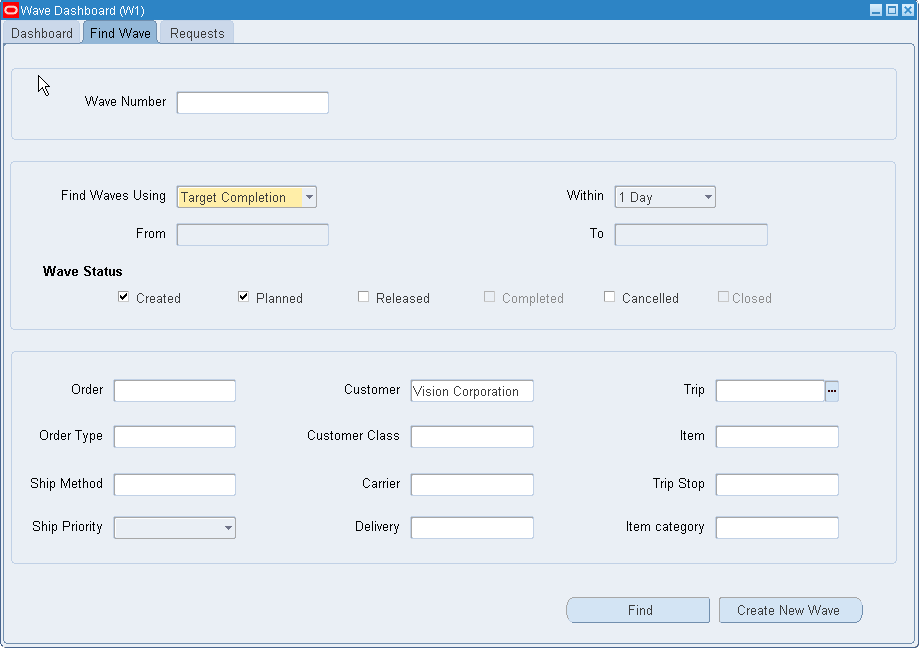
In the Find Waves Using field , select one of the following options:
Target Completion: Find waves that are targeted for completion within the time range specified in the Within field (for example, within 1 Day, or 1 Week). Alternatively, leave the Within field blank to enter a specific date range in the From/To fields.
Actual Completion: Find waves that were completed during the time range specified in the From/To fields.
Estimated Start Date: Find waves where the estimated start date is planned for the time range specified in the Within field. Alternatively, leave the Within field blank to enter a specific date range in the From/To fields.
In the Within field, select the time period defined in hours, days, weeks, month, or null (no time selected). The field is disabled if you select Actual Completion in the Find Waves Using field.
If you select Target Completion in the Find Waves Using field and select a time period, then all waves scheduled to complete within that range appear. For example, if you select 1 Day in the Within field, the Wave Dashboard displays all waves that will complete in the 24 hours after the query criteria is selected.
In the From/To fields, select a date range to filter the results of the waves shown in the Wave Dashboard.
Note: The field is enabled when the null option is selected in Within field.
Click Find to display the search results in the Dashboard tab.
Click the Requests tab to view automatic and recurring requests.
Related Topics
Viewing Waves Using the Wave Workbench
Setting Up Task Release Options
Using Concurrent Requests with Wave Planning
After you create and plan a wave, you can preview it in the Wave Workbench window. Multiple planners can create and plan waves, or you can create and plan multiple waves to compare which is the most feasible to release to the warehouse. Viewing the wave enables you to preview the work to perform, and provides an estimate of the labor required to perform the work. You can also add or delete lines from the wave if necessary.
After you release a wave, you can use the Wave Workbench window to view the order and order line status, track the progress of operators as they pick tasks, or remove lines from the wave.
Before releasing the wave, use the Wave Workbench window to complete the following tasks:
Plan and create waves concurrently with multiple planners.
Modify and re-plan a wave before it is firmed.
Note: Select the reservations options only when you re-plan the wave for the final time.
Add or delete order lines from the wave. For information on adding priority orders to a wave (unreleased or released), see To add priority orders to a wave.
Preview the work to perform.
Estimate the labor required to perform the work (labor requirements).
After you plan the wave, you can firm the wave which ties the orders to that wave for release. Order(s) associated with the firmed wave can no longer be part of any other wave. You can choose to firm a wave prior to release, or at release. When you release the wave, it is automatically firmed.
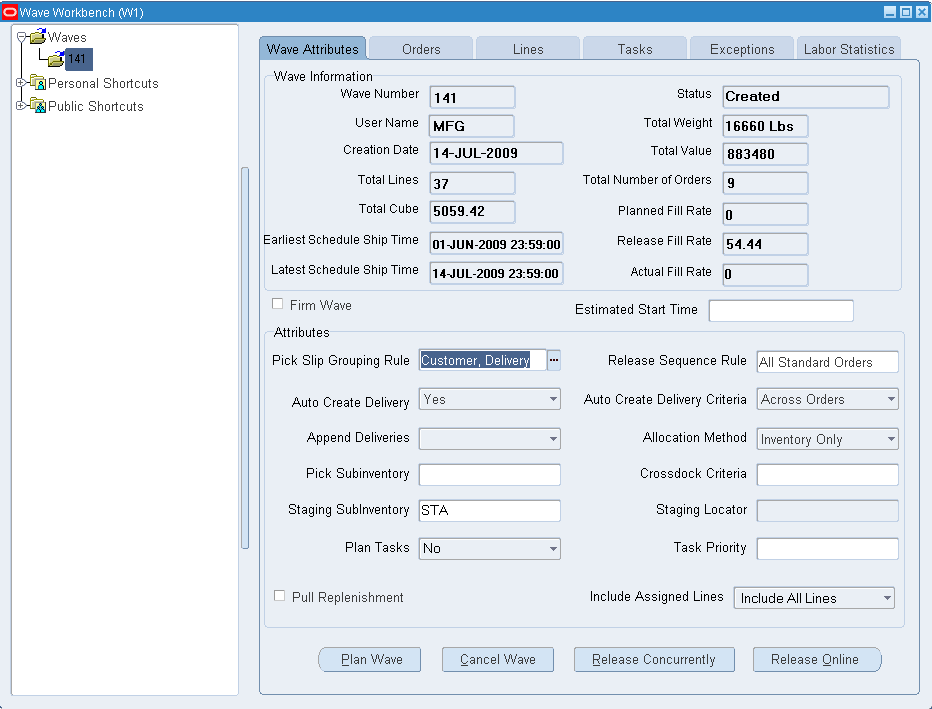
To view a wave (before releasing the wave)
Navigate to the Wave Workbench window.
From the navigation tree, click the plus sign next to the Waves item to display the available waves, then select the wave.
On the Wave Attributes tab, you can review or update criteria for the wave:
Firm Wave check box: Select this option to firm the wave. When you firm a wave, the orders are tied to that wave for release. You can choose to firm a wave prior to release or during release. When the wave is released, it is automatically firmed (if you have not already firmed the wave).
Note: If you selected the Reserve Stock for order line check box on the Fulfillment Planning tab in the Plan Wave window, then reservations are created during wave planning and material cannot be allocated to other orders.
Estimated Start Time: The system uses the date entered during labor planning to plan resources and tasks and to determine a target completion date.
Pull Replenishment: Select this option to enable pull replenishment for the wave. (When creating the wave, you can also select the Pull Replenishment check box on the Wave Options tab in the Create Wave window).
Note: After the wave is released, you cannot select these options.
To plan the wave (after you have reviewed the remaining tabs in the Wave Workbench window), click the Plan Wave button. If you already selected the Plan Wave check box in the Create Wave window then you do not need to re-plan the wave. For more information, see Planning a Wave.
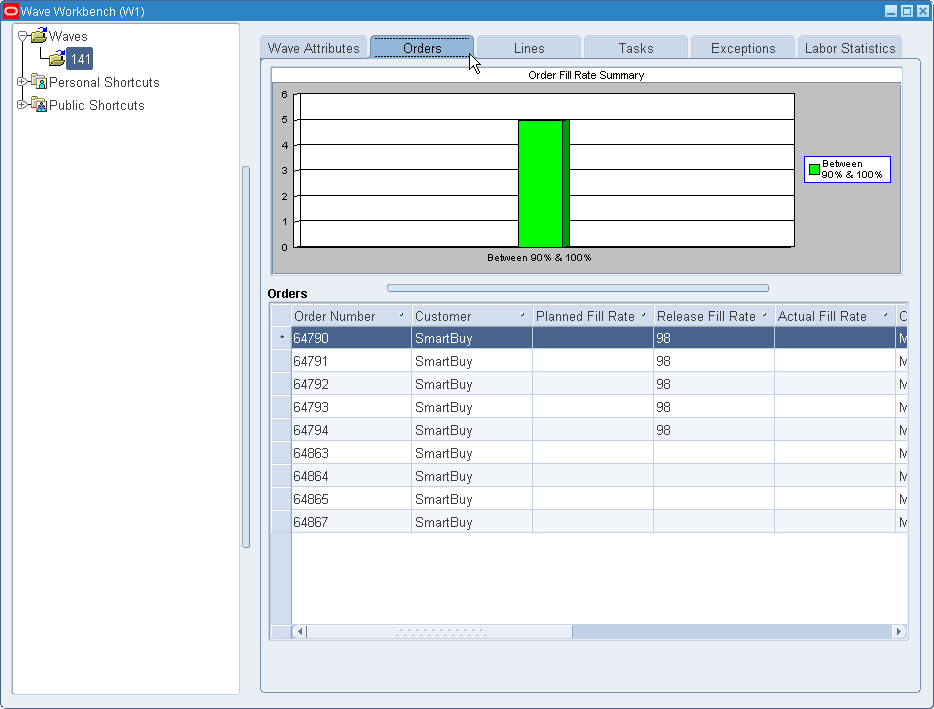
Orders tab
Click the Orders tab to view information about individual orders for the wave. The graph shows the fill rate summary for all of the orders within the wave.
Lines tab
Click the Lines tab.
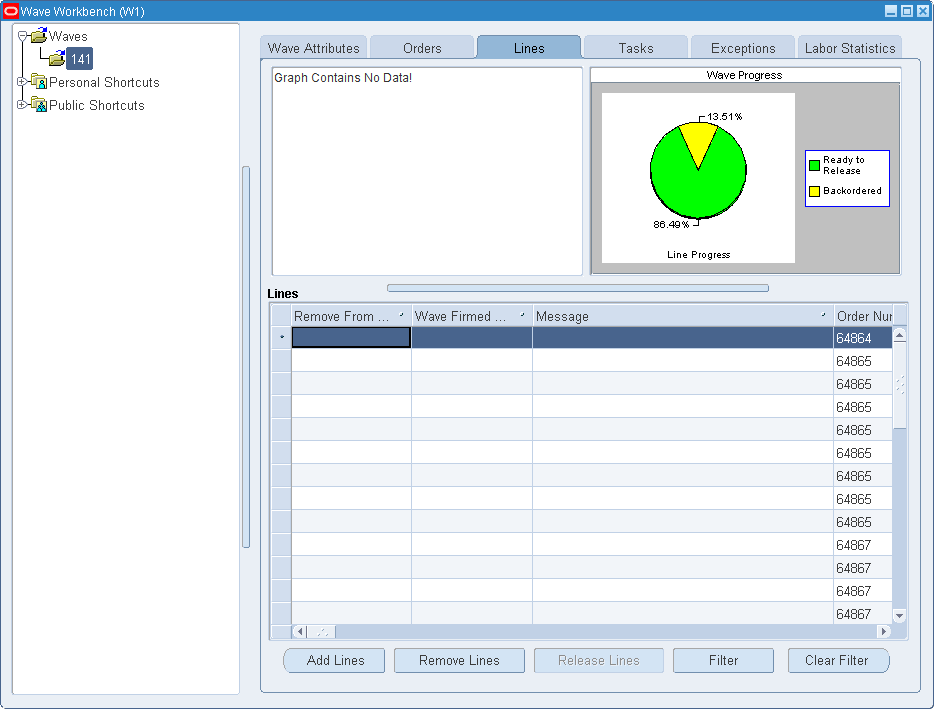
On the Lines tab, you can complete the following actions:
View the order lines within a wave, the overall progress of a wave, and information about individual order lines such as item, line status, and delivery information.
Click Add Lines (on the Lines tab of the Wave Workbench) to add additional orders or lines to the wave. For information on adding priority orders to a wave (unreleased or released), see To add priority orders to a wave.
Click Remove Lines to remove a line from a wave that has been created or planned.
Click Filter to filter lines by criteria such as order number or item to see specific details.
Tasks tab
Click the Tasks tab to view a real-time monitoring of waves and the status of the tasks in the picking process.
Note: To refresh the Tasks tab, you need to navigate to a different tab and return to the Tasks tab.
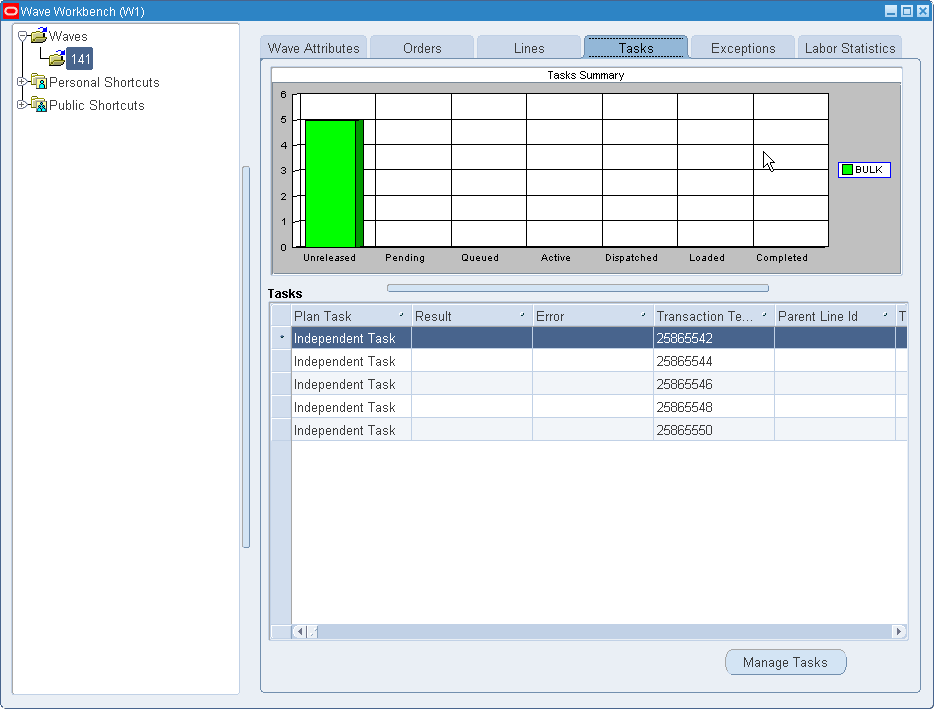
When a wave is unreleased, tasks may or may be created depending on the wave. Most of the time, tasks to do not exist because the material has not been allocated to fulfill the orders. If the material has already been allocated to fulfill the orders, then a pending or an unreleased task may exist for the wave prior to release.
Note: Tasks can have the status of pending and unreleased.
Click Manage Tasks to change the priority, assignment, and status of tasks. For more information on managing tasks, see To manage tasks.
Exceptions tab/Labor Statistics tab
Click the Exceptions tab to display exceptions (for released waves only).
Click the Labor Statistics tab to preview the labor planning information set up during wave planning such as planned wave load, net and available capacity, and workloads for various resources.

To add priority orders to a wave (released and unreleased waves)
When action on a priority sales order is required, a warehouse manager must be able to manually add a priority order to a wave so that it can be dispatched to a user who can pick and stage it for immediate delivery. Warehouse management enables you to add a priority order (and lines) to a wave. The wave can be either in unreleased or released status.
Note: If replenishment has completed, backordered lines may also be added back into the wave using the Add Lines button. If you add the line after the wave has been planned, but before the wave is released, then you can re-plan the wave, and the system will consider the newly-added lines. If you add the line after the wave is released, then the system does not consider the line in planning calculations.
Navigate to the Lines tab of the Wave Workbench window.
Click Add Lines.
On the Create Wave window, enter the criteria to determine which lines or orders you want to add to the wave.
Note: After you add lines or orders to the system, the system recalculates the following values based on the new number of tasks: total lines, total cubic volume, total weight, total value, actual fill rate, and total number of orders.
To release the wave
Select the wave to be released.
On the Wave Attributes tab, choose one of the following options:
Click Release Concurrently to run the Wave Planning Release Wave concurrent request to release the wave. You can release the wave immediately or schedule a different release time. The system runs the concurrent request in the background so you can run other processes.
Click the Release Online button to release the wave. If you select this option, the wave is released immediately but you will be unable to complete other activities on your terminal until the process has completed.
Note: If you add orders or lines to a released wave, you will be able to release the wave again. In this case the lines or orders are added to the wave.
To view a wave (after releasing the wave)
After you release a wave, you can view the order and order line status, and track the progress of operators as they pick tasks. You an also remove lines from the wave.
Navigate to the Wave Workbench window.
From the navigation tree, click the plus sign next to the Waves item to display the available waves, then select a wave.
You can view detailed information about the selected wave on the following tabs:
Wave Attributes tab
Click the Wave Attributes tab to review the criteria used to release the wave.
Firm Wave check box: The Firm Wave check box is unavailable (grayed out) because the wave was firmed when it was released.
Pull Replenishment: Shows if pull replenishment is enabled for the wave.
Plan Wave, Release Concurrently, and Release Online buttons (bottom of the Wave Attributes tab): After the wave is released, these buttons are grayed out.
If you add orders or lines to a released wave, you will be able to release the wave again. In this case the lines or orders are added to the wave.
Orders tab
Click the Orders tab to view lines that have been released within the wave.
The graph on the Orders tab shows the fill rate summary for all of the orders within the wave. The table below the graph displays information about individual orders.
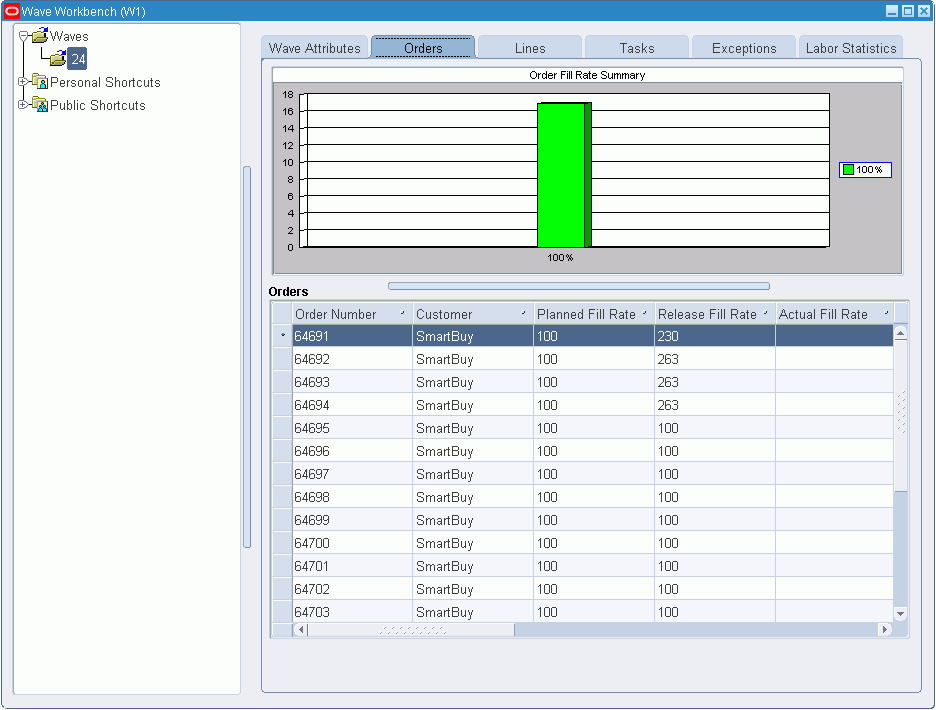
On the Orders tab, you can also complete the following actions:
View order and order line level details to track progress of orders in the warehouse.
Track the progress of operators as they pick tasks.
Track the fill rate.
Track the status of various lines in the warehouse, for example, Picked, Queued, Staged.
Lines tab
Click the Lines tab to view the order lines within a wave, the overall progress of a wave, and information about individual order lines such as item, line status, and delivery information.
Note: The system updates the fill rate summary when new lines are added to the wave. When you release the new lines for picking then the new lines will be considered as well. The system differentiates between cross docked tasks and inventory tasks.

Complete your entries as required:
Add Lines: Click to add lines to a wave even after it has been released.
Remove Lines: Click Remove Lines to remove a line from a wave after it has been released to the warehouse.
Filter: Click Filter to filter lines by criteria such as order number or item to see specific details.
Tasks tab
Click the Tasks tab to monitor tasks that have been released to the warehouse and the progression of tasks through the picking process. For example, as an operator progresses through picking tasks, the warehouse manager can monitor the task progress in the Tasks tab.
In addition, you can run the Launch Task Release concurrent process to release tasks to users over time. You can release tasks only after a location has been replenished based on reverse trip sequence, release all tasks for a consolidation locator, or tasks that will be cartonized together. Finally, you can manage tasks by changing their priority, assignment, and status.
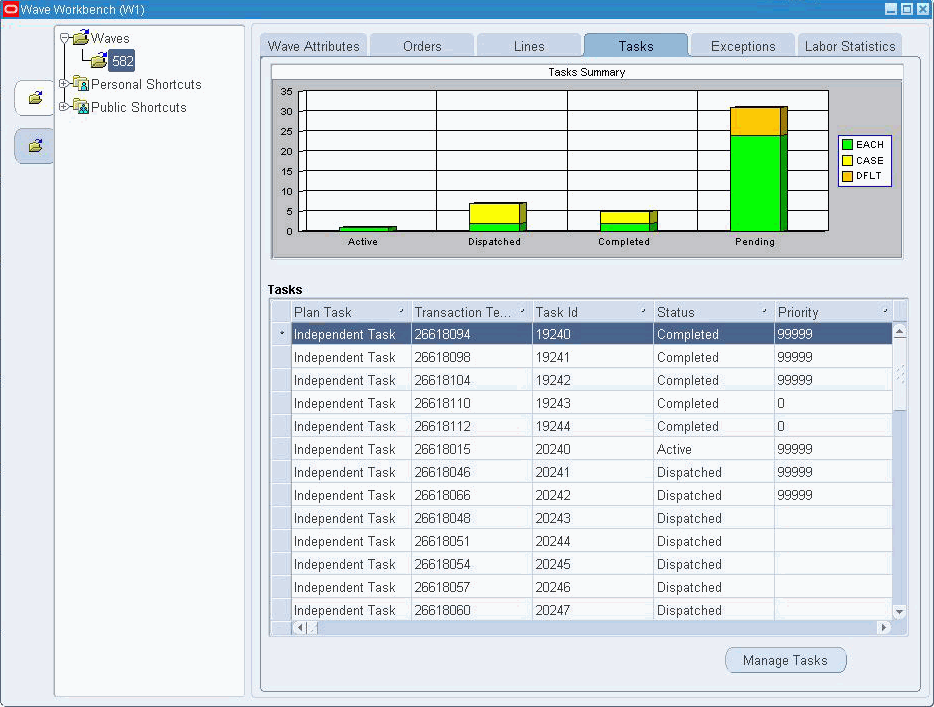
Note: To refresh the Tasks tab, you need to navigate to a different tab and return to the Tasks tab.
When a wave is unreleased, tasks may or may be created depending on the wave. Most of the time, tasks to do not exist because the material has not been allocated to fulfill the orders. If the material has already been allocated to fulfill the orders, then a pending or an unreleased task may exist for the wave prior to release.
Note: Tasks can have the status of pending and unreleased.
To manage tasks in the Manage Tasks window
Tasks are created when a wave is released. Occasionally, warehouse managers may need to cancel tasks but still associate the task to the sales order; for example, during work stoppages in the warehouse.
Click Manage Tasks to update the priority, assignment, and status of tasks, or to cancel tasks.

In the Task Summary field, select the category whose tasks you want to update or cancel: Picks, Replenishments, or Putaway.
Complete the following steps to update or cancel the associated tasks.
To update tasks
In the Action field, select Update.
Select the update criteria:
Status: Restricts task updates to only those tasks in the selected status such as pending, queued, or unreleased. For example, select Unreleased to update unreleased tasks only. Alternatively, leave the Status field blank to update tasks regardless of status.
Priority: Restrict task updates to the selected priority level, or select the Clear Task Priority check box to disregard task priority.
Employee: To update tasks for a selected employee, select the employee name. Select the Override Employee Eligibility Check box to override eligibility checks.
To cancel tasks
In the Action field, select Cancel.
Note: Tasks with the following statuses can be cancelled: unreleased, queued, pending, and dispatched.
When you cancel a task, the system backorders the task quantity and, if necessary, splits the sales order line. The system automatically recalculates the following measures based on the new number of tasks:
Total number of lines.
Total cubic volume.
Total weight.
Total value.
Actual fill rate: When fulfilling the remaining tasks, the actual fill rate will reflect the deleted tasks.
Total number of orders: The total number of orders is recalculated. This number may or may not change depending on if all tasks for a sales order are deleted.
Exceptions tab
Click the Exceptions tab:
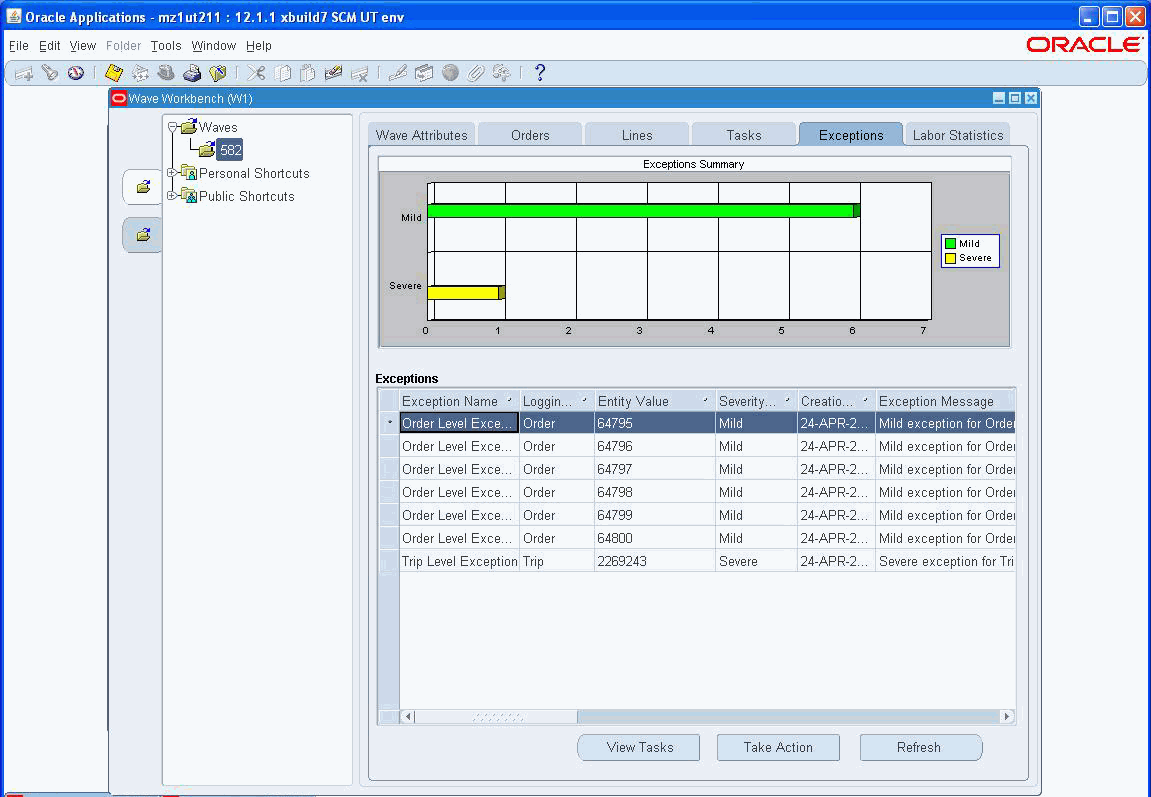
To view wave exceptions in the Exceptions tab, run the Wave Planning - Catch Exceptions concurrent request. Review the wave exceptions and the severity level associated with the wave, and if required, you can take actions on the exceptions. As with other concurrent requests, you can schedule this request to run on a periodic basis. The system bases exceptions on a hierarchical order using dock door appointments, scheduled ship date, and expected ship date.
Exceptions can be logged for waves, trips, deliveries, orders, and order lines as described in the following examples:
Wave: You can set up the system to log an exception when 80% of the orders for a wave are not staged two hours prior to the dock door appointment time.
Note: When logging a wave or a trip level appointment, the system looks at the earliest basis (such as dock door appointment) to log the exception.
Trip: You can create trip level appointments if all order lines for a trip are not loaded one hour prior to the end of the dock door appointment time.
Order: You can log order level line exceptions for example if 100% of the lines for an order are not packed three hours prior to the end of a dock door appointment.
Order line: You can also log exceptions for individual order lines. This can be useful if an line is in the replenishment requested status for more than a specified amount of time.
Click the Take Action button to take corrective actions such as incrementing the task priority, or dispatching tasks directly to a user to speed up the picking process. For example, if you take an action such as incrementing the task priority, the task with the increased priority will now take precedence over other tasks in the queue (after you refresh the view).
You can also perform actions on the exceptions detected by the concurrent request. You can perform automatic corrective actions when you run the concurrent request, or take action on the exceptions in the Wave Workbench window. You can release backordered lines, release planned tasks, change the priority of a task, place a hold on pending task, and view existing tasks.
Related Topics
Viewing Waves Using the Wave Dashboard
Setting Up Task Release Options
Using Concurrent Requests with Wave Planning
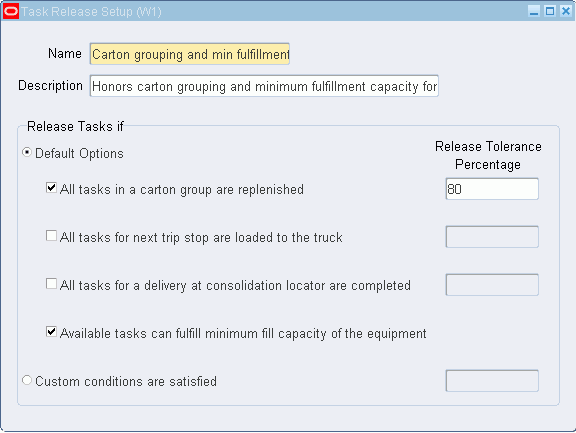
In the Task Release Setup window, you can create one or more templates that define default options for releasing tasks; for example, you could define a template to release tasks when:
All tasks in a carton group are replenished.
All tasks for next trip stop are loaded to the truck.
All tasks for a delivery at consolidation locator are completed.
For each option, you can also specify a release tolerance percentage by entering a value from 0 to 100. For example, a tolerance of 20 percent enables tasks to be released within a margin of 20 percent above or below the actual release value.
To run the task release process, select the desired template in the Launch Task Release concurrent request window, then run the request. When the request runs, the tasks are released according to the conditions defined in the selected template.
Note: The Launch Task Release concurrent request can cartonize the tasks across pick release batches based on the default cartonization options selected in the Organization Parameters window (Warehouse tab). Cartonization eliminates suboptimal packing configurations by suggesting the best cartons to use based on grouping rules, carton weight capacity, carton volume, and the dimensions of the items to be packed in comparison to the carton's dimensions. For more information, see the Oracle Warehouse Management Implementation Guide, Warehouse Organization Setup.
To set up task release options
Navigate to the Task Release Setup window.
Enter a name and description to create a new task release template.
In the Release Tasks if region, select the default option(s) for releasing tasks. A task can be released when it meets the set criteria.
For each selected option, you can enter a release tolerance percentage to define acceptable release tolerance margins for that task.
Alternatively, if you select Custom conditions are satisfied, you can enter a release tolerance percentage; however, the Default Options will be grayed out.
Save your work.
After you create the template, use the Launch Task Release concurrent request to select the appropriate task release template, then run the concurrent request.
Related Topics
Launch Task Release Concurrent Request
Using Concurrent Requests with Wave Planning
Viewing Waves Using the Wave Dashboard
Viewing Waves Using the Wave Workbench
![]()
Copyright © 1999, 2010, Oracle and/or its affiliates. All rights reserved.