Release 12.1
Part Number E13507-10
Contents
Previous
Next
| Oracle Self-Service Human Resources Deploy Self-Service Capability Guide Release 12.1 Part Number E13507-10 | Contents | Previous | Next |
SSHR uses the same security mechanisms as Oracle HRMS applications. By defining user profiles, security profiles, responsibilities, and menu structures, you can control who uses SSHR, which information they can access, and how they access it.
See: Security Overview, Oracle HRMS Configuring, Reporting, and System Administration Guide
This documentation identifies the key concepts relating to SSHR user access and security and to provide information on how to apply these concepts to address the needs of your enterprise.
The following section answers common questions on SSHR and user access and gives an overview of the functionality.
The security controls - responsibilities, menus, and security profiles - used in standard Oracle applications also apply to self-service users. The seeded SSHR menus (Employee Self Service, Manager Self Service, and Contingent Worker Self Service) are collections of functions intended for distinct audiences. The employee functions are constrained to operate only on the current self-service user's record; the manager functions allow the user to select an person from a list of available employees and workers and carry out the required function. The seeded SSHR responsibilities corresponding to each of these menus are useful for exploring the functionality delivered with the product, although they are not intended for production use. Instead, customers can configure their own variations of these menus and responsibilities, combined with appropriate security profiles, to restrict different groups of users to specific functions and employee groups. The Personalization Framework and Workflow Builder tools offer considerable flexibility in controlling the user's access to specific functions and require that users' transactions are approved before they are committed to the database. You can also control the user's access by configuring the base products. For example, Benefits eligibility profiles and enrollment requirements can determine which benefits an employee can select from within the Benefits Enrollment function.
In addition to controlling which self-service functions a user can access, you can also control which employee records a user can access. Employees can only access their own personal information. Manager and HR professionals can access the personal information for selected employees. This access is controlled by security profiles which restrict different groups of users to accessing specific employee groups. When a manager selects a function from the self-service menu, the list of subordinate employees and workers is displayed in a hierarchy. If appropriate, you can permit managers to search for employees and workers in other business groups or organizations and if required, you can restrict this access to view-only and prevent managers from performing any transactions on employees outside of their business group.
In certain situations, for example, after an applying for a different position, an employee may wish to release their personal information to a third party, for example, a new manager. In this case, the employee can use the Release Employee Information function to enable the new manager to access the employee's personal information.
You can follow the standard Oracle procedures to create users and enable self-service by adding the self-service responsibilities to the user. Alternatively, you can use a batch process to create multiple users at one time. The batch processes are particularly useful if you need to create large numbers of accounts after initial installation, or for the new hire process.
The following description gives an overview of the standard security mechanisms used in Oracle HRMS and discusses how they relate to Oracle SSHR.
A responsibility combines low-level elements of user access configuration to control which functions the user can access (User Access to Functions) and on whom they can perform these actions (see User Access to People).
You define SSHR responsibilities in the same way as you define responsibilities for Oracle HRMS applications.
Note: When you define your responsibilities, make sure they are available from Oracle Self-Service Web Applications.
See: Responsibilities, Oracle HRMS Configuring, Reporting, and System Administration Guide
As an administrator, you can view a list of all owned responsibilities using the Responsibility Ownership functionality in SSHR. This functionality enables you to display a list of people with access to each of your owned responsibilities and revoke access to the responsibilities if appropriate.
The primary users of SSHR can be divided into two main groups: managers and employees (non-managers).
Employees (non-managers)
Employees and workers can only access their own employee records.
Managers can process the records for other employees and workers after selecting them from the Enter Process page. In the Enter Process page the manager can switch between View as:
Hierarchy
This view presents a hierarchical view of the employees and workers reporting to the current user. This view is based on either the supervisor or supervisor assignment hierarchy but can be configured to use the position hierarchy by setting the profile option HR: Self-Service Display Position Hierarchy to Yes.
For more information on supervisor hierarchies, see Security Profiles by Supervisor Hierarchy, Oracle HRMS Configuring, Reporting, and System Administration Guide
Note: Although Oracle recommend using either a position or supervisor-based hierarchy, you can set up other security structures in Oracle HRMS if you prefer.
My List
This view contains a user-defined list of people for quick reference.
Note: If the profile option HR:Expand Role of Contingent Worker is set to Yes, contingent workers will be able to manage other employees.
The Enter Process page enables managers to perform a basic search for any employee within the underlying security profile. Alternatively managers can access the Advanced Search page to apply more detailed search criteria.
The manager can process employees and workers in the resulting list directly or add them to My List for future reference.
Note: You can extend the security profile for managers by enabling the Release Employee Information function.
See:Release Employee Information
Some functions enable managers and HR Professionals to search for ex-employees and terminated employees.
See:
Configuring the Appraisals Function, Oracle Performance Management Implementation and User Guide
This extended search functionality is controlled by a function parameter.
See: Menu Function Parameter Descriptions
You can control user access to the People Search functions by excluding certain functions if required, for example, you can hide the Person Search function so that managers can only process the records for the employees and workers displayed in their hierarchy.
See: Defining User Access and Menus
You can also control how managers search for employees and workers by assigning profile options. For example, you can apply the HR: Cross Business Group profile option to enable managers to search across business groups. If you then set the HR: Restrict Transactions Across Legislations in SSHR profile to Yes, the names of the employees and workers in other legislations will be disabled.
SSHR uses security profiles to control a user's access to person records. For example, a security profile can give a manager access to the records for all the employees and workers in the department.
See: Security Profiles, Oracle HRMS Configuring, Reporting, and System Administration Guide
Employees (non-managers) and contingent workers
You can use the default View All security profile for the corresponding business group for the employee (non-manager) responsibilities because the employee functions restrict the user to accessing only their own record.
Managers
If you allow your managers to access the Search functions, you must create suitable security profiles. For most SSHR managers, the most appropriate security profile is a profile based on a supervisor hierarchy. This type of security profile dynamically generates a list of available employees and workers based on either the supervisor hierarchy or the supervisor assignment hierarchy (starting with the current user). The advantage of using a profile of this type is that you can set up a single security profile and use it for multiple users. To activate supervisor security, select either the Restrict by Supervisor (person-based) option or the Restrict by Supervisor (assignment-based) option in the Security Profile window. In this case, the manager can see the records for the persons with at least one assignment for which they are the supervisor and the manager can also see the direct reports for this person.
See: Security Profiles by Supervisor Hierarchy, Oracle HRMS Configuring, Reporting, and System Administration Guide
You can choose to build your supervisor hierarchy based on individual assignments. This means that your SSHR manager can only view and update a person's record if the manager is the supervisor for the specific assignment.
See: Assignment-Level Security, Oracle HRMS Configuring, Reporting, and System Administration in Oracle HRMS
Multiple Assignments
If you wish to enable your managers to view and update multiple assignments for employees and workers, you can use the HR:Enable Multiple Assignments in SSHR system profile to allow this.
Note: If you are using assignment-based security, you must enable this profile option.
If the profile is set to No, managers can only view and update primary assignments. If the profile is set to Yes, managers can view and update only the assignments that are reporting to them through the security hierarchy.
Note: In the Security Profile window, on the User-Based Security tab, select the Primary Assignments Only check box to restrict managers to viewing and updating primary assignment information only.
See: Defining a Security Profile, Oracle HRMS Configuring, Reporting, and System Administration Guide
Alternatively, you can choose to disable the Search functions for an SSHR manager responsibility. In this case, you can assign the View All security profile to the users.
You can supplement the list of people who appear in a security profile by enabling the Release Information function. With this function, users can allow other users (who are outside of the security profile) to access their records. Similarly, managers can use the Release Information to allow a second manager (who is outside of the security profile) to access the records for one of their employees.
To illustrate a typical use of this function, imagine that an employee wants to transfer to another organization. The new manager may need to review the employee's absence history before the transfer can take place. However, this manager may be outside the employee's current business group and would therefore, be restricted by HRMS security access. The manager cannot access the employee's data from a Person Search because of the defined security profiles. With the Release Information function, the employee granting access can search for the manager's name across all organizations and business groups and grant access to that person. This enables the manager to view the employee's absence history. However, you must ensure that the manager has a responsibility that satisfies the following conditions:
includes appropriate manager functions, for example, My Employee Information.
is associated with a security profile which has the "Allow Granted Access" check box flagged.
If you want managers in your enterprise to have the same privileges for granted employees as for other employees who work for them, you can simply enable the "Allow Granted Access" option on the security profile they use with their main Manager Self Service responsibility. Alternatively, you may choose to limit managers' capabilities with respect to granted employees. For example, you may restrict managers to selected views and not allow them to use functions such as Termination. To do this, disable the "Allow Granted Access" check box for the main security profile and enable the check box for a separate security profile with a reduced set of functions.
See: Release Information
You control user access to specific functions using function security. Functions are attached to menus which are then attached to responsibilities.
The traditional navigation path for SSHR users is to select a function, for example, Personal Information or Change Manager, directly from a user menu. From SSHR 4.2, SSHR supports this approach but also introduces a new navigation path which uses the Actions pages.
Instead of selecting a specific function from the menu, the user selects either the Personal Actions function (for employees and workers) or the Manager Actions function (for managers). SSHR displays a context-sensitive list of available functions.
Personal Actions
The Actions page displays a list of available functions for the employee or worker. To generate this context-sensitive list, SSHR takes the submenu defined in the HR: Personal Actions Menu profile option and excludes any legislation-specific functions that do match the legislation code of the user's business group.
Manager Actions
The manager is first presented with the Enter Process page from which they can select an employee assignment. They will then proceed to the Actions page which displays a list of functions available for the selected employee or worker. SSHR derives the list of functions by taking the submenu defined in the HR: Manager Actions Menu profile option and excluding any legislation-specific functions that do not match the legislation code of the selected person's business group.
Note: If the manager first selected their own record, the submenu is derived using the HR: Personal Actions Menu profile option.
Managers
When a user selects a manager function directly from the menu, they are first presented with the Enter Process page. From this page, they can select an employee for processing. The user is then taken, via the Effective Date page, to the corresponding web page for the function.
Note: Data security starts after the user has selected a person. If the function is specific to a legislation other than the legislation to which the selected person belongs, an error message is displayed.
Other Employees
When a user selects an employee function directly from the menu they are taken, via the Effective Date page if appropriate, to the corresponding web page for the function.
Note: Data security is checked after the user has selected a function. If the function is specific to a legislation other than the legislation to which the user belongs, an error message is displayed.
Workflow administrators can monitor all workflow transactions across the business areas in an enterprise. Now, depending on your business requirements, you can restrict a workflow administrator's access to specific workflow transactions using the HR Self Service Selected Person ID Instance Set. This object instance set uses security profiles to identify the data that workflow administrators can access. For example, you can use this feature to restrict an administrator's access to workflow transactions in a specific organization hierarchy or a business group. Similarly, you can restrict a human resources manager to view only HR transactions and a payroll executive to view only payroll transactions.
See: Restricting Access to Workflow Transactions
Most SSHR functions are global and can be used on employees in any legislation. However, some functions are legislation-specific and must be restricted to employees in the corresponding legislation.
SSHR uses FND Data Security to enforce this restriction. A data security object has been defined on the combination of person and legislation and data security menus have been created for predefined functions. There is one data security menu for global functions and one for each legislation code. The predefined functions are associated with either the global data security menu or with one or more of the country-specific data security menus as appropriate.
Data security grants have been predefined associating each data security menu with the appropriate legislation code (or with all legislation codes in the case of the global menu). The effect of each grant is to enable the functions attached to the corresponding data security menu for people in business groups having the corresponding legislation code.
For example, a function on the global data security menu may be used with any employee but a function that is only on the US data security menu may be used only with employees in a US business group.
In addition to the data security menus that are available for predefined functions, there is a similar set of data security menus to which you can attach your custom functions. The data security grants are already in place.
See: Data Security Menus
You define SSHR users in the same way as you define users for Oracle HRMS applications.
See: Users Window, Oracle E-Business Suite System Administrator's Guide - Security
However, the Person field of the Users window is particularly important for SSHR as it acts as the link between the professional forms interface and SSHR. It ensures that the user name is linked to the correct person records. For example, if you were to create a user and assign an SSHR responsibility to this user, the correct employee records would only be displayed in SSHR if the user's name is entered in the Person field.
See: Responsibilities, Oracle HRMS Configuring, Reporting, and System Administration Guide
The New User Registration functions enable new users to register their own details and create their own users for SSHR. You can also add a user hook which generates the user name when the user clicks a button on the web page.
You can enable the New User Registration functions for both employees and non-employees. The non-employee registration form is usually used in conjunction with Advanced Benefits.
You apply user profiles to control how the SSHR application runs. You can set profile options at site level, application level, responsibility level, and user level. The individual profile options are specified in the sections on each module.
See: User Profiles, Oracle HRMS Configuring, Reporting, and System Administration
You can control which functions employees, workers, and managers can access by adding or removing functions from the user menus. For example, you could restrict employee access to the Termination function by only including it in the Manager menu.
See: Defining User Access and Menus
Access roles specify permission to view or update routed transactions, such as self-service actions. You manage access roles for self-service actions in the Maintain Roles window.
SSHR provides two predefined types that you can use to create access roles that govern update permissions in self-service actions:
SSHR Update Allowed
SSHR Update Not Allowed
By default, all users can update an action. If you define a role using the SSHR Update Allowed type and assign it to a user, everyone else can no longer update. If you define and assign a role using the SSHR Update Not Allowed type, everyone else can update.
You do not use both types in the same implementation. Your decision to use one type or the other depends on whether the majority of users require update privileges. If they do, use the Update Not Allowed type to remove edit privileges from the remaining users. If the majority do not require permission to update, use the Update Allowed type to grant edit permission to those who do. If your organization has 40,000 people, of whom only 80 require update privileges for self-service actions, it makes more sense to grant privileges to 80 people than to deny them to 39,920.
Note: Position control and budgeting features also use role types to set up roles for routing and approvals. Do not use the predefined role types of Line Manager, HR Manager, or Budget Manager with self-service actions.
See: Defining Workflow Roles for Transactions, Oracle HRMS Enterprise and Workforce Management Guide
SSHR uses four types of menu: top-level menus, submenus, hidden submenus, and data security menus. The following section looks at each of these menus in detail.
The predefined menus are overwritten whenever an SSHR patch is applied so any changes you have made to the menus are lost. For this reason, you should create at least one top-level menu for employees and at least one for managers.
Note: You can avoid having to configure several similar menus by adding all employee and manager functions to each of your menus and then defining menu exclusions against the responsibility to exclude specific functions from groups of users.
Top-level Menus
The top-level menus define the choices that the user sees on their menu when they log in to SSHR. For example, the top-level menu for the Employee Self-Service responsibility is the Employee Self Service menu.
See: Defining User Access and Menus
Submenus
Submenus group together functions in a logical group on the top-level menu, for example, the Professional Details functions are grouped together in the Manager Professional Details submenu. The predefined submenus for SSHR include:
Professional Details (for Employee Self-Service)
Manager Professional Details (for Manager Self-Service)
Hidden Submenus
By attaching a submenu to the top-level menu without defining a prompt, you can assign functions to the responsibility but hide them from the user. This means that the user cannot select these functions directly. The following hidden submenus are predefined for SSHR:
Submenus for Actions
Manager Actions Menu (for Manager Self-Service)
Personal Actions Menu (for Employee Self-Service)
Contingent Worker Personal Actions Menu (for Contingent Worker Self-Service)
Appraisals Menu
Submenus for Pages (Employee Self-Service)
Suitability Matching Employee Personal menu
Suitability Matching Pages menu
HR Self-Service Pages submenu
My Information Functions menu
Submenus for Pages (Manager Self-Service)
HR Self-Service Pages submenu
Suitability Matching Manager menu
Suitablility Matching Pages menu
Self Service Contingent Worker Functions
HR Manager Self Service Pages
My Employee Information Functions menu
SSHR hierarchy and search functions
SSHR uses these submenus to determine the availability of functions in other places. For example, the Manager Enter Process submenu controls the tabbed regions appearing on the Manager Enter Process page. The Manager Actions menu controls which functions are available on the Actions page for a manager to perform on other employees. The Personal Actions menu controls which functions are available to a user on the Personal Actions page. This menu also controls which functions are available from the Actions page when the manager selects their own record.
Data Security Menus
SSHR uses the data security menus to determine which functions are global and which are for specific legislations.
The data security menus for SSHR are:
HR_GLOBAL_SS_FUNCTIONS_SEED
Contains all the functions that are accessible across legislations (global functions)
HR_cc_SS_FUNCTIONS_SEED (where cc is legislation code)
Contains all the functions that are specific to a legislation
HR_GLOBAL_SS_FUNCTIONS_CUSTOM
Contains customer functions that are accessible across legislations
HR_cc_SS_FUNCTIONS_CUSTOM (where cc is the legislation code)
Contains customer functions that are specific to a legislation
If you create a new employee menu and want to use the Personal Actions functionality, you need to add the following submenu to your new menu:
Personal Actions Menu (or your configured copy of this menu)
If you intend that contingent workers use your new employee menu, add the Contingent Worker Personal Actions Menu (or your configured copy) instead of the Personal Actions Menu.
You must also add the following functions to your new menu:
Personal Actions (or your configured copy of this menu)
Suspended Actions
You must also make sure that, for any responsibilities that use your new employee menu, the values for the following profile options match the names of the personal actions submenus you selected above.
HR:Personal Actions Menu
HR:Contingent Worker Personal Actions Menu
If you create a new Manager menu and want to use the Manager Actions functions, you need to add the following submenus to your new menu:
Personal Actions Menu (or your configured copy of this menu)
Manager Actions Menu (or your configured copy of this menu)
SS Hierarchy and Search Functions
If you intend that contingent workers use your new manager menu, add the Contingent Worker Personal Actions Menu (or your configured copy) instead of the Personal Actions Menu.
You must also add the following functions to your new menu:
Suspended Actions Mgr
You must also make sure that, for any responsibilities that use the new manager menu, the values for the following profile options match the names of the manager actions and personal actions submenus you selected above.
HR:Manager Actions Menu
HR:Contingent Worker Manager Actions Menu
HR:Personal Actions Menu
SSHR modules are accessible from predefined responsibilities, each with a corresponding top level menu.
In this version of SSHR, the predefined responsibilities are:
Employee Self-Service
Manager Self-Service
HR User Self Service
New User Registration
HR Professional
Payroll Professional
Contingent Worker Self-Service
Responsibility Ownership
The predefined US Federal responsibilities are:
US Federal Employee Self-Service
US Federal Manager Self-Service
US Federal HR Self-Service
The predefined responsibilities for the HR Foundation application are:
Employee Self Service Foundation
Manager Self Service Foundation
The additional responsibilities provided by OSSWA (Oracle Self-Service Web Applications are:
Workflow User Web Applications
Preferences
Note: These responsibilities are provided as a starting point only. You should create your own responsibilities and menus using the predefined SSHR responsibilities and menus as examples. Otherwise, your changes may be lost during an upgrade.
SSHR includes several predefined top-level menus:
Employee Self Service
Manager Self Service
HR Professional
Payroll Professional
Contingent Worker Self Service
Employee Self Service Foundation
Which includes the following functions/submenus:
Suspended Actions
Personal Actions
Employee Enter Process submenu
Personal Actions Foundation submenu
Professional Details
Manager Self Service Foundation
Which contains the following functions/submenus:
Suspended Actions Manager
Manager Actions Tree View
Manager Enter Process submenu
Manager Actions Foundation
Personal Actions Foundation
Manager Professional Details
US Federal SSHR includes predefined top-level menus:
Benefits
My Information
My Employee Information
Employee Information
The Employee Self Service menu contains the functions that employees can perform on their own records, for example, the Personal Details function. The Manager Self-Service menu contains the same functions as the employee menu plus additional functions that the manager can carry out for the employees for whom they are responsible.
The HR Professional menu is available for HR professionals who wish to view summarized information on employees.
You can also use the following menu for administration purposes:
HR Web Administrator
See: Self-Service Menus
Both employees and managers can access functions in one of two ways. They can either use the above menus and select the function using the corresponding menu option or they can display the Actions page through the Manager Actions or Personal Actions menus and select the required function from the list of available actions.
SSHR provides legislation-specific menus to give users access to the functions that are specific to a country.
See: Self-Service Menus
The Responsibility Ownership function enables you (as an administrator or implementor) to view a list of owned responsibilities. You can expand the list of responsibilities to display the menus and functions attached to each responsibility. From the list of responsibilities, you can see the number of people with access to each responsibility both within the organization (in other words, within your HR security access environment) and outside of the organization (outside of your HR security access environment). By clicking on the number of people, you can display the user ID and other information for each user with access to the responsibility and if required, you can revoke access directly in the self-service page. If you choose to revoke access to a responsibility, the affected user receives notification of the change.
Note: When the application generates the notification, it also triggers a business event. You can subscribe to this business event and call Application Programmatic Interfaces (APIs) to end date the responsibility access.
See: Event Subscriptions, Oracle Workflow Developer's Guide
You can use the Responsibility Ownership functionality as an extra security measure to review and restrict the number of people outside of your organization with access to particular responsibilities. You can also monitor the number of people with access to each responsibility for auditing purposes.
You access this module can be accessed from the following menus and functions:
| User Menu Name | Function Name |
|---|---|
| Responsibility Ownership | Responsibility Ownership |
The workflow details for this module are listed below:
Not applicable
Not applicable
Not applicable
Before you can use the Responsibility Ownership function, you must create data security grants to link responsibilities to your users.
See: Creating Data Grants for Responsibility Ownership
See: Create Data Grant (Oracle E-Business Suite System Administrator's Guide - Security)
You should create code to subscribe to the following business event:
oracle.apps.per.selfservice.respowner.revoke_access
This code should trigger the fnd_user_resp_groups_api.update_assignment API to end date the responsibility assignment.
See: Sample Code for Subscribing to Business Event (Responsibility Ownership)
If you are using the Responsibility Ownership function, you should write a PL/SQL code to subscribe to the following business event:
oracle.apps.per.selfservice.respowner.revoke_access
Important: The code should call the following Application Programmatic Interface (API) which end-dates the responsibility assignment:
fnd_user_resp_groups_api.update_assignment
Sample code is provided below. You can use this as a basis for your own code.
Creating a Sequence (CUST_RESP_OWNER_ARCHIVE_SEQ)
CREATE SEQUENCE CUST_RESP_OWNER_ARCHIVE_SEQ
    MINVALUE 1
    MAXVALUE 999999999999999999999999999
    START WITH 1
    INCREMENT BY 1
    CACHE 20;
Creating a Table (CUST_RESP_OWNER_ARCHIVE)
create table CUST_RESP_OWNER_ARCHIVE
(REVOKE_ID varchar2(25),
USER_ID NUMBER(10),
RESPONSIBILITY_ID NUMBER(10),
REVOKE_JUSTIFICATION varchar2(250),
REVOKE_DATE Date,
REVOKED_BY NUMBER(10),
STATUS varchar2(250));
Creating a Package Header
CREATE OR REPLACE  PACKAGE cust_resp_owner_bevent AUTHID CURRENT_USER AS
FUNCTION revoke_access_wfevent_subscrb
( p_subscription_guid in raw,
p_event in out NOCOPY wf_event_t)
RETURN VARCHAR2;
END cust_resp_owner_bevent;
/
Creating Package Body
CREATE OR REPLACE  PACKAGE BODY cust_resp_owner_bevent AS
PROCEDURE archive_data
(p_user_id IN NUMBER,
p_user_name IN VARCHAR2,
p_resp_id IN NUMBER,
p_resp_appl_id IN NUMBER,
p_security_group_id IN NUMBER,
p_justification IN VARCHAR2,
p_status IN VARCHAR2) IS
l_login_person_id number;
BEGIN
l_login_person_id := fnd_global.user_id;
INSERT INTO CUST_RESP_OWNER_ARCHIVE
(REVOKE_ID,
USER_ID,
RESPONSIBILITY_ID,
REVOKE_JUSTIFICATION,
REVOKE_DATE,
REVOKED_BY,
STATUS)
VALUES
(CUST_RESP_OWNER_ARCHIVE_SEQ.nextval,
p_user_id,
p_resp_id,
p_justification,
sysdate,
l_login_person_id,
p_status);
EXCEPTION
WHEN OTHERS THEN
NULL;
END archive_data;
PROCEDURE remove_resp
(p_user_id IN NUMBER,
p_resp_id IN NUMBER,
p_resp_appl_id IN NUMBER,
p_security_group_id IN NUMBER,
p_error OUT VARCHAR2,
p_justification IN VARCHAR2) IS
cursor csr_user_name(v_user_id in number) is
select user_name
from fnd_user
where user_id = v_user_id;
cursor csr_user_resp_groups is
select description
from fnd_user_resp_groups
where user_id = p_user_id
and responsibility_id = p_resp_id;
l_user_name fnd_user.user_name%type;
l_owner_name fnd_user.user_name%type;
l_description varchar(2000);
l_login_person_id number;
BEGIN
l_login_person_id := fnd_global.user_id;
OPEN csr_user_name(p_user_id);
FETCH csr_user_name into l_user_name;
CLOSE csr_user_name;
OPEN csr_user_name(l_login_person_id);
FETCH csr_user_name into l_owner_name;
CLOSE csr_user_name;
OPEN csr_user_resp_groups;
FETCH csr_user_resp_groups into l_description;
CLOSE csr_user_resp_groups;
BEGIN
Fnd_User_Resp_Groups_Api.update_assignment(
USER_ID => p_user_id,
RESPONSIBILITY_ID => p_resp_id,
RESPONSIBILITY_APPLICATION_ID => p_resp_appl_id,
SECURITY_GROUP_ID => p_security_group_id,
START_DATE => SYSDATE - 2,
END_DATE => SYSDATE - 1,
DESCRIPTION =>
substr('RO:'||l_owner_name||':'||l_description,1,240)
);
p_error := 'Status SUCCESSFUL!';
EXCEPTION
WHEN OTHERS THEN
p_error := SQLERRM;
END;
--Helpdesk.remove_resp
-- (p_username => l_user_name,
-- resp_code => to_char(p_resp_id),
-- p_error => p_error,
-- p_description =>
--substr('RO:'||l_owner_name||':'||l_description,1,240));
archive_data(
P_USER_ID => p_user_id,
P_USER_NAME => l_user_name,
P_RESP_ID => p_resp_id,
P_RESP_APPL_ID => p_resp_appl_id,
P_SECURITY_GROUP_ID => p_security_group_id,
p_justification => p_justification,
p_status => p_error
);
EXCEPTION
WHEN OTHERS THEN
NULL;
END remove_resp;
FUNCTION revoke_access_wfevent_subscrb
( p_subscription_guid in raw,
p_event in out NOCOPY wf_event_t)
RETURN VARCHAR2
IS
I number := 0;
usrIdCnt number := 0;
l_error varchar2(2000) := null;
BEGIN
usrIdCnt := to_number(p_event.GetValueForParameter('USER_COUNT'));
FOR I IN 1 .. usrIdCnt LOOP
remove_resp
(p_user_id =>
to_number(p_event.GetValueForParameter('USER_ID'||to_char(I)))
,p_resp_id => to_number(p_event.GetValueForParameter('RESP_ID'))
,p_resp_appl_id =>
to_number(p_event.GetValueForParameter('RESP_APPL_ID'))
,p_security_group_id => to_number(p_event.GetValueForParameter
('SECURITY_GROUP_ID'))
,p_error => l_error
,p_justification => p_event.GetValueForParameter('MESSAGE'));
END LOOP;
COMMIT;
RETURN 'SUCCESS';
EXCEPTION
WHEN OTHERS THEN
WF_CORE.CONTEXT('PER_RESPOWNER_UTIL_SS',
'revoke_access_wfevent_subscrb', p_event.getEventName(),
p_subscription_guid);
WF_EVENT.setErrorInfo(p_event, l_error);
RETURN 'ERROR';
END revoke_access_wfevent_subscrb;
END cust_resp_owner_bevent;
/
For more information on using PL/SQL, see: Overview of Using PL/SQL in Applications, Oracle E-Business Suite Developer's Guide
Use the Workflow Administrator Web Applications responsibility and Events page to enable the business event: oracle.apps.per.selfservice.respowner.revoke_access. The revoke access feature of the Responsibility Ownership functionality works only if you subscribe to the business event
Follow these steps to subscribe to the business event:
Enabling the Business Event
Log on to the Workflow Administrator Web Applications responsibility.
Click Business Events. The Events page appears.
In the Events page, search for the business event: oracle.apps.per.selfservice.respowner.revoke_access.
Click Update.
In the Update Event page, select the Enabled status and click Apply.
Creating Subscription for the Business Event
In the Events page, search for the business event: oracle.apps.per.selfservice.respowner.revoke_access.
Click Subscription. The Subscriptions: Event: oracle.apps.per.selfservice.respowner.revoke_access page appears.
Click Create Subscription. The Create Event Subscription page appears.
Select the instance name.
Select the event filter: oracle.apps.per.selfservice.respowner.revoke_access
Enter 10 in the Phase field.
Select Enabled as the Status.
Select Message as the Rule Data.
Select custom as the Action Type.
Click Next.
In the PL/SQL Rule Function, enter the PL/SQL rule function in the following format: <package_name>.<function_name>
for example, cust_resp_owner_bevent.revoke_access_wfevent_subscrb
Enter the Owner Name: SSHR.
Enter the Owner Tag: PER.
Click Apply.
Data grants enable you to control access to data in the data security system. When you create a data grant, you grant access to a database object to a user. In the case of the Responsibility Ownership function, you use data grants to grant responsibility ownership to a user. The following graphic illustrates the concept of data grants:
Data Grants for Responsibility Ownership:
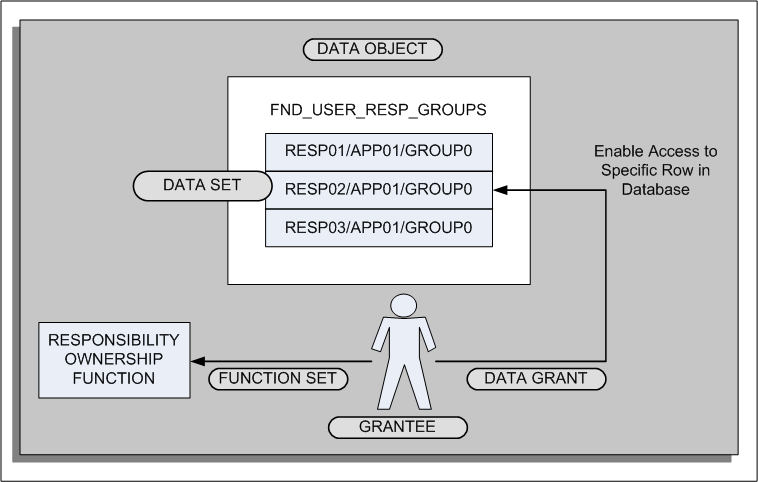
The data grant links the user (grantee) to a specific data set instance (row in the data object). In addition, you link a function set to the user which enables the user to access particular functionality (in this case, the Responsibility Ownership functionality).
For information on using data grants for other purposes, see: Overview of Data Security (Oracle E-Business Suite System Administrator's Guide - Security).
To create a data grant for the Responsibility Ownership
First identify which users should be granted ownership of responsibilities. These users would have an administrative role, for example, an HR Manager, Finance Manager, or System Administrator.
Use the Functional Administrator responsibility to create grants.
Select the Grants tab.
From the Grants page, click Create Grant to initiate the creation process and define the data grant.
In the Name field, enter a descriptive name for the grant, for example, <responsibility name>-Ownership. You can also enter a description.
Specify the effective date for the grant.
Navigate to the Security Context region to define the context for applying the grant.
In the Grantee Type field, select Specific User.
In the Grantee field, enter the user ID of the person who you are designating as the owner of the responsibility.
Navigate to the Data Security region.
In the Object field, enter the following delivered object:
FND_USER_RESP_GROUPS
Note: Oracle provides this object for use with the Responsibility Ownership functionality.
For the purpose of the Responsibility Ownership function, you must create a data set that grants access to a specific instance in the object table. Select this option (Instance) and continue to the next page to enter the instance information.
The data set instance comprises three segments of information. Enter the information, leaving the remaining fields blank:
| Primary Key | Example |
|---|---|
| Responsibility ID | 50101 |
| Application ID | 800 |
| Security Group ID | 0 |
Note: To determine the information for the data set, query the user in the Users window and select Help > Diagnostics > Examine from the Responsibilities block. Query the following fields in the Examine Field and Variable Values window:
RESPONSIBILITY_ID
RESPONSIBILITY_APPLICATION_ID
SECURITY_GROUP_ID
In the Set field, enter the delivered set PRIMARY_OWNER.
Note: Oracle provides this function set for use with the Responsibility Ownership functionality.
In this case, a function set is a data security menu containing the Responsibility Ownership function.
Click Finish to complete the data grant creation process. The desginated owners can now log on to SSHR and use the Responsibility Ownership function to administer and control access to their responsibilities.
You should repeat steps 1 through 11 for each responsibility that you want to review and maintain.
You can restrict a workflow administrator's access to specific workflow transactions, depending on your business requirements. To restrict access to workflow transactions, you create a grant for the Workflow Item Attribute Values object using the Functional Developer responsibility.
Prerequisites
Before you define restrictions to access workflow transactions, ensure that you:
Set up users and responsibilities to use Oracle SSHR.
Assign the Workflow Administrator responsibility to users to monitor workflow transactions.
Set up security profiles to give access to restricted set of information.
Set the HR: Security Profile option at the responsibility level for the Workflow Administrator responsibility.
To restrict access to workflow transactions
Log on to the Functional Developer responsibility.
Search for the predefined Workflow Item Attribute Values (WF_ITEM_ATTRIBUTE_VALUES) object.
Click the Update icon to navigate to the Update Object page.
Click Create Grant on the Grants tab to initiate the creation process and to define the grant.
On the Define Grant page, enter the following details:
In the Name field, enter a descriptive name for the grant.
Specify the effective date for the grant. Navigate to the Security Context region to define the context to apply the grant.
In the Grantee Type field, you can select a single user, a role, or global (all users and roles).
In the Responsibility field, specify a Workflow Administrator responsibility to apply the grant to that responsibility.
In the Object field, select the delivered object Workflow Item Attribute Values
Note: Oracle provides the Workflow Item Attribute Values object to restrict access to workflow transactions.
On the Grant: Select Object Data Context page, select the HR Self-Service Selected Person ID Instance Set (HRSS_WF_ATTR_PERSONID_INSTSET) to create a data set that grants access to a specific instance in the object table.
On the Grant: Define Object Parameters and Select Set page:
Review the definition of the grant.
In the Set field, enter the delivered Business workflow item attribute permission set (WF_ADMIN_ITEM_ATTR_PSET) to define the grantee's access.
Click Finish to complete the grant creation process. The designated workflow administrators can administer only the workflow transactions that they can access.
You must repeat these steps for each workflow administrator responsibility that you want to review and maintain.
Note: If users in your enterprise perform multiple roles such as a workflow administrator and a HR manager, then ensure that the users have the appropriate workflow responsibility to view their workflow transactions. For example, as a workflow administrator, the user must be able to view HR transactions.
Every Oracle HRMS user needs to be registered with a user name, password and responsibility. The creation or deletion of these user accounts can often be time consuming, particularly if you are restricting a user's access with a responsibility associated with a security profile and a menu.
A set of concurrent programs have been created for Oracle HRMS applications to automate the creation and management of large groups of user accounts. These programs are particularly useful if you have to create a large number of user accounts at initial installation, for managing new hire user accounts, or for managing accounts for terminated employees.
Note: The creation of users with effective dates in the future is not supported.
The concurrent programs are:
User Account Employee Extract Process
Data Pump Engine
Data Pump Batch Exceptions Report
Before you can use the concurrent programs however, you must write custom logic to reflect your enterprise's unique business rules. A user hook in the hr_user_acct_api is provided for you to do this.
You can find sample user hook code in the following package:
$PER_TOP/patch/115/sql/hrhksmpl.pkb
The Create Batch Users process only creates new responsibilities or profile option values for the new responsibility you create in the batch. This is for Oracle HRMS Applications only. The batch process does not create security profiles either. However, if you create a security profile, in Oracle HRMS, you can assign the security profile to a new responsibility that is created for a user in the batch process. The batch process does not create security attributes for a responsibility or a user.
A naming convention you might use is email ID with a responsibility name. For example, email ID JSMITH associated with the Manager Self Service responsibility could be JSMITH_MSS. If you have set up security profiles for managers in Oracle HRMS you can associate the security profile name to a user, a responsibility and a security profile. For example, the SEC_PF security profile could be JSMITH_MSS_SEC_PF.
You can create a template responsibility for the batch process. If you create a template responsibility, or use the predefined Manager Self Service responsibility, you can code a new responsibility created by the user hook to inherit the template responsibilities attributes. You can then overwrite the template responsibilities attributes, by setting values in the communication area, hr_user_acct_utility, of the API.
To create batches of users you must first write user hooks with your own custom logic.
See: Writing User Hooks to Create Batch User Accounts.
When you have created user hooks, you can run a set of concurrent programs to manage the batch creation of users on an ongoing basis.
You run the concurrent programs from the Submit Requests window.
To create batch user accounts with concurrent programs
Run the User Account Employee Extract Process
This program extracts employee records and creates a batch file of user accounts to be created or deactivated.
Run Data Pump Engine
This program uses the batch from the employee extract process and calls the HR API to create or deactivate user accounts.
Submit Data Pump Batch Exceptions Report
This program reports errors in the Data Pump Engine.
This extract process produces output records which are used by the Data Pump Engine. The Data Pump Engine calls the hr_user_acct_api to create or deactivate user accounts.
The batch name is written to the HR_PUMP_BATCH_HEADERS table. The extracted employee records are written to the HR_PUMP_BATCH_LINES table. The batch line table has defined generic attributes but for each API, the Data Pump generates a view on the HR_PUMP_BATCH_LINES table to reflect the parameters of the API.
The specific views tailored for the hr_user_acct_api are:
hrdpv_create_user_acct
Records for creating new user accounts can be mapped to this database view
hrdpv_update_user_acct
Records for terminated employees whose user accounts are to be inactivated can be mapped to this database view
Note: You must use a meaningful batch name. For example, run type and date range or another parameter. The batch name is the only way you can identify which batch to select in the Employee Data Pump process and the Data Pump Batch Exceptions Report processes.
To run the user account employee extract process
Access the User Account Employee Extract Process concurrent program.
Enter a batch name to identify the batch.
Enter the following date input parameters:
Start Date
defaults to SYSDATE. This parameter sets the start date from which the records are extracted
End Date
defaults to SYSDATE. This parameter is used in conjunction with the start date parameter to set a date range for the extraction of the records
Enter the following organization input parameters:
Organization
this parameter comprises a list of all the business group organizations that the responsibility is associated with. If you select an organization from the list of values, the program only extracts records from the selected organization.
Note: If you enter values in the Organization parameter, they are superseded by any values you enter in the Organization Hierarchy, Organization Hierarchy Version, and Parent Organization parameters. These parameters always take precedence and replace the values entered in the organization parameter and work together as a set.
Organization Hierarchy
organization hierarchy name for the responsibility's business group. This parameter contains an list of all the organizations hierarchies in the business group.
Organization Hierarchy Version
organization hierarchy version for the responsibility's business group. This parameter contains an list of the organization hierarchy versions selected in the organization hierarchy parameter.
Parent Organization
parent organization within the hierarchy. Selecting the parent organization will extract records from this organization and any organizations below the parent organization.
Enter the Run Type input parameters by selecting a processing option from the list of values. The processing options are:
Create User Account for New Hires
selects all employees hired between the start date and end date within the organization or organization hierarchy. This run type is used on an ongoing basis.
Create User Accounts for All Employees
selects all employees as of the end date, within the organization or organization hierarchy. The start date parameter will be ignored and employees terminated before the end date will not be selected either. This run type is used on the initial implementation and is usually used once.
Inactivate User Account for Terminated Employees selects all employees terminated between the start date and end date parameter within the organization or organization hierarchy. Once selected, the user account for the terminated employee or worker is end dated. This run type is used on an ongoing basis to end date accounts for terminated employees and workers within the date range.
Create and Inactivate User Accounts runs two queries. The first query selects all employees and workers hired between the start date and end date within the organization or organization hierarchy. The second query selects all employees and workers terminated between the start date and end date within the organization or organization hierarchy. This run type is used on an ongoing basis.
Note: Each employee or worker extracted from the database is recorded in the hr_pump_batch_line table. The hrdpv_create_user_acct view has been defined to map create user accounts to the hr_pump_batch_line table. The hrdpv_update_user_acct view has been defined to map inactivate user accounts to the hr_pump_batch_line table. You can access these views because the API column name is used to identify the record rather than the generic names used in the hr_pump_batch_lines table.
The Data Pump Engine will call the hr_user_acct_api to perform data validation and loading operations. The employee data is recorded in the hr_pump_batch_lines table.
Note: You must run the User Account Employee Extract Process before you run the Data Pump Engine process. The Data Pump Engine depends on the batch id the User Account Employee Extract process creates.
To run the Data Pump Engine concurrent program:
Access the Data Pump Engine concurrent program.
Enter the following parameters:
Batch Name
you must enter the same batch name as you did in the Employee Extract Process. The Batch Name is the only information you have to identify which batch to run
Validation Mode
you can set two values, YES or NO. A YES value enables you to review errors in the batch, or related records in a batch, and change them before any are committed to the database.
A NO value will commit the data to the database if there are no errors. If there are errors the data will not be committed to the database and you can fix the errors and rerun the batch.
DataPump will set the Line Status to one of the following values:
E - Error
C - Completed
U - Unprocessed
V - Valid
See: Oracle HRMS Data Pump, Oracle HRMS Implementation Guide
Each person record is recorded in an individual batch line. The data pump exceptions report will show whether the error is from the batch header or batch line. You can identify which person record is in error from the person id in the exception report.
Note: You must run the User Account Employee Extract Process before you run the Data Pump Engine and Data Pump Batch Exception Report processes. The Data Pump Engine and Data Pump Batch Exception Report processes depend on the batch id the User Account Employee Extract process creates.
To run the Data Pump Batch Exceptions report:
Access the Data Pump Process Exceptions Report concurrent program.
Note: You can run the Data Pump Engine and Data Pump Batch Exception Report processes in sequence. See: Overview of Concurrent Processes, Oracle E-Business Suite System Administrator's Guide - Security
See: Oracle HRMS Data Pump, Oracle HRMS Implementation Guide
Before you write your user hook, you must review your user population and create a standard user name format, responsibility, and security profile for your enterprise. When you have defined a standard and created any security profiles or security groups you need, you can begin to write your user hook.
You can create a template responsibility for the batch process. If you create a template responsibility or use the predefined Manager Self-Service responsibility, you can code a new responsibility created by the user hook to inherit the template responsibilities attributes. You can then overwrite the template responsibility's attributes by setting values in the communication area of the API, hr_user_acct_utility.
You can find sample user hook code in the following package:
$PER_TOP/patch/115/sql/hrhksmpl.pkb
To set up the prerequisites for writing user hooks
Create a security profile in Oracle HRMS and, using your naming standard, associate the security profile and responsibility to a new user in your user hook code.
Implement security groups to manage security profiles with the Enable Security Groups profile option. By implementing security groups, you can associate more than one security profile to a single responsibility.
Note: Before you write user hooks, run the Security List Maintenance concurrent process. This ensures that the security profiles work.
Note: If you plan to use security groups in a responsibility defined for use in Oracle Self-Service Web Applications, or plan to create a new responsibility for use in Oracle Self-Service Web Applications, set the Enable Security Groups profile option at the application level: Oracle Self Service Web Applications.
Set up a guest user account in Oracle Applications by setting the GUEST USER PASSWORD profile option. This must be in the format <username/password>. You can obtain and verify the guest user account with your Database Administrator.
Use the Define System Profile Option Value in System Administrator responsibility to set a security profile at Site or Application level. This is necessary because security profile option values can be set at Responsibility or User level with the batch process.
Note: The sample user hook is called hrhksmpl.pkb and each code block is documented. You can also find a copy of the sample in the following directory $PER_TOP/patch/115/sql.
See: API User Hooks, Oracle HRMS Implementation Guide
See: Sample Code, Oracle HRMS Implementation Guide
The batch process inserts records into the following FND tables:
FND_USER
FND_USER_RESP_GROUPS
to enable a new user to use a designated responsibility
FND_RESPONSIBILITY
if new responsibilities are created in the custom user hook module for the new user
FND_RESPONSIBILITY_TL
stores the translated value of responsibility name
FND_RESP_FUNCTIONS
if the new responsibility has function exclusion rules
FND_PROFILE_OPTION_VALUES
to set profile option values for any newly created responsibility for the user.
PER_SEC_PROFILE_ASSIGNMENTS
if security groups are enabled.
The batch process automates the functionality of the Define User Form and inserts records into the following FND tables:
FND_USER
FND_RESP_GROUPS
Note: Security attributes for a user cannot be created in the batch process
The batch process automates the functionality of the Define Responsibility Form and inserts records into the following FND tables:
FND_USER_RESP_GROUPS
FND_RESPONSIBILITY_TL
Note: Security attributes for a responsibility cannot be created in the batch process
The batch process automates the functionality of the Profile Option Value Form and inserts records into the following FND table:
FND_PROFILE_OPTION_VALUES
To write batch user hooks with your own custom business logic
To create batches of users you need to write PL/SQL programs in the user hooks of the following API:
hr_user_acct_api
This API contains two procedures:
hr_user_acct_api.create_user_acct
used to create a new user
hr_user_acct_api.update_user_acct
used to inactivate user accounts, for example on termination of an employee or worker
To set up the Create User API procedure
Write a PL/SQL program to communicate to the API the user name, password, responsibility, and profile to use when it creates a new user account for the employee or worker in the process.
There are two user hook points in the create user procedure:
hr_user_acct_bk1.create_user_acct_b
before-process hook point
hr_user_acct_bk1.create_user_acct_a
after-process hook point
Use the before-process hook for the PL/SQL program. The program enters these values into the global variables or record structures in hr_user_acct_utility.
Note: You can supply passwords for the new user account or leave the API to generate a random string. The string will be in an 8 character alphanumeric format.
Write a PL/SQL program for the after-process hook if you leave the API to generate a password. The program must save the password of the new user account to a file that can be accessed by a system administrator. This is necessary because the password created by the API is encrypted when it is saved to the FND_USER table in the database. You must capture the password before it is encrypted so that you can notify employees of their initial password.
Note: If you supply a password, you may not need to write a user hook for this after-process hook point.
To set up the Update User API procedure
The update user API procedure is used to inactivate employees. The API end dates the employees record in the FND_USER and FND_USER_RESP_GROUPS tables and is not meant for general purpose update.
There are two user hook points in the update user procedure:
hr_user_acct_bk2.update_user_acct_b
before process hook point
hr_user_acct_bk2.update_user_acct_a
after process hook point
The before process user hook point is used for your extra validation. The API will not pick up any values from your user hook.
The after process user hook point executes any extra logic after the main API validation and processing logic has successfully completed and the update process is finished.
To carry out the remaining steps
Compile the custom package you have created after you have written your user hooks.
Register and link your custom package procedures to the appropriate API user hooks when you have compiled the package.
See: API User Hooks, Oracle HRMS Implementation Guide
A sample script to register and link your custom package and procedures is provided below.
Sample code
DECLARE

 ln_api_hook_call_id NUMBER;

 ln_object_version_number NUMBER;

 ln_api_hook_id NUMBER;


  BEGIN


 -- get api_hook_id for the seeded before process user hook package procedure

 SELECT ahk.api_hook_id

 INTO  ln_api_hook_id

 FROM  hr_api_hooks ahk

   ,hr_api_modules ahm

 WHERE ahm.module_name = 'CREATE_USER_ACCT'

 AND ahm.api_module_type = 'BP'

 AND ahk.hook_package = 'HR_USER_ACCT_BK1'

 AND ahk.hook_procedure = 'CREATE_USER_ACCT_B'

 AND ahk.api_hook_type = 'BP'

 AND ahk.api_module_id = ahm.api_module_id;


 -- insert a row into HR_API_HOOK_CALLS for before process user hook custom package procedure


 hr_api_hook_call_api.create_api_hook_call(

  p_effective_date => to_date('02/02/2000', 'DD/MM/YYYY'),

  p_api_hook_id   => ln_api_hook_id,

  p_api_hook_call_type => 'PP',

  p_sequence   => 1,

  p_enabled_flag  => 'Y',

  p_call_package  => 'MY_USER_ACCT', -- your custom package name

  p_call_procedure => 'CREATE_USER_ACCT_B', -- your custom package procedure name

  p_api_hook_call_id  => ln_api_hook_call_id,

  p_object_version_number => ln_object_version_number

 );


 -- get api_hook_id for the seeded after process user hook package procedure

 SELECT ahk.api_hook_id

 INTO  ln_api_hook_id

 FROM  hr_api_hooks ahk

   ,hr_api_modules ahm

 WHERE ahm.module_name = 'CREATE_USER_ACCT'

 AND ahm.api_module_type = 'BP'

 AND ahk.hook_package = 'HR_USER_ACCT_BK1'

 AND ahk.hook_procedure = 'CREATE_USER_ACCT_A'

 AND ahk.api_hook_type = 'AP'

 AND ahk.api_module_id = ahm.api_module_id;


 -- insert a row in HR_API_HOOK_CALLS for after process user hook custom package procedure

 hr_api_hook_call_api.create_api_hook_call(

  p_effective_date => to_date('02/02/2000', 'DD/MM/YYYY'),

  p_api_hook_id   => ln_api_hook_id,

  p_api_hook_call_type => 'PP',

  p_sequence   => 1,

  p_enabled_flag  => 'Y',

  p_call_package  => 'MY_USER_ACCT',

  p_call_procedure => 'CREATE_USER_ACCT_A',

  p_api_hook_call_id  => ln_api_hook_call_id,

  p_object_version_number => ln_object_version_number

 );


  EXCEPTION

 when others then

  dbms_output.put_line('Error in seeding user hook procedures: ' || sqlerrm);

  END;


  /

  commit;

  exit;
Execute User Hook Pre-Processor
When you have registered and linked your custom package procedure to the API you should execute the user hook pre-processor program. Run the hrahkone.sql found in $PER_TOP/patch/115/sql directory to do this. However, you'll need to know the internal api_module_id for the HR_USER_ACCT_API before running the script. To find the internal api_module_id you should run the script below:
  SELECT api_module_id

  ,api_module_type

  ,module_name

 FROM  hr_api_modules

 WHERE module_package = 'HR_USER_ACCT_API';
You should see results similar to those below:
 API_MODULE_ID API_MODULE_TYPE     MODULE_NAME

 --------------------------------------------------------

      383 BP                       CREATE_USER_ACCT

      384 BP                       UPDATE_USER_ACCT
Note: Your api_module_id will be different from the one above.
Use your own API module id when executing hrahkone.sql. If you have a customer package for UPDATE_USER_ACCT hook point, you will need to run hrahkone.sql twice. Once for the api_module_id for CREATE_USER_ACCT hook call and second for the UPDATE_USER_ACCT hook call.
Enter any new message text for the messages that you issue in your custom package when you have run the pre-processor program. Use an Application Developer responsibility in Oracle Applications to create your message text.
Ensure you have set the application level correctly if you use security groups to manage security profiles. For example, in SSHR you must set the application level to Oracle Self Service Web Applications. Set the security profile option to the application level if you need to associate the responsibility with another HRMS application.
This updates the following tables: per_sec_ profile_ assignments, and fnd_user_resp_groups
Make sure that the Enable Security Groups profile option is Yes.
Set the Data Pump error parameters. These parameter control aspects of the Data Pump Engine process.
See: Oracle HRMS Data Pump, Oracle HRMS Implementation Guide.
Note: You must set the MAX_ERRORS_ALLOWED parameter to see all the errors logged during the run. This parameter controls how many errors are issued before the engine stops processing. The default value for the parameter is 20 or the chunk size. If you do not set this parameter value, the engine will stop processing after 20 errors.
Test the custom packages by running the following programs:. To test, run the User Account Employee Extract concurrent program to create batches of extracted employees. Run the Data Pump Engine concurrent program to process your batch, and run the Data Pump Batch Exceptions
User Account Employee Extract concurrent program - to create batches of extracted employees
Data Pump Engine concurrent program - to process your batch
Data Pump Batch Exceptions concurrent program - to report any errors.
If necessary, you can rerun the batch after fixing any errors.
Note: You can use the Pipemon utility to help you debug your code.
![]()
Copyright © 2002, 2015, Oracle and/or its affiliates. All rights reserved.