Worksheets
This chapter describes worksheets, outlines the primary configuration options, and summarizes the available tools.
This chapter covers the following topics:
- Introduction
- Main Worksheet Options
- Elements of a Worksheet View
- Level Layout in a View
- Filtering per View
- Level and Worksheet Association: Embedded Worksheets
- Worksheet and Layout Ownership
- Worksheet Caching
- Configuration Notes
Introduction
Within Demantra, users work almost entirely within worksheets. A worksheet is a customized working environment where users can view and edit data. When users save changes back to the database, they become available to other users and to downstream operations.
A worksheet consists of one or more views, usually displayed as tabs within the worksheet. Each view retrieves a set of data that is aggregated in a specific way and that may also be filtered. The following shows an example:
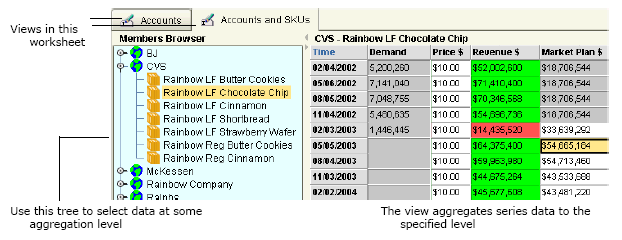
Views in this worksheet
Use this tree to select data at some aggregation level
The view aggregates series data to the specified level
You can also display views as child windows of the worksheet.
Main Worksheet Options
This section provides a quick overview of the main worksheet options:
-
Levels in the worksheet
-
Series in the worksheet
-
Time resolution and time span
-
Optional filters
-
Optional exception filters
-
View definition and layout
Levels in a Worksheet
A worksheet usually includes aggregation levels. Based on the levels included in a worksheet, Demantra automatically determines which item-location combinations the worksheet should include. Depending on which combination you select, the worksheet displays series data associated with that combination. For example, if you select one location level (city) and one item level (SKU), the worksheet will contain series data associated with each city-SKU combination. On the other hand, if you select one location level (city) and you do not specify an item level, the worksheet aggregates data for all items. That is, the worksheet will contain series data associated with each city, aggregated for all products.
-
If you do not specify any aggregation levels in a worksheet, the data is completely aggregated across all selected items and locations.
-
If you use a settlement level in a worksheet, you cannot use levels from any other hierarchy in that worksheet.
Advanced Selection Options
By default, if a worksheet includes a promotion level, the worksheet includes all the following types of combinations:
-
Combinations that have both sales data and promotions
-
Combinations that have sales data, but no promotions
-
Combinations that have promotions, but no sales data
The worksheet displays placeholders for combinations that do not have promotions. For example:
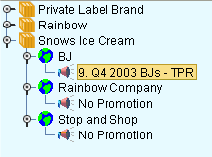
You can exclude some of these combinations. For example, you might want the worksheet to include only the combinations that have both sales and promotions, as follows:

Series in a Worksheet
Every worksheet must include at least one series. You can display series in the worksheet table, the graph, both, or neither. (It can be useful to add series to a worksheet but leave them undisplayed, so that the series are available for any client expressions that depend on them.)
Note: If you use a settlement level in a worksheet, all series in the worksheet must refer to tables used by the settlement hierarchy.
Time Criteria
Each worksheet selects data for a specified span of time and optionally aggregates it in time using a time unit.
You can specify the span of time as a fixed range of dates, a time range relative to today, or a time range relative to the last sales date in the loaded data.
To aggregate data in time, you can also include a time aggregation in the worksheet.
Filters
Within Demantra, you generally apply filters by specifying a level and the members of that level to include. For example, the following filter includes only the Rainbow brand.
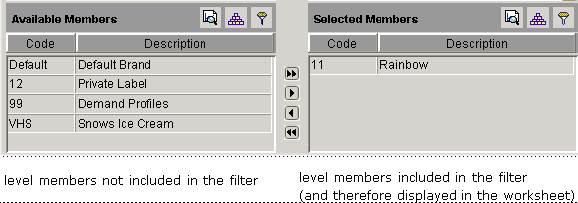
You can apply multiple filters at the same time. For example, for the preceding worksheet, you could also filter by account.
In contrast to an exception filter (“Exception Filters”), this type of filter is static and behaves the same no matter how the data changes.
Exception Filters
See Applying Exception Filters in Oracle Demantra User's Guide.
View Layout
A worksheet contains one or more views, which the user can display either as tabs or as sub windows. For each view, you specify the following options:
-
Name of the view
-
Elements to include in the view
-
Layout of levels and series in the view
-
Additional filtering of the view
-
Sub tab worksheets in the view
The following sections provide more details on view layout.
Elements of a Worksheet View
For each worksheet view, you can control which of the following elements are included in that view:
-
The Members Browser or combination-selection lists. A worksheet view usually includes either a Members Browser or a set of drop down menus, with which the user chooses the data to display in the rest of the worksheet:
-
The worksheet table, which shows series data for the item-location combination that is currently selected in the view. Depending on how the layout is configured, this may appear as an ordinary table or it may appear as a cross tab; see “Level Layout in a View”.
By default, each row in the table corresponds to a point in time, and each column displays the data for a series. As noted earlier, the table also has a summary row. If the worksheet is in cross tab layout, the table also includes subtotal rows.
-
The graph, which displays data for the current selection. By default, the horizontal axis shows time, and the vertical axis shows one or more series.
-
The Notes/Attachments sub tab, which displays notes and attachments related to the selected combination.
-
The Activity Details sub tab, which displays promotions and the promotion hierarchy. The Activity Browser displays an expandable tree view of the promotions associated with the currently selected combination. The Gantt chart displays the promotions associated with the currently selected combination.
-
Sub tabs that contain related worksheets. When a selection is made in the worksheet, the related worksheet shows further details. This related worksheet potentially includes different series than the rest of the worksheet and may also be filtered further.
Level Layout in a View
When you include levels in a worksheet, that means you can see data associated with each member of those level. In each view of a worksheet, you can use any of those levels in any of the following ways:
-
Use it within the Members Browser or combination-selection lists, as in the previous examples.
-
Use it on one of the worksheet axes, creating a crosstab layout. Each worksheet view has an x-axis and a y-axis.
-
Hide it, causing Demantra to aggregate data to that level.
Crosstab Layouts
In a crosstab layout, you include a level on an axis. The table (also known as a pivot table) provides a cross tabulation of all the members.
The following figure shows a worksheet table in crosstab layout, with a row for each SKU member within each time bucket:
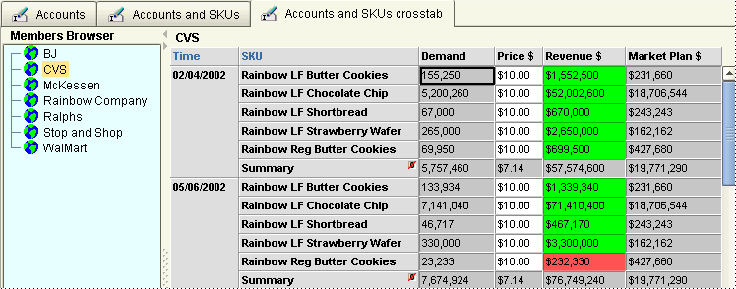
Notice that the Members Browser does not include the SKU level, because all SKUs are displayed at the same time.
For another example, the worksheet could instead display the SKU members across the top of the table rather than down the side, as in the following example:
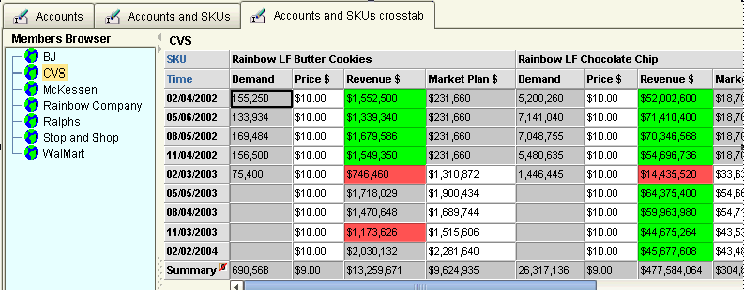
Other variations are possible.
Hidden Levels
Hidden Levels allow users to exclude worksheet selected levels from specific worksheet views. This allows flexibility of what individual worksheet tabs can show without having to use embedded worksheet functionality. When used, one or more levels are removed from a worksheet view this causes data to aggregate across the level. In order to support this aggregation the worksheet data will not be editable
To hide a level:
-
Access Worksheet Designer -> Layout.
-
Navigate to the tab where the level should be hidden
-
Right click on any level
-
Navigate to Hide level and click on the desired level
To show a hidden level:
-
Access Worksheet Designer -> Layout.
-
Navigate to the tab where the level should be hidden
-
Right click on any level
-
Navigate to Show level and click on the desired level
Editing Data
-
Data in a view with hidden level will not be editable
Advanced Analytics
-
Levels appearing in one or more view will be shown in the advanced analytics screen. Levels hidden in all views will not be shown
Information Retrieval
-
Notes and other information being retrieved or updated will include all filters on the worksheet and view. This includes filters applied to level which are subsequently hidden.
-
The ability to filter data based on level members is not affected by hiding a level.
Open With
-
Levels not being displayed in the view being used to “open with” will not part of context used to the filter opened worksheet.
Filtering per View
In some cases, you create multiple views so that you can show different series in each view. In other cases, you might need to show different combinations in each view. You can separately filter each worksheet view. In this case, you filter a view by choosing a subset of the members of the levels included in the worksheet.
DSM uses this feature to segregate settlements with different statuses. Settlements of each status are on a different worksheet tab.
Level and Worksheet Association: Embedded Worksheets
It is useful to be able to examine a level member more closely, to launch a worksheet from that member that is filtered to show only that member. But typically, a Demantra application includes a large number of worksheets, and most of those worksheets would not be useful in this way. So Demantra provides an option for associating each level with any number of worksheets. Demantra uses this association in two ways:
-
A user can start from a level member and launch a worksheet that is filtered to that member. To do so, the user right-clicks the member and clicks the Open or Open With option.
Alternatively, this worksheet can show just the combination from which the user started.
The worksheet appears in a new window.
Note: Demantra indicates the filtering as follows:
-
If the worksheet is filtered by member, the name of the worksheet is preceded by the name of the member by which you are filtering it.
-
If the worksheet is filtered by combination (full context), the name of the worksheet is preceded by the word “Filtered”.
-
-
A worksheet can include an embedded worksheet that is associated with any of the levels in the main worksheet. Then when a user selects a member in the main worksheet, the embedded worksheet shows the details. The embedded worksheet is displayed in a sub tab.
If you open a worksheet as an embedded worksheet:
-
It retrieves filters based on the parent worksheet selection.
-
The update does not filter unless you explicitly include the level in the embedded worksheet. Oracle Demantra treats the embedded worksheet as if you opened it independently; it filters the population to update only by the worksheet filters itself, and doesn't consider the parent worksheet filters
If you open a worksheet as an embedded worksheet using Open With, Oracle Demantra retrieves and updates using both the worksheet filters and the parent worksheet filters.
Worksheet and Layout Ownership
In general, any worksheet is available as follows:
-
A private worksheet is available only to the user who created it.
-
A public worksheet is available to all users but can be changed only by the user who created it.
In any case, Demantra automatically prevents any user from seeing data for which he or she does not have permissions.
Worksheet Definition, Layout, and Local Adjustments
As users work with a Demantra worksheet, they often sort columns, hide or display features, and make various other changes. It is useful to understand how these settings are saved.
| Base Demantra configuration These settings affect all users and all worksheets. |
|
| Worksheet definition These settings are saved through the File > Save Worksheet menu option. Only the worksheet owner can make these changes. |
|
| Layout changes These settings are saved separately for each user if the user clicks File > Save Worksheet. Any user can save these changes, not just the worksheet owner. |
|
| Local adjustments These settings are saved automatically separately for each worksheet and each user. |
|
| Not saved |
|
The auto run option (Options menu) is saved separately for each user, but applies to all worksheets that the user sees.
Worksheet Caching
-
Enabling Worksheet Caching
-
Creating a Workflow to Build Worksheet Caches Automatically
Enabling Worksheet Caching
Perform the following to enable worksheet caching:
-
Verify that the System Parameter EnableWorkSheetCaching is set to True (Business Modeler > Parameters > System Parameters).
-
For each Worksheet that you want to cache, open Worksheet Designer (Display section) and then select Cache Worksheet Data.
-
Set Refresh Type to either Manual or Automatic:
-
Manual: Users must manually refresh the cache.
-
Automatic: Changes to source data will be detected when the worksheet is opened and the cache will automatically be refreshed as needed
-
The Open Worksheet dialog displays an icon next to all worksheets that are cached.
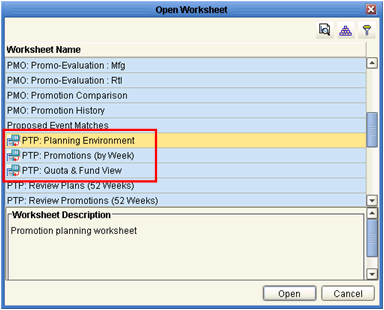
Default Worksheet Caching Behavior
By default, all users can create cached Worksheets. However, a system administrator can revoke this privilege for specific users. To do this, the administrator must modify the CAN_CREATE_CW column on the USER_ID table (this table contains one row for each User). This setting is not visible in Business Modeler; therefore it must be updated directly in the database.
Set the CAN_CREATE_CW column to:
-
1 to indicate that the user can create cached Worksheets (this is the default
-
0 (or null) to indicate that the user cannot create cached Worksheets.
See also Creating a Workflow to Build Worksheet Caches Automatically.
Creating a Workflow to Build Worksheet Caches Automatically
You can create a workflow that automatically creates caches for worksheets that can be opened via the Open With method from another worksheet. This workflow creates worksheet caches in a batch process thereby eliminating the need to build the cache the first time the user opens the worksheets.
Note: This procedure supports building caches only for worksheets that are opened using Open With and where the Open With Context for the worksheet is set to Selected Member.
Create the workflow as follows:
-
Stored Procedure Step: This step runs the APPPROC_REBUILD_CONTEXT_CACHES procedure, passes the ID of the worksheet, the Open With Level, the User Group to be cached, and Run Mode equal to 1. For details about this stored procedure, see APPPROC_REBUILD_CONTEXT_CACHES.
-
Worksheet Cache Step: Specify the following settings:
-
Worksheet Name: The Worksheet to be cached (must match Worksheet ID from Step 1).
-
User/Group: The User Group to cache for the selected Worksheet (must match User Group Id from Step 1).
-
Cache Type: Open With Context.
For details about this step, see Worksheet Cache Step.
-
-
Stored Procedure Step: This step runs the APPPROC_REBUILD_CONTEXT_CACHES procedure passing the same values as Step 1 for the ID of the worksheet, the Open With Level, and the User Group to be cached, but with a Run Mode equal to 2.
The Worksheet, Open With Level, and User Group must be the same for each of the steps listed above. Only one Worksheet/Open With Level/User Group combination can be processed in each group of these steps. Multiple combinations can be processed by repeating these steps in a single workflow or by creating separate workflows.
Configuration Notes
This section contains configuration notes related to worksheets.
Dependencies
Before you can create worksheets, you will need to load some sample data, create any needed levels, and create any needed series.
Design Considerations
-
It is common practice to create a master worksheet, which is public and meant for multiple users. Different users typically have permission to see different subsets of the worksheet data, such as different accounts. In addition, users can launch the worksheet from a level member, to further filter the worksheet results.
-
For performance reasons, don't select too much data to view, unless there is no other choice.
-
If you receive a message saying “out of memory,” try the following techniques to reduce the amount of memory that your worksheet selects:
-
If you do need to select a large amount of data, use the levels to your advantage. Specifically, use the levels in the Members Browser or selector lists rather than moving them to a worksheet axis. If levels are in the Members Browser or selector lists, each combination in the worksheet is relatively smaller and will load more quickly.
-
Remember that you can filter the worksheet by any level, including levels that are not shown in the worksheet. For example, you might want to see data at the region level, but exclude any data that does not apply to the Acme territory. To do this, you would filter the worksheet to include only the Acme member of the Territory level, but you would select data at the Region level.
-
A multi-view worksheet is useful in following cases:
-
If you need to edit data at one aggregation level and see easily how that affects higher aggregation levels.
-
If you need to display a large number of series without having to scroll to see each one.
-
-
To make sure that all client expressions in a worksheet are always evaluated correctly, make sure that the worksheet includes all series to which those client expressions refer. (Note that you can add series to a worksheet but leave them undisplayed.)
Known issue regarding evaluating client side exceptions
For series that contain both client and server expressions, filtering of exceptions occurs first on the server expression, causing it to take precedence over the client expression. Therefore, if the critical value is coming from the client side, you must configure the exception series with '0' as the server expression (thereby removing it).
Tools
Demantra provides the following tools for configuring worksheets and related objects:
| Tool | Purpose/Notes | See |
|---|---|---|
| Worksheet wizard in the Web client (Demand Planner Web, Promotion Effectiveness, and Settlement Management) | Define worksheets and Collaborator Workbench content panes. | Oracle Demantra Demand Management User's Guide or other user guide |
| Content wizard in Collaborator Workbench | Define worksheets and Collaborator Workbench content panes. | Oracle Demantra Demand Management User's Guide or other user guide |
| Components > Open/Create Component option in the Business Modeler | Creates components. Among other things, a component defines the associations between levels and worksheets. | “Creating or Modifying a Component” |