Configuring Series and Series Groups
This chapter describes how to configure series and series groups.
This chapter covers the following topics:
- Before Configuring Series
- Creating a Series
- Creating a New Series Based on an Existing Series
- Specifying General Properties of a Series
- Specifying How to Display a Series
- Configuring a Dropdown-Style Series
- Filtering a Series Drop-down List
- Specifying Data Properties of a Series
- Using the Expression Editors
- Syntax of Server Expressions
- Syntax of Client Expressions
- Specifying Server and Client Expressions
- Creating an Edit-Lock Expression
- Creating a Color Expression
- Controlling Access to Series
- Configuring Desktop Group Expressions
- Deleting a Series
- Enabling Series Caching By Item
- Specifying the Order of Series in Dynamic Open Link
- Creating or Modifying a Series Group
- Deleting a Series Group
- Viewing Dependencies Among Series
Before Configuring Series
Before you use Configure > Series option, be sure to do the following:
-
Read the “Series” Chapter and make sure you understand how series are calculated and stored.
-
Load some sample data for items, locations, and sales, by using the batch script created by the Data Model Wizard.
-
If you are using DSM, use the Demantra database procedures to set up an initial set of series for that product; see “Configuring DSM”.
Creating a Series
The following procedure describes the minimal set of steps needed to create a new series.
To create a series
-
Click Configuration > Configure Series or click the Configure Series button.
-
Click the New button.
The series editor displays the General Properties screen, with a new series that has a default name and internal name.
-
Edit the Series name field as needed. This should be a user-friendly name, because it is displayed in the components.
You can include series names in client expressions. If a series name contains a mathematical expression, for example, Primary Forecast -10, Oracle Demantra evaluates the mathematical expression. Therefore, the client expression doesn't function as you intended. See Operators in Client Expressions for the way to include mathematical expressions in series names.
-
Edit the Internal Name field as needed. Use a name that is easy to remember. The internal name cannot have spaces or special characters.
Note: Business Modeler uses this name as the name of the column in which it stores the series data. When you create server expressions, you refer to those column names.
-
Click Next repeatedly until the Data Properties screen appears.
-
In the Data Table field, select the table in which data for this series should be stored, if you choose to store the data. The choice depends on how you want to use the series, as follows:
Caution: If you change the selection in the Data Table field, Business Modeler automatically removes the existing data from the table where it had been originally stored. Business Modeler then creates a new, empty column in the newly selected table.
-
What happens next depends on the table you chose.
-
If you selected sales_data, mdp_matrix, or promotion, Business Modeler asks you to confirm whether you want to create this series within that table.
If you want to store this series directly in the database, click Yes. Business Modeler automatically populates Update Field with the value you used for the internal name. Otherwise, click No.
-
If you selected the name of a level, then in Update Field, select the field that you want to use as this series.
Note: If you are familiar with database terminology, note that this option determines the primary key of the series.
-
-
At this point, you have entered enough information to save your work.
About the series editor
The series editor consists of a set of screens with different purposes. To move from screen to screen, click Next and Previous.
Screen Purpose For details, see... General Properties Specify the series name and other basic information. “Specifying General Properties of a Series”. Display Properties Specify how to display this series in tables and graphs; also specify numeric precision of series (number of decimal places). “Specifying How to Display a Series”. Drop-down Properties Optionally configure the series elements as drop-down lists. “Configuring a Dropdown-Style Series”. Data Properties Specify how this series will be stored in the database. “Specifying Data Properties of a Series”. Expressions Properties Specify either a server expression, a client expression, or both, that calculate values for this series. “Specifying Server and Client Expressions”. Optionally specify special-purpose expressions. “Creating an Edit-Lock Expression” “Creating a Color Expression” . Security Specify which users can access this series “Controlling Access to Series” .
Creating a New Series Based on an Existing Series
You can easily create a new series that has most of the properties of an existing series. This is useful when you need to define multiple series to use for multiple forecast versions or for use in rolling data sessions.
To create a series based on an existing series
-
Click Configuration > Configure Series or click the Configure Series button.
-
Right-click the series and click Create As.
Business Modeler prompts you for the name and internal name of the new series.
-
For Series Name, specify a user-friendly name. This name is displayed in the worksheets.
-
For Internal Name, specify a unique name that has no spaces or special characters.
-
Click OK.
-
A new series is created, with everything copied from the original series, except for Update Field, on the Data Properties screen.
-
-
In the series list on the left side of the screen, right-click the series and then select Open > Data Properties.
-
For Update Field, select the field in which you want to store this series, if any.
See also
-
“Creating a Series” “Configuring Rolling Data”
-
Specifying General Properties of a Series
To edit general properties of a series
-
Click Configuration > Configure Series or click the Configure Series button.
-
Right-click a series and then select Open > General Properties.
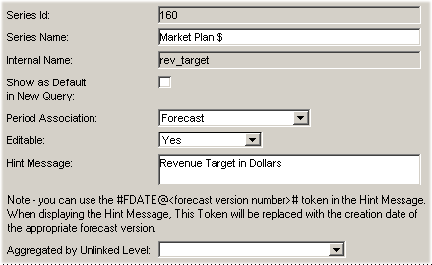
-
Specify the following information about the series:

Specifying How to Display a Series
To specify the display properties
-
Click Configuration > Configure Series or click the Configure Series button.
-
Right-click a series and then select Open > Display Properties.

-
Specify the following information about the series:
-
For Summary Function, specify how to summarize data for this series within the Summary row in any worksheet table that includes this series.
Note: The Summary Function is used in all rows of the worksheet table if a level is hidden in the worksheet view.
Choose a function, specify a client expression, or select the No Summary option:
Function
-
Total gives the numeric total of the non-null series entries that worksheet currently displays. (If all entries are null, the total is given as 0.)
-
Average gives the numeric average of the non-null series entries that worksheet currently displays. (If all entries are null, the average is given as 0.)
-
Count gives the number of series entries that worksheet currently displays, including any null entries.
-
Min gives the smallest of the non-null entries.
-
Max gives the largest of the non-null entries.
-
Common gives the most common non-null entry. If multiple values appear the most times, an arbitrary one of them is displayed.
-
Uncommon gives the least common non-null entry. If multiple values are the least common, an arbitrary one of them is displayed.
-
Latest gives the last non-null entry in the column.
Client Expression
If you enter a client expression, that expression calculates the summary for this series. To enter a client expression, click the Client Expression option and then click the ellipses (...) button. The system displays a dialog box where you can create a client expression; see “Using the Expression Editors”.
Note: If you use a client expression, the series is supported only in Web-based products, not in the desktop.
You can also create a weighted average. To do so, enter an expression in the sum_func column in the computed_fields table in the database. For example, to create a weighted sum for two series called batch_for and final_for, use the following expression in the sum_func column:
sum(cbatch_for for all) * sum(cfinal_for for all)
Note: The series names are given the prefix c. Also note that "for" and "all" are protected names.
No Summary
No Summary gives a null value.
-
-
Specify the width of the columns in which to display this series in worksheet tables:
DP Series Width Width of the column in the desktop. Each increment of 25 can display approximately one character, depending on the formatting. If the field width is 250, it can display about 9 characters. DP Web Series Width Width of the column in the Web-based products. Each increment of 2 can display approximately one character, depending on the formatting. If the field width is 25, it can display about 11 characters. See “Series Widths on the Web”. Series Widths on the Web
For Web worksheets, the following table provides common useful settings for DP Web Series Width:
DP Web Series Width Sample Data of Maximum Displayable Width 5 $ 99
-$ 99
99%
-99%6 $0.99
$123
($123)
-$1237 $99.99
-$99.998 $ 999.00 9 $99,999.00
10/10/200510 $ 999,999.00 11 $ 9,999,999.00 You should also consider the width needed to display the series title.
Display Formats for Dates
For a series that contains date values, you can use any of the following display formats. The date used in the examples is 28 January 1971.
Format Example Name of format MM/dd/yyyy 01/28/1971 American slash MM/dd/yy 01/28/71 American slash 2-digit year MM-dd-yyyy 01-28-1971 American dash MM-dd-yy 01-28-1971 American dash 2-digit year dd.MM.yyyy 28.01.1971 European dot dd.MM.yy 28.01.71 European dot 2-digit year dd/MM/yyyy 28/01/1971 European slash dd/MM/yy 28/01/71 European slash 2-digit year E, MMM. dd yyyy Thu, Jan. 28 1971 American text long E MM/dd/yyyy Thu 01/28/1971 American number slash long E MM-dd-yyyy Thu 01-28-1971 American number dash long E dd/MM/yyyy Thu 28/01/1971 European number slash long E dd.MM.yyyy Thu 28.01.1971 European number dot long
Configuring a Dropdown-Style Series
You can configure the elements in a series as drop-down lists. When a user includes the series in a worksheet, he or she can set the value of a series element by selecting from the list, if the series is editable.
To specify a series as a dropdown-style series
-
If you have not yet created the table or level that you want to use for series values, create the table or level. (A level is stored as a table, of course.)
To create a table, use a database tool or an SQL script.
For information on creating a level, see “Configuring Levels”.
-
Click Configuration > Configure Series or click the Configure Series button.
-
Right-click a series and then select Open > Dropdown Properties.
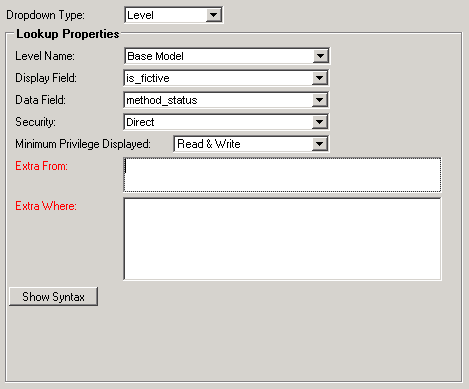
-
Specify the dropdown style, one of the following:
List Use this option if the list of choices is not available in the database as a level or as a regular table. Table Use this option if the database includes a table that contains the choices you want to present in the user interface. Level Use this option if the database includes a level that contains the choices you want to present in the user interface. All three styles look the same to end users.
-
If you specified list style, click the Edit Dropdown List button. Then specify the list elements as follows:
-
If you specified table or level style, specify the following information:
Table Name or Level Name Select the name of a table or a level, depending on the style you specified. Display Field Field that contains the values to display in the series drop-down list. Data Field Field that contains the values associated with the selected display field. The data field must contain numeric data. When the user selects a given display field, Demantra sets the series entry equal to the corresponding data field.
Note that the Data Type for this series must also be numeric; see “Specifying Data Properties of a Series”.Extra From Comma-separated list of additional tables to include in the query that retrieves the drop-down list. See “Using Extra From for a Series Dropdown”. Extra Where True/false SQL expression that filters this list further. See “Using Extra Where for a Series Dropdown”. -
The dropdowns “Security” and “Minimum Privilege Displayed” are only enabled when the Dropdown Type is set to “Level.” These fields enable you to specify which level members will be accessible by the series. For an explanation of these two fields, see the section “Dropdown Security” in the chapter “Configuring Levels.”
-
(Optional) To see the syntax of the series, click the Show Syntax button, which appears after you have specified the required information.
Then, to copy the syntax to the Windows clipboard, click Copy. This button appears after you click the Show Syntax button.
Filtering a Series Drop-down List
Sometimes it is useful to filter the dropdown list of a series, and to filter this list in a context-specific way. For example, the value of one series sometimes should restrict the list of choices for another series. Demantra provides options to enable you to filter the dropdown list.
Note: The MaxAvailableFilterMembers parameter specifies the maximum number of entries that a filtered drop-down list can display.
Using Extra From for a Series Dropdown
For a dropdown-type series, the values are taken either from a table or from a level (which of course is also in a table). You can provide a comma-separated list of other tables that should be included in the query that returns the drop-down list.
Using Extra Where for a Series Dropdown
For a dropdown-type series, you can specify a SQL expression that filters the dropdown list. The syntax of this expression is generally as follows:
table.column operator other_table.other_column
Here operator is a comparison operator, one of the following:
=
<>
>
>=
<
<=
And table.column and other_table.other_column are key columns in the database.
A user sees the drop-down list for a series within a worksheet table in the Web client. Your Extra Where clause may need to refer to the value of a series or a level member that is present in that window. To do so, you can include either of the following syntax elements in your Extra Where clause:
#series.null-warning.series-name#
#level.null-warninglevel-name#
Where:
| series or level | Indicates the type of object that you are referring to:
|
| null-warning | Indicates what to do if the attribute has a null value. Use one of the following keywords:
Set this appropriately so that users do not see an error. |
| series-name or level-name | Name of the series or level to consider. Specifically: For a series, this should be the COMPUTED_NAME value in the COMPUTED_FIELDS table. For a level, this should be the TABLE_LABEL value in the GROUP_TABLES table. |
For example, the syntax #pop.oknull.population.Selling Entity# refers to the Selling Entity member of a population attribute.
Specifying Data Properties of a Series
To specify the data properties of a series
-
Click Configuration > Configure Series or click the Configure Series button.
-
Right-click a series and then select Open > Data Properties.
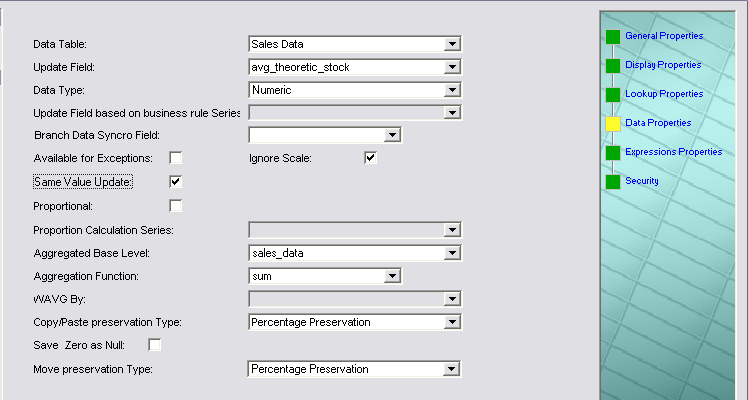
-
In the Data Table field, select the table with which this series should be associated. (If you are familiar with database terminology, note that this option determines the primary key of the series.) The choices are as follows:
sales_data Use for data that varies by item, location, and time. In this case, you are creating a sales series. mdp_matrix Use for data that varies by item and location, but does not vary by time. In this case, you are creating a combination or matrix series. promotion Use for data that varies by item, location, promotion ID, and time. In this case, you are creating a promotion series, which is supported only in the Web client. Level name Use for data associated with a specific level; all levels that you have defined are listed here; see “Configuring Levels”. In this case, you are creating a level series, which is supported only in the Web client. Note: If you change the selection in the Data Table field, Business Modeler automatically removes the existing data from the table where it had been originally stored. Business Modeler then creates a new, empty column in the newly selected table.
-
For Update Field:
-
If you selected sales_data, mdp_matrix, or promotion, Business Modeler asks you to confirm whether you want to create this series within that table.
If you want to store this series in the database, click Yes. Business Modeler automatically populates Update Field with the value you used for the internal name; see “Specifying General Properties of a Series”. Otherwise, click No.
-
If you selected the name of a level, then in Update Field, select the field that you want to use as this series.
-
-
Enter the rest of the information as follows:
Using the Same Value Update Option
Sometimes a user changes a worksheet cell value, and then changes the cell back to the original value without saving or rerunning the worksheet. This option lets you specify whether this series should send all modified cell values when updated, or send only the cells with changed values.
Using the Aggregated Base Level Option
This option lets you specify how this series is aggregated in a worksheet that includes a promotion level:
-
If you choose sales_data, this series is aggregated by the items, locations, and dates selected in the worksheet. Most series are aggregated this way in a typical implementation.
-
If you choose promotion, this series is aggregated by the items, locations, dates, and promotions selected in the worksheet. That is, when the series is aggregated, any data that is not associated with a promotion is ignored.
Within a worksheet that does not include a promotion, the series is aggregated based on the series setting; that is, it is aggregated by the items, locations, and dates if it aggregates by sales_data only, and additionally by promotions if aggregated by promotion.
Specifying a Proportions Reference Series
For best performance, Oracle recommends the following:
-
Proportions from the same table are better than proportions from a different table.
-
If the proportions are not in the same table that stores the series that uses those proportions, consider caching the proportions into the same table that stores the series. For example: create a cache of GLOB_PROP in sales_data and promotion_data.
-
Use PROPORTION_COLUMN when the proportions are from the same table and do not require a server expression.
-
Use a series that is not empty (most of the time) for the proportion reference.
-
The series available in the proportional series drop-down depend upon the table on which the series is defined.
-
Series on Sales_Data can be split by series residing on Sales_Data, MDP_Matrix, Item or Location levels.
-
Series with a data table such as Promotion_Data or Settlement may only be split by series on the same table.
-
Series on a general level without population may be split by any series.
-
Series on MDP_Matrix may be split by any series on MDP_MATRIX, Item or Location levels but not on Sales_Data.
-
-
Using the Expression Editors
For server and client expressions, you use the Business Modeler expression editors, which are similar for these two types of expressions.
For example, the Client Expression Editor looks like this:
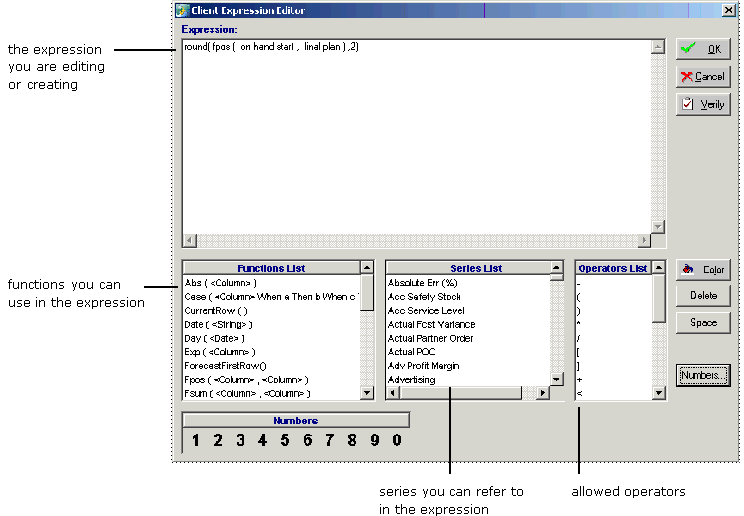
This editor has been designed so that you can create expressions without using the keyboard, so that you can avoid introducing errors. The number buttons at the bottom of the screen, the Space button, and the Delete button support this.
Note: You use the Color button only if you are creating a color expression; see “Creating a Color Expression”.
The Server Expression Editor is similar, with the following main differences:
-
The set of allowed functions is different.
-
Rather than a list of series, the editor provides a list of the allowed database columns.
-
The Server Expression Editor includes two extra fields, Extra From and Extra Where. For details, see “Specifying a Server Expression”.
To edit or create an expression
-
To insert an element at the position of the cursor, click that element. For example, to insert a function, scroll to that function and then click it.
-
To replace an element (such as a placeholder like <Column>), highlight that element and then click the element you want to replace it with.
-
When you are done, click either OK or Verify.
If the expression is not valid, you will receive the message “Expression is not valid.” In that case, close the message box and correct the expression.
See also
“Syntax of Server Expressions” “Syntax of Client Expressions” “Specifying Server and Client Expressions” “Creating an Edit-Lock Expression” “Creating a Color Expression”
Syntax of Server Expressions
This section summarizes the allowed syntax for server expressions. For a more detailed discussion, see “Series”.
A server expression must be an aggregating SQL expression that returns to a value with length greater than zero for each element. (If you never plan to use the series within a cached worksheet, it can return null or a zero-length value; but you may not be able to prevent the series from being misused.)
A server expression must have one of the following forms:
aggregate_function (branch_data.database_column * #UNIT#)
aggregate_function (branch_data.database_column)
aggregate_function (mdp_matrix.database_column * #UNIT#)
aggregate_function (mdp_matrix.database_column)
aggregate_function (other_expression)
Here:
-
aggregate_function is one of the SQL aggregating functions, most commonly sum.
-
database_column is a column of the branch_data or mdp_matrix table, most often the update field that corresponds to this series. That is, if SeriesA is associated with branch_data.SeriesA, then the server expression for SeriesA could be sum(branch_data.SeriesA)
Note: branch_data is a synonym for the sales_data table or the promotion_data table.
-
#UNIT# represents the unit conversion factor. Within a worksheet, this token is automatically replaced by the conversion factor that corresponds to the unit that the worksheet is currently using.
In turn, other_expression can be made up of some or all of the following components:
-
Other SQL functions.
-
Constants and expressions that have numeric, string, date, and true/false values.
Note: Enclose any literal negative value within parentheses, as in this example: (-0.33)
-
Operators such as +-*/.
-
Demantra tokens such as #UNIT#. Note that #UNIT# currently supports ONLY multiplication (*).
-
Columns of the branch_data and mdp_matrix tables.
You can use parentheses to control the precedence of calculations, according to standard algebraic rules.
Note: SQL expressions have a limit of 3000 characters. To avoid reaching this limit, use small field names.
For information on the supported operators, tokens, and SQL functions, see “Server Expression Functions and Operators”.
Syntax of Client Expressions
This section summarizes the allowed syntax for client expressions. For a more detailed discussion, see “Series”.
A client expression uses Demantra functions. The client expression can be made up of some or all of the following components:
-
Constants and expressions that have numeric, date, true/false or null values.
Note: Enclose any literal negative constant within parentheses, as in this example: (-0.33)
-
Demantra functions.
-
Operators such as +-*/.
-
References to other series. To refer to a series, you use the name of the series.
-
References to series at other time periods. Here, you use the following syntax:
series_name[relative-time-bucket]
An expression like this is sometimes called a vertical formula. For example: Sales [-1] refers to the Sales series for the previous period. Sales [1] refers to the Sales series for the next period. [0] is not allowed.
Here relative-time-bucket must be any of the following:
-
An integer
-
A series name
-
A simple expression using integers, series names, and the basic mathematical operators.
For information on the supported operators and functions, see “Client Expression Functions and Operators.”
Specifying Server and Client Expressions
Specifying a Server Expression
To edit a server expression
-
Click Configuration > Configure Series or click the Configure Series button.
-
Right-click a series and then select Open > Expression Properties.

-
Click the button to the right of the Server Expression field.
The Server Expression Editor is displayed.
-
In the Expression field, create an expression as described in “Using the Expression Editors”. For information on the syntax to use, see “Syntax of Server Expressions”.
-
Enclose any literal negative value within parentheses, as in this example: (-0.33)
-
If this series is going to be used within cached worksheets, it cannot return null or zero-length values. Use the expression to_number(null,0) to express null values that can be cached.
-
branch_data is a synonym for the sales_data table.
-
-
When you are done, click either OK or Verify.
If the expression is not valid, you will receive the message “Expression is not valid.” In that case, close the message box and correct the expression.
See also
“Server Expression Functions and Operators”
Specifying Extra From for a Server Expression
Normally the server expression can refer only to fields in the following tables:
In rare cases, you may need to refer to data in other tables. In such a case, use the Extra From field. In this field, specify an optional list of additional tables (separated by commas) that contain data relevant to this series.
If you include a table here, the server expression can refer to columns in that table.
Note: Internally, these tables are added to the From clause in the SQL query that retrieves data for this series.
Specifying Extra Where for a Server Expression
If you need to filter the data further, use the Extra Where field. The syntax of this field is as follows:
table.column operator other_table.other_column
Here operator is a comparison operator, one of the following:
=
<>
>
>=
<
<=
And table.column and other_table.other_column are key columns in the database.
Note: Internally, the Extra Where field is added to the WHERE clause in the SQL query that retrieves data for this series.
Specifying a Client Expression
To edit a client expression
-
Click Configuration > Configure Series or click the Configure Series button.
-
Right-click a series and then select Open > Expression Properties.
-
Click the button to the right of the Client Expression field.
-
In the Expression field, create an expression as described in “Using the Expression Editors”. For information on the syntax to use, see “Syntax of Client Expressions”.
-
Enclose any literal negative value within parentheses, as in this example: (-0.33)
-
To include a null value within a client expression, do the following:
-
Create a series named, for example, Null Value and give this series a server expression that evaluates to null.
-
Within the client expression, refer to the Null Value series.
-
-
-
When you are done, click either OK or Verify.
If the expression is not valid, you will receive the message “Expression is not valid.” In that case, close the message box and correct the expression.
Verifying All Expressions
To verify all server and client expressions
-
Click the Verify Expressions button in the toolbar. Or click File > Verify All Expressions.
See also
“Client Expression Functions and Operators”
Creating an Edit-Lock Expression
An editable series can have an optional edit-lock expression, which can make series cells uneditable based on a condition. For each editable cell in a series, an edit-lock expression evaluates to true or false.
-
If the expression evaluates to true, the cell is automatically made uneditable.
-
If it evaluates to false, the cell is left in its original state, which can be either editable or not.
To create an edit-lock expression
-
Click Configuration > Configure Series or click the Configure Series button.
-
Right-click a series and then select Open > Expression Properties.
-
Click the button to the right of the Edit Lock Expression field.
The Client Expression Editor appears.
-
Create an expression that evaluates to true or false; see “Syntax of Client Expressions”.
See also
“Client Expression Functions and Operators”
Creating a Color Expression
Any series can have a color expression, which controls only the appearance of the series. For each editable cell in a series, a color expression evaluates to either a numeric color value or null. This expression must have one of the following forms:
If condition, numeric-color-value
If condition, expression-with-numeric-value
Then for each cell in the series:
-
If the expression evaluates to a number, the cell is displayed in the corresponding color.
-
If the expression evaluates to null, the color of the cell is left unchanged.
-
In its basic form, a color expression returns one numeric color value based on one condition. To return different color values for multiple conditions, use the second form, and use an If-Then-Else expression for the expression-with-numeric-value.
-
A color expression cannot include time-shift expressions such as [ - 1 ], Fpos, and Fsum.
-
To create a color expression
-
Click Configuration > Configure Series or click the Configure Series button.
-
Right-click a series and then select Open > Expression Properties.
-
Click the button to the right of the Color Expression field.
The Client Expression Editor appears.
-
Construct an expression (using the If function) that evaluates to a numeric color value. For example, the following color expression makes the cell background red (red=255) if the absolute value of the order variance is greater than the order tolerance:
if ( -order variance > order tolerance , 255)
To insert a numeric color value, do the following:
-
Place the cursor where the numeric color value should appear in the expression.
-
Click Color to display the Color dialog box.
-
Select an existing color. Or click Define Custom Colors and define a color. See “To define a custom color”.
-
Click OK.
Demantra finds the numeric value that corresponds to the color you selected, and places that number into the expression.
Standard Colors
For reference, the following table lists the standard colors in numeric order. You can use this table to look up a color without having to use the Business Modeler user interface. This may be useful when you are working with unfamiliar client expressions.
Color Description Color Description Color Description 0 black 4210816 brown 8454143 yellow 64 dark brown 4227072 green 10485760 dark blue 128 brown 4227200 olive green 12615680 steel blue 255 red 4227327 orange 12615808 blue 16384 dark green 4259584 bright green 12615935 pink 16512 brown 8388608 dark blue 12632256 gray 32768 green 8388672 purple 16711680 royal blue 32896 olive green 8388736 purple 16711808 purple 33023 orange 8388863 pink 16711935 pink 65280 bright green 8404992 dark blue 16744448 blue 65408 bright green 8421376 blue green 16744576 blue 65535 yellow 8421440 blue green 16744703 pink 4194304 very dark blue 8421504 gray 16776960 aqua 4194368 very dark purple 8421631 pink 16777088 aqua 4194432 brown 8453888 aqua 16777215 white 4210688 very dark green 8454016 light green -
Defining Custom Colors
To define a custom color
-
Click Define Custom Color in the Color dialog box.
The Color dialog box expands to display a color palette.
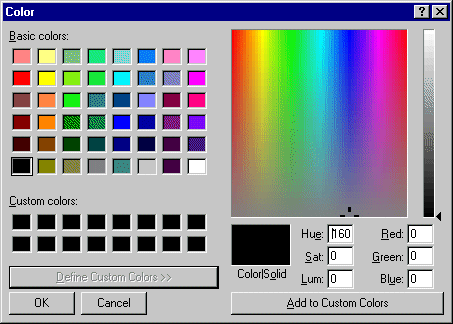
-
Click the color palette to select a color.
-
Drag the luminance pointer (on the right of the dialog box) up to the required luminance (according to the color/solid display).
-
Click Add to Custom Colors to add the color to the Custom Colors list.
-
Click OK.
Controlling Access to Series
When you create a series in the Business Modeler, Demantra automatically adds that series to your component. You can give access to this series to other users of your component.
To control access to a series
-
Click Configuration > Configure Series or click the Configure Series button.
-
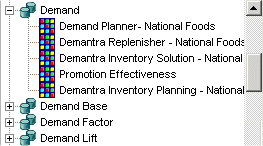
To see which components include a specific series, click the plus sign (+) to the left of the series name. The display expands to list all the components that include this series:
-
To make changes, right-click the series and then select Open > Expression Properties.
-
Click Next to access the Security page.
-
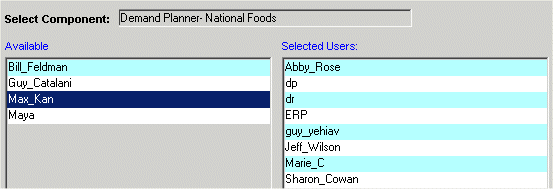
If you logged into Business Modeler with one of the internal Demantra passwords, you can select any component. Otherwise, you can make changes only within the component with which your ID is associated.
-
For each user of this component who needs access to this series, double-click the user name to move the user name from the Available list to the Selected Users list.
Configuring Desktop Group Expressions
Group expressions specify how to group data for display purposes, into different blocks of time such as quarters, months, or half years, when the user chooses to group data in that way.
Note: Group expressions are supported only in Demand Planner and Demand Replenisher. For the equivalent functionality in the Web products, create a time aggregation; see “Creating a Time Aggregation”.
The following figure shows an example of a worksheet when it is ungrouped and also when it is grouped by month.

A group expression specifies the group (in time) to which each row belongs. It does not specify how the subtotals are calculated. The subtotals are calculated as specified by the summary function; see “Specifying How to Display a Series”.
Demantra provides a set of possible group expressions, which are all pre-configured. You can reconfigure these as needed.
To configure a group expression
-
Click Configuration > Configure Group Expressions.
The Edit Group Expression screen appears.
-
Select an expression name from the list at the left.
-
In the Expression Description field, edit the name of this expression.
This name appears in the list of choices when the user clicks Data > Define Group... (in Demand Planner or Demand Replenisher).
-
In the Expression field, edit the expression itself.
-
Click File > Save to save this change.
-
Click the close button at the top right of the window to close the dialog box.
Deleting a Series
To delete a series
-
Right-click the series and click Delete.
Business Modeler prompts you to confirm that you want to delete this series.
-
Click Yes.
Deleting a series may take a couple of minutes, depending on the size of the database.
-
Click File > Save to save this change.
Enabling Series Caching By Item
You can cache series data that is aggregated by item, in the branch_data_items table; this improves performance. This technique can be used only in worksheets that meet certain conditions.
To make sure cached data can be accessed from a worksheet
-
Make sure that the DYNAMIC_SYNC procedure is scheduled to run. See “Database Procedures”.
This procedure updates branch_data_items based on changes elsewhere in the database.
-
Make sure that the worksheet is defined as follows:
-
It does not include filters of the location or matrix types.
-
It does not include levels of the location or matrix types.
-
It does not include contain any matrix series.
-
-
For the user who is running the worksheet, make sure that no security filters have been defined. see “Creating or Modifying a User”.
-
Make sure that the UseItemsAggri parameter is set to Yes. For information on this parameter, see “Non-Engine Parameters”.
Specifying the Order of Series in Dynamic Open Link
You can control the order in which series are displayed when linked into a third-party tool through Dynamic Open Link (DOL).
Note: This option controls the order of series in the worksheet wizard used by the following:
-
Default display order in the Desktop
-
Order of series exported via Demantra Dynamic Open Link
-
Default display order of Web client Worksheets
To specify the order of series in the desktop
-
Click File > Define Series Display Order.
The Business Modeler displays the following screen:
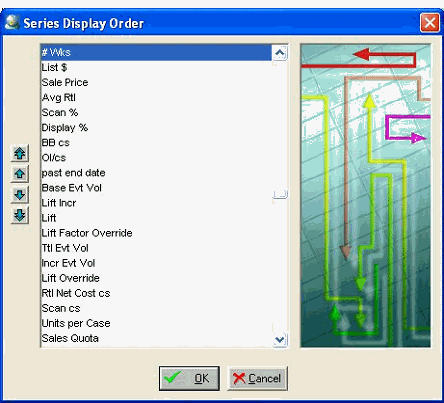
-
To move a series, click it and then click the arrows to move the series to the beginning of the list, up one, down one, or to the end of the list.
-
Click OK.
Creating or Modifying a Series Group
To create or modify a series group
-
Click Configuration > Configure Series Groups.
-
Next:
-
To create a new series group, double-click the New Group icon. Or click the icon and then click OK.
-
To edit a series group, double-click the icon corresponding to the series group. Or click the icon and then click OK.
The Business Modeler displays the General Properties screen.
-
-
In Group Name, type a unique name for the new series group.
-
In Group Description, type an optional description for the new series group.
-
Click Next.
The Business Modeler displays the Series screen.
-
To select the series to include in this series group, move series from the left list to the right list.
-
When you are done specifying series, click Finish.
Deleting a Series Group
To delete a series group
-
Click Configuration > Configure Series Groups.
-
Click the icon corresponding to the series group.
-
Click Delete.
-
Click Yes to confirm the deletion.
Viewing Dependencies Among Series
The Business Modeler provides a simple tool you can use to check the dependencies among the series in your system. The results for a given series depend on whether that series is editable.
To view series dependencies
-
Click Tools > Series Dependencies.
The Business Modeler displays the Series Dependencies screen.
-
In Select Series, select a series.
If the series is not editable, the Business Modeler updates the screen, as follows:
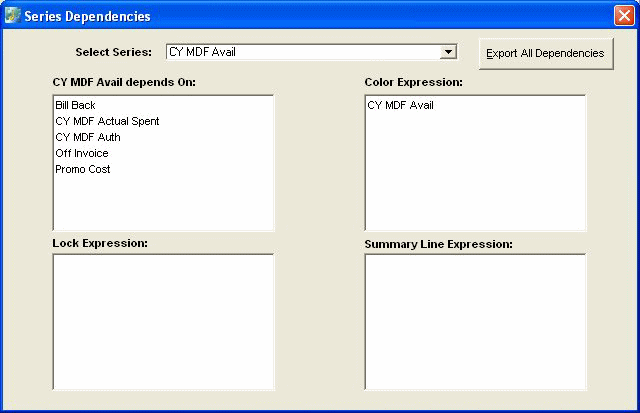
These fields have the following meanings:
However, if the series is editable, the screen is slightly different:
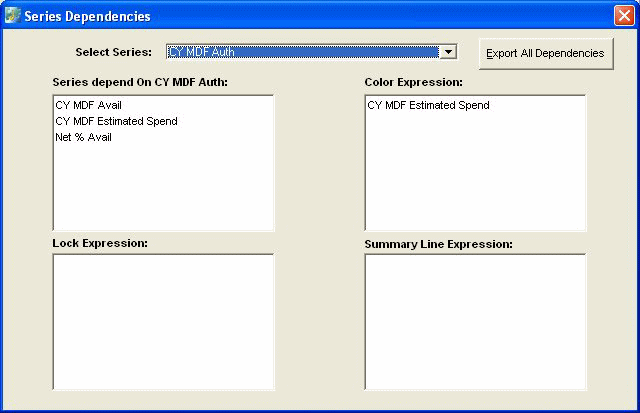
Notice that the first field has a different label and meaning:
Series depend on selected series All the series that depend on the selected editable series, directly or indirectly, through their client expressions. The other fields have the same meanings as in the other case.
To export dependencies of all series
-
Click Export All Dependencies.
The Business Modeler generates the file Demantra_root/Demand Planner/Desktop/Dependencies.xls.