Upgrading Using Oracle Demantra Business Application Language
This chapter describes the Business Application Language tool (BAL) that helps you to compare old and new schemas, and make choices about how to handle differences. The BAL Explorer is launched during the installation process when you select to manually upgrade to the latest application version.
This chapter covers the following topics:
Overview
When upgrading to new versions of Demantra, your data needs to be changed to the new data schema.
Demantra provides you with a tool called the Business Application Language (BAL) that helps you to compare old and new schemas, and make choices about how to handle differences. It also provides you with the capability to assemble key elements from other schemas and merge them into a target schema (for testing purposes, for example).
The BAL Explorer is launched during the installation process when you select to manually upgrade to the latest application version. Currently, it is only available when upgrading from Demantra version 7.1.1 to newer versions.
Important: The BAL is only available to customers who have implemented the standard pre-configured applications available from Demantra 7.1.1 onwards. Customers who are using the standard Oracle application configuration with supported modifications like adding their own new levels/series, can use the "Application and Platform Upgrade" option in the installer. Customers who are not using the standard Oracle application configuration should , choose the platform upgrade option which preserves custom configurations and enables new platform functionality. It does not introduce new application objects. If you are uncertain which option to choose, please contact support for guidance.
The Upgrade Process
For those using Demantra 7.1.1 or later, you can make choices about how you want to migrate your data to the latest application version. The upgrade schema choices are presented when you install Demantra and configure the database. This diagram shows the placement of the upgrade schema options during the installation process:
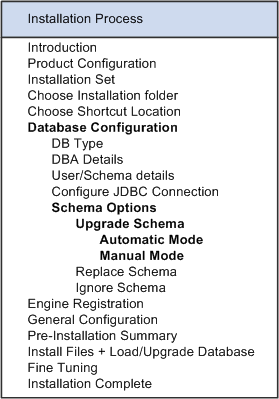
Two upgrade schema options are available: automatic mode and manual mode. In the automatic mode, the installer upgrades your schema based on a set of default actions:
-
New objects are inserted
-
Overlapping objects are be reconciled by aligning some of the objects to the new application definition and creating duplicate objects where relevant.
The automatic mode runs the BAL Explorer in the background without any personal interaction.
If you want to make specific choices about how objects are upgraded to the new schema, then you should choose manual mode. This mode launches the BAL Explorer and enables you to:
-
Review the relationship between objects
-
Compare schemas
-
Specify how individual objects are upgraded when conflicts occur between the schemas
The Business Modeler is invoked at the end of each upgrade mode, enabling you to apply any configuration changes identified in the new schema.
The following diagram shows the process involved with the two upgrade schema options:
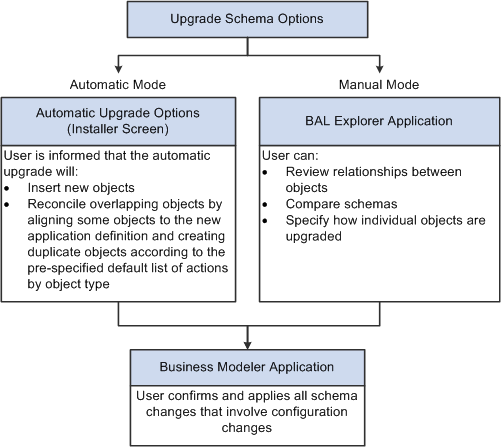
When the upgrade is complete, the Business Modeler displays the Upgrade Complete screen, which summarizes the objects that were upgraded.
Important: Oracle strongly recommends that you backup your database before attempting to upgrade from an earlier schema.
BAL Explorer Screen Elements
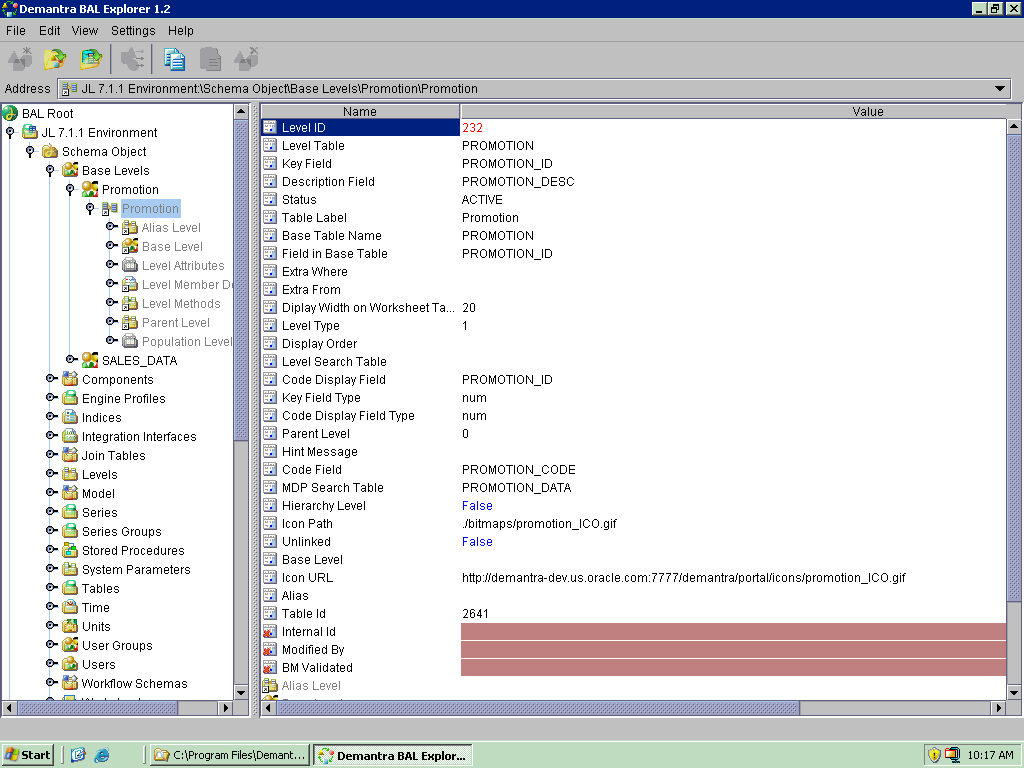
The BAL Explorer main screen, shown below, is comprised of two main components:
-
Schema Browser pane (on the left)
-
Object Details pane (on the right)
The Schema Browser Pane
The Schema Browser displays all the schemas currently defined in the BAL Explorer. These schemas can be expanded to display the objects contained within the schema. Depending on the type of object you select, the attributes are displayed with icons representing their data type. For example, time attributes are displayed with a clock icon.
The Schema Browser also provides information about how objects are related.
-
Black represents a container relationship: object A contains object B (shown in black). Object B has meaning only within object A. Object B is shown in black within object A. For example, a list for a series has meaning only within that series.
-
Gray represents a referring relationship: object A refers to object B. Object B has meaning independent of object A. Object B is shown in gray within object A. For example, a worksheet refers to the Demand series.
Object Details Pane
The Object Details pane provides information about the object currently selected in the Schema browser, including:
-
Database fields that correspond to the configuration settings in the Demantra platform tools (Business Modeler and Workflow Editor).
-
Folders of objects that are contained within or referred to by the selected object.
The Object Details pane also displays any mismatches between the selected schema (the database) and the latest Demantra schema (the configuration files). Mismatches between the database and the configuration files appear as follows:
-
Green: Field is in the database but not found in the latest BAL configuration files.
-
Red: Field is in the BAL configuration files but not in the database. Missing fields are also indicated by the red x on the field icon.
Legend
For a better understanding of the many icons used in the BAL Explorer, a legend is available.
To view the legend:
-
From the View menu, select Legend. The Legend window appears on the far right.
-
Close the Legend window when you are not using it.
Status Bar
To view the progress of an upgrade, you can activate the status bar.
To turn on the status bar, from the View menu, select Status Bar.
Using the BAL Explorer
This section includes the following:
-
Understanding Objects, Schemas, Folders, Files and Repositories
-
Schema Procedures
-
Folder Procedures
-
Upgrading Procedures
-
Troubleshooting
Understanding Objects, Schemas, Folders, Files and Repositories
A schema object is a logical data storage structure. Schema objects do not have a one-to-one correspondence to physical files on the disk that stores their information. Oracle stores a schema object logically within a tablespace of the database. The data of each object is physically contained in one or more of the datafiles of the tablespace. For example, each Demantra object generally corresponds to a row in a particular table of the Demantra database, and further details might be located in other tables.
A schema is a collection of schema objects that also defines how they relate to one another. No relationship exists between schemas and tablespaces: a tablespace can contain objects from different schemas, and the objects for a schema can be contained in different tablespaces.
Configuration files describe the target Demantra schema. BAL compares these configuration files to the source database. Presently, Demantra recommends using standard configuration files for upgrading purposes. Customized configuration files might be available in future releases.
The BAL Explorer organizes objects into folders for convenience and readability. By default, the BAL Explorer groups the objects by type and displays each type in separate folders, as follows:
-
Base levels
-
Components
-
Engine profiles
-
Indices
-
Integration interfaces
-
Join tables
-
Levels
-
Model
-
Series
-
Series groups
-
Stored procedures
-
System parameters
-
Tables
-
Time
-
Unit
-
User groups
-
Users
-
Workflow schemas
-
Worksheets
The default folders used to display different types of objects have no inherent meaning aside from organizing the object information for viewing purposes.
When upgrading to a new version of the Demantra software in manual mode, you can create one or more schema aliases that you can compare with the latest Demantra schema. You can represent an existing schema as is, or you can create new schemas that are customized with objects from a full schema for testing purposes. You can create additional folders within schemas for testing purposes and copy objects from other schemas into them. Successfully upgrading the contents of a personal folder will add these objects to the parent schema.
Note: When you upgrade from the installer in manual mode, a schema is created automatically.
When the BAL Explorer first connects to a schema, it creates a BAL repository, saving the information it needs in its own internal tables. This repository can reside either within the same database user or a different database user so that nothing new is introduced into the original repository.
Schema Procedures
Note: If you are upgrading your schema from the installer, the schema definition is created automatically. Go to Upgrading Procedures for detailed instructions.
Creating a Schema Connection
To view the contents of a Demantra database or compare databases, you must create a visual representation of the schema. This alias schema appears in the Schema Browser pane.
Caution: Do not use any unusual characters when defining the name such as apostrophes, brackets, and so on. This usage might cause your comparison report to not save.
Important: When you create a schema, you can create the repository in the current database user or a different user. If you choose the latter, make sure that the second database user exists before creating the schema.
To create a schema connection:
-
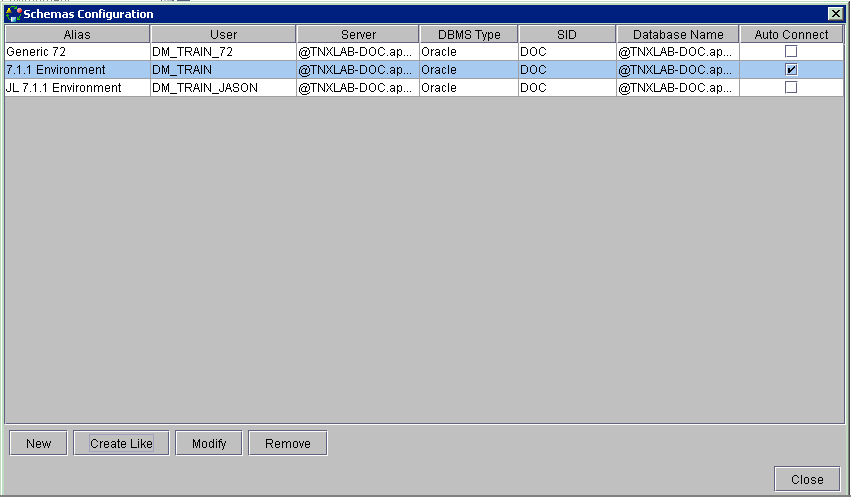
Click Open Schema. The Schema Configuration dialog box appears.
-
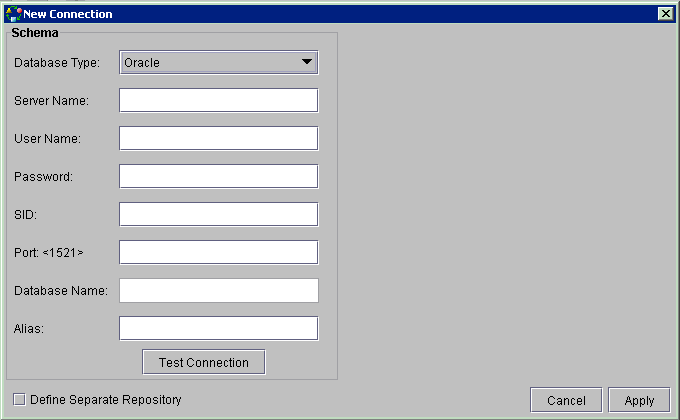
Click New. The New Connection dialog box appears.
-
Enter the following data in the following fields:
Field Description Database Type Select your database type. Server Name The name of the server where your database resides. User Name The user name of the database. Password The password of the database. SID If you are using an Oracle database, enter the SID. Port <1521> The port your database is using. The default is 1521. Alias The schema alias to appear in the Schema Browser. -
Select Define Separate Repository if you do not want the repository created in the current database tables. The Repository information area appears in the New Connection dialog box:
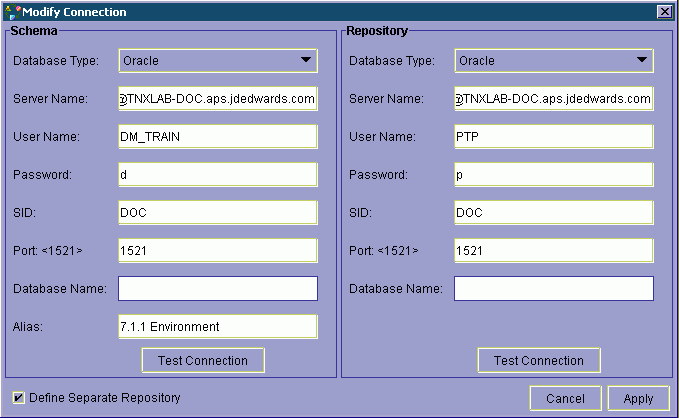
Note: A second database user must already exist for the repository to be successfully defined.
-
Click Test Connection to see if your schema is properly configured.
-
Click Apply. The new schema alias appears in the Schemas Configuration dialog box.
-
Click AutoConnect if you always want the schema to be active when you are working in the BAL Explorer.
-
Click Close. The new schema appears in the Schema Browser Pane.
Editing a Schema Connection
-
Click Open Schema.
-
Select the schema you want to modify from the list of schema aliases.
-
Click Modify.
-
Make any changes necessary to your schema.
-
Click Apply.
-
Click AutoConnect if you always want the schema to be active when you are working in the BAL Explorer.
-
Click Close.
Creating a Schema Connection Based on Another Schema Connection
To create a schema connection based on another schema connection:
-
Click Open Schema.
-
Select the schema connection you want to base your new schema connection on.
-
Click Create Like. The New Connection dialog box appears with the configuration details of the original schema.
-
In the Alias field, change the schema alias name.
-
Make any additional changes to the new schema.
-
Click Apply. The new schema appears in the list of schemas.
-
Click Close. Your new schema appears in the Schemas Browser Pane.
Deleting a Schema Connection
-
Click Open Schema.
-
Select the schema connection you want to delete.
-
Click Remove.
-
Click Yes when prompted for confirmation. The schema alias is removed from the list of schemas in the schemas configuration dialog box.
-
Click Close. The schema connection no longer appears in the Schemas Browser pane.
Connecting to the Schema Repository
If you did not select the autoconnect option for your schema, you can manually connect to your schema when necessary.
To connect to a schema:
-
In the Schema Browser, right-click the schema to which you want to connect.
-
Select Connect. Your schema becomes active.
Disconnecting from a Schema Repository
-
In the Schema Browser, right-click the schema that you want to disconnect.
-
Select Disconnect. Your schema becomes inactive and appears gray in the Schema Browser.
Rebuilding a Schema Repository
You rebuild a schema repository if you have made configuration changes to the database since the schema was created in the BAL Explorer (for example, using Business Modeler). Rebuilding the schema repository incorporates all of the latest database contents, including any objects that were already upgraded into the schema. However, any personal folders associated with the schema that have not been upgraded are discarded when the schema is rebuilt.
To rebuild a schema repository:
-
In the Schema Browser, right-click the schema that you want to rebuild.
-
Select Rebuild. Your schema repository is rebuilt.
Note: Rebuilding your schema repository also has the effect of connecting your schema
Changing Object Order and Display
By default, the BAL Explorer sorts the display of objects by their types within a schema or folder. You can change this default and display the objects alphabetically instead. The alphabetical display may appear as follows:
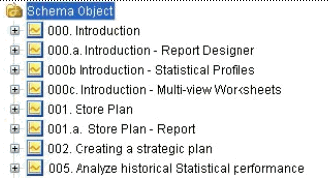
To change object order and display:
-
Right-click the schema or folder that you want to display differently. A check next to the View by Type option indicates that the option is currently selected.
-
Select View by Type to change the appearance.
Folder Procedures
Folders are used for testing purposes and to move objects from one schema to another. If you want to upgrade specific objects from schema A to schema B, you create a folder in schema B. All objects the folder contains will become valid objects in the target schema if the upgrade process completes successfully. The folder itself does not have meaning to Demantra.
Creating Folders
-
Right-click the schema in which you want the folder to be located.
-
Select New Folder. The folder icon appears in the Schema Browser.
-
Type the name of the folder and press Enter.
Renaming Folders
-
Right-click the folder that you want to rename.
-
Select Rename.
-
Type the new folder name and press Enter. The name has been changed.
Deleting Folders
-
Right-click the folder you want to delete.
-
Select Delete.
-
Click OK when Prompted to confirm the deletion. The folder and its contents are deleted.
Copying Objects from a Schema to a Folder
Within the BAL Explorer, you can copy objects from more than one schema to a folder. You can use the Shift or Control keys to copy more than one object at a time. The Shift key enables you to copy adjacent objects. The Control key enables you to copy multiple objects that are not adjacent.
After the objects are pasted into the target folder, they appear in blue italics to show that they were not upgraded to the target folder.
To copy an object from a schema to a folder:
-
Right-click the object that you want to copy to a folder.
-
Select Copy.
-
Right-click the folder to which you want to copy the object.
-
Select Paste. The object appears in the target folder.
Deleting an Object from a Folder
Objects can be deleted from a folder, but not from a schema.
To delete an object from a folder:
-
Right-click the object that you want to delete from a folder.
-
Select Delete.
-
Click OK when prompted to confirm the deletion. The object is deleted from the folder, but it remains in the original schema.
Upgrading Procedures
Important: Before upgrading to a new version, it is strongly recommended that you take a backup of your existing database.
Setting the Global Upgrade Preferences
When you upgrade an existing schema to a new schema definition, conflicts can occur between the two schemas. The Upgrade Settings option provides guidance to the BAL Explorer when performing an upgrade. New objects are always inserted. Overlapping objects can be duplicated, aligned to the new object, or ignored.
There is a set of default options available for new and overlapping objects. The default options by object type are listed in a table below. When you choose the “Automatic Upgrade” option when installing, you are not able to interact with the BAL Explorer to change the default options. When you choose the “Manual Upgrade” option when installing, an upgrade package is created by BAL with the same default options but you can choose to change or override the default options in the BAL Explorer.
By default:
-
New objects are inserted.
-
Overlapping objects are either duplicated, aligned or ignored based on the object type itself.
-
Customizations to standard integration interfaces are not preserved during the automatic upgrade process.
Integration Interfaces and Data Profiles
| Type of Upgrade | Result |
|---|---|
| Automatic | BAL Explorer aligns modified standard integration interfaces and associated data profiles to the new version, |
| Manual | Same as the Automatic Upgrade except you can change the default upgrade action. |
After you upgrade:
-
Review your pre-upgrade schema backup for any standard integration interfaces that you may have customized. These interfaces would have been aligned to the new version in the upgraded schema.
-
Add back those customizations to the new version of the integration interface in the upgraded schema.
Worksheets
| Type of Upgrade | Result |
|---|---|
| Automatic | BAL Explorer retains customized standard worksheets in your existing schema and duplicates them in the new schema. See ‘Naming convention for duplicate objects’ for more details. |
| Manual | Same as the Automatic Upgrade except you can change the default upgrade action. |
Note: Only those standard worksheets that have changes between the two versions will be duplicated. If a worksheet has not changed between your version and the new upgrade version, it is not duplicated.
After you upgrade, Oracle recommends that you evaluate each worksheet and:
-
Manually merge your pre-upgrade customizations from the pre-upgrade version to the new version and use the new version of the worksheet.
-
Optionally, delete the old unused worksheet so as to prevent the application from having too many old and unused worksheets.
Note: Workflow schemas also follow the same upgrade behavior as worksheets.
Naming Convention for Duplicate Objects
For objects that are duplicated during the upgrade, certain naming conventions are followed. During an upgrade, if an object has to be duplicated, the following naming conventions are used:
-
The existing object in your schema will be renamed according to the below convention:
Objectname_version number being upgraded to_build number being upgraded to
If you are upgrading from version 7.1.1 to 7.3.0.1 and the upgrade process has to duplicate a worksheet called ‘Demand Analysis Item & Org’, then the existing 7.1.1 worksheet is renamed as ‘Demand Analysis Item & Org_730_125’. Here version number = 7.3.0, build number = 125 (a fictional build number). The build and version numbers corresponding to the new release you are upgrading to can be found in the table version_details after the upgrade is complete. (Every released version corresponds to a specific version number and build number. For example, version 7.2.0.2 corresponds to version number 7.2.0 and build number = 226, version 7.3.0 corresponds to version number 7.3.0 and build number = 68.)
-
The new object introduced in your schema by the upgrade process is named according to the same name in the Demantra standard schema, with no suffixes.
In the above example, the new version of the worksheet will be introduced as ‘Demand Analysis Item & Org’, with no suffixes
Important Note: There is a change in the naming behavior of duplicate objects from earlier versions (7.2.0.2 and 7.3) to the behavior in version 7.3.0.1:
-
From version 7.2.0.2 until version 7.3, new/duplicate objects were inserted with a suffix of the new version and the existing objects were left intact. For example, when upgrading from version 7.1.1 to version 7.3, the new 7.3 version of a worksheet called ‘Demand Analysis Item & Org’ would have been inserted as ‘Demand Analysis Item & Org_730’, while the existing worksheet would be left intact as ‘Demand Analysis Item & Org’.
-
From version 7.3.0.1 onwards, the new/duplicate worksheets are inserted without a suffix with the same name in the Demantra standard schema, while the existing object will be suffixed with the version and build number as explained above.
Therefore, if your schema has gone through multiple application upgrades prior to version 7.3.0.1, you may see objects with a ‘_720’ or a ‘_730’ suffix, which means that these objects were introduced during an upgrade to 7.2.0.2 or 7.3.0 respectively and you may see objects with a ‘_730_125’ suffix, which means that these objects were suffixed and ‘archived’ during an upgrade to version 7.3.0.1 ( In this example, version number = 7.3.0 and build number = 125).
Table of Default Upgrade Actions for Overlapping Objects
This table describes the upgrade reconciliation actions for overlapping objects when you choose the Default upgrade option:
| Object | Sub-Objects | Reconciliation Action | Comments |
|---|---|---|---|
| Series | - | Align | Existing series definition is aligned to the new series definition. |
| Worksheet | - | Duplicate | If there is a change in the worksheet definition between the existing version and the new version, then the new version of worksheets are created as duplicate objects. Existing worksheets are retained in their original version. After the upgrade, it is recommended that you manually merge your pre-upgrade customizations from the pre-upgrade version to the new version and use the new version of the worksheet thereafter. |
| Level | - | Ignored; sub-objects evaluated. | The level definition is retained. Sub-objects of level are handled as indicated below. |
| Level | Method | Align with Merge; method input.output arguments evaluated. | Existing methods are aligned to new version. |
| Level | Method Input Arguments | Align | Input arguments are aligned to the new version. |
| Level | Method Output Arguments | Align | Output arguments are aligned to the new version. |
| Level | Level Attributes | Align with merge | Level attributes are aligned and merged so that post upgrade, both customer level attributes and level attributes in the new version are included. |
| Level | Unit Levels | Align with merge | The customer unit levels are aligned and merged with the new version unit levels. After the upgrade, the original customer unit levels are included with any new unit levels. |
| Level | Population Attributes | Align | Population attributes are aligned to the population attribute definition in the new version. |
| Level | Level Member Defaults | Ignore | Customer level member defaults are retained. |
| Integration Interface | - | Align | If there is a change in the integration interface, data profile, or level profile between the existing and new application versions, the existing version of the integration interface is aligned (overwritten) with the new version. When an integration interface is aligned, any data profiles within it are also aligned to the new version. Therefore, customizations made to the standard integration interfaces are not preserved during the upgrade process. After the upgrade,: - Review your pre-upgrade schema backup for the integration interfaces that have been aligned -Add back any customizations you have made to the new version of the integration interface. |
| Workflow Schema | - | Duplicate | If there is a change in the workflow schema between the existing and new application version, then the new version of the workflow schema is created as a duplicate object. After upgrade, it is recommended that you manually merge your pre-upgrade customizations from the pre-upgrade version to the new version and use the new version of the workflow. |
| Users | - | Align | - |
| Model | - | Align | Changes to the existing entries in the standard data model are aligned with the definition in the new version. |
| Components (Component Wizard of the Business Modeler) | All sub-objects
|
Align with Merge | All sub-objects under Components (for example, component levels, series, units, and so on) are merged with the new version so that the original and new settings are available. For example, if a customer has associated a COGS unit to a component and in the newer version, there is a new unit XYZ associated with this component, then both COGS and XYZ units are available after the upgrade. Note: The existing component level permissions are overwritten by the new level permissions. It is important to keep track of the existing component level permissions before the upgrade. After the upgrade, these component level permissions can be reconfigured in the Business Modeler to match the pre-upgrade settings. |
| Group Users | - | Align with Merge | Any users a customer has added to a user group are merged with any users associated with this group in the new version. |
| Indexes
Note: These are not database indexes, but rather indexes created in Business Modeler through the Configure > Configure Indexes menu option. |
- | Align | - |
| Series Group | - | Align with Merge | Custom series added to existing series group will be retained along with any standard series in that group. |
| Any other objects not mentioned in this table | - | Align | Objects not specifically mentioned in this table are aligned to the new version. |
Based on your settings, the Object Resolution dialog box displays default upgrade suggestions for each object during the upgrade process. Choices can be changed on an object-by-object basis using the Set Object Resolution option.
To set the global upgrade preferences:
-
From the Settings menu, select Upgrade Settings. The Upgrade Settings dialog box appears.

Note: New objects are always inserted.
-
For Overlapping Objects, select:
-
Insert Duplicate Object: Objects exist in both the original and new schema definitions. The original object is suffixed as "objectname_version number_build number", while the new object is created as a duplicate object with the same name as in the Demantra standard schema. See Naming Convention for Duplicate Objects for more information.
Note: Only overlapping objects that have changed between the current and new versions are duplicated. For example, if a worksheet in 7.1.1 has not changed compared to the 7.3 worksheet, then it is not duplicated when upgrading to 7.3.
-
Align to New Object: Original objects are merged with the objects in the new version schema definition. In cases where the table indicates "Align with Merge", the original objects are merged with the new objects; both exist after the upgrade.
-
Ignore New Object: Existing object is retained in its original form; new version of the object is ignored.
-
Default: Objects and sub-objects are upgraded based on the action type specified in the Table of Default Upgrade Actions for Overlapping Objects above.
-
-
Click Apply. All upgrade suggestions are based on these upgrade setting preferences from this point forward.
Upgrading the Objects in a Folder
To add objects from one schema to another, you create a folder in the target schema. Once you have added objects to the folder, you can upgrade these objects to the target schema database. During the upgrade process, the BAL Explorer checks to see whether all the necessary related objects, such as levels and series, exist in the schema. If not, you are prompted to substitute other objects or cancel the operation. Some objects may require configuration changes. These changes can be implemented through the Business Modeler.
Note: If you want to add more objects after you have upgraded a folder, add the objects to a new folder and, when ready, upgrade that folder.
To upgrade objects in a folder:
-
Right-click the folder that you want to upgrade.
-
Select Upgrade.
Upgrading Schemas
Upgrading a schema begins with comparing two schemas to detect differences. The BAL Explorer compares the schemas object by object, and it returns a detailed report that itemizes the differences. This report can be saved in html format for future reference. If you are satisfied with the comparison, you can prepare the upgrade package. Once the upgrade package has been prepared, you can start the upgrade process.
Note: When upgrading from the installer, the BAL Explorer automatically performs the comparison of the two schemas and displays the report. The upgrade package is created automatically.
If you have chosen the upgrade setting that allows you to change the resolution action, you will be able to choose how to handle the differences between schemas on an object-by-object basis. BAL then processes the schema upgrade. Finally, the Business Modeler launches and you activate the configuration changes to complete the upgrade. The following diagram illustrates the upgrade process:
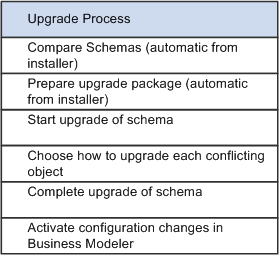
The schema repository, which contains all upgrades to that particular schema, is not deleted after the upgrade unless you choose to remove it completely. It is updated with future upgrades.
To upgrade a schema:
Note: Go directly to Compare Results Step if you are upgrading manually from the installer. The other steps are performed automatically.
-
Click the source schema (the original schema).
-
Ctrl-click the target schema (the new schema).
-
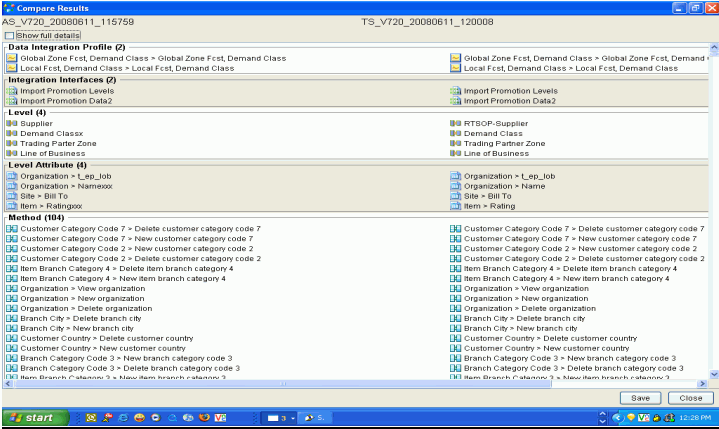
For manual upgrades, right-click one of the selected schemas and select Compare. The Compare Results screen appears, listing the objects that differ between the two schemas. The system displays the source schema on the left (AS_V730_TIMESTAMP) and the target schema on the right (TS_V730_TIMESTAMP).
The installer takes you directly to the Compare Results screen.
Note: Once you have selected the manual upgrade, the installer begins to upgrade the schema and prepare the BAL repositories. The Manual Upgrade screen appears while the BAL Explorer is comparing the source and target schemas. Both the Next and the Previous buttons are greyed out during this process. The comparison may take a long time, and during this time, the BAL Explorer may appear to be gray for the most part. To see whether the comparison is still running, note the bottom left-hand corner in the BAL Explorer. A status bar displays the comparison currently being done.
-
Click Show full details to show the specific differences between the schemas.
-
Click Save to save the report in html format for future reference. The html reports are saved in the <Demantra install folder>\Demand Planner\BAL\logs\AS_V730_Timestamp to TS_V730_Timestamp folder. You can print the report from the saved document. Review the html comparison reports in detail to determine the optimum upgrade actions to use on your schema.
-
If you are not upgrading from the installer, click Prepare Upgrade for the schema that you want to upgrade. A progress bar appears so you can monitor the production of the upgrade package. When complete, the upgrade package appears in the Schema Browser before the schema object folder. In the following example, the AS_V730_20080221_2031 schema was prepared for upgrading. The upgrade folder appears before the schema object folder:

-
Click Close to close the Compare Results dialog box.
-
From the Settings menu, select Set Object Resolution. This selection enables you to modify the upgrade suggestions for each object individually.
-
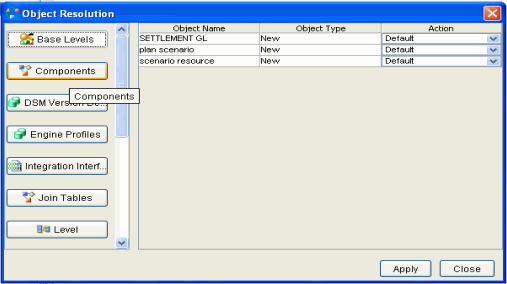
Right-click the upgrade package and select Upgrade. The Object Resolution dialog box appears. The type of object conflict appears with the action suggested based on your global upgrade settings.
-
Choose how you want to handle each new or overlapping object.
For each new object, your options are:
-
Insert: Add the new object to the target database.
-
Default: Add the new object to the target database.
For each overlapping object, your options are:
-
Align to New: Align the source object with the target schema object.
-
Insert Duplicate: Create the new version of the object as a duplicate in the target schema.
Note: This option may not be available depending on the type of object.
-
Ignore: Retain the source object in its original form and ignore the new version of the object in the target schema.
-
Default: Objects and their sub-objects are upgraded according to the Table of Default Upgrade Actions for Overlapping Objects .
-
-
Click Apply when done. The source schema is upgraded to the target schema format based on your upgrade choices. A progress bar appears.
-
If there are any issues that need your intervention to resolve, the activation issues list is displayed. These issues can occur if you accidentally delete any objects that are referred to by other objects in the upgrade package.
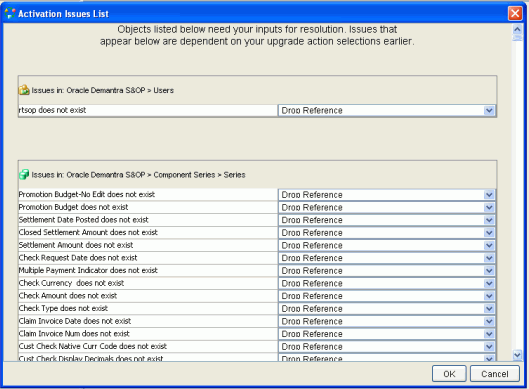
For each issue displayed, you can accept the default Drop Reference which removes the link between the new objects and the existing object.
-
When you have specified how to deal with all the issues presented, click OK.
-
A prompt appears when the BAL application upgrade is complete. The following prompt is displayed for those upgrading using the installer. A different prompt appears if you are running the BAL without the installer.

Important: Do not close the BAL utility before receiving the prompt or the upgrade may fail.
Click OK to continue.
-
Close the BAL Explorer. If you are upgrading through the installer, the Business Modeler application opens automatically (this may take a few minutes). Otherwise, start the Business Modeler to continue the upgrade process.
-
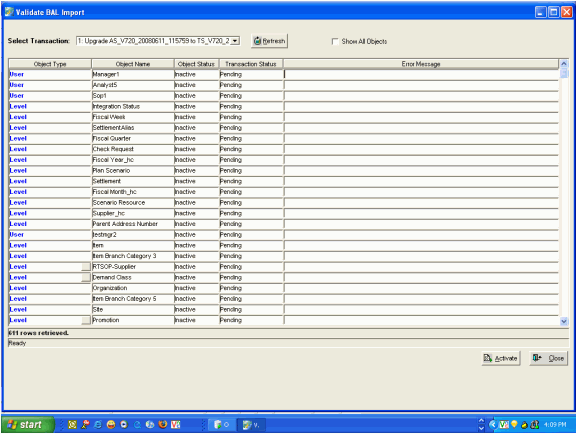
The Validate BAL Import screen appears. If are not updating from the installer, from the Configuration menu, select Validate BAL Import, and select the update package to continue.
-
Click the Activate button. The configuration changes are made through the Business Modeler to the database.
-
Close the Business Modeler. A prompt appears that indicates that warnings were encountered while trying to activate some objects.
-
Click Resume (recommended) to return to the installer. Alternatively, click View to log file or Exit to quit the installation.
-
Click Done to complete the installation. For more details about the upgrade, review the bal_bm.log.
Troubleshooting
Starting The BAL Explorer Application
For the following troubleshooting options, you must start the BAL Explorer manually. From the < Demantra install directory>\Demand Planner\BAL, double-click on bal.bat.
Viewing Transactions
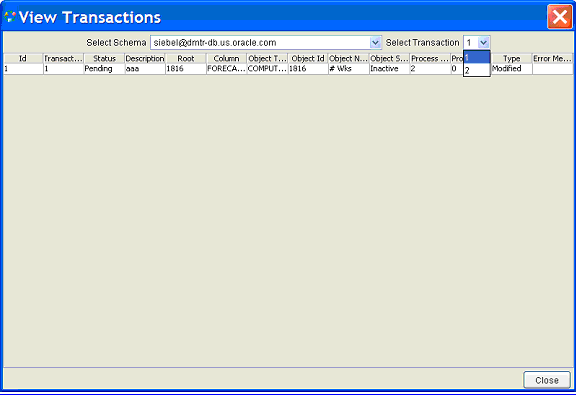
The View Transactions window displays information about all the schema upgrades that have been made within BAL, including the status, description, root, column, object table, type, and error message. You can filter the results by schema or transaction.
To view transactions, open the BAL Explorer application, select Transactions. The View Transactions window appears.
Including the Upgrade SQL in the Log File
You can view the PL/SQL run by the BAL Explorer during the upgrade once the upgrade is complete. The SQL appears in the bal_log.txt file located in the <root directory>\Demand Planner\BAL\Logs directory. This option provides you with many more details about the upgrade than would normally be captured.
To include the upgrade SQL in the bal_log.txt file:
-
From the View menu, select View Upgrade SQL.
-
Perform a folder or schema upgrade.
-
3. When complete, open the <root directory>\Demand Planner\BAL\Logs\bal_log.txt file to view the upgrade details.
Viewing Log Files
If your upgrade fails, you may find the reasons for the failure in the log file. The bal_log.txt file and the log.properties files are located as follows:
-
<root directory>\Demand Planner\BAL\Logs\bal_log.txt This file shows details about the processing of an upgrade, including errors. If you selected the View Upgrade SQL option, then the SQL run by the BAL Explorer during the upgrade appears when the upgrade completes.
-
<root directory>\Demand Planner \BAL\log.properties
You can customize the amount of detail shown in the bal_log.txt file by altering the settings in this file.