Administration
This chapter covers the following topics:
Running the Analytical Engine
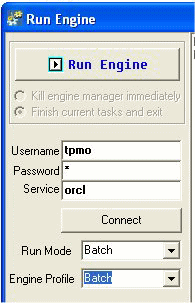
You should run the Analytical Engine in batch mode probably about once a week. This generates a forecast for all the data in the system.
-
Click Demantra > Demantra Spectrum release > Engine Administrator.
-
Click File > Run Engine.
-
For Username and Password, enter the username and password of the database user that stores the Demantra data. (In the installer, this user is referred to as the Oracle Database User).
-
For Server, enter the Oracle SID of the database.
-
Click Connect.
-
For Run Mode, click Batch.
-
For Engine Profile, click Batch.
-
Click Run Engine.
After running the Analytical Engine, you should run the Run App Proc After Batch Engine workflow.
Running Required Workflows
PTP provides several workflows that perform necessary back-end tasks. An administrator will need to run these workflows periodically. To run workflows, you use the Workflow Manager, a Web-based tool that can be accessed only by users with the System Manager permission level.
This section lists these workflows and describes how to run them.
Required Workflows
You should run the following workflows periodically:
Logging on to the Workflow Manager
-
Click Demantra > Demantra Spectrum release > Collaborator Workflow.
-
In the Log On dialog box, enter your user name and password.
The Workflow Manager comes up, displaying a list of workflow schemas.
Starting Workflow Instances
To start a workflow instance
Click Start next to the schema that you want to start.
Viewing Workflow Status
You can view all the status of all public workflow schemas and all private workflow schemas that you created. This means that you can see how many instances of those schemas are running, as well as the status of each instance.
To view overall status of the workflows
The Workflow Manager displays the overall status information for the workflows.
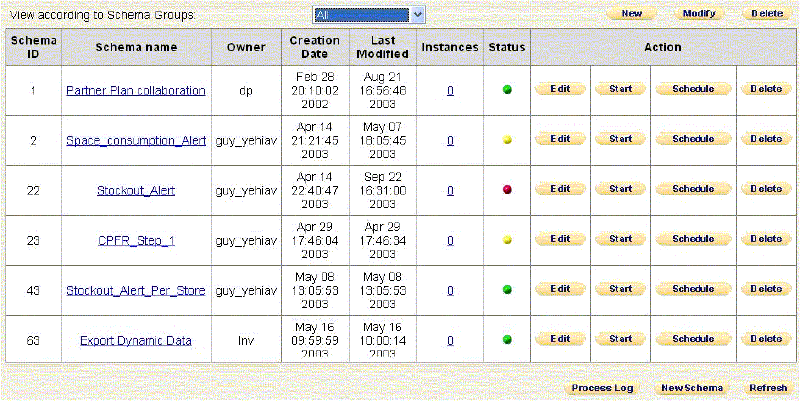
Each row corresponds to a workflow schema. The Instances column indicates how many instances of this workflow schema are currently running, if any. The Status column uses the following color codes:
| Green | The workflow schema is live and you may execute it, creating a workflow instance. |
| Red | The workflow schema is archived and cannot be executed. |
| Yellow | There is a data error or other fault within this schema. |
To view the currently running instances of a schema
-
Click the Instances link in the row corresponding to that workflow.
The Workflow Manager lists all the instances of that schema that are currently running.

-
When you are done, click Back.
Scheduling Workflow Instances
If you are the owner of a workflow, you can schedule an instance to start at a specific time or times. If you are not the owner, you cannot schedule it, although you can start it manually, as described in "Starting Workflow Instances".
To schedule a workflow instance
-
If the workflow schema is not visible, use the dropdown menu and select the name of a schema group to which it belongs. Or select All.
-
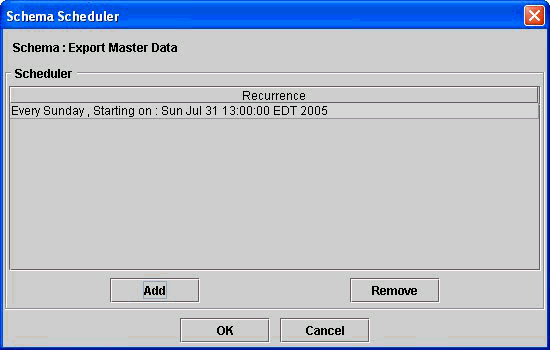
Click Schedule in the row corresponding to that workflow.
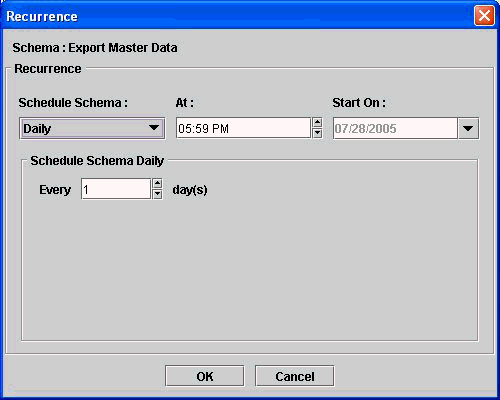
The system displays the Schema Scheduler page, which lists all the times when Workflow Engine will start an instance of this schema.
-
Click Add.
-
In the Schedule Schema dropdown list, select the option that specifies how often to start an instance of this workflow:
-
Daily
-
Weekly
-
Monthly
-
Once
-
At Startup (This option launches the workflow whenever the Web server is started.)
-
Periodic (in this option, you can start a workflow at periodic intervals (measured in seconds, minutes, hours, days, weeks, months, or years. Note that you cannot choose the starting time.)
Depending on the choice you make here, the system displays additional scheduling options in the bottom part of the page.
-
-
In the rest of the page, finish specifying the schedule.
-
Click OK.
To unschedule a workflow instance
-
On the Workflow Management page, click Schedule in the row corresponding to that workflow.
The system displays the Schema Scheduler page. This page displays one row for each scheduling entry for this workflow.
-
Click the row corresponding to the scheduling entry you want to remove.
-
Click Remove.
Stopping Workflow Instances
You can stop any workflow instance that you started. You cannot stop a workflow instance started by another user.
To stop a workflow instance
-
If the workflow schema is not visible, use the dropdown menu and select the name of a schema group to which it belongs. Or select All.
-
Click the number in the Instances column that corresponds to that workflow.
The system lists all the instances of that schema.
Note: Instances that show in red are instances of Fail-To-Execute Step steps. For more information, see the Oracle Demantra Foundation Implementation Guide.
-
Click Terminate next to the instance that you want to stop.
-
Click OK.
The instance is stopped and is removed from the list of instances.
Note: Terminate stops only the workflow instance itself. It does not cancel any work that the instance may have initiated (such as tasks that were sent or requests placed in the Simulation Engine or Business Logic Engine queues). These items must be cancelled manually.
See the Oracle Demantra Implementation Guide
Managing the PTP Users
To manage the PTP users, you use the Business Modeler, a desktop tool that can be accessed only by users with the System Manager permission level. (Other users can log into the Business Modeler, to change their own passwords, but no other options are available to them.)
Logging onto the Business Modeler
Before starting the Business Modeler, make sure that the database is running.
To start the Business Modeler
-
On the Start menu, click Programs.
-
Click Demantra > Demantra Spectrum release > Business Modeler.
A login window appears.
-
Enter your user name and password.
-
Click Login.
Copying a User
The easiest way to create new users is to copy existing users and edit the details as needed.
To copy a user
-
In the Business Modeler, click Security > Create/Modify User.
The Create/Modify User dialog box appears.
-
Click the button of the user you want to copy, and then click Create Copy.
The User Details dialog box appears. Some of the information, such as user name, is blank. Other details, such as the company name, are copied from the original user.
-
Specify the user name and password for the new user.
-
Make other changes as needed.
-
Do one of the following:
-
Click Next to continue editing information for the new user. Demantra initially uses all the same values as for the original user.
-
Click Finish.
-
Creating or Modifying a User
To create or modify a user
-
In the Business Modeler, click Security > Create/Modify User.
-
Next:
-
To create a new user, click the New User button, and then click OK.
-
To modify a user, click the button of that user then click OK. Or double-click the icon of the user whose details you want to modify.
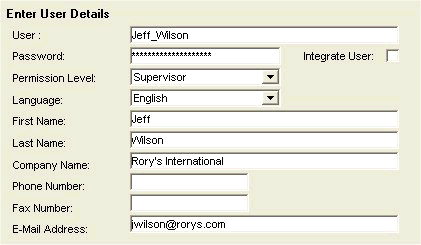
The User Details dialog box appears.
-
-
Specify basic user details as follows:
-
Under Enter User Details, type the following information in the appropriate boxes (or select from the dropdown lists):
-
For Permission Level, use System Manager if this user needs access to the Business Modeler and the Workflow Manager. Otherwise, use Supervisor.
-
Click Next.
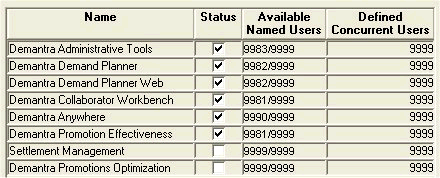
The User Modules dialog box appears. Here you specify which Demantra user interfaces this user can access.
-
-
Click the check box next to each module that the user needs to work with. Then click Next.
The New User - Select User Series dialog box appears. This dialog box allows you to determine what data series will be active for the new user, from the entire set of series in this component. Each list is a collapsible list of series groups and the series in them.
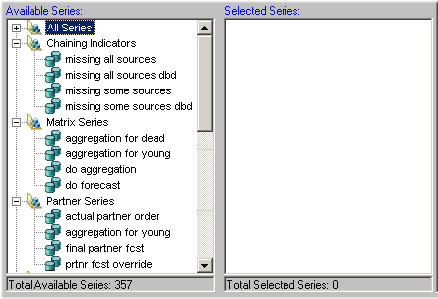
If a series is not active for a user, it is not available when the user creates worksheets and is not viewable in existing worksheets to which the user has access.
-
Specify the series that a user can see, as follows:
-
Move all series that you want into the Selected Series list. To do so, either double-click each series or drag and drop it.
-
Remove any unwanted series from the Selected Series list.
Note: You can also move an entire series group from one list to the other in the same way.
-
When you are done specifying series, click Next.
The New User - Select User Filters dialog box appears. This dialog box lets you filter the data that the user can see; specifically, you control which levels and which members of those levels the user can see.

-
-
Filter the data that the user can see, as follows:
-
Click a level in the left side of the dialog box and drag it to the box on the right. Or double-click a level in the left side.
-
Now specify which members of this level the user can see. To do so, click a member in the list, and then click the right arrow button. Or double-click the member you want to filter out.
The system moves the selected members to the box on the lower right side. Now the user can see only the selected members of this level. In the preceding example, the user can see only data that is associated with the Rainbow brand.
Note: The Selected Members list cannot include more than 200 members.
-
Repeat the preceding steps for each filter you want to add. Each filter automatically limits the choices available in subsequent filters.
-
When you have appropriately filtered data for the user, click Next.
The New User - Select User Groups dialog box appears. This dialog box allows you to select the group or groups to which the new user will belong. Members of a group can see each other within Who's Online.
-
-
Specify the collaboration groups to which a user belongs, as follows:
-
Move all groups to which the user should belong into the Selected Groups list. To do so, either double-click each group or drag and drop it.
Note: You can also select and move multiple groups with the standard Ctrl+click or Shift+click actions.
-
Remove any unwanted groups from the Selected Groups list.
-
Click Next.
-
-
Click Finish.
Deleting a User
To delete a user
-
In the Business Modeler, click Security > Create/Modify User.
-
Click the button of the user you want to delete, and then click Delete.
A question box appears, asking if you are sure you want to delete the selected user.
-
To delete the selected user, click Yes.
See the Oracle Demantra Implementation Guide