Using Oracle Mobile Field Service Store and Forward - Pocket PC
This chapter describes how to use Oracle Mobile Field Service Store and Forward - Pocket PC to process service requests and tasks.
This chapter covers the following topics:
- Introduction
- Application Overview
- Navigation Path of Oracle Mobile Field Service Store and Forward - Pocket PC
- Launching Oracle Mobile Field Service Store and Forward - Pocket PC
- Using Global Functionality
- Configurable Display
- Data Search and Sort Capabilities
- Working with the Task List
- Viewing a Past or Future Task List
- Viewing and Updating Task Information
- Viewing a Task Attachment
- Uploading Attachments
- Creating a Task
- Creating a Personal Task
- Working with Service Requests
- Accessing the Knowledge Base
- Creating and Viewing a Note
- Making a Query
- Performing a Part Search
- Using Radius Search
- Ordering Parts
- Receiving Parts
- Getting Driving Directions
- Performing Debrief Reporting
- Obtaining an Electronic Signature
- Counter Readings
- Managing Spare Parts
- Viewing Customer Information
- Viewing Customer Product Information
- Using Messaging
- Automatically Synchronizing with the Enterprise System
- Manually Synchronizing with the Enterprise System
- Changing Passwords
- Closing the Application
Introduction
This chapter describes how to use Oracle Mobile Field Service Store and Forward - Pocket PC to process service requests and tasks. This application enables you to do the following:
-
View your task list for the day or all tasks assigned to you.
-
Work easily with tasks and service requests.
-
Create notes for tasks and service requests.
-
View customer information.
-
Create reports summarizing labor, material, and expense.
-
Set counter readings.
-
Obtain an electronic signature.
-
View customer product information.
Application Overview
As a field service technician, you will have the following general responsibilities when using Oracle Mobile Field Service Store and Forward - Pocket PC:
-
Synchronize with the enterprise system at the beginning of each work day.
-
Review your calendar for the day.
-
Visit the customer and then update service requests and tasks.
-
Report service request and task details.
The following is a general outline of how a field service technician may start and end his work day:
-
Launch Oracle Mobile Field Service Store and Forward - Pocket PC.
See Launching Oracle Mobile Field Service Store and Forward - Pocket PC.
-
Synchronize Oracle Mobile Field Service Store and Forward - Pocket PC with the enterprise system.
-
Review your calendar for the day.
-
Open the task and view or change task information.
-
Set the status of the task on which you will be working.
-
Learn the customer address.
-
Review service request information.
See Working with Service Requests
-
Review contract information.
-
Review service history information.
-
Create or update a customer note if necessary.
-
-
Set any counter and counter properties.
See Counter Readings.
-
Report task details.
See Debrief Reporting.
-
Repeat these steps for each task that time allows.
-
Finally, exit out of Oracle Mobile Field Service Store and Forward - Pocket PC.
Navigation Path of Oracle Mobile Field Service Store and Forward - Pocket PC
This diagram displays the high-level structure of Oracle Mobile Field Service Store and Forward - Pocket PC.
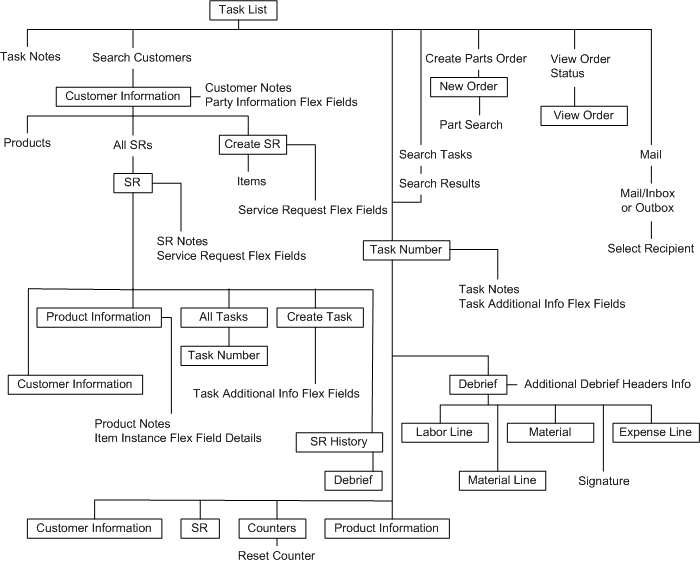
In Oracle Mobile Field Service Store and Forward - Pocket PC, there are screens with and without global functionality. A screen that has global functionality contains various global icons in the lower portion of the screen. See Using Global Functionality for further details. In the above diagram, text within a rectangle represents a screen with global functionality.
The Task List screen is where you start in Oracle Mobile Field Service Store and Forward - Pocket PC. The Task List screen is the "Home" screen. From this screen, you can access your tasks for the current day or all the tasks assigned to you, both past, present, and future. From the Task List screen, you can locate a desired task by either opening the Search Customers screen to access the task for a desired customer or you can open the Search Task screen to access the desired task. Also from the Task List screen, you can create a part order in the New Order screen and then monitor the part order status in the View Order screen. Other functions you can perform from the Tasks List screen include viewing and creating notes, opening the Task screen, and accessing the Mail Inbox and Outbox.
The Task screen describes the task. From this screen, you can access and create task notes and you can also access any customer product information, and the SR (Service Request) Details, customer information, and Debrief screens.
Using the SR screen you can access product information and open the All Tasks, Create Task, and SR History screens. In addition, you can open and create service request notes and access service request flexfield information.
The Copy Service Request screen copies information from the parent service request header, and then you can update many fields.
Using the Customer Information screen you can view the customers address and access and create customer notes and any Party Information flexfields. From this screen, you can also access the All Products, All SRs, and Create SR screens.
From the Debrief screen, you can access any Additional Debrief Headers Info flexfield information. Also from this screen, you can open the signature screen. Using the Debrief screen you can view the labor time, materials, and expenses incurred while completing the service request.
From the All Tasks screen, you can view all the tasks for the current service request. From this screen, you can open the Task screen.
The Create Task screen enables you to create a task and access task flexfields in the Task Additional Information screen.
The SR History screen provides you with service request history. From this screen, you can also open the Debrief screen.
From the Counters screen, you can set and change readings. You can also access the Reset Counter screen from here.
See the appropriate sections in this guide for more details about each screen.
Launching Oracle Mobile Field Service Store and Forward - Pocket PC
Complete this procedure to launch Oracle Mobile Field Service Store and Forward - Pocket PC.
-
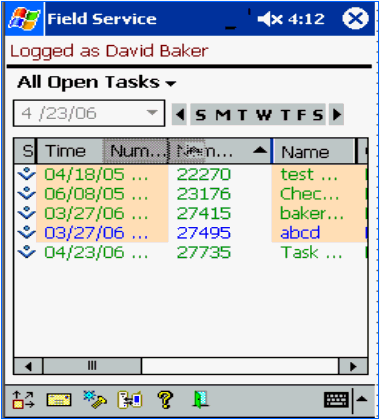
Select Start > FieldService.
Oracle Mobile Field Service Store and Forward - Pocket PC opens in the Task List screen. This screen is the starting point in the Oracle Mobile Field Service Store and Forward - Pocket PC application. See Working with Your Task List for a complete description of the Task List screen.
-
Tap the synchronization icon in the lower portion of the screen to synchronize Oracle Mobile Field Service Store and Forward - Pocket PC with the enterprise system.
See Synchronizing with the Enterprise System for a complete description of this procedure.
It is necessary to synchronize Oracle Mobile Field Service Store and Forward - Pocket PC before beginning your work to ensure that you receive and send the latest updates to the enterprise system.
Using Global Functionality
Oracle Mobile Field Service Store and Forward - Pocket PC provides various global functions in many of its screens. At the bottom of these screens, you can access global functionality through global icons.
The following graphics display most global functionality found in Oracle Mobile Field Service Store and Forward - Pocket PC.
The global icons perform the following functions:
![]()
Tap the home icon to go to the Task List screen. See Working with Your Task List.
Tap the notes icon to create or view notes. See Creating and Viewing a Note.
Tap the flexfields icon to view, change, or enter flexfield information.
Tap the complete icon to close the screen and return to the previous screen.
Tap the left arrow icon to return to the previous screen.
Tap the synchronize icon to synchronize Oracle Mobile Field Service Store and Forward - Pocket PC with the enterprise system. See Synchronizing with the Enterprise System.
Tap the mobile queries icon to start a mobile query. See Making a Query.
Tap the driving directions icon to get driving directions. See Getting Driving Directions.
Tap the Knowledge Management icon to access the knowledge base. See Accessing the Knowledge Base.
Tap the mail icon to access messaging. See Messaging.
Tap the parts icon to perform spares management. See Spare Parts Management.
Tap the attachment icon to view attachments for either a task or service request. See Viewing a Task Attachment and Viewing a Service Request Attachment.
Tap the help icon to receive general and Oracle Mobile Field Service Store and Forward - Pocket PC-specific help. You can also tap this icon to define preferences and change your password. For the last, see Changing Passwords.
Tap the search customer icon to go to the customer menu.
Tap this icon to log out of the Store & Forward Pocket PC.
Configurable Display
Configurable display helps technicians customize screens.
-
Search Task Results
-
Search Customers
-
Search Part Orders
-
Search Parts Requirement
Hide, Show, or Re-size Columns
-
To hide a visible column, select and drag the column sideways to decrease the width to zero.
-
To show a hidden column, select the column, and then drag sideways to increase the column width.
-
To re-size a column, select the column, and then drag sideways to adjust the width.
Change Column Sequence
To change the displayed column sequence, select a column, drag it from its current position, and then drop it in the desired position.
Restore Default Settings
To restore the default setting for a column:
-
Select the column.
-
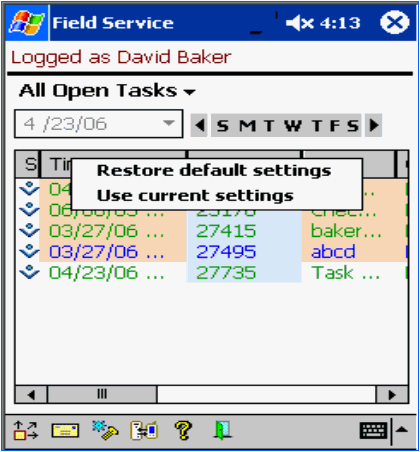
Tap the right side of the column.
The following two options appear:
-
Restore default settings
-
Use current settings
-
-
Tap Restore default settings.
Data Search and Sort Capabilities
Data search provides the ability to search on the information related to task by keying in the search data.
Note: You cannot search on flex fields.
Data sort provides the ability to sort the information related to tasks in ascending or descending order.
-
Search Task Results
-
Search Customers
Using Data Search
Use these steps to perform a data search:
-
Select the field.
-
Start keying in the search value.
Data containing that value is highlighted.
Working with the Task List
A task is a unit of work within the service request. An administer creates a task during field service request screening and qualification in the office, or a field service technician creates a task when working out in the field. A task is related to a specific problem that needs to be resolved through a service request.
You will want to update the task status to keep your schedule up to date and to inform the dispatcher on the progress of your schedule. See Viewing and Changing Task Information for a complete description of this procedure.
In Oracle Mobile Field Service Store and Forward - Pocket PC, you can enter task information and even change some existing task information. The application also enables you to create a new task.
The Task List screen is the starting point in the Oracle Mobile Field Service Store and Forward - Pocket PC application. The Task List screen lists non-closed tasks in descending order, based on the scheduled date and time stamp. See Viewing a Past or Future Task List to view the tasks for a different day.
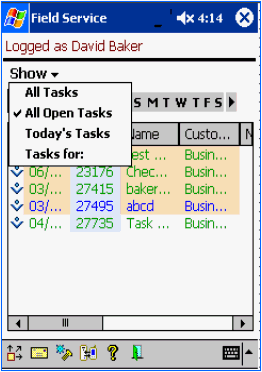
Understanding the Task List Screen
The Task List screen is updated each time you synchronize with the enterprise system. See Synchronizing with the Enterprise System for a complete description of this procedure.
You can perform the following from the Task List screen:
-
View tasks.
-
View 'Today's Tasks'.
-
View 'All Tasks' assigned to the technician (past, present, and future).
-
View 'All Open Tasks' assigned to the technician that are not Closed, Rejected, Completed or Canceled.
-
View 'Tasks for' a specific date.
-
-
Search for task-related information.
-
Access information for a selected task.
-
Search for an assigned task.
-
Search for a customer for whom the technician is assigned tasks.
-
-
View parts-related information.
-
View the on-hand quantity of parts.
-
View parts requirement status.
-
-
Create orders and tasks
-
Create a parts requirement.
-
Create a personal task.
-
The Task List Screen Table
In the following table format, the Task List screen briefly describes the tasks:
-
Column 1: Task status
-
Column 2: Task start time
-
Column 3: Task name
-
Column 4: Customer of the task
-
Column 5: Task note icon
-
Column 6: Contact
-
Column 7: Phone
If you tap in either the Task Status, Task Start Time, or Task Name column, Oracle Mobile Field Service Store and Forward - Pocket PC opens the Task screen for a task. See Viewing and Changing Task Information for a complete description of this screen. If you click in the Customer of the task column, Oracle Mobile Field Service Store and Forward - Pocket PC opens the Customer screen for a task. See Viewing Customer Information for a complete description of this screen. Finally, if you click in the Notes column, Oracle Mobile Field Service Store and Forward - Pocket PC opens the Task Notes screen for a task. See Creating and Viewing a Note for a complete description of this screen.
Task Statuses
Column 1 of the Task List screen table uses one of the following symbols to indicate the task status:
![]()
Cancelled
![]()
Rejected
![]()
Assigned
![]()
Interrupted
![]()
Working
![]()
Completed
Typically, the status for a task progresses in the following order:
-
Upon initial download to the Pocket PC, a task has a status of "Assigned".
-
Once you review your schedule for the current day, change the status of "Assigned" tasks to "Accepted".
-
Before you start working on an "Accepted" task, change its status to "Working".
-
When you have successfully completed a "Working" task, change its status to "Completed".
See Viewing and Changing Task Information to learn how to change the status of a task.
The Use of Color in the Task List Screen
The following colors are used in Oracle Mobile Field Service Store and Forward - Pocket PC to indicate the priority of a task:
-
Red—priority 1
-
Blue—priority 2
-
Green—priority 3
-
Black—priority 4
Viewing a Past or Future Task List
This section describes how to navigate to a past or future task list. Two ways are available to do this:
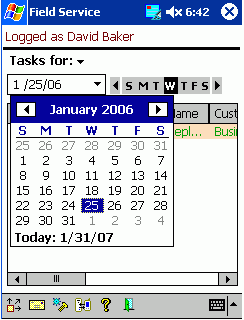
Complete the following steps from the Task List screen to go directly to a desired date:
-
Select the view as 'Tasks for:'
-
Tap the date drop-down list.
A calendar appears.
-
To change the month or year, tap the left and right arrows at the top of the calendar.
To change the year, continue tapping the appropriate arrow button until you reach the desired year and month.
Alternatively, you can change the month by tapping on the month and then choosing the desired month from the popup list.
-
To change the day, tap the desired day in the calendar.
Oracle Mobile Field Service Store and Forward - Pocket PC returns you to the Task List screen. Tap outside the calendar to return to the Task List screen without selecting a day. Tap Today to select the current day and return to the Task List screen.
Complete the following steps from the Task List screen to change the day for the active week:
-
Tap the desired day of the week in the calendar bar.

The tasks for the specified day appear in the Task List screen.
-
To change the week, tap either the left or right arrow near the calendar bar.
Depending on the arrow you tap, the application retrieves the schedule for the day seven days before or after the date you are currently displaying on the Task List screen.
Viewing and Updating Task Information
From the [Update] Task screen, you can access the following information:
-
Tasks
-
Service requests
-
Customers
-
Task notes
-
Debriefs and counters
-
Customer products
-
Item details
-
Install Base (IB) attributes related to the item
Complete the following steps to view and change task information:
Prerequisites
- Open a task from the Task List screen. See Working with Your Task List and Viewing All Tasks for a Service Request.
-
Navigate to the Task screen.
-
Use one of the following methods to open the Task screen:
-
To Open a Task Directly:
-
From the Task List screen, tap the desired task.
The Task screen appears and displays information for the selected task such as, customer, customer product, contract, and problem details.
Task Screen
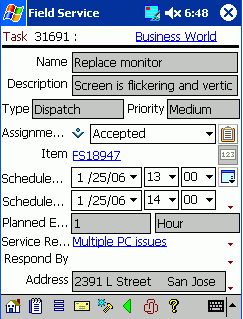
The following table describes the read-only information in the [Update] Task screen:
Read-only Information Description Task Number Located in the screen title, this is a generated number for a task. Customer field Located in the screen title, this is the name of the customer. Tap this field to view additional customer product information. See Viewing Customer Information for a complete description of this procedure. Name field The name of the task. Description field Describes the task. Type drop-down list The type of task. Priority drop-down list The priority of the task in which it is to be completed. Item field The name of the customer product that needs service. Tap this field to view additional customer product information. See Viewing Customer Product Information for a complete description of this procedure. Planned Effort field The planned time duration for executing the task. Service Request field The name of the service request. Tap on this field to view additional information. Respond By field The date and time by which the customer needs a response regarding the task. Address field The address details for the customer. Esc If a task is escalated on the enterprise system, then "Esc" appears in the upper right corner of the Task screen, across from the screen title.
-
-
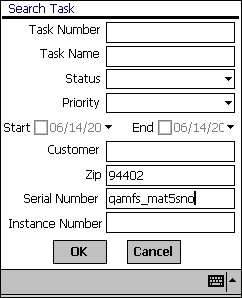
To Search for the Desired Task:
-
From the Task List screen, selectSearch Tasks from the Goto menu.
The Search Task screen appears.
Search Task Screen
-
Tap OK to view all tasks.
The Search Result screen appears.
To narrow your search, complete as many fields and drop-down lists as possible and then tap OK.
Search Result Screen
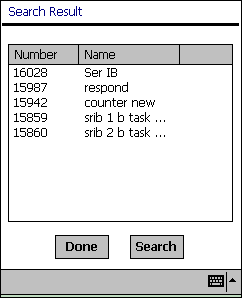
-
Select the desired task.
The Task screen appears and displays information for the selected task such as, customer, customer product, contract, and problem details.
-
-
-
To view or add a task note, tap the note icon in the lower portion of the screen.
See Creating and Viewing a Note for a complete description of this procedure.
-
To change the task status, select the Status drop-down list and make one of the following selections:
-
Accepted: Select when you are ready to begin work on the task.
-
Rejected: Select if the assigned task is not applicable to the current situation.
The application checks whether a labor line exists for a field service task when you change the assignment status to one with Completed or Closed flags enabled. Set the profile CSF: Mandatory Labor Debrief to Yes to enable this feature. A error message appears if you try to close a task without entering any labor line.
Similarly, the application checks whether a resolution code exists for the service request when you change the assignment status to one with Completed or Closed flags enabled. Set the profile CSF: Mandatory Resolution Code to Yes to enable this feature. A error message appears if you try to close a task without entering any labor line.
-
-
To change the task start time, make the appropriate selections from the Start Date drop-down lists.
The default start time is the date and time the task was created.
-
To change the task end time, make the appropriate selections from the End Date drop-down lists.
The default end time is the date and time the task was created.
To change the planned start and end time, tap the Planned/Schedule Dates icon and modify the planned, scheduled start, end date and time appropriately.
-
To view any additional task information, tap the flexfields icon in the lower portion of the screen.
The Task Additional Information screen appears.
Tasks Additional Information Screen
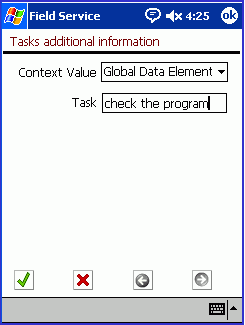
Note: Task flexfields are determined at the home office and cannot be changed or created in the field. This includes whether a field is read-only or not.
-
Tap OK to save any work and return to the Task screen.
Tap Cancel to return to the Task screen without saving any work.
-
To access debrief reporting, tap Debrief.
The Debrief screen appears. From this screen, you can enter information for the labor, material, and expense reports. See Debrief Reporting for a complete description of this procedure.
-
To view the task service request, tap SR.
The SR screen appears. In this screen, you can view and change service request details, including the problem and resolution. See Viewing and Changing Service Request Information for a complete description of this procedure.
-
To access any counters, tap Counters.
The Counters screen appears. In this screen, you can set a counter reading. See Creating a New Counter Reading for a complete description of this procedure.
-
To view any parts requirement status for the task, select View Parts Requirement Status from the Goto menu.
See Viewing Parts Requirement Status for a complete description of this procedure.
-
To specify a part for a task, tap the Parts icon in the tool bar.
See Creating a Parts Requirement for a complete description of this procedure.
-
To delete a task, tap the Undo icon in the tool bar.
A confirmation message "Are you sure to undo (Y/N)" pops up to notify you that this task will be marked for undo. Confirm the deletion by selecting Yes, and the application system initiates an immediate synchronization.
Viewing a Task Attachment
From the Task screen, you can open and view any attachment associated with a task. The attachment can be of any type such as, a .pdf, .doc, .xls, or .gif.
-
Navigate to the Task screen.
See Viewing and Changing Task Information for a complete description of this procedure.
-
Tap the attachment icon at the bottom of the screen.
The Attachments screen appears, displaying the attachment file name, size, and description.
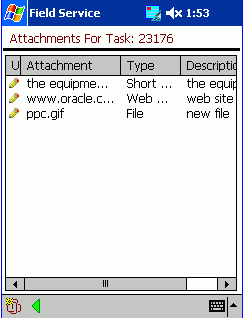
-
Tap the file that you want to open.
The selected file opens.
Tap Done to return to the Task screen.
Uploading Attachments
Field Service technicians have the ability to upload service request attachments such as, photos, drawings, and diagnostic data from their mobile devices. Attachments can be added to tasks and service requests. Uploaded data can be viewed by the enterprise location after synchronization.
This feature assists technicians in capturing additional information related to task execution such as, diagnostic reports, image captures, and so on, that can be accessed at a later time.
Supported Attachment Types:
-
Short Text Attachment.
-
Add text up to 4000 characters.
-
Size is not limited by profile value.
-
-
Web Page Attachment.
-
Link a URL up to 4000 characters.
-
Size is not limited by profile value.
-
-
File Attachment.
-
Multiple files types are supported such as, .jpeg, .bmp, and .doc.
-
Attachment size is limited by the CSM: Maximum Attachment profile value. The profile value represents the size of the attachment in megabytes (MB) for each task or service request per synchronization.
-
If the profile value is not set, the value will be regarded as zero. The technician cannot upload or download file attachments.
-
If the attachment size is greater than the value set in the profile, then the application will generate an error message. The technician cannot upload the file attachment.
-
-
To Create Attachments to a Non Existing Service Request or Task
-
Create the service request in the pocket PC.
-
Associate a task to the service request, and then assign the task to the user.
-
Complete the steps in the next procedure "To Create Attachments to an Existing Service Request or Task".
To Create Attachments to an Existing Service Request or Task
-
For the service request or task, select the attachment icon in the tool bar.
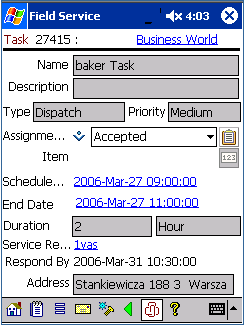
The Attachment Summary page appears.
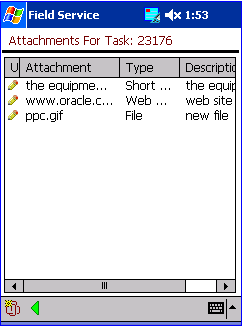
-
Select the attachment "clip" icon to proceed with attachment details.
-
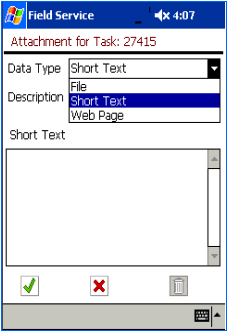
Select the type of the attachment from the Data Type drop-down menu. Attachment type options are:
-
File
-
Short Text
-
Web Page
-
-
Depending on the type of attachment, provide details in the fields that appear.
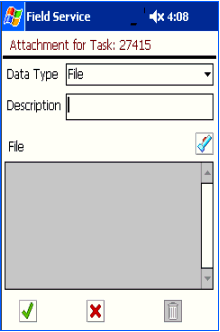
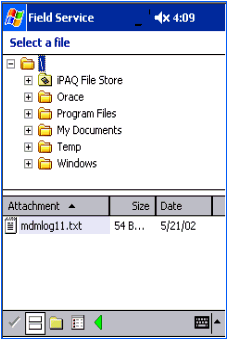
If the File attachment type is selected, enter the Description, and then use the search "flashlight" icon to find the location of the file, or enter the location details of the file in the File field column.
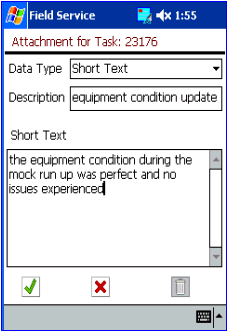
If the Short Text attachment type is selected, enter the Description, and then enter up to 4000 characters of text in the Short Text box.
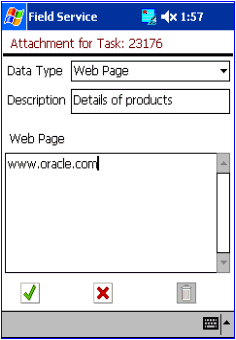
If the Web Page attachment type is selected, enter the Description, and then enter up to 4000 characters of URL address in the Web Page.
-
Click the Check Mark button.
-
Synchronize with enterprise to upload the new attachment details to the enterprise.
Creating a Task
Complete the following steps to create a task:
Steps
-
Navigate to the SR screen.
See Viewing and Changing Service Request Information for a complete description of this procedure.
-
Tap Create Task.
The Create Task screen opens.
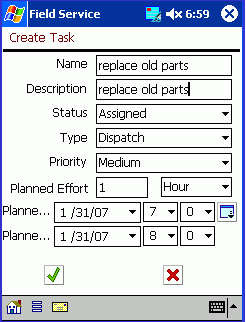
Create Task
-
In the Name field, enter the name of the task that you want to create.
-
In the Description field, enter a brief description of the task.
-
From the Status drop-down list, select task status.
The default selection is Unassigned.
Note: For a task to be automatically assigned to you, it should have the "Assignment" attribute and the task type should have the Dispatch rule. You can immediately work on a task with this criteria, which includes entering debrief reports.
-
In the Planned Effort field, enter the planned finish time for the task.
Next to this field is a drop-down list where you can select the type of time units.
-
To change the task planned start date, select a new date from the Start drop-down list.
See Using the Date Drop-down List for a complete description of this procedure.
-
To change the task planned start time, select a new time from the Start hours and minutes drop-down lists.
-
To change the task end date, select a new date from the End drop-down list.
See Using the Date Drop-down List for a complete description of this procedure.
-
To change the task planned end time, select a new time from the End hours and minutes drop-down lists.
-
Tap OK to save the task.
Tap Cancel to return to the SR screen without saving the task. See Viewing and Changing Service Request Information for a complete description of the SR screen.
Creating a Personal Task
A personal task is a notice to the dispatcher that you will not be available for a particular period. A personal task is not dispatchable or tied to a service request, therefore making it different from a task that is loaded onto your Pocket PC. For example, if you need to go to the dentist next week, you can create a personal task stating that you will be unavailable to service tasks for a certain period. By knowing your availability, the dispatcher can better schedule your tasks.
To create a personal task, complete the following steps:
Steps
-
From the Task List screen, select Create Personal Task from the Goto menu.
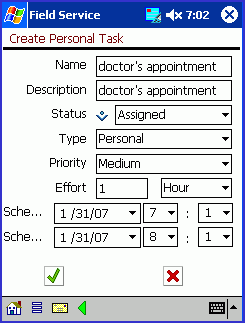
Create Personal Task
-
Specify the desired information in the Create Task screen and then tap OK.
See Creating a Task for a complete description of this procedure.
Working with Service Requests
A service request is created when a customer contacts your organization with a problem. Typically, the customer representative analyzes the service request and assigns a task or tasks to it. Then the service request, along with all related information and tasks, are sent to the field service technician. You can view the summary details of a service request in the Task List screen. See Understanding the Task List Screen for a complete description of this procedure.
In Oracle Mobile Field Service Store and Forward - Pocket PC, you can view, change, and create service requests. The application also enables you to view all the tasks for a service request.
Viewing and Changing Service Request Information
Prerequisites
Opening a task from the Task List screen. See "Working with Your Task List"
Complete the following steps to view or change service request information:
-
Navigate to the Task List screen and tap the desired task.
The Task screen opens. See "Viewing and Changing Task Information" for a complete description of this screen.
-
Tap SR.
The SR screen opens.
Service Request
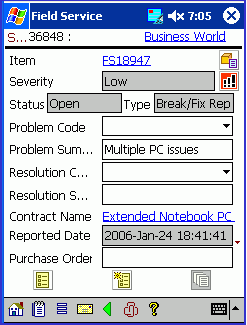
-
Tap the Reported Date field.
The incident, reported, respond by, and resolve by dates and times appear. The home office determines these dates and times and they cannot be changed.
Service Request
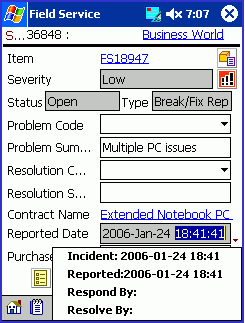
The following table describes the read-only information in the SR screen:
Read-only Information Description Service request number Located in the screen title, this is a generated number for a service request. For field The name of the customer. Tap this field to open the Customer screen where you can view additional customer information. See "Viewing Customer Information" for a complete description of this procedure. Product field The name of the customer product that needs service. Tap this field to view additional customer product information. See "Viewing Customer Product Information" for a complete description of this procedure. Severity The urgency of the service request. Reported Date The date that the incident was reported. Contract field The name of the customer contract. Tap this field to view additional contract information. See "Viewing Contract Information" for a complete description of this procedure. Status drop-down list The current status of the service request. Type drop-down list The type of service request. -
To change the customer product, tap the ellipse (...) button near the Product field.
The Products screen opens. See "Viewing and Changing a Customer Product for a Task" for a complete description of this procedure.
-
To add or change customer purchase order information, enter new information in the Customer PO field.
-
To change the service request problem type, open the Problem drop-down list and make the appropriate selection.
-
To change the service request problem resolution, open the Resolution drop-down list and make the appropriate selection.
-
In the lower portion of the SR screen, tap the note icon to view or add a service request note.
See "Creating and Viewing a Note" for a complete description of this procedure.
-
To copy the service request, tap the SR Copy icon in the toolbar. The icon is disabled if no task exists with a working status..
See "Copying a Service Request" for a complete description of this procedure.
-
To view or add information to the service request flexfields, tap the flexfields icon in the lower portion of the screen.
The Service Request screen opens.
Additional Information
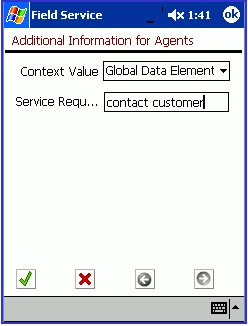
This screen shot is a typical view of the Service Request screen. In this example, Context Value drop-down list, qamfs g 1 (150), qamfs g 2 (3 d), and qamfs g 3 (3 c), qamfs g 4 (3 c), qamfs g 5 (3 c), qamfs g 6 (3 c), are the service request flexfields.
Note: The home office determines the service request flexfields and they cannot be changed or created in the field. This includes whether a field is read-only or not.
-
Tap OK to save your work and return to the SR screen.
Tap Cancel to return to the SR screen without saving your work.
-
To view all the tasks for the current service request, tap All Tasks.
The All Tasks for SR screen opens. In this screen, you can view all the tasks for the service request. See "Viewing All Tasks for a Service Request" for a complete description of this procedure.
-
To create a task for the service request, tap Create Task.
The Create Task screen opens. Use this screen to create a task. See "Creating a Task" for a complete description of this procedure.
-
To view the service request history, tap SR History.
The SR History screen opens. Use this screen to view the service request history. See "Viewing Service Request History" for a complete description of this procedure.
Viewing a Service Request Attachment
From the SR screen, you can open and view any attachment associated with a service request. The attachment can be of any type such as, a .pdf, .doc, .xls, .gif.
-
Navigate to the SR screen.
See "Viewing and Changing Service Request Information" for a complete description of this procedure.
-
Tap the attachment icon at the bottom of the screen.
The Attachments screen opens, displaying the attachment file name, size, and description.
Attachments For Task

-
Tap the file that you want to open.
The selected file opens.
Tape Done to return to the SR screen.
Before performing a job, a field service technician should have as many details about the customer and task as possible. Part of these details is the contractual information. The field service technician uses this information to determine the following:
-
Customer entitlements
-
Service coverage
Complete the following steps to view contract information:
-
Navigate to the SR screen.
See "Viewing and Changing Service Request Information" for a complete description of this procedure.
-
To view any contract information, tap the underlined, blue contract text.
The Contract screen opens.
Contract
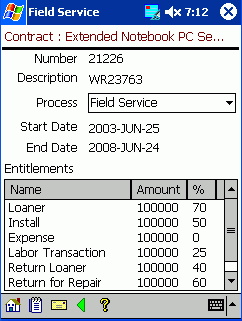
The following table describes the read-only fields of the Contract screen:
-
To change the business process, open the Process drop-down list and make the appropriate selection.
-
To see contract coverage details, tap View Contract Details to display a screen that shows-- among other information-- coverage name, covered times, reaction times, and resolution times.
-
In the lower portion of the Contract screen, tap the note icon to view or add a contract note.
See Creating and Viewing a Note for a complete description of this procedure.
-
Tap the complete icon in the lower portion of the screen to save any changes and return to the Task screen.
Viewing All Tasks for a Service Request
Complete the following steps to view all the tasks associated with a service request:
-
Navigate to the SR screen.
See "Viewing and Changing Service Request Information" for a complete description of this procedure.
-
Tap All Tasks.
The All Tasks for Service Request screen opens.
All Task for Service Request
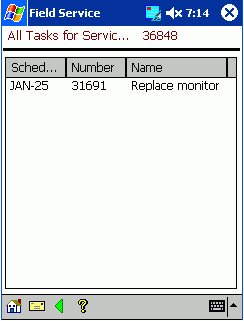
This screen contains the service request number as part of the screen title and lists each task for the service request in a table. The table contains the task scheduled start date, number, and name.
-
To view the task description, tap the desired task.
The Task screen opens. See Viewing and Changing Task Information for a complete description of this screen.
-
Tap the global arrow icon in the lower portion of the Task List screen to return to the SR screen. See Using Global Functionality for complete details.
Viewing Service Request History
To best serve the customer, the field service technician should review the customer's service history prior to making a customer visit. Oracle Mobile Field Service Store and Forward - Pocket PC can provide you with service history for either a customer or a customer product. Only tasks and service requests that are closed or completed appear in the service history. In customer setup the administrator determines the amount of service history to gather for a customer. The administrator determines how many service requests will be used to create the service history. For example, the last three service requests may be compiled to create the service history.
Complete the following steps to view service request history:
-
Navigate to the SR screen.
See "Viewing and Changing Service Request Information" for a complete description of this procedure.
-
Tap SR History.
The SR History screen opens.
Service Request History
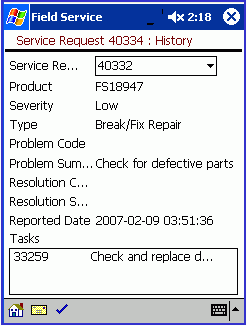
The following table describes the read-only fields of the SR History screen:
-
To change the service request number, make the appropriate selection from the SR Number drop-down list.
-
Tap the task in the Tasks table to learn more about the task.
The Task Debrief screen opens, displaying read-only debrief information about the selected task. For additional details about this screen and how to view reports, see "Debrief Reporting".
Task Debrief
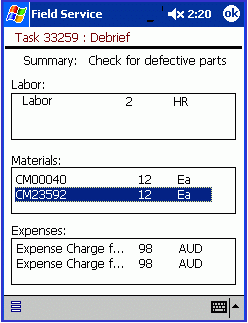
-
In the Task Debrief screen, tap OK in the upper right corner near the time.
Oracle Mobile Field Service Store and Forward - Pocket PC returns you to the SR History screen.
You can create a service request for each of the following scenarios:
-
Without having any product information
-
With a system item
-
With a known customer product (install base)
Complete the following steps to create a service request:
-
Navigate to the Customer screen.
See "Viewing Customer Information" for a complete description of this procedure.
-
Tap Create SR.
The Create Service Request screen opens.
Create Service Request
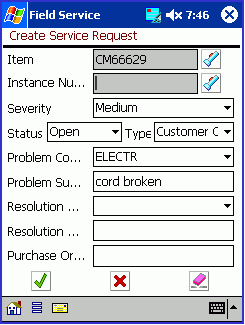
-
In the Summary field, enter a brief description for the service request.
-
Tap Find near the Item field to select a serviceable item.
Note: To specify a serviceable item, you can either complete the Item and Instance fields or simply complete the Instance field. Specifying the Instance field automatically completes the Item field.
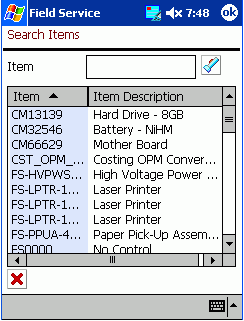
The Search Items screen opens listing items and their descriptions in a table.
Search Items
-
Tap the desired item.
Oracle Mobile Field Service Store and Forward - Pocket PC returns you to the Create SR screen.
Optionally, you can enter the desired item in the Search field and then tap Go.
-
In the Create SR screen, tap Find near the Instance field to select a serviceable item of the Item type.
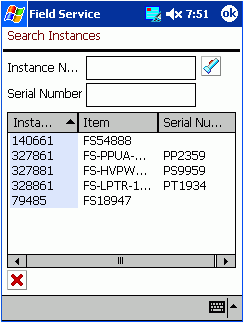
The Search Instances screen opens listing instances, items, and their descriptions in a table.
Search Instances
-
Tap the desired item.
Oracle Mobile Field Service Store and Forward - Pocket PC returns you to the Create SR screen.
Optionally, you can enter the desired item in the Search field and then tap Go.
-
In the Create SR screen, enter the customer purchase order in the Customer PO field.
-
From the Severity drop-down list, select service request severity.
-
From the Status drop-down list, select service request status.
-
From the Type drop-down list, select the service request type.
-
From the Problem drop-down list, select the service request problem.
-
Tap OK to save the service request.
Tap Cancel to return to the Customer screen without saving the service request. See "Viewing Customer Information" for a complete description of the Customer screen.
Tap Clear to clear the contents of the Create SR screen without saving the service request and to start over.
You can copy a service request. Perform the following steps to copy a service request.
-
Navigate to the Update Service Request screen.
-
Tap Copy SR.
The application can validate whether this customer has any open tasks for the site. If the profile CSF: Restrict Service Request Creation to Scheduled Sites is set to Yes, then the application checks for open, or working, tasks for that customer site. If the profile value is set to No, then technicians can copy any service request.
Tasks with check boxes cleared for statuses Closed, Canceled, Completed, On Hold, or Rejected are considered to be open. If the profile is set to Yes and no task exists with on open working status, then the Copy SR button is disabled.
If the validation permits, then the Copy Service Request screen appears, and the information is copied to the new service request.
-
Make the necessary updates.
You can enter free-form values for Serial Number and Instance Number. If you enter a free-form number that is not already downloaded to your device, then the number is validated by Enterprise Installed Base during synchronization.
-
Tap Apply the save the new service request.
Accessing the Knowledge Base
Through integration with Oracle Mobile Field Service Wireless, you can access the knowledge base from that application. The following instructions are from the Wireless text. After following them and completing your work, tap X in the upper right-hand corner of the screen to return to the native screens of the Pocket PC. See Accessing the Knowledge Base from the Wireless application.
Creating and Viewing a Note
You can create notes for a number of reasons. For example, you may want to note that a power supply has to be replaced by a refurbished one.
You can create and view notes for the following:
-
Service request
-
Task
-
Customer
-
Customer product
-
Contract
Note: Since the creation of all these note types is the same, a common procedure is used to describe the note creation. In this procedure, the phrase <Note Kind> is used in the screen names, instead of specific screen names, so as to keep the screens universal.
A note includes the following:
-
Note text
-
Current date
-
Note type
-
Note status
To create and view a note for either a service request, task, customer, or customer product requires the same steps, with the only difference in screen names. Therefore, in this section, generic screens are used, but specific instructions are given when necessary.
Steps
Complete the following steps to view or add a note:
-
Navigate to the appropriate screen.
-
For a service request note, navigate to the SR screen.
See "Viewing and Changing Service Request Information" for a complete description of this procedure.
-
For a task note, navigate to the Task screen.
See "Viewing and Changing Task Information" for a complete description of this procedure.
-
For a customer note, navigate to the Customer screen.
See "Viewing Customer Product Information" for a complete description of this procedure.
-
For a customer product note, navigate to the Customer Product screen.
See "Viewing Customer Product Information" for a complete description of this procedure.
-
For a contract note, navigate to the Contract screen.
See "Viewing Contract Information" for a complete description of this procedure.
-
-
-
In the lower portion of the screen, tap the note icon to view or add a note.
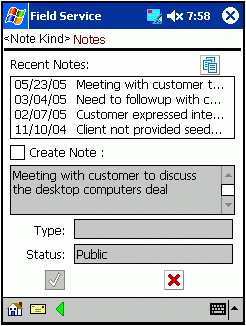
Depending on the kind of note that you are creating, either the SR Notes, Task Notes, Customer Notes, Product Notes or Contract Notes screen opens.
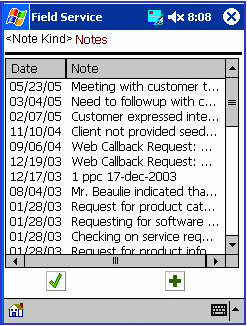
Notes
-
Select the Create Note check box to create a note.
The cursor appears in the note field and the Type drop-down list becomes active with the Action default selection and the Status drop-down list becomes active with the Public default selection.
-
Enter the note text in the note field.
-
If you are not satisfied with the default note type, then make the appropriate selection from the Type drop-down list.
-
If you are not satisfied with the default note status, then make the appropriate selection from the Status drop-down list.
-
Tap OK.
The new note is now listed in the Recent Notes field along with the creation date.
-
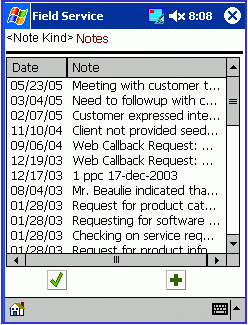
To view more of the note text, either tap an individual note or tap Show All.
In the first case, the text for the selected note appears in the Create Note field. In the second case, the note text and date for all notes appear in the either the SR Notes, Task Notes, Customer Notes, Product Notes or Contract Notes screen, depending on the kind of note that you are creating.
Notes - Show All
-
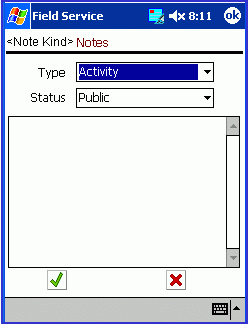
To add another note, tap Add.
Depending on the kind of note that you are creating, either the SR Note, Task Note, Customer Note, Product Note or Contract Note screen opens with the Action default selection in the Type drop-down list and the Public default selection in the Status drop-down list.
Notes - Adding
-
If you are not satisfied with the default note type, then make the appropriate selection from the Type drop-down list.
-
If you are not satisfied with the default note status, then make the appropriate selection from the Status drop-down list.
-
Enter the note text in the note field.
-
Tap Save.
The new note appears either in the SR Notes, Task Notes, Customer Notes, Product Notes or Contract Notes screen, depending on the kind of note that you are creating.
Notes - Show All
-
Tap Done to return to either the SR Notes, Task Notes, Customer Notes, Product Notes or Contract Notes screen, depending on the type of note that you are creating.
Tap Add to add another note.
Making a Query
After administrators define queries and download them to local devices, you can select one of the predefined queries, enter variables, and submit it to the enterprise for execution at the next synchronization. After synchronization, results appear in your screen.
Complete the following steps to prepare, submit, and view a query.
Prerequisites
- An administrator must have created and downloaded one or more predefined queries.
Steps
-
Tap the Mobile Query icon in the icon region.
The Mobile Queries screen appears.
-
Either tap a seeded query from the Query List LOV or tap an already saved query from the Query Name field.
-
Advance to the next screen, Submit Mobile Query.
A detailed description of the selected query appears in the Desc field. Then the cursor moves to the first query variable required.
-
Enter values for query variables until no more are required.
-
Tap the synchronize icon to transmit your query.
When the enterprise has responded, a message appears in the Mobile Query Instances screen that says that a reply is available.
-
Tap the reply to display it in the mobile query results screen.
Performing a Part Search
Through integration with Oracle Mobile Field Service Wireless, you can access the part search from that application. For a conceptual overview of part searching, see Performing a Part Search from the Wireless application.
Using Radius Search
Through integration with Oracle Mobile Field Service Wireless, you can access the part search from that application. The following instructions are from the Wireless text. After following them and completing your work, tap X in the upper right-hand corner of the screen to return to the native screens of the Pocket PC. See Using Radius Search from the Wireless application.
Ordering Parts
Through integration with Oracle Mobile Field Service Wireless, you can order parts from that application. The following instructions are from the Wireless text. After following them and completing your work, tap X in the upper right-hand corner of the screen to return to the native screens of the Pocket PC. See Ordering Parts from the Wireless application.
Receiving Parts
Through integration with Oracle Mobile Field Service Wireless, you can receive parts from that application. The following instructions are from the Wireless text. After following them and completing your work, tap X in the upper right-hand corner of the screen to return to the native screens of the Pocket PC. See Receiving Parts from the Wireless application.
Getting Driving Directions
Through integration with Oracle Mobile Field Service Wireless, you can get driving directions from that application. The following instructions are from the Wireless text. After following them and completing your work, tap X in the upper right-hand corner of the screen to return to the native screens of the Pocket PC.
To get driving directions:
Steps
-
Tap the Get Direction icon from the toolbar.
The Driving Direction screen appears and contains a list of addresses from all the tasks that are scheduled for the system date.
-
Enter the starting address:
-
Tap a link in the list to select it.
-
Tap Work Address for help to select the work address.
-
Tap Other to type in the starting address.
-
-
Enter the destination address by following a parallel procedure to that in step 2.
-
Tap OK.
The Driving Direction screen displays written directions and an associated map.
Performing Debrief Reporting
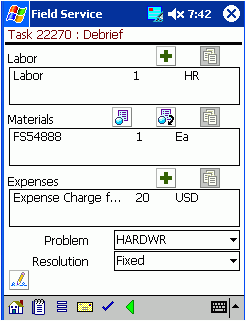
The Debrief screen is where you perform debrief reporting. Debrief reporting involves creating and viewing different report types.
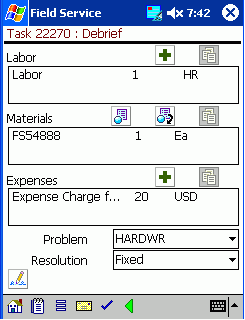
After you complete a task, you can report the following information:
-
Labor: Describes how much labor a task took to complete.
-
Materials: Describes the materials that were involved in the completion of a task. This includes both replacement and recovered parts. The home office uses this information to replenish part inventories.
-
Expenses: Describes the expenses that were required to complete a task.
The Debrief screen is where you specify the task problem and resolution. The default problem description is Electrical Problem, and the default resolution description is Solution to Software. In the Labor region, tapping the travel debrief "right arrow" icon displays default travel lines, and tapping the labor debrief "plus" icon displays default travel lines. These last two defaults are drawn from task assignment status change history.
Complete the following steps to change this information.
-
To change the default problem description, select the appropriate problem description from the Problem drop-down list.
-
To change the default problem description, select the appropriate resolution description from the Resolution drop-down list.
You create labor report items to describe how much labor time was involved in the completion of a task. Oracle Mobile Field Service Store and Forward - Pocket PC enables you to add labor report items regardless of the task status. The application also can enforce mandatory labor debrief by which you cannot complete or close a task until you create a labor line.
-
Navigate to the Task List screen and tap the desired task.
The Task screen opens. See "Viewing and Changing Task Information" for a complete description of this screen.
-
Tap Debrief.
The Debrief screen opens. See "Debrief Reporting" for a description of this screen.
-
In the Debrief screen, tap Add above the Labor field.
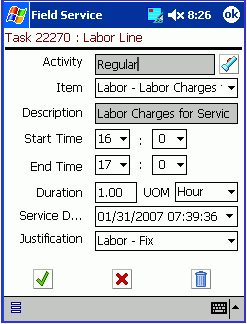
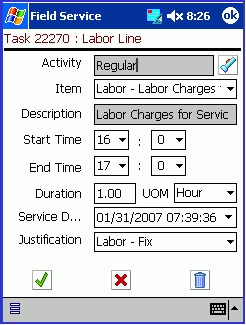
The Labor Line screen opens with the current date and time appearing in the Service Date drop-down list and the Start Time drop-down lists, respectively. The End Time drop-down list also contains a default value—the start time value plus one hour.
The Labor Line screen has drop-down lists where you can describe the labor report item.
Labor Line
-
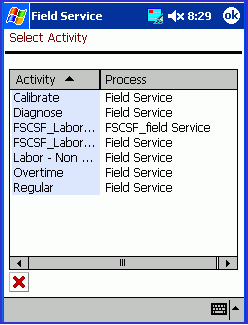
Tap the Activity flashlight icon to specify the labor activity.
The Select Activity screen opens listing activities and processes in a table.
Select Activity
-
Select a labor activity.
The Labor Line screen opens again with the selected activity in the Activity field.
-
From the Item drop-down list, select the labor item.
Using the following steps, enter the amount of labor time used to complete the task. Complete either steps 7 through 9or steps 10 and 11, according to your business process.
-
If you are not satisfied with the default service date, then make the appropriate selection from the Service Date drop-down list.
See "Using the Date Drop-down List" for complete details.
-
If you are not satisfied with the default start time, then select the appropriate hour and minutes from the Start Time drop-down lists.
The hour values are depicted in the 24-hour clock format. If you are selecting a time after 12:00 P.M., add twelve to the hour to get the 24-hour clock equivalent. For example, 4:30 P.M. would be entered as 16 hours and 30 minutes.
-
If you are not satisfied with the default end time, then select the appropriate hour and minutes from the End Time drop-down lists.
Again, the hour values are depicted in the 24-hour clock format.
-
In the Duration field, enter the amount of labor time that was needed to complete the task.
-
From the UOM drop-down list, select the unit of time that describes the labor duration.
-
From the Justification drop-down list, make a selection that best describes the state of the labor report item.
It is not mandatory to complete the Justification drop-down list.
-
Tap OK.
The Debrief screen opens. The labor report item along with the start and finish times appear on the screen.
Tap Cancel to exit the Labor Line screen without saving your work.
Debrief
Deleting a Labor Report Item
For an open or closed task that has not yet been synchronized, Oracle Mobile Field Service Store and Forward - Pocket PC enables you to delete a labor report item from the labor report.
Prerequisite
-
Creating a labor report item. See Creating a Labor Report Item.
Complete the following steps to delete a labor report item:
-
For a desired task, navigate to the Debrief screen.
See "Creating a Labor Report Item" for a complete description of this procedure.
-
Select the desired labor report item in the Labor field.
The Labor Line screen opens.
-
Select the labor report item that you want to delete.
The Labor Line screen opens containing the Delete button. If Oracle Mobile Field Service Store and Forward - Pocket PC was synchronized after the creation of the desired labor report item, the Delete button will be disabled in the Labor Line screen.
Labor Line
-
Tap Delete.
-
Oracle Mobile Field Service Store and Forward - Pocket PC returns you to the Debrief screen where the desired labor report item no longer appears.
Creating a Material Report Item
After you complete a task, you can record the materials that were used in the completion of the task. The home office uses this information to replenish or replace needed materials, maintain the customers install base, and possibly invoice the customer for the materials used.
Initially, one item is associated with a service request. This can be an item from a customer's install base or an item from inventory. One or more tasks are created for this service request and you can create a material report for each task. If multiple field service technicians are assigned to a task, then multiple material reports for a task can be created. You can also add several material report items to a material report. For each material report item, a separate line is created in the report. Oracle Mobile Field Service Store and Forward - Pocket PC enables you to add material report items regardless of the task status.
When servicing an item, a field service technician may remove or return an old part and then install or use a new replacement part. Oracle Mobile Field Service Store and Forward - Pocket PC provides the functionality in the Debrief screen to describe material usage.
Creating a Material Report Item with a Pre-defined Parts List
Complete the following steps to create a material report item:
-
Navigate to the Task List screen and tap the desired task.
The Task screen opens. See Viewing and Changing Task Information for a complete description of this screen.
-
Tap Debrief.
The Debrief screen opens. See Debrief Reporting for a description of this screen.
-
Tap Install above the Materials field.
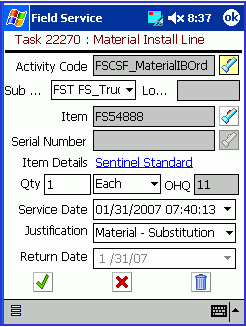
The first material item appears in the Material Line screen. The sub-inventory of the material item appears in the Sub Inventory drop-down list. The activity code associated with the service request incident type appears in the Activity Code field. If the activity code is blank, you can choose an activity code.
Material Install Line
-
Click OK to save the material item.
If the material item is not in any of your subinventories, then an error message appears stating that no on hand quantity is available.
Click Cancel to close the screen without saving the material item.
Creating a Regular Material Report Item
Complete the following steps to create a material report item:
-
Navigate to the Task List screen and tap the desired task.
The Task screen opens. See Viewing and Changing Task Information for a complete description of this screen.
-
Tap Debrief.
The Debrief screen opens. See Debrief Reporting for a description of this screen.
-
Tap Install above the Materials field.
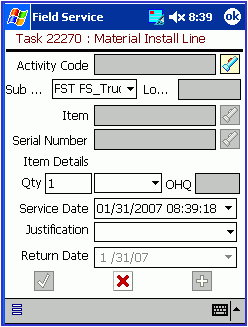
The Material Line screen opens with a default inventory type in the In drop-down list. In this example, qamfs_sub1 is the default inventory type. Also, the Service Date drop-down list contains a default value (the current date).
The Material Install Line screen has various drop-down lists where you describe the material report item.
Material Install Line
-
Tap the Activity Code flashlight icon to specify the material activity.
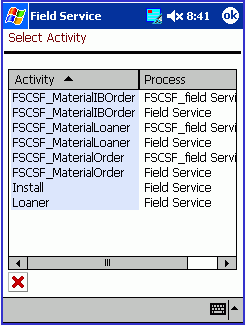
The Select Activity screen opens listing activities and processes in a table.
Select Activity
-
Select a material activity.
The Material Line screen opens again with the selected activity in the Activity Code field.
-
Select a material report item using one of the following methods:
-
From the Item drop-down list, make the appropriate selection.
-
Tap Find.
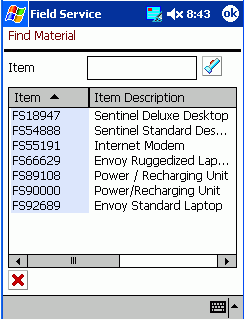
The Find Material screen opens listing material names and descriptions in a table.
Find Material
-
Select the desired material report item.
In the Material Line screen, the material report item appears in the Item drop-down list.
Regardless of the method that you use to select the material report item, Oracle Mobile Field Service Store and Forward - Pocket PC populates the On Hand field and UOM drop-down list of the Material Line screen.
-
-
-
-
To change the default inventory, make the appropriate selection from the In drop-down list.
-
Enter the number of items needed in the Quantity field.
If the item is serialized, then 1 appears in the Quantity field. Change this value if it is not correct.
-
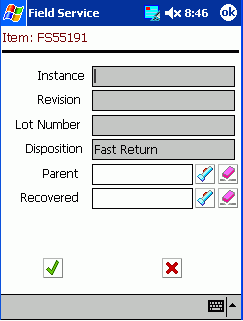
To add revision, lot, and instance information, tap Item Details.
Item Details
-
To change the default unit of measure, make the appropriate selection from the UOM drop-down list.
-
To change the default service date, make the appropriate selection from the Service Date drop-down list.
See Using the Date Drop-down List for a complete description of this procedure.
-
From the Justification drop-down list, make a selection that best describes the justification for the material report item usage.
It is not mandatory that you select a justification.
-
Tap OK.
The new material report item now appears in the Materials field of the Debrief screen.
Tap Cancel to exit the Material Line screen without saving your work. Tap Add Another to save your work and create another material report item.
Creating a Material Report Item for a Return
Complete the following steps to create a material report item:
-
Navigate to the Task List screen and tap the desired task.
The Task screen opens. See Viewing and Changing Task Information for a complete description of this screen.
-
Tap Debrief.
The Debrief screen opens. See Debrief Reporting for a description of this screen.
-
Tap Return above the Materials field.
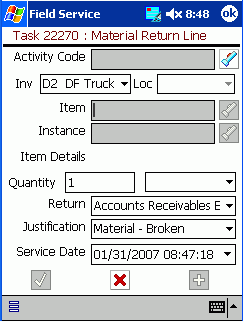
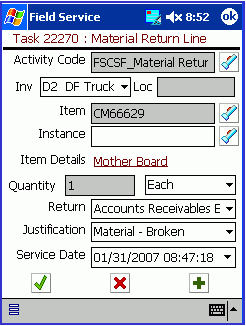
The Material screen opens with a default inventory type in the Sub Inventory drop-down list. There is also default information in the Return Reason, Justification, and Service Date drop-down lists. The service date defaults to the current date.
Material Return Line
-
Tap the Activity Code flashlight icon to specify the material activity.
The Select Activity screen opens listing activities and processes in a table.
Select Activity

-
Select a material activity.
The Material screen opens again with the selected activity in the Activity Code field.
-
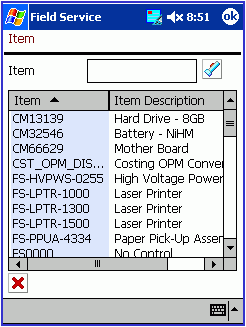
Tap the Item flashlight icon to select a material report item.
The Item screen opens listing the name and description of each material report item in a table.
Item
-
Select the desired material report item.
If there are several material report items listed in the Item screen, you can access a specific material report item directly by entering information in the Item field or Serial Num field at the bottom of the screen. Then click Go.
In the Material screen, the material report item appears in the Item field. Oracle Mobile Field Service Store and Forward - Pocket PC populates the Instance field with a default value and places a unit of measure in the drop-down list near the Quantity field. The application also places a link in the Item Details field.
Material Return Line
-
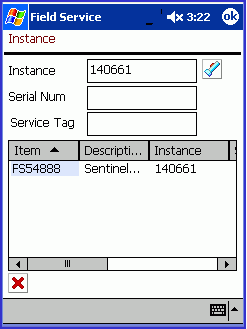
To change the default instance value, tap the Instance flashlight icon.
The Instance screen opens.
Instance
-
Select the appropriate item instance.
The selected instance appears in the Instance field of the Material screen.
If there are several instances listed in the Instance screen, you can access a specific instance directly by entering information in the Instance field or Serial Num field at the bottom of the screen. Then click Go.
-
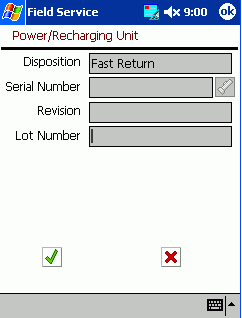
To view or add item details, tap Item Details.
The Item Details screen opens with default information in the Disposition field.
Item Details
-
In the Serial Number field and Revision field, enter the appropriate information and then tap OK.
-
In the Material screen, enter the number of items needed in the Quantity field.
If the item is serialized, then 1 appears in the Quantity field. Change this value if it is not correct.
-
To change any default information in the Material screen, make the desired selection from the appropriate drop-down list.
-
Tap OK.
The new material report item now appears in the Materials field of the Debrief screen.
Tap Cancel to exit the Material Line screen without saving your work. Tap Add Another to save your work and create another material report item.
Deleting a Material Report Item
For an open or closed task that has not yet been synchronized, Oracle Mobile Field Service Store and Forward - Pocket PC enables you to delete a material report item from the material report.
Complete the following steps to delete a material report item:
Prerequisite
Creating a material report item. See "Creating a Material Report Item".
-
For a desired task, navigate to the Debrief screen.
See "Creating a Material Report Item" for a complete description of this procedure.
-
Tap the desired material report item in the Material field.
The Material screen opens containing the Delete button.
Material Return Line
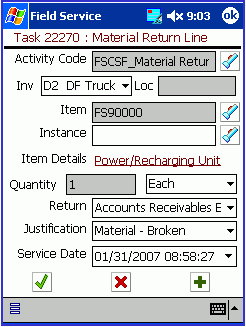
If Oracle Mobile Field Service Store and Forward - Pocket PC is synchronized after the creation of the desired material report item, then the Delete button is not available in the Material Line screen or Material screen.
-
Tap Delete.
Oracle Mobile Field Service Store and Forward - Pocket PC returns you to the Debrief screen where the desired material report item no longer appears.
Creating an Expense Report Item
After you complete a task, you can then enter information that describes the expenses associated with that task. Expenses may include such things as a meal and driving costs. Oracle Mobile Field Service Store and Forward - Pocket PC enables you to add expense report items regardless of the task status.
Complete the following steps to create an expense report:
-
Navigate to the Task List screen and tap the desired task.
The Task screen opens. See "Viewing and Changing Task Information" for a complete description of this screen.
-
Tap Debrief.
The Debrief screen opens. See "Debrief Reporting" for a description of this screen.
-
Tap Add above the Expenses field.
The Expense Line screen opens with the current date defaulting into the Service Date field.
Expense Line
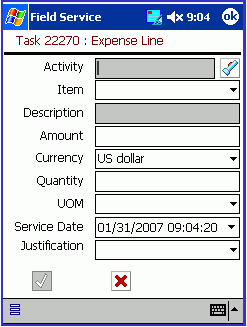
-
Tap the Activity flashlight icon.
The Select Activity screen opens listing expense activities and processes in a table.
Select Activity
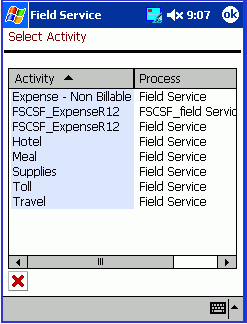
-
Select an expense activity.
The Expense Line screen opens again with the selected activity in the Activity field. Based on your activity selection, Oracle Mobile Field Service Store and Forward - Pocket PC automatically populates the Item drop-down list.
-
If you are not satisfied with the selection in the Item drop-down list, then change the selection.
In the following steps, enter the amount of money used to complete the task. Complete either steps 7 and 8 or steps 9 and 10, according to your business process.
-
In the Amount field, enter the amount of money that was needed to complete the expense task.
-
From the Currency drop-down list, specify the currency being used for the expense.
-
In the Quantity field, ener the quantity of items used to complete the service request.
-
From the UOM drop-down list, select the unit of measure being used.
-
If you are not satisfied with the date in the Service Date drop-down list, then change this selection.
-
From the Justification drop-down list, make a selection that best describes the justification for the expense report item.
It is not mandatory to enter a justification.
-
Tap OK.
The new expense report item now appears in the Expenses field of the Debrief screen.
Tap Cancel to exit the Expense Line screen without saving your work.
Deleting an Expense Report Item
For an open or closed task that has not yet been synchronized, Oracle Mobile Field Service Store and Forward - Pocket PC enables you to delete an expense report item from the expense report.
Prerequisite
-
Creating an expense report item. See "Creating an Expense Report Item".
Complete the following steps to delete a expense report item:
-
For a desired task, navigate to the Debrief screen.
See "Creating a Material Report Item" for a complete description of this procedure.
-
Tap the desired expense report item in the Expenses field.
The Expense Line screen opens containing the Delete button.
Expense Line
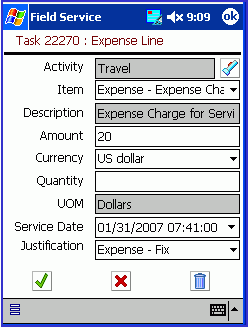
If Oracle Mobile Field Service Store and Forward - Pocket PC is synchronized after the creation of the desired expense report item, then the Delete button will not be available in the Expense Line screen.
-
Tap Delete.
Oracle Mobile Field Service Store and Forward - Pocket PC returns you to the Debrief screen where the desired expense report item is no longer present.
Obtaining an Electronic Signature
Oracle Mobile Field Service Store and Forward - Pocket PC enables you to obtain a customer's electronic signature for task sign off. The customer's electronic signature indicates that the task is complete and that the customer has accepted your work.
Steps
Complete the following steps to obtain an electronic signature:
-
Navigate to the Task List screen and tap the desired task.
The Task screen opens. See "Viewing and Changing Task Information" for a complete description of this screen.
-
Tap Debrief.
The Debrief screen opens. See "Debrief Reporting" for a description of this screen.
-
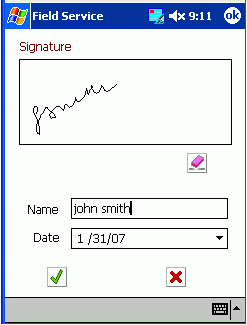
The Signature screen opens with customer name in the Name field and the current date in the Date drop-down list.
Signature
-
Have the customer use the Pocket PC stylus to sign in the Signature field.
-
If you are not satisfied with the customer name, then enter the customer name in the Name field.
-
If you are not satisfied with the default date in the Date drop-down list, then change this selection.
See Using the Date Drop-down List for a complete description of this procedure.
-
Tap OK.
Oracle Mobile Field Service Store and Forward - Pocket PC returns to the Debrief screen.
Tap Cancel to exit the Signature screen without saving a signature.
Counter Readings
You can log a service request for a customer product that contains a counter. A copier having a number-of-copies counter is an example of this.
In the Counter screen, there can be multiple readings listed for a customer product. For each counter, you can learn about the historic readings. You can also create new readings for a customer product counter. You can execute miscellaneous readings.
A counter reading consists of the following:
-
Name
-
Time stamp
-
Value
-
Unit of measure
Creating a New Counter Reading
Complete the following steps to set a counter reading:
-
Navigate to the Task List screen and tap the desired task.
The Task screen opens. See "Viewing and Changing Task Information" for a complete description of this screen.
-
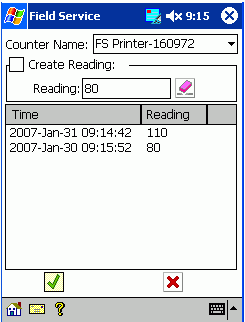
The Counters screen opens with the Number of units default selection in the Counter drop-down list.
Counters
-
If you are not satisfied with counter default selection, then make the appropriate selection from the Counter drop-down list.
In this case, Number of units is the only counter for the customer product.
-
Select the Create Reading check box.
The Reading field is available.
-
In the Reading field, enter the counter value and then tap OK.
The counter reading appears in the table.
Note: Depending on how you define the counters, you might have to enter a reading that is either less than or greater than the last counter reading. You can also define the counters with no restrictions.
Managing Spare Parts
Spare parts management includes creating a parts requirement, searching parts online, receive parts, return parts, and viewing the parts requirement status.
Complete the following steps to order a part:
-
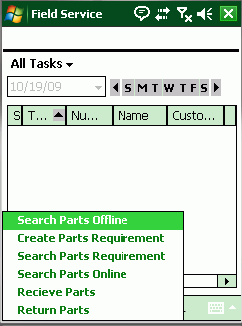
From the Task List screen, tap the parts icon.
All Open Tasks
-
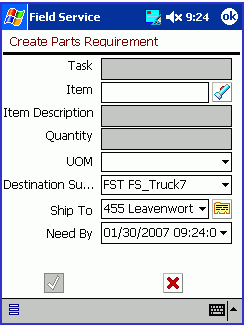
From the Goto menu, select Create Parts Requirement.
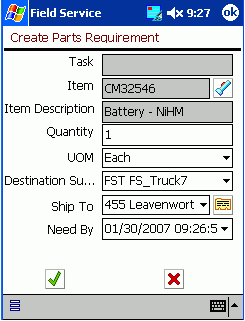
The New Order screen opens with a default address in the Ship To field and the current date in the Need By field.
Create Parts Requirement
-
Tap the Item flashlight icon.
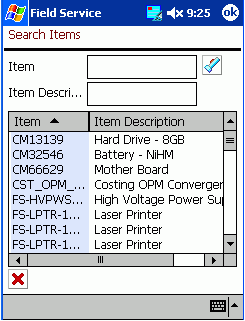
The Parts Search window opens.
Search Items
-
Select the desired part from the table.
If you know the information for a specific part, you can enter this in the Part Number field or Description field at the top of the screen. You can then make your selection from the table.
The part you select appears in the New Order screen.
Create Parts Requirement
-
Tap Order.
A message appears stating the requirement number and prompting you to continue. You will want to remember this part number in case you want to reference the part order status in the future.
-
Tap OK in the prompt.
The part you selected is added to the part order. Oracle Mobile Field Service Store and Forward - Pocket PC enables you to check the status of this order. See "Viewing Parts Requirement Status" for a complete description of this procedure.
Viewing Parts Requirement Status
After you create a parts requirement, you can view the parts requirement status.
Complete the following steps to view a parts requirement status:
-
From the Task List screen, select View Parts Requirement Status from the Goto menu.
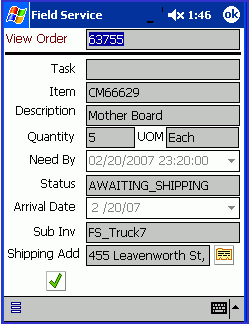
The View Order screen opens.
View Order
-
To change the requirement number, make the appropriate selection from the View Order drop-down list.
-
To see the full shipping address, tap the equal sign (=) button.
The Address screen opens.
-
Tap Done to close the Address screen.
-
Tap OK to close the View Order screen.
Viewing On-hand Parts and Quantities
Complete the following steps to view on-hand parts and quantities:
-
From the Task List screen, tap the parts icon and then select Search Parts in the Goto menu.
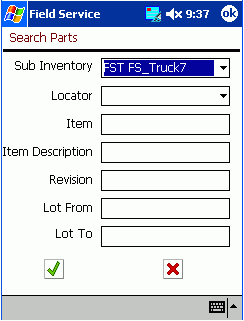
The Search Parts screen opens.
Search Parts
-
Enter the search criteria for the desired part and then tap OK.
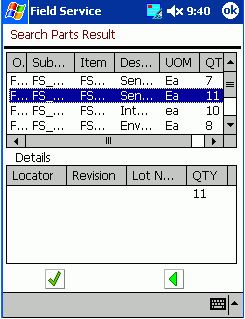
The Search Parts Result screen opens with the desired part information displayed.
Search Parts Result
-
Select the desired part and then tap Done.
To locate another part, tap Search to return to the Parts Search screen.
Search Parts Online
-
From the Task List screen, tap the parts icon and then select Search Parts Online in the Goto menu.
The Parts Search page appears. This page enables you to search for the parts required to complete a task. The Parts Search page allows you to initiate the parts search, view search results, select source and receive parts.
Refer to the "Overview: Parts Search and Ordering" section in the Oracle Field Service User Guide for more information.
-
Search the desired part and then tap Done.
Receive Parts
-
From the Task List screen, tap the parts icon and then select Receive Parts in the Goto menu.
The Receive Parts page appears. This page enables you to select the source and parts in the Search Results page to create an inbound order or reservation automatically.
Refer to the "Overview: Parts Search and Ordering "section in the Oracle Field Service User Guide for more information.
-
Tap Done to return to the All Tasks page.
Return Parts
-
From the Task List screen, tap the parts icon and then select Return Parts in the Goto menu.
The Return Parts page appears. This page displays the Source, Consolidation, and Destination Summary associated with the technicians sub-inventories.
Refer to the "Using Parts Returns" section in the Oracle Field Service User Guide for more information.
-
Tap Done to return to the All Tasks page.
Viewing Customer Information
You can view the following customer information using the Customer screen:
-
Name
-
Contact
-
Address
-
Phone number
There are two methods to open the Customer screen: from within a task or with no task open.
Steps
Complete the following steps to view customer information:
-
Open the Customer screen.
To Open the Customer Screen from within a Task:
-
From the Task List screen, tap the desired task.
The Task screen opens. See "Viewing and Changing Task Information" for a complete description of this screen.
-
Tap the Customer field.
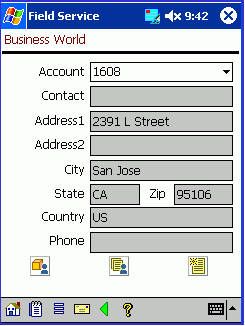
The Customer screen opens with the customer name appearing in the screen title. In this example, Business World is the customer and therefore this name is in the screen title.
Customer
To Open the Customer Screen with no Task Open:
-
From the Goto menu at the bottom of the Task List screen, select Search Customers.
The Search Customers screen opens. For each customer, this screen displays the customer name and address.
Search Customers
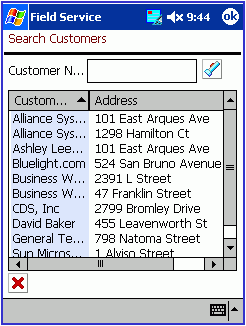
-
Tap the desired customer.
The Customer screen opens with the customer name appearing in the screen title.
Customer

-
-
To view or add information for the customer flexfields, tap the flexfields icon in the lower portion of the screen.
The Party Information screen opens.
Party Information
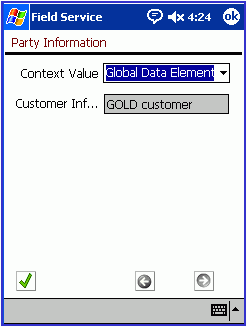
This screen shot is a typical view of the Party Information screen. In this example, Context Value drop-down list, qamfs g 1 (150), qamfs g 2 (3 d), and qamfs g 3 (3 c) are the customer flexfields.
Note: The enterprise server level determines the customer flexfields, and they cannot be changed or created in the field. This includes whether a field is read-only or not.
-
Tap OK.
Oracle Mobile Field Service Store and Forward - Pocket PC returns you to the Customer screen.
Tap More to view any additional information in the Party Information screen.
Tap Cancel to return to the Customer screen without saving any of your work.
-
In the lower portion of the Customer screen, tap the note icon to view or add a customer note.
See "Creating and Viewing a Note" for a complete description of this procedure.
-
To view all customer products, tap All Customer Products.
The All Products screen opens. In this screen, you can search for a customer product and then receive details about this product. See "Viewing Customer Product Information" for a complete description of this procedure.
-
To view all service requests for a customer, tap All Service Requests.
The All SRs screen opens. In this screen, you can view all the service requests for a customer. See "Viewing All Tasks for a Service Request" for a complete description of this procedure.
-
To create a service request, tap Create Service Requests.
The Create SR screen opens. In this screen, you create a service request by specifying various information. See "Creating a Service Request" for a complete description of this procedure.
Viewing Customer Product Information
Oracle Mobile Field Service Store and Forward - Pocket PC enables you to view or change the customer product for a task or to view all the products for a customer. The customer product details are displayed in the Customer Product screen.
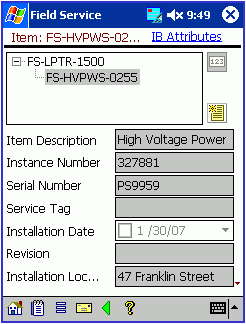
The following table describes the read-only information in the Customer Product screen:
Viewing and Changing a Customer Product for a Task
Complete the following steps to view or change customer product information:
-
Navigate to the SR screen.
See "Viewing and Changing Service Request Information" for a complete description of this procedure.
-
Tap the Item field to view the customer product information.
The Customer Product screen opens, displaying a product description, number and serial number along with the installation date and any revision information.
-
To change the customer product, tap the flashlight icon near the Item field.
The Products screen opens. This screen lists in a table all the possible customer's products, with the instance, name, and description provided.
Products
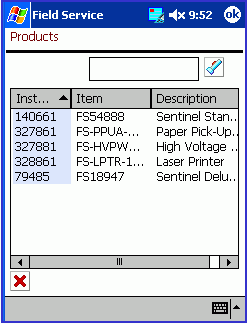
-
Tap the desired customer product.
The selected customer product appears in the Product field of the SR screen.
Viewing All Products for a Customer
Complete the following steps to view customer product information:
-
Navigate to the Customer screen.
See "Viewing Customer Information" for a complete description of this procedure.
-
Tap Products.
The All Products screen opens displaying in a table the customer product instance, name, and description.
All Products
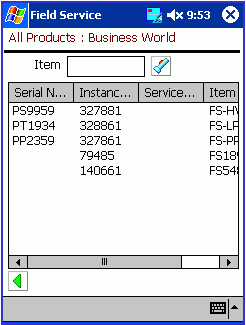
-
Select the desired customer product.
The Customer Product screen opens, displaying a product description, number and serial number along with the installation date and any revision information.
-
Tap Done to return to the All Products screen.
Using Messaging
This section describes how you can use messaging in the Oracle Mobile Field Service Store and Forward - Pocket PC application.
Messaging Functionality
The messaging function enables the field service technician to send and receive messages from other people within the organization.
-
It can be used to send messages to all field service users, or to members of a group to which the field service technician is a member.
-
You can use this function to ask for support or to request additional information. For example, you can also use messages to request new parts.
After you synchronize, you can view any new messages in the Mail screen (inbox view). You can verify that a message you wrote has been sent by viewing it in the Mail screen (outbox view).
Reading, Sending, and Deleting Messages
This section describes how to do the following:
-
Read messages that you have received.
-
Send messages to other members of the field service organization.
-
Delete messages that you have read.
Complete the following steps to read, send, and delete messages:
-
Tap the mailbox icon at the bottom of the Task List screen.
The Mail screen opens, listing all the mail in your inbox. The inbox is the default view.
Mail
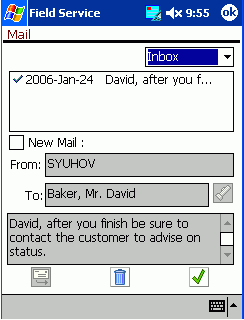
-
Select the message that you want to read.
The message text appears in the scrollable box near the bottom of the Mail screen (Inbox view).
-
To create a new message, select the New Mail check box.
The user name appears in the From field.
-
Tap the To flashlight icon to select a recipient.
The Select Recipient screen opens with the user name and full name of all the possible mail recipients listed in a table.
Select Recipient
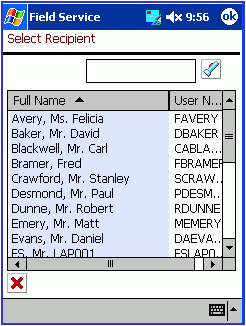
-
Select the recipient from the table.
The recipient appears in the To field of the Mail screen (Inbox view).
-
Type your message in the scrollable box near the bottom of the screen and then tap Send.
The message is sent to the recipient.
-
To view the messages that you sent, select Outbox from the drop-down list.
The Mail screen (Outbox view) displays all sent messages.
-
Select the message for which you want to view the text.
-
The message text appears box near the bottom of the screen.
-
To create and send a new message in the Mail screen (Outbox view), complete the steps in this procedure you used to create a new message in the Mail screen (Inbox view).
-
Tap Done to return to the Task List screen.
Automatically Synchronizing with the Enterprise System
The application provides automatic synchronization based on three types of changes:
-
Instantaneous automatic synchronization
This term is used to refer the Automatic Synchronization process based on data change in a client or enterprise.
-
Timer based automatic synchronization
This term is used to refer the Automatic Synchronization process based on a timer.
-
Exception event based automatic synchronization
This term is used to refer the automatic synchronization process based on exception events. Only an administrator can set up exception events.
Prerequisites
- An administrator must set up synchronization based on exception events. For more information, see "Using the Oracle10g Lite Administration Screens" in the Oracle Mobile Service Implementation Guide.
To Establish Automatic Synchronization
Establishing automatic synchronization has steps that are specific to each type of the three types, instantaneous, timer based, or event based.
To establish instantaneous automatic synchronization
Automatic synchronization is initiated instantaneously to reflect the latest changes in the key service objects such as service request attributes and task attributes in the enterprise or a mobile device. Automatic synchronization is initiated instantaneously when changes occur in key inventory objects such as inventory item attributes and organization attributes in the enterprise application.
-
Set the profile value of CSM: Automatic Synchronization Interval for Data Download to 0 (zero) to initiate instantaneous automatic synchronization from the server.
-
Set the profile value of CSM: Automatic Synchronization Interval for Data Upload to 0 (zero) to initiate instantaneous automatic synchronization from the client.
Note: Device Manager never initiates automatic synchronization from the client if the profile CSM: Automatic Synchronization Interval for Data Upload is set to a negative integer. In this situation, you must initiate the synchronization manually by tapping or clicking the synchronization icon located in the client application.
To establish timer based automatic synchronization
-
Set the profile value of CSM: Automatic Synchronization Interval for Data Download to a positive integer to initiate automatic synchronization from the server in a specific time interval.
-
Set the profile value of CSM: Automatic Synchronization Interval for Data Upload to a positive integer to initiate automatic synchronization from the server in a specific time interval.
Note: Your mobile device also checks the setup for time interval or specific time on any day and initiates automatic synchronization based on this platform-level setup.
Manually Synchronizing with the Enterprise System
To receive new data assigned to you, such as new tasks and service requests, you need to synchronize with the enterprise system. Likewise, to send the changes that you have made, such as creating report items and updating task statuses, you need to synchronize with the enterprise system. Usually you can set up automatic synchronization, but there are times when you need a manual procedure.
Steps
Complete the steps below to synchronize Oracle Mobile Field Service Store and Forward - Pocket PC with the enterprise system.
-
Establish a network connection for your Pocket PC.
-
Tap the synchronization icon near the bottom of the Task List screen.
The synchronization screen opens.
Synchronization
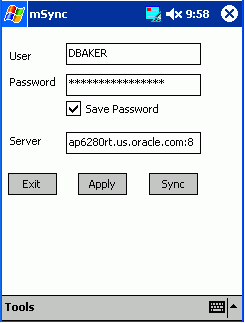
-
Complete the following fields and check boxes in the synchronization screen as described in the following tables:
Field Description User Name mSync client user name. (This is the Mobile Field Service user name.) Password mSync client password. This field is case sensitive. Server IPaddress:port Check box Description Save password Select this check box to save the mSync user name and password. -
Tap Sync.
Information from your Pocket PC and enterprise system synchronize.
Note: Synchronizing your data could take a few minutes. Do not abort the synchronization. If the synchronization fails with errors, contact your system administrator.
Tap Apply to save your work without synchronizing. Tap Cancel to exit the synchronization screen without saving your work.
Changing Passwords
Through integration with Oracle Mobile Field Service Wireless, you can change passwords from that application. The following instructions are from the Wireless text. After following them and completing your work, tap X in the upper right-hand corner of the screen to return to the native screens of the Pocket PC. See Changing Passwords from the Wireless application.
Closing the Application
When you have finished working in Oracle Mobile Field Service Store and Forward - Pocket PC, you will want to logout of the application.
Prerequisites
- Save all data and be ready to exit the application.
Steps
Complete the following to logout of Oracle Mobile Field Service Store and Forward - Pocket PC:
-
In the lower portion of the Task List screen, click the Exit icon from the tool bar.
Oracle Mobile Field Service Store and Forward - Pocket PC checks that all data has been saved correctly and then closes. The Pocket PC returns to the Pocket PC desktop where all the applications are listed.
