Oracle E-Business Suite Help
Setting Oracle E-Business Suite Help Profile Options
Oracle E-Business Suite Help uses several profile options (in the profile category Help System):
-
Applications Help Web Agent - set this profile option if you want to have online help launched on a web server other than that specified by the Apps Servlet Agent profile.
-
Help Utility Upload Path - used in uploading help files. See: Downloading and Uploading Help Files.
-
Help Utility Download Path - used in downloading help files. See: Downloading and Uploading Help Files.
-
Help System Root - determines which Contents navigation tree appears when the online help first launches. At the site level, this should be set to 'fnd:library'. To have an application's navigation tree appear in context-sensitive help, set this profile at the application level to '<application short name>:<root node key>'. For example, set it to '<ap:contents>' for the Oracle Payables main tree.
-
Help Localization Code - used to group and differentiate help documentation within a language.
Customizing Oracle E-Business Suite Help
This section describes how you can create and upload custom Oracle E-Business Suite help files for the online help system.
Oracle E-Business Suite help files are formatted as HTML allowing easy modification using commercial HTML text editors. You can also add customized files of your own to the help system.
If you have licensed Oracle Tutor, you can use it to edit your Oracle E-Business Suite help files. See: Using Oracle Tutor.
Caution: With each new release of Oracle E-Business Suite and each patch you accept, you may need to reapply your changes to any updated help files you have modified, if you want access to the latest information.
Customizing Oracle E-Business Suite Help includes the following topics:
Customizing help files involves utilities available under "Help Administration" from the seeded System Administration responsibility. These utilities include the Help Builder and the Help Upload and Help Download functions.
Downloading and Uploading Help Files
The Generic File Manager Access Utility (FNDGFU) is used for downloading and uploading help files. For an overview of this utility, see: Generic File Manager Access Utility (FNDGFU)
Oracle E-Business Suite help files are stored in the database. The Oracle E-Business Suite Help Administration pages of the Help System Utility are provided for retrieving and replacing them in the course of customization.
Setting Help System Utility Profile Options
Before using the Help Download or Help Upload pages you should define the upload and download directory paths. Oracle E-Business Suite provides profile options for you to set these paths.
Use the profile option Help Utility Download Path to define the directory location to which the Help System Utility will download files. Use Help Utility Upload Path to define the directory location from which your customized files will be transferred back into the Oracle E-Business Suite Help System.
Identifying Help Files for Customization
Help files are downloaded by file name. To identify the specific file that you want to customize, open the document in the Oracle E-Business Suite Help System. Use the view source function of your browser to view the HTML source code. The source information will include the file name.
To identify the language and product of the help file, use the source document URL. The final three nodes of the source document URL are the language, the product name, and the anchor or target name.
Using this document again as an example, you will see the final three nodes of the URL are /US/FND/@ht_updown#ht_updown. This identifies the language as US, the product group as FND (Oracle Application Object Library), and the target name as ht_updown.
Note: The syntax in the URL, @ht_updown#ht_updown, is an example of the Oracle E-Business Suite special syntax used to link documents by anchorname. For more information about this syntax see Linking Help Files.
The Oracle E-Business Suite Help System also provides reports to cross-reference target names and help file names. See Creating Reports.
Downloading Help Files
You download help files by language and by product. That is, you select the language (for example, US for U.S. English) and you select the product (for example, AR Oracle Receivables). It is important to note the two-letter code for the product (in this example, the two-letter code is AR) because the product code determines the download directory.
To download files, navigate to the Help Download page. This page is listed under Help Administration available under the seeded System Administration responsibility.
Follow these steps to download a single help file:
-
Select Single File Download.
-
Enter search criteria for the file you want.
-
Select the file you want from the search results, and select Download.
Follow these steps to download multiple help files:
-
Select Bulk Files Download.
-
Enter in the Target Directory and Filter Options as appropriate.
-
Select Download.
Uploading Help Files
Once you have customized the help files, use the Help System Utility to upload the documents into the help system. Your files are uploaded from the upload directory specified in the profile option Help Utility Upload Path.
You can upload different types of files, including:
-
HTML files (all HTML files must have a .htm extension)
-
GIF graphics files (must have a .gif extension)
-
Adobe® Acrobat files (must have a .pdf extension)
-
Cascading Style Sheets (must have a .css extension)
Follow these steps to upload a single help file.
-
Copy the customized file to a directory accessible from your desktop. .
-
Navigate to the Help Upload page. This page is listed under Help Administration available under the seeded System Administration responsibility.
-
Select Single File Upload.
-
Specify the application under which this help file belongs.
-
Specify the customization level (100 and above indicates a custom file; below 100 indicates a file from Oracle).
-
Select Upload.
Follow these steps to upload multiple help files:
-
Copy the customized files to the appropriate product folder in the upload directory.
-
Specify the application under which these help files belong.
-
Specify the customization level (100 and above indicates a custom file; below 100 indicates a file from Oracle).
-
Select Upload.
Creating Reports
The Help System Utility provides two reports for you to cross-reference help targets and file names.
Help Target to File Names Report This report lists by target, each file that contains the target, the document title of the file, and the product.
File Name to Help Targets Report This report lists every file name and document title by language and product and all the targets found within each file.
Follow these steps to run these reports:
-
Navigate to the Help Reports page. This page is listed under Help Administration available under the seeded System Administration responsibility.
-
Select the report you want to run.
-
Select the desired application, language, and output format.
-
Click Go.
Linking Help Files
The Oracle E-Business Suite help system supports a special syntax for hypertext links that keeps them working even when files are renamed or split into parts. The special syntax, which is explained in detail below, looks like this:
For more about widgets, see <A HREF="@widgets#widgets">All About Widgets</A>.
Oracle E-Business Suite help files use this syntax, and you can use it too in your custom help files. Or if you prefer, you can always use conventional hypertext links based on filename.
Linking Help Files includes the following topics:
Special Link Syntax
Links in Oracle E-Business Suite help files point, not at a particular filename, but rather at one of the named anchors contained in the file. The Oracle E-Business Suite help system resolves anchorname to file dynamically, every time a link is negotiated.
Information on which files contain which anchornames is put into the help system automatically on upload. Authors must ensure that anchornames are unique across an application's help files to prevent duplicate links. In return, they need never worry about a change in filename breaking their links.
Named Anchors in Conventional HTML
By named anchor is meant the following kind of HTML tag:
<A NAME="anchorname"></A>
Named anchors can be placed anywhere in the body of an HTML file, and are typically used for links internal to the file in question. A pound sign (#) is placed before the anchorname in the link that points at it.
For example, you would use HTML like the following to allow users to jump forward to a section with the anchorname of "widgets":
For more about widgets, see <A HREF="#widgets">All About Widgets</A> below.
<A NAME="widgets"></A> <H2>All About Widgets</H2>
Extended to Support Interdocument Links
Oracle E-Business Suite help files extend this conventional HTML syntax to create links not only within, but also between help files. To link to a file that contains a particular named anchor, you simply place an at sign (@) before the anchorname. To link to the precise spot within the file where this anchor appears, you append a pound sign followed by the anchorname, just as you would in conventional HTML. This results in the following special syntax:
<A HREF="@anchorname#anchorname">link text</A>.
For example, to link to the file that contains the "widgets" anchor illustrated above, at the point in the file that this anchor occurs, you would use HTML like the following:
For more about widgets, see <A HREF="@widgets#widgets">All About Widgets</A>.
If you simply want to link to the top of the file that contains this anchor, you can omit the pound-sign segment "#widgets."
Links in Oracle E-Business Suite help files rarely omit the pound-sign segment. This means that however topics are rearranged within or among files, links to these topics from other files always go to the proper file, and to the precise spot within the file where the topic occurs.
Caution: Do not use case to make distinctions between anchornames. Unlike most web browsers, the Oracle E-Business Suite help system treats anchornames in a case-insensitive fashion.
Cross-Application Links
In the Oracle E-Business Suite help system, all help files associated with a particular application exist in the same directory, as far as their URL is concerned. Help files associated with other applications exist in directories named after the application's short name. All these application directories are at the same level in the help system.
To create a link that goes to a help file associated with a different application, you create a relative link that goes up a level to the parent of all help application directories, and then back down through the other application's directory, before concluding with Oracle E-Business Suite's special link syntax. This results in the following cross-application link syntax:
<A HREF="../shortname/@anchorname#anchorname"> link text</A>
For example, if the "All About Widgets" topic illustrated above were an Oracle Payables help topic, and you wanted to link to it from an Oracle General Ledger help file, you would use a link like the following, where AP is Oracle Payables' short name:
For more about widgets in Oracle Payables, see <A HREF="../AP/@widgets#widgets">All About Widgets</A>.
When used in this fashion, application short names are case insensitive.
Note: These application help directories are merely "virtual" directories recognized by the Oracle E-Business Suite help system when used in URLs. All files are actually stored in the database, with application short name being one attribute among many associated with them.
Oracle Payables' official short name is SQLAP. This has been shortened to AP for the virtual directory used in the Oracle E-Business Suite help system. Similarly, Oracle General Ledger's official short name of SQLGL has been shortened to GL, and Oracle Assets short name of OFA has been shortened to FA.
Related Topics Links
Links are not limited to a single target in the Oracle E-Business Suite help system. You can point your links at multiple topics and files by using the following syntax:
<A HREF = "@anchorname1,anchorname2,anchorname3"> Related Topics</A>
When a user negotiates the link, a page headed "Related Topics" appears, containing a list of the page titles corresponding to these anchornames, with each title linked to the file in question.
To include cross-application links, simply prefix the application short name and a colon to the anchorname:
<A HREF = "@anchorname1,shortname:anchorname2,anchorname3"> Related Topics</A>
Context-Sensitive Help
When you ask for help in Oracle E-Business Suite, the topic for your current window opens. If you ask for help from a report parameters window, your help file opens to a discussion of that report.
Oracle E-Business Suite help files contain special anchornames to enable these context-sensitive links. When calling help from an Oracle E-Business Suite Forms-based window, Oracle E-Business Suite looks for an anchorname based on the form name and the window name combined as follows:
<A NAME="form_name_window_name"></A>
You can override the form_name portion of the anchorname by specifying a HELP_TARGET parameter in the parameter field of the Form Functions window. Use the syntax HELP_TARGET = "alternative_form_name". See: Form Functions, Oracle E-Business Suite System Administrator's Guide - Security.
When calling help from an Oracle Application Framework (HTML-based) window from the global Help button, the anchorname follows this syntax:
<A NAME="appShortName_packageFunctionalComponent_pageName"></A>
For more information on coding for the global Help button, refer to the documentation listed in the Oracle Application Framework Release Notes, Release 12.1.3, My Oracle Support Knowledge Document 1087332.1.
When calling help from a report parameter window, Oracle E-Business Suite looks for an anchorname constructed as follows:
<A NAME="SRS_concurrent_program_shortname"></A>
Updating the Search Index
Oracle interMedia Text enables the search feature provided by the Oracle E-Business Suite help system. Run the concurrent program Rebuild Help Search Index to rebuild the search index after uploading customized documents. This ensures that they will be included in any searches your users perform.
Customizing Help Navigation Trees
You use the Help Builder applet to customize the help navigation trees that appear in your browser window's navigation frame when help is invoked.
Caution: With each new release of Oracle E-Business Suite and each patch you accept, you will need to reapply your changes to any updated help navigation trees you have modified, if you want access to the latest information. In addition, Oracle does not provide any mechanism for identifying changes between releases of Oracle E-Business Suite help navigation trees.
You can use the Help Builder to perform the following tasks:
For help understanding the information associated with each of the Help Builder's fields, see Help Builder Window Reference.
Accessing the Help Builder
To access the Help Builder, use the seeded responsibility System Administration and navigate to the Help Builder under Help Administration.
The Help Builder User Interface
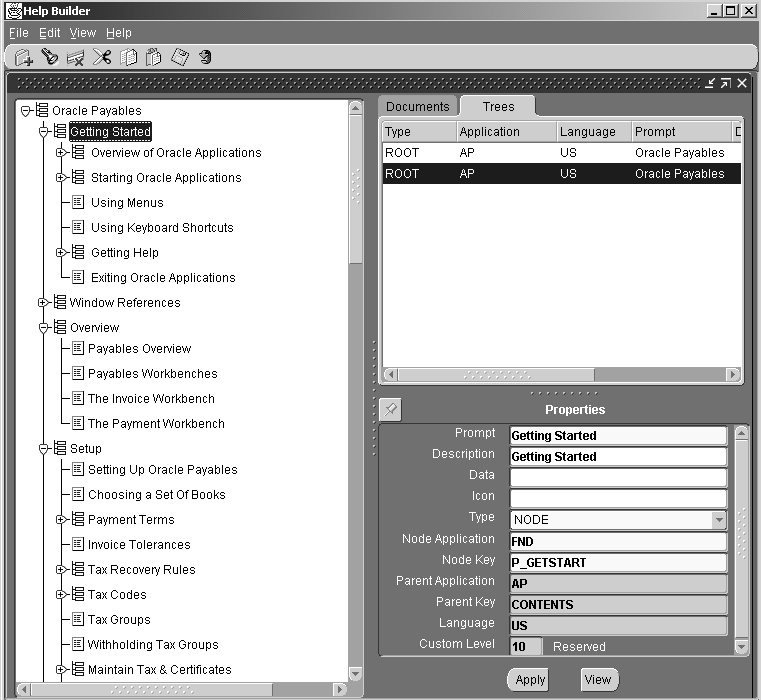
The Help Builder window default view consists of three panes. The left pane displays the tree that is currently selected. Use this area to manipulate your tree by adding nodes, deleting nodes, and dragging nodes into the positions desired. The top right pane displays items matching the searches you have performed using the Find Documents or Find Trees functions. Click on the Trees or Documents Tab as appropriate. The bottom right pane is the Properties Pane. This area displays the properties of the item (root, node, or document) currently selected. Those properties with enabled fields can be updated.
Help Builder Menus
Help Builder has the following menus:
File Menu
The File Menu provides the following functions:
| Variable | Description |
|---|---|
| New | Creates a new root node. Selecting this option will open the Root Node Properties window for you to enter the appropriate values for your new root node. |
| Open | Opens a tree. Selecting this option will open the Find Trees window for you to enter selection criteria to find the appropriate tree. |
| Save | Saves the current changes. |
| Reload | Reloads the current tree to apply all changes throughout the tree hierarchy. |
| Prints the current tree pane. | |
| Exit | Exits the Help Builder. |
Edit Menu
The Edit Menu provides the following functions:
| Variable | Description |
|---|---|
| New Node | Creates a new node beneath the selected node on the tree. If the selected node is a document, a document node is created. If the selected node is a branch node, a branch node is created. |
| Cut | Cuts the selected item (document or branch node). |
| Copy | Copies the selected item (document or branch node). |
| Paste | Pastes an item beneath the currently selected node on the tree. If the node selected is a document, the item will be pasted beneath it on the tree. If the node selected is a branch that has been expanded, the item will be pasted as a child of the selected node. If the node selected is a branch that has not been expanded, the item will be pasted as a sibling beneath the selected node. |
| Delete | Deletes the selected item. |
| Properties... | Allows you to update the properties of the selected item via the Properties window. The Properties window is identical to the Properties Pane. See Help Builder Window Reference for descriptions of the Properties fields. |
| Preferences... | Allows you to set interface preferences via the Preferences window. The preferences you can set are: Background Color Line and Box Color Default Node Color Default Node Text Color Font Name Font Size |
View Menu
The View Menu provides the following functions
| Variable | Description |
|---|---|
| Node Properties | Enable the check box to display the Node Properties pane (enabled is the default). |
| Toolbar | Enable the check box to display the Toolbar (enabled is the default). |
| Statusbar | Enable the check box to display the Status Bar (enabled is the default). |
| Find Documents | Opens the Find Documents window. |
| Find Trees | Opens the Find Trees window. |
Help Menu
The View Menu provides the following functions:
| Variable | Description |
|---|---|
| About... | Displays information about the Help Builder. |
| Library | Opens the Oracle E-Business Suite Help Library. |
Help Builder Tasks
Opening a tree for editing
-
Open the Find Trees window using one of the following menu options:
(M) File > Open
(M) View > Find Trees
-
Enter your search criteria in the Find Trees window, and click Find.
For example, enter %Payables% in the Prompt field to find the Oracle Payables tree.
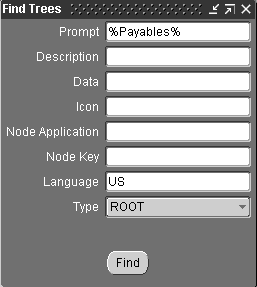
See Help Builder Window Reference for descriptions of the Find Trees search fields.
-
Trees matching your criteria will be displayed in the upper right pane of the Help Builder window on the Trees tab. Select a tree in the list to see its properties displayed in the Properties pane below. Double-click a tree to open it.
The tree's top-level node will appear in the left pane. Expand and contract nodes to display the part of the tree you want to edit.
Adding new help files to a tree
To add new help files to a tree:
-
Click the Find Documents icon on the toolbar, or select Find Documents from the View Menu.
The Find Documents window appears.

See Help Builder Window Reference for descriptions of the Find Documents search fields.
-
Enter your search criteria, select Exclude documents already on a tree, and click Find.
Files corresponding to the information you entered appear on the Documents tab of the upper right pane of the Help Builder window. Select a document to view its properties in the Properties Pane.
-
To add the file to the tree, drag it from the Documents tab and drop it on the tree in the the position desired.
Note: Files containing multiple named anchors appear multiple times. Each Target will have its own listing. Choose the Target that corresponds to the topic you want to add.
If the topic you want to add is not the header target of the file, but a target within the document, you must supply the special link syntax in the Data field of the Properties Pane.
For example, the target name might appear in the Data field as @ht_updown. To link directly to this anchor you would add #ht_updown to the end of the anchorname. The resulting entry in the Data field will be @ht_updown#ht_updown.
For more information about this syntax see Linking Help Files.
Adding new nodes to a tree
-
Select the node beneath which you want to add a new node, and click New Node on the toolbar or select New Node from the Edit Menu.
Note: The New Node feature will add a node that is like the node selected. For example, if a branch node is selected a branch node will be added beneath it. It a leaf node is selected, a leaf node will be added beneath it.
When adding a branch node as a sibling to an existing branch node, be sure that the selected branch node is not expanded. If the existing branch node is expanded, the new node will be added as a child to the selected branch.
-
Enter information for the new node in the Properties Pane, and click Apply.
-
Click Save to save your changes.
Adding nodes from one tree to another
To add nodes from one tree to another:
-
From the View menu select Find Trees.
-
In the Find Trees window select Node from the Type poplist and enter search criteria for the nodes you want to add. Click Find.
Nodes corresponding to the information you enter appear on the Trees tab of the main Help Builder window.
-
Drag nodes from the Trees tab and drop them on the tree.
-
Click Save to save your changes.
Changing the organization of a tree
To change the organization of a tree:
Caution: Changes made to nodes added from another tree are reflected in the original tree and all other trees that include them.
-
To move a node, drag the node from its current location and drop it at its new location in the tree.
-
To delete a node, select it and click Delete on the toolbar or select Delete from the Edit Menu.
-
To change a prompt, select the node, enter the new prompt in the Prompt field of the Properties pane, and click Apply.
Other node properties can be changed in a similar fashion.
Note: If the same node appears elsewhere in the tree, your changes will not appear there until you click the Reload button on the toolbar. For one node to be the same as another, the Node Key and Node Application of their parent nodes must be the same, as well as all their own properties. Their grandparent nodes and above can be different.
Creating a new navigation tree
To create a new navigation tree:
-
Choose File > New.
The Root Node Properties window appears.
-
Enter information for the tree's root node, and click Apply.
-
To view the new tree with context-sensitive help, enter its root as the Help Tree Root for some application, responsibility, or user.
To view it stand alone, substitute its root in the root= parameter at the end of your site's Oracle E-Business Suite Help URL. Include the application short name. For example, for a root named ROOT_INV belonging to the Oracle Inventory product, you would use root=INV:ROOT_INV in the URL.
Help Builder Window Reference
Field names and descriptions for the Help Builder window are given below.
| Variable | Description |
|---|---|
| Application | Application shortname of application that owns the help file. |
| Custom Level | Customization level of the node. 100 is the default for customer use. Levels under 100 are reserved for system use. |
| Data | If the node links to a help file, the file name or a target name preceded by an "@" symbol, or an absolute URL. |
| Description | Longer description of the node, if the Prompt is terse. Otherwise may simply repeat the Prompt. |
| Filename | Pre-upload filename of the help file. |
| Icon | Not used. |
| Language | Language code of help files covered by the node. |
| Node Application | Application shortname of the application that owns this node. If different from the value given for the ROOT, this node and all the nodes it branches into have been grafted into the tree from another application. |
| Node Key | String that uniquely identifies the node in this Node Application. The node key can be generated automatically or typed into the field (for a new node). However, once references to the node exist, the node key cannot be changed. |
| Prompt | The text that appears on the tree for this node. |
| Target | Anchorname contained in the help file. Do not precede with an @ sign in the Find Documents window. |
| Title | Title of the help file. |
| Type | ROOT: Top-most node of a navigation tree. NODE: Node that branches into other nodes, but is not the ROOT. If Data is not null, it links to a help file as well. DOCUMENT: Node that does not branch into other nodes, but simply links to a help file. |
| Version | Version identifier of the help file. |
Customizing Help in a Global Environment
The Oracle E-Business Suite help system contains files translated into many different languages, and localized for diverse countries and regions. If your enterprise crosses linguistic and cultural boundaries, or if you use Oracle Human Resources, the following information may apply when customizing your help files.
Linking Between Different Languages
One level up the virtual directory hierarchy used in Oracle E-Business Suite help URLs are the application directories used to construct cross-application links. Two levels up are the language directories, which you can use to construct cross-language links.
To create a link that goes to a help file in a different language, use the following link syntax:
<A HREF = "../../language_code/shortname/@anchorname#anchorname"> link text</A>
For example, to link to "All About Widgets" in the French version of Oracle Payables help, you would use the following link, where AP is Oracle Payables' short name and F is the French language code:
For more about French widgets, see <A HREF="../../F/AP/@widgets#widgets">Qu'est-ce qu'un widget?</A>.
When used in this fashion, language codes are case insensitive.
Note: After following a link to a different language, users stay in that language until they follow a link back out to their original language. This can be either a link they encounter within a help file, or a link from the navigation tree, which remains in their original language throughout.
Using Oracle Tutor
Oracle Tutor is a documentation tool designed to help companies create and maintain their end user process documentation. Oracle Tutor defines end user process documentation as policies and procedures, instructions, and support documents. Oracle Tutor also provides a system for
-
distributing process documentation to employees by job role
-
customizing Oracle E-Business Suite online Help
-
integrating process documentation with Oracle E-Business Suite courseware
-
building customized Oracle E-Business Suite training materials based on job title or topic
-
auditing process documentation to ensure accuracy and effectiveness
Oracle Tutor is comprised of three components:
-
the documentation methodology
-
model documents
-
software
The Tutor method defines all aspects of the documentation process: the content and format of the different document types, as well as the relationship between documents; the process by which documents are created and maintained; and the methods by which documents are distributed and used for training and reference purposes.
Tutor model documents are complete process documents and courseware that provide a starting point -- document “owners” edit the models instead of creating documents from scratch.
Tutor software includes tools for keeping documents up to date and distributing them on a need to know basis.
-
Author is the tool used by individual document owners to create and edit MS Word documents quickly and easily.
-
Publisher is the tool used to
-
build desk manuals by job title,
-
build student and instructor guides by job title or topic, and
-
ensure document integrity through the generation of a wide range of cross-reference reports.
-
Together, these three components help companies overcome the operational challenges of documenting and maintaining business practices.
For more information, please see the Tutor Author User Manual, the Tutor Publisher User Manual, and the Tutor Implementation Guide.