Interface Repository
This chapter explains the Interface Repository feature and its usage. All Oracle iSetup users can access Interface Repository for searching existing interfaces and users with the iSetup Super User role can register interfaces as well.
This chapter covers the following topics:
- Overview
- Searching for Interfaces
- Registering an Interface
- Updating an Interface
- Example of Data Migration Using Registered Interfaces
Overview
Oracle iSetup provides a central repository where users with the iSetup Super User role can register Generic Loader type of interfaces with Interface Repository. These registered interfaces contained in the AZ_APIS table can be used later in creating custom selection sets. See: Creating a Custom Selection Set.
In addition to interface registration, iSetup Interface Repository also provides search and update features.
For security consideration, the Interface Repository is only available for users with the iSetup Super User role along with the iSetup responsibility.
Prerequisites Before Registering Interfaces:
Before registering the interface, users should perform the following tasks:
-
Create a function of type Interface Method using the Function Developer responsibility.
Use the following naming standards while defining the function code for the different types:
-
Type Generic Loader:
FNDLOAD:<path>
-
Type Extension
EXT:<path>
-
Type Service Bean
EXT:<path>
<path> is the same as that of one entered while registering the interface.
-
-
Create a menu of type Interface and associate the function created in previous step. Make sure to clear the Grant check box.
-
Update the iSetup Super User role by creating a grant and associate the menu created in previous step with the grant.
Searching for Interfaces
Oracle iSetup uses the search feature as the main entry to the Interface Repository.
To access the Interface Repository, select Administration tab > Interface Repository subtab.
By default, you get the Advanced Search page.
Interface Repository Advanced Search
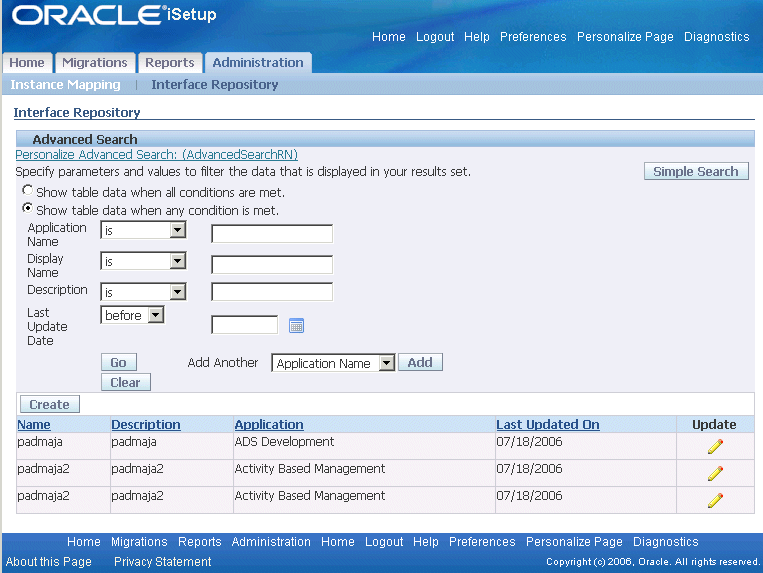
In Advanced Search, you can search on the following attributes of interfaces:
-
Application Name
-
(Display) Name
-
Description
-
Last Update Date
You can also search by user and API type from the Add Another drop-down list along with other criteria you entered. In addition, you can have the search results match any or all the criteria you specify by selecting the appropriate option.
You can use a Simple Search to search interfaces only by name.
Interface Repository Simple Search
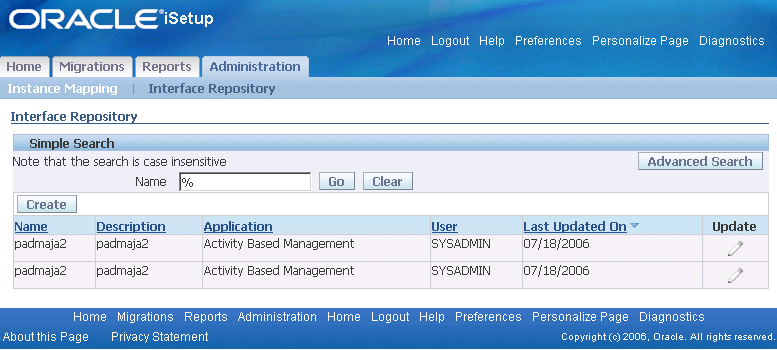
Search Results
Oracle iSetup uses the search results region as the main entry to the Interface Repository. Through the search results, you can update existing interfaces that you have created by clicking appropriate icons.
All interfaces that match your search criteria are listed in a table format. Use the search results page to:
-
View a list of interfaces with name, description, application, user, type, and last updated date
The values in the User column could be the user names who created the interfaces or Oracle for seeded interfaces.
-
Register a new interface with Interface Repository by clicking Create if you have the iSetup Super User responsibility
See: Registering an Interface.
-
Update an interface you created before by clicking the Update icon
See: Updating an Interface.
Registering an Interface
To register an interface, you should have the iSetup Super User responsibility.
Navigate to the Administration tab > Interface Repository subtab and click Create to access the Create Interface page to register new interfaces with iSetup Interface Repository.
These registered interfaces can be used later in custom selection sets. See: Creating a Custom Selection Set and Example of Data Migration Using Registered Interfaces for details.
You can register three different types of interfaces:
-
Generic Loader type
-
Extension type
-
Service Bean type
Generic Loader Type Interface
Register Generic Loader Type Interface
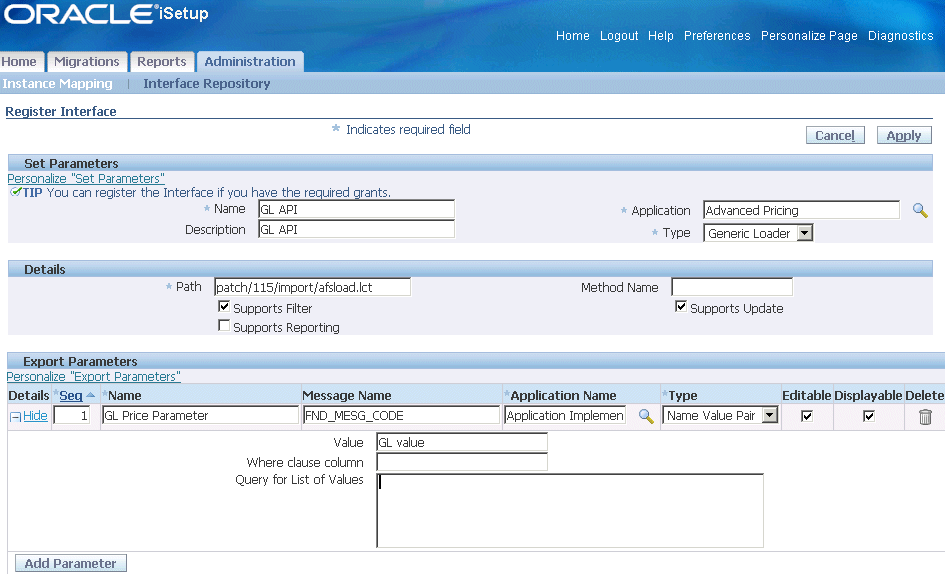
Use the following steps to register a Generic Loader type interface:
-
Enter information in the Set Parameters region:
-
Name: Enter a name for your interface. This is a required field.
-
Description: Enter descriptive information.
-
Application: Select an application that owns the interface from the list of values. This is a required field.
-
Type: Select Generic Loader from the list. Generic Loader indicates that the interface should be LCT based. This is a required field.
-
-
Enter information in the Details region:
-
Path: Provide the path for the interface such as patch/115/import/afsload.lct. This is a required field.
-
Supports Filter: Select this check box to indicate support for filtering and the corresponding filterable attributes can be provided in the Export Parameters region.
-
Supports Update: Select this check box to indicate that interface will update a record in the target instance if it finds a match after validation.
-
-
Click Add Parameter to enter the following information in the Export Parameters region:
-
Seq: Enter the order of this parameter needs to be passed to the interface for export operation.
-
Name: Enter the exact name of the filterable parameter defined in the corresponding LCT file.
-
Message Name: Enter the FND message name for the prompt of this parameter. This message name is used to display the prompt in the selection set while filtering a data object.
-
Application Name: Enter the application that owns the message name.
-
Type: Select one of the following values from the drop-down list:
-
Name Value Pair: If interface expects both name and value as filterable parameter during the export operation.
-
Standalone: If interface expects only name (standard tokens) and does not need to provide a value for the filterable parameter during the export operation.
-
Value: If interface expects only value and does not need to provide a name for the filterable parameter during the export operation.
-
-
Editable: Select this check box to indicate the value of the filterable parameter can be editable while setting the filter.
-
Displayable: Select this check box to indicate the parameter can be displayed as a filterable one to the end user while setting the filter.
-
Value: This field is useful if the Parameter type is Name Value Pair or Value. It's optional for the user to enter a value. If any values are set, then these will be considered as default values for filtering during the export process. This value would be defaulted to % if the user doesn’t enter any value.
-
Query for List of Values: The SQL query entered here will be used to render the list of values while setting the filters for data objects in the selection set.
Your SQL query should have only one column in the SELECT clause.
-
Where Clause Column: You need to provide the Where clause column name if the parameter name is different from the one specified in the SELECT clause of the Query for List of Values field.
-
-
Click the Delete icon if you want to delete a parameter.
-
Click Add Parameter if you want to add another parameter row to the Export Parameters table.
-
Click Apply to validate and save the creation with a confirmation message.
Extension Type Interface
Register Extension Type Interface
Use the following steps to register an Extension type interface:
-
Enter information in the Set Parameters region:
-
Name: Enter a name for your interface. This is a required field.
-
Description: Enter descriptive information.
-
Application: Select an application that owns the interface from the list of values. This is a required field.
-
Type: Select Extension from the list. Extension indicates that the interface should be java class based.
-
-
Enter information in the Details region:
-
Path: Provide the path for the interface such as oracle.apps.az.r12.ext.api.HelloExtAPI. This is a required field.
-
Supports Filter: Select this check box to indicate support for filtering and the corresponding filterable attributes can be provided in the Export Parameters region.
-
Supports Update: Select this check box to indicate that interface will update a record in the target instance if it finds a match after validation.
-
Supports Transform: Select this check box to indicate that the interface is transformable before loading to target instance.
-
-
Click Add Parameter to enter the following information in the Export Parameters region:
-
Seq: Enter the order of this parameter needs to be passed to the interface for export operation.
-
Name: Enter the exact name of the filterable parameter defined in the corresponding Java file.
-
Message Name: Enter the FND message name for the prompt of this parameter. This message name is used to display the prompt in the selection set while filtering a data object.
-
Application Name: Enter the application that owns the message name.
-
Type: Select one of the following values from the list:
-
Name Value Pair: If interface expects both a name and a value as a filterable parameter during the export operation.
-
Standalone: If interface expects only a name (standard token) and does not need to provide a value for the filterable parameter during the export operation.
-
Value: If interface expects only a value and does not need to provide a name for the filterable parameter during the export operation.
-
-
Editable: Select this check box to indicate the value of the filterable parameter can be editable while setting the filter.
-
Displayable: Select this check box to indicate the parameter can be displayed as a filterable one to the end user while setting the filter.
-
Value: This field is useful if the Parameter type is Name Value Pair or Value. It's optional for the user to enter a value. If any values are set, then these will be considered as default values for filtering during the export process. This value would be defaulted to % if the user doesn’t enter any value.
-
Query for List of Values: The SQL query entered here will be used to render the list of values while setting the filters for data objects in the selection set.
Your SQL query should have only one column in the SELECT clause.
-
Where Clause Column: You need to provide the Where clause column name if the parameter name is different from the one specified in the SELECT clause of the Query for List of Values field.
-
-
Click the Delete icon if you want to delete a parameter.
-
Click Add Parameter if you want to add another parameter row to the Export Parameters table.
-
Click Add Parameter to enter the following information in the Import Parameters region:
-
Seq: Enter the order of this parameter needs to be passed to the interface for the import operation.
-
Name: Enter the exact name of the filterable parameter defined in the corresponding Java file.
-
Type: Select one of the following values from the drop-down list:
-
Name Value Pair: If interface expects both a name and a value as a filterable parameter during the export operation.
-
Standalone: If interface expects only a name (standard token) and does not need to provide a value for the filterable parameter during the export operation.
-
Value: If interface expects only a value and does not need to provide a name for the filterable parameter during the export operation.
-
-
Value: This field is useful if the Parameter type is Name Value Pair or Value. It's optional for the user to enter a value. If any values are set, then these will be considered as default values for filtering during the import process. This value would be defaulted to % if the user doesn’t enter any value.
-
-
Click Add Parameter if you want to add another parameter row to the Import Parameters table.
-
Click Apply to validate and save the creation with a confirmation message.
Service Type Interface
Register Service Type Interface
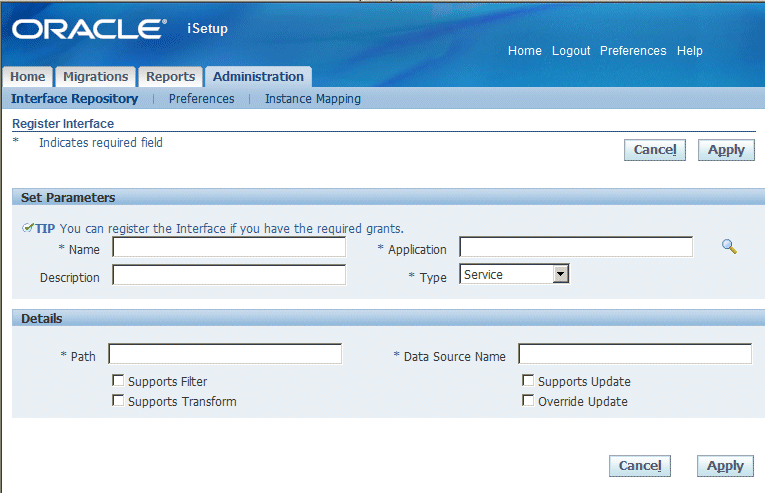
Use the following steps to register a Service type interface.
-
Enter information in the Set Parameters region:
-
Name: Enter a name for your interface. This is a required field.
-
Description: Enter descriptive information.
-
Application: Select an application that owns the interface from the list of values. This is a required field.
-
Type: Select Service from the list. Service indicates that the interface should be AM class based.
-
-
Enter information in the Details region:
-
Path: Provide the path for the interface such as oracle.apps.fnd.framework.svctoolbox.labsolutions.server.SupplierSAM. This is a required field.
-
Supports Filter: Select this check box to indicate support for filtering and the corresponding filterable attributes can be provided in the Export Parameters region.
-
Supports Update: Select this check box to indicate that interface will update a record in the target instance if it finds a match after validation.
-
Supports Transform: Select this check box to indicate that the interface is transformable before loading to target instance.
-
-
Click Apply to validate and save the creation with a confirmation message.
Updating an Interface
Only the interface creator has the privilege to update the interface that he or she created before. The Update icon for the interface will not be enabled if you are not the creator.
To update an interface, select an interface from the search results region and click the Update icon to access the Update Interface window.
You can update the interface information in the Details and Export Parameters regions as well as delete parameter rows if you want; however, you cannot change the interface name, type, and application in the Set Parameters region as they are displayed in read-only fields.
Example of Data Migration Using Registered Interfaces
To best understand the Interface Repository and custom selection set features, use the following steps as a guideline to migrate data using registered interfaces.
Business Scenario
A need to create a new custom selection set to include a new interface and then use this selection set for Extract and Load processes.
Assumption: There are three different instances available as Central, Source, and Target instances.
Follow the steps to migrate data using registered interfaces:
-
Ensure that Central, Source, and Target instances have the same username with the iSetup responsibility and iSetup Super User role.
-
Ensure the completion of the prerequisites before registering the interface in your Central instance.
-
Register a new interface with iSetup Interface Repository.
See: Registering an Interface.
-
Register the function in the Source for Extract and in the Target for Load processes.
Function of type Interface Method corresponding to the interface needs to be registered in the Source for Extract and in the Target for Load processes.
See: Prerequisites Before Registering Interfaces, Step 1 Create function of type Interface Method for details.
-
Migrate the menu registered.
Create a custom selection set by adding the interface Menus as a data object. Set the filter for Menu Code with the desired criteria. Perform an extract on this selection set from Source instance and then load the extract to Target instance.
-
Migrate the iSetup Super User role which is updated with the new grant.
Create a custom selection set by adding the interface iSetup Super User Role. Perform an extract on this selection set from Source instance and then load the extract to Target instance.
-
Migrate the metadata of the new interface that is registered.
Create a custom selection set by adding the interface iSetup Interface as data object to migrate the interface metadata that is registered. Set the Filter for Interface Code as the Interface Code generated through Interface Repository and Application Short Name as AZ. Perform an extract on this selection set from Source instance and then load the extract to Target instance.
-
Migrate the data using the registered interface.
Create a custom selection set by adding the registered interface as a data object. Set the required filters if there are any and then perform the Extract and Load operations.