Administering Oracle Web Applications Desktop Integrator
This chapter covers the following topics:
- Defining Layouts
- Defining Mappings
- Defining a New Mapping
- Defining a Style Sheet
- Defining Setup Options for Key Flexfields
Defining Layouts
Layouts enable you to customize the user interface presented in your spreadsheet. Use the layout functionality to determine the fields in a spreadsheet, set their positions, and specify default values for the fields.
A layout must be available before you create a spreadsheet in the Create Document flow. Some integrators offer predefined layouts, or you can use the procedure described in this chapter to create a layout.
Note: For some products, the layouts are predefined and preselected. Therefore you cannot select an alternate layout during document creation.
Note: Unless your User is assigned the System Administrator responsibility, you must be granted access to an integrator to modify its layout. Specific form functions grant access to specific integrators. See the product-specific documentation for information regarding access to individual integrator layouts.
Use the Define Layout flow to perform the following:
-
Define a new layout
-
Modify an existing layout
-
Duplicate a layout from the list and save it under a different name. You can then modify this duplicated layout.
-
Delete a layout from the list
Defining a New Layout
Use this procedure to define or modify a layout. The define layout flow consists of the following actions:
-
Select the integrator.
-
Select an existing layout to update or create a new layout.
-
Enter a name for the layout and select the number of headers.
-
Select the fields to appear on the layout, set defaults for the fields, and select the placement of the field as context, header, or line item.
-
Set properties for the layout components including field width or column span, hidden or unhidden, and position.
Define Layout Flow
To access the Define Layout flow: From the Oracle E-Business Suite navigator, select Define Layout. This may be under the Desktop Integration responsibility, or it may be located under a different responsibility assigned to you by your system administrator.
-
Select the integrator. Existing layouts for the integrator will be displayed.
-
Choose Create to create a new layout; or, select an existing layout and choose Update to modify it. To create a new layout based on an existing layout, select Duplicate.
-
Enter a Layout Name and specify the Number of Headers to place across the top of the document.
If your document has one header, all fields that you identify as Header fields will display in a single list. If your layout includes numerous header fields, you may consider defining multiple headers to place them horizontally across the top of your document.
-
Determine the fields to be included in the Layout, their placement and default values. The page displays Required Fields and Optional Fields.
Some integrators offer the option Include Graph of Lines Data. Select the box to include a graph.
All required fields must be included in your layout. Include optional fields by selecting the Select box. The following table describes the options available for the fields in your layout:
Layout Field Options Fields Description Placement Defines the location of the field on the spreadsheet. Choices are Context, Header, and Line. In your spreadsheet: -
Context: Appears at the top of the spreadsheet as read-only, contextual information.
-
Header: Fields whose values do not change for every record you are uploading. This region appears above the line region in the spreadsheet. If you specified multiple headers, select the one you wish the field to display in (for example: Header 1, Header 2, or Header 3).
-
Line: Fields whose values change for every record that is uploaded to Oracle E-Business Suite. The rows of data in this region represent every record that will be uploaded.
Default Types Note that some fields will have defaults predefined. Default Type - Constant Used when the text entered in the Default Value field is used as the default value in the spreadsheet. Default Type - Environment Used to reference an environment variable when setting a default for a field. Values are as follows: -
sysdate: System date
-
database: Name of the current database
-
oauser.id: ID of your current Oracle E-Business Suite user
Default Type - Parameter Used to reference a parameter that your system administrator stores in the form function (Self Service Link) that you use to access the Create Document flow. The parameters that can be referenced are specific to each integrator. See the product-specific documentation for the valid values for the default type. Default Type -SQL Used to run a SQL statement to determine the default for the field. Oracle Web Applications Desktop Integrator runs the SQL statement entered in the Default Value field and automatically populates the spreadsheet with the results. If more than one value is returned from the query, it uses the first value.
You can use the following tokens in the SQL statement for the Default Value field:-
$profiles$.profilename: Returns the value for the current user's profile when you enter the name of the profile option.
-
$env$.userid: Returns the current user ID.
-
$env$.appid: Returns the current application ID.
-
$env$.respid: Returns the current responsibility ID.
-
$env$.language: Returns the current session language.
Default Type - Formula You can enter Excel-compatible formulas as default values for fields. Follow the Excel formula syntax and enclose field names in brackets.
For example: [credit]+[debit]
Note that referencing the field names rather than the cell names prevents your formulas from being corrupted if the order of the fields is changed in the layout. -
-
In the Create Layout page, define display properties for the page components. Use this page to mark fields as Read Only, to Hide fields, and to move the fields up or down in the display order.
-
Protect Sheet - select Yes or No to set the state of the document when downloaded. A protected sheet will allow you to update the data fields but will not allow you to insert rows. The user can change this setting in Excel by selecting Protection from the Tools menu.
-
Stylesheet - select a stylesheet to apply to the document. See Defining a Stylesheet.
-
Apply Filters - select Yes to enable Microsoft Excel filters for the lines region when the document is downloaded. The user can change this setting in Excel by selecting Filters from the Oracle menu.
If you selected the Include Graph of Lines Data check box on the previous page, this page will include a section to enter your graph properties. Enter the following:
-
Enter a graph Title
-
Select the Graph Type: Area, Bar, Column, Line, or Pie
-
Select the Subtype: 3D (three-dimensional) or 2D (two-dimensional)
-
For 2D charts: Enter the titles for the Category (X) Axis and theValue (Y) axis.
For 3D charts: Enter the titles for the Category (X) Axis, Series (Y) Axis, and the Value (Z) Axis.
-
Enter the Category Columns. The data from these columns will be represented on the x-axis. Separate each column name with a comma. Each name entered must be a valid column name occurring in the layout definition.
-
Enter the Series Columns. The data from these columns will be represented on the y-axis. Separate each column name with a comma. Each name entered must be a valid column name occurring in the layout definition.
Context and Header Field Properties
-
Prompt Span - enter the number of columns that the field prompt will span.
Important: For context and header fields, you set the number of columns for the Prompt, Hint, and Data to span. You set the column widths for the fields at the Line level. Therefore, when setting the column spans for a header or context field, be aware that the width of a column is determined by the width of the line fields in the spreadsheet. See Design Considerations.
-
Title - (optional) enter a title for the header.
-
Hint Span - enter the number of columns for the field hint to span. The hint for a field can include the following:
-
* - indicates the field is required.
-
List - indicates that the field provides a list of values. Double-click the field to invoke the list.
-
Data type - the data type for each field is always displayed. For example, Text or Number.
-
-
Data Span - enter the number of columns for the data to span.
-
Hide - select this box if you want the field hidden on the spreadsheet.
-
Read Only - select this box if you want the field to display as a nonupdateable, read-only field.
Line Region Properties
-
Data Entry Rows - enter the number of blank rows to display when the document is generated. The user can add more rows once the document is downloaded to Excel.
-
Width - enter the width of the field in characters.
-
Frozen Pane - use this selection to set the fields that you want to remain visible while you scroll horizontally across the spreadsheet.
-
Read Only
-
Design Considerations
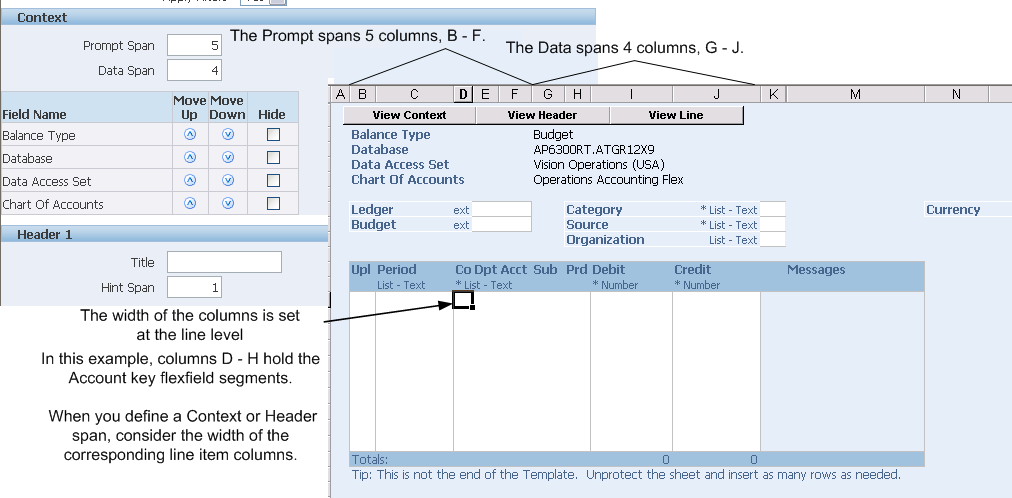
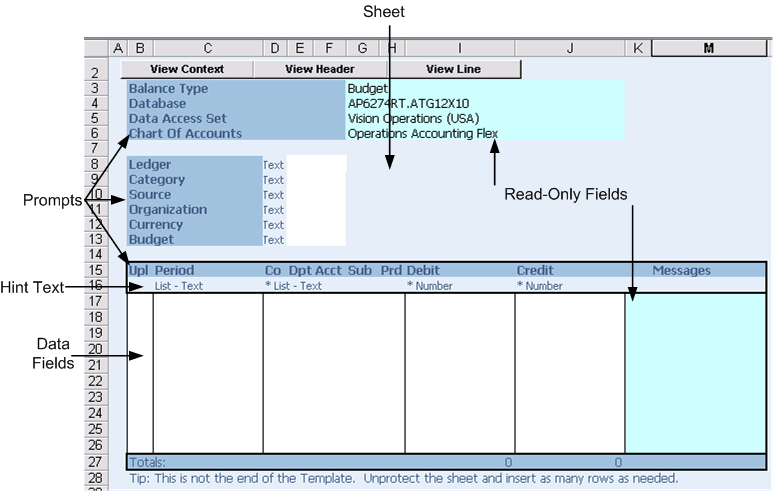
When setting the column spans for context and header fields, you must consider the column widths that are set at the line item level. The following figure shows the layout specifications for the Context fields and how these specifications rendered in the actual document. The Context Prompt Span is defined as 5 columns and the Context Data Span is defined as 4 columns. Note that the Prompt span covers columns B through D:
-
Column B is the automatically generated Upload line item column
-
Column C is the Period line item column
-
Columns D, E, and F are key flexfield segment columns
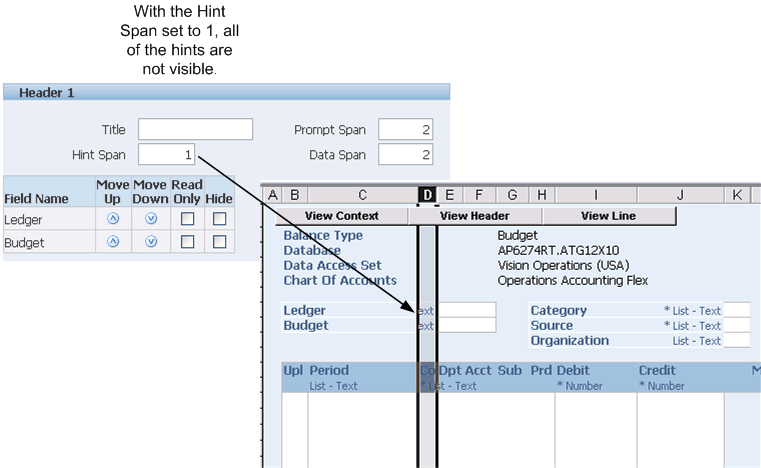
The next example shows the Hint Span for the Header set to 1. In this case because the column that the hint falls into is narrow, all the hints are not displayed. To correct this for this example, expand the Hint Span to 3.
The following figure shows the same document after increasing the Header Hint Span to 3.
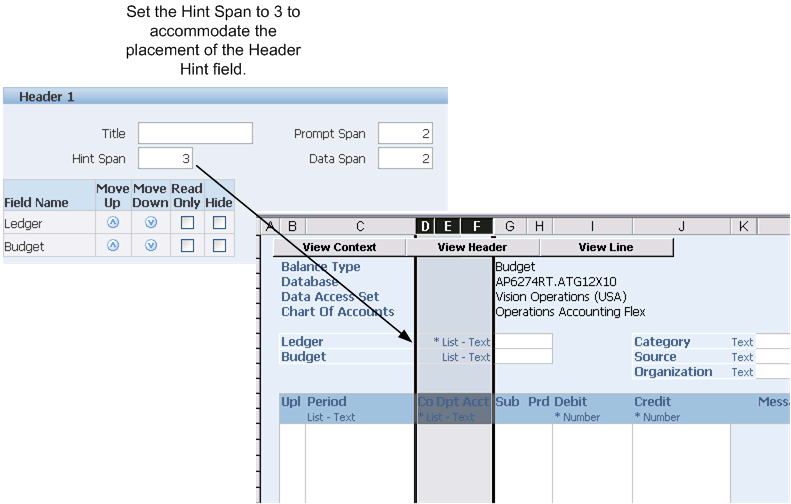
Note that achieving the desired layout may require several iterations, as changing the column spans for the fields in the first header will affect the placement of the fields in the second header. For example, in the preceding figure, when the Hint Span was changed to 3 for Header 1, the Hint text for Header 2 was moved to a narrower column resulting in part of that text being hidden.
Defining Mappings
You can choose to automatically import data into the spreadsheet during the Create Document flow, as discussed in Creating a Document. When you choose to import data on the Content page, Oracle Web Applications Desktop Integrator prompts you to select a mapping. Oracle Web Applications Desktop Integrator requires a mapping in order to determine where imported data should be placed in the spreadsheet.
Mapping associates columns in the imported data with columns in the spreadsheet. You do not need to create new mappings for fields that do not have data, or if a mapped field is not included in the spreadsheet. You need to create multiple mappings for Content only if the associations between the downloaded columns and the fields in the spreadsheet change. If you import text files with varied data structures, you may have to define more than one mapping for each text file variation.
Note: Do not modify Contents that download data from Oracle E-Business Suite.
Note: To modify an integrator's mappings, you must be granted access to the integrator or have the System Administrator responsibility. Specific form functions grant access to specific integrators. See the product documentation for the form functions that must be added to your menu to have access to an integrator's list of mappings.
Defining a New Mapping
Use this procedure to define a mapping between source data and columns in a spreadsheet.
Steps
-
From the Oracle E-Business Suite Navigator, select the Define Mapping link. This may be under the Desktop Integration responsibility, or it may be located under a different responsibility assigned to you by your system administrator.
-
In the Mapping window, select an integrator.
-
In the Select Content window, select a content to import. For example, Text File.
Content indicates the information you will import into your spreadsheet. One or more mappings can be defined for a particular content.
-
In the Select Mapping window, select Define Mapping. Enter a name for the new mapping, and the number of columns to be mapped.
-
In the Define Mapping - Source to Target Columns window, associate columns being imported from the content to fields in the spreadsheet.
-
Click the list of values for the Source Column to view a list of available columns to import, and then enter the search criteria. (If you know the name of the Source Column, you can type it directly into the field without using the list of values.) Click the radio button next to the column name, and then click select to select columns to map.
-
Use the Target Column field next to each Source Column to create a mapping between the two fields. The Target Column list of values contains a list of columns that can exist in a spreadsheet. You may add new rows if more columns need to be mapped. Click the list of values for the Target Column to view a list of available columns to import, and then enter the search criteria. Click the radio button next to the column name, and then click select to select columns to map.
-
Some Target Columns support the translation of ID values from Source Columns. To find out if the translation of IDs is supported by a specific column, select that column and click Lookup. If the column supports the ID translation, a check box appears under Lookup for that column name. To perform the ID translation, select the Lookup check box for the desired columns.
-
-
-
Apply the mapping definition you have created.
Defining a Style Sheet
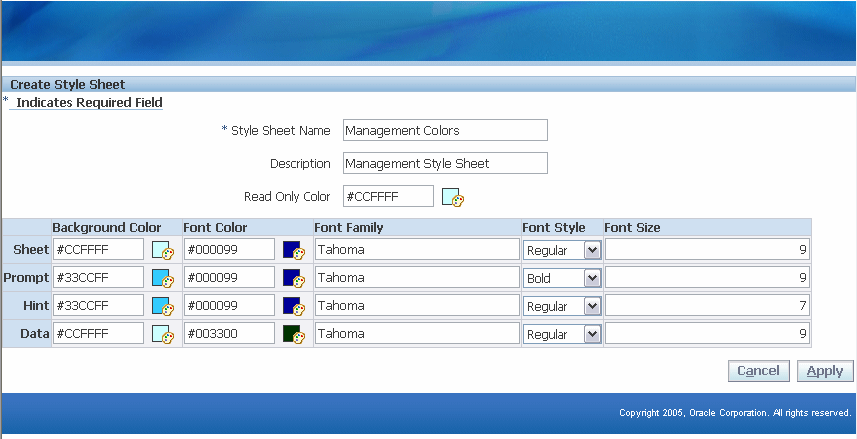
The style sheet enables you to define the colors and fonts to apply to the sheet, the prompts, the hints, and the data fields of your document.
Navigate to the Create Style Sheet page using the Define Style Sheet link. This may be under the Desktop Integration responsibility, or it may be located under a different responsibility assigned to you by your system administrator.
You can define the following properties for the Sheet, the Prompts, the Hints, and the Data fields:
-
Background color
-
Font color
-
Font family
-
Font style
-
Font size
Select a Read Only color to apply to the background of read-only fields. Read-only fields take the font properties of Data fields.
Use the color picker to select a color, or for additional color options, you can enter the hexadecimal value for the color in the field provided. For example, enter #A52A2A for brown.
The following figure shows the style sheet items as they appear on a generated document:
Defining Setup Options for Key Flexfields
Oracle Web Applications Desktop Integrator provides the option to set right-justification and zero padding for every segment of a key flexfield, regardless of this setting at the value set level.
Lists of values for flexfields apply character format masks after a segment value has been selected. These format masks such as right-justify and zero padding and maximum character width are derived from the flexfield value set definition. Use the Oracle Web Applications Desktop Integrator Setup Options feature to override the values specified in the value set definition.
If you set the right-justify and zero-fill format mask for a key flexfield segment, then Oracle Web Applications Desktop Integrator performs right-justification and zero padding on the value entered in the spreadsheet based on the segment length and validates the value according to this option before updating the segment value in the interface table.
Note: If you are migrating from the client-server Oracle Applications Desktop Integrator, this provides the equivalent functionality to the Zero Pad Account Values feature.
To set the right-justify and zero-fill format mask for a key flexfield, or for a specific key flexfield structure:
-
From the Oracle E-Business Suite Navigator, select Desktop Integration, then Setup Options.
-
Choose Select Key Flexfields.
-
To apply the right-justify and zero-fill format mask to every structure of a flexfield, select it from the list.
-
To apply the format mask to specific structures of the key flexfield, choose Select Structure, then select the appropriate structures.
The Overridden column will display the number of structures selected.
Note: If you choose this option, you must not modify the format of the cells for the flexfield segments in the spreadsheet. Oracle Web Applications Desktop Integrator sets a custom number format for the flexfield segments in the spreadsheet to enable zero padding. If you change this format, such as by using the Format Cells menu option within Microsoft Excel, by copying and pasting a cell with a different format, or by adding a character such as an apostrophe (') to the cell value, then Oracle Web Applications Desktop Integrator does not perform zero padding for the value, and the value may fail validation and not be updated in the interface table.