Performing Oracle Install Base Related Tasks in Other Oracle Applications
This chapter covers the following topics:
- Overview
- Using the Order Management Transaction Details Window
- Using the WIP Component Install Window
- Using the Order Management Item Instance Query Window
Overview
Oracle Install Base is integrated with many Oracle applications. This chapter describes the following operations performed in Oracle applications related to Oracle Install Base:
Using the Order Management Transaction Details Window
In the Transaction Details window you can update Oracle Depot Repair with attributes provided for an item that is being sold or returned. In addition, you can update a referenced item instance.
This topic group covers the following topics:
Accessing the Transaction Details Window
Unlike the main interfaces for end users in Oracle Depot Repair, the Transaction Details window is based on forms, not HTML. Therefore the window requires a different access procedure than does the main part of the application.
You access the Transaction Details window through the Sales Orders window as follows:
-
Using the URL, user name, and password provided by your local system administrator, log in to the Oracle Forms mode of Oracle Applications.
-
From the Responsibilities menu, select the Order Management Super User responsibility, and click OK.
-
From the Navigator, choose Orders, Returns > Sales Orders.
The Sales Orders window appears.
-
Enter an appropriate sales order number in the Order Number field to populate the window.
-
In the Line Items tab, select a line.
-
Click Actions.
The Actions window appears.
-
Select Installation Details and click OK.
The Transactions Details window appears.
The Transaction Details Window
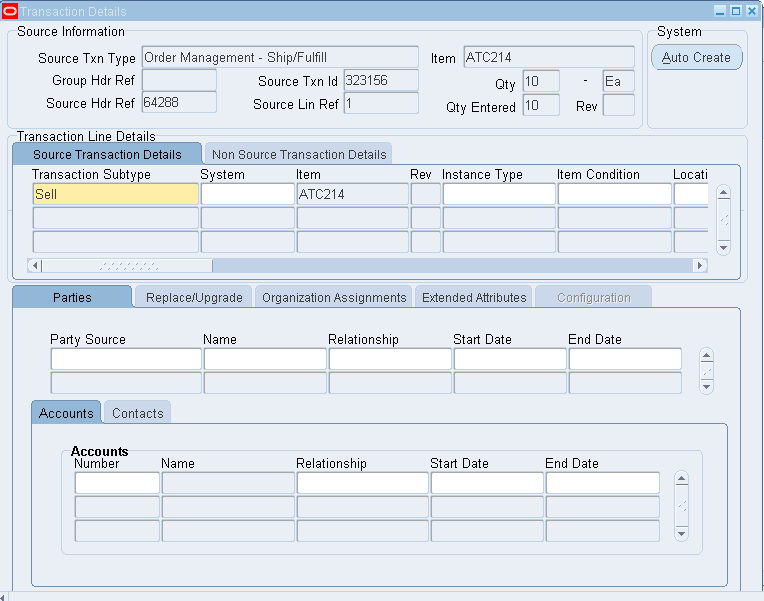
The Transaction Details window is used to specify the transaction type used to update a source instance and non-source instance and to define multiple parties, contacts, accounts, organization assignments, configuration, and extended attributes for the source instance. In addition, a new system can be created for the instance from this window.

Source Information Region
In this region you can define the updates to be made for the item being sold or returned on the sales order line.
System Region
Auto Create Button
Use the Auto Create button to define a new system for the source instance. This process is similar to setting up a system and related information in the system setup in the HTML page. After setup here, you can use the system name to associate it with the source instance.
Transaction Line Details Region
Source Transaction Details Tab
Use this tab to specify the attributes and transaction type for the item displayed in the Source Information region. This tab provides for specifying the Oracle Depot Repair transaction subtype, which is defined in the subtype name of the transaction type and subtype setup window. In that setup, the kind of actions that can happen to a source instance and its related non-source instance has already been defined. An LOV displays only the subtypes defined for this source application.
This window can also be used to specify system, item, revision, instance type, item status, location type, installation location, installation date, serial/lot number being processed, instance number being referenced, in service date, external reference, version label, start date, and end date. For the instance, the following can be defined: party, configuration, organization assignment, extended attributes, accounts, and contacts. At the right-hand side of the window is a check box named Cascade Ownership, whose value defaults from an Oracle Install Base Install Parameter. If this is selected, then whenever ownership of an item instance changes for a parent instance, the application cascades the party ownership of the parent to all its children for outbound transactions such as Shipment.
Parties Tab
For a sales shipment line, the owner party is displayed and cannot be changed. In addition, other parties with different relationship types can be specified here for the source instance. Fields include party source, name, relationship, start date, and end date. For each of these parties, the Accounts tab and the Contacts tab can be used to define multiple accounts and contacts for the source item. The Accounts tab includes the following fields within the Accounts region: number, name, relationship, start date, and end date.
Replace/Upgrade Tab
The Replace/Upgrade tab is used to specify the Replaced-by and Upgraded-from relationships between the instance in the source region and the one defined in the non-source region. If this page is used, then the non-source region must be populated.
Org Assignments Tab
Here the various organization assignment such as Service Billed From can be specified for the source instance.
Extended Attributes Tab
If any extended attribute has been defined for this item, instance, or category, then the values for these attributes can be entered here.
Accounts Tab
This tab is used to define accounts for a party. For a shipped item on a sales order line, the owner account default is displayed. In addition, more accounts can be specified for the party of the source instance.
Contacts Tab
This tab is used to define contacts for a party. Multiple contacts can be specified for the same party of the source instance.
Non Source Transaction Details Tab
This tab is used to specify the attributes for the instance that is related to the one displayed in the Source Information region. An example of a non-source instance is an instance being replaced by the one being shipped in the source transaction. You can specify a parent instance and instance number when doing a replacement.
Note: The Transaction Subtype is entered only on source lines in the Source Transaction Details tab. This determines the mandatory attribute values in the non-source lines entered.
The LOV for Parent Instance lists all instances that are parents of the item that you entered in the Non Source Transaction Details tab and are customer items (not internally owned).
If you are replacing the highest node (top-level parent, assembly item) in a hierarchy, then directly enter an instance number without entering a value for Parent instance. This is existing functionality where you can only replace a top-level parent or stand-alone items.
The component replacement functionality includes the Return for Repair scenario where a subassembly has been returned for repair and is either repaired and shipped or a replacement is shipped. You can reference components that are to be replaced whether they are at a customer site or in inventory.
Replacing a Component
The component replacement feature provides functionality to replace components in a hierarchical component-of configuration using Sales Order Installation and Transaction Details windows. Here are some characteristics of the feature:
-
This enhancement addresses the business need of performing actual detachment of old components and attachment of new components in a configuration using a one-step process during sales order entry.
-
New components are automatically covered under parent assembly service warranty contracts.
-
The capability applies to tangible as well as intangible items such as Service or Software License.
The component replacement functionality has the following limitations:
-
Component replacement does not support the addition of new items in a configuration.
-
Component replacement is valid for a one-to-one item replacement or upgrade. No more than one item instance can be replaced or upgraded with a new instance.
-
The item being replaced or upgraded must be in a component-of relationship in a configuration.
-
Component replacement functionality is focused on external customer items and configurations
Business Process for Entering Transactions for Component Replacement
Here is the business process for entering transactions for component replacement:
-
Cause: A need exists to ship an item replacement.
-
Enter a sales order.
-
Create order lines.
-
Enter transaction details (using Oracle Depot Repair windows).
This is where you enter further details of the new item being shipped (optional) and the details of the item being replaced (mandatory).
-
Confirm and book the order.
-
Result: The item is replaced, and the instance information is updated.
Using the Feature: Details For Step 4 in the Business Process
Use the following procedure as an example of entering transaction details for step 4 in the business process. You can use the seeded Replace value for Txn Subtype (transaction subtype) after making modifications as needed.
Prerequisites
Component replacement requires setting up Oracle Depot Repair transaction subtypes in the Transaction Subtypes window:
-
In the Transaction Subtypes region, the Name field must be set to the Replace subtype.
-
In the Source Info region, the value of Status must be Replacement.
-
In the Non Source Info region, the value of Status must be Replaced.
Refer to the Oracle Depot Repair Implementation Guide for details on using the window.
Steps
-
Select Installation Details from the Action button for a sales order line.
This displays the Install Base Transaction Details window.
-
Enter a value of Replace in the Transaction Subtype field in the Source Transaction Details tab.
This tab is used to specify the transaction type to be used for the item being shipped.
-
Click the Parties and Accounts tabs to show the owner and the account respectively.
These values default from the Order Management sales order setup.
-
Click the Non-Source Transaction Details tab.
-
Enter the item number, instance number, and serial number if the item is serialized. If you are replacing a component in a hierarchy, then enter the parent instance first and then select the appropriate component instance. If you are replacing the highest node (top level parent, assembly item) in a hierarchy, then you can directly enter an instance number without entering the parent instance.
-
Click the Replace/Upgrade tab.
-
Select the relationship type Replaced By.
This value is derived from seeded Oracle Depot Repair Relationship Type setup codes. Enter the to-be-shipped item number in the inventory item field.
Note: If you were in the Source Transaction Details tab when you clicked the Replace/Upgrade subtab, then the relationship type shows as "Replacement for."
-
Select the Txfr Components check box if you want the components under the old item instance to be transferred under the new item instance. This feature works only if the new item is a standalone item with no components attached. If the new item has components attached, then the box is ignored and components from the old instance are not transferred.
-
Save your entries.
Following shipment, Oracle Depot Repair creates a replaced-by relationship from the to-be-replaced instance to the to-be-shipped item.
Using the WIP Component Install Window
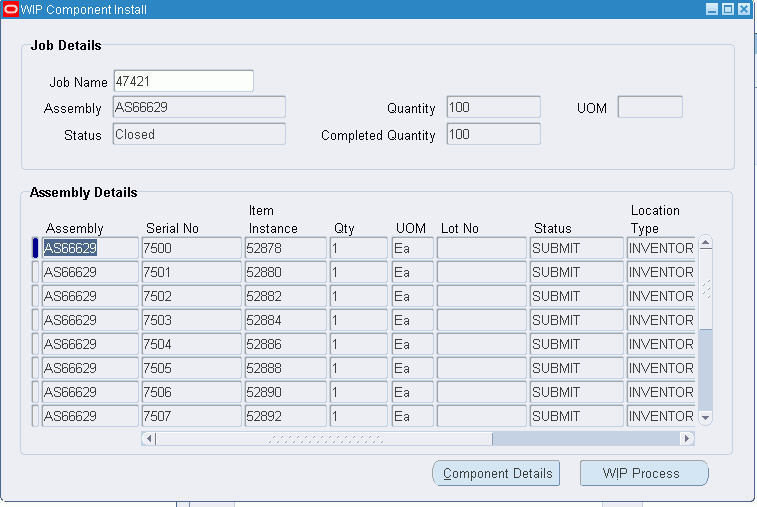
Oracle Install Base configurations are generally created using job requirement quantities. When the issued quantity does not match the job requirement quantity, excess components are left free standing and are not attached as part of an Install Base top assembly configuration. You can use the Install Base component install (WIP) windows to allocate these freestanding or non-allocated components to specific assembly configurations following WIP assembly completion.
Note: With reference to WIP and Install Base integration:
-
Configurations are built only for serialized top assemblies.
-
The functionality is relevant to multi quantity WIP jobs.
Attaching Non-Allocated Components
Use this procedure to allocate free-standing or non-allocated components to specific assembly configurations following WIP assembly completion.
Prerequisites
You must have completed a job and created at least one serialized assembly.
Steps
-
Using the Oracle Install Base Admin responsibility, navigate to IB Component Install (WIP).
The WIP Component Install window appears.

-
Enter a WIP job name.
-
Tab to the next region.
The window displays assemblies created by your job.
-
Click in a row to select a specific assembly to which you want to attach unattached components.
-
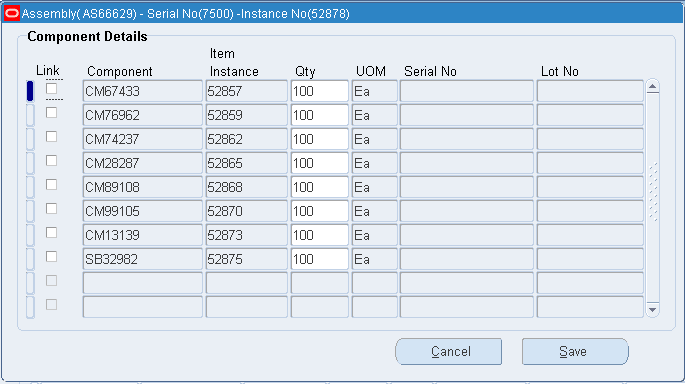
Click Component Details.
The Component Details region of the Assembly window displays unattached components for the job.

-
Select the Link check box for any component that you want to attach to the serial assembly.
-
Click Save to save your changes.
The WIP Component Install window reappears.
-
Click WIP Process to submit a concurrent job to attach components to desired assemblies.
-
Optionally, query the job until it displays an assembly status of Processed, which denotes successful processing.
Using the Order Management Item Instance Query Window
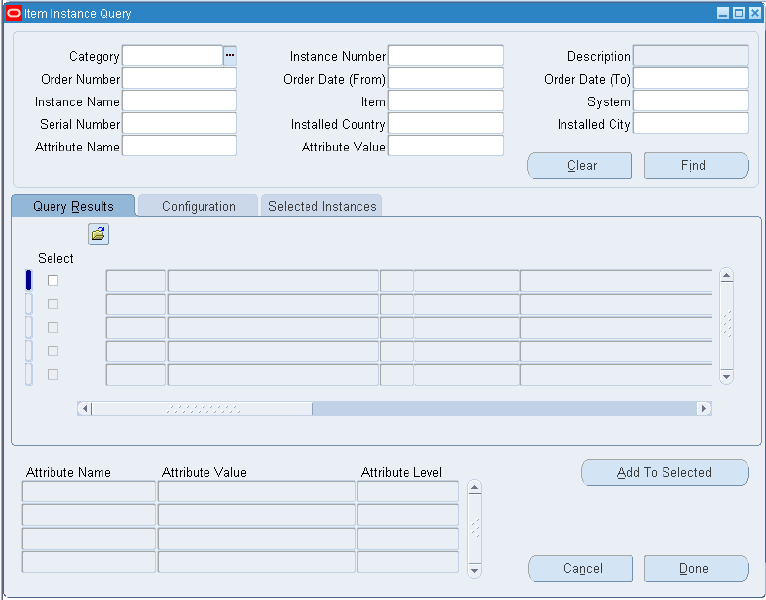
The Item Instance Query window displays existing configured item instances, including attributes and components, primarily to support the Oracle Order Management Telecommunications Service Ordering (TSO) functionality using Sales Orders or Quick Sales Orders windows. The Item Instance Query window provides integration and flexibility in entering TSO changes from multiple sources.
Here are key features of the window:
-
Ability to query instances based on a wide range of query parameters including extended attributes
-
Ability to view configurations, in a tree structure, from the Sales Order window and select those instances where you want the configuration to change
-
When called from the Sales Orders window, the ability to return a PL/SQL table of records for processing by Oracle Order Management
Steps
-
To make a query through Oracle Order Management so that you can return values to that application, perform the steps below:
-
Using the Order Management Super User responsibility, select Orders, Returns > Sales Orders.
The Sales Orders window appears.
-
Create or query an order.
-
Click the Line Items tab.
-
Enter an order line.
-
Click Actions.
The Actions window appears.
-
Select Item Instance Query, and click OK.
The Item Instance Query window appears.

-
-
In the top region, specify the criteria for your instances, and click Find.
The results of the search appear in the Query Results tab. Extended-attribute information for a selected instance appears in the bottom region of the Item Instance Query window.
-
To add an instance from the Query Results tab to the list on the Selected Instances tab, either select its Select box or select the instance and click Add to Selected.
-
In the Query Results tab, select an instance and then click the Configuration tab to see any configuration for that instance.
-
Select any node, either parent or child, and click Add to Selected to add the node to the list in the Selected Instances tab.
-
To remove an instance from Selected Instances, select an instance there and click Remove from Selected.
-
Click Done to close the window, pass a PL/SQL table of selected instances to the calling window if there is one, and clear the PL/SQL table.
The selected instances are not stored in any database table. After you close the window, you cannot go back and add more instances to those that you selected.