Setting Up Source and Destination Instance Data
This chapter covers the following topics:
- Source Instance Setup Data
- Defining Source Instance Item Attributes
- Defining Organization Type
- Associating Field Technicians with Subinventories
- Setting the Part Condition Subinventory Type
- Product – Part Relationships
- Defining Item Relationships
- Destination Instance Setup Data
- Defining Destination Instance Item Attributes
- Mass Attribute Import Capability in the Simulation Set
- Parts Usage View
- Setting up the Supply Chain
- Re-order Point Based Planning
Source Instance Setup Data
The following data is set up in the source instance and collected to the Service Parts Planning tables.
Source Instance Item Attributes
The following item attributes are set up in the repair source organization on Inventory > Items > Organization Item > (T) MPS/MRP Planning.
-
Repair program – Spares Management supports the following repair programs for a given item and repair supplier combination. This information affects both planning repair lead time and generated recommendation messages.
-
Repair Return (pull)
-
Repair Return with prepositioning (push)
-
Advanced Exchange without prepositioning
- Advanced Exchange on PO issue
- Advanced Exchange on Defective Receipt
-
Advanced Exchange with prepositioning
- Advanced Exchange on PO issue
- Advanced Exchange on Defective Receipt
Note: SPP essentially treats the return of defectives and the demand for good parts independently and accounts for each as it occurs.
For more information about Repair Programs see External Repair Execution Management.
-
-
This attribute, expressed in percent, represents the proportion of the item quantity sent to repair that is successfully repaired to specifications for usable parts. This definition is always in the context of the final usable part or product. For example, if item B is created by repairing item A, then planning uses the repair yield for item B when calculating the proportion of defective item A that is successfully repaired.
-
This attribute represents the amount of time that the repair organization requires, in days, to process a defective part into a usable part. This definition is always in the context of the final usable part or product. For example, if item B is created by repairing item A, then planning uses the repair lead time for item B when calculating the lead time offset to repair defective item A.
-
This item attribute check box is used in the Push type of relationship with the repair supplier to indicate that the item’s defectives are physically stored in advance of actual need at the repair supplier’s site. When planning hits a prepositioning point for an item and organization combination, it pushes all existing supply down stream to this point.
The assumption is that the prepositioning inventory process is triggered based on supplier contracts in the execution system. This could include contract constraints, such as shipment size, frequency, and maximum and minimum storage capacity at the repair supplier site. Planning nets through the repair supplier to use up existing, prepositioned defective inventory prior to recommending additional movement of defectives.
Note: In the case of multiple sourcing of repair, Oracle recommends not setting the prepositioning points for multiple item and repair supplier combinations. When multiple source prepositioning relationships are defined, planning moves the entire inventory to the first repair supplier encountered.
Service Parts Planning, however, plans primarily in the Pull mode, which is an on demand type of repair return relationship. SPP does not create plans to preposition inventory.
Related Topics
Defining Source Instance Item Attributes
Defining Source Instance Item Attributes
Several item attributes are set up in the source instance, and then collected for use in Service Parts Planning.
To define item attributes at the repair source organization
-
From the Manufacturing and Distribution Manager responsibility in the source instance, change organizations to the repair source organization.
-
Navigate to the Organization Items form.
Inventory > Items > Organization Item
The Find Organization Items window appears.
-
Find the item, and then click OK.
The Organization Items form is populated with information about the selected item.
-
Navigate to the MPS/MRP Planning tab.
-
At the lower right
-
Select one of the Repair Programs from the list of values.
See External Repair Execution Management.
-
Advanced Exchange on Defective Receipt
-
Advanced Exchange on PO issue
-
Repair Return
-
-
Specify the Repair Yield percentage.
-
Define the Repair Lead Time.
-
Select the Preposition check box, where applicable.
-
-
Click Save.
Source Instance Item Attributes for Service Planning
| Item Tab | Field | Description | Field Type | Default Value |
|---|---|---|---|---|
| MPS/MRP Planning | Repair Program | The repair program relationship for an item and supplier combination | List of Values (LOV): Advanced Exchange on Defective Receipt, Advanced Exchange on PO issue, Repair Return |
Repair Return |
| MPS/MRP Planning | Repair Yield | The yield rate of defectives being repaired, in percent | Number (%) | Null |
| MPS/MRP Planning | Repair Lead Time | Time, in days, required to repair a part | Number | Null |
| MPS/MRP Planning | Preposition Inventory | Indication of whether planning pushes defective inventory to this point | Check box | Not selected |
Defining Organization Type
Because field technicians and internal repair depots are both modeled as inventory organizations, the Organizations form provides an organization type drop down field with values including None, Field Technician, and Depot Repair. This information helps the collection process identify and collect the correct data streams for Service Parts Planning.
For example, the history of outbound shipments to fulfill sales orders and internal sales orders is collected for all organizations. However, for purposes of forecasting shipments to the field, Service Parts Planning considers only the history of shipments to organizations designated as organization type Field Technician.
| Field | Description | Validation | Default Value |
|---|---|---|---|
| Organization Type | Indicates the type of organization for collection, and affects how planning uses the data stream. | LOV contains None, Field Technician, and Depot Repair. | None |
To define organization type
-
From the Advanced Planning Administrator Responsibility, navigate to the Application Instances form.
Admin > Instances
The Application Instances form appears.
-
Select the destination instance.
-
Click the Organizations button.
The Organizations window appears.
-
Select the repair organization. In the Type column, select the organization type from the list of values:
-
None
-
Field Technician
-
Depot Repair
-
External Repair
-
Supplier
-
-
Click Save.
Associating Field Technicians with Subinventories
In Spares Management, technicians are modeled as external organizations. These organizations contain separate subinventory locations for defective and usable parts. Associating field technicians with subinventories ties internal sales orders (for outbound shipments to field organizations) to organizations of type Field Technician.
Oracle Spares Management functionality available from the Allocation Workbench allocates scarce supply to the technicians’ trunk stock, based on internal sales orders and internal requisitions raised by the field technicians.
To associate field technicians to subinventories
-
From the Spares Management responsibility, navigate to the Addresses and Subinventories window.
Setup > Addresses and Subinventories
-
Select the employee resource from the Resource Type list of values.
-
Select the field technician’s name from the Employee Name list of values.
-
On the Addresses tab, enter the employee’s address information.
-
Select the Subinventories tab.
The employee’s name appears as the subinventory owner.
-
On the Subinventories tab, select the field technician organization from the Organization list of values.
-
Select the appropriate subinventory from the Subinventory list of values.
-
(Optional) Specify the part condition for the items stored in this subinventory.
-
(Optional) Specify the effectivity start and end date. The start date default value is today’s date.
-
Click Save.
Setting the Part Condition Subinventory Type
Both defective and usable inventory can exist in the same organization. When the same part exists in two different conditions, you need to differentiate between the usable and the defective stock such that proper netting and sourcing logic can be used to plan the supply chain.
Spares Management uses the subinventory Type to distinguish usable from defective on-hand inventory. Planning collects this data, and appropriately marks the condition of the on-hand stock. Inventory stored in a defective subinventory is marked as Defective. Inventory stored in a usable subinventory is marked as Usable.
To set the part condition subinventory type
-
From the Spares Management responsibility, navigate to the Addresses and Subinventories window.
Setup > Addresses and Subinventories
-
Select the Subinventories tab.
-
On the Subinventories tab, select the repair depot or field technician organization from the Organization list of values.
-
Select the subinventory from the Subinventory list of values
-
Specify the part condition by selecting one of the following Condition list of values:
-
Defective
-
Usable
-
-
(Optional) Specify the effectivity start and end date. The start date default value is today’s date.
-
Click Save.
Product – Part Relationships
You can create product - part relationships based on a data stream, based on a service item, or both. Item relationships defined here are supplied to the repair bill for a product.
Spares Management uses the inventory item relationship called supersession to capture the supersession chain. The supersession definition defines global supersession and repair capability.
The Repair to definition determines:
-
Whether the defective part is repairable.
-
Whether the defective part can be repaired to a higher (more recent) version part in the supersession chain.
In the forward supply chain, which consists of only usable parts, the disposition code default value is Use to Depletion. If you want a disposition code of Scrap, the available on-hand inventory of the superseded item must be moved to a non netable subinventory. In case of a New Buy recommendation, planning always orders the latest revision of the supersession chain. In the reverse supply chain, the Repair to portion of the definition determines the global repair capability for the supersession chain (repair yield and lead times are considered).
Note: Any item can be repaired to itself, without the need for an explicit definition.
Service supply chain planning honors the supersession chain and the disposition code.
Supersession Items and Inline Forecasting.
Forecasts are always generated for the latest (active) supersession item. Service Parts Planning supports supersession effectivity dates when generating the spare part forecasts. When generating forecasts for the latest supersession item, planning considers the history for all superseded items.
For example, today’s date is April 1st. The supersession chain is defined as follows:
A ->A1 -> A2 <- -> A3.
Part A4 supersession of A3 is planned to go into effect in the future, on May 15th.
The forecast for the period April 1st through May 14th is generated for part A3, and is generated for part A4 from May 15th onward. The forecasts are based on history data for parts A through A3.
Planning for Related Items.
When SPP generates a demand plan or a replenishment plan, items that are related as part revisions, supersession items, and components of a Depot Repair work order are planned as a group.
Defining Item Relationships
-
From the Manufacturing and Distribution responsibility, navigate to the Item Relationships window.
Inventory > Items > Item Relationships
After you select an organization, the Find Item Relationships window appears.
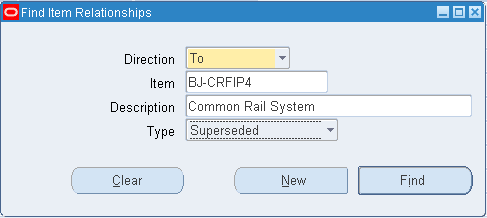
-
To create a new item relationship, click New.
To update an existing item relationship, enter the relationship query criteria, and then click Find.
Tip: If you would like to see existing relationships in both directions, leave the Direction field blank. If you would like to see all types of existing relationships, leave the Type field blank.
The Item Relationships window appears.
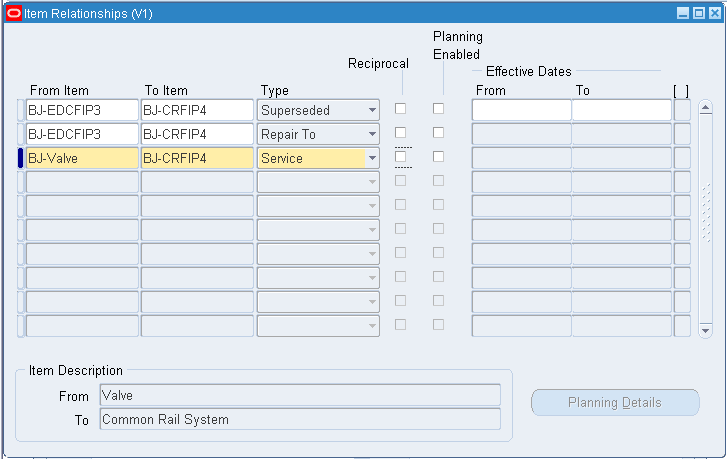
-
To create an Item Relationship, highlight a blank row and select an item to be replaced from the From Item list of values.
-
Select the superseding item from the To Item list of values.
-
Select the desired relationship from the following Type list of values:
-
Superseded - Creates a link in the supersession chain.
-
Repair To - Defines whether the From item can be repaired to a higher revision.
-
-
If the relationship is bilateral, that is, if the transformation can go in either direction, select the Reciprocal check box.
-
(Optional) Specify Effectivity Start and End dates.
-
Click Save.
Destination Instance Setup Data
Destination Instance Item Attributes
The following data is set up in the destination instance:
-
The Planning Time fence causes Service Parts Planning to enforce time fence control for repair items within the repair lead time.
-
The history data series is assumed to be intermittent when the user chooses the Blended forecast method and the Intermittent Demand item attribute is set to Yes OR when the user sets the attribute to ‘Auto’ and the number of zeros is higher than the threshold specified by Intermittency Threshold (see below)
-
Intermittency Threshold
If the attribute ‘Intermittent Demand’ is set to Auto, the threshold set here is used to determine if the demand pattern for the item is intermittent or not.
-
This manually sets service level, in percent, for an item and organization combination. This attribute causes the system to calculate a safety stock for this item to be stored at this location. See Evaluation of Multiple Service Levels Specified on Different Forms.
| Attribute | Description | Field Type | Default Value |
|---|---|---|---|
| Repair Lead Time | This attribute, when set to equal the repair lead time, prevents Service Parts Planning from recommending changes to repair orders dated within this time period. * | Positive Integer | Null |
| Intermittent Demand | This attribute indicates that the demand history for this item contains many null values. This setting triggers special handling in forecasting. | Yes or No | No |
| Service Level | Manual setting triggers calculation of safety stock quantity corresponding to this specified service level. | Number | Null |
| Intermittency Threshold | If the attribute ‘Intermittent Demand’ is set to Auto, the threshold set here is used to determine if the demand pattern for the item is intermittent or not. | Number | Null |
Note: * The repair lead time value can be set in the source instance and then collected, or set in the destination instance. The source instance item attribute appears on the Inventory Items MPS/MRP tab. The equivalent destination instance value is set as an item attribute on the destination instance Item Attributes Mass Maintenance window. When set in both places, for purposes of Service Parts Planning the destination instance value overrides the source instance value when collection runs.
Defining Destination Instance Item Attributes
To define destination instance item attributes
-
From the Service Supply Chain planner responsibility, navigate to the Item Attributes Mass Maintenance window.
Setup > Item Attributes Mass Maintenance
-
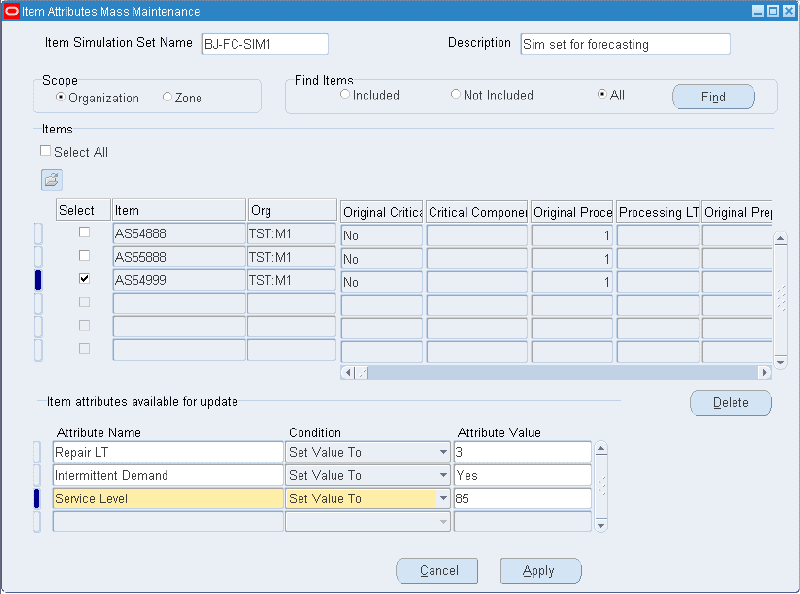
In the header region, enter the Item Simulation Set Name. In the Scope region select the Organization radio button. In the Find Items region, select the All radio button.
-
Click Find.
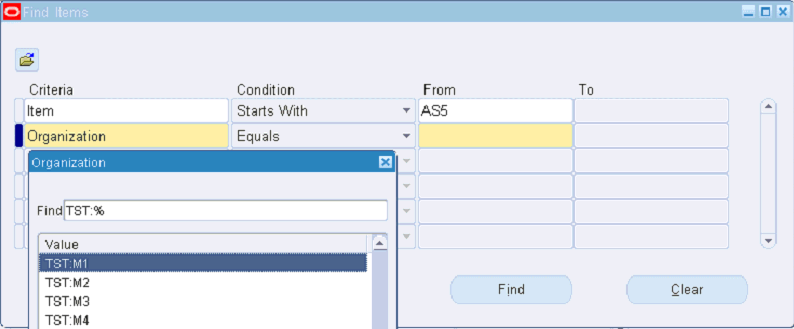
The Find Items window appears.
-
Specify criteria to retrieve the item-organization combinations for which you want to set these item attributes.
-
Click Find.
The Find Item window closes. Item and organization combinations matching the Find criteria are supplied on the Item Attribute Mass Maintenance window.

-
Select one or more items.
-
In the Item attributes available for update region, perform a query to retrieve the desired attributes.
For example:
-
Repair LT
-
Intermittent Demand
-
Service Level
-
-
Click Apply.
Mass Attribute Import Capability in the Simulation Set
The Simulation Set in SPP is used by planners to update item-attributes on the destination. For mass maintenance of this data, a standard format Excel template is provided with the OA template. This .dat file uses a fixed format (similar to Legacy Collections). The first column is the name of the Simulation Set that needs to be updated. (Note: It is therefore possible to update multiple simulation sets simultaneously through a single upload.) The file also contains columns for the Item, Organization, Zone, Customer and all other attributes in the Simulation Set that can be updated.
The planner uses this template to enter, edit, or delete attribute values, then upload the Excel file to mass-update the values for the respective attributes on the items.
See:
-
Item Simulation Set (Mass Maintenance), page 8-17.
Importing the .dat File and Updating the Simulation Set
After editing the .dat file, the planner can Import it back to update the Simulation Set. There is an option in the Service Parts Planning > Setup menu to import the Simulation set.
When the planner selects to import a file, a dialog box appears: Enter the name and location of the flat file that contains the updated attributes to be imported.
When the flat file is imported, the Simulation Set (as specified in the file) is updated as follows:
-
For each Item-Org (or zone / customer, depending on the scope) row available in the Simulation Set and the .dat file, the attributes in the Simulation Set are replaced by the attribute value in the .dat file.
-
If the .dat file has an empty entry for an attribute, the existing value of the attribute is retained.
-
If the .dat file has the text NULL for an attribute, the existing value is cleared so that the collected value is respected.
-
-
For Item-Orgs (or zone / customer, depending on the scope) that are NOT present in the Simulation Set but are present in the .dat file, new rows are created and the attribute values from the .dat file inserted.
-
For each Item-Org (or zone / customer, depending on the scope) present in the Simulation Set but NOT in the .dat file, the import program does nothing.
Parts Usage View
The Parts Usage window provides a where-used view of all the products that consume a given service part during maintenance or service.
To view parts usage, from the Supply Chain Planner responsibility, navigate to the Parts Usage window, or to open the Parts Usage window in context of a selected item, from the Planner’s Worksheet click the Parts Usage icon.
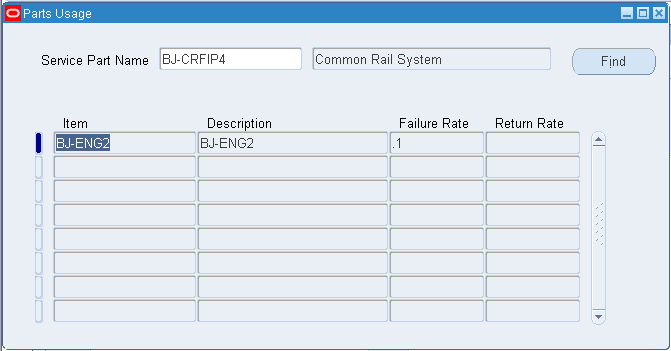
Note: You cannot create product-part relationships here. This relationship comes from the Failure Rates window.
Setting up the Supply Chain
You can define the rules that govern the movement of goods throughout your supply chain. This network is the backbone of your material flow, and you can further control its behavior by defining a time-phased replenishment strategy. Oracle ASCP implements this strategy with sourcing rules and bills of distribution (BODs).
Sourcing rules and BODs both describe sourcing supply; in other words, for any organization, they answer the question Where do I get part A? (They never ask Where do I send part A?) Sourcing rules apply the answer to one organization or all the organizations in your enterprise. BODs define this behavior across multiple organizations (not just one or all).
Defining Sourcing Rules
You can define sourcing rules that specify how to replenish items in an organization, such as purchased items in plants. Sourcing rules can also specify how to replenish all organizations, as when the entire enterprise gets a subassembly from a particular organization.
If there are conflicts in Sourcing, a predetermined hierarchy will resolve the sourcing conflict. For instance, if you assign a bill of distribution to an organization AUS that tells it to source the part from another organization NYC, you can still define a local sourcing rule at organization AUS to source the part from yet another organization SAC. In this case, the local sourcing rule overrides the bill of distribution.
The planning assignment set holds information for:
-
Sales order global distribution
-
Organization-to-organization sourcing
Watch for conflicts between sourcing rules for external demands and sourcing rules for internal demands. For example:
-
External demand for an item is sourced globally from either organizations M1 or M2. The sourcing rule is Transfer from with M1, M2. assigned at the item level
-
Internal demand at organization M1 is sourced from organization M3. The sourcing rule is Transfer from with M3 assigned at the item/org level. The item/org assignment tells the planning engine that this sourcing rule applies to the sourcing for internal demand and not for the external demand.
-
If you assign a sourcing rule for external demand at the item level, then you cannot assign a sourcing rule for internal demand at that level.
For more information on defining sourcing rules, see Defining Sourcing Rules, Oracle Master Scheduling/MRP and Oracle Supply Chain Planning User’s Guide in the Oracle Master Scheduling/MRP and Oracle Supply Chain Planning User's Guide. For information on viewing sourcing rule assignments, see Viewing the Supply Chain, Oracle Advanced Supply Chain Planning Implementation and User’s Guide .
Ship methods apply to Buy from and Transfer from sourcing rules. To create the ship methods:
-
Navigate to Oracle Inventory > Shipping Networks
-
Navigate to the detail region
-
Navigate (M) Tools> Shipping Methods
Defining BODs
You can define BODs that specify a multilevel replenishment network of warehouses, distribution centers, manufacturing centers (plants), and trading partners.
For more information on defining BODs, see Defining Bills of Distribution, Oracle Master Scheduling/MRP and Oracle Supply Chain Planning User’s Guide in the Oracle Master Scheduling/MRP and Oracle Supply Chain Planning User's Guide. For information on viewing BOD assignments, see "Viewing the Supply Chain", Oracle Advanced Supply Chain Planning Implementation and User’s Guide.
Defining Assignment Sets
Once you have defined your sourcing rules and BODs, you must assign them to particular items and/or organizations. These assignments are grouped together in assignment sets. This is where various sourcing strategies define a particular supply chain network.
Each assignment set represents a selection of organizations and/or items you want planned. To influence the planning process, you must include an assignment set in your plan options.
In an assignment set, you can assign your sourcing rules and BODs at different levels, as follows:
-
Item-Instance-Organization
-
Category-Instance-Organization
-
Category-Instance
-
Item-Instance: If the Item field is empty, use the Reduce Criteria Window to restrict the selection.
-
Instance-Organization
-
Instance
These levels allow you to assign a replenishment rule to as many or as few items as possible. For example, a category of items could be defined as packaging material, and a sourcing rule that identifies the suppliers could be assigned to this category.
For more information on assigning a sourcing rule or BOD, Assigning Rules and Bills, Oracle Master Scheduling/MRP and Oracle Supply Chain Planning User’s Guide in the Oracle Master Scheduling/MRP and Oracle Supply Chain Planning User's Guide. For information on viewing sourcing rule and BOD assignments, see Viewing the Supply Chain, Oracle Advanced Supply Chain Planning Implementation and User’s Guide.
Assignment Hierarchy
In the preceding list of assignment levels, rows above override rows below. For instance, Item-Organization overrides Item.
For information on viewing assignments, see Viewing the Supply Chain, Oracle Advanced Supply Chain Planning Implementation and User’s Guide.
Re-order Point Based Planning
Enabling Re-order Point Based Planning
To enable re-order point planning, set the plan launch parameter "Compute SS & EOQ" to Yes (default is No). This tells the planning engine to re-compute the safety stock value and Economic Order Quantity for items that are enabled for re-order point based planning (to enable item-organizations, see below).
| Plan Launch Parameter | Valid Values | Default | Description |
|---|---|---|---|
| Compute SS & EOQ | Yes / No | No | Plan Level control on whether to invoke the code to re-compute Safety Stock Value and EOQ for items planned for based on their re-order point. |
Enabling Item-Organizations for Computation of Safety Stock
Two levels of control determine if the re-order point based planning parameters for an item-organization are re-computed. In addition to the plan launch parameter "Compute SS & EOQ", the item-attribute "Compute Safety Stock Value" determines whether the safety stock value for that item-organization will be re-computed.
This attribute is available on the destination side through the Item Attribute Mass Maintenance form. It can take values of Yes or No, and if left blank, it is interpreted as No.
| Attribute | Valid Values | Default | Description |
|---|---|---|---|
| Compute Safety Stock Value | Yes / No | No | Item Organization level control to determine whether Safety Stock Value for the particular Item-Organization must be re-computed or not. |
The following example illustrates the effect of enabling or disabling this attribute.
| Item | Org | IMM \> Safety Stock Value | Compute Safety Stock Value |
|---|---|---|---|
| Item_1 | TST:M1 | 50 | Yes |
| Item_2 | TST:M1 | 40 | No |
| Item_3 | TST:M1 | - | Yes |
| Item_4 | TST:M1 | - | No |
-
For Item_1, since Compute Safety Stock Value = Yes, SPP will compute a new value for the safety stock and overwrite the 50 units in the IMM > Safety Stock Value field.
-
For Item_2, since Compute Safety Stock Value = No, SPP will retain and respect the target of 40 units.
-
For Item_3, since Compute Safety Stock Value = Yes. So SPP will calculate the safety stock value and update the IMM > Safety Stock Value field.
-
For Item_4, since Compute Safety Stock Value = No, SPP will not calculate the safety stock based on the new program. If Item_4 has an IO / MRP /Non-MRP safety stock target that will be respected.
Enabling Item-Organizations for Computation of EOQ
Two levels of control determine if the re-order point based planning parameters for an item-organization are re-computed. In addition to the plan launch parameter "Compute SS & EOQ", the item-attribute "Compute EOQ" determines whether the Economic Order Quantity for that item-organization will be re-computed.
This attribute is available on the destination side through the Item Attribute Mass Maintenance form. It can take values of Yes or No, and if left blank, it is interpreted as No.
| Attribute | Valid Values | Default | Description |
|---|---|---|---|
| Compute EOQ | Yes / No | No | Item – Org level control to determine whether the Economic Order Quantity for the particular item-organization needs to be re-computed or not. |
The following example illustrates the effect of enabling or disabling this attribute.
| Item | Org | Fixed Order Qty | Compute EOQ |
|---|---|---|---|
| Item_1 | TST:M1 | 1000 | Yes |
| Item_2 | TST:M1 | 1200 | No |
| Item_3 | TST:M1 | - | Yes |
| Item_4 | TST:M1 | - | No |
-
For Item_1, since Compute EOQ = Yes, SPP will compute a new value for the EOQ and overwrite the 1000 units in the IMM.
-
For Item_2, since Compute EOQ = No, SPP will retain and respect the fixed order Qty of 1200 units.
-
For Item_3, since Compute EOQ = Yes. So SPP will calculate the EOQ and update the IMM.
-
For Item_4, since Compute EOQ = No, SPP will not calculate EOQ. SPP will plan orders for this item depending on demands (regular SPP planning).