Horizontal and Advanced Horizontal View
This chapter covers the following topics:
Overview
A horizontal view displays planning data over time. With advanced horizontal view, you can select specific items using the search functionality. Advanced horizontal view also enables you to graphically view your supply and demand information.
Advanced Horizontal View enables you to do the following:
-
Use Oracle Discoverer to query Oracle Collaborative Planning data
-
Customize data display
-
Perform user-defined calculations
-
Define end-user queries (administrators only)
-
View and navigate reports and graphs
Advanced horizontal view enables you to manipulate display data using Oracle Discoverer. You can group and aggregate your planning data in different ways and define custom calculations for supplies and demands. The calculation is created in terms of order types and the sum of the quantities of those order types. After a custom view is created you can edit or delete any portion of your custom view. You must be assigned the Supply Chain Collaboration Administrator responsibility to set up a custom view. Advanced horizontal view enables you to:
-
Search over the time horizon to view details or summaries of planning data.
-
Search on items for collaboration information.
-
Search organizations and sites for collaboration information.
Horizontal View
The seeded horizontal view enables you to view supply and demand information over time. In order to use the horizontal view, you must create a preference set.
The Search Region
You can find a customer, supplier, item, or order in the Search region of the Horizontal View screen. Complete the following steps to filter records based on search criteria:
-
From the Home page of Oracle Collaborative Planning, select the Planning tab.
-
On the Planning page, select Horizontal View. Alternatively, you can select Horizontal View under the Planning category in the right-hand list on the Collaborative Planning Home page.
-
In the Search region, enter your search criteria and select Go.
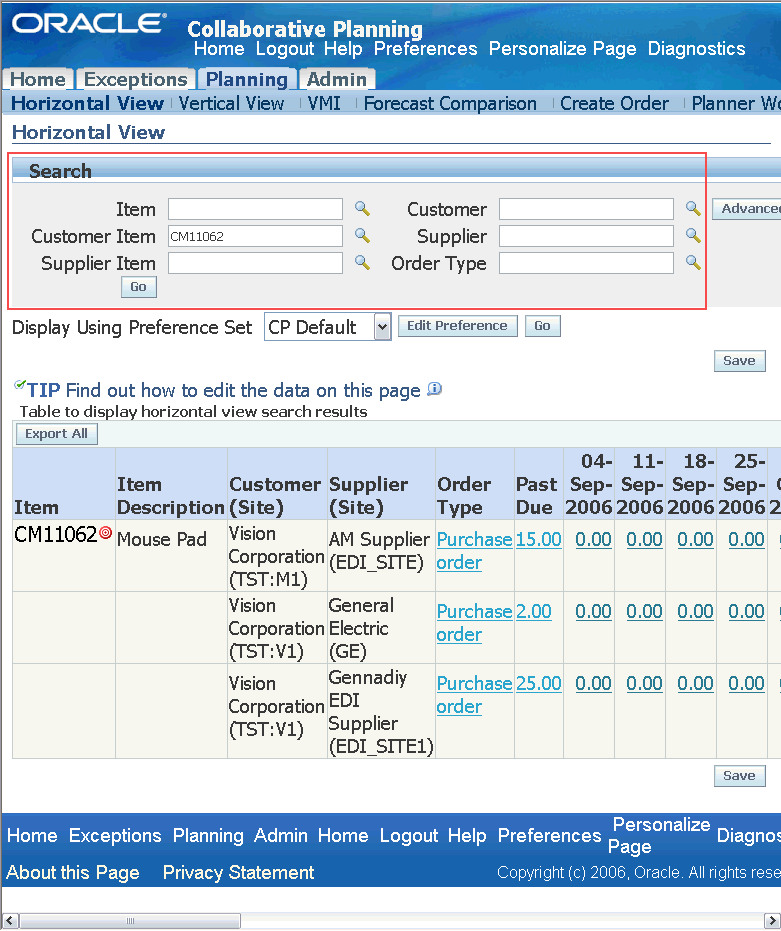
The following example depicts the Search region in the Horizontal View and the search results for the customer item CM11062.
The Horizontal View Screen
Advanced Search
The Advanced Search facility enables you to search planned objects based on multiple and complex criteria.
Complete the following steps to perform an advanced search on the Horizontal View screen:
-
From the Home page of Oracle Collaborative Planning, select the Planning tab.
-
On the Planning page, select Horizontal View.
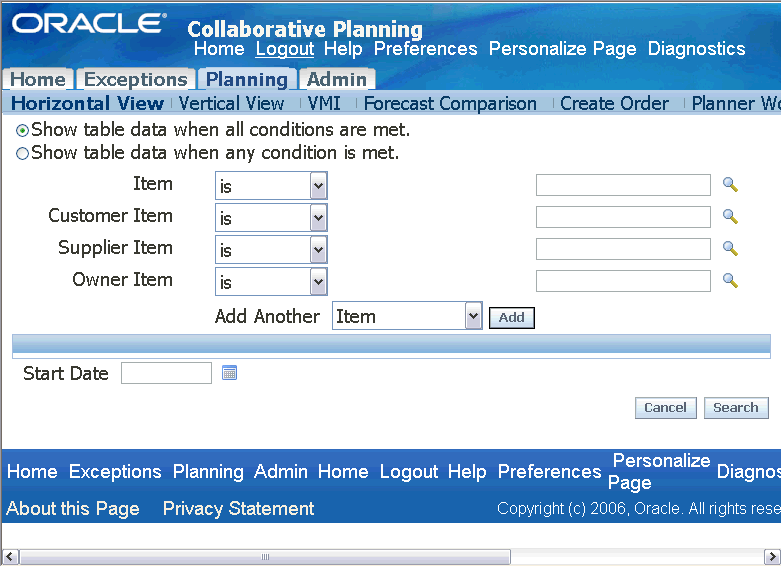
Alternatively, you can select Horizontal View under the Planning category in the right-hand list on the Collaborative Planning Home page and select Advanced Search. The following example depicts the :
Advanced Search Screen for Horizontal View
-
In the Advanced Search screen:
-
To filter the plan data based on all of the search criteria, select the option Search results where each must contain all values entered.
-
To filter the plan data based on any one of the search criteria, select the option Search results where each must contain any value entered.
-
Select a specific Item; customer item, supplier item, or owner item from the drop-down lists.
-
Add a new search field from the Add Another drop-down list if required and select Add. You can now select a search criterion in the added field.
Note: Oracle Collaborative Planning enables you to filter and categorize purchase orders and purchase requisitions based on customers' buyer codes.
To filter records based on buyer codes, select Buyer as a new search field from the drop-down list in the Add Another field on the Advanced Search screen.
-
In the Start Date field, select a start date for time bucketing if required. Note that by default, Collaborative Planning buckets the search results according to your default preference set.
To create a new preference set or edit an existing one, see "Horizontal and Advanced Horizontal View: Preference Sets." For more information about time bucketing, see "Horizontal and Advanced Horizontal View: Time bucketing."
-
Select Search.
-
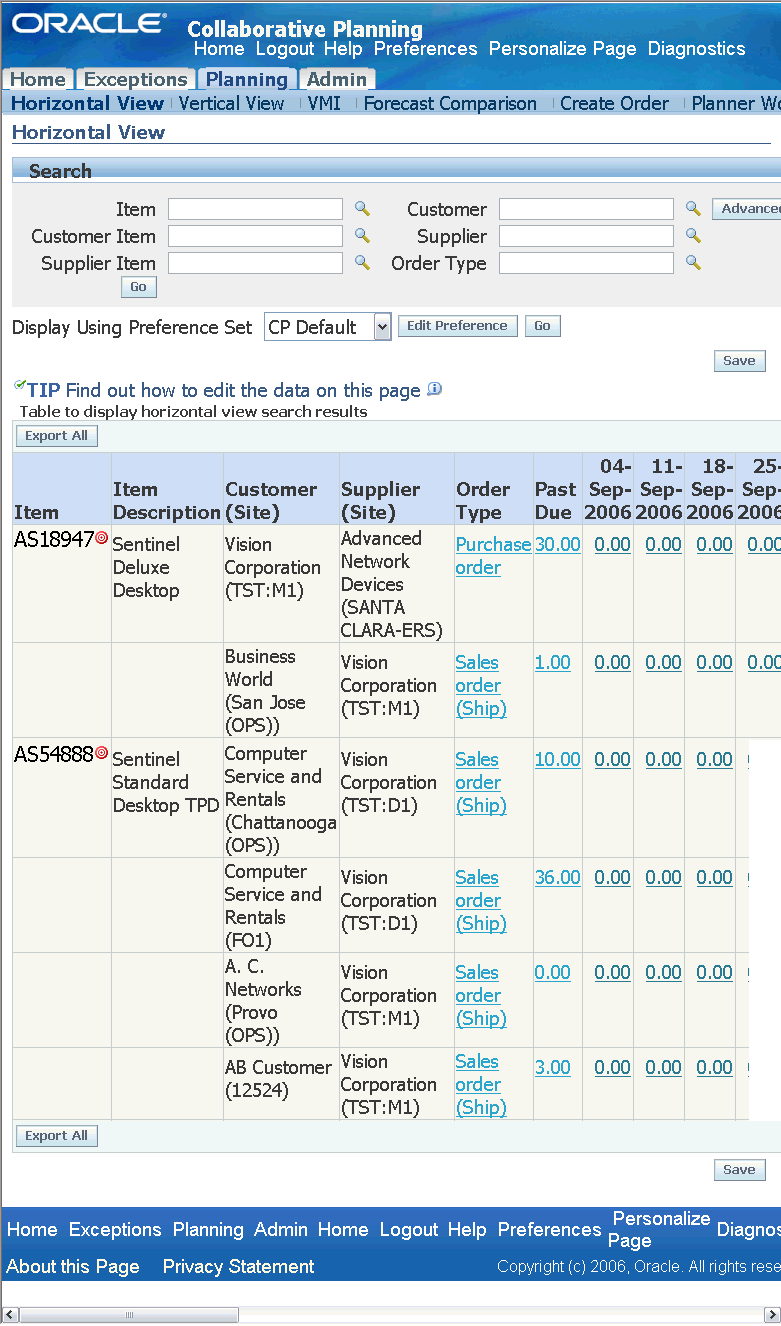
The system retrieves the supply/demand information based on the search criteria and displays them on the Horizontal View screen. The following example depicts the Horizontal View screen after you perform an Advanced Search based on the buyer code "Smith, Mr. Jonathan."
Advanced Search Screen Displaying Search Results
Note: Though the system can filter and categorize records based on buyer code, it does not display the buyer code while displaying the search results.
Note that you can restrict by category set the search results that you want to query in Oracle Collaborative Planning in the Horizontal View, but the system does not display a column for category. To search transactions based on item category, you must set the profile option MSC: Category set for CP Horizontal View in Advanced Supply Chain Planning. For more information about setting up the profile option, see "Setup: Setting Up Buyer Code and Item Category for Advanced Search."
Preference Sets
Before you can view your supply and demand information in the horizontal view, you must determine how to display the data. In Oracle Collaborative Planning, you can create or edit a preference set that enables you to view your data in various ways. For example, you can create a preference set to view data horizontally for only purchase orders and replenishments. A preference set enables you to do the following:
-
Set aggregation with your company and trading partners
-
Display or hide order types
-
Arrange order types in the display
-
Specify time periods (time horizons) over which data is viewed and time buckets
-
Arrange preference sets
Note: When Oracle Collaborative Planning passes information to the horizontal view from different pages, the default preference set you create filters that information. For example, if an order type from Vendor Managed Inventory (supplier or customer-facing) doesn't exist in your preference set, then you cannot view that information in the horizontal view.
Complete the following steps to create a preference set:
-
From the Home page in Oracle Collaborative Planning, select the Admin tab.
-
Select Define User Preferences.
-
Select Create New Preference Set.
-
Enter information in the following required fields:
-
Preference Set Name
-
Company Aggregation
-
Trading Partner Aggregation
-
Graphing Options
-
Display Buckets
-
-
Select any order type(s) from the Available Order Types column and select Move or Move All.
Note: The Sales Forecast order type can be used as standalone or implicit pair with a trading partner's Sales Forecast. Customers and suppliers can post this order type. You have the option of rendering a response to a trading partner's sales forecast if your trading partner has posted one to you. When the option is enabled, then the horizontal view renders a Sales Forecast row. If the option is disabled, then the horizontal view will not render the Sales Forecast row.
-
In the Selected Order Types column, you can arrange your order types in whatever order you wish. Select an order type and select either the up or down arrows to move the order type within the column.
Note: To provide the safety stock and projected available balance to the related trading partners, include Safety stock and Projected available balance order types in the Selected Order Types list.
To view graphical comparison of safety stock and PAB, include the graph Safety Stock/Projected available balance in the Graphing Options list.
-
To set your preference as the default, select the set as the default preference set option. You can make the preference step a public preference set. A public preference set will be available to all users and cannot be made a default preference set.
-
Select Save.
Complete the following steps to edit a preference set:
-
Select a preference set from the Preference Set Details window.
-
Select Go.
-
Edit your preference set.
-
Select Save.
Display CTO Data
Collaborative Planning Horizontal View supports Configure to Order (CTO) solution from Oracle. You can view and analyze configurations under configurations and source them from anywhere in the supply chain. The Collaborative Planning Horizontal View displays the aggregated summary of the supplies and demands for individual configured items based on their parent base models. It helps you to understand the forecast trend and summary view for every base model. The Horizontal View displays the following for configured items:
-
Aggregated values for the supply and demand data for all configurations. Note that,
-
These values are displayed against their respective base model for actual orders.
-
Actual order includes purchase orders, sales orders, purchase requisitions, planned orders, and released planned orders. Note that, none of the actual order quantities are editable.
-
-
Order forecast and supply commit based on the base configuration models.
-
Aggregated bucketed data for all the other order types at the standard item level.
The sum of all the configuration quantities of all the configurations displayed in the Vertical View tab is equal to the model quantity displayed in Horizontal View.
Edit Order Quantities
You can edit order quantities in the horizontal view for orders your company publish. The following order types can be edited in the horizontal view:
-
Sales forecast
-
Sell through forecast
-
Order forecast
-
Supply commit
-
Negotiated capacity
-
Historical sales
If an order forecast is published by a customer to its supplier, the supplier will see a rendered supply commit row (if it has not yet published a supply commit response). The rendered supply commit row is editable, enabling the supplier to acknowledge an order forecast by accepting the values in the supply commit row or by modifying the values and saving changes.
Available Columns
There are several columns displayed using horizontal view. The following table lists those columns and their descriptions:
| Column | Description |
|---|---|
| Items | Items are set up using Oracle Inventory. For more information about item setup, refer to Setup. |
| Customer (Sites) | For more information about customer and customer site setup, refer to Setup. |
| Supplier (Sites) | For more information about supplier and supplier site setup, refer to Setup. |
| Order Type | For more information about supported order types in Oracle Collaborative Planning, refer to Setup. |
| Net Forecast | A calculated column that displays when Display Net Forecast and Total Supply Commit is checked. Net forecast in a bucket = [Order forecast - (PO + Requisitions + ASNs] in a bucket. |
| Total Supply Commit | A calculated column that displays when Display Net Forecast and Total Supply Commit is checked. Net forecast in a bucket = [Supply commit + sales orders)] in a bucket. |
Collaborative Planning Time Bucketing
Overview
Trading partners often require a common time structure to exchange order information for collaboration purposes. Therefore, companies require a specific calendar, which ensures that planning periods evenly divide larger time increments into smaller time increments. The Collaborative Planning time bucketing allows planners to display, use, and summarize transaction data according to site-specific calendars assigned to different trading partners. The site-specific calendar divides weeks evenly into days, months into weeks, and years into months. It uses a 5/4/4 or 4/4/5 week pattern and summarizes data from a weekly level to monthly level. A day always corresponds to a calendar day. Week and month periods always begin on a specified weekday, such as Monday.
Benefits of using site-specific calendar for time bucketing
-
See supply and demand for a location time-bucketed in accordance with a location-specific calendar. This calendar is typically the location-specific receiving calendar or, if it is not defined, the location-specific manufacturing calendar.
-
Post orders specifying a bucket type. The system stores the order quantity based on the bucket type at the daily, weekly, or monthly level.
-
Spread supply and demand data evenly to a specific time bucket and help planners create a more consistent supply and demand statement.
-
Localize data display in the Horizontal View with calendars specific to the inventory organizations and trading partner sites.
-
Compare supply and demand data for similar time periods and resolve the mismatches efficiently.
Setup
The following steps outline the setup for Collaborative Planning time bucketing:
-
Create a workday calendar.
-
Assign the workday calendar to trading partners.
-
Select the default system calendar
Setup in Oracle Bills of Materials (BOM)
Create a workday calendar in the Workday Calendar window. Use the following navigation path to open the Workday Calendar window:
Navigator > Bills Of Materials > Setup > Calendars
Workday Calendar Window
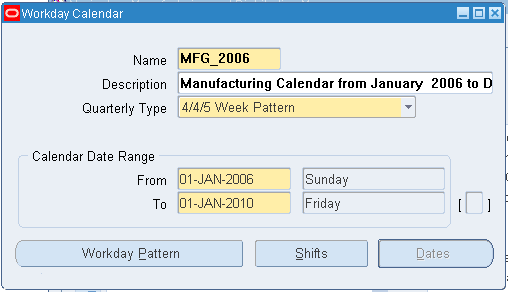
The default system calendar acquires the following attributes from the selected calendar:
-
The start day of a week and month period: Derived from the start date of the calendar.
-
The quarterly type: The quarterly type can have the following periodic divisions indicating the number of weeks in the first, second, and third months of a quarter:
-
4/4/5 week pattern for a quarter
-
5/4/4 week pattern for a quarter
-
Calendar months in a year
-
13 periods in a year
-
For more information on creating workday calendars, see "Creating a Workday Calendar" in Oracle Bills of Material User's Guide.
Note: You can also access workday calendars through Oracle Order Management. Use the following navigation path to open the Workday Calendar window: Navigator > Order Management > Setup > Shipping > Calendars > Enter
Setup in Oracle Order Management
Select the role of the trading partner (Supplier, Customer, Organization, or Carrier) and assign the workday calendar to the trading partner in the Assign Calendars window. Use the following navigation path to open the Assign Calendars window:
Navigator > Order Management > Setup > Shipping > Calendars > Assign
Assign Calendars Window
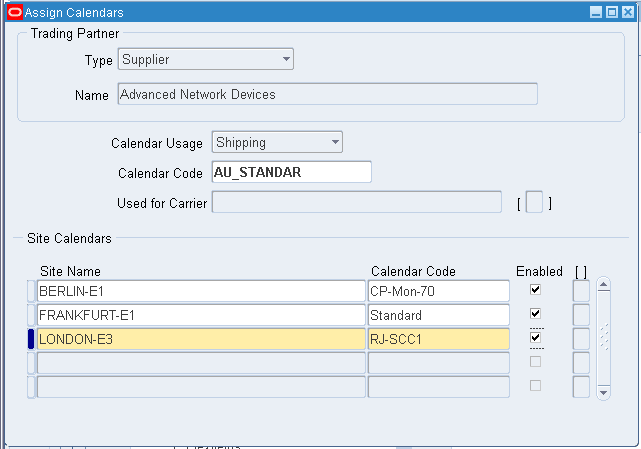
Note that a calendar must be created and defined in the Oracle Bills of Material (BOM) or Oracle Order Management application as a Workday calendar before it can be assigned to a shipper, receiver, or carrier. If the receiving calendar is not defined, the delivery calendar, manufacturing calendar, or the shipping calendar of the supplier site or the supplier organization is used. If none of these calendars is available, Collaborative Planning uses the default system calendar.
For more information on assigning calendars to trading partners, see "Defining Transportation Calendars" in Oracle Order Management Implementation Manual.
Setup in ASCP
Set up profile option MSC: Collaborative Planning Default Calendar to indicate the default system calendar that Oracle Collaborative Planning uses to bucket supply/demand information when multiple customer sites are displayed together.
Select the default system calendar from the list of workday calendars you created earlier in the E-Business Suite source instance. Note that the Collaborative Planning Horizontal View buckets supply and demand data into days, weeks, and months (periods) according to the receiving calendar of the trading partner who receives the material. For more information on the profile options, see "Appendix A: Profile Options" in Oracle Advanced Supply Chain Planning Implementation and User's Guide.
Creating Time Buckets
The following sections discuss the steps to create time buckets:
Step 1: Specify a time horizon
You can specify a time horizon to display order information in Horizontal View preference sets. You can specify a single time bucket such as day or a combination of multiple time buckets. For more information on creating preference sets, see "Preference Sets."
Step 2: Define the first day of the time horizon
The start day of a site-specific week and a site-specific month are always the same. Unlike a manufacturing calendar, the start day on a site-specific calendar does not consider a working day or non-working day specification.
Step 3: Support time aggregation on orders posted to Oracle Collaborative Planning
The trading partners can post orders specifying a calendar date and a bucket type along with other information through the Sales Orders window. For more information on posting orders, see "Order Entry" in Oracle Order Management User's Guide. Oracle Collaborative Planning groups these order records in the following way by obeying the site-specific calendar of the trading partner:
-
The trading partners specify a time range on orders posted to the system through the Create Order page or by uploading a flat file. For more information on the Create Order page, see "Add to Order and Add To Quote Capability" in Oracle Order Management User's Guide.
-
The planning engine determines the start date from the order's key date, such as Ship date and Receipt date.
-
Planners populate the Ship date or the Receipt date based on the order type, and enter an end date while posting the order in the Sales Order window.
-
Bucket type: Day
System creates a record on each day beginning on the start date and ending on the end date.
-
Bucket type: Week
System creates one record for each week on the same weekday (Sunday through Saturday) across consecutive weeks that include the start date and end date.
-
Bucket type: Month
System creates one record for each month on the same day of the month across consecutive months that include the start date and end date.
-
-
The system stores the order at the daily, weekly, or monthly level, depending on the following bucket types:
-
Time bucket specification: Day
System considers the calendar date specified on the order to be its due/availability date.
-
Time bucket specification: Week
System considers the order to be due/available in the week that includes the calendar date specified on the order. Note that the definition of week is derived from the site-specific calendar.
-
Time bucket specification: Month
System considers the order to be due/available in the month that includes the calendar date specified on the order. Note that the definition of month is derived from the site-specific calendar.
-
-
The system retrieves the number of days between order receipt date and the order end date (based on the bucket type) and then spreads the order quantities equally among these days.
-
The system collects the orders and buckets them based on either the ship date or the receipt date of the order. The rules for bucketing are as follows:
-
For transactions between the OEM organization and a supplier, the due date is the receipt date at the OEM organization's dock.
-
For transactions between the OEM organization and a customer, it is the ship date from the OEM organization's dock if the customer controls outbound logistics (for most order types).
-
The receipt date is considered as the due date at the customer's dock if the OEM organization controls outbound logistics.
-
For ASN, Shipment Receipt, Shipment In Receiving order types, the receipt date is always considered as the due date.
-
For Sales forecast and sell-through forecasts, the ship date is always considered as the due date.
-
Note: Each order type in the e-Business Suite has order date, promise date, need by date, request date, and so on. One of these always has the functional meaning of "Due Date." Depending upon the order transaction specification or the customer's setting, the due date is interpreted as follows:
-
The ship date is interpreted as the due date when the material leaves its origin location.
-
The receipt date is interpreted as the due date when the material arrives at its destination location.
Step 4: Segmenting Data into Time Buckets for Horizontal Display
Depending upon the user's preference set, Collaborative Planning uses the following seven possible combinations to segment supply and demand information into time buckets.
| Combination No. | Day | Week | Month |
|---|---|---|---|
| 1 | 1 | 0 | 0 |
| 2 | 1 | 1 | 0 |
| 3 | 1 | 1 | 1 |
| 4 | 1 | 0 | 1 |
| 5 | 0 | 1 | 0 |
| 6 | 0 | 1 | 1 |
| 7 | 0 | 0 | 1 |
First bucket displayed is Day
Combinations 1 to 4 have Day as the first time bucket. In this case, the default start date of the Horizontal View is always the system date. For example, if the first bucket is Day and the system date is January 1, 2003, then the first bucket in the Horizontal View begins with 01-January-2003. The system will summarize and display all records that fall on this day in the Horizontal View.
First bucket displayed is Week
Combinations 5 and 6 have Week as the first time bucket. In this case, the start date of the Horizontal View will be the first day of the week, which includes the system date. To find the first day of the week, the system will refer to the site-specific calendar. The site-specific calendar stores the definition of a week and its start day. All records that fall between the first day of the week and the last day of the week will be summarized in the first weekly bucket displayed. For example, if the first bucket is Week, the system date is January 1, 2003, and the week begins on Monday, then the first bucket in the Horizontal View begins with 30-December-2002. The week will end on 05-January-2003.
First bucket displayed is Month
Combination 7 has Month as the first time bucket. In this case, the start date of the Horizontal View will be the first day of the month, which includes the system date. To find the first day of the month, the system will refer to the site-specific calendar. The site-specific calendar stores the definition of a site-specific month and its start day. All records that fall between the first day of the month and the last day of the month will be summarized in the first monthly bucket displayed. For example, if the first bucket is month, the system date is January 1, 2003, and the month begins on Monday, then the first bucket in the Horizontal View begins with 30- December-2002. The month will end on 02-February-2003.
Step 5: Transition from a Lower Bucket to a Higher Bucket
Oracle Collaborative Planning converts a lower time bucket into a comparatively higher time bucket to aggregate the supply and demand information of the lower time buckets, and then compares it with the supply and demand information from higher time buckets. The system conforms to the conventions for time bucket transition described in the following paragraphs.
Transition from daily to weekly buckets
When the system converts the daily buckets into weekly buckets, the last Day bucket may fall on any day of the week. If the last display day bucket falls in the middle of a site-specific week, extra days are added to complete the week until the time bucket reaches the end of the week. After reaching the end of the week displayed in days, the system will begin displaying data in weekly buckets. The system will look at the site-specific calendar to identify the start and end of the site-specific week where the last Day bucket falls. For example, if the display preference is set to show 1 day and 1 week, the system date is 01-January-2003, and the site-specific week/month begins on Monday, then the system will display 5 daily buckets (from 01-January-2003 until 05-January-2003) before it begins the display of the weekly bucket on 06-January-2003.
Transition from weekly to monthly buckets
When the system converts the weekly buckets into monthly buckets, the last week bucket may fall on any week of the month. If the last display week bucket falls in the middle of a site-specific month, extra weeks will be added to complete the month weeks until it reaches the end of the month. After reaching the end of the month displayed in weeks, the system will begin displaying data in monthly buckets. The system will look at the site-specific calendar to identify the start and end of the site-specific month where the last Week bucket falls. For example, if the display preference is set to show 0 days, 1 week, and 1 month, the system date is 01-January-2003, and the site-specific week/month begins on Monday, then the system will display 5 weekly buckets (from 30-December-2003 until 27-January-2003) before it begins the display of the monthly bucket on 03-February-2003.
Transition from daily to monthly buckets
The system converts the daily buckets into monthly buckets, when the last day bucket falls during the middle of the site-specific month. In such case the system adds extra days until it reaches the end of the month. After reaching the end of the month displayed in days, the system will begin displaying data in monthly buckets. The system looks at the site-specific calendar to identify the start and end of the site-specific month where the last Day bucket falls. For example, if the display preference is set to show 1 day and 1 month, the system date is 01-January-2003, and the site-specific week/month begins on Monday, then the system will display 33 daily buckets (from 01-January-2003 until 02-February-2003) before it begins the display of the monthly bucket on 03-February-2003.
The system can display 36 columns in the Horizontal View. In the previous example, 34 buckets or columns appear in the Horizontal View, and 33 of these are daily buckets. If a user specifies this combination of days and months, the system will run out of available buckets, as the maximum number of buckets displayed is 36. Therefore, it is recommended that you avoid this combination of days and months in your display preferences.
As different customer sites may use different site-specific calendars, the system may find data for two sites with different site-specific definitions while retrieving information based on a query. In this situation, a single customer site displays against the Collaborative Planning default system calendar instead of against the customer site's calendar. The following example explains this situation.
| Calendar Type | Quarterly Pattern | Week/Month Start Day | |
|---|---|---|---|
| Collaborative Planning system | Default calendar | (4-4-5) | Monday |
| Customer site 1 | Receiving calendar | (5-4-4) | Monday |
| Customer site 2 | Receiving calendar | (4-4-5) | Monday |
| Calendar Entries | Start Date | End Date | ||
|---|---|---|---|---|
| Collaborative Planning system | Default calendar | Period 1 | 6-Jan-03 | 2-Feb-03 |
| Collaborative Planning system | Default calendar | Period 2 | 3-Feb-03 | 2-Mar-03 |
| Customer site 1 | Receiving calendar | Period 1 | 30-Dec-02 | 2-Feb-03 |
| Customer site 1 | Receiving calendar | Period 2 | 3-Feb-03 | 2-Mar-03 |
| Customer site 2 | Receiving calendar | Period 1 | 6-Jan-03 | 2-Feb-03 |
| Customer site 2 | Receiving calendar | Period 2 | 3-Feb-03 | 2-Mar-03 |
| Record Number | Customer Site | Date | Quantity |
|---|---|---|---|
| Record 1 | Customer site 1 | 6-Jan-03 | 100 |
| Record 2 | Customer site 1 | 2-Feb-03 | 100 |
| Record 3 | Customer site 2 | 1-Jan-03 | 25 |
We assume that the system date is 7-Jan-03 with the following user preference:
| Days | Weeks | Months | |
|---|---|---|---|
| User preference set | 0 | 0 | 2 |
The Collaborative Planning Horizontal View retrieves transaction data for a time horizon of two months. It uses the start and end dates of the default system calendar. The default system calendar periods are as follows:
| Calendar Type | Calendar Entries | Start Date | End Date |
|---|---|---|---|
| Default calendar | Period 1 | 6-Jan-03 | 2-Feb-03 |
| Default calendar | Period 2 | 3-Feb-03 | 2-Mar-03 |
The Horizontal View retrieves the following records:
| Record Number | Customer Site | Date | Quantity |
|---|---|---|---|
| Record 1 | Customer site 1 | 6-Jan-03 | 100 |
| Record 2 | Customer site 1 | 2-Feb-03 | 100 |
The Horizontal View finds only one customer site and tries to render the data against the customer site's receiving calendar, which has start and end dates as follows:
| Customer site | Calendar Type | Period | Start Date | End Date |
|---|---|---|---|---|
| Customer site 1 | Receiving calendar | Period 1 | 30-Dec-02 | 2-Feb-03 |
| Customer site 1 | Receiving calendar | Period 2 | 3-Feb-03 | 2-Mar-03 |
The Horizontal View then uses the start and end dates of the receiving calendar to query and parse the data. Using the start and end dates of the receiving calendar of customer site 1, the Horizontal View then retrieves the following records:
| Record Number | Customer site | Date |
|---|---|---|
| Record 1 | Customer site 1 | 6-Jan-03 |
| Record 2 | Customer site 1 | 2-Feb-03 |
| Record 3 | Customer site 2 | 1-Jan-03 |
Since two customer sites exist, the Horizontal View resolves the calendar conflict by selecting the default system calendar to display data, yielding the following information:
| Customer site | Date | Quantity |
|---|---|---|
| Customer site 1 | 6-Jan-03 | 100 |
| 2-Feb-03 | 100 |
No data is displayed for customer site 2.
To understand the transition better, consider the following example, which is illustrated by this diagram:
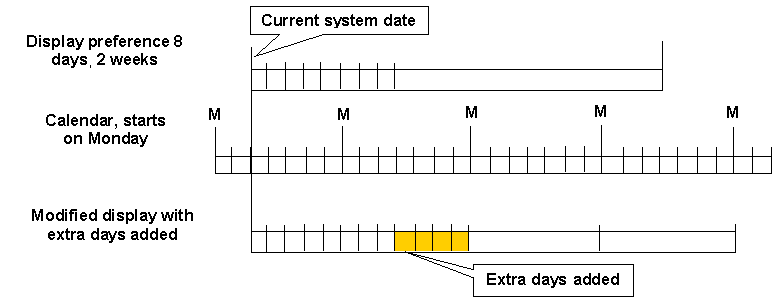
Assume that you have the following time bucketing preferences:
-
Week start day: Monday.
-
Current system date: 31-Jan-2004, Saturday.
-
Your display preference: 8 days, 2 weeks, 0 months.
In this situation, the last day bucket falls on Sunday, 8-Feb-2004. Therefore, the two weekly buckets will start from 9-Feb-2004, and 16-Feb-2004 both on Monday. No adjustment is required in this case.
If you want to look at the same data after two days, when the system date is 2-Feb-2004, Tuesday, the last day bucket will fall on 10-Feb-2004, Tuesday.
The weekly bucket should start from the following day, 11-Feb-2004, or Wednesday. But it is middle of the week. In this case, more day buckets will be added to complete the week and the two weekly buckets will start from 16-Feb-2004, and 23-Feb-2004 (both are Mondays), respectively.
The final bucket pattern in the display will be:
-
2-Feb-2004 (Tuesday) to 10-Feb-2004: Bucket type= Day as per your display preference.
-
11-Feb-2004 (Wednesday) to 15-Feb-2004: Bucket type = Day, extra 4 Day buckets added to complete the week.
-
16-Feb-2004 (Monday) to 29-Feb-2004: Bucket type = Week, as per your display preference.
Similarly, if there is a transition from day to month, (such as in display preference of 8 Days - 0 Weeks - 2 Months), and the last day bucket falls on the middle of the selected calendar's month, extra days will be added to complete the month.
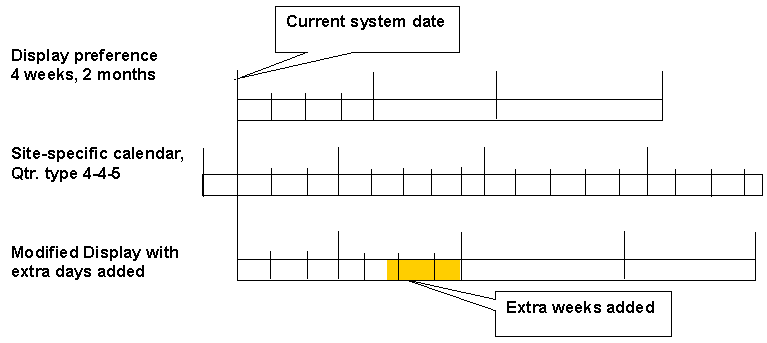
Similarly, for transitioning weekly buckets to monthly buckets, if the last week bucket falls in middle of a month period as defined in the selected calendar, then extra weeks will be added to the complete the month. For example, if the end of 4 weeks (in 0day-4week-2month preference set) falls on 21-Mar-2004 and next month starts from 29-Mar-2004, a week will be added till the end of the month, making your display 0day-5week-2months. The following diagram illustrates this example:
Step 6: Horizontal View Start Day Adjustment According to the Time Bucket
In Horizontal View, start date of the week and month are derived according to the calendar used. The correct calendar is selected based upon the following calendar hierarchy.
-
When the first bucket displayed in the view is specified as Day, the system does not make any adjustments and uses the current system date as the start day in the Horizontal View.
-
When the first bucket displayed in the view is specified as Week, the system adjusts the view to the first day of the current week derived from the selected calendar.
-
When the first bucket displayed in the view is specified as Month, the system adjusts the view to the first day of the current month derived from the selected calendar.
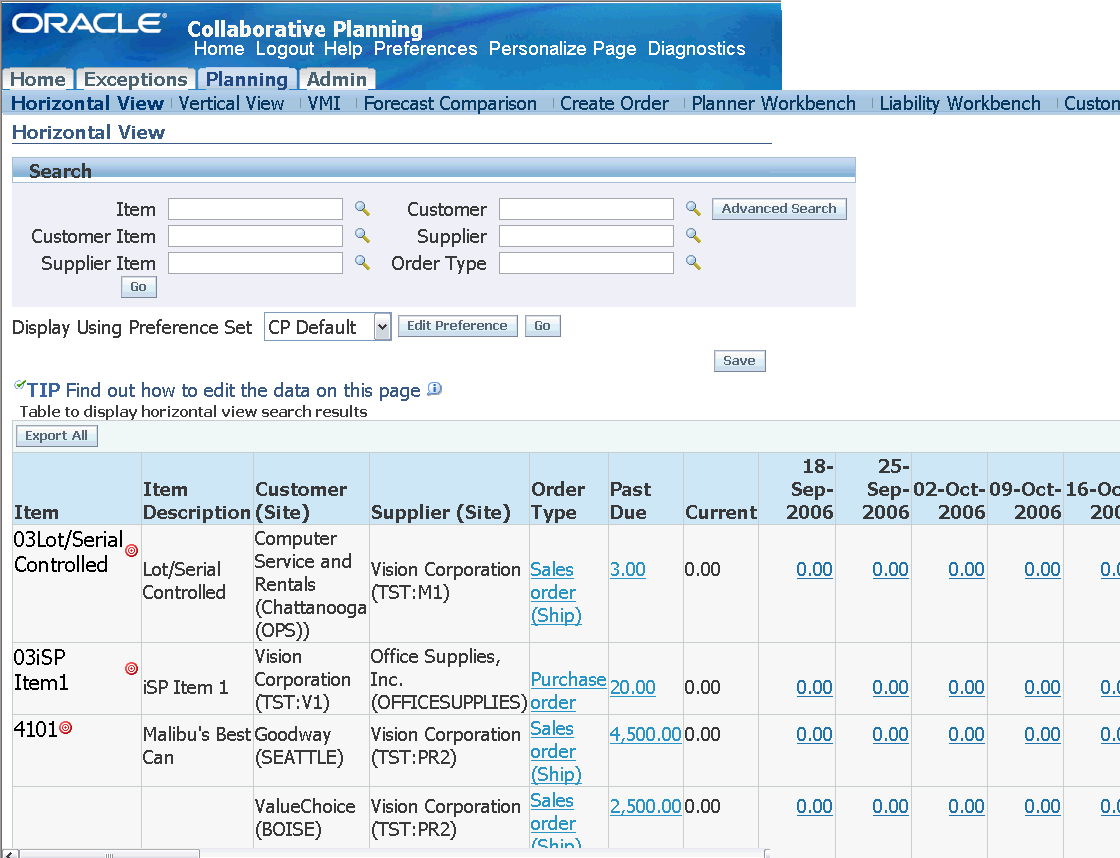
Consider an example for which you have selected the month to start from 9-Sep-2006 in the selected calendar based upon the quarterly settings. If the order's demand date in a monthly bucket is 14-Sep-2006, it will be adjusted to 5-Sep-2006, instead of 1-Sep-2006. The following image shows how the Start Day is adjusted to the first day of the week and month using the correct calendar:
Horizontal View Screen
However, for new records, the system populates the ship date or receipt date based on the trading partner responsible for arranging the transport, considers this date as the bucket start date, and uses it for order bucketing.
To convey the date used for order bucketing, the Horizontal View displays the Request Date type (Ship or Arrival) in the order type column after the order type. The following order types are classified based on Request Date type:
-
Purchase order
-
Sales order
-
Order forecast
-
Supply commit
Note that this display rule applies only to outbound transactions (transactions between the owner of Collaborative Planning and the owner's customers). It does not apply to transactions between the owner and the owner's suppliers. Any purchase order issued by the Collaborative Planning owner to its supplier would not have the Ship or Arrival designation. Only purchase orders issued by the customer to the owner of Collaborative Planning and posted to Collaborative Planning by the customer would show the Ship and Arrival designations. For more information about the order bucketing procedure, see "Support time aggregation on orders posted to Oracle Collaborative Planning."
Step 7: Horizontal View Displays Orders Based on Site-Specific Calendar
The Horizontal View aggregates orders and display data according to a site-specific calendar definition. However, planners may define one or more calendars for different business needs. In addition, a supply/demand statement always involves more than one trading partner. The system may have to select a calendar from multiple calendars representing different trading partners' sites. To select the calendar for the Horizontal View, the Collaborative Planning system uses the following conventions.
When the OEM organization is the customer:
-
The receiving calendar of the OEM's organization is used to display the data.
-
The Horizontal View determines the start and end dates of the time buckets based on the calendar entries found on this calendar.
-
In the absence of the receiving calendar, the system uses either the manufacturing calendar of the OEM organization or the default system calendar.
When the OEM organization is the supplier:
-
The receiving calendar of the customer's site is used to display the data.
-
The Horizontal View determines the start and end dates of the time buckets based on the calendar entries found on the receiving calendar of the customer's site.
-
In the absence of this calendar, the system uses the shipping calendar of the supplier's site (OEM's organization), the manufacturing calendar of the supplier's site, or the default system calendar.
When the OEM organization is not involved:
-
The receiving calendar of the customer's site is used to display the data.
-
In the absence of this calendar, the system uses the delivery calendar of the supplier's site or the default system calendar.
When two customer sites are displayed together or data are aggregated across customer sites
When two or more receiving calendars are involved, the system uses the default system calendar to display data.
Editing Order Quantities in the Horizontal View
Order quantities can be edited in the Horizontal View for specific order types under certain conditions. The following conditions are prerequisite to data editing in the Horizontal View:
-
Your company must be the publisher of the data.
-
You must select the order type you intend to edit in your preference set.
-
The time bucket of the underlying data and the display time bucket must be homogenous (either day or week or month) for the time range you selected for your preference set. For example, data posted at the weekly level may be editable only if the display bucket is set to Week.
The system assigns a time bucket to the data the first time when you edit the order quantity and saves the changes. The time bucket of the data corresponds to the display time bucket that is specified in your preference set. The following example explains the circumstances in which you can edit the order quantities in a Horizontal View: Assume the system date is January 10, 2003. The receiving calendar used to display the data has a 5-4-4 quarterly pattern. Its week and month begin on Monday. The following records are posted to the system for an item, customer site, and supplier site combination:
| Date | Order type | Quantity | Bucket |
|---|---|---|---|
| 01/11/2003 | Order forecast | 300 | Day |
| 02/03/2003 | Order forecast | 200 | Week |
| 02/08/2003 | Order forecast | 100 | Week |
| 03/26/2003 | Order forecast | 100 | Week |
The following diagram shows the four scenarios with varying display preferences and a common set of data posted to the system. Depending upon the start date of the Horizontal View and the display settings in your preference set, you can edit the data. Each scenario represents an independent query initiated from the Horizontal View.
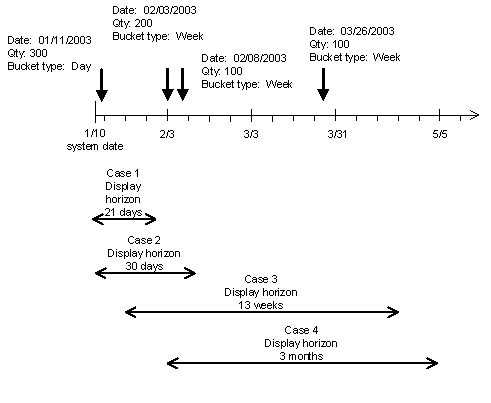
In cases 1 and 3, you can edit data in the Horizontal View. In cases 2 and 4, you cannot edit data. The following table explains the reasons. Note that in all four cases a single time bucket is used to display data either days, weeks, or months.
| Case | System date | Start date of Horizontal View | Display buckets | Edit data in Horizontal View? |
|---|---|---|---|---|
| 1 | 1/10/2003 | 1/10/2003 | 14 days | Yes. Data posted at daily level. Display buckets at daily level. |
| 2 | 1/10/2003 | 1/10/2003 | 30 days | No. Data posted at daily and weekly levels. Display buckets at daily level |
| 3 | 1/10/2003 | 1/20/2003 | 13 weeks | Yes. Data posted at weekly level. Display buckets at weekly level. |
| 4 | 1/10/2003 | 2/3/2003 | 3 months | No. Data posted at weekly level. Display buckets at monthly level |
In case 3 you can see a quantity of 300 in the weekly bucket beginning on February 3. There are two orders with quantities of 200 and 100 each. If the quantity of 300 is changed to 500 the system will make the following changes after you submit the data:
| Date | Order type | Old Quantity | New Quantity | Bucket |
|---|---|---|---|---|
| 02/03/2003 | Order forecast | 200 | 200 | Week |
| 02/08/2003 | Order forecast | 100 | 300 | Week |
| 02/03/2003 | Total for week | 300 | 500 |
The system sorts the records in the buckets in ascending order by quantity. If you edit the quantity in the bucket, the first record or the record with the smallest quantity is adjusted.
If the quantity of 500 is subsequently changed to 100, the system will make the following changes after you submit the data:
| Date | Order type | Old Quantity | New Quantity | Bucket |
|---|---|---|---|---|
| 02/03/2003 | Order forecast | 200 | 0 | Week |
| 02/08/2003 | Order forecast | 300 | 100 | Week |
| 02/03/2003 | Total for week | 500 | 100 |
The record with the smallest quantity was decremented until it reached zero. The next record was decremented until the total amount deducted from the weekly quantity came to 400.
Running Totals of Supply and Demand
You can tailor your horizontal plan preference set to enable the display of running total demand and running total supply rows. When you do so, you must also choose to display the Order Forecast and Supply Commit order types. Company and trading partner aggregation is respected when displaying the running total rows. Row totals are displayed after the last time period in the horizon.
Advanced Horizontal View
Setup
To set up advanced horizontal view, your administrator must complete the following steps:
-
Create new workbooks and specify report format
-
Select and arrange data elements
-
Customize the workbooks and define filters and calculations
-
Manage and share workbooks with other users
The following image depicts the administrator setup flow for advanced horizontal view.

Create Workbooks
Complete the following steps to create a workbook:
-
From the Home page in Oracle Collaborative Planning, select the Admin tab.
-
In the Admin page, select Define Custom Bucketed View.
Note: When you select Custom View, the system launches Oracle Discoverer.
-
In the Workbook Wizard, select Create a new workbook.
-
Select the type of view you want for the workbook.
-
Select the columns to display by choosing from the Available column.
Note: You can move an element back to the Available column from the Selected column. After you select an element, you can rearrange elements for your specific business needs.
-
Select Next.
-
Define your query conditions.
-
Select Next.
-
On the Format page, you can format data and your heading as well as editing the heading.
-
Select Next.
-
On the Conditions page, you can create a conditional statement. Select New.
Note: Your conditional statement will limit information. Select OK after completing your statement.
-
Select Next.
-
In the Calculations page, you can create a calculation for your condition. To define calculations, enter information in the following fields:
-
Calculation Name
-
Show
-
Calculation
Repeat this procedure for every calculation you want in your workbook.
-
Select Next.
-
On the Percentage page, you can create a percentage for your condition.
-
Select Next.
-
On the Totals page, you can summarize the results of your calculations.
-
Select Next.
-
On the Parameters page, you can enter parameters for your conditional statement.
-
Select Finish. The system will now load your new workbook.
Share Workbooks
Workbooks can be shared with all users, including customers and suppliers. The following information is required to share a workbook:
-
Workbook name
-
User(s) who will access the workbook
After you create a workbook you can share your workbook. To share your workbook, complete the following steps:
-
With your new workbook open in Oracle Discoverer, navigate to Sharing under Manage Workbooks.
-
Select users who you want to view the workbook.
View Workbooks
Complete the following steps to view a workbook:
-
From the Home page in Oracle Collaborative Planning, select the Planning tab.
-
Select Custom View.
Note: Oracle Discoverer automatically launches when you select Custom View.
-
Select the workbook you want to view.
-
To enter or change parameters for limiting a query over a time horizon, select Options.
-
Enter the following information in the options window:
-
Query governor
-
Worksheets
-
Summary data
-
Fan-trap detection
-
End user layer access
-
Locale selection
-
-
Select Apply.
-
View the report.