Shipping Execution Setup
This chapter covers the following topics:
- Overview of Setup
- Setup Steps
- Profile Options
- Roles and Users
- Defining Global Parameters
- Shipping Parameters
- Defining Shipping Parameters
- Defining Pick Release Parameters
- Defining Shipping Transaction Parameters
- Defining Delivery Parameters
- Defining Freight Carriers and Ship Methods
- Ship Method
- Defining Freight Costs
- Defining Shipment Transit Times
- Defining Document Sequences
- Defining Document Categories
- Assigning Document Sequences to Document Categories
- Defining Shipping Document Sets
- Choosing Printers for Shipping Documents and Labels
- Defining Pick Slip Grouping Rules
- Defining Release Rules
- Defining Release Sequence Rules
- Defining Transportation Calendars
- Defining Shipping Exceptions
- Defining Containers and Vehicles
- Defining Container-Item Relationships
- Finding Container-Item Relationships
- Using LPNs/Containers in Shipping Execution
- LPN/Container Setup Steps
- Creating LPNs/Containers
- Define Default Containers for Customer Items
- Packing Items into LPNs/Containers
- Additional LPN/Container Functionality
- International Trade Management Partner Integration
- Regions and Zones
- Order Processing
- Setting Up Regions and Zones
- Oracle Shipping Debugger
Overview of Setup
Some of the setup steps are required and some are optional:
-
The Required Step With Defaults refers to setup functionality that comes with pre-seeded, default values in the database; however, you should review those defaults and decide whether to change them to suit your business needs. If you want or need to change them, you should perform the step.
-
You need to perform Optional steps only if you plan to use the related feature or complete certain business functions.
Oracle Shipping Execution Setup Steps
Setup Steps
Step 1: Set Up System Administrator
This step involves the following tasks:
-
Define responsibilities. See: Oracle E-Business Suite System Administrator Guide Documentation Set
-
Set up printers (optional). See Setting Up Your Printers, Oracle E-Business Suite System Administrator Guide Documentation Set
Step 2: Set Up Flexfields
Define key and descriptive flexfields to capture additional information about orders and transactions. See: Oracle E-Business Suite User's Guide.
Step 3: Perform Oracle Inventory Setup
Perform all setup steps required for Oracle Inventory, then perform the following.
-
Set up internal locations for Human Resources for your Inventory Organizations
-
Map inventory organizations to internal locations
Organizations
Define at least one of the following:
-
Item validation organization
-
Organization as inventory source for internal orders
-
Organization for receiving purposes, if you use drop ship orders
Your item validation organization can be the same as your inventory source or your logical receiving organization, but you cannot use one organization for all three purposes.
Note: If you change the location of your organization, after delivery details have been created, then the new location will not take effect as the ship from location until new transactions are created. Each delivery detail needs to be updated with the new location if the ship from location needs to be changed on current deliveries.
Pick Confirmation
The Pick Confirmation Required check box affects the behavior of the picking process in Shipping Execution. Navigate: Oracle Shipping > Set up > Organization Parameters > ATP, Picking, Item- Sourcing tab.
If the Pick Confirmation Required check box is selected, then the system requires you to navigate to Inventory forms or Pick Confirm using a mobile device to perform a manual pick confirmation of the move order that was generated as a result of the Pick Release process. The pick confirmation process acknowledges the transfer of the item being picked from its source location to the default staging location.
If the Pick Confirmation Required check box is deselected (the default) for new installs, the system performs the pick confirmation process automatically based on sourcing rules set up in Oracle Inventory.
Organization Parameters Window - ATP, Pick, Item-Sourcing Tab
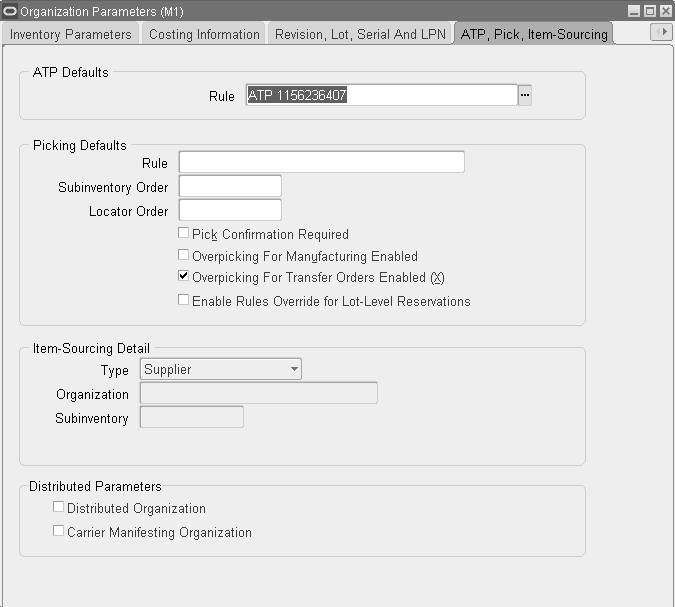
Staging Subinventory
Create at least one staging subinventory for each organization. Move orders record the movement of pick released material to staging subinventories. Staging subinventories should be reservable.
Step 4: Define Profile Options
Define profile options to specify certain implementation parameters, processing options, and system options. See: Profile Options.
Step 5: Define Lookups
Define lookups that provide custom values for many lists of values throughout Oracle Shipping Execution, including Shipping Workflow specific lookups. See: Shipping Execution Workflows.
Step 6: Define Roles and Users
Assign roles to users that control access (edit or view privileges) to shipping entities in the Shipping Transactions form and Quick Ship window. See: Roles and Users.
Step 7: Define Global Parameters
Define default Global Parameters. See: Defining Global Parameters.
Step 8: Define Shipping Parameters
Define default Shipping Parameters. See: Shipping Parameters.
Step 9: Define Freight Carriers, Cost Types
Define freight carriers, services, and freight costs to specify on orders. Assign carrier services to organizations. See: Defining Freight Carrier Ship Method Relationships.
Define freight costs to specify on orders. See: Defining Freight Costs.
Step 10: Define Documents and Choose Printers
Define groups of shipping documents that can print to specified printers when you pick release and confirm shipments.
To set up document sequencing perform the following tasks:
-
Define document sequences. See: Defining Document Sequences in Shipping Execution User's Guide.
-
Define document categories. See: Defining Document Categories in Shipping Execution User's Guide.
-
Assign document sequences to document categories. See: Assigning Document Sequences to Document Categories in Shipping Execution User's Guide.
-
Define document sets. See: Defining Shipping Document Sets in Shipping Execution User's Guide.
-
Choose printers. See: Choosing Printers for Shipping Documents and Labels.
Step 11: Define Pick Slip Grouping Rules
Define pick slip grouping rules to determine how released picking lines are grouped onto pick slips. See: Defining Pick Release Parameters
Step 12: Define Release Rules and Release Sequence Rules
Define the order in which picking lines are allocated to inventory. See: Defining Release Sequence Rules and Defining Release Rules.
Step 13: Defining Transportation Calendars
Assign a calendar that you created in the Bill of Materials (BOM) application to a shipper, receiver, or carrier. See: Oracle Bills of Material User's Guide and Defining Transportation Calendars.
Step 14: Define Shipping Exceptions
You can define exceptions, define processes for exception handling and relate them to appropriate exceptions, log exceptions, associate status with exceptions at various stages in the logging and handling process, start exception handling, and view and track exceptions. See: Defining Shipping Exceptions.
Step 15: Define Container-Item Relationships
Define the relationship between container items and load items to specify the preferred container to use for automated packing and to specify the maximum quantity, weight, or volume of the load item that can be packed into a container item. See: Defining Container-Item Relationships.
Step 16: Define LPN Name Defaults
Define the default naming convention of LPNs for your organization. Specify the Prefix, Suffix, Starting Number, Pad to Width, and UCC-128 Suffix.
Profile Options
During implementation, you set a value for each user profile option to specify how Shipping Execution controls access to and processes data.
Generally, the system administrator sets and updates profile values. See: Setting Profile Options, Oracle E-Business Suite System Administrator's Guide - Maintenance.
Implementing Profile Options Summary
The following table indicates whether you (the “User”) can view or update the profile option and at which System Administrator level the profile options can be updated. The System Administrator level includes User, Responsibility, Application, and Site levels.
The table also displays if the profile option is optional or required:
-
Required: Requires you to provide a value
-
Optional: A default value is provided, so you only need to change it if you do not want to accept the default
Note: If you are using a multi-organization structure, your system administrator must change the OM Item Validation Organization system parameter to be visible and updateable at the responsibility level. This change enables Shipping Execution to apply the default tax code and revenue account information correctly. See: Oracle Applications Multiple Organizations Implementation Guide.
The following terms are used in the table to identify if you can view or update the profile option information:
-
Updatable: You can update the profile option
-
View Only: You can view the profile option value but you cannot change it
-
No Update or View: You cannot view or change the profile option value
Oracle Shipping Execution Profile Options Profile Option User System Admin. User System Admin. Resp System Admin. App System Admin. Site Required Default Value WSH: Bulk Batch Size Updatable Updatable Updatable Updatable Updatable Optional Null WSH: DSNO Output File Extension View Only View Only View Only View Only Updatable Optional Null WSH: Debug Enabled Updatable Updatable Updatable Updatable Updatable Optional No WSH: Debug File Prefix View Only Updatable Updatable Updatable Updatable Optional Null WSH: Debug Level View Only View Only View Only Updatable Updatable Optional Null WSH: Debug Log Directory View Only Updatable Updatable Updatable Updatable Optional Null WSH: Debug Module View Only Updatable Updatable Updatable Updatable Optional % WSH: Defer Inventory Process Updatable Updatable Updatable Updatable Updatable Optional No WSH: Distributed Source Entity View Only View Only View Only View Only Updatable Optional Shipment Delivery WSH: Enable Delivery Merge Updatable Updatable Updatable Updatable Updatable Optional No WSH: Express Pick View Only Updatable Updatable Updatable Updatable Optional Null WSH: Ignore Weight/Volume Conversion Errors View Only View Only Updatable View Only Updatable Optional Yes WSH: Internet Proxy URL View Only View Only View Only View Only Updatable Optional <none> WSH: Number of Pick Release Child Processes Updatable Updatable Updatable Updatable Updatable Optional <none> WSH: Overpicking Enabled Updatable Updatable Updatable View Only Updatable Optional No WSH: Override Ship to Deliver Workflow View Only Updatable Updatable Updatable Updatable Optional No WSH: Pick Release Batch Size View Only Updatable Updatable Updatable Updatable Optional Null WSH: Populate Latest Ship/Delivery Date View Only Updatable View Only View Only View Only Optional Null WSH: Quick Ship Default View Updatable Updatable Updatable Updatable Updatable Optional Delivery Confirm WSH: Retain ATO Reservations Updatable Updatable Updatable Updatable Updatable Optional Null WSH: Run PL/SQL Profiler Updatable Updatable Updatable Updatable Updatable Optional No
WSH: Bulk Batch Size
This profile option enables you to specify how many lines are to be interfaced to Oracle Order Management per call, and to specify the batch size that is inserted in the Oracle Inventory tables. If the value is set to null, the batch size passed to Oracle Order Management and Oracle Inventory will not be limited.
However, if your system experiences out-of-process memory or rollback segment errors when processing a large number of order lines, then you may need to restrict the batch size by setting the minimum batch size to 1000.
WSH: DSNO Output File Extension
This profile option enables you to select the file extension for your DSNO output file. Select from DOC, TXT, RTF, and DAT.
WSH: Debug Enabled
Select from the Debug Enabled LOV either YES or NO to activate the debug feature. The default is NO.
WSH: Debug File Prefix
The naming convention for the debug file is <Debug File Prefix Profile>_sessionid.dbg If value of profile is null, naming convention is wsh_<username>_<sessionid>.dbg Where: <username> is Application user name. If application context is not established, it will be defaulted to dbuser: <dbusername>.
<sessionid> is Database session id.
WSH: Debug Level
The value entered for this profile option will determines the level of the Shipping Debugger. Default value: Procedure.
WSH: Debug Log Directory
The value entered for this profile option must be specified as a UTL_FILE parameter value.
WSH: Debug Module
The Module describes where to find the log message within the code. This profile indicates that debug messages from only those modules with names beginning with the profile value will be logged. The naming convention for Module is: <application short name>.<directory>.<package>.<routine>.<label> e.g. wsh.plsql.WSH_WV_UTILS.convert_uom.
WSH: Defer Inventory Process
When this profile option value is set to YES, then Oracle Inventory's Process Online API call will be deferred. If the value is set to either NULL or NO, then the process online API will be called in online mode.
WSH: Distributed Source Entity
The value of this profile option determines the way shipment requests are sent to the Distributed WMS system. If it is set to Shipment Delivery, then Shipment Requests can be generated for Delivery. If set to Fulfillment Batch, then Shipment Requests can be generated for Shipment Batch. The default is Shipment Delivery.
WSH: Enable Delivery Merge
This profile option is used to enable delivery merge in Shipping Execution.
WSH: Express Pick
If this profile is enabled (YES), then the Pick Release process will skip move order line creation, allocations, and the pick confirm process if the following conditions are met:
-
Prior Reservations Only is selected in the Release Sales Orders window before submitting pick release request
-
Auto Pick Confirm is set to Yes in the Release Sales Orders window before submitting pick release request
If the above conditions are met then the lines will not be staged if:
-
The organization to which the line belongs is WMS enabled OR
-
The sales order line does not have detailed reservation OR
-
The line is not part of ship set but is part of Model/Kit (which has Ship Model Complete set to Yes) and the shipping parameter Enforce Ship Sets and Ship Models is set to Yes OR
-
Reservations are detailed up to the locator level or sub inventory reserved require a locator
No Pick slips can be generated for lines processed as part of Express Pick. The subinventory where reservation was created (before pick release) will be used for storage of material and staging. The Staging subinventory and locator entered on the Release Sales Order window is always ignored.
WSH: Ignore Weight/Volume Conversion Errors
This profile option enables you to determine whether Shipping Execution should ignore weight and volume conversion errors when updating an LPN. Default is Yes.
WSH: Internet Proxy URL
This enables the system to access UPS servers for United Parcel Service integration. If no firewall is installed at your site, you do not need to set the profile. This profile can only be modified by the System Administrator at the site level.
WSH: Number of Pick Release Child Processes
This profile enables you to specify the default number of child processes that are run when pick release is executed.
WSH: Overpicking Enabled
Enter Yes to enable overpicking. Overpicking is using the pick confirm transaction to pick more than the requested quantity of a delivery, up to the overshipment tolerance.
WSH: Override Ship to Deliver Workflow
This profile enables you to specify whether the Ship to Delivery workflow can be overridden or not. If it is set to Yes, then you can override the workflow process if a problem occurs. If set to No, then you cannot override the workflow process.
WSH: Pick Release Batch Size
This profile option enables you to change the batch size from 3 to 1000. Any value less than 3 is interpreted as 3 and any value greater than 1000 is interpreted as 1000.
WSH: Populate Latest Ship/Delivery Date
This profile enables you to determine whether Shipping Execution should populate the Latest Ship Date and Latest Delivery Date.
WSH: Quick Ship Default View
This profile option enables you to determine the default view of the Quick Ship window. The default is the Delivery Confirm view.
WSH: Retain ATO Reservations
This profile option enables you to avoid the redundancy of re-reserving an item. If set to Yes, then the inventory system retains the reservation and the reservation status changes from Staged to Unstage, while the delivery line status changes to Backordered.
WSH: Run PL/SQL Profiler
This profile option enables you to determine whether or not to run the PL/SQL Profiler. Select from YES or NO. The default is NO.
Roles and Users
Shipping Execution provides data access controls called roles that control users' access to the Actions list and Tools menu in the Shipping Transactions form and the Quick Ship window. Roles also control ship confirm error and warning messages for breaking ship sets, missing inventory controls, and breaking proportionality of ship model complete. Roles are assigned to users using grants that control access to view or edit specific shipping data or actions.
This is useful, for example, if you want to assign a grant to inexperienced users that provides view-only access or assign grants that prevent unwanted actions such as unintentional pick releases across multiple organizations.
Note: Roles provide data access controls for the Shipping Transactions form and the Quick Ship window. If you want to restrict user access to other windows like the Pick Release or setup windows, you can edit the Shipping menus in Shipping Administration.
For each role, select the following data access controls that control Edit and View access to shipping entities:
-
Data Access Edit enables you to edit and view the data
-
Data Access View enables you to browse the data
-
Data Access None prevents you from editing and browsing data and performing actions
A role can provide either view-only, edit-only, or a combination of view and edit access depending on how you setup the role. You can create customized roles by defining the access controls you want. During the setup for each role, you enable or disable actions by selecting or deselecting the check box next to each action.
Note: If no data access control is selected, the user cannot edit or view the selected action.
Note: Ship confirm error and warning message configuration, on the Message tab, does not use data access.
After you have defined a role you can assign it to a user through a grant. A grant defines both the user's role and related information about the grant including the date, and the organization(s) to which the grant applies.
The system administrator or super user is responsible for defining roles and assigning the grants to users.
Defining a New Role
Shipping Execution enables you to define new roles by selecting the data access controls that you want. You can define a new role by:
-
Copying an existing role: An existing role can be copied to create a new role. The copied role has the same data access privileges of the original, but if desired, these privileges can be edited for the new role. Save the new role with a different name than the original.
-
Manually defining a new role: You can create a new role in the Shipping Execution Role Definition window by selecting the data access controls to trips, stops, lines, and deliveries. Save the new role with a unique name.
After you have created the new role you can assign it by grant to a user.
To define a new role:
-
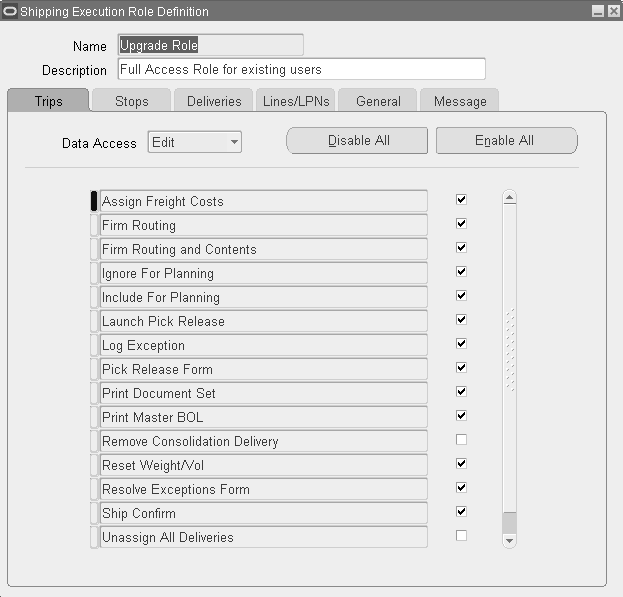
Navigate to the Shipping Execution Role Definition window.
Shipping Execution Role Definition Window
-
Enter the Name of the role.
-
Enter a Description for the role.
-
In the Trips tab, in the Data Access field, select:
-
Edit to provide edit access for the trip records
-
View to provide view-only access for the trip records
-
None to disable access and actions
-
-
-
Enable each action that you want the user to have permission to perform.
Note: As a shortcut, choose the Disable Actions button to disable all the actions or the Enable Actions button to enable all the actions.
-
Select the Stops tab.
Shipping Execution Role Definition Window - Stops Tab

-
In the Data Access field, select:
-
Edit to provide edit access to the stop records
-
View to provide view-only access to the stop records
-
None to provide no access to the stop records
-
-
-
Enable each action that you want the user to have permission to perform.
Note: As a shortcut, choose the Disable Actions button to disable all the actions or the Enable Actions button to enable all the actions.
-
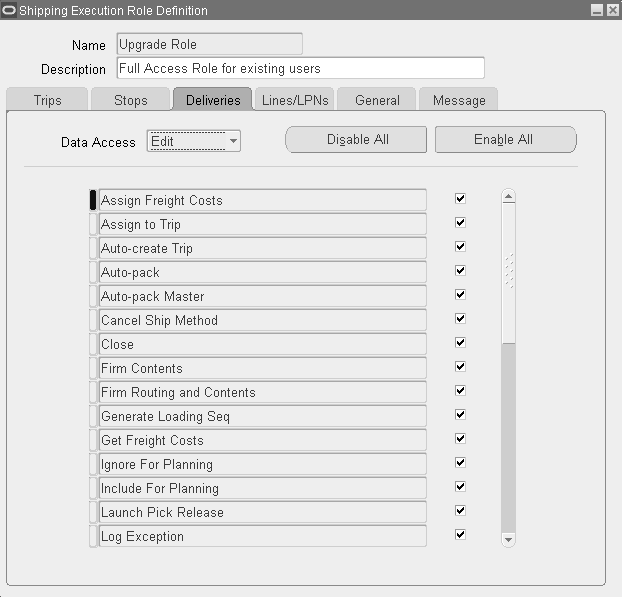
Select the Deliveries tab.
Shipping Execution Role Definition Window - Deliveries Tab
-
In the Data Access field, select:
-
Edit to provide edit access to the delivery records
-
View to provide view-only access to the delivery records
-
None to provide no access to the delivery records
-
-
-
Enable each action that you want the user to have permission to perform.
Note: As a shortcut, choose the Disable Actions button to disable all the actions or the Enable Actions button to enable all the actions.
-
Select the Lines/LPNs tab.
Shipping Execution Role Definition Window - Lines/LPNs Tab
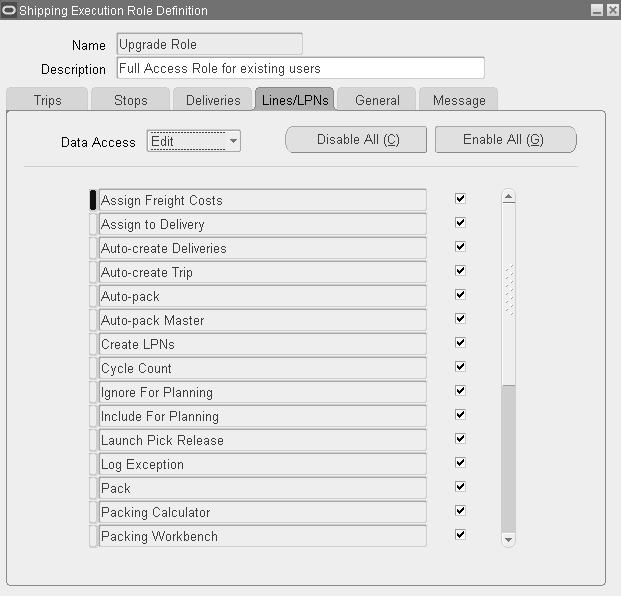
-
In the Data Access field, select:
-
Edit to provide edit access to the lines/LPNs records
-
View to provide view-only access to the lines/LPNs records
-
None to provide no access to the lines/LPNs records
Note: The delivery records also include delivery legs and packing slips.
-
-
-
Enable each action that you want the user to have permission to perform.
Note: As a shortcut, choose the Disable Actions button to disable all the actions or the Enable Actions button to enable all the actions.
-
Select the General tab.
Shipping Execution Role Definition Window - General Tab
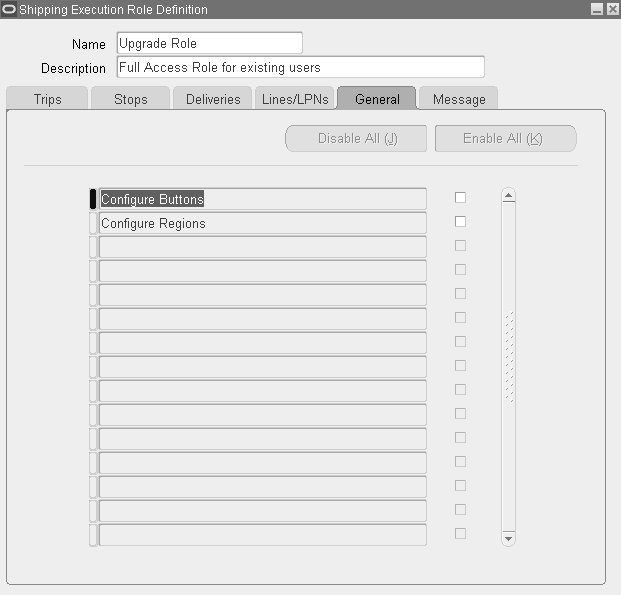
-
Enable each action that you want the user to have permission to perform.
-
Select the Message tab.
The Message tab enables you to configure ship confirm messages for Breaking Proportionality of Ship Model Complete, Breaking Ship Sets, and Missing Inventory Controls. See: Message Configuration in the Shipping Execution chapter of the Oracle Order Management Implementation Manual.
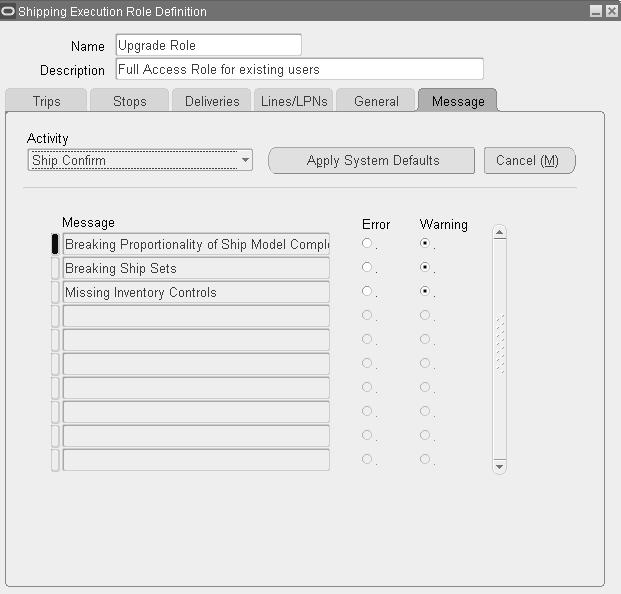
-
From the Activity list of values, select Ship Confirm.
-
For each Message, select either Error or Warning depending on your business needs.
Note: The System Defaults are Warning for each Message.
-
Save your work.
Copying an Existing Role
Copying a role is useful for creating a new role based on the privileges of an exiting role. Because copying automatically duplicates the original role, it saves you time from manually entering all the control privileges of the original.
You can edit the privileges of the copied role, save the role with a new name, and assign it to users.
To copy an existing role:
-
Navigate to the Shipping Execution Role Definition window.
-
Find the role that you want to copy.
-
Click New Record to create a new record.
-
From the Edit menu, select Duplicate—Record Above to create a new role based on the privileges of the original.
-
Save the new role.
Granting a Role to a User
You can grant a user a role in one organization or all organizations for a period of time. The role is assigned to a user by a grant. The grant is specific to a particular user and defines the role(s) assigned to the user, the organization where the grant is effective, the start date and optionally, an end date.
More than one grant can be assigned if the user requires different access controls to more than one organization. The start and end dates for grants can overlap.
For example, if a user requires full-access privileges to three organizations and view-only access to a fourth, the user must be assigned four grants—one for each respective organization (three full-access and one view-only grant). However, if only one grant is assigned, that grant becomes the default grant for the user.
In addition, the grant has the following requirements:
-
A grant may or may not have one inventory organization selected.
-
Many grants can be assigned for each role.
-
A user can have one or more grants. If the user does not have any grant (expired, effective, or future), the default is view-only access to all organizations. If the user has grants, the user's access is controlled by the effective grants. If there are overlapping grants in the same organization or an intersection of grant date ranges, the union of grant privileges controls the user's access.
-
A grant cannot be designated as the default grant.
A role can be assigned to a user that spans all organizations instead of granting a unique grant per organization. If an organization is not specified, the grant is applicable to all organizations.
Warehouse Organization
A grant can have one or all inventory organizations. If an organization is not specified, the grant is applicable to all organizations.
For example, you can use grants to prevent a shipping clerk from assigning freight costs or planning a delivery in one or all organizations.
Note: Use caution when creating grants for all organizations (when no specific organization is selected). For example, if a user has a grant to view all organizations and a grant to perform actions on one organization, the union of these grants will enable the user to perform actions in all organizations.
Changing Organizations in the Shipping Transactions Form
If a user's effective grants are single organization, the user can select an organization when opening the Shipping Transactions form or from the Tools menu—Choose Organization. If all effective grants are in the same organization, the Shipping Transactions form defaults to that organization.
Effective Dates for a Grant
Optionally, in the Start and End Date fields, you can enter a start and end date for the grant to assign it for a specific period. For example, you can assign temporary employees a grant that is effective for the duration of their assignment. The date status for a grant can be endless, future or expired:
-
Endless: If you enter a start date but no end date, the grant is effective for an indefinite period.
-
Future: You can specify start and end dates for a grant so that the grant is effective only between those dates. For example, a temporary employee can be assigned a role that is effective for the duration of his/her contract. The start date can be a current or future date. You cannot back-date the date: for example, you cannot enter a start date of yesterday.
-
Expired: When the end date of the grant expires, the user cannot perform the job duties unless assigned a new grant by the system administrator.
Note: If the user has expired and future grants but no effective grants, the user has no access to the Shipping Transactions form. If required, you can leave a gap between an expired grant and a future grant: for example, one grant can expire in June and another can begin in August.
To grant a role to a user:
-
Navigate to the Shipping Execution Grants window.
Shipping Execution Grants Window
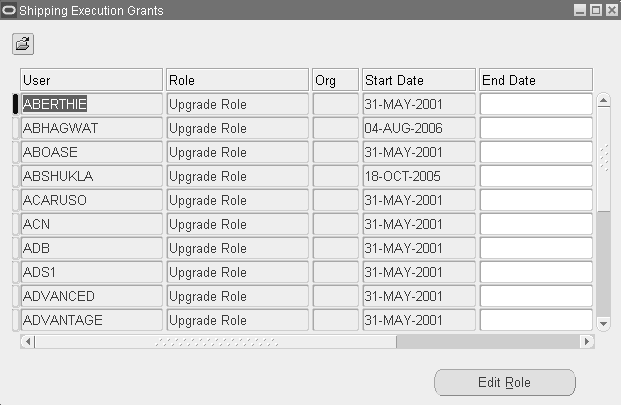
-
In the User field, select the user's name.
-
In the Role field, select the role that you want assigned to the user.
Note: To view the available privileges for a selected role, click Edit Role to display the Shipping Execution Role Definition window.
-
In the Org field, select the organization to which the grant is assigned (optional). A user can be assigned only role per warehouse (organization). However, you can assign a different role to a different warehouse.
-
In the Start Date field, enter the date that you want the role to start.
-
In the End Date field, enter the date that you want the role to end. If you do not want the role to end, leave the field blank.
Once the grant is saved, only the end date can be updated. However, the date cannot be updated once it has expired.
-
Save your work to activate the role.
Finding Grants and Roles
You can perform a search to find current or expired grants, find users and their assigned grants, or find active grants for an organization(s).
You can also perform a search to find existing roles.
To find grants and roles:
-
Navigate to the Shipping Execution Grants window.
-
Click the Find icon to display the Find Grants window.
Find Grants Window
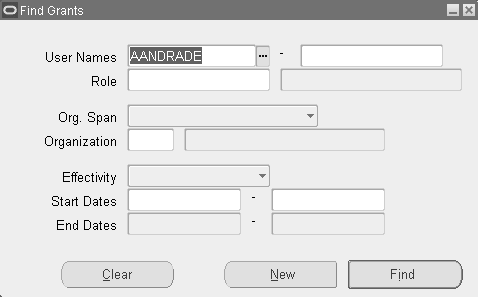
-
Enter the User Names to find the users and their assigned roles.
-
Enter the Role name to find the available roles and the users assigned to them.
-
In the Org Span field, select:
-
Single Organization to find grants in one organization, or
-
All Organizations to find grants in all organizations.
-
-
-
Enter the Organization if you selected Single Organization for the Org Span, or leave blank if you left the Org Span blank.
-
Select the Effectivity for the role you are searching for. Select from:
-
Expired: All expired roles.
-
Effective: All current active roles.
-
Future: All roles beginning on a future date.
For example, if you wanted to search for expired roles, select Expired.
-
-
-
Select the Start dates or a range for the start dates.
-
Select the End dates or a range for the end dates.
-
Click Find to display the search results in the Shipping Execution Grants window.
-
Click Edit Role to see details about the assigned role.
-
Optionally, click Define Role to create a new role.
-
-
-
Save your work.
To find a role definition
-
Navigate to the Shipping Execution Role Definition window.
-
Click the Find icon to display the Find a Role Definition window.
Find a Role Definition Window
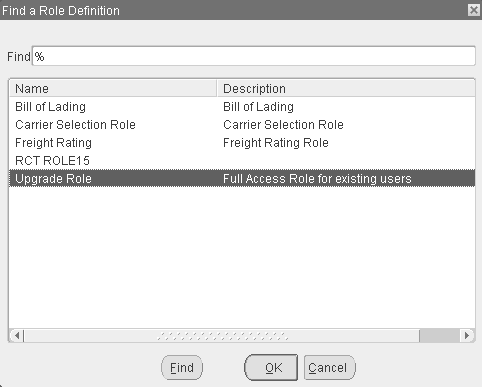
-
Enter the name of the role and click Find.
The search results display in the Name column.
-
Select the role and click OK to display the role in the Shipping Execution Role Definition window.
Updating a User's Grant
At times, a user's assigned grant may need to be updated. For example, if the user is promoted and requires a different set of privileges, the assigned role needs to be updated for the user's organization to reflect the changed responsibilities.
To change the role, you must end the user's existing role and assign a new role with the new privileges.
If you want to change the end date for a grant that has not expired, you can update the end date and saving the changes. If the date and grant has expired, the user must be granted a new grant (role).
Note: You cannot change a role by editing the role's parameters and saving the changes.
Updating a user's grant only affects that user, not all users assigned with the role.
To update a user's grant:
-
Navigate to the Shipping Execution Grants window.
-
Find the user whose role you want to update. The user and current role assignments display in the Shipping Execution Grants window.
-
If you are just updating the End Date, enter a new date in the End Date column and save the changes.
-
If you are ending a user's role and assigning another role, enter an end date in the End Date column of the role you want to end.
-
Select the new role, the organization to which the new role is assigned, and the start and end dates of the new role.
The start date must follow the end date of the role that you are updating. The new role is effective when it reaches its start date.
-
Save your work.
Defining Global Parameters
Global General parameters enable you to define miscellaneous parameters, Oracle Workflow parameters, and unit of measure (UOM) defaults for all of your organizations.
To define global miscellaneous parameters and UOM defaults
-
Navigate to the Global Parameters window.
Global Parameters Window
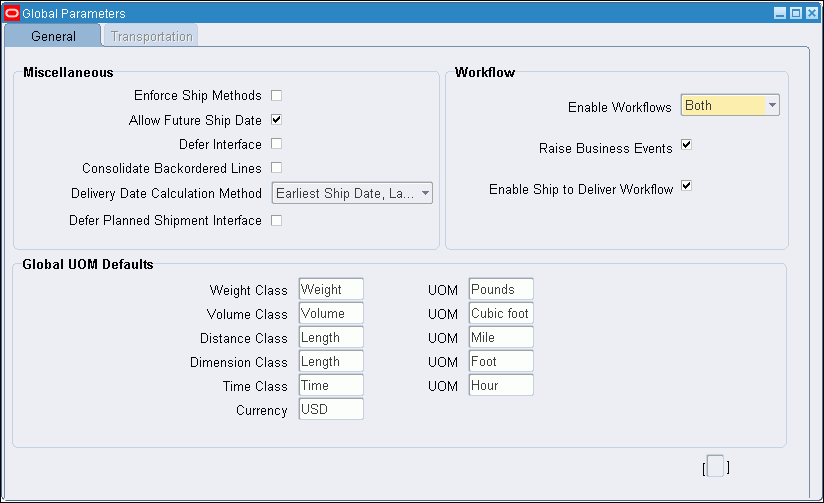
-
Select the Enforce Ship Method check box to enforce that a ship method (carrier) is entered and recorded for each shipment.
This is recommended if your business practices require a record of the ship method/carrier for each shipment.
-
Selected: During order processing, if a ship method has not been entered, then an error message is displayed at ship confirm and you are prevented from ship confirming until a ship method is entered. You can enter the ship method in the Confirm Delivery window, the Delivery tab of the Shipping Transactions form, or the Sales Order window.
-
Cleared: The ship method is not enforced at ship confirm and an error message is not displayed. For example, if your organization uses the same ship method (carrier) for all shipments, you may not want to enforce the selection of a ship method.
-
-
Select or clear Allow Future Ship Date.
-
Selected: You can enter a future date as the Actual Departure Date while ship confirming the delivery
-
Cleared: you should not enter a future date as the Actual Departure Date while ship confirming the delivery because you receive an error
-
-
Select the Defer Interface check box to defer shipping interfaces from initiating updates to the Oracle Order Management and Oracle Inventory interface tables.
-
Selected: You must manually run the interface to update the interface tables. For example, if you defer the Inventory Interface, the inventory tables are not updated until you manually run the Inventory Interface in the Shipping Interfaces window.
-
Cleared: The interfaces are run automatically at ship confirmation.
-
-
Select Consolidate Backordered Lines if you want to consolidate a line that was split and subsequently backordered. The line will be automatically consolidated with other backordered lines that it was part of originally.
-
The Defer Planned Shipment Interface parameter controls the default setting for running the Planned Shipment Interface concurrent request. Select Yes to run the request manually (or to schedule it), or No to run the request automatically every time the planned shipment is received from Oracle Transportation Management.
-
Within the Global UOM Defaults region, define the default Weight Class.
The Weight Class default controls:
-
Default weight UOM in deliveries, stops and containers for their respective weights
-
Default handling UOMs for facilities
-
Default weight UOM in the Carrier/Carrier Services Rating/Mode Limits tab
-
-
Define the default Volume Class.
The Volume Class default controls:
-
Default volume UOM in deliveries, stops and containers for their respective volumes
-
Default handling UOMs for facilities
-
Default volume UOM in the Carrier/Carrier Services Rating/Mode Limits tab
-
-
Define the default Distance Class.
The Distance Class default controls the default distance UOM in the Carrier/Carrier Services Rating/Mode Limits tab.
-
Define the default Dimension Class.
The Dimension Class default controls the default dimension UOM in the Carrier/Carrier Services Rating/Mode Limits tab.
-
Define the default Time Class.
The Time Class default controls the default time UOM in the Carrier/Carrier Services Rating/Mode Limits and carrier sites transportation tab.
-
Define the default Currency.
The Currency default controls the default currency used for Carrier Services Rating.
-
Within the Workflow region, use the list of values in the Enable Workflows field to select the Shipping entities for which you want Oracle Workflow to be enabled. These fields are optional and include:
-
Enable Workflows: Select from Trip, Delivery, Both, or None. Your selection here determines which Shipping entity, if any or both, will utilize Oracle Workflow during your day-to-day business flow.
-
Raise Business Events: Enabling this option turns business events on.
-
Enable Ship to Delivery Workflow: Enabling this option enables the Ship to Delivery workflow, which will then be used in your day-to-day business flow.
-
Related Topics
For more information on Oracle Shipping Execution workflows, and using Oracle Workflow with Oracle Shipping Execution, see Oracle Workflow User's Guide.
Shipping Parameters
You define the default values for basic shipping information such as units of measurement, pick release rules, weight and volume calculations, and delivery grouping rules. Shipping parameters are organization specific.
The parameters are arranged into the following tabbed regions in the Shipping Parameters window:
-
General: You can define the shipping weight and volume unit of measure classes, criteria for calculating percent fill basis like weight, volume, or quantity, and shipping events at which export compliance screening will be performed. (Screening is only applicable if Oracle Shipping Execution is integrated with a third party ITM partner application).
-
Pick Release: You can define Release Sequence rules and Pick Slip Grouping rules, limiting the number of lines in the pick slip, printing behavior, document set to be printed at pick release, default staging subinventory, locator, and decision points to autocreate delivery, auto allocation, enforcing ship sets and ship models, and task planning at the time of pick release.
-
Shipping Transaction: You can define document sets to be printed at the time of ship confirm, ship confirm rule, auto-pack options, goods dispatched (COGS) account and whether to enforce packing in containers.
-
Delivery: You can define the attributes forming the basis of delivery grouping for the organization. You can also specify if delivery grouping is limited to lines within the same sales order or across orders. For consolidation of deliveries, you specify the event at which appending will stop for the appending of delivery lines to the delivery stops.
Defining Shipping Parameters
On the General tab, you define general Shipping Execution parameters such as weight and volume unit of measure (UOM) class parameters, criteria for percent fill basis calculations, International Trade Management (ITM) screening generation, and Oracle Workflow settings.
To define shipping parameters
-
Navigate to the Shipping Parameters window.
Shipping Parameters Window - General Tab
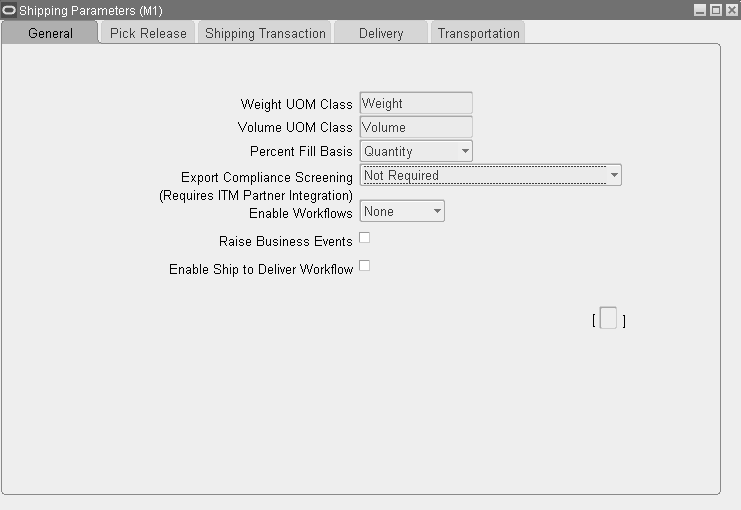
-
Select the General tab.
-
Select the default Weight UOM Class from the valid UOM classes.
-
Select the Volume UOM Class from the valid UOM classes.
Note: The seeded values shown in the UOM class are created in Oracle Inventory.
-
Select the default unit of measure for the Percent Fill Basis of a container. You can select Weight, Volume, or Quantity.
Percent Fill Basis is used to determine if containers have met their minimum fill percentage requirements.
If you select Weight or Volume, the calculation uses the item and container physical attributes in Oracle Inventory.
If you select Quantity, the calculation uses the Container Load Relationship details to determine the maximum number of items that will fit into the container.
-
In the Export Compliance Screening field, select one of the following: (Requires ITM Partnership Integration)
-
Not Required: Use this option if ITM Partner Integration is not used
-
At Delivery Creation: Use this option if Export Compliance Screening is to be enforced when the delivery is created
-
At Ship Confirm: Use this option if Export Compliance Screening is to be enforced at ship confirm
-
At Delivery Creation and Ship Confirm: Use this option if Export Compliance Screening is to be enforced when the delivery is created and at ship confirm
-
-
Enable Workflows by selecting whether you want Delivery workflows or None of the workflows enabled.
Specific tasks and output are enabled through the use of customized business objects. For example, the workflow can be configured so that specific users receive a notification email when an overship or backorder occurs.
-
Depending on your business needs, select the Raise Business Events check box.
Business events are optional. Individual Business Events can be enabled via the Business Events definition window. See: Shipping Execution Workflows and Oracle Workflow User’s Guide.
-
Save your work.
Defining Pick Release Parameters
You can define default picking criteria that is used at pick release. You can also select the default settings for auto-detailing and auto-creating deliveries.
To define pick release parameters
-
Navigate to the Shipping Parameters window.
Shipping Parameters Window - Pick Release Tab
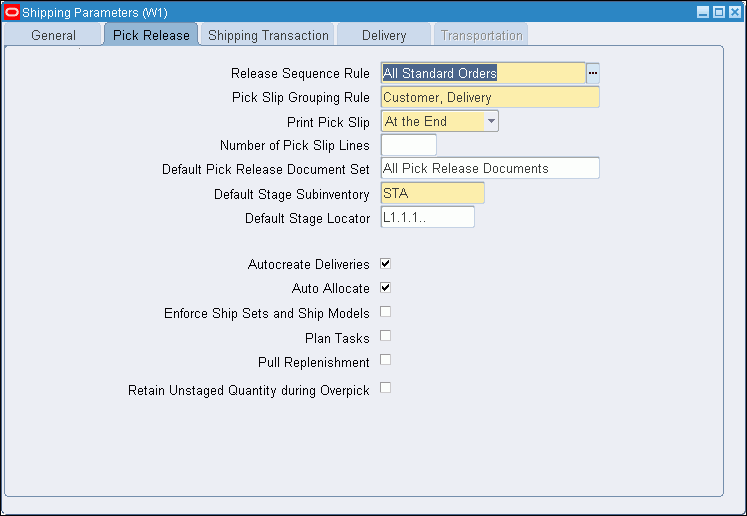
-
Select the Pick Release tab.
-
Select the Release Sequence Rule.
During pick release, this rule determines the order in which delivery lines are allocated to inventory. It appears as the default release sequence rule in the Release Sales Order window.
Note: It is recommended that you select the most frequently used release sequence rule; although it becomes the default, you can change it any time you launch pick release.
-
Select the Pick Slip Grouping Rule.
This rule dictates how the released delivery lines are grouped on pick slips and how the pick slip number is generated by pick release. It appears as the default pick slip grouping rule in the Release Sales Order form.
Note: It is recommended that you select the most frequently used pick slip grouping rule; although it becomes the default, you can change it any time you launch pick release.
-
From the Print Pick Slip list of values, select when you want the pick slips printed.
-
If you select At the End, pick slips will be generated when the pick release process has completed.
-
If you select Immediate, you specify the number of lines per pick slip. Whenever this threshold is reached, a pick slip document is submitted for printing. Every time the threshold is reached, another pick slip document will be submitted for printing. This continues until all lines meeting the release criteria for a batch have been pick released. For example, if there are 20 custom defined lines, all pick slips belonging to these 20 lines are printed in a single pick slip report. The number of pick slips printed depends on the pick slip grouping rule and the custom defined lines. This choice has more impact on system resources.
-
-
Enter the Number of Pick Slip Lines to print on each pick slip.
If Print Pick Slip is Immediate, enter the maximum Number of Pick Slip Lines to print on each pick slip. For example, if Number of Pick Slip Lines is 25 and pick release selects 40 lines, it prints two pick slips, one with 25 lines and the other with 15 lines.
-
Select the Default Pick Release Document set to be printed at pick release.
-
Select the Default Stage Subinventory.
The process of Pick Confirmation transfers move orders to this staging subinventory. The list of values displays all subinventories in the organization. Staging subinventories should be reservable.
-
Select the Default Stage Locator.
Move orders move material to this locator. The list of values displays all locators in the Default Stage Subinventory.
-
Select the Autocreate Deliveries option to specify your preference for delivery creation. You can override this preference at pick release execution.
-
Selected: Pick release automatically creates deliveries based on the delivery grouping rules and assigns delivery lines to them. When pick releasing, the Autocreate Deliveries check box in the pick release form defaults to this parameter setting if you enter a warehouse. If you do not enter a warehouse, pick release uses this parameter setting from the organization of the warehouse on each sales order line.
-
Cleared: Pick release does not automatically create deliveries.
Note: There are six descriptive flex field defaulting types supported when auto-creating deliveries: SQL Statement (Not having references to:$FLEX$.<VALUE_SET_NAME> and:block.field), Constant, Current Date, Current Time, Previous Segment, and Profile Option value.
-
-
Select Auto Allocate to automatically allocate delivery lines at pick release.
-
Selected: Pick release creates move orders and automatically allocates them.
-
Cleared: Pick release creates move orders. You must manually allocate the order lines using the Inventory Transact Move Orders window.
-
-
Select Enforce Ship Sets and Ship Models to enforce that all lines in the Ship Set or Ship Model are released together.
-
If you do not select the Enforce Ship Sets and Ship Model's check box, delivery lines for ship sets and ship models are not validated during picking even if the ship set is specified on order lines.
Note: Depending on your business needs, you must set up the Enforce Ship Sets and Ship Models parameter for each warehouse.
-
If you select the Enforce Ship Sets and Ship Models check box, delivery lines for ship sets and ship models are validated during picking. All order lines in ship sets are either released completely or auto-backordered during pick release. If any portion is not available, then all lines in the entire ship set are backordered.
When you create the order, you must specify if you want to retain (or not retain) the ship set for the back-ordered lines. You can do this in the Sales Order window in Order Management.
Note: Ship sets for non-transactable delivery lines are validated during ship confirm. However, a ship set for non-transactable delivery lines is not validated during pick release because the item(s) are not picked from inventory.
-
-
Select Plan Tasks if Oracle Warehouse Management is enabled within your organization. See: Oracle Warehouse Management User's Guide.
-
Select Pull Replenishment to enable the pull replenishment process to fill up a locator up to a maximum capacity when a shortfall is detected during order release.
Note: This field supports the Forward Pick Replenishment feature in Oracle Warehouse Management System (WMS).
-
Select Retain Unstaged Quantity during Overpick if you do not want delivery details to be cancelled during overpicking; however, if deselected, then only the non-staged delivery details will be cancelled during overpicking.
For move order lines: When overpicking a move order line (in the Transact Move Order window or Mobile Picking window), you can transact a maximum of the over-tolerance quantity minus the total of all the staged/shipped/allocated Released to Warehouse quantity for the current order line. Depending on the quantity that is overpicked, the remaining non-staged details of the requested quantity is adjusted so that the sum of shipped quantity on shipped/staged details and the requested quantity on the non-staged details does not exceed the total allowed tolerance quantity.
Defining Shipping Transaction Parameters
You can define parameters for your shipping transactions such as default ship confirm document set, ship confirm rule, auto-pack options, goods dispatched account and whether to enforce packing into containers.
To define shipping transaction parameters
-
Navigate to the Shipping Parameters window.
Shipping Parameters Window - Shipping Transaction Tab

-
Select the Shipping Transaction tab.
-
Select the Default Ship Confirm Document Set that prints as part of the ship confirm process.
The list of values displays the valid delivery document sets. See: Defining Shipping Document Sets .
-
Select a Ship Confirm Rule that your organization will use as a default for auto ship confirming.
Note: If you want to define a default ship confirm rule, then you must select Ship All as your option when you define your ship confirm rules in the Ship Confirm window.
-
Select your Autopack Options. From the list of values, select either No, Yes, or Autopack Master.
-
No: Autopack will not be enabled
-
Yes: Autopack will be enabled and delivery line items will be systematically packed into LPNs based on container-item relationships
-
Autopack Master: Autopack will be enabled and delivery line items will be systematically packed into LPNs based on container-item relationships and the container will then be packed into another container, such as a freight container for transport.
You can autopack delivery lines for a delivery into LPNs (containers). When you autopack a delivery, the delivery lines are grouped together by shared attributes such as the Ship To location, and are packed into LPNs based on the delivery grouping rules.
Once a delivery is packed, the delivery line information cannot be changed until you unpack the delivery. The weight and volume is calculated at ship confirm automatically.
-
-
Select a default Goods Dispatched Account.
Use the Cost of Goods Sold (COGS) account for this organization. The sales order issue transaction uses this account if the Oracle Order Management workflow cannot determine one.
-
Select a value for Enforce Packing in Containers:
-
If you select Yes, ship confirm displays a warning when confirming a delivery or trip with unpacked delivery line items. You can bypass the warning and complete the shipment.
-
If you select No, ship confirm does not display the warning.
-
-
Save your work.
Defining Delivery Parameters
Delivery parameters enable you to define how to group delivery lines for a delivery. The mandatory default attributes are Ship From Location and Ship To Location; however, you can select additional optional grouping parameters that include:
-
Customer
-
Freight Terms
-
FOB Code
-
Intermediate Ship To location
-
Ship Method
The delivery attributes determine how delivery lines are grouped into deliveries when auto-creating deliveries. For example, if the grouping attribute Customer is selected, the delivery lines are grouped into deliveries by customer: for example, deliveries for Customer A are grouped into Delivery A, deliveries for Customer B are grouped into Delivery B.
You can select more than one grouping attribute to refine your grouping criteria further: for example, if you select Customer and Ship Method as grouping criteria, delivery lines with the same customer and carrier criteria are grouped into deliveries.
If each optional grouping attribute is checked, the delivery's corresponding field cannot be updated if delivery lines are assigned to the delivery. This ensures that the delivery lines' grouping criteria is not broken by a different attribute value: for example, if someone tries to select a different ship method.
If each optional grouping attribute is unchecked, its field in the delivery record can be updated until the ship confirm stage.
For example, if you want to change the Ship Method in the delivery and do not need to enforce it as a grouping attribute, you can deselect Ship Method.
Do not change these options if you have deliveries that are not ship confirmed.
To define delivery parameters
-
Navigate to the Shipping Parameters window.
Shipping Parameters Window - Delivery Tab
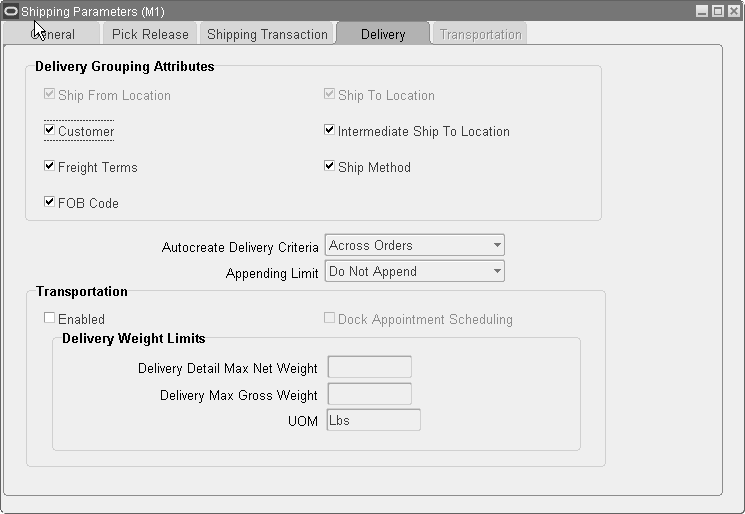
-
Select the Delivery tab.
-
Choose the attributes for grouping the delivery lines.
-
Optionally, select Autocreate Delivery Criteria if you enabled the Autocreate Delivery option on the Pick Release tab.
-
Select Within An Order to autocreate deliveries whose lines all belong to the same sales order and match on the Delivery Grouping Attributes.
-
Select Across Orders to autocreate deliveries across orders. All selected delivery lines that match on the Delivery Grouping Attributes are eligible to appear on one delivery.
-
-
Select an Appending Limit.
The appending limit enables you to indicate the point at which you want to stop the system from adding lines to a delivery (the point that ends the ability to merge deliveries). You must set the appending limit to a value other than Do Not Append in order to use the Append Deliveries option within Release Rules and the Process Deliveries SRS.
The Appending Limits include:
-
Do Not Append
-
Start of Staging
-
End of Staging
-
Start of Packing (Oracle WMS enabled organizations only)
-
Start of Shipping (Oracle WMS enabled organizations only)
-
-
Select Dock Appointment Scheduling to receive dock appointment information from Oracle Transportation Management (OTM) to Oracle E-Business Suite (EBS) as part of the planned shipment interface. The following prerequisites are required to select the Dock Appointment Scheduling option:
-
Enabled check box is selected.
-
The organization is Oracle Warehouse Management (WMS) enabled in the organization parameters.
-
-
Save your work.
Defining Freight Carriers and Ship Methods
A freight carrier is a commercial company that transports shipments to and from customers, suppliers, and internal organizations. You must set up each carrier's information as a party in Oracle Shipping Execution before shipping goods; you should assign a carrier to each delivery. You also must associate a general ledger account with each carrier to collect associated costs.
Before you set up the carriers:
-
Collect general information about each carrier
-
Determine the types of services that your carriers offer and that you use
To define a freight carrier
-
Navigate to the Carriers window.
Carriers Window

-
Enter the Name and Short Name for the carrier.
-
Enable the Active check box and Generic check box, if applicable.
Note: You can only define one generic carrier. The generic carrier is used to quote transit times based on a mode of transportation and service level when the final carrier is not yet assigned. See: Defining a Generic Freight Carrier.
-
Optionally, enter the standard carrier alpha code (SCAC).
-
Within the Services tab, select the Service Level for this carrier.
Examples of service level include: next day air, ground, and next day air early AM.
-
Select the Mode (of transportation) for the carrier.
After you enter each service level and mode combination, Oracle Shipping Execution assigns a ship method and displays it in the Ship Method field. The format of the generated ship method is <carrier short name>-<transportation mode>-<service level>, for example, Truck-LTL-Ground.
Note: You can change the name of the generated Ship Method after it has been generated as long as it is unique.
-
Optionally, enter Service Times.
Certain carriers offer services with time estimates or guarantees. Record this information in the Service Times fields and then use it later for reference when deciding which of this carrier's many services to use for a certain delivery.
Note: Assemble the times so that both of them are in the same unit of time. Enter the best case time in Service Times Min, enter the worst case time in Service Times Max, and select the unit of time of both of them in Service Times Period.
-
Select Enable if you will be assigning this ship method to organizations and to deliveries in Oracle Shipping Execution.
-
Select Web Enable if you will be assigning this ship method in Oracle iStore.
-
Save your work.
-
Click Define Service Levels if you need to define a new Service Level that is not identified.
The Oracle Shipping: Carrier Service Levels Lookup window displays the carrier service levels lookups.
-
Select any line and the New icon on the toolbar.
-
Enter a unique Code for your lookup.
-
Enter a Meaning and Description for your lookup code.
-
Optionally, enter a Tag number.
-
The From Effective Date will default to the current date.
You can modify this field to another future date if needed.
-
Optionally, enter a To Effective Date that will disable your lookup.
-
Verify that the Enabled check box is selected.
Oracle Shipping: Carrier Service Levels Lookups Window
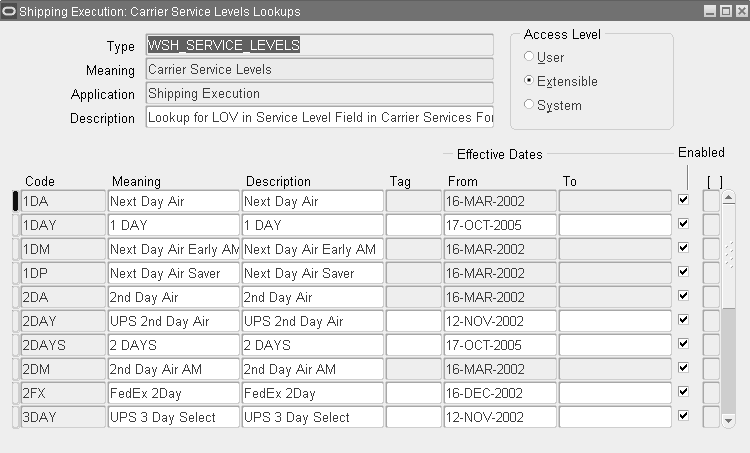
-
Save your work and return to the Carriers window, Services tab.
-
From the Services tab, click Details to view, update, or define the service level attributes specific to your carrier.
Note: If the value is set differently at the carrier and service levels, then service level values take precedence. The carrier level attributes will take precedence only if something is undefined (blank/null) at the service level.
Service Attributes Window
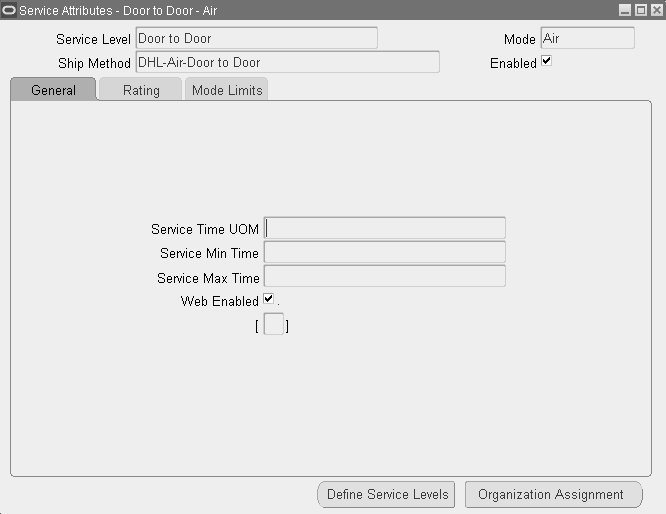
-
The General tab displays the following:
-
Service Time UOM
-
Service Min Time
-
Service Max Time
-
Web Enabled
Note: You must enable the service level in the Carrier Service Levels Lookup window when you define the service level. You cannot enable it from within the Service Attributes window.
-
-
Navigate to the Rating tab.
Service Attributes Window - Rating Tab
-
Within the UOMs region, the following fields are displayed:
-
Weight
-
Volume
-
Time
-
Distance
-
Dimension
-
-
Within the TL Rating Attributes region, the following fields are displayed:
-
Surcharge Level
-
Unit Rate Basis
-
Distance Calculation
-
Max Out of Route%
-
First Load Discount
-
Free Deadhead Distance
-
Rate Variant
-
Min Distance
-
Min Time
-
-
Click Organization Assignments.
Organization Assignments-Carrier Service Window
-
Select Assigned to assign the ship method to the organization(s) that use it.
You can assign the ship method to more than one organization.
Note: If you want to assign the ship method to all of your organizations, click Assign All to have all organizations' Assigned field selected. If you want to begin again with your assignments, click Unassign All to have all organizations' Assigned field cleared.
-
Click Done.
-
Save your work.
To define and edit carrier address/site
-
From the Carriers window, select the Addresses/Sites tab.
The information on the Addresses/Sites tab pertains to contacts at the local carrier site, such as a dispatch center. Existing addresses and contacts will be displayed if they exist. You can edit an existing site using the Edit button, or you can create a new Address/Site by clicking New.
-
Click New to create a site or Edit to edit an existing site, depending on your business needs.
Note: This documentation covers the details of creating a new carrier address/site. To edit an existing address/site, you edit the fields that require an update.
-
Select the Country from the list of values.
-
Enter a unique Site Number.
-
Enter the Address, City, State, County, Postal Code, and Province as required.
Carrier Site Details Window - Address Tab
-
Select the Contacts tab.
The information on the Contacts tab pertains to contacts at the local carrier site, such as a dispatch center.
-
Optionally, enter a contact Number.
-
Enter the Last Name, First Name, Title, Job Title, and Email Address as needed.
-
Select the Active check box to indicate whether or not the contact is a current employee.
-
Under Contact Telephones, enter the Country Code, Area Code, Telephone Number, Extension, and Type as needed.
Note: Contacts cannot be deleted.
Carrier Site Details Window - Contacts Tab
-
Save your work.
-
To enter distribution accounts, return to the Carriers window, place your cursor in the Name field and, from the Tools menu, select Distribution Accounts.
Freight Carriers - Distribution Accounts Window
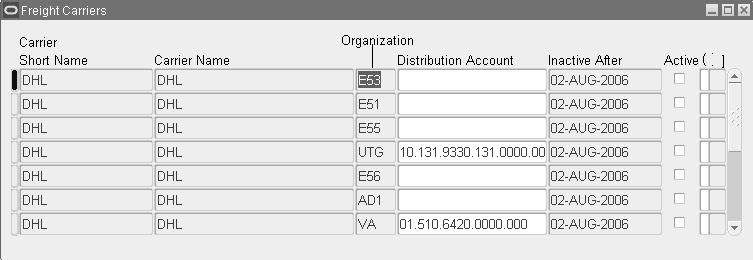
-
For each organization to which the carrier is assigned, enter the Distribution Account.
If the Inactive After field displays a date, then it is the date that the carrier became inactive in the organization (the Organization Assignments form, Active checkbox is cleared).
-
Save your work and close the Distribution window.
To define carrier contacts
-
From the Carriers window, select the Contacts tab.
-
Enter the contact information for the carrier's centralized corporate contracts, such as, sales representative, pricing manager, and customer service rep.
-
Mark the current contact as Active, mark the current telephone numbers of each contact as Active, and select one telephone number for each contact as the Primary.
To define carrier classifications
-
From the Carriers window, select the Classification tab.
-
Select the class Category that the carrier belongs to.
-
Save your work.
-
Navigate to the Carriers window.
-
Enter the Name of the generic carrier.
Note: A generic carrier cannot be an existing carrier. You must define a new carrier to be the generic carrier.
-
Enter a Short Name for the generic carrier.
-
Select the Active check box.
-
Select the Generic check box.
Note: Each organization can have only one generic carrier. If a generic carrier has already been defined for your organization, an error will display notifying you that a generic carrier has been defined.
Note: The Services tab is the only tab that is active for a generic carrier.
-
Enter a Service Level.
-
Enter a Mode.
-
Save your work.
Ship Method
Upgrade Processing
At upgrade, the information in ORG_FREIGHT will be upgraded to FND_LOOKUP_VALUES. You should not have to maintain freight carrier and ship method information immediately after the upgrade; you can then begin to maintain any changes after this point.
Ship Method Defaulting Rule
For the ship method to pass from the sales order to the Shipping Transactions form, it must appear at the line level. To accomplish this, create a defaulting rule such that ship method defaults automatically from the sales order header to all sales order lines. The procedure appears later in this section.
Default Ship Method Example
To create a ship method defaulting rule
-
Navigate to the Defaulting Setup - Entity Attributes window.
-
Choose the flashlight icon to display the Entity window.
-
Select Order Line as the entity and click OK.
-
From the attribute list, select Shipping Method.
-
Click Defaulting Rules.
-
In the Defaulting Conditions section, enter 1 as the precedence and select Always as the defaulting condition.
-
In the Default Sourcing Rules section, enter 1 as the sequence and select Related Record as the source type.
-
In the Default Source/Value section, select Order Header.Shipping Method.
-
Save your work.
-
Enter a sales order to verify that the defaulting rule is working properly. Select a ship method in the order header, enter a sales order line, then verify that the line ship method matches the header ship method.
Defining Freight Costs
You can define allowable freight costs and suggested amounts for shipments. These amounts are applied at ship confirm or once a delivery line is planned. You can add multiple freight costs to a shipment from the list of allowable freight cost types that you define.
Note: If necessary, you can override the freight costs and suggested freight amounts at ship confirm.
You can also define multiple freight costs for a specific freight cost type. For example, if you want to track different types of insurance, you can create different insurance costs under the insurance freight cost type such as liability insurance or shipping insurance.
When you add freight costs at ship confirmation for a foreign currency order, you can use either your functional currency or the order's foreign currency. If you use your functional currency, the freight charges are converted to the order currency through Oracle Receivables.
Note: You should define all your freight costs in your functional currency for uniformity. You can then modify the currency to match the order, and modify the amount on the Confirm Shipments window, as necessary.
Prerequisites
-
Define your Freight Cost Type Lookups.
-
To pass freight costs to Order Management and Accounts Receivable so that the customer is invoiced (for example, freight terms = Prepay and Add), then a pricing modifier and pricing formula are required.
To define freight costs
-
Navigate to the Freight Cost Types window.
Freight Cost Types Window
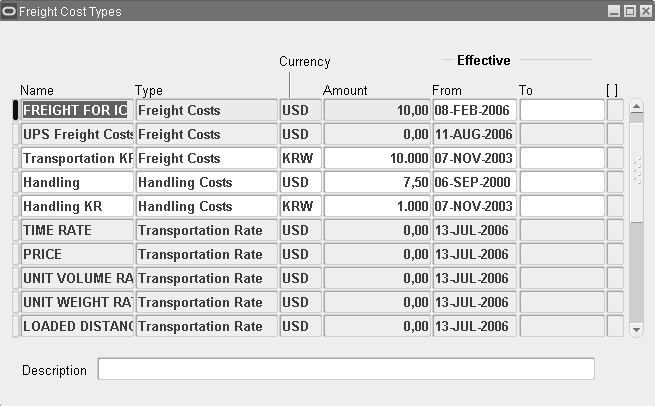
-
Enter a Name for the freight cost.
-
Select the Type of freight cost.
-
Select a Currency for the freight cost.
-
Enter the Amount for the freight cost.
You can change this amount during ship confirmation. You can enter 0 as the amount.
-
Optionally, enter Effective dates for the freight cost.
-
Save your work.
Related Topics
Oracle Pricing User's Guide
Defining Shipment Transit Times
Within the Inter-Org Shipping Methods window, you can specify the ship method, intransit times, load weight and the volume capacity for any movement between two location types.
Note: Within Oracle Inventory, you must set up the relationship between organizations before using this window. You must also specify the Ship Method and other associated parameters for the interlocation movement of the goods.
To enter ship methods
-
Navigate to the Transit Times window.
Transit Times Window
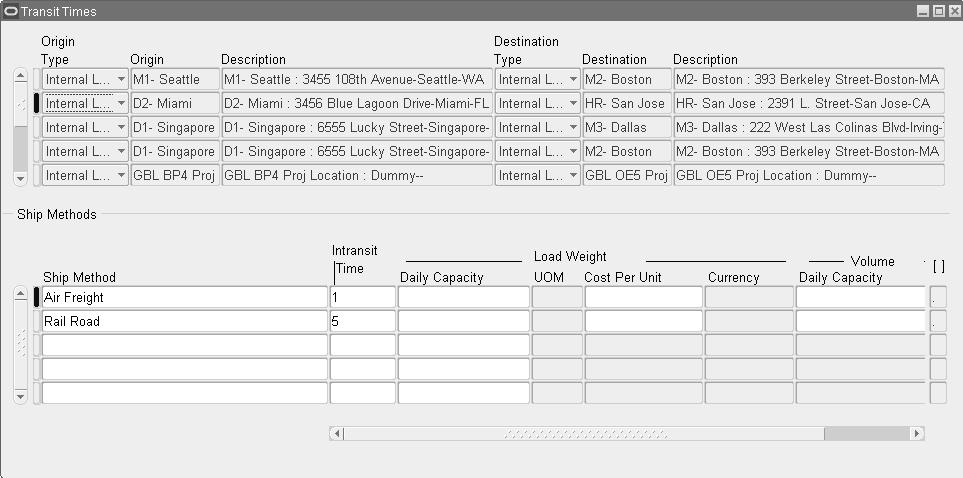
-
Click the New icon in the tool bar.
-
In the Origin Type column, select one of the following:
-
Internal Location
-
External Location
-
Region
-
Zone
-
-
In the From Location column, select where the shipment will ship from.
-
In the Destination Type column, select Internal Location, External Location, Region, or Zone depending on the scenario for which you are defining the transit times and other information.
Note: The destination type you select will determine the outcome in the Destination column. For example, if you select Internal Location, then the Destination list of values will contain only internal organizations. If you select Region as the Destination Type, then click the Destination field and the Select Regions window displays to enable you to find a defined region.
-
In the Destination column, select a location that the shipment is destined for.
-
Within the Ship Methods region, select a Ship Method.
Note: If a ship method is not defined for an internal location, then the lead-time will not be taken into consideration for internal requisitions.
-
Enter an Intransit Time.
Note: For a given ship method, ASCP/GOP will use the transit time to calculate ship or arrival date.
-
Enter Daily Capacity to define the maximum allowable daily load weight capacity that may be transported via this ship method.
Note: Daily Capacity serves as a parameter in Oracle Advance Planning applications and a penalty factor may be associated with exceeding the daily capacity.
-
Enter UOM for the weight unit of measure used for daily capacity, for example pounds, tons, or kilograms.
-
Enter Cost Per Unit for goods transported using this ship method for the specified From Location and Destination Type.
-
Enter the Currency associated with the cost per unit.
-
Enter the Daily Capacity to define the maximum allowable daily volume capacity that may be transported using this ship method.
Note: Daily capacity serves as a parameter in Oracle Advance Planning applications and a penalty factor may be associated with exceeding the daily capacity.
-
Enter UOM for the volume unit of measure used for daily capacity, for example cubic feet or cubic meter.
-
Select Default Method if you want this ship method to default into the Sales Order pad for this combination of From Location and Destination Type when Oracle Advanced Planning and Scheduling is installed.
Global Order Promising will use the default ship method and its associated transit time if no shipment is specified on the sales order.
-
Save your work.
To find and modify information related to ship methods:
-
Navigate to the Transit Times window.
-
Click the Find icon in the tool bar.
-
Enter the From and To criteria and click Find.
-
Within the Ship Methods region, add another Ship Method and the supporting information or modify the information for an existing ship method.
Defining Document Sequences
You can define document sequences to generate a unique numbering sequence for documents in an Oracle Applications product. For example, document sequencing can be used to uniquely number invoices generated by Oracle Receivables and bills of lading and packing slips in Oracle Shipping Execution.
Using the Sequence Assignments window, you assign your sequence to number only those documents that satisfy rules you define. Document sequences ensure that every document your users create can be accounted for.
To define document sequences
-
Navigate to the Document Sequences window.
Document Sequences Window
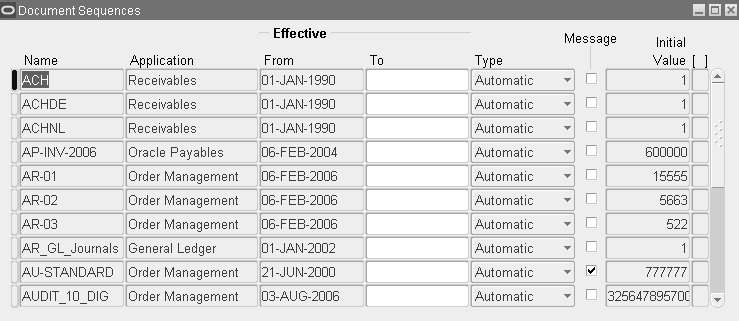
-
Define the document sequence Name and Application.
Note: Once the sequence name and application are selected, they cannot be changed.
-
Select an Effective From and To date.
The From field automatically defaults to the current date, and once a sequence is defined, the start date cannot be changed. If you leave the To field blank, your document sequence does not expire; and if you enter an end date and define your sequence, the end date cannot be modified later. If there is no end date defined and there are no active assignments for a sequence, you can disable the sequence by entering the current date as the end date.
-
In the Type field, select Automatic. If you have certain localizations, select Gapless only under the direction of Oracle Support.
-
Enable the Message box to have each document display a message to inform the user of the sequence name and value (number).
The message displays in the message line near the bottom of the window.
Note: This check box only applies to sequences with the automatic type of numbering. Messages appear only on form displays, and are not written to a request's log file. Once a sequence is defined, the message choice cannot be changed.
-
Enter an Initial Value for the first document in your sequence. This field only applies to sequences with automatic or gapless numbering type.
If you leave this field blank, the first document is automatically assigned a value of 1. Once a sequence is defined, this initial value cannot be changed.
You can assign valid operating dates for document sequences, and set them to run manually or automatically during ship confirm and pick release. See: Application Object Library.
Defining Document Categories
You can create a document category for shipping documents such as a bill of lading (BOL) and assign it to a location or all locations. You can create more than one document category for a document, for example, if you want each carrier to have its own bill of lading number series, you can set up a unique document category to accommodate this requirement.
You must define a category for each bill of lading and packing slip that you want to create. You can create a bill of lading category for each ship method/carrier or define a single bill of lading category for all. When you use a different bill of lading sequence for each carrier, you can easily identify the carrier by looking at the bill of lading number.
In addition, you can tie a category to a specific location and have a different BOL sequence for the same carrier departing from a different location. For example:
-
For a Trucking Co. Freight shipment departing from warehouse 1, the bill of lading number is WH1-12345-Trucking Co
-
For a Trucking Co. Freight shipment departing from warehouse 2, the bill of lading number is WH2-55466-Trucking Co
When defining a document sequence for the packing slip, you can create a category for every location or one category for all locations. The document category is specific to a document type and location. The document category is also specific to the application and responsibility from which you accessed the form. If you create a document category called Viking BOL for WH1 in responsibility Oracle Order Management Super User, you must be working as Oracle Order Management Super User to have visibility of this category when assigning document sequences to it.
To view existing document categories
-
Navigate to the Document Categories - Summary window.
Document Categories - Summary Window
-
Click the Find icon to display the list of existing document categories.
-
Select the document category, and click OK to display it in the Document Categories Summary window.
-
Select the document category and click Open.
To define a document category
-
Navigate to the Document Categories window.
Document Categories Window
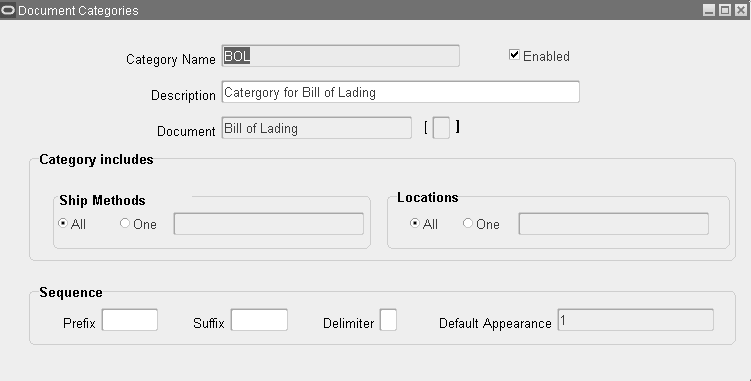
-
Enter a Category Name and Description.
-
Select the Document assigned to the category; for example, Bill of Lading or Packing Slip.
Note: You can override this selection when you create documents; however, selecting a default here provides faster document definitions.
-
Within the Category Includes region, select the Ship Methods and Locations for the document types:
-
All: All ship methods and inventory locations are included.
-
One: Only the selected ship method and inventory location are included.
Decide at the initial setup whether to set up document categories and locations for All or One (individual) ship method and location. For example, you initially set up document category name SEQ3204 for bills of lading on deliveries shipped via carrier Viking. Then, you select One in the Ship Methods region. Later, you decide to enter a setup for All ship methods for the document bill of lading. The individual bill of lading setup information is overridden by the All ship methods setup.
-
-
In the Sequence region, enter the Prefix, Suffix, and Delimiter for the sequence number to be printed on the document.
-
Preview the sequence name in Default Appearance.
Note: Enter any alphanumeric values for Prefix and Suffix. Typically, enter a value that identifies the location, carrier, or date in which document is generated. The delimiter separates the prefix and suffix from the generated number and can be any character.
-
Save your work.
Assigning Document Sequences to Document Categories
After defining document sequences and categories, assign document sequences to document categories. Assigning sequences is application and category specific.
You cannot change a document category definition. If you find incorrect information, create a new category with the correct information, re-assign document sequences to the new category, and disable the old category.
Either leave alone the existing Category or Disable it cautiously since it may affect other documents using the setting. For that reason disabling cannot be undone.
To assign document sequences to document categories
-
Navigate to the Sequence Assignments window.
-
Select Oracle Shipping as Application.
-
Select the Document Category.
-
Select the ledger.
-
Select the Method:
-
Null
-
Manual
-
Automatic
Within the Assignment tab:
-
-
Enter the Start and End Dates.
-
Choose the Document Sequence.
Defining Shipping Document Sets
You can group related shipping documents and other reports in a set that can be printed at pick release or ship confirm. You can include a variety of shipping documents in a set such as a Bill of Lading and Packing Slip Report and determine the print sequence.
Shipping Execution provides three pre-defined (seeded) document sets:
-
All Pick Release documents: You can set the default Pick Release Document Set in the Pick Release tab of the Shipping Parameters window
-
Ship Confirm documents: You can set the default in the Document Set field of the ship confirm window
-
Pack Slip only (at ship confirm): You can set the default in the Document Set field of the ship confirm window
Note: You can create additional document sets based on your business needs.
To define document sets
-
Navigate to the Shipping Document Sets window.
Shipping Document Sets Window
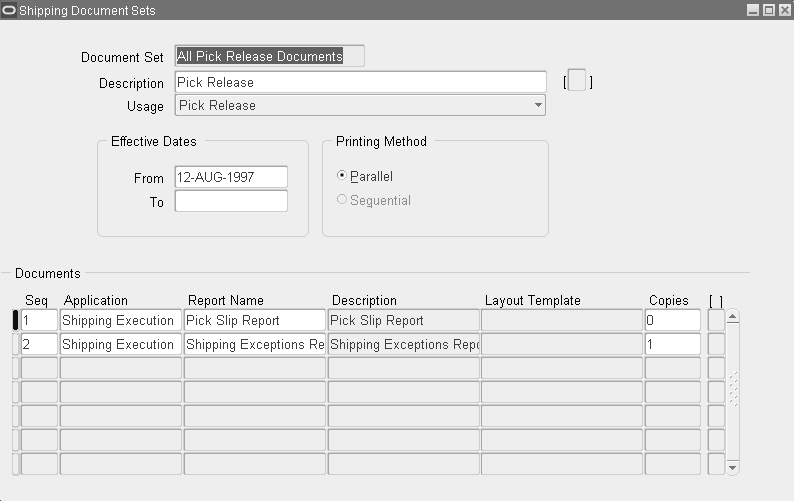
-
Enter a Name and Description for the new document set.
-
Select the Usage for the document set:
-
Pick Release: For printing at pick release
-
Ship Confirm: For printing at ship confirm
-
-
Optionally, enter the Effective Dates for the document set.
-
The default Printing Method is parallel. This submits the reports for printing separately, each with a different request ID. If one of the reports in the document set fails to print, the other reports will print.
-
Enter a Sequence number.
-
Select Shipping Execution as the Application.
-
Select the Report Name to be included in the document set.
Selecting a report with PDF Output enables you to select a layout template. If you select a report without PDF Output, then the Layout Template field is not updatable.
-
If you selected a report with PDF Output, then use the list of vales to select a Layout Template for your report.
Oracle XML Publisher enables you to extend various Oracle Shipping Execution reports to suit your business needs. The following list represents those seeded Oracle Shipping Execution report layout templates within Oracle XML Publisher:
-
Bill of Lading
-
Commercial Invoice
-
Mailing Label
-
Master Bill of Lading
-
Packing Slip
-
Pick Slip
-
Vehicle Load Sheet Summary
-
-
Enter the number of Copies that you want.
If number of copies for a document is specified in the document set form, then copy count is used. If it is not specified (that is, it is null), then the profile option Concurrent: Report Copies is used. If the profile option Concurrent: Report Copies is also null, then 1 copy is printed.
-
Save your work.
To edit document sets
-
Navigate to the Shipping Document Sets window.
-
Query an existing document set.
-
Edit the existing Effective Dates, Sequence of documents, or documents contained within the document set.
-
Save your work.
Choosing Printers for Shipping Documents and Labels
You can assign shipping documents and selected reports to specific printers for multiple levels. The levels are:
-
User
-
Responsibility
-
Application
-
Site
-
Zone/Subinventory
-
Format
-
Organization
Note: Oracle Shipping will look for a printer at the User level first. If one exists, then it is selected, if one does not exist at the User level, then the system will look for a printer at the Responsibility level. This pattern will continue until a printer is found at one of the levels. If more than one printer is setup at a level, then you must use the Default check box to specify the preferred printer at that level. You should only have one default printer at each level.
If the document to be printed is a Pick Slip report, the system will look at the Subinventory level first. If a printer exists at the Subinventory level, then it will select that printer, but if a printer does not exist, then the system will look at the Organization level and then through the rest of the levels.
For example, you can assign pick slips and pack slips to your warehouse tractor feed printer, your mailing labels to a tractor feed printer stocked with blank labels, and other documents to a laser printer in your order entry office.
The window consists of a Document and a Printer tab: the Documents tab displays all the documents assigned to a printer, while the Printers tab displays all printers assigned to a document.
If a user or responsibility is not specified, Shipping Execution uses the printer assigned to the application.
To assign documents to a printer
-
Navigate to the Choose Document and Label Printers window.
Choose Document and Label Printers Window
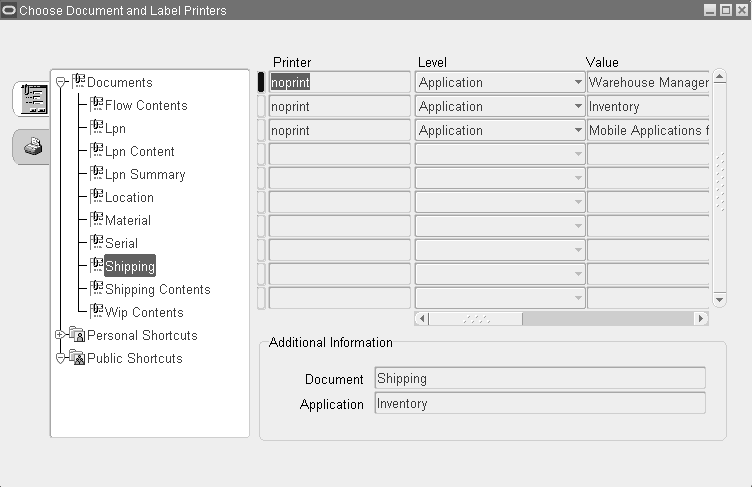
-
Choose the Documents icon to display documents currently assigned to printers.
-
Select the document from the Documents list.
If the document is not listed, select New from the File menu to display documents not yet assigned to a printer. Select the document and click OK. The document is added to the Documents list and you can start assigning printers to it.
-
In the Printer field, select the printer that you want assigned to the document.
-
In the Level field, select the operational level for the printer. You can choose from the following:
-
User
-
Responsibility
-
Application
-
Site
-
Zone/Subinventory
-
Organization
-
Format
Format is used for Radio Frequency Identification (RFID) and Electronic Product Code (EPC) compliant label printing. EPC information is also included on the Departure Shipment Notice Outbound (DSNO) file. This option is used with Oracle Warehouse Management only.
RFID EPC compliance enables the recognition and tracking of products using the RFID EPC label. Customers would use this feature before ship confirm at the line, box, or pallet level. The benefit is the ability to track the shipment before and after it leaves the shipper.
See Oracle Warehouse Management User's Guide for more information on RFID EPC usage.
Note: You must assign the shipping document to at least one printer at the Application level.
Note: Use Zone/Subinventory and Format when Oracle Warehouse Management is installed.
Note: There is one document printing exception. Pick Slip can be printed at the Subinventory level.
-
-
Optionally, enter any comments.
-
Click Enabled to activate the printer assignment.
-
Enable the Default box if you want this printer as the default.
Only one printer can be used as the default. For example, if a document is printed in multiple printers by one user, only one printer should be assigned as the default.
Note: The default printer check box is visible only in the Document tab.
-
Save your work.
To assign printers to documents
-
Navigate to the Choose Document and Label Printers window.
Choose Document and Label Printers Window - Printers Tab
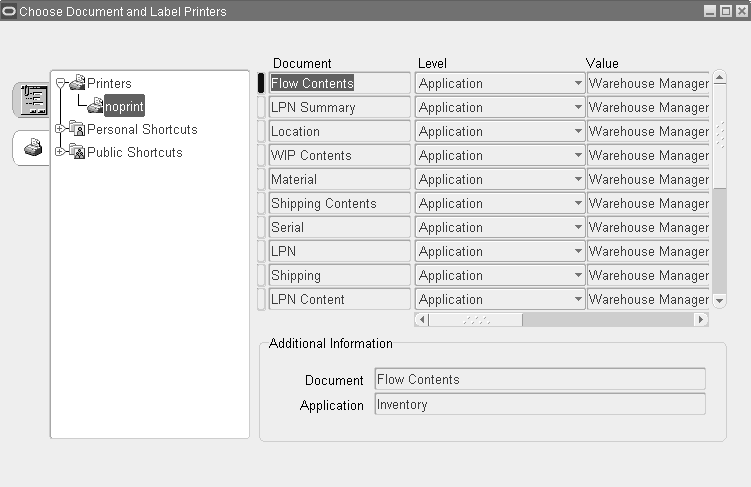
-
Choose the Printers icon to display printers currently assigned to documents.
-
Select the printer from the list.
If the printer is not listed, select New from the File menu to display new printers. Select the printer and click OK. The printer is added to the Printers list and you can start assigning documents to it.
-
In the Document field, select the document to be assigned to the printer.
-
In the Level field, select the operational level for the printer. You can choose from Application, Site, Responsibility, User, Zone/Subinventory (with Oracle Warehouse Management), Organization, and Format (with Oracle Warehouse Management).
See: Oracle Warehouse Management User's Guide
-
Optionally, enter any comments.
-
Enable the Enabled box to activate the document/printer assignment.
-
Save your work.
Defining Pick Slip Grouping Rules
You can create grouping rules to organize how picking lines for released sales orders are grouped on to pick slips. For example, if you select Delivery as a grouping criteria, all picking lines for the same delivery are grouped together on a pick slip. If there are multiple deliveries, multiple pick slips are created.
You can also define your grouping criteria further by selecting additional grouping attributes. For example, if you select Delivery and Carrier as grouping criteria, picking lines for the same delivery and carrier are grouped together on a pick slip.
Related Topics
Oracle Inventory User's Guide.
Defining Release Rules
You can create default pick release rules that are applied at pick release in the Release Sales Orders window. Each rule can be set up with its own set of unique pick release parameters depending on the pick release criteria required.
When pick release is run, the pick release is performed based on the parameters set up in the selected pick release rule. For example, you can create a specific rule that pick releases only backordered lines.
Note: Although you can also enter the pick release criteria at pick release time without creating a rule, creating a rule is more efficient if you frequently run the same pick release. Also, note that it is required when releasing using SRS or when using the Auto Pick Pack and Ship features.
To define release rules
-
Navigate to the Release Rules window.
Release Rules Window - Order Tab
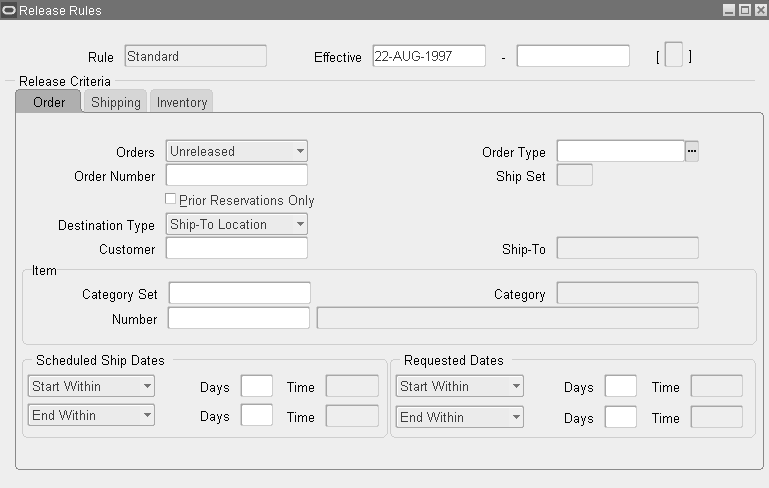
-
Enter a Rule name and the Effective dates.
Within the Order tab, select one or more of the following criteria for your query. Select only the criteria that you want for the pick release:
-
Select the Orders and Order Types that you want included in the pick release:
-
Unreleased: The rule will select order lines only in unreleased status.
-
All: The rule applies to all lines not pick released.
-
Backordered: The rule will select order lines with delivery details only in backordered status
-
Replenishment Completed: The rule will select order lines only in replenishment completed status.
Note: The Replenishment Completed status is valid only if Oracle Warehouse Management is enabled for the organization involved.
-
-
Enter the Order Number.
-
Select the Ship Set.
-
Client: Select the client name from the list if you have set LSP mode as the value for WMS: Deployment Mode profile option. See Oracle Inventory User's Guide for client setup.
-
Optionally, select the Prior Reservations Only check box if you only want to pick release already reserved quantity for lines. This is allowed only for the allocation method of Inventory Only.
-
Select the Destination Type:
-
Region
-
Zone
-
Ship-To Location
-
-
Select the Customer and the Ship-To location for the customer.
-
Within the Item region select a Category Set, Category, and Item Number
-
Select the range of Scheduled Ship Dates and/or Requested Dates.
You can indicate whether you want the system to look at the scheduled ship date or the requested date. You can then enter the number of days in the past or future, as well as the time, relative to current system date that you want included in the release criteria. This means that it is possible to set up a desired release window in terms of number of days rather than only static dates. If your organization has a calendar assigned, then the release rule will honor non-working days (for example, Saturday, Sunday) to select delivery lines for pick release. If the rule shown were applied to Organization V1 and that Organization has Saturday and Sunday as non-working days on their organization calendar, then the following would occur: If pick release is run on Thursday, the delivery lines for Thursday, Friday, Monday, and Tuesday (system date + 3 working days) are selected for pick release. A negative value may be used in the Days field to include past dates which enables backordered lines to be considered for pick release.
Alternatively, you can create a pick release rule using static dates by selecting the options Start On and End On in the Scheduled Ship Dates region and the Requested Dates region.
Release Rules Window - Shipping Tab
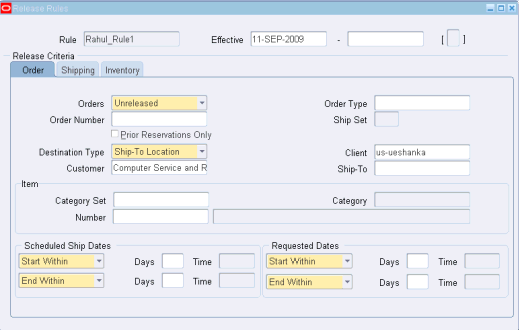
-
Select the Ship Method to pick release by a certain ship method.
-
Select the Shipment Priority, and Ship From location.
-
Enable the Include Assigned Lines box if you want to include assigned lines in the pick release.
-
Select a Document Set to be printed during pick release.
-
Select a Release Sequence Rule if required.
-
From the list of values, select either Yes or No to Autocreate Deliveries.
-
If you selected Yes to Autocreate Deliveries, then in the Autocreate Delivery Criteria field select either Across Orders or Within an Order.
-
Select either Yes or No in the Auto Pick Confirm field. Auto pick confirm is not allowed for the allocation method of Cross Dock.
-
From the Autopack Deliveries list of values, select No if you do not want to utilize autopacking, select Yes to enable autopacking, or select Auto Pack Master if you want to utilize autopacking the item into its primary container and additionally automatically packing the primary container into a defined master container.
You must setup container-item relationships to support the functionality for auto pack or auto pack master. See: Oracle Inventory User's Guide.
-
Select a Ship Confirm Rule, if you want to utilize auto ship confirming.
-
Select Yes or No to Append Deliveries (consolidate delivery lines.)
Note: The appending limit must be defined as a value other than Do Not Append in the Shipping Parameters window before you can append deliveries within a release rule. Additional prerequisites for setting Append Deliveries flag include:
-
Organization must be specified
-
Autocreate Delivery Criteria must be Across Orders
-
Autocreate Delivery must be Yes
-
Auto Pick Confirm must be No
Release Rules Window - Inventory Tab
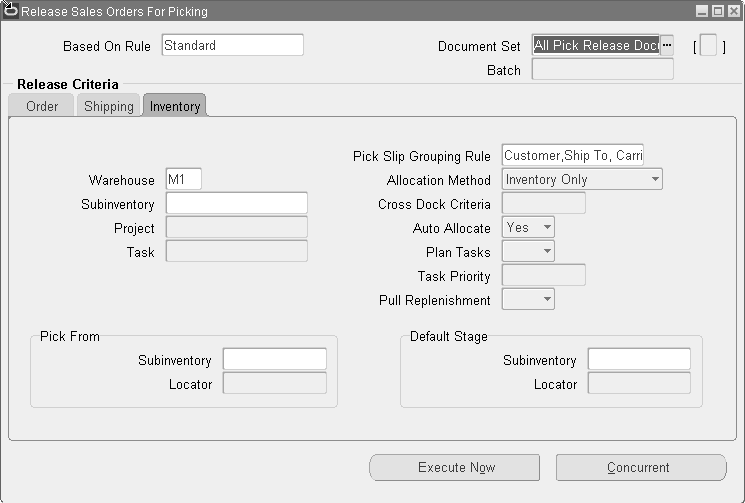
-
-
Select the Warehouse (organization code) and default Pick Slip Grouping Rule for grouping the pick slips.
-
Optionally, enter a specific Subinventory for your rule.
This value determines which lines are considered for picking based on the subinventory name assigned to the sales order line.
-
If Oracle Project Manufacturing is installed, specify a Project and Task for your rule.
-
If Oracle Warehouse Management is installed, then you can select an Allocation Method to be used:
-
Inventory Only: (Default) If you select this allocation method, then pick release allocates inventory materials only.
-
Cross Dock Only: If you select this allocation method, then pick release allocates cross docking materials only.
-
Prioritize Inventory: If you select this allocation method, then pick release checks for inventory availability before all other sources, then allocates material from other sources if needed.
-
Prioritize Cross Dock: If you select this allocation method, then pick release checks for material available for cross docking from all other sources other than Inventory, then allocates materials from Inventory if needed.
The Allocation Method field cannot be updated unless Oracle Warehouse Management is installed.
See: Oracle Warehouse Management User's Guide and Oracle Warehouse Management Implementation Guide for more information.
-
-
If Oracle Warehouse Management is installed and if you selected Cross Dock Only or Prioritize Cross Dock in the Allocation Method, then select a Cross Dock Criteria.
Enables a rule to be named, which limits the cross docking criteria. This field is disabled if the organization is not WMS Enabled, or the Allocation Method is Inventory Only.
See: Oracle Warehouse Management User's Guide and Oracle Warehouse Management Implementation Guide for more information.
-
Select Auto Allocate if you want to allocate the order lines automatically at pick release.
If Auto Allocate is selected, order lines are automatically allocated and reserved. If not selected, you must allocate the lines and create reservations using the Inventory Transact Move Orders window.
-
Select either Yes or No to Enable Plan Tasks if Oracle Warehouse Management is installed and you choose to utilize the Plan Tasks feature.
-
Enter a Task Priority.
-
Select whether you want to include order lines with the status of pull replenishment.
Note: You cannot select the pull replenishment value if the Allocation Method value is Cross Dock Only or Prioritize Inventory. For more information, see the Oracle Warehouse Management User's Guide, Multi-Step Putaway and Replenishment.
-
In the Pick From region, select the Subinventory and Locator of the default picking location.
Pick From Subinventory determines where the line items are picked/allocated from.
-
In the Default Stage region, select the Subinventory and Locator of the default staging area.
-
Save your work.
Defining Release Sequence Rules
You can define release sequence rules to specify the order in which eligible picking lines are allocated to Inventory during pick release. You can release the picking lines by:
-
Order number
-
Outstanding Invoice Value
-
Scheduled Date
-
Departure Date
-
Shipment Priority
You can assign a priority level to one or more attributes with 1 being the highest priority and 5 being the lowest. You can also define whether you want the picking lines released in ascending or descending order.
For example, if you select the Ascending button for Order, picking lines are released by ascending order number--Order 1 is released first, then Order 2, Order 3, and so on. If the Descending button is selected, the picking lines are released by descending Order number from highest to lowest--Order 4 is released first, then Order 3, Order 2, and Order 1.
Note: You can define either the Outstanding Invoice Value attribute or the Order attribute for the release sequence rule, but you cannot select both for the same rule. No two attributes can be given the same priority.
You can edit existing release sequence rules, but you cannot change the name of an existing release sequence rule.
To define release sequence rules
-
Navigate to the Release Sequence Rules window.
Release Sequence Rules Window
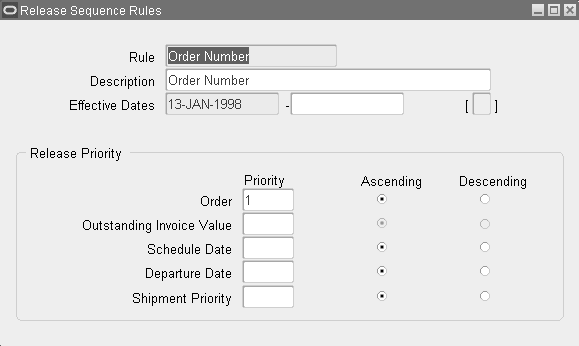
-
In the Rule field, enter a name for your rule.
-
Enter a Description.
-
Enter the Effective Dates for the rule.
-
Within the Release Priority region, specify a Priority (1, 2, 3, 4, or 5 where 1 is the highest priority and 5 is the lowest) for one or all of the following attributes:
-
Order Number: Releases picking lines based on order number. If you define a priority for the Order Number attribute, you cannot define a priority for the Outstanding Invoice Value attribute.
-
Outstanding Invoice Value: Releases picking lines based on the outstanding invoice value. If you define a priority for the Outstanding Invoice Value attribute, you cannot define a priority for the Order Number attribute.
-
Scheduled Date: Releases picking lines based on scheduled date.
-
Departure Date: Releases picking lines based on departure date.
-
Shipment Priority: Releases picking lines based on shipment priority.
-
-
Select the Ascending or Descending toggle next to each attribute.
If you select the Ascending toggle next to the Scheduled Date attribute, for example, the picking lines with the earliest Scheduled Date are released first. If you select the Descending toggle, the picking lines with the most recent Scheduled Date are released last.
-
Save your work.
Defining Transportation Calendars
You can use a transportation calendar to define valid shipping days and hours for a shipper, receiver, and carrier. Using these calendars is optional.
The shipping and receiving calendars are used to designate when your customers, customer sites, suppliers, supplier sites, and internal organizations can ship and receive.
Note: The ship confirm process uses these calendars to warn you of invalid shipping days and hours.
The calendars do not affect scheduling performed by Oracle Advanced Planning and Scheduling.
For example, if you are shipping a delivery on Tuesday to arrive at your customer's site on Wednesday, ship confirm checks the calendars to confirm the following:
-
Your warehouse can ship on Tuesday
-
Your customer can receive goods on Wednesday
-
Your carrier is able to pick up and drop off the deliveries on those days
Note: If the transportation calendars are not defined, every day and time is assumed to be valid for shipping and receiving.
During Ship confirm, the application validates the actual departure against the following:
-
Shipping calendar associated with the location of the organization. If there is no assignment of a shipping calendar to the organization location, and if there is any assignment at organization level (shipping calendar), then the application defaults the shipping calendar of the assignment at the organization level and validates against that.
-
Receiving calendar for customer. If there is any assignment of receiving calendar at customer location, then the application considers it for validation. Otherwise, the application defaults the calendar at customer level (if any).
-
For carrier calendar, if there are any assignments at organization location or customer location, then the application considers these calendars. Otherwise, the application considers the calendar defined at organization level (for a particular carrier), and the one defined at customer level (if any).
Prerequisites
A calendar must be created and defined in the Oracle Bills of Material (BOM) application as a Workday calendar before it can be assigned to a shipper, receiver, or carrier.
Note: The start and end dates for the calendar and the location's shipping and non-shipping patterns must be defined.
To define a transportation calendar
-
Navigate to the Assign Calendars window.
Assign Calendars Window
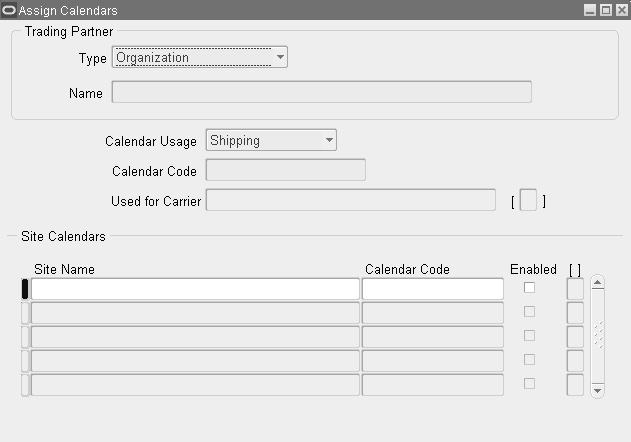
-
Select the role of the Trading Partner: Supplier, Customer, Organization, or Carrier. For example, if the trading partner is a customer, then click Customer.
If you selected Carrier as the trading partner, you must select whether the carrier is used for pick up/delivery to a supplier, customer, or organization and then select the name of the supplier, customer, or organization in the Used For fields.
-
Select the Trading Partner Name to whom you are assigning the calendar.
-
Select the Calendar Usage.
The calendar usage depends on the trading partner you selected. For example, if the trading partner is receiving your goods, create a Receiving Calendar.
-
Select the Default Calendar Code.
You can override the default calendar code by selecting a new calendar code for each site as described below.
-
Click Show Candidates to display the sites for the selected trading partner.
-
If you want to override the default calendar code, then select the new calendar code in the Calendar Code field.
-
Select the Enabled box to activate the calendar for that site.
-
Save your work.
Defining Shipping Exceptions
During the shipping and transportation of goods, unforeseen shipping exceptions can occur that conflict with the actual requirements of the shipper, transportation carrier, or customer.
If these exceptions are not handled promptly or properly, it could result in reduced customer satisfaction and loss of business and revenue for a company. Tracking exceptions can also be helpful to identify and correct defects in the business process.
The seeded exceptions are logged automatically against delivery lines, LPNs, deliveries, and trip stops when specific events occur. The events are shown in the descriptions below:
| Exception Name | Description |
|---|---|
| WSH_BATCH_MESSAGE | Logged against a delivery, trip stop, or batch to store the messages generated during the automated shipping processes such as auto-pack and ship-confirm. The seeded value is INFO. If this is changed to ERROR, the exceptions generated, even though they are coded as ERROR, will not stop a shipment. It is suggested that you leave this exception as INFO to avoid any confusion. |
| WSH_CARRIER_CREATE_DEL | Failed to auto apply routing rules at delivery creation. |
| WSH_CHANGED_QUANTITY | Logged when quantity is changed and line is staged OR packed OR a planned delivery. Reasons can be: WSH_CANCELED_PACKED WSH CANCELED_PLANNED WSH_CANCELED_RELEASED Exception can be logged against delivery or container or line itself. If the line is packed, then the exception is logged against the LPN record. |
| WSH_CHANGED_SHIP_METHOD | Logged if the Document Category for generating a bill of lading is defined so that a different document numbering sequence is established for each ship method (i.e. Ship Method radio button for One is selected). If so, the exceptions is logged against trip when changing ship method of trip causes delivery legs' BOL numbers to become deleted. |
| WSH_CHANGE_DEL_GROUP | Logged against delivery or LPN when a delivery grouping attribute (mandatory or enforced) is changed that causes the delivery line to become unpacked from its LPN or unassigned from delivery or both. |
| WSH_CHANGE_SCHEDULE | Logged against delivery or LPN when the organization is changed or when order line is unscheduled and the delivery line is released to warehouse or staged and is assigned to delivery or LPN or both. |
| WSH_CHANGE_SCHED_DATE | Logged against delivery line when order line's scheduled date is moved into future. Rationale: we do not want to ship the line early. |
| WSH_CUSTOMER_MERGE_CHANGE | Logged against delivery when a customer merge occurs that affects delivery details within the delivery for one of the merge customers. The exception could be caused by a change in Ship To address. |
| WSH_DELIVERY_APPENDED | Logged if an appending delivery takes place. This exception is logged only if appending has taken place on a delivery created in a previous batch. |
| WSH_DEL_SCPOD_PURGED | Logged when the Ship to Delivery workflow has been purged. |
| WSH_EXPORT_COMPL_FAILED | Logged when the export compliance screening failed for the delivery. |
| WSH_EXPORT_COMPL_SKIP | Logged when the export compliance screening is skipped for the delivery. |
| WSH_HONOR_PICK_FROM | Logged when pick release completes with a Warning. |
| WSH_IB_DELIVERY_CHANGE | Logged whenever ship to location is changed on the purchase order and the delivery details are assigned to a delivery, or whenever shipping control is changed from Buyer to Supplier on the purchase order and the Routing Response has not been sent, or whenever the requested quantity for assigned delivery detail is changed on the purchase order and the Routing Response has been sent and the delivery firm status is Contents Firm. |
| WSH_IB_DEL_ATT_CHANGE | Logged against a delivery, whenever the exception WSH_IB_DETAIL_CHANGE is logged against an assigned delivery detail line. |
| WSH_IB_DEL_DATE_EXCP | Logged against a delivery whenever the earliest delivery detail line date is greater than the ultimate drop off date of the delivery, or the latest delivery detail line date is less than the ultimate drop off date of the delivery. |
| WSH_IB_DETAIL_CHANGE | Logged against delivery details whenever Ship To location is changed and Routing Response has been sent, or whenever request date is changed on the purchase order and Routing Response has been sent, or whenever Requested Quantity is changed on the purchase order and Routing Response has been sent. |
| WSH_IB_RR_NUMBER_CHG | Logged when a routing request number has changed during Vendor Merge. |
| WSH_IB_SF_LOCN_CODE_CHG | Logged when Ship From Location code has changed during Vendor Merge. |
| WSH_IB_TS_DATE_EXCP | Logged against Trip Stops whenever the earliest delivery detail line date is greater than the planned arrival date of the trip stop or the latest delivery detail line date is less than the planned arrivals date of the trip stops. |
| WSH_INVALID_DELIVERY_PLANNING | Logged if WSH cancels/deletes delivery line that is in a planned delivery (This could happen because order line is canceled, or its quantity is reduced). |
| WSH_INVALID_PACKING | Logged against LPN when a delivery grouping attribute (mandatory or enforced) is changed that causes the delivery line to become unpacked from its LPN. |
| WSH_INVALID_PACKING_PLANNING | Invalid Packing Contents Firming: Contents Firmed packing has changes. |
| WSH_INV_EXPECTED_ERROR | Logged from Pick Release when Inventory returns error. |
| WSH_LAUNCH_WF_FAILED | Logged when Ship to Deliver workflow could not be launched for the entity. |
| WSH_LOCATION_REGIONS_1 | Location regions mapping failure - no non-country regions mapped to location. |
| WHS_LOCATION_REGIONS_2 | Location regions mapping - number of regions mapped to locations has changed. |
| WSH_PARTY_MERGE_CHANGE | Logged when there are changes to a delivery detail due to party merge. |
| WSH_PICK_BACKORDER | Logged against batch during Pick Release for any of these cases: Other lines in Ship Set/SMC being backordered due to one line being backordered. Other lines in Ship Set/SMC being backordered due to insufficient quantities for one line. Normal line being backordered. |
| WSH_PICK_HOLD | Logged against the concurrent request ID or the batch during Pick Release when holds are found. |
| WSH_PICK_PRIOR_RSV | Logged against the delivery lines if Prior Reservations is specified during Pick Release but quantity is not reserved or Ship Set or Ship Model Complete line is partially reserved. |
| WSH_PICK_XDOCK | Logged when supply is not found at picking time. |
| WSH_PICK_XDOCK_NR | Logged when a non-reservable line is skipped for cross-docking. |
| WSH_PLAN_DELIVERY_FAIL | Logged when the system failed to firm contents of the delivery at end of append delivery. |
| WSH_PR_REQ_EXPORT_COMPL | Delivery requires export compliance screening before ship confirmation. |
| WSH_PR_SUB_EXPORT_COMPL | Delivery submitted for export compliance screening before ship confirmation. |
| WSH_RATE_CREATE_DEL | Logged when the system failed to calculate the freight rate at delivery creation. |
| WSH_RATE_MIXED_TRIP | Logged when a trip has deliveries both eligible and ineligible for freight rating. |
| WSH_ROUTE_TRIP_FAIL | Logged when there are no routing guide rules found for the trip. |
| WSH_SC_REQ_EXPORT_COMPL | Delivery requires export compliance screening at ship confirmation. |
| WSH_SC_SUB_EXPORT_COMPL | Delivery submitted for export compliance screening at ship confirmation. |
| WSH_SHPST_IGNRE_FR_PLNG | Logged when Ignore for Planning status for the line is different than other ship set lines. |
| WSH_UNPACK_ITEM | This is a packing exception. |
You can also define unique exceptions and processes for exception handling in the Define Shipping Exceptions window.
To define shipping exceptions
-
Navigate to the Define Shipping Exceptions window.
Define Shipping Exceptions Window
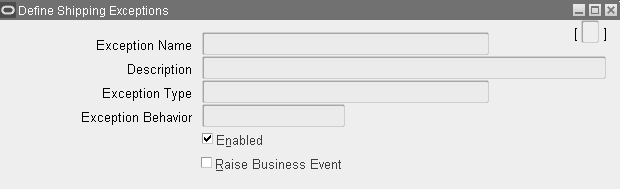
-
Enter a unique Exception Name to identify the exception.
-
Enter a Description.
-
Select the Exception Type that you want to create: Batch, Delivery, Picking, or Trip exception.
-
Select one of the following default Exception Behavior settings:
-
Error: The exception must be handled before the entity can be closed.
-
Information Only: The exception must be handled before the task can be completed. However, you can override it so that the entity (for example, delivery, trip, trip stop) can be closed.
-
Warning: A warning is given but the entity can be closed.
-
-
Enable the exception.
-
Select Raise Business Events to use Oracle Workflow for notification and exception handling.
-
Save your work.
Defining Containers and Vehicles
You define containers and vehicles in Oracle Inventory, as inventory items.
To define containers and vehicles in Oracle Inventory
-
Navigate to the Items window.
-
In the Inventory tabbed region, select Transactable.
-
Within the Physical Attributes tab, Container region, complete the following:
-
Select either Container or Vehicle
-
Enter Container Type
-
Enter the container's Internal Volume
-
Enter the container's Maximum Load Weight
-
Enter the container's Minimum Fill Percent
-
-
Within the Physical Attributes tab, Weight region and Volume region, enter the Unit of Measure and Unit Weight of the empty container.
Defining Container-Item Relationships
When setting up container-item relationships, you define the maximum quantity of load items (delivery lines) that can be packed into a container: for example, defining that a maximum of 12 items can be packed into a small box. These relationships are used to:
-
Calculate/estimate the number of containers required for delivery lines in a delivery or trip. This enables you to use the auto-pack function to auto-pack delivery line items into new containers. The number of containers required to pack the delivery lines is automatically calculated based on the container-item relationships.
-
Calculate the fill percentage for containers when the Fill Percentage Shipping parameter is set to Quantity. See: Defining Shipping Transaction Parameters.
In addition to packing delivery lines in containers, Oracle Shipping Execution features an Auto-pack Master function that enables you to auto-pack delivery line items into containers, and then auto-pack these containers into master containers such as pallets or railway boxcars.
The innermost container is considered the detail container item, and the pallet or boxcar is the master (outermost) container. If you want to use the auto-pack master feature, you must set up a relationship that relates the container (the load item) to a master container such as a pallet (the container item).
In the following example, auto-pack master would create one box for up to five engines and pack up to four boxes onto a pallet.
| Load Item | Container Item | Max Load Qty | Preferred |
|---|---|---|---|
| Engine | Box | 5 | Y |
| Container | Pallet | 4 | Y |
To define container-item relationships
-
Navigate to the Container-Item Relationships window.
-
Select the Container Item from the list of values.
-
Select the load item that you want to place in the container item.
-
Define the maximum quantity of items that can be placed in the container item.
-
If the container-item relationship is a common shipping configuration in that inventory organization, then select the Preferred flag.
-
Save your work.
Related Topics
Auto-packing delivery Lines into Containers, Oracle Shipping Execution User's Guide.
Finding Container-Item Relationships
You can search existing container-item relationships to find:
-
Load items associated with a container (LPN) or container type
-
Containers (LPNs) associated with a particular load item
For example, a shipper may search for container-item relationships to find what load items packed in a certain type of container, or the type of container used to pack a particular load item.
If one or more relationships for the selected item, container, or container type are found, the relationships display in the Container-Item Relationships window.
The Preferred Flag box in the Container-Item Relationships window indicates the preferred relationship that is used when auto-packing LPNs. See: Auto-packing delivery Lines into Containers, Oracle Shipping Execution User's Guide.
To find container-item relationships
-
Navigate to the Container-Item Relationships window.
-
Click the Find icon to display the Find Customer-Item Relationships window.
-
Enter only the criteria required for your search:
-
Container Item: Enter the name of the container item to find container-load relationships for that container
-
Load Item: Enter the name of the load item to find container-load relationships for that load item
-
Container Type: Enter the name of the container type to find all relationships for that container type and the related load items
-
-
Click Find to display the relationships in the Container-Item Relationships window.
-
Optionally, click New to create a new container-load relationship.
Using LPNs/Containers in Shipping Execution
There are a number of ways that you can pack items into License Plate Numbers (LPNs)/containers. Auto-Pack enables you to automatically pack items into specific types of containers. Auto-Pack Master enables you to automatically pack items into a specific LPN/container type and automatically pack the LPN/container into another type of LPN/container. You can manually pack items into previously created containers. You can also pack items into previously created LPNs/containers using the Packing Workbench, that allows for packing equal quantities of lines into multiple containers and also for packing full quantities of lines into one LPN/container at a time.
Aside from the actual packing of line items into LPNs/containers, you can also:
-
Create multiple LPNs/containers using a specified prefix, numeric string, and a suffix
-
Assign serial numbers to LPNs/containers
-
Define the order that you want to place items into LPNs/containers
Oracle Warehouse Management (WMS) handles other LPN/container functionality not available in Shipping Execution, including:
-
Transactable Containers out of Inventory: Treat LPNs/containers as a subinventory/storage location within your warehouse
-
Receiving Full Containers: Receive LPNs/containers from a shipment and automatically receive all items within the LPNs/containers into inventory
-
Dimensions: Specify height, width, and length of LPNs/containers and items
LPN/Container Setup Steps
Before you can begin packing lines into LPNs/containers, you need to perform the following setup steps, in the following sequence:
-
Weights and volumes for the items that will be involved in the packing process. See: Oracle Inventory User's Guide.
-
Container types See: Oracle Inventory User's Guide
-
Vehicle types See: Oracle Inventory User's Guide
-
Container-load relationships
-
Shipping parameters
-
Optionally define default Master and Detail containers for customer items
-
Optionally, define LPN name defaults.
Defining LPN Name Defaults
You define LPN name defaults in Oracle Inventory organization parameters. See Oracle Inventory User's Guide for more information.
To define LPN name defaults
-
Navigate to the Oracle Inventory Organization Parameters window, Revision, Lot, Serial and LPN tab.
-
Within the LPN Generating Option region, enter the following:
-
Total Length: Enter the total length of your defaulting LPNs.
-
Prefix: The prefix entered here will be the default prefix for your LPNs.
-
Starting LPN Number: Enter the number that you want your LPNs to start with.
The numbering starts from the base number and increments by 1. For example, if you enter 100 as the base number for the first instance of a container, the second is numbered 101, the third 102, and so on. The Base Number is defaulted if you specify it in the Starting LPN Number field within the Organization Parameters window/Revision, Lot, Serial and LPN tab.
-
Suffix: Enter a Name Suffix for the container name.
The Name Suffix is defaulted if you specify it in the Suffix field within the Organization Parameters window/Revision, Lot, Serial and LPN tab.
-
UCC-128 Suffix (Modulo-10): Select the UCC-128 Suffix option if you want to enable the Uniform Code Council, 128 ASCII character set suffix functionality.
If you select the UCC-128 Suffix option (checked is Yes, unchecked is No), then you will not be able to specify the Name Suffix. The default suffix for UCC-128 is "No." The UCC-238 Suffix is defaulted if you enable it by selecting the UCC-128 Suffix (Modulo-10) check box within the Organization Parameters window/Revision, Lot, Serial and LPN tab.
-
Enter the Pad to Width.
The default Pad to Width is the total number of digits in the base number. For example, the default Pad to Width for the container name VIS100BOX is 3.
-
Setup Container-Load Relationships for Containers and Items
You set up Container-Load Relationships if you intend to use auto-pack functionality. The relationship determines the product items that can be automatically packed into specified containers, and in what quantity.
To setup container-load relationships for containers and items
-
Navigate to the Container-Item Relationships window.
Note: The purpose of setting the container-load relationship is to establish a link between item and container type, or container and container. This allows the Auto-Pack and Auto-Pack Master functionality to perform automatic packing.
Container Item Relationships
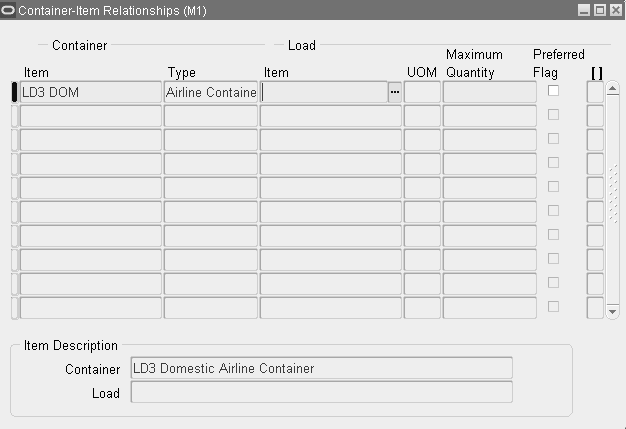
-
Select the Container Item.
-
Select the Load Item.
-
Define the Maximum Quantity of the of the Load Item that should be placed in the Container Item.
Note: You can specify container-item relationships or container-container relationships.
Continue creating container-load relationships for all containers and items you plan to use. Container-load relationships are used for packing whenever the Percent Fill Basis Shipping Parameter is set to Quantity and also when you use the Auto-Pack and Auto-Pack Master features to pack items into containers.
-
Select the Preferred Flag toggle to use the container-load relationship as the preferred relationship between items and containers (and containers and containers).
You could potentially have multiple load-relationships between items and different containers. When you select the Preferred Flag toggle for a container-load relationship, Auto-Pack and Auto-Pack Master will use the Preferred relationship when packing that item. For example, if you have two container-load relationships for Item A—one with Container A, which is the preferred LPN/container, and one with Container B—the maximum load defined in the relationship with Container A will be used when you select Auto-Pack or Auto-Pack Master for packing Item A. You must set the Preferred Flag for one of the Container-Load Relationships you have for an item in order to use Auto-Pack or Auto-Pack Master for that item. If you do not set the Preferred Flag for one of the relationships for an item, you will receive an error message.
-
Save your work.
To define LPN/container related shipping parameters
-
Navigate to the Shipping Parameters window.
Shipping Parameters
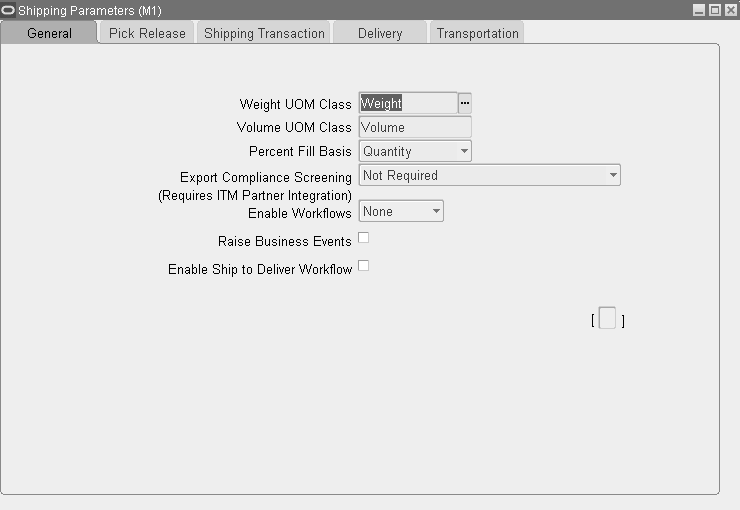
-
Select the Percent Fill Basis. Select from Quantity, Weight, or Volume.
This is used to determine whether or not containers have met their minimum fill percentage and also used to determine how autopack should work based on quantity, weight, or volume.
For example, if you define a container-load relationship in which CONTAINER A can hold quantity 5 of ITEM A, you select Quantity in this field, and you define the minimum fill percentage for CONTAINER A to be 75 percent, you must have at least quantity 4 of ITEM A in CONTAINER A to meet your minimum fill percentage. If you select Weight or Volume, the Percent Fill is calculated based on the weight or volume (physical attributes) you have defined for your items.
Shipping Parameters: Shipping Transaction

-
From the Shipping Transaction tab, set the Enforce Packing in Containers display list to Yes if you want Shipping Execution to display an error message during Ship Confirm when you try to ship a delivery that contains unpacked delivery lines.
Note: You must define shipping parameters for each warehouse.
-
Save your work.
See: Oracle Shipping Execution User's Guide
Oracle Inventory User's Guide
Creating LPNs/Containers
You can automatically or manually create containers. Containers are created automatically when using the Auto-Pack and Auto-Pack Master functionality by using a defined Container-Load Relationship between a type of LPN/container and an item. Shipping Execution uses the container type, the item, and the defined maximum quantity of the item that will fit in the LPN/container and then automatically creates the required number of containers with automatically generated names. Grouping attributes are also taken into consideration when packing. See: Defining Delivery Parameters.
However, to manually pack items into LPNs/containers using the Pack and Packing Workbench functionality, you must manually create LPNs/containers.
To manually create LPNs:
-
Navigate to the Shipping Transactions form and find your Lines.
-
Select the action Create LPNs.
Create LPNs Window
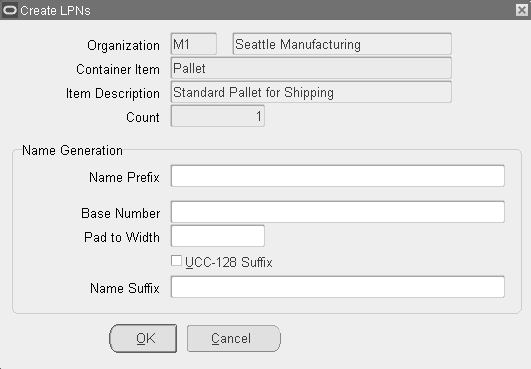
-
Enter your Organization.
-
From the list of values, select the Container Item.
The Container Item is the container itself. Container items are created in Oracle Inventory.
-
Enter a Count for the number of container instances you want to create.
-
Within the Name Generation region, enter your Name Prefix.
The Prefix is defaulted if you specify it in the Prefix field within the Organization Parameters window/Revision, Lot, Serial and LPN tab.
-
Enter a Base Number.
The numbering starts from the base number and increments by 1. For example, if you enter 100 as the base number for the first instance of a container, the second is numbered 101, the third 102, and so on. The Base Number is defaulted if you specify it in the Starting LPN Number field within the Organization Parameters window/Revision, Lot, Serial and LPN tab.
-
Enter the Pad to Width.
The default Pad to Width is the total number of digits in the base number. For example, the default Pad to Width for the container name VIS100BOX is 3.
-
Select the UCC-128 Suffix option if you want to enable the Uniform Code Council, 128 ASCII character set suffix functionality.
If you select the UCC-128 Suffix option (selected is Yes, deselected is No), then you will not be able to specify the Name Suffix. The default suffix for UCC-128 is "No." The UCC-238 Suffix is defaulted if you enable it by selecting the UCC-128 Suffix (Modulo-10) check box within the Organization Parameters window/Revision, Lot, Serial and LPN tab.
-
Enter a Name Suffix for the container name.
The Name Suffix is defaulted if you specify it in the Suffix field within the Organization Parameters window/Revision, Lot, Serial and LPN tab.
-
Click OK to create the container instances.
-
Save your work.
Once created, you can select the containers from a list of values that displays when you choose the Pack option in the Shipping Transactions form. You can also query up existing (created) containers using the Query Manager (via the LPNs or Lines and LPNs options).
Define Default Containers for Customer Items
This section does not apply to standard items. Use the information in this section if you are using customer items.
To define default containers for customer items:
-
Navigate to the Customer Items Summary window.
Customer Items Summary
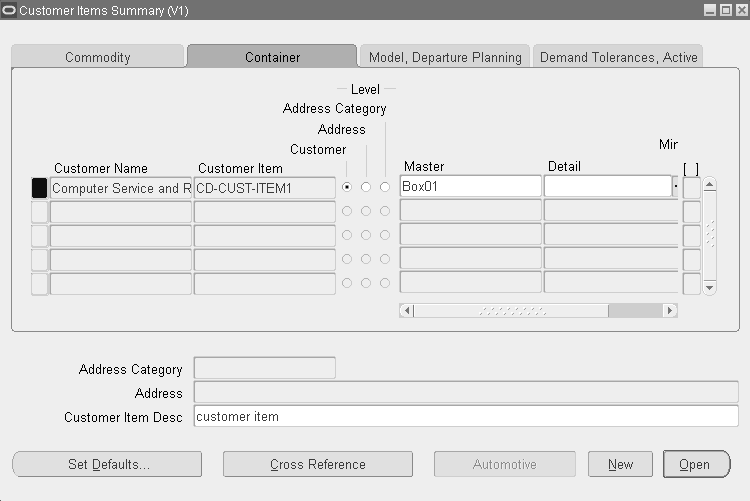
-
Query your customer item and define default Master and Detail containers in the Containers tab.
These containers will default in the Master and Detail fields in the Shipping Transactions form when you query the item associated with your customer item. When you Auto-Pack, these containers will be used to pack the items. If a container-load relationship is defined for the item and the detail LPN/container (and for the detail and master containers) and the Percent Fill Basis is set to Quantity, Shipping Execution will use the Container-Load Relationship to determine the required number of containers. If no relationship is defined, the weight and volume of the items and the maximum load weight or volume for the LPN/container will determine how the items are packed into containers (and containers into containers.)
-
Save your work.
Packing Items into LPNs/Containers
You can pack items into LPNs/containers in the following ways:
-
You can manually pack items into an existing LPN/container (Pack option)
-
You can automatically pack an item into a LPN/container (Auto-Pack)
-
You can automatically pack an item into a LPN/container using Pick/Pack/Ship
-
You can automatically pack an item into a LPN/container, and pack that LPN/container into another (parent/Master) LPN/container (Auto-Pack Master)
-
You can automatically pack equal quantities of multiple items into multiple LPNs/containers (Equal Packing in the Packing Workbench)
-
You can automatically pack line items into a LPN/container until you fill the LPN/container or use all of the items, and then continue packing the next line into the next LPN/container (Full Packing in the Packing Workbench)
-
Concurrently using the Auto Pack concurrent process.
Manual Packing
Manual packing involves packing items into LPNs/containers that have already been created using the Create LPN action in the Lines and LPNs tab in the Shipping Transactions form. Manual packing can be accomplished by selecting the line (in the Lines and LPNs tab in the Shipping Transactions form) that you want to pack into the LPN/container and selecting the Pack option from the Actions list, which displays a list of values containing previously created LPNs/containers.
Manual packing does not use a container-load relationship when packing, but the weight, volume, and percent fill (based on the setting for the Percent Fill Basis Shipping parameter) are calculated to determine whether or not the items will fit into the LPN/container. A warning message will display if the total weight and volume of the items is greater than the available capacity of the LPN/container. A warning will also display if the minimum fill percentage is not attained.
You might want to use this method of packing if you have several items (maybe pencils, paper clips, and pads of paper) that are heading to the same customer and the customer does not care about what type of LPN/container is used. So, you could query up your delivery lines in the Shipping Transactions form (using the Query Manager), multi-select your lines, choose Pack from the Actions list, and then select the LPN/container you have created from the resulting list of values.
Auto-Packing Standard Items
Auto-Pack is an option on the Actions list in the Lines and LPNs tab in the Shipping Transactions form that will automatically calculate and create the number of LPNs/containers required to pack all of the items and then pack all of the items into the created LPNs/containers.
Auto-Pack Master behaves identically to Auto-Pack except that it goes one step further and packs the created detail LPNs/containers into one or more parent (master) LPN/container. If you have multiple container-load relationships set up for the same item (with different LPNs/containers), Auto-Pack will look at the Preferred toggle on the Container-Item Relationships window to determine which relationship to use. You must define one of the container-load relationships for your items as the preferred relationship. If you do not toggle on the Preferred Flag for one of your container-load relationships, then you will receive an error when you try to use Auto-Pack or Auto-Pack Master for that item.
For any other type of item you are Auto-Packing, you must have a container-load relationship set up. If you try to Auto-Pack items into a LPN/container and no container-load relationship is established, then you will receive an error message. Auto-Pack will use the container-load relationship to determine the type of LPN/container needed to pack the item. The setting of the Percent Fill Basis Shipping parameter is used to determine how many containers are going to be needed to pack all of the items. If the Percent Fill Basis Shipping parameter is set to Quantity, then the Maximum Quantity defined for the container-load relationship (being used to determine the type of LPN/container) will be used to calculate the necessary number of LPNs/containers. If the Percent Fill Basis is set to Weight or Volume, then the physical attributes (weight or volume) that are defined for the item and LPN/container are used to calculate the total number of required LPNs/containers. Once the type of LPN/container is determined and the required number of LPNs/containers are calculated, Auto-Pack/Auto-Pack Master creates those LPNs/containers and systematically packs the items into the LPNs/containers. For example, let's say you had a Container-Load Relationship set up so that 6 of Item A fit into Container A and Percent Fill Basis was set to Quantity. If you have a delivery line with a quantity of 12 of Item A and you run Auto-Pack, Shipping Execution will create two LPNs/containers, split the line into two lines with a requested quantity of 6, and pack the first split line into the first container and pack the second split line into the second LPN/container.
Auto-Pack Master packs not only an item into a LPN/container (detail container in this scenario), but it will also pack the detail container into a master container. For example, you have a delivery line with a quantity of 12 of Item A and a container-load relationship set up so that 6 of Item A will fit into Container A and 2 of Container A will fit into Container B (and Percent Fill Basis is set to Quantity). If you run Auto-Pack Master, the line will be split into 2 lines of 6, the first line will be packed into the first LPN/container, the second line will be packed into the second LPN/container, and the two Detail Containers (2 Container As) will be packed into Container B.
Auto-Packing Customer Items
There are two different ways to specify the type of LPN/container to be used when using Auto-Pack or Auto-Pack Master: specify a Master and/or Detail LPN/container for a customer item, or set up a Container-Load Relationship between the item(s) and LPN(s)/container(s).
If you are Auto-Packing a customer item with a pre-defined Master and/or Detail association (set up in the Customer Item Summary window), then Auto-Pack will use those container types to create the LPNs/containers required and pack the customer item. To determine how many LPNs/containers are needed, Auto-Pack will use the Percent Fill Basis Shipping Parameter. If Percent Fill Basis is set to Quantity, Auto-Pack will look for Container-Load Relationships set up for the item and the Detail Container, as well as for the Detail Container and the Master Container. If these Container-Load Relationships are not set up, then Auto-Pack will use the weights and volumes for the item and the available capacities defined for the LPNs/containers.
For example, your customer preferred that you pack the monitors that you make into a cardboard box (one in each box) and that you pack twelve cardboard boxes (containing the monitors) on a pallet for shipment. You can assign the specific cardboard box (type of container) as the detail LPN/container for the customer item and the pallet as the Master Container for the customer item in the Customer Item Summary window. When the order is booked and the line is pulled into (imported into) Shipping Execution and viewed in the Lines and LPNs tab in the Shipping Transactions form, the cardboard box and the pallet container types will default into the Master and Detail fields for the line. When you run Auto-Pack for this line and Percent Fill Basis set to Quantity, Auto-Pack uses the Container-Load Relationship set up for the item and the LPN/container. If no Container-Load Relationship is set up, Auto-Pack uses the weight and volume and LPN/container capacity for the item and LPN/container to calculate the required number of LPNs/containers. Once the number of LPNs/containers is calculated, the LPNs/containers are created and the items are packed into the LPNs/containers. Then, the total number of Master LPNs/containers are calculated based on the number of Detail containers created, and the appropriate number of Detail LPNs/containers are systematically placed into the appropriate Master LPN/container. So, if you set up a Container-Load Relationship where a maximum of 1 monitor fit in 1 cardboard box and 12 cardboard boxes fit on one pallet and your customer ordered 24 monitors, the 24 monitors would be placed in 24 cardboard boxes (1 in each box) and then 12 cardboard boxes would be placed on each of the 2 pallets that were created.
Packing Workbench
The Packing Workbench allows for two different methods of packing:
-
Equal Packing
-
Full Packing
Equal Packing involves packing equal amounts of items from one or many lines into one or many LPNs/containers. Full Packing involves packing the entire quantity of one delivery line into one or many LPNs/containers, and then packing the entire quantity of the next delivery line into one or many LPNs/containers. If the entire quantity of the first line does not fill a LPN/container, items from the next delivery line will be added to the LPN/container with available space until it is filled.
To use the Packing Workbench, you must select the delivery lines and the LPNs/containers in the Lines and LPNs tab in the Shipping Transactions form that you want to pack and then select Packing Workbench from the Actions list. You must have queried up lines and previously created LPNs/containers or you must have queried up lines and then created new LPNs/containers. When selecting lines in the Shipping Transactions form to use in the Packing Workbench, you can use the Packing Calculator (accessed by clicking on the bar on the far right hand side of the Shipping Transactions Form or by selecting Packing Calculator from the Tools menu) to determine whether or not the lines might be able to fit in the LPNs/containers that you have selected. The Available Capacity region shows how much weight and volume the LPNs/containers that you have selected can hold and the Item Total region shows the total weight and volume for all of the lines you have selected.
Once you have selected your lines and LPNs/containers and have selected Packing Workbench from the Actions list, the Packing Workbench displays containing your selected LPNs/containers on one tab and your selected lines on the other tab. The total Available Capacity for the LPNs/containers and the weights and volumes for the items are displayed on the left side of the Packing Workbench. By default, the Pack toggle is next to your lines and LPNs/containers that are selected. If you turn the Pack toggle off for a LPN/container or line, then that line or LPN/container will not be used for packing and, hence, the Available Capacity and Item Total regions will be updated accordingly.
Equal Packing
The first method of packing within the Packing Workbench is Equal Packing. Equal Packing is explained using the following example: Your customer ordered 10 computer monitors and 10 keyboards. The order consists of two lines, one for 10 monitors and one for 10 keyboards. Once the order is booked, you can query your lines in the Shipping Transactions form. If you wanted to pack one of each item into a LPN/container, you would create 10 LPNs/containers (using a container type that was large enough to hold one of each item.) You would then select your two lines and your ten LPNs/containers and pull them into the Packing Workbench. Once in the Packing Workbench, select the Equal Packing Method and choose the Pack button. The Packing Workbench will split the two lines into ten lines for each item and pack 1 monitor and 1 keyboard into each LPN/container. So you will end up with 10 LPNs/containers that have 1 monitor and 1 keyboard in each.
There is a potential drawback to using Equal Packing. When you use Equal Packing, lines are split evenly so that equal quantities will be packed into the selected LPNs/containers. Container-Load Relationships and weight and volume limitations within containers are not used when packing the items equally into LPNs/containers. In other words, the lines are split and packed into the LPNs/containers prior to performing weight and volume validations. Validations based on weight and volume do take place to determine whether or not the LPNs/containers are over-packed (weight or volume exceeds maximum weight or volume for a LPN/container), resulting in the display of Warning messages, but not until after the lines are split. Once the lines are split, you cannot return the lines to their original status (if one line for quantity of 6 was split into two lines for quantity of 3, you cannot return the two lines into one line for quantity of 6). So, if you split the lines and find out that you really want to pack them differently, you will have to pack the resulting split lines rather than the initial pre-split lines.
Full Packing
Full Packing involves taking items in a delivery line and packing them completely into one LPN/container, then taking the next line and packing its entire quantity. If the items in the first delivery line do not completely fill the first LPN/container, the items in the second delivery line will be added to the first LPN/container until it is filled. If all of the items in the second delivery line were not used to fill the first LPN/container, then the remaining items are packed into the second LPN/container.
For example, you have two delivery lines, one consisting of 10 of Item A and one consisting of 10 of Item B, and you wanted to pack them into three LPNs/containers. If the Percent Fill Basis Shipping Parameter was set to Quantity, the Packing Workbench would use the Container-Load Relationship set up to determine the maximum number of items that could fit in the first LPN/container. If Percent Fill Basis was set to Weight or Volume, the Packing Workbench would use the weight and volume defined for the item and the maximum load weight or volume defined for the LPN/container to calculate the total number of items that could fit in the first LPN/container. Let's say Percent Fill Basis is set to Quantity and a Container-Load Relationship is established that says that 5 of Item A will fit in the first LPN/container. Five of Item A will be placed in the first LPN/container, then the Packing Workbench calculates the total number of Item As that will fit into the second LPN/container. If a Container-Load Relationship is set up so that 10 of Item A will fit in the second LPN/container, the Packing Workbench will place the remaining 5 of Item A in the second LPN/container. The Packing Workbench then calculates that the LPN/container is only fifty percent filled, so the Packing Workbench will look at a Container-Load Relationship set up for Item B and the second LPN/container. If the Container-Load Relationship for Item B and the second LPN/container was defined so that 4 of Item B will fit, the Packing Workbench takes fifty percent of the total defined Container-Load Relationship (2 of Item B) and packs that quantity into the second LPN/container. This leaves us with 8 of Item B. The Packing Workbench then looks at the Container-Load Relationship between Item B and the third LPN/container. If 10 of Item B fits into the third LPN/container, the Packing Workbench will pack the remaining 8 in the third LPN/container.
Additional LPN/Container Functionality
Assigning Serial Numbers to LPNs/Containers
You can assign serial numbers to your LPNs/containers. When you create your LPNs/containers in the Master Items window, you can define your LPNs/containers as requiring serial numbers by navigating to the Inventory tab and choosing At Sales Order Issue in the Generation field in the Serial region. Once you create your LPNs/containers in the Shipping Transactions form, you can assign serial numbers to your LPNs/containers. Since LPNs/containers are not transacted items (LPNs/containers are not stored in inventory), you are not required to enter a serial number even though the LPN/container is serialized.
If you assign a LPN/container (Detail Container) to another LPN/container (Master Container), the serial number of the Master Container will automatically default into the Master Serial Number field for the Detail Container. If you change the serial number for the Master Container, which will automatically change the Master Serial Number for the Master Container, Shipping Execution will automatically update the Master Serial Numbers for all Detail Containers assigned to that Master Container.
Generating a Loading Sequence for Deliveries/Containers
You must have imported order lines with a defined Production Sequence Number or you must have entered a Customer Production Sequence Number in Others tab in the Lines region of the Sales Orders window. Generating a loading sequence is optional. You would only generate a loading sequence when you wanted to place items in a LPN/container or on a delivery in a certain order. For example, if an automotive manufacturer's assembly line needed specific items in a certain order, they might want to have items shipped to them placed in a certain order in the LPN/container or delivery so that they could remove the items in the most efficient order for their assembly line. The loading sequence is printed on the Vehicle Load Sheet Detail report.
To generate a loading sequence for deliveries/containers:
-
Navigate to the Shipping Transactions form.
-
Select the Delivery tab (a delivery must exist).
-
Click Details.
-
In the Lines Loading field, select a loading pattern.
You can select from Forward (1, 2, 3, 4), Reverse (4, 3, 2, 1), Forward Inverted (2, 1, 4, 3), and Reverse Inverted (3, 4, 1, 2).
Loading sequence determines the order in which the delivery lines are placed in the LPN/container or the delivery, depending on whether or not you have defined a Detail Container for the delivery line. If you have specified a Detail Container, the loading sequence determines the order in which the delivery line is placed into the LPN/container. If you have specified a Master Container or if you have not specified any LPN/container for the delivery line, the loading sequence will determine the order in which the delivery line will be placed in the vehicle.
-
Select the action Generate Loading Seq.
If you have ITEM A with a Production Sequence Number of 1 and ITEM B with a Production Sequence Number of 2 and you select Reverse as your Lines Loading order, ITEM B would have a Loading Order Number of 1 and ITEM A would have a Loading Order Number of 2 (ITEM B would be loaded first and ITEM A would be loaded second).
If a Customer Production Sequence Number is not assigned to the delivery line, you can enter a Loading Sequence to determine the order in which the delivery line will be loaded into the LPN/container or delivery.
International Trade Management Partner Integration
You use the International Trade Management (ITM) application if you conduct business across international borders and need to ensure that your cross-border trade complies with the export and import rules, regulations, and duties of all countries involved in the transaction (trade compliance).
To provide export compliance and resolve regulatory screening issues, Oracle Applications enables you to use International Trade Management Adapter to communicate with ITM applications that are skilled in the laws of import/export and in acquiring and maintaining this information. With the ITM integration, there is global trade functionality in the standard business transactions.
Oracle Order Management provides a workflow subprocess called Export Compliance Screening - Line that you can insert into your workflows to execute the ITM functions. This workflow subprocess is part of the seeded Line Flow - Generic, With Export Compliance workflow process.
ITM Partner Integration Enhancements Oracle Order Management introduces Generic Export Compliance Request via XML for all the export related compliance checks. These include Restricted Party Screening, Embargo Country Screening, License Determination, Document Generation as well as other partner supported screening such as EPCI.
The partner ITM application evaluates the transaction for export compliance and responds to Oracle Applications with the overall compliance pass or fail status for each of the order lines. The audit trail of the compliance checks is maintained in the partner ITM application.
An eBusiness Suite installation can integrate with a 3rd party vendor's ITM application or 3rd party vendor's / Oracle's Global Trade Management (GTM) application. You cannot integrate with both of these applications (ITM and GTM) at the same time.
Setting Up Constraints
There is a constraint that does not allow user-splits if the line is interfaced to the ITM adapter (Export Compliance Screening activity notified) and is waiting for response. This constraint is seeded by default and cannot be removed in order to prevent the second line split from hanging in Workflow.
Additional constraints at the line level do not allow changes to ship-from, ship-to and all other parties such as Sold to, Bill to, or Deliver to. These constraints are non-system constraints that can be disabled.
Setting Up Workflows
If you plan to use the Generic Export Screening feature, then complete one of the following:
To set up workflows:
-
For the Order Types and Line Types that you want to perform export screening, assign the line level export screening workflow process Line Flow-Generic, With Export Compliance.
-
Enable the Export Compliance Screening – Line sub-process into existing line level workflows.
See: Oracle Shipping Execution Implementation Manual for information on setting up the ITM Adapter.
Export Compliance Screening Line
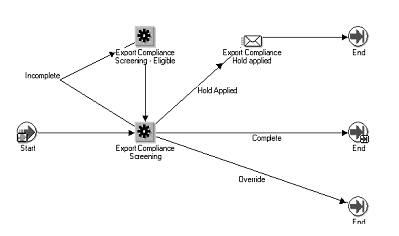
Export Compliance Screening—Line subprocess can be used in the line level workflow process to perform Export Screening. The subprocess should be placed after scheduling so that the Ship from Organization (warehouse) is already determined. You can plug-in the subprocess based on your business needs.
Line Flow: Generic, With Export Compliance

Line Flow-Generic, With Export Compliance" is a seeded line flow with the "Export Compliance Screening - Line" activity placed after Scheduling. You can plug in the Export Compliance Screening —Line subprocess into existing line workflows.
Services
-
Item Synchronization: The Oracle ITM Adapter provides the party synchronization service for facilitating the item definition in partner ITM applications by utilizing item synchronization request XML. The Item Synchronization request XML contains all of the necessary data elements required to classify items. The partner ITM application provides country specific rules and regulations to help you assign the right classification (for example, HS code, ECCN for exports from US) for your items.
-
Party Synchronization: The Oracle ITM Adapter supports an XML service request to communicate the international trade entities to the partner ITM application. The Party Synchronization XML Request contains all of the necessary data elements required for performing export screenings like Restricted Party Screening, Embargo Country Screening, and other country specific export screenings.
Party Synchronization sends relevant party information to ITM vendor/3rd parties. If you have enabled Global Transportation Management (GTM) as the ITM vendor, then you can send information regarding organization (which includes customers and suppliers), person, party types along with customer and carrier details. Additionally, for GTM, the Party Synchronization process sends relevant data like party number (registry id), party status (for example, A- active, M-merged), person – first, last name, party type, default address from eBusiness Suite to GTM. You must ensure to run this Synchronization program to synchronize changed information to GTM whenever additions, changes, merges, or purges of parties take place in eBusiness Suite.
-
Order Export Compliance: The ITM adapter supports one combined request, Order Compliance Request XML, for all the export related compliance checks for a sales order. These might include Restricted Party Screening, Embargo Country Screening, License Determination, Document Generation, and other partner supported screening like EPCI. The combined request XML contains all of the necessary data elements required for these screenings. The partner ITM application evaluates the sales order line for export compliance and responds to Oracle Applications with the overall compliance pass or fail status for each order line, asynchronously.
If you are integrating with Global Trade Management (GTM) application instead of ITM application, then you can send information regarding the end customer (site, address and country ) and end customer contact apart from party (shipfrom, shipto, billto, deliverto site/address details) and transaction details (like ordered item, quantity). Additionally, the request xml shows HZ elements for party sites along with HZ details for contact. (for bill to /ship to /deliver to/sold to /end customer sites), and the order_line_id. This service sends the end customer and contact information only when entered or present on the order lines. See Setup Process.
-
Delivery Export Compliance: Oracle Shipping Execution features export compliance screening for deliveries. The ITM Adapter's Delivery Compliance Request XML is utilized to communicate key delivery attributes to the ITM application. The ITM application responds with overall compliance Pass or Fail result in the Export Compliance Response XML asynchronously.
If you are integrating with Global Trade Management (GTM) application instead of ITM application, then the Request XML displays the following:
-
Additional HZ elements for party sites (for Bill to / Ship to sites).
-
Complete ATO BOM structure for ATO model items.
-
Complete BOM structure for PTO/KIT if top most model or item is shippable.
-
Note: The XML tag Order Number is included in the Request XML generated when deliveries are screened for delivery export compliance in ITM.
Concurrent Processing
The concurrent processes submit transactions to the Oracle ITM Adapter. The Oracle ITM Adapter then communicates the transactions to the partner ITM application.
-
Item Synchronization concurrent process: The Oracle ITM Adapter communicates key item information to the partner ITM application for export classification using the Item Synchronization Request XML. The parameters for Item Synchronization include the following:
-
Organization From: Select the organization range.
-
Organization To: Select the organization range. (Defaults to Organization From).
-
Item From: Select the item range. (This parameter is entered in an automatic pop up box after the Organization To field is populated).
-
Item To: Select the item range. (This parameter is entered in an automatic pop up box after the Organization To field is populated).
-
User Item Type: Select the item type.
-
Created in Last N Days: Enter a number of days.
-
Updated in Last N Days: Enter a number of days.
-
-
Party Synchronization concurrent process: The Oracle ITM Adapter communicates key party definition information to the partner ITM application for export screening using the Party Synchronization Request XML. The parameters for Party Synchronization include the following:
-
Party Type: Select the party type.
-
Party From: Enter a party range. (This field is available after you have determined the party type).
-
Party To: Enter a party range. (This field is available after you have determined the party type).
-
Business Purpose: Select a business purpose.
-
Created in Last N Days: Enter a number of days.
-
Updated in Last N Days: Enter a number of days.
-
-
Submit Deliveries for Screening concurrent process: This process selects all of the deliveries with the exception Require Export Screening and populates the Oracle ITM Adapter interface tables to send the deliveries to the partner ITM application. It logs the exception Submitted for Export Screening for the delivery along with handling Require Export Screening exception. The parameters for Submit Deliveries for Screening include the following:
-
Organization: Select the organization.
-
Delivery From: Enter a delivery range. (This field is available after you have determined the organization).
-
Delivery To: Enter a delivery range. (This field is available after you have determined the organization).
-
Carrier: Select a carrier.
-
Pickup Date (From): Enter a pickup date range.
-
Pickup Date (To): Enter a pickup date range.
-
-
Resubmit Errored Requests: This process re-submits those export screening requests that errored during submission. The parameters for Resubmit Errored Requests include the following:
-
Application: Select the Oracle application.
-
Resubmit Type: Select the resubmit type. (This field is available after you have selected the application).
-
Reference Number: Select the reference number of the program that you wan to resubmit. (This field is available after you have selected the application).
-
Error Type: Select an error type.
-
Error Code: Select an error code.
-
Vendor: Select an ITM partner.
-
Reference Line Number: Enter a reference line number (if applicable).
-
Party Type: Enter a party type (if applicable).
-
Party Name: Enter a party name (if applicable).
-
-
Skip Screening: This process is run to cancel existing screening requests. The parameters for Skip Screening include the following:
-
Application: Select the Oracle application.
-
Override Type: Select the override type. (This field is available after you have selected the application).
-
Reference Number: Select the reference number of the program that you want to resubmit. (This field is available after you have selected the application).
-
Reference Line Number: Enter a reference line number (if applicable).
-
Error Type: Select an error type.
-
Error Code: Select an error code.
-
Vendor: Select an ITM partner.
-
Party Type: Enter a party type (if applicable).
-
Party Name: Enter a party name (if applicable).
Note: You can customize the criteria for Item Synchronization, Party Synchronization, and Delivery Export Compliance using the PL/SQL package WSH_ITM_QUERY_CUSTOM and WSH_ITM_CUSTOMIZE. These packages enable you to filter what is being sent to your ITM partner application. For example, you may have a specific item type that does not need to be sent to the ITM partner application. You customize the criteria in the WSH_ITM_CUSTOMIZE package that will be executed as part of the standard Item Synchronization process.
-
Processing
Oracle's ITM adapter provides a common infrastructure between Oracle e-Business Suite Applications and International Trade Management partner applications.
To use the ITM adapter, populate the adapter interface tables through an API that submits a service request to the adapter. The adapter generates XML transactions for submission to a partner at the appropriate time in your business process.
The adapter can also use your custom processing logic after it performs its usual transaction processing. You can group requests by assigning them to the same request set; the Adapter performs your custom process after it processes all transactions in each request set.
The partner:
-
Validates the XML transactions
-
Performs the services
-
For each transaction, sends a success/fail status and a response to each XML transaction to Oracle Applications.
The adapter receives the statuses and responses and places them in the response interface tables.
The response processor API interprets the messages and takes actions. It sets the request status based on the highest level message that it finds. The hierarchy of message levels, from highest to lowest, is SYSTEM, DATA, ON_HOLD, and SUCCESS. The error type is always ITM Adapter.
After analyzing the error responses in a report, you can:
-
Run a concurrent process (Skip Screening) to skip adapter screening for certain requests and maintain the workflow activity. Then, you correct the errors and submit the request again.
-
Run a concurrent process (Resubmit Errored Requests) to resubmit requests to the ITM Adapter.
Setup Process
Prior to performing international trade management setup, decide:
-
Whether you will need lookup codes in addition to those seeded
-
Which ITM partner you use for which services
-
Which current Oracle Applications users will process international trade management information
-
The master organizations in which they will work
-
Whether to restrict any users to only one organization
-
How Oracle Applications should respond to error conditions from the partners
To set up for international trade management functions, you must:
-
Define international trade management partners
-
Define international trade management users
-
Specify your preferred partners for the ITM services
-
Specify adapter parameters
-
Specify the actions to take with the partner responses.
-
As a transactional requirement, Oracle Order Management (OM) users must set up the end customer and contact in OM to enable the application to default these details from the order header to the order lines. The application captures and sends the end customer and contact details only from the order lines and not from the order header. Ensure to enter the end customer location (apart from selecting or entering the end customer name and end customer contact as the application uses these to retrieve the end customer country, site, and other details.
ITM Lookup Codes
You define lookups, in addition to the seeded ITM lookups, that provide custom values for lists of values within the Oracle ITM Adapter setup windows. ITM lookup codes provide a way to include additional attributes on the outbound compliance request XML messages. For example, if your partner ITM application requires a certain element on the message, you can define a value in lookup code at the appropriate level. The seeded lookups for the Oracle ITM Adapter include the following:
-
WSH_ITM_COMMUNICATION_MODE: The various modes in which communication is established in ITM
-
WSH_ITM_ERROR_INTERPRETATION: Lookups for LOV in Interpreted Values Field in Response Error Classification Form
-
WSH_ITM_OVERRIDE_TYPES: Lookups for LOV in Override Types Parameter in Skip Screening Concurrent Program
-
WSH_ITM_PROTOCOLS: Lookups for LOV in Protocol Field in Vendor Setup Form
-
WSH_ITM_RESUBMIT_TYPES: Lookups for LOV in Resubmit Types Parameter in Resubmit Errored Requests Concurrent Program
-
WSH_ITM_SERVICE_COMMUNICATION: Service type along with acknowledgement and response
-
WSH_ITM_SERVICE_COMM_MODE: Communication Mode for ITM Partners
-
WSH_ITM_SERVICE_TYPE: Lookups for LOV in Service Type Field in Vendor Setup Form
-
WSH_ITM_SITE_USE_CODE: Not used
-
WSH_ITM_SYNC_PARTY_TYPE: ITM Synchronization Party Types
To add additional ITM lookups
-
Navigate to the Oracle Shipping Lookups window.
-
Enter a lookup Type and Meaning.
-
Use the list of values to select the Application Oracle Shipping.
-
Optionally, enter a Description.
-
Enter a unique Code for your lookup.
-
Enter a Meaning and Description for your lookup code.
-
Optionally, enter a Tag number.
-
The From Effective Date will default to the current date.
You can modify this field to another future date if needed.
-
Optionally, enter a To Effective Date that will disable your lookup.
-
Verify that the Enabled check box is selected.
-
Save your work.
International Trade Management Partners
Use this form to master information about international trade management partners. You enter three types of information about a partner:
-
Master information
-
Services offered and parameter information about the services
-
Parameters about the partner
To set up international trade management partners
-
Navigate to the ITM Partners window.
ITM Partners Window
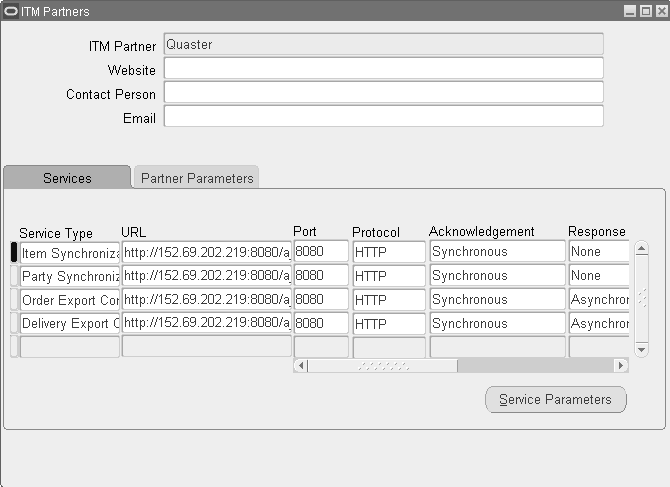
-
Enter your ITM Partner.
-
In the Website field, enter the uniform resource locator of the partner's web site.
-
Enter the name of your Contact Person.
-
Enter the Email address of your contact person.
-
Save your work.
-
Within the Services tab, select a service that the partner provides in the Service Type column.
-
In URL, enter the uniform resource locator (web site address) of the site to which you post the request.
-
In Port, enter the web server listener port number of the uniform resource locator to which you post the request.
-
Select the Protocol.
-
If the protocol is HTTPS:
-
In Certificate Name, enter the certificate name.
-
In Certificate Store, enter the certificate storage location.
-
In Certificate Password, enter the certificate password.
-
-
Save your work
-
For each service, click Service Parameters.
ITM Service Parameters Window
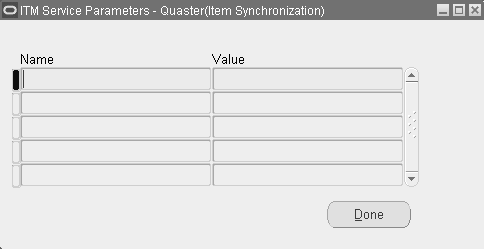
-
Enter the Name of the service parameters.
-
Enter the Value for each service parameter.
International Trade Management partner may specify the additional service parameters that they need in the compliance request XML that you submit to them.
-
Click Done and navigate to the Partner Parameters tabbed region.
ITM Partners Window
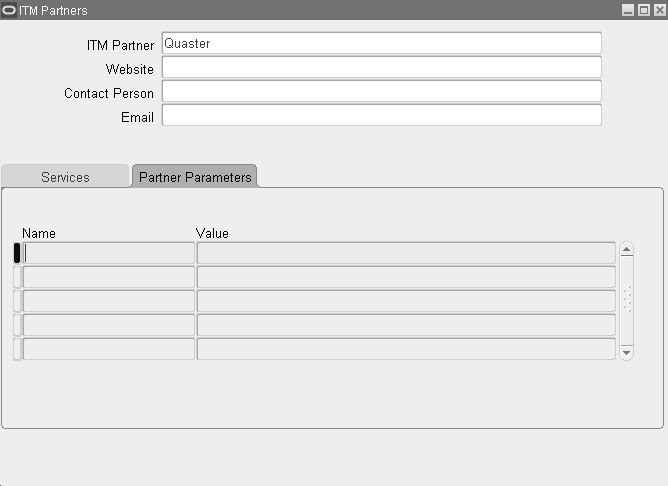
-
Enter the Name of the partner parameters.
-
Enter the Value for each partner parameter.
Each International Trade Management partner specifies the additional partner parameters that they need in the requests that you submit to them.
-
Save your work.
International Trade Management Users
Use this window to set up the login information for the partners. You can set up a user for an Application User ID, for a master organization, for an individual organization. A more specific setup overrides a more general setup. For example, a request from an organization with a specific setup uses that specific setup while a request from an organization without a specific setup uses the setup of the master organization to which it belongs.
To set up international trade management users:
-
Navigate to the ITM Application Users window.
ITM Application Users Window
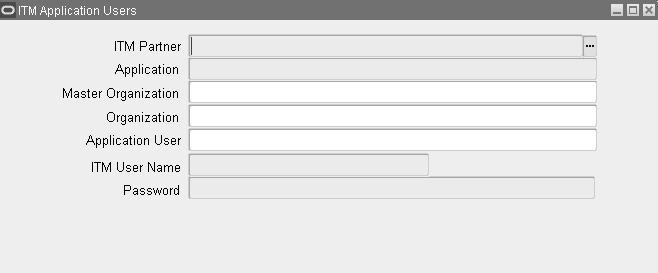
-
Select the ITM Partner.
-
Select the Application that sends requests to this partner (the calling application), for example, Oracle Order Management.
-
Enter the Master Organization whose organizations send requests to this partner. For Oracle Exchange, enter Operator ID.
-
Enter an Organization that sends requests to this partner. For Oracle Exchange, enter Party ID.
-
In Application User, enter an existing Oracle Applications user name that sends requests to this partner.
-
In ITM User Name, enter the user name that the partner provides for your access to the partner system. The user name can be up to 35 characters and numbers.
-
In Password, enter, twice, the password that the partner provides for your access to the partner system. The password should be at least five characters.
-
Save your work.
International Trade Management Partner Service Types
Use this window to specify your preference of partners who provide international trade management services to you.
To set up international trade management partner service types:
-
Navigate to the ITM Partner Service Types window.
ITM Partner Service Types Window
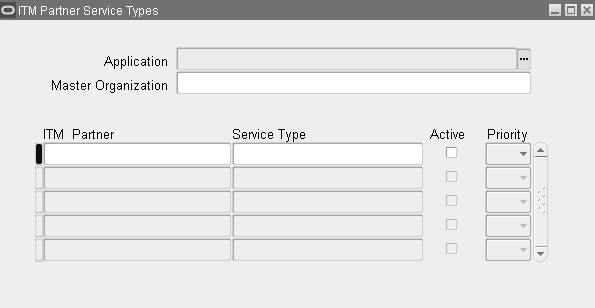
-
Select an Application from which you make service requests.
-
Select a Master Organization from which you make service requests. For Oracle Exchange, enter Operator ID.
-
In ITM Partner, select a partner that provides a service.
-
In Service Type, select a service that the partner provides.
Enter one line of information for each service and partner that you use. If you use more than one partner for a service, enter each partner-service combination on a separate line.
-
Select Active to indicate that you can submit this type of service request to this partner.
Note: Clear Active to indicate that you do not want to submit this type of service request to this partner. You can have only one Active partner for each service at one time.
-
In Priority, indicate the processing priority of this service type with this partner in relation to other partners and services. Select a number from one (highest priority) through five.
International Trade Management Adapter Parameters
Use this window to set up adapter parameters. After you set up or change parameters, stop and start the Adapter (ShutDown ITM Adapter concurrent process and StartUp ITM Adapter concurrent process).
To set up international trade management adapter parameters
-
Navigate to the ITM Parameter Setup window.
ITM Parameter Setup Window
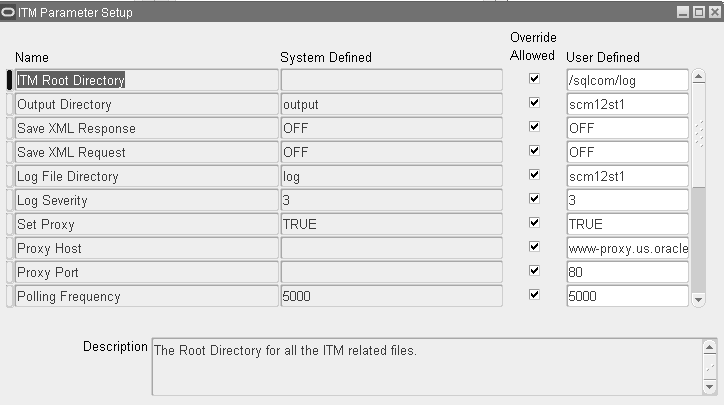
-
The valid values are seeded, you cannot create new parameters. You can change the parameters whose Override Allowed checkbox is selected.
-
Highlight the parameter that you want to change.
-
In Description, read instructions for the parameter.
-
In User Defined, enter your changed information.
-
Save your work.
Adapter Parameters
The Oracle ITM Adapter functions based on parameters. The parameters include the following:
-
ITM Root Directory: The root directory for all the ITM Adapter related files, for example: d:\ITM.
-
Output Directory (Default = output: The directory under the ITM Application Root Directory where all the request and response XML files are stored. For example, if the parameter value is output, then all the request and response XML Files will be stored in the d:\ITM\output directory. If this directory structure does not exist then the Adapter Startup Concurrent Program errors out.
-
Save XML Response (Default = OFF): This option enables all the response XML Files sent by ITM partner to be stored in the Output Directory. Please contact your ITM partner for further information on the naming convention for their XML response.
-
Save XML Request (Default = OFF): This option enables all the request XML Files generated by the ITM Adapter to be stored in the Output Directory. Please contact your ITM partner for further information on the naming convention for their XML response.
-
Log File Directory (Default = log): The directory under the ITM Application Root Directory where all the log files generated by ITM Adapter are stored. For example, if the parameter value is log, then all the log files will be stored in the d:\ITM\log directory. If this directory structure does not exist then the Adapter Startup concurrent program errors out.
-
Log Severity (Default = 3): The log severity values are:
-
1: Debug. If the log severity is 1, the log files generated by ITM Adapter print all types of messages; recommended for heavy debugging.
-
2: Information
-
3: Warning
-
4: Error. If the log severity is 4, the log files generated by ITM Adapter print only the error messages.
-
-
Set Proxy (Default = True): Set this value to True if proxy settings are required.
-
Proxy Host: If the parameter Set Proxy is True then Proxy Host should be not null.
-
Proxy Port: If the parameter Set Proxy is True then Proxy Port should be not null.
-
Polling Frequency (Default = 3000): This is the time interval for polling the interface table in milliseconds. For example, if this value is 500 milliseconds, the interface tables are checked for new requests after every 500 milliseconds. Based on the frequency of requests submitted, this parameter has to be set so that the Adapter immediately picks up by the requests.
-
Task Size (Default = 2): The number of requests which will be grouped and sent as one request to the ITM partner Application. Task Size of 2 is recommended for better performance.
-
Maximum DB Connection (Default = 7): Based on the load, the ITM Adapter can increase the number of connections in the Connection Pool to this value. This parameter should be ideally set to (Maximum threads) +1.
-
Minimum DB Connections (Default = 4): The minimum number of database connections which the ITM Adapter could get during startup. The minimum number of connections should be at least (Minimum threads) +1. Ideally this parameter can be set to say (Minimum threads) + 2.
-
DB Connection Timeout (Default = 5): Maximum wait time while getting a database connection (in milliseconds).
-
DB Connection Idle Time (Default = 300): Maximum time for which a database connection can be idle. If the number of connections in the connection pool is greater than Minimum DB Connection, a connection will be dropped if the idle time exceeds this parameter. The idle timeout should be large enough so that connections are not too frequently dropped. But it should not be so large as to hold on to costly connection resources. This parameter can be set to 5 minutes so that we are not holding the resource for a longer time.
-
Maximum Threads (Default = 5): The maximum number of threads ITM Adapter can create.
-
Minimum Threads (Default = 2): The number of worker threads that the ITM Adapter creates initially. For example, if there are 500 requests submitted each hour, you can have a minimum of three threads running so that no extra time is spent in creating new threads when a request is submitted.
-
Maximum Resubmits on Error (Default = 2): If a request errors out with Error Code 100, 101, 106, 108, 109, or 110, the Adapter tries to resubmit these requests. This parameter limits the number of times these requests can be resubmitted. We recommend an initial value of 2.
-
Thread Maximum Idle Time (Default = 100000): The maximum time a thread can be idle. After this interval that thread is ended.
-
Queue Polling Interval (Default = 7000)
-
XSL Transform URL (Default = http://www.w3.org/1999/XSL/Transform): W3C XSL transform URL.
-
Request Stylesheet: The stylesheet used for producing the request root of the XML request document.
-
Weight of Priority 1 Queue (Default = 33): Weight attached to the Priority 1 queue.
-
Weight of Priority 2 Queue (Default = 27): Weight attached to the Priority 2 queue.
-
Weight of Priority 3 Queue (Default = 20): Weight attached to the Priority 3 queue.
-
Weight of Priority 4 Queue (Default = 13): Weight attached to the Priority 4 queue.
-
Weight of Priority 5 Queue (Default = 7): Weight attached to the Priority 5 queue.
-
Integrated with Global Trade Management (GTM): Set the value to either True or False. The default value is False. If you want an eBusiness Suite installation to integrate with Global Trade Management (GTM) application rather than ITM application, then you must set the value to True. This parameter’s value governs the outbound XML formats. If the value is True, then the outbound XML for each of the services/areas have the GTM specific tags/elements in addition to the existing ITM tags/elements. To retain the ITM format, ensure to maintain the default value of False.
International Trade Management Response Rules
The partner ITM application evaluates the delivery for export compliance and responds to Oracle Applications with the overall compliance Pass or Fail status for the delivery. The export compliance is evaluated for delivery as a whole. If a delivery is found to be compliant by the partner application, it responds back to Oracle Application with compliant (Pass) status. The asynchronous response is received by the Oracle XML Gateway and a synchronous acknowledgement is provided to the partner application.
If a delivery is determined to be non-compliant (Fail), then the ITM adapter logs the exception Not Compliant for Export against the delivery. You need to manually cancel these deliveries depending upon your business processes. In case, the ITM application is unable to evaluate the compliance of a delivery programmatically, the ITM application notifies the compliance users for a manual compliance review. No response is communicated back to Oracle Application until a final compliance determination is made by the compliance user.
Use response rules to translate error types and error codes from the partner responses.
To set up international trade management response rules
-
Navigate to the ITM Response Errors Classification window.
ITM Error Classification Window
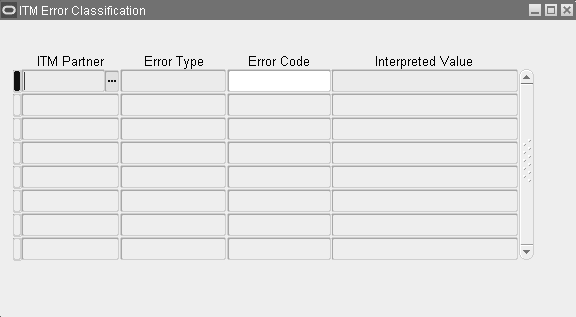
-
In ITM Partner, enter a partner.
-
Enter an Error Type and Error Code.
-
In Interpreted Value, select the interpreted value for the combination of the error code and error type:
-
DATA: Data error
-
FAILURE: Compliance failed
-
SUCCESS: Compliance passed
-
SYSTEM: System error
-
-
Save your work.
Regions and Zones
If you have the Oracle Advanced Planning and Scheduling Suite installed, use regions and zones to group by geographical areas and save the effort of setting up point-to-point transit times.
You can perform the following:
-
Group geographical areas into regions and set transit times from your warehouses to the regions. For example:
-
Create a region for San Francisco Bay U.S.A. and specify that it consists of the cities San Francisco, Oakland, and Berkeley
-
Set up a transit time of two days from your New York U.S.A. warehouse to the San Francisco Bay U.S.A. region
-
-
Group regions into zones and set transit times from your warehouses to the zones to encompass a larger geographic area.
The Oracle Advanced Planning and Scheduling Suite uses this origin-destination information to plan and schedule shipment departure dates, arrival dates, and sourcing.
Region and zone terms are:
-
Region: A geographical area, for example, a group of cities, states, provinces, or a country. Region information is hierarchical (postal codes belong to cities which belong to provinces which belong to countries), standard (defined by political and geographical boards), and is usually available through third-party vendors and standards agencies.
You can model regions at different levels of scale. A region can consist of countries, provinces/states, cities, or postal codes.
-
Sub-region: A child of a region. For example, the sub-regions of the region Canada can be its provinces; the sub region of the region London can be its postal codes.
-
Zone: A collection of regions, for example, a western zone. Zone information is unique to your business.
-
Regional transit times: In-transit times specified between ship-from locations and locations, zones, and regions based on shipping methods. You can specify cost and load to track specifics of each shipping method.
When the Oracle Advanced Planning and Scheduling Suite plans shipments, it assumes that the transit time from your facility to all locations within the zone is the same. For example:
-
You ship from Tokyo, Japan to customers in Manila, Philippines and Taipei, Taiwan
-
You place Manila and Taipei in zone A
-
You specify the regional transit time between your Tokyo facility and zone A as two days
-
Oracle Applications plans shipments from Tokyo to Manila for two days and shipments from Tokyo to Taipei for two days also
The advantages of planning shipments in terms of regions and zones are:
-
You enter and maintain in-transit and sourcing rules information between zones rather than between every ship-from/ship-to address combination
-
With less in-transit information, Oracle Shipping Execution finds the information that you need faster
-
The in-transit information automatically applies to new customers
-
For shipping quotes, you can match your inter-zone shipment requirements to service provider shipping lanes
Order Processing
When calculating available-to-promise, the Oracle Advanced Planning and Scheduling Suite uses regional transit times.
When scheduling shipments using zones and regions, the Oracle Advanced Planning and Scheduling Suite:
-
Consults the sales order line ship-from location, ship-to country, ship-to postal code, ship method, and customer request date.
-
Determines the ship-from and ship-to zones.
-
Determines the regional transit time between the zones. If you specify a shipping method, it determines that transit time. If you do not specify a shipping method in the sales order line, it determines the transit time of the default shipping method.
-
Calculates the scheduled ship date from the available to promise date and the regional transit time.
-
If you have specified an in-transit time and shipping method for the specific ship-to location, the Oracle Advanced Planning and Scheduling Suite uses that information instead of the regional information.
Setting Up Regions and Zones
If you ship to multiple locations that are near to each other and you want to plan shipments by regions and zones:
-
Determine the regions and sub-regions that support your the Oracle Advanced Planning and Scheduling Suite shipment planning, create them, and map address locations to them
-
Determine the zones that support your the Oracle Advanced Planning and Scheduling Suite shipment planning, create them, and assign regions to them
-
Specify the in-transit times between zones (regional transit time) and preferred ship method between zones
Use two concurrent processes to map and load bulk geographical information. Use the forms for individual data entry and data correction.
Setting Up Region and Zone Information
Use the following procedures to set up region and zone information through forms and through concurrent processes.
To set up region and zone information
-
Navigate to the Regions and Zones window, Regions tabbed region.
Regions and Zones Window
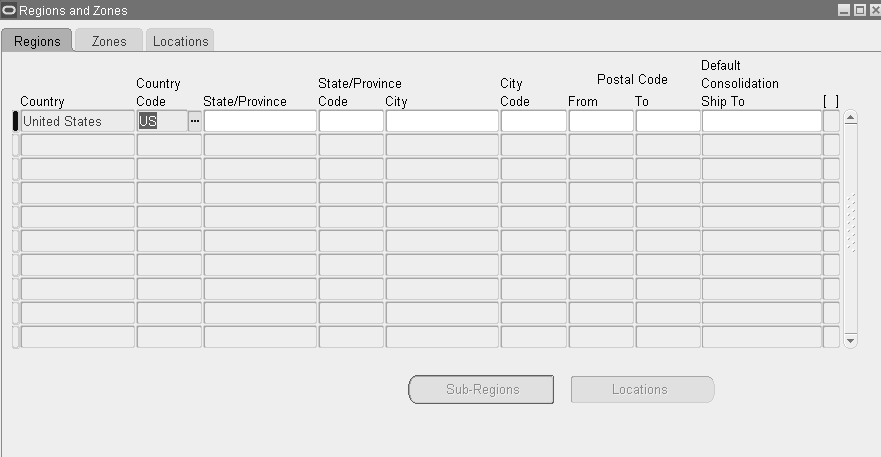
-
Enter the following information as available.
Note: The Sub-Regions button is active only after you have saved a new region or when you are querying an existing region.
-
When you enter a region, you can specify only one new component.
For example, if you enter country China, province/state Guangdong, and city Guangzhou, you must already have entered the region country China, province/state Guangdong. Use the list of values if you are unsure about existing information for each field.
Note: After you query previously created regions, you can use the Locations button to view all locations for a selected region. With the cursor on the selected region, click the Locations button to display locations for that region.
-
Save your work.
To update regions
-
Navigate to the Regions and Zones window, Regions tabbed region.
-
From the menu bar, select Query > Enter.
-
Enter search criteria.
-
From the menu bar, select Query > Run and view regions that match your search criteria.
-
Select one of the regions that displays and update the information.
-
Save your work. If you have changed a parent region, the region becomes assigned to a new parent.
To add and update sub-regions
-
Navigate to the Regions and Zones window, Regions tabbed region.
-
From the menu bar, select Query > Enter.
-
Enter your search criteria.
-
From the menu bar, select Query > Run and view regions that match your search criteria.
-
Select one of the regions that displays and click Sub-regions.
Sub-Regions Window
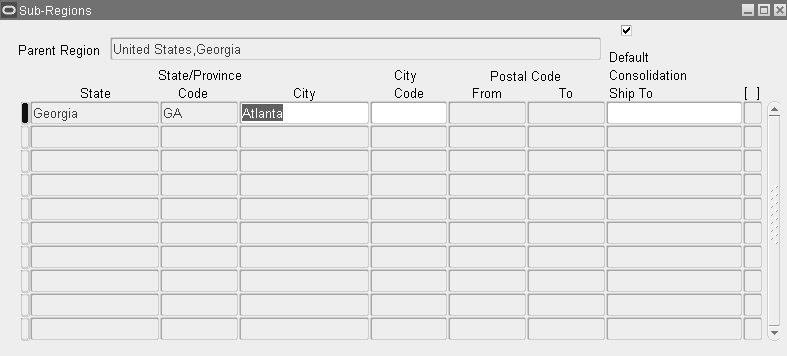
-
View existing sub-region information and add or change information
When you enter a sub-region, you can enter only one component and the region must exist. For example, you cannot change the region country United States and province/state California and the sub-region city San Diego in one entry. Instead:
-
Enter region country United States, province/state California
-
Query region country United States, province/state California and enter sub-region city San Diego
-
To add zones
-
Navigate to the Regions and Zones window, Zones tabbed region.
Regions and Zones Window - Zones Tab

-
Enter a Zone name.
-
In the Zone Components region, enter information about the regions that you are assigning to the zone. You cannot assign a region and its parent regions to the same zone.
-
Save your work.
-
Select the Locations tab.
The Regions and Zones - Locations Tab window is a view only window used to find previously entered information for locations and the locations, regions, and zones to which they are mapped.
To query existing information, in the Locations area, use the View pull down menu and select Query by Example, and Enter. Input your query criteria and select the View pull down menu and Query by Example and Run.
You can also query for a particular location, region, and zone. Place the cursor in the lower area of the window, select the View pull down menu and Query by Example and Enter. Input your query criteria, such as, a city and select the View pull down menu and Query by Example and Run.
To update zones
-
Navigate to the Regions and Zones window, Zones tabbed region.
-
From the menu bar, select Query > Enter
-
Enter search criteria.
-
From the menu bar, select Query > Run and view zones that match your search criteria.
-
Update the zone name and components information.
-
Save your work.
To search for regions and zones
-
Navigate to the Regions and Zones window, and select a tabbed region.
-
From the menu bar, select Query > Enter.
-
Enter values or partial values for the elements that you want to search.
-
From the menu bar, select Query > Execute.
-
View information about the regions or zones that match the search criteria.
-
Navigate to the Regions Interface window and query the region information that you have mapped and verify it; remove any that you do not want to load.
To load regions from locations
-
Execute the Location to Region Mapping concurrent process. After it completes, check the log to verify the number of regions loaded and that there are no errors. For additional information, see Oracle Shipping Execution User's Guide, Reports, Documents, and Processes chapter.
-
Navigate to the Regions Interface window.
-
Query the region information that you have mapped and verify it; remove any that you do not want to load.
Regions Interface Window

-
Execute the Region Interface concurrent process by clicking Load All Regions and clicking OK. For additional information, see Oracle Shipping Execution User's Guide, Reports, Documents, and Processes chapter.
Oracle Shipping Debugger
The Oracle Shipping Debugger is a package (WSH_DEBUG_SV) and set of profiles that enable you to debug the Oracle Shipping Execution application with the help of Oracle Support.
Calls are made to these APIs from various places in the code:
-
Entering an API
-
Exiting an API
-
Calling another API
-
Any other places, as required
The Oracle Shipping Debugger enables you to do the following:
-
Print messages in a concurrent log file or debug log file
-
Print timing information for API calls
-
Run PL/SQL profiler
-
Start Order Management and Inventory debuggers and print Order Management and Inventory messages to same debug file along with Shipping Execution debug messages
-
Start and stop the debugger for each session or action in the following ways:
-
Within the Shipping Transactions form or Quick Ship window, Tools menu, select Debug
-
Within the Release Sales Orders for Picking (Pick Release) window, Tools menu, select Debug
-
Log Level parameter on Oracle Shipping Execution concurrent programs
-
The Oracle Shipping Debugger enables you to debug certain areas of Code Flow.
Logging is enabled or disabled in two dimensions:
-
Level: A scale specifying the priority of a log message
-
Module: Describes which part of the code the log message is in
The level and module of any given log message are defined by the programmer who makes the logging API call to log the message.
Shipping Debugger Profile Options
There are six profile options specific to the Oracle Shipping Debugger:
-
WSH: Debug File Prefix: Naming Convention for Debug File is <Debug File Prefix Profile>_sessionid.dbg If value of profile is null, naming convention is wsh_<username>_<sessionid>.dbg Where: <username> is Application user name. If application context is not established, it will be defaulted to dbuser: <dbusername>. <sessionid> is Database session id.
-
WSH: Debug Enabled: Select from the Debug Enabled LOV either YES or NO to activate the debug feature. The default is NO.
-
WSH: Debug Module: The Module describes where to find the log message within the code. This profile indicates that debug messages from only those modules with names beginning with the profile value will be logged. The naming convention for Module is: <application short name>.<directory>.<package>.<routine>. <label> e.g. wsh.plsql.WSH_WV_UTILS.convert_uom.
-
WSH: Debug Log Directory: The value entered for this profile option must be specified as a UTL_FILE parameter value.
-
WSH: Debug Level: The level is a scale specifying the priority of a log message. The level is the lowest level for which the user wants to see messages. Select from the Debug Level LOV one of the following.
Valid Values are (in increasing order of priority):
-
Performance
-
Statement
-
Procedure (Default)
-
Event
-
Exception
-
Error
-
Unexpected Error
To obtain the most information within the debug file, set the Debug Level to Statement.
-
-
WSH: Run PL/SQL Profiler: If this profile option is turned on and you are using PL/SQL, then it collects the performance statistics for the PL/SQL code.