Oracle Pricing Setup
This chapter covers the following topics:
- Overview of Basic Pricing
- Oracle Advanced Pricing Versus Basic Pricing
- Pricing Terminology
- Basic Pricing Features
- Setting Up Basic Pricing
- Overview of Pricing Security
- Pricing Security Terms
- Pricing Security and Operating Units
- Setting up Pricing Security
- Changes to Pricing windows after Upgrading and Turning Pricing Security On
- Assigning Ownership of Pricing Entities to Operating Units (Entity Usage page)
- Creating Pricing Entity Usage
- Making Bulk Updates to Pricing Entity Usage
- Creating Privileges
- Using the Bulk Create Privileges feature
- Setting up Default Security Profile Options for New Pricing Entities
- Security Profile Option Settings Compared
- Setting Pricing Security ON
- Overview of Price Lists
- Maintaining Price Lists
- Price List Features
- Overview of GSA Pricing
- Setting up GSA Pricing
- Overview of Formulas
- Overview of Modifiers
- Implementing Modifiers
- Types of Adjustments
- Modifiers: How Do I Define My Product Hierarchy?
- Modifiers: How are they qualified?
- Modifier: Additional Controls and Special Considerations
- Manual Adjustments using Modifiers
- Overview of Agreements
- Revising Agreements
- Defining Special Terms for an Agreement
- Setting up Agreements
- Overview of Contexts and Attributes in Attribute Management
- Creating Context and Attributes
- Deleting Contexts
- Creating Attributes
- Deleting Attributes
- Linking Attributes to a Pricing Transaction Entity
- Viewing Information about a Pricing Transaction Entity
- Summary of Attribute Levels for Pricing Setup windows
- Using Defaulting Rules in Basic Pricing
- Overview of Freight and Special Charges
- Process Flows
- Setting up Pricing Modifiers for Freight and Special Charges
- Setting up Freight and Special Charges For Cost to Charge Conversion
- Other Business Scenarios
- Troubleshooting Freight and Special Charges
- Service Duration Computation
- Price Book
- Bulk Loader Import
Overview of Basic Pricing
This section explains how to implement the Basic Pricing component of Oracle Order Management and includes information on the following topics:
-
Definitions of pricing terms and feature highlights
-
Implementation Planning Process Flow
-
Defaulting Rules in Basic Pricing
-
Pricing Security
-
Price Lists
-
GSA Pricing
-
Formulas
-
Freight And Special Charges
-
Pricing Engine Request Viewer
-
Agreements
-
Modifiers
-
Contexts and attributes
-
Profile Options and Systems Parameters (see the Pricing chapter on profile options)
The Basic Pricing component of Oracle Order Management provides the capability to price orders according to price lists, pricing formulas, or agreements. You can also apply discounts, control the lowest level price that may be given in order to comply with General Services Administration Agency (GSA) regulations, and apply freight and logistics related charges to orders.
Note: If you have licensed Oracle Advanced Pricing, you should not use this section for implementation guidance. Instead, refer to the Oracle Advance Pricing Implementation Manual and Oracle Advanced Pricing User's Guide.
Oracle Advanced Pricing Versus Basic Pricing
The term basic pricing refers to a component of Oracle Order Management that provides pricing functionality when Oracle Advanced Pricing is not installed. Oracle Advanced Pricing and basic pricing have common software components; however, Oracle Advanced Pricing extends and expands the capabilities of basic pricing.
The pricing system software components examine the installation type (either full or shared) to determine the appropriate mode in which to run. Users of basic pricing are installed as “shared” and are not licensed to use Oracle Advanced Pricing capabilities. When in basic mode, the pricing system software components restrict exposure of advanced features in the setup windows. Because the information necessary to drive Oracle Advanced Pricing functionality cannot be set up in a pricing implementation running in basic mode, use of Oracle Advanced Pricing features is also inhibited.
Users who have licensed Oracle Advanced Pricing are installed as “Full.” The pricing setup windows enable setup for all information needed to drive features provided by Oracle Advanced Pricing.
The following table describes the primary differences between Oracle Advanced Pricing and the basic pricing capabilities included in Oracle Order Management:
Pricing Terminology
Customer Hierarchy
The customer hierarchy in Basic Pricing enables you to roll up individual customers according to the following structure:
-
The sold-to organization
-
Site
-
Customer Class
You can use elements of the customer hierarchy as defaults to control the operation of price lists and modifiers.
Note: Additional customer hierarchy capabilities, such as additional levels, can be defined if Oracle Advanced Pricing is installed. In Basic Pricing, you can define additional pricing contexts. See Overview of Contexts and Attributes in Attribute Management for more information.
Pricing Engine
The pricing engine is the program module called by Order Management that prices the order as orders are entered or order data changed.
Pricing Request
A pricing request is the specific information provided to the pricing engine when the engine is called by Order Management. In general, this includes the customer, the product, the attributes associated with the customer or product that may be used by the pricing engine, the pricing date, and other pricing data attributes that may be required by the pricing engine.
Product Hierarchy
The product hierarchy in Basic Pricing enables you to up roll individual items as defined in MTL_SYSTEM_ITEMS table into single level groups called Item Categories. For price lists, you can only define products at the item level; You can price at all the seeded levels of product hierarchy. For modifiers, you can use item, item and pricing attribute, item categories, or the Super Group of item ALL.
Additional levels of product hierarchy can be defined if Oracle Advanced Pricing is installed.
Oracle Advanced Pricing
Oracle Advanced Pricing and Basic Pricing share common software components; however, Oracle Advanced Pricing is a separate licensable product that can be used as an alternative to Basic Pricing. Oracle Advanced Pricing provides the functionality of Basic Pricing, while adding significant functionality and extensibility.
The pricing software examines the installation type (either full or shared) to determine the appropriate mode to run in: users of Basic Pricing are installed as "shared" and are not licensed to use Advanced Pricing capabilities.
When in basic mode, the Advanced Pricing features cannot be viewed or selected in the user interface setup windows. Because the information for Advanced Pricing cannot be set up in pricing implementation running in basic mode, use of Advanced Pricing features is also inhibited.
Users who have licensed Advanced Pricing are installed as "full" and can access the Advanced Pricing features. For additional information about the features available with Oracle Advanced Pricing, see the Oracle Advanced Pricing User's Guide and the Oracle Advanced Pricing Implementation Guide.
Warning: Since Advanced and Basic Pricing share common lookups, a user with the responsibility of Pricing User can modify and save Advanced Pricing lookups in Basic Pricing. It is not possible to restrict the update of Advanced Pricing lookups in Basic Pricing.
Basic Pricing Features
The following section describes the key Basic Pricing features supported by Oracle Applications.
Pricing Security
Oracle Pricing provides a level of security called pricing security in addition to the existing functional security. Pricing security enables you to restrict pricing activities such as updating and viewing pricing entities to users granted specific access privileges.
Pricing security can be set up and maintained by a user who is assigned the Oracle Pricing Administrator responsibility. Pricing security is set up and maintained in the HTML user interface. The Oracle Pricing Administrator typically has the authorization to access and update all pricing entities for all functional users. Pricing entities include price lists, pricing agreements, and modifiers.
Price Lists
Price lists relate a selling price to a product. Price lists consist of price list lines, pricing attributes, and a secondary price list and include information such as the price list name, effective dates, currency, rounding factor, and shipping defaults such as freight terms and freight carrier.
You may default a price list based on any one of the following:
-
An agreement
-
The sold-to organization
-
The ship-to organization
-
The bill-to organization
-
Order type
You can create multiple price lists. Alternatively, you may enter a specific price list on the order header or at the order line level. For each price list, you can also assign a secondary price list, which the pricing engine searches when it cannot find an item on the primary list. Only one secondary price list will be searched for each primary list.
Price lists and Currencies
Price lists may be specified in different currencies. During order entry, if you enter a currency on the order, the pricing engine will select price lists having a currency matching the currency you entered on the order.
Maintaining Price Lists
You can maintain price lists using any one of the following functions:
-
Copy Price List
-
Adjust Price List
-
Add Items to Price List
Pricing Engine Request Viewer
The Pricing Engine Request Viewer window captures the pricing call from any calling application such as Oracle Order Management and displays the inputs and outputs of the pricing call.
The information displayed by the Pricing Engine Request Viewer enables you to review which lines were selected or rejected by the pricing engine and to evaluate why certain prices and adjustments were or were not applied. For more information on using the Pricing Engine Request Viewer, see the Oracle Advanced Pricing User’s Guide.
Agreements
Agreements enable you to define the prices, payment terms and freight terms that you negotiated with specific customers. Using agreements, you can:
-
Define your agreements using customer part numbers and inventory item numbers.
-
Make revisions to the original terms and maintain these changes and their reasons under separate revision numbers.
-
Attach an already existing price list to the agreement or define new prices.
-
Assign optional price breaks by quantity
-
Set effective dates for agreement terms
-
Set payment terms including invoice rule and accounting rule.
-
Set freight terms including the freight carrier.
-
Apply agreement terms to sales orders by reference agreements.
-
Use Sales Agreements.
GSA Pricing
General Services Administration Agency (GSA) pricing enables you to define a GSA price list for your GSA customers. The GSA price list is created in the modifier window and uses the new price. You create a discount that adjusts the base price of the item to the GSA price.
Formulas
Formulas enable you to define a mathematical expression that the pricing engine can use to determine the list prices of items. A full complement of mathematical operators and numeric operands can be used.
When processing formulas, the pricing engine locates a price list line linked to a formula. It then applies the mathematical expression to generate a final list price. In Basic Pricing, formulas are static; that is, the variables in the formula must be pre-populated with data by running a concurrent manager job before the formula can be used.
Modifiers
Using modifiers, you can increase or decrease the list price to arrive at a net selling price for your orders. A modifier can be applied automatically by the pricing engine, or you can manually apply a modifier. Additionally, modifiers, with proper setup, can be overridden.
Modifiers consist of a header region with one or more modifier lines. You can define three types of modifier headers:
-
Discount
-
Surcharge
-
Freight and Special Charge (supports only point breaks)
You can attach following customer attributes as qualifier attributes to the modifiers at the header level : Site, Customer Name, and Customer class (as defined in RA_CUSTOMERS table).
Alternately, you can also default the pricing engine's selection of modifiers based on the price list name.
You may define default modifiers at the order line level based on agreements including:
-
Agreement Type
-
Agreement Name
Alternatively, you can default modifiers based on sales order. For a modifier to default at the line level, it must first default at the header level. If it does not default at the header level, the line level default will have no effect.
Combined with the preceding defaults, you can also default modifiers based on the following product-level attributes:
-
Item
-
Item Category
-
All Items
Modifiers can be used to calculate price breaks. You can define breaks at the line level to be computed as percent, amount or fixed price. Price breaks are available only on modifiers in Basic Pricing. Point type price breaks are supported in Basic Pricing. In Basic as well as Advanced Pricing, price breaks are now continuous, which means that the high value of the break is greater than the low value of the next break. Example: 0-100, 100-200, 200-300 etc.
Note: In basic Pricing all the modifiers created are active and you can not change the active status. This feature is available in Advanced Pricing only. Also, to make the modifier inactive, you need to end date the modifier. This can be done on the modifier header. Once the modifier is end dated it will no longer be active.
Qualifiers
Oracle Pricing lets you define qualifiers to determine eligibility rules governing who can receive a particular price, discount, promotion, or benefit. Qualifiers can then be linked to modifiers. See the Oracle Order Management User's Guidefor more information on setting up and using qualifiers for modifier lists and modifier lines.
Freight and Special Charges
The Freight and Special Charges capability of Oracle Order Management enables you to capture, store, update and view costs associated with a shipment, order, container, or delivery. You can either itemize or summarize such charges on your orders. This capability includes functionality to pass customer charge information to Oracle Receivables for invoicing.
When using freight and special charges, you set up freight and special charges as pricing modifiers. The pricing engine applies the qualified freight and special charges to order lines. You can view the application of freight and special charges. Order Management captures costs at shipping and converts them to charges. Freight and special charges appear on invoices. See Setting up Pricing Modifiers for Freight and Special Charges.
Pricing Attributes and Attribute Management
Order Management with Basic Pricing is delivered with seeded pricing attributes. The seeded attributes are described in the appendix of this implementation manual. You can use one pricing context per order line. See Overview of Contexts and Attributes in Attribute Management.
Setting Up Basic Pricing
Whether you are implementing from a fresh install or upgrading from a previous version, the process flows for implementation require that:
-
Oracle Applications, including Order Management, have been successfully installed.
-
Oracle Pricing has been installed as Shared.
-
All necessary patches have been applied.
Implementing from Fresh Install
The following table recommends the implementation steps for a fresh install (no prior implementation of Oracle Order Entry/Shipping exists). The recommended implementation steps differ when upgrading from a prior release.
| Step # | Name | Description |
|---|---|---|
| 1 | Analyze and Understand Business Pricing Scenarios | It is highly recommended that an exact understanding of pricing business requirements be established, before beginning an implementation of Basic Pricing. |
| 2 | Develop Logical Pricing Model Solutions | For each Pricing Scenario, plan how you will use Basic Pricing to accomplish each. An excellent resource for this is the remainder of this manual. |
| 3 | Setup and Test Prototype Solutions | Prior to implementing a production system, setup prototype Basic Pricing solutions for all the pricing scenario's you have identified, and have entered test orders against them to determine that they are handled properly. The Vision Sample database shipped with the software can be used to facilitate this process. |
| 4 | Make necessary defaulting decisions | See subsequent section of this manual for details. |
| 5 | Set up Basic Pricing Profile Options and System Parameters | See subsequent section of this manual for details. |
| 6 | Set up Customers and necessary customer hierarchy information | Customer setup must be performed using Oracle Accounts Receivable |
| 7 | Set up Items and Item Hierarchy information (except Pricing Attributes) | Item setup must be performed using Oracle Inventory |
| 8 | Set up Pricing Attributes | See subsequent section of this manual for details. |
| 9 | Set up Pricing Security | See subsequent section of this manual for details. |
| 10 | Set up Price Lists | See subsequent section of this manual for details. |
| 11 | Set up Formulas | See subsequent section of this manual for details. |
| 12 | Set up Agreements | See subsequent section of this manual for details. |
| 13 | Set up Modifiers | See subsequent section of this manual for details. |
| 14 | Set up GSA Pricing, if required | See subsequent section of this manual for details. |
| 15 | Set up Freight and Special Charges, if required | Refer to Appendix for information on Freight and Special Charges |
Overview of Pricing Security
This section describes the implementation of pricing security for Oracle Pricing. In Oracle Applications, a basic level of security called functional security manages and controls users' access to each application and to windows, functions, and reports within an application.
Typically, the System Administrator administers functional security and assigns operating unit, responsibility, and system access to users. See the Oracle E-Business Suite System Administrator's Guide Documentation Setfor more information about functional security.
Oracle Pricing provides an additional level of security called pricing security in addition to the existing functional security. Pricing security enables you to restrict pricing activities such as updating and viewing pricing entities to users granted with specific access privileges.
Pricing security can be set up and maintained in the HTML user interface by a user with the Oracle Pricing Administrator responsibility. The Oracle Pricing Administrator can access and update all pricing entities for all functional users. Pricing entities include price lists, pricing agreements, and modifiers.
With pricing security, you can implement a higher level of control by:
-
Assigning pricing entities such as price lists and modifiers to operating units.
-
Assigning privileges to pricing entities to control who can view or maintain the specified entity. You assign privileges to a "Grantee."
-
Setting default security access rules for newly-created pricing entities. Use security profile options to set access rules.
Assigning pricing entities to Operating Units
A pricing entity can be assigned ownership to a specific operating unit. You can restrict usage to one operating unit or allow usage by all operating units.
Assigning security privileges to control users' access to pricing entities
You can use security privileges to control users' access to pricing entities in the following ways:
-
Grant view-only or maintain access privileges to functional users at the Global or Operating Unit level.
-
Grant temporary access - for example, to auditors or temporary employees - for a specified date range.
-
Assign or reassign Operating Unit ownership to price lists and modifiers and control which operating units can use them for pricing transactions.
Note: Before setting the profile option QP: Security Control to ON, you must create privileges for existing pricing entities.
Related Topics
Assigning Ownership of Pricing Entities to Operating Units (Entity Usage page)
Setting up Default Security Profile Options for New Pricing Entities
Pricing Security Terms
The following terms are used in Oracle pricing security:
-
Pricing Entity Security: The highest level of security administration for Oracle Pricing. This level of security is in addition to Functional Security and PTE plus Source System Code security. Functional security is established for each user by responsibility set up. The Oracle Pricing Administrator is a new Responsibility which has complete access to all pricing entities without restriction and is used for global administration of secured access to pricing entities. This security is administered in the Oracle HTML user interface.
-
Pricing Entity: A pricing entity can be a price list, modifier list, or pricing agreement.
-
Entity Type: A term used to describe one of the following pricing entities: Standard Price list, Modifier List, and Pricing Agreement.
-
Entity Usage: Grants the entity's usage to one or all operating units so it can be used during pricing engine calls.
-
Entity Set: A set of grouped pricing entities.
-
Global Usage: When Global Usage for a pricing entity is set to Yes, the pricing entity can be used across all operating units for processing orders. If No is selected, the entity's usage is restricted to the operating unit that created or owns it.
When security is turned on, a Global box indicating Global Usage is dynamically added to the header region of all price lists and modifiers. A user with Maintain access privileges can update the Global box. The Oracle Pricing Administrator can also update the Global Usage settings in the Entity Usage pages.
-
Grantee: The specific user or users of a Grantee Type that are given permission to view or maintain a pricing entity. Used in combination with a Grantee Type.
-
Grantee Type: The level to which privileges are granted:
-
Global: Includes all users with access to pricing menus.
-
Operating Unit: Includes users within the named operating unit.
-
-
Access Level: Provides Maintain or View-Only access to a pricing entity:
-
View-Only: Enables the user to view but not update the pricing entity.
-
Maintain: Enables the user to view and update pricing entities. Not all of the entities support delete capabilities.
-
Pricing Security and Operating Units
Pricing Security allows you to create pricing data specific to an operating unit. The multi-org access control (MOAC) feature further enables users to access multiple operating units within one responsibility, and to create multiple pricing entities (price lists, modifiers) for different operating units without changing responsibility. This feature is controlled by the profile option MO: Security Profile. When MOAC is enabled, you can enable pricing security to provide centralized control of pricing entities for use by operating unit or across all operating units for pricing orders.
Note: See the Multiple Organizations in Oracle Applications guide for information on setting the profiles MO: Security Profile and MO: Default Operating Unit.
Multi-Organization Access Control
Prole option MO: Default Operating Unit automatically creates pricing security privileges
When you create a price list or modifier list, the default pricing security privileges are created for the operating unit set in the MO: Default Operating Unit regardless of whether the price list or modifier list is created as Global or for a different operating unit. This occurs when:
-
Profile option MO: Default Operating Unit is enabled (MO: Security Profile is set)
-
Pricing security is ON (profile option QP: Security Control is ON)
-
One of the pricing profile options, QP: Security Default ViewOnly Privilege or QP: Security Default Maintain Privilege, is set to Operating Unit
For example, suppose you are assigned the Pricing Manager responsibility with access to the following operating units--OU1, OU2, and OU3--and the following conditions exist:
-
Pricing security is ON
-
MO: Default Operating Unit profile is set to OU1
-
QP: Security Default Maintain Privilege and QP: Security Default View Only Privilege profiles are set to Operating Unit
If you then create a global price list (PL1) or price list for OU2 (PL2), the view and maintain privileges will be created for OU1 because the operating unit defaults from the MO: Default Operating Unit profile (the default operating unit set for the responsibility) for both PL1 and PL2.
Update to Operating Unit eld allowed if users have Maintain access
In Oracle Advanced Pricing, the operating unit on the price list or modifier list must match the operating unit of the transaction (for example, a sales order) being priced. If pricing security is ON, any user granted maintain access to the price list or modifier list can update the Operating Unit field of the modifier or price list.
For example, suppose you have a price list PL1 from operating unit OU1 that is assigned a maintain privilege of Global, but you log into a responsibility with access to only OU2, OU3 as assigned by the MO: Security Profile. You could update the price list PL1 due to Global security privilege and update it from OU1 to OU2; however, you cannot change it back to OU1 through the same responsibility because the security profile does not provide access to OU1.
Setting up Pricing Security
After you upgrade to pricing security, pricing security is not switched on automatically. Pricing users with functional access can still fully view and maintain existing price lists and modifiers as before the upgrade. Before turning security on, it is recommended that you review and complete the following setup steps for implementing pricing security, otherwise, pricing users may be unable to query any price lists or modifiers in the pricing windows. After you have completed the security setup steps, you can set the QP: Security Control profile option to ON which turns security on.
Complete the following steps to set up and use pricing security
-
Map Complete Security Access Requirements
For price lists, modifiers, and agreement price lists (the pricing entities), map to the following:
-
Operating units that should own and maintain them.
-
The users in those operating units who require View-Only or Maintain access to pricing entities.
-
Operating units that can use them when pricing transactions.
-
-
Assign Ownership of Pricing Entities to Operating Units (Entity Usage page)
The next step is to assign pre-existing price lists and modifiers to an operating unit. You can also select Global Usage settings that determine if the entity is restricted to that operating unit or available across all operating units. See Assigning Ownership of Pricing Entities to Operating Units (Entity Usage page) for more information.
-
Create Privileges (Privileges page)
The next step is to assign privileges for all users in all operating units. Using security privileges, you can provide access to view and/or maintain pricing entities. See Creating Privileges for more information.
-
Set up Default Security Profile Options for New Pricing Entities
You can use the following profile options to set the default security privileges for newly-created pricing entities:
-
QP: Security Default ViewOnly Privilege
-
QP: Security Default Maintain Privilege
These profile options are delivered in default settings that maintain the existing functional security features of Oracle Pricing.
Before changing these profile settings, the Oracle Pricing Administrator must map the complete security access requirements for each pricing entity. No security profile option should be changed until these steps have been completed. See Setting up Default Security Profile Options for New Pricing Entities for more information.
-
-
Set Pricing Security ON
. See Setting Pricing Security ON for more information.
Changes to Pricing windows after Upgrading and Turning Pricing Security On
This section summarizes the changes that occur to pricing entities after you upgrade to pricing security and turn security on. Some of the changes, such as the Global box on price lists and modifiers, are only visible to users after pricing security is turned on.
Entity Usage
After the upgrade to security, all existing price lists and modifiers are assigned the default entity usage of Global Usage. Global usage enables the pricing entity to be used across all operating units. When security is turned on, a Global box is added to the header of all modifiers and price lists to indicate the global usage status for the entity:
-
If selected, global usage is enabled for the entity.
-
If cleared, global usage is not enabled for the pricing entity, and an operating unit must be assigned to the entity.
The Global check box is not visible to users until the concurrent program Security Control is turned ON. When visible, a user with Maintain access privileges can select or clear the Global check box. However, users with view-only privileges cannot change the Global box. If a user creates a new pricing entity (such as a price list) and clears the Global box, then an operating unit must be assigned to that entity. If MOAC is not enabled, this defaults to the value of the profile MO: Operating Unit.
With MOAC, this operating unit will default to the value in the MO: Default Operating Unit profile. You can override this default and select from any operating unit assigned to the MO: Security Profile option. If the Global check box is left selected (the default value), then the entity can be used across all operating units when pricing transactions.
Alternately, the Pricing Administrator can also update the Global box for one entity at a time or in bulk using the Bulk Update Entity Usage page available from the Entity Usage page.
Changes to Price Lists
After the upgrade, you can review the operating unit and global usage settings for an entity in the Entity Usage page. An example of the information that displays for a selected entity is outlined in the following table:
| Entity Name | Type | Global Usage | Owned by Operating Unit |
|---|---|---|---|
| Name of the Entity (for example, Summer Pricelist) | Type of Entity (for example, Standard Pricelist) | Yes | Blank (not assigned to an operating unit) |
The following other changes occur to price lists after the upgrade to pricing security:
-
Price lists assigned Global usage cannot be assigned to an operating unit as well. Any such global price lists will be updated to clear out the operating unit.
-
Once security is turned on, all new price lists have their view and update properties determined by the pricing security profile options.
-
You need at least view-only access privileges to display or query price lists in the price list windows. With view-only access, you cannot change header or any associated information such as price list lines, pricing attributes, qualifiers, or secondary price lists.
-
Users who have view-only privileges on a price list as per pricing security rules will be in view-only mode on the price list window. To update a price list, the user requires specific maintain-access privileges.
-
Secondary price lists: You can only select the price lists with view-only or maintain privileges for the secondary price list. In addition, secondary price lists are also restricted by entity usage assigned to primary price list: if the primary price list is global, you can select any secondary price list (global or assigned to any operating unit). If an operating unit is assigned to the primary price list, you can select a global price list for secondary price list or a secondary price list that has the same operating unit as the primary price list.
-
The Public API, QP_PRICE_LIST_PUB.PROCESS_PRICE_LIST will only update price lists as per price list security rule.
-
You can select Price Lists > Copy Price Lists to copy price lists. A copied price list is assigned the default privilege from the security profile options. During copying, you can override defaults that are derived from Copy From price list and specify your own settings for global flag and operating unit for the Copy To price list. However if the default security privilege profile is set to Operating Unit, the copied price list is still assigned default privilege based on MO: Default Operating Unit profile.
Changes to Modifier windows
-
Modifiers assigned Global usage cannot be assigned to an operating unit. Any such global modifiers will be updated to clear the Operating Unit field.
-
After pricing security is turned on, the default view and maintain properties for all new modifiers are determined by the security profile options.
-
You need at least view-only access privileges to display or query modifiers in Define Modifier window. With view-only access privileges, you can view all line limits for a modifier including attributes and transactions for the limit.
-
With view-only access privileges, you cannot modify the header information, lines, list or line qualifiers, pricing attributes, and related modifier information. A message will display to advise you about the view-only status.
-
In the Modifier Incompatibility Setup window, only those modifier lines belonging to a modifier list that can be viewed or maintained will get queried as per pricing security rules. Modifiers opened by clicking the Modifiers button may be viewed or maintained depending on the privileges defined by the Pricing Security Administrator.
-
A copied modifier will inherit the default privileges set by the security profile options. The copied modifier will always belong to the operating unit of the user that created it, regardless of the source operating unit.
Changes to Order Management
All list of values (LOV) for price lists in Oracle Order Management will call the Pricing API, Get_Pricelists(), to return a list of valid price lists. The API returns the price lists owned by the same operating unit as the operating unit of the current user and those price lists where the Global box is selected.
Changes to other Pricing windows
The following table outlines the impact of pricing security and security privileges on various windows in pricing:
| For the following: | Security Privileges are enforced: |
|---|---|
| Copy Price Lists | Yes. User needs at least View-only access. |
| Copy Modifier | Yes. User needs at least View-only access. |
| Adjust Price List | Yes. User needs Maintain access. |
| Add Items to Price Lists | Yes. User needs Maintain access. |
| Formulas | No security at present. |
| Agreement Header | Agreement inherits security rules of attached price list. |
Assigning Ownership of Pricing Entities to Operating Units (Entity Usage page)
By default, a new price list or modifier is assigned Global usage. If the Global check box is deselected for a pricing entity such as a modifier, the Operating Unit field is enabled. The operating unit defaults from the profile option MO: Default Operating Unit if Multi-Org Access Control (MOAC) is enabled. If MOAC is not enabled, the value defaults from the profile option MO: Operating Unit.
This operating unit field value displays in the Owned by Operating Unit field on Pricing Entity Usage user interfaces. A pricing entity assigned to an operating unit can only be used for that operating unit and not across all your operating units.
Since pre-existing price lists and modifiers are not assigned a default operating unit, the Oracle Pricing Administrator can:
-
Assign or reassign ownership of pre-existing price lists and modifiers to the appropriate operating unit.
-
Grant or revoke Global Usage of pricing entities which enables the pricing entity to be accessed across all operating units.
Warning: It is recommended that the Oracle Pricing Administrator assigns ownership to all price lists and modifiers prior to upgrading or implementing Oracle Pricing Security. This can be done using the Bulk Update Entity Usage feature in the Entity Usage page.
Creating Pricing Entity Usage
To assign pricing entity usage:
-
Navigate to the EntityUsage page to perform the following:
-
Global Usage: To make the entity available across all operating units, select Yes for Global Usage. If not selected (cleared), global usage is not enabled for the pricing entity, and the entity’s usage is restricted to the assigned operating unit. The Global Usage status is also displayed to users via the Global box on price list and modifier windows.
-
Owned by Operating Unit: To restrict the entity’s usage to a specific operating unit, select the operating unit name.
To make bulk changes to multiple pricing entities, click Bulk Update Entity Usage.
-
-
In the Search region, select your search criteria:
-
Entity Type: Select an entity type such as Standard Pricelist or Modifier.
-
Entity Name: Optionally, enter an Entity Name to search for a particular price list or modifier.
-
-
Click Apply to display the search results in the Results region of the page. For each listed entity, the following information is displayed:
-
Details: Click the Expand icon to view additional details about the selected Entity such as its Active Status, Start and End Dates, Description, and Currency.
-
Entity Name: Displays the unique name that identifies the selected entity.
-
Type: Describes the Entity Type selected such as Standard Price List or Modifier.
-
Global Usage: Indicates the current usage status of the pricing entity.
-
Owned by Operating Unit: Displays the name of the Operating Unit associated with the Entity.
Note: For fresh upgrades or new installations, the Global Usage box is Yes (selected) and the Owned by Operating Unit field is blank.
-
To update Operating Unit and Global Usage for a pricing entity:
-
For each pricing entity listed in the Results region, you can assign a Global Usage and Owned by Operating Unit value. To make bulk changes to multiple pricing entities, use the Bulk Update Entity Usage feature. See Making Bulk Updates to Pricing Entity Usage for more information.
-
To make the entity available across all operating units, select Yes for Global Usage. Alternately, select No to restrict the entity's use to within the specified operating unit.
-
Select the operating unit in the Owned by Operating Unit field.
-
Click Apply to save your changes.
Making Bulk Updates to Pricing Entity Usage
Use the Bulk Update Entity Usage page to quickly apply settings for global usage and operating unit assignment across multiple pricing entities; for example, to assign the same operating unit across all price lists.
To make bulk updates:
-
Navigate to the Bulk Update Entity Usage
Bulk Update Entity Usage page

-
In the Global Usage box, select one of the following:
-
Yes: To set the global usage for the selected entities to Yes.
-
No: To set the global usage for the selected entities to No.
-
-
Select the Owned by Operating Unit box and an Operating Unit to update all the entities with the specified Operating Unit.
-
Click Apply. If successful, a Confirmation message advises that you have successfully bulk updated the entity usage.
Creating Privileges
You can use security privileges to define who can access each pricing entity and their access level.
Note: You must be assigned the Oracle Pricing Administrator responsibility to grant security privileges
You can assign privileges using the following setup pages:
-
Privileges page: To search for and update existing privileges.
-
Express Create Privilege page: To create an access privilege for one specific pricing entity.
-
Bulk Create Privileges page: To select multiple pricing entities and create access privileges for a grantee.
Precedence Levels for Multiple Privileges
A Maintain access privilege is a higher privilege than View Only, and therefore, the higher Maintain privilege prevails for the named user.
If a user has a Maintain access privilege to a given entity at any level of their user hierarchy (operating unit or Global), they will have Maintain access regardless of any other privileges.
Implementation Suggestions for Privileges
It is recommended to list all users and have their access privileges maintained by the Pricing Administrator. Once mapping has been completed and access privileges granted, you can query the privileges granted using the Privileges page of the Security pages. A search by Entity Type such as Standard Price List displays all Standard Price Lists by Entity Name, Grantee Type, Grantee Name, Access Level (ViewOnly or Maintain}, and Effective Dates. Your listing of new access privileges can be checked against the results.
To create privileges:
-
Navigate to the Privileges
Privileges page
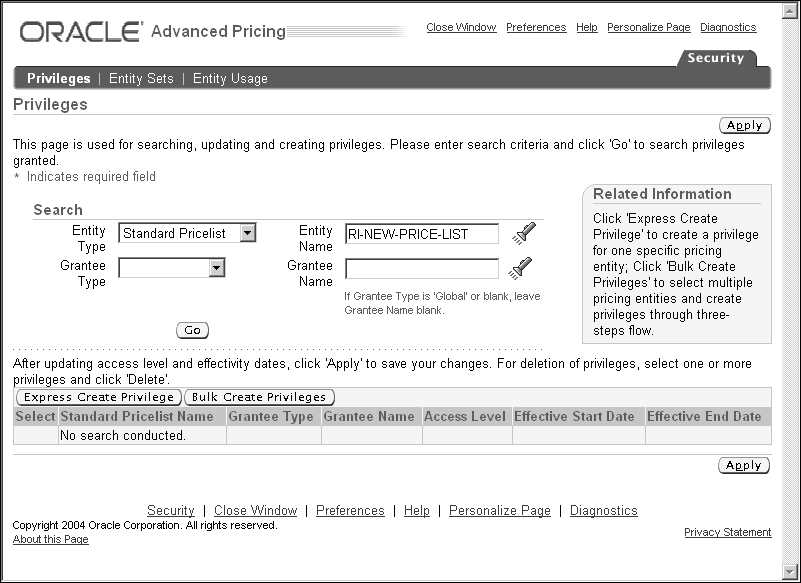
-
In the Search region, select an Entity Type. Optionally, select additional search criteria such as Entity Name, Grantee Type, or Grantee Name to filter your search results. To view the available values for an Entity Name or Grantee Name, click the Search icon.
-
Click Go to display the search results in the Privileges page.
Results: Privilege(s) page
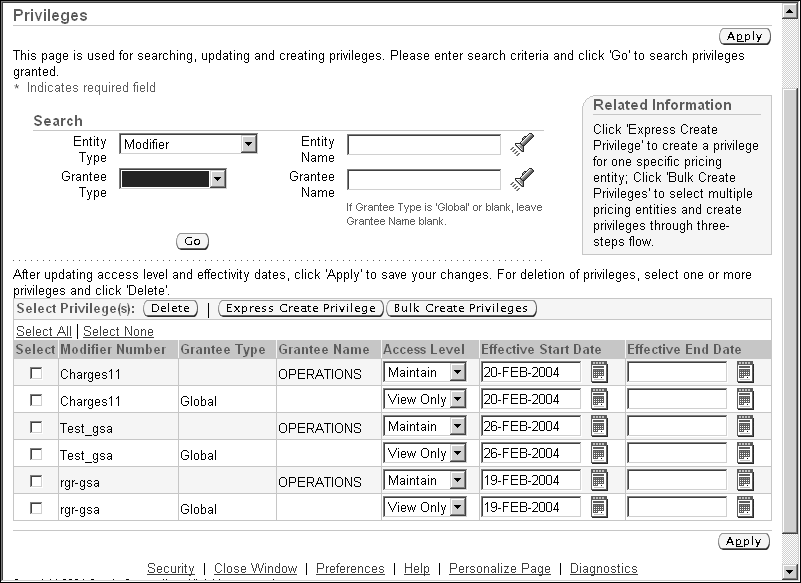
If the message No data exists displays in the Results: Privilege(s) region then no privileges exist for the entity.
If search results display, then you can view or update the privileges directly in the Results: Privilege(s) region.
-
To revoke privileges, select the line to delete and click Delete.
-
To assign or update an Access Level, select Maintain or View Only.
-
Enter or update the Effective Start and End Date and click Apply to save your changes.
To use Express Create Privilege:
-
To create a privilege for one specific pricing entity, select the entity and click the Express Create Privilege button to display the Express Create Privilege page.
Express Create Privilege page
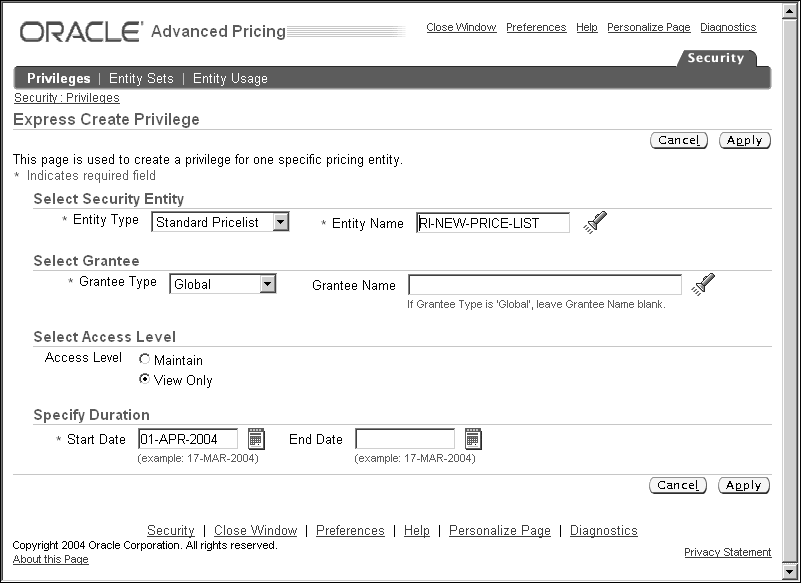
-
In the Select Security Entity region, select the Entity Type and Entity Name of the pricing entity to be granted privileges.
-
In the Select Grantee region, select one of the following Grantee Types and a Grantee Name:
-
Global: If Grantee Type is Global, leave Grantee Name blank. This makes the privilege available to all users with functional access to pricing menus.
-
Operating Unit: Grants the privilege to a specific operating unit. For example, select Vision1 to give a privilege to all users that have Vision1 as the default operating unit.
-
-
In the Select Access Level region, select the Access Level to be granted to the Grantee:
-
Maintain: Enables users to delete, view, and update pricing entities.
-
View Only: Enables users to view but not update the pricing entity.
-
-
In the Specify Duration region, select the Start and End Date. For example, to provide temporary access to a temporary employee, you could enter a Start Date of 02-Jul-2004 and an End Date of 31-Aug-2004. Alternately, accept the system dates.
-
Click Apply.
Using the Bulk Create Privileges feature
Use the Bulk Create Privileges page to create and assign privileges to multiple entities for a specific entity type. For example, you could grant access to several price lists to the Operating Unit: Vision France.
To use the bulk create privileges feature
-
Navigate to the Bulk Create Privileges page
-
In the Quick Search region, search by Entity Type to find the pricing entity or entities to be granted privileges. For example, select Standard Pricelist to search for standard price lists.
-
Optionally, select additional search criteria to refine your search. In the Based on field, select Owned by Operating Unit or Entity Name then enter related details.
For example, to find the Summer Pricelist, select Standard Pricelist as the Entity Type, then select Entity Name and enter Summer Pricelist to specify your search criteria. Click Go to display the search results in the Results region.
-
From the search results, select the entities to be assigned privileges.
-
Click Next to display the Bulk Create Privileges: Provide Additional Privileges Information page.
Bulk Create Privileges: Provide Additional Privileges Information page
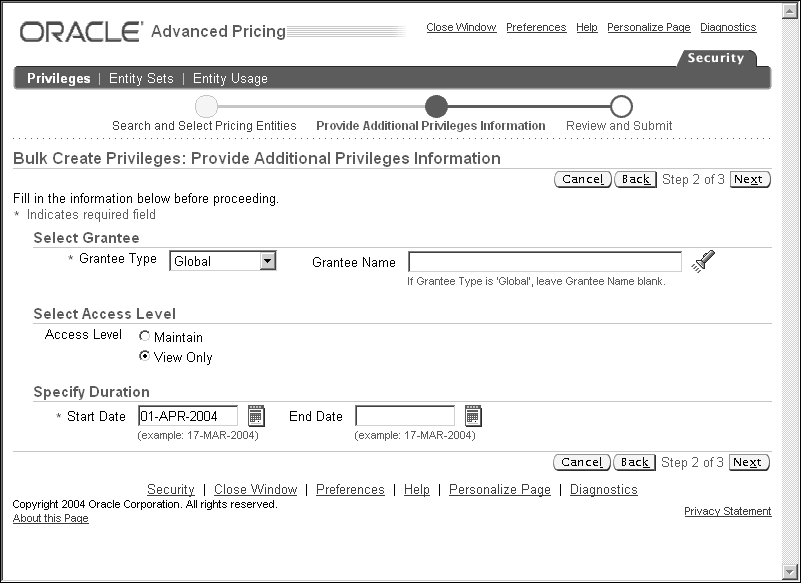
-
Select one of the following Grantee Types and select an associated Grantee Name. To display the available values for a Grantee Name, click the Search icon:
-
Global: If Grantee Type is Global, leave Grantee Name blank. This makes the privilege available to all users across operating units.
-
Operating Unit: Grants the privilege to a specific operating unit. For example, select Vision1 to give a privilege to all users that have Vision1 as the default operating unit.
-
-
Select the Access Level to be granted to the Grantee:
-
View Only: Enables users to view but not update the pricing entity.
-
Maintain: Enables users to delete, view, and update the pricing entity.
-
-
Select the Start and End Date in the Specify Duration region. For example, to grant temporary access to a summer employee, you could enter a Start Date of 02-Jul-2004 and an End Date of 31-Aug-2004. Alternately, accept the default system dates.
-
Click Next to display the Bulk Create Privileges: Review and Submit page.
Bulk Create Privileges: Review and Submit page
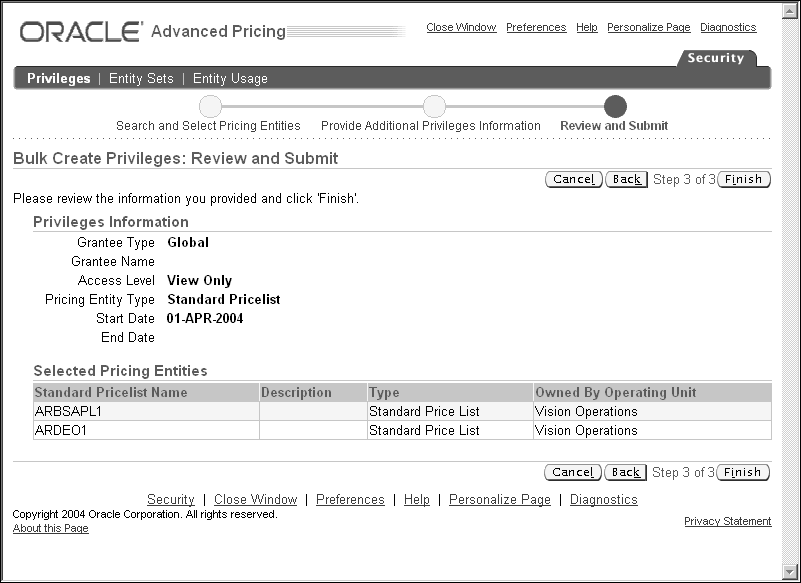
-
Review the information in the following regions before submitting your changes:
-
Privileges Information region: Displays the privilege information.
-
Selected Pricing Entities region: Displays the following information about the pricing entities to be granted the privileges listed in the Privileges Information region: Entity Name, Description, Type, Owned By Operating Unit.
-
-
If changes are required, click Back, or click Cancel to stop the process completely.
-
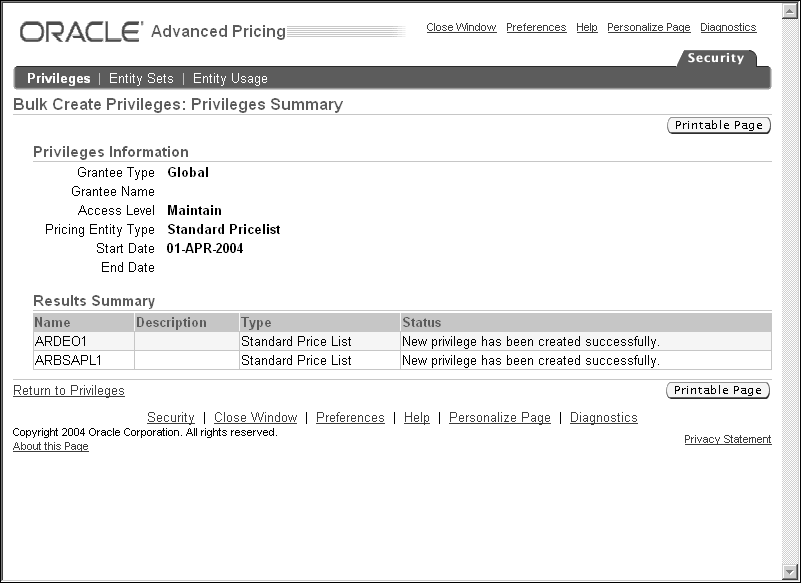
Click Finish. The Privileges Summary page displays the Privileges Information and Results Summary.
Setting up Default Security Profile Options for New Pricing Entities
Security profile options are used to define the default security privileges for newly-created price lists and modifiers. These profiles should be left in default setting (maintaining current functionality) and not be changed until you have decided which users should have automatic privileges of View Only or Maintain whenever a pricing entity is newly created.
These privileges are automatically created as soon as the creating user saves the new entity. The following discussion will assist you in choosing the combination of settings to meet your security policy.
The following profile options are used to assign the default view-only or maintain access privileges to newly created price lists or modifiers:
-
QP: Security Default ViewOnly Privilege: Controls the default view-only privileges for NEWLY CREATED price lists and modifiers. View and maintain responsibilities are controlled separately by different profile options. This profile option enables you to set the view-only privileges at one of the following levels: Global (Default), Operating Unit, or None. This controls which users (if any) can view newly-created price lists and modifiers.
-
QP: Security Default Maintain Privilege: Controls the default maintain privileges for NEWLY CREATED price lists and modifiers. For example, if the profile option is set to Operating Unit, then the maintain privileges for that price list or modifier are restricted to the pricing users of the operating unit where the price list or modifier was created. This profile option enables you to set maintain privileges at one of the following levels: None, Global (Default), or Operating Unit.
Before setting the security profile options and changing the defaulting privilege profiles, complete all security setup requirements.
Note: To change the access privileges for pre-existing price lists and modifiers, use the Security Privileges window.
Security profile options and existing pricing entities
The two security profile options, QP: Security Default Maintain Privilege and QP: Security Default ViewOnly Privilege, do not change the behavior of existing pricing entities. Access to existing pricing entities depends on the privileges already granted by the Oracle Pricing Administrator using the Security Privileges and related pages.
QP: Security Control: The profile option QP: Security Control (read-only) displays the current setting of the security option for your entire installation (either on or off). This profile option value cannot be directly updated and can only be turned on using the concurrent program Security Control.
Resolving conflicts between multiple access levels
If the user has two different access privileges to the same pricing entity, the access level of Maintain always prevails.
In all cases, the highest access level (the Maintain access privilege) prevails over the View-Only privilege. This rule applies regardless of what operating unit id the user is in.
Security Profile Option Settings Compared
The following section lists possible combinations of security profile option settings that define the default view and maintain access privileges for newly created pricing entities. Review the combinations of profile option settings and select the combination that suits the requirements for your installation. When security is turned on, a price list and modifier that is newly created will be assigned the default view and maintain security privileges from the profile option settings.
Security Profile ON: Behavior when creating a new Pricing Entity
The following shows behavior by combinations of profile settings when setting up new price lists and modifiers. Available values are: None, Operating Unit, and Global.
| QP: Default View Only Privilege | QP: Default Maintain Privilege | Behavior while being created | After saving and exiting the Entity's (Price list or Modifier) setup windows |
|---|---|---|---|
| None | None | Entity can be viewed/updated while being created. | 1. The new entity cannot be viewed or updated by anyone. |
| None | Operating Unit | Entity can be viewed/updated while being created. | 4. The new entity can be viewed and updated by all users with the same default operating unit as the user who created the entity |
| None | Global | Entity can be viewed/updated while being created. | 5. The new entity can be viewed and updated by all users. |
Security Profile ON: Behavior when creating a new Pricing Entity for Combination: Values for Operating Unit
The following show behavior by combinations of profile settings when setting up new price lists and modifiers. Available values are: None, Operating Unit, and Global.
| QP: Default View Only Privilege | QP: Default Maintain Privilege | Behavior while being created | After saving and exiting the Entity's (Price list or Modifier) setup windows |
|---|---|---|---|
| Operating Unit | None | Entity can be viewed and maintained by user who created it. | All the users within the same Operating Unit as the user who created it can view the new entity. Nobody can update it. |
| Operating Unit | Operating Unit | Entity can be viewed and maintained by user who created it. | Same as None/Operating Unit settings. The new entity can be viewed and updated by all users with the same default operating unit as the user who created the entity |
| Operating Unit | Global | Entity can be viewed and maintained by user who created it. | Same as None/Global settings. The new entity can be viewed and updated by all users. |
Security Profile ON: Behavior when creating a new Pricing Entity for Combination: Values for Global
The following show behavior by combinations of profile settings when setting up new price lists and modifiers. Available values are: None, Operating Unit, and Global.
| QP: Default View Only Privilege | QP: Default Maintain Privilege | Behavior while being created | After saving and exiting the Entity's (Price list or Modifier) setup windows |
|---|---|---|---|
| Global | None | Entity can be viewed and maintained by user who created it. | All the users can view the new entity. But nobody can update it. |
| Global | Global | Entity can be viewed and maintained by user who created it. | Same as None/Global. The new entity can be viewed and updated by all users |
The Oracle Pricing Administrator can assign or change ownership of a pricing entity using the Entity Usage page.
The Pricing Administrator can make changes to Global Usage of price lists and modifiers one by one, or use the Bulk Update Entity Usage function in the Entity Usage page to make changes more quickly.
Warning: It is important that the Oracle Pricing Administrator assigns ownership to all price lists and modifiers prior to upgrading or implementing pricing security. This can be done using the Bulk Update Entity Usage feature in the Entity Usage page. Otherwise, users will be unable to query any price lists or modifiers.
Setting Pricing Security ON
Warning: The concurrent program QP: Security Control with Views Conversion turns pricing security on or off for your entire installation. If you are upgrading or freshly installing the security feature for the first time, ensure that you have completed the following setup and implementation steps before turning pricing security on or setting the default security profile options; otherwise, users will be unable to query any price lists or modifiers in the pricing windows:
-
You have assessed and mapped out the behavior your business requires when a new price list or modifier is created.
-
Assigned an operating unit owner for existing pricing entities.
-
Granted privileges at all levels based on your security policy and needs.
When security control is first turned ON, a Global check box displays in the header region of all price lists and modifiers. If the Global box is enabled for the entity, then that entity is available across all operating units in your organization. The Global box is visible to end-users and can be updated (cleared or selected) by users with Maintain access privileges.
To activate pricing security, set the concurrent program QP: Security Control with Views Conversion to ON. This is the "switch" that turns security on or off for your installation. Before setting the program to ON, ensure you have completed all the preceding implementation steps.
Note: The Global box is visible to end-users and can be updated (cleared or selected) by users with Maintain access privileges.
You can update the Global box for each price list and modifier window singly, or do bulk updates in the Bulk Update Entity Usage page. See Assigning Ownership of Pricing Entities to Operating Units (Entity Usage page) for more information.
Prior to setting the pricing security on, pricing entities are not assigned to an operating unit. It is important that the Oracle Pricing Administrator assigns ownership to all existing price lists and modifiers prior to turning pricing security on. You can use the Bulk Update Entity Usage feature in the Entity Usage page to assign or reassign global usage values.
After turning pricing security on, all newly created pricing entities are assigned a unique default operating unit identification that makes the creating operating unit the "owner" of the pricing entity.
The following table shows the behavior of existing pricing entities when pricing security is on and no pre-security is assigned:
| QP: Default View Only Privilege | QP: Default Maintain Privilege | Privileges from Pricing Security Administrator | Behavior |
|---|---|---|---|
| Not applicable | Not applicable | No privileges granted | Entity cannot be viewed or updated by anybody except the Oracle Pricing Administrator through the security management pages selected from the Oracle HTML user interface. |
| Not applicable | Not applicable | Maintain | Entity can be viewed and updated by the user with Maintain access privileges. |
Overview of Price Lists
This chapter explains implementation considerations for price lists in Basic Pricing for Oracle Order Management.
Price Lists are essential to ordering products because each item entered on an order must have a price. To book the order, the ordered item must be on a price list. Each price list contains basic list header information and one or more pricing lines, pricing attributes, and a secondary price list. Basic price list information includes the price list name, effective dates, currency, pricing controls, rounding factor, and shipping defaults such as freight terms and freight carrier.
Price lists contain prices and currencies for specific products and services. The prices can be defined by:
-
Unit price: A fixed price.
-
Percent Price: A price which is a percent of the price of another item. This is especially useful in pricing service items.
-
Formula: Multiple pricing entities and constant values related by arithmetic operators. For example, you define the price of an item to be a percentage price of another price list line.
For additional information see the Pricing chapter of the Oracle Order Management User's Guide.
Related Topics
Using Precedence to Resolve Multiple Price Lists
Maintaining Price Lists
Once price lists have been set up Oracle Order Management, you can do the following using price lists:
-
Manually add lines to a price list or copy price list lines from one price list to another.
-
Add a new group of inventory items to a price list by specifying a range.
-
Add a new group of inventory items to a price list by specifying an item category.
See the Pricing chapter of the Oracle Order Management User's Guide for additional information on completing these tasks.
Price List Features
Multiple Price Lists
Order Management enables you to define and use multiple price lists to serve various business needs. At least one price list must be established to price all orders. A base or corporate price list can be created with all inventory items to establish a base price for each. This price list can be used in the absence of a specific price list.
Price lists in Basic Pricing feature the following characteristics:
-
one Product Context: Item
-
one Product Attribute: Item Number
-
Product Value is the item Id.
-
The default precedence value of 220.
If price list defaulting rules are not defined for a customer or order type, the sales order header does not require a price list to be selected. In this event, the pricing engine uses precedence to search for and return the price with the lowest precedence value for any given order line from among the several price lists.
Multiple price lists may contain the same products but with different prices. For example, item AS54888 on Price List A may be priced at $7.00 but on Price List B it is priced at $8.00. The price list containing the item ordered with the lowest precedence value will be selected by the pricing engine. Precedence is not used by the pricing engine if a specific price list defaults to the customer or order type, or is selected at order entry. See Using Precedence to Resolve Multiple Price Lists for more information.
Price lists can be in several currencies. If you have international sales, you can record transactions in different currencies by defining a price list for each currency. After entering the currency for an order or return, you must choose a price list in the same currency.
If an ordered item is not on any price list, the pricing engine returns an error message that it cannot locate the item and UOM. In such cases, the order cannot be booked with an un-priced line.
Secondary Price Lists
The pricing engine uses secondary price lists when it cannot determine the price for an item using the price list assigned to an order. Primary and secondary price lists must have the same currency. You can only assign one secondary price list to any specific primary price list, however, you can assign the same secondary price list to multiple primary price lists.
If an item appears on both the primary and a secondary price list with the same effective dates, the pricing engine uses the primary price list to price the item. If an item appears on the primary price list but is not active (the effective end date has passed), the pricing engine uses the price on the secondary price list.
Discounts and modifiers apply irrespective of whether the price is taken from the primary or secondary price list.
Multiple Currencies
International sales transactions can be recorded in different currencies by defining a price list for each currency. After entering the currency for an order or return, you must select a price list in the same currency.
Negative Pricing
Depending upon the Profile setting of QP: Negative Pricing, you can have either positive or negative prices (or both) on a price list. The profile option OM: Allow Negative Pricing determines if a negative list price or selling price can be entered on an order.
GSA (USA General Services Administration) Price List
If your business requirements require GSA price lists, you can set these price lists up using the GSA Price Lists window. See the Profile Options section for discussion of setting up GSA profile options.
Qualifiers for Price Lists
You cannot create qualifiers to a price list in Basic Pricing. To make a price list, customer or order specific you need to use the Defaulting Rules in Order Management to default the appropriate price list. These defaults can be set up in Order Management at the Customer Setup or when setting up Order Types.
Active box in Price List windows
The Active box on the price list header indicates if the price list is active or not. When the Active box is selected (the default for new price lists), the price list is Active. You can temporarily or permanently disable the price list by clearing the Active box. This enables a user to manually activate or deactivate a particular price list.
In query mode, the Active box is selected, but the underlying value is null. Therefore, when doing a "query by example" to retrieve active price lists, you must clear then re-select the Active box on the query window.
Effective dates
Price lists can have Starting and Ending Dates. This enables you to prepare price list before they are valid and ensure they are not used until their Start Date.
You can use price list and price list line effective dates to retain a history.
Default Price List
You cannot create qualifiers for a price list in the pricing Price List window. Price lists default from the Customer Setup or from the Sales Orders window.
-
Customer Setup: In the customer definition, a price list can be assigned to a customer. At order entry for this customer, this price list will be defaulted from that source.
-
Sales Orders window: In the Sales Orders window, a price list may be selected from the LOV of available price lists.
-
Order Type: In Order Management, order types are defined and may be defined to default a specific price list.
Using Precedence to Resolve Multiple Price Lists
The Precedence value for price list lines decides what price the pricing engine should select when an item is found on more than one price list. This could occur if the price list was not specified on the order line and as a result the pricing engine searched all eligible price lists for an item.
The Precedence value controls which price list or modifier is applied to the order line if multiple price lists or modifiers are eligible. The price list line or modifier with the highest precedence is selected. Remember that the lower the Precedence number, the higher its precedence. Precedence (or Specificity) means the lower the precedence, the more specific the price or discount.
Static Formulas
You can use static formulas to create a price on a price list. Once static formulas are created, or updated, you must run a concurrent process BEFORE any order entry to update the price on the price list. Otherwise, the pricing engine will not return the new price. Static formulas are calculated once, and related price lists updated.
Uploading Price Lists using QP: Bulk Import of Price List
You can use the concurrent program QP: Bulk Import of Price List to import price lists from interface tables into the Oracle Pricing tables.
This provides an efficient alternative to APIs for validating and loading large pricing data into pricing tables. To improve processing efficiency, it is recommended that you run the concurrent program at optimal times such as when no active users are on the system.
See the Advanced Pricing User's Guide, Reports and Concurrent Programs, and the Advanced Pricing Implementation Manual for more information.
Deleting Price Lists
You can delete only price lists lines once they are created and saved. However, price lists can be ended by entering an End Date on the price list header for the entire price list, or on the price list line to effectively remove use of the line to be deleted. You can also make a price list inactive, by clearing its Active box.
Overview of GSA Pricing
This section describes the implementation of Government Services Administration (GSA) pricing for companies that follow GSA pricing guidelines. GSA pricing can also be used to create minimum price floors.
Oracle Order Management enables you to identify when a selling price of an item falls below a minimum price. This can be used by companies that have Government Services Administration agreements. Commercial customers, otherwise known as non-GSA customers, should not receive a selling price for an item that is equal or less than a price for a GSA customer.
Order Management provides functionality to manage this pricing practice. It does not provide any official GSA pricing policies. Setting up and managing GSA customers is solely the responsibility of internal corporate policies and practices. Business practices for overriding GSA violation warnings should be determined by the company.
Even though this feature is designed to enforce GSA Pricing, it's functionality can also be used to set price floors.
GSA Pricing Guidelines
GSA policies require that commercial (non-GSA) customers of a company do not receive equal or greater discounts than GSA customers. If the price of the same item is equal or lower then it causes a GSA violation. Oracle Order Management provides functionality to warn when a GSA violation has occurred.
The GSA Advantage policy allows the Order to have several ship-to locations but a single bill-to (GSA Address). Order Management also provides functionality to allow different ship-to addresses on the same order. Order Management also allows you to have more than one bill-to address for a customer, but only the bill-to addresses checked GSA will get the GSA price.
Using Agreements for Minimum Price Floors
Even if your business is not governed by the pricing rules of the Government Services Administration, the GSA Pricing feature can be used to monitor minimum price floors for items. This provides the ability to define price minimums and issue warnings when selling prices go below this minimum.
GSA Pricing = GSA Discount
In Oracle Order Management, the GSA Pricing window actually uses a modifier discount with an application method of New Price to define GSA prices.
At order entry time, when the item is entered for a GSA customer, the base price will be returned from the regular price list. When you leave the order line, the New Price discount will be applied and become the new base price. A price adjustment will be created for the difference of the new price and the base price:
For example:
-
Base Price Item A: $12
-
GSA Price Item A: $10
-
Unit Selling Price on Order Line: $10
-
GSA Discount Item A: $2
A GSA Discount is created for the requirement that some companies need to manage the discounts given to GSA customers. The value of these discounts represents the loss in revenue for an item for doing business with a GSA customer versus a non-GSA customer.
GSA Violation
A GSA Violation occurs when the price of an item for a non-GSA customer is equal to or less than the price of this item in the GSA Price List. In Oracle Order Management there is a profile option that determines how the company wants this violation to be controlled.
In the event of multiple GSA price lists, the violation floor will be set based on the GSA price list with the highest price for the item.
Related Topics
Setting up GSA Pricing
The Define GSA Pricing window uses modifier functionality for setting up GSA Prices (GSA Discounts), and only accepts GSA Price setup. You cannot use this window to define any other modifiers. See the Oracle Order Management User's Guide for detailed information about Define GSA Pricing window and related fields.
Creating a GSA Customer
To identify a customer that is eligible to receive a GSA Price, select the GSA box on the Customer record of the Order Management tab. You can navigate to the Customer window from Oracle Order Management > Customers > Standard. Only GSA customers can receive prices listed on the GSA price list.
Note: You do not need to specify any customers as being GSA in order to use the GSA feature for monitoring price minimums.
QP: Verify GSA
You must enable this system profile option to use the GSA feature for monitoring price minimums. This profile option controls the comparison between the selling price for items being sold to non-GSA customers and items priced in the GSA Price List. The default value of No must be switched to Yes before the GSA Pricing feature is activated.
OM: GSA Discount Violation Action
This system parameter instructs Order Management what to do when a GSA Violation occurs. You can select from the following values:
-
Prevent GSA Violation by Causing Error
-
Issue Warning when GSA Rules are violated (Default)
GSA Violation Hold
Oracle Order Management has seeded the hold type: GSA Violation Failure. If the OM: GSA Discount Violation Action is set to Prevent GSA Violation by Causing Error, orders that are in GSA violation will automatically be placed on hold. The GSA Violation holds are automatically released if the order or order line is updated and no longer violates the business rule due to which the hold was applied.
Overview of Formulas
You can create mathematical expressions called formulas that the pricing engine uses to calculate the list prices of items and the discounts that apply to them. You can use these formulas to:
-
Create a price from a computation as an alternative to entering prices in a price list.
-
Calculate a price adjustment. For example, you can instruct the pricing engine to calculate Freight and Special charges by attaching a formula to a freight charge modifier line.
This enables you to meet different business needs by determining how to use each formula and by establishing controls around the naming and description of each formula.
Note: In Basic Pricing, only static formulas can be used on price lists. The concurrent program Build Formula Package should be run if you create a new formula or update an existing formula expression.
Related Topics
Seeded Freight and Special Charge Formulas
See the Oracle Order Management User's Guide for information about:
-
Creating a Pricing Formula
-
Defining Factor List Details
-
Updating Formula Prices
Overview of Modifiers
This section contains information about modifiers and modifier implementation. For detailed information on setting up modifiers and modifier lines, see the Oracle Order Management User's Guide.
The Define Modifier window is used to set up price adjustments, freight and special charges, simple discounts and surcharges. Modifier lists contain one or more modifier lines. Modifiers have list-level and line-level components.
You can define qualifiers at the modifier list and line levels to define a customer's eligibility for the modifier. The modifier level, product and product groups, and attributes also help to determine which modifiers will get applied. In Basic Pricing, pricing phase, incompatibility group, and bucket are default values. The pricing engine returns volume breaks and price adjustments back to the calling application.
Related Topics
Modifiers: How Do I Define My Product Hierarchy?
Modifier: Additional Controls and Special Considerations
Manual Adjustments using Modifiers
Implementing Modifiers
There are certain questions you should consider when implementing modifiers, including the following:
-
What types of adjustments can I make?
-
At what item level can I apply my adjustments?
-
How are these modifiers qualified?
-
How are my adjustments applied?
-
Are there any additional controls and special cases?
Types of Adjustments
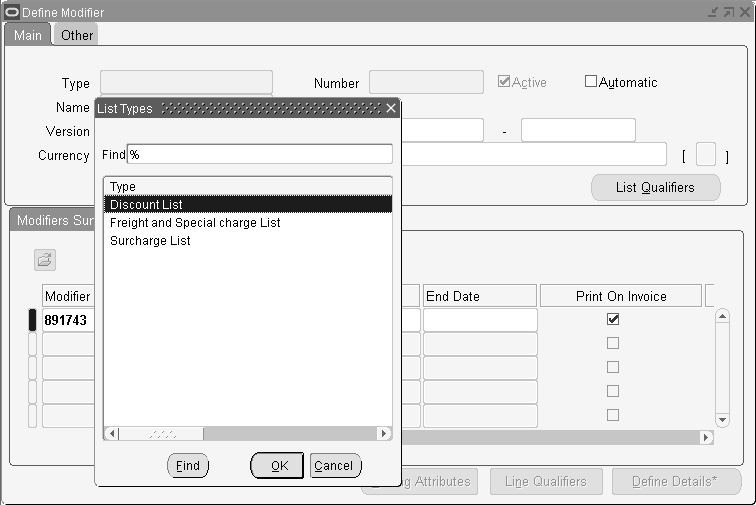
You can create three modifier list types in Basic Pricing:
-
Discount List
-
Freight and Special charge List
-
Surcharge List
There are four modifier line types available in Basic Pricing:
-
Discount: Creates a negative price adjustment
-
Freight and Special Charges: Amount applied to the customer invoice for movement of a shipment to a destination. See Setting up Pricing Modifiers for Freight and Special Charges for more information.
-
Price Break Header: Creates price breaks based on item quantity or item amount.
-
Surcharge: Creates a positive price adjustment
Discounts and Price Breaks can be defined for a Discount list modifier. Similarly, a Surcharge list can include surcharges and price breaks. Freight and special charges are only available from the Freight and Special Charges List.
The following image displays the modifier types.
Modifier Types
Modifiers: How Do I Define My Product Hierarchy?
Modifiers can be defined at the line or order level:
-
Discounts, surcharges, and freight and special charges may be defined at the line or order level.
-
Price Breaks are only defined at the line level and are continuous.
Line level modifiers can be defined for an item, an item category, or for all products within your product hierarchy. You can attach pricing attributes when Product Attribute field is ITEM_ALL. Only one context per order line with 100 attributes is allowed for Pricing Attributes.
Example:
-
Discount of $15 on Item A
-
Surcharge of 10% for All Items with Grade A
-
Price Break for item category- Sodas
Setup Considerations
The Precedence field is defaulted based on the Product Attribute selected and can be updated. When two modifiers qualify to apply to the same line, precedence determines which one applies. The lower the value the higher the precedence.
The unit of measure (UOM) is not mandatory unless the modifier line type is price breaks.
For line-level Discount and Surcharge Lists, the values for the following fields are defaulted:
-
Pricing Phase: List Line Adjustment
-
Incompatibility: Level 1 Incompatibility
-
Bucket: 1
Modifiers: How are they qualified?
Qualifiers are linked individually to modifiers and are used to determine who is eligible for certain modifiers. Oracle provides basic seeded qualifier contexts and attributes. You cannot create new qualifier attributes.
Qualifiers may be grouped to create and/or conditions using grouping numbers. Qualifiers with the same group number create and conditions and require that all conditions be met. Qualifier groups with different numbers create or conditions indicating that at least that at least one (set of) qualifier conditions with the same grouping number must be met.
Qualifiers can be defined at the list or line level. List Qualifiers are Customer Name, Price Lists, Customer Class, and Customer Site. Line Level Qualifiers are Agreement Name, Agreement Type, Order Type, and Purchase Order. Line level qualifiers are only applicable if the Product Attribute is ITEM_ALL.
See the Oracle Order Management User's Guide for more information on setting up and using qualifiers for modifier lists and modifier lines.
Setting up a Common Qualifier using Grouping Number -1
To make a qualifier mandatory for all qualifying conditions, you can use a qualifier grouping number of -1. The pricing engine will always ensure that a common qualifier condition is met before proceeding to other qualifiers.
For example, suppose that customers must order an item from the "Fall" price list to get a discount. To enforce this condition, the "Fall" price list is assigned the -1 Grouping Number to make it a common qualifier. You can also set up other qualifiers (in addition to the common qualifier) to define other qualifying conditions, for example:
Customer Name is Computer Store OR
Customer Class is High Tech AND the Customer Name is Customer Y
The following table shows how these qualifier values would be set up in the qualifiers window:
| Grouping No | Qualifier Attribute | Operator | Value From | Value To |
|---|---|---|---|---|
| -1 (This is the Common Qualifier whose conditions must be met). | Price List | = | Fall Price List | - |
| 1 | Customer Name | = | Computer Store | - |
| 2 | Customer Class | = | High Tech | - |
| 2 | Customer Name | = | Customer Y | - |
Even if the customer is eligible for qualifier 1 or 2, the conditions of the Common qualifier must be met.
Modifier: Additional Controls and Special Considerations
Precedence
The precedence value defaults from the Context Setup window (Setup > Attribute Management > Context and Attributes). In Basic Pricing, all modifiers are automatically incompatible with one another as the Incompatibility Code is always set as Level 1. Basic Pricing only honors precedence processing for modifiers. If there are two modifier lines with the same precedence value, then the modifier for the best price will get applied. For example:
-
Modifier 1: Discount by Item Category: All 6 Packs of Soda $1.00, (Defaulted Precedence > 290).
-
Modifier 2: Discount by Item: 6 Pack of Pepsi $2.00, (Defaulted Precedence > 220).
-
The engine will select a discount of $2 when pricing a 6 Pack of Pepsi because the precedence value is lower for the second discount
Optional Currency
When Optional Currency is selected for a modifier using the lookup OPTCUR, the modifier can be used with any price list regardless of its currency. Such modifiers could be used with both single price lists that are set up in a single currency, or with multi-currency enabled price lists.
Modifier Effectivity
The pricing engine determines if a modifier is valid by evaluating the modifier's Active box and effective dates. The pricing engine evaluates all Active modifiers, then evaluates if the modifier must have current effective dates for the pricing engine to continue. Modifier effective dates can be set at the header and line level. The effective dates of the modifier line must fall within the effective dates for the modifier list.
Unit of Measure (UOM)
The UOM is not a mandatory field for modifier types other than price breaks. UOM conversions are not carried out for modifiers.
Manual Adjustments using Modifiers
To manually create a new selling price on the order line, either a discount, surcharge or new price, you can define a manual discount to decrease the price or a manual surcharge to increase the price. When you move to another line or the line is saved, a new price can be typed and the manual adjustment type selected.
If you have only manual overridable discounts eligible at the line level, you can only decrease the price. If you have only manual overridable surcharges eligible at the line level, you can only increase the price.
A manual adjustment has the following field value characteristics: Automatic box is cleared at the modifier list and line level, Modifier Line is overridable, and the bucket is null. Please note that buckets are used in Advanced Pricing only.
The pricing phase determines when you can override the selling price. For lines in the pricing phase List Line Adjustment, you cannot override the selling price without moving to another line or saving the order for lines. For Order level adjustment, you cannot override the selling price without saving the order. For the pricing phase All Lines Adjustments (Phase 30), the modifier is applied only when the order is saved. Please note that if you include pricing attributes for the sales order line, then batch event gets triggered and Phase 30 gets applied. This means that the modifier gets applied. Batch events are workflow driven and Phase 30 contains batch events.
Only seeded phases in Price Line and Order support manual adjustment. If you want to create a brand new phase of your own, you have to attach it to the BATCH event. For example, Phase 80 by default (seeded definition) is assigned to the BOOK event, and will not appear in the manual adjustment LOV. Again, only seeded phases in Price, Line and Save Order support manual adjustments. If you use a phase other than these, for example, phase 80, you will need to associate it to BATCH event.
If the profile option QP: Return Manual Discounts Profile Option set to Y, then ALL manual discounts will be returned and all automatic discounts that were not considered will be returned as manual discounts. This is the default value.
If this profile option is set to N, then the pricing engine will return only one automatic or one manual discount. Discounts (automatic or manual) will not be returned as manual discounts.
Applying Manual Adjustments
In the Sales Orders window, select Actions and select View Adjustments. In the Modifier Name field, select the LOV to view the unapplied manual adjustments for the line.
In the Sales Orders window Line Items Tab, choose Unit Selling Price LOV to apply line level manual adjustments. Type over the Unit Selling Price field to apply manual overridable adjustments for the line.
Overtype the Unit Selling Price field to apply line level manual overridable adjustments.
The profile option OM: Discounting Privileges determines if a manual modifier can be applied to the price or not. Please note that this profile option determines the application of the manual modifier and not the Calculate Price Flag which is mainly for automatic discounts. So whatever the value of the Calculate Price Flag (Yes, No or Partial), the profile option allows the user to apply all eligible manual adjustments. It can have the following values:
-
Unlimited: The manual modifier will be applied irrespective of the value of the Calculate Price Flag.
-
Full: The manual modifier will be applied.
-
Non-Overridable: The manual modifier can only be applied if the Override option is not checked. Also make sure the Enforce List Price check box for the order type is unchecked so that the order allows manual override of the selling price.
-
None: The manual modifier will not be applied.
Note: If you invoke the Unit Selling Price LOV twice, you may get an error message because the manual adjustment was applied the first time and there are no more manual adjustments eligible.
Overview of Agreements
Oracle Order Management enables you to establish agreements with your customers that let you define the prices, payment terms, and freight terms that you negotiated in your agreement. This section contains information about the implementation considerations of agreements in Oracle Order Management.
Types of Agreements
Order Management provides the following Agreement types:
-
Standard Agreements: Standard Agreements use standard price lists. Price list lines are set up and maintained through the regular Price List Setup window. Use Standard Agreements to define special terms and conditions that are defaulted onto the order, but use prices that are available to other orders. Standard Agreements can be generic or can be specific to a customer or customer family.
-
Pricing Agreements: Pricing Agreements use Agreement Price Lists. These price lists are setup and maintained through the Agreements window. Use Pricing Agreements to setup special pricing arrangements with either a customer or a group of customers. You are also able to define special terms and conditions that are defaulted onto the order.
-
Sales Agreement: In Oracle Order Management, you can define the prices, payment and freight terms that you negotiated with your customers in a Sales Agreement. Defining a default price list for a sales agreement enables all releases against the sales agreement to receive the special sales agreement pricing. See the Oracle Order Management User's Guide for information on using sales agreements.
Since each agreement type serves different business needs, you need to determine how you will name, number, and use each agreement.
Standard Agreement vs. Pricing Agreement
The following table compares Standard and Pricing agreements:
| Standard Agreements | Pricing Agreements |
|---|---|
| Agreement lines not allowed. | Agreement lines required. |
| Associated with standard price list (type PRL). | Associated with agreement price list (type AGR). |
| Maintain and view price list lines through price list window. | Maintain and view price list lines through agreement window. |
| Use each standard price list with multiple standard agreements and to price orders not associated with an agreement. | Use each agreement price list with multiple pricing agreements. Not usable to price orders not associated with an agreement. |
| Cannot revise price list lines using agreement window. | Can revise price list lines using agreement window. |
| Agreement number not automatically created as a qualifier for the associated price list. | Agreement number automatically created as a qualifier for the associated price list. You can only use it to specify the pricing agreement on the order line. |
Related Topics
Defining Special Terms for an Agreement
Revising Agreements
Order Management enables you to maintain multiple versions of the same agreement. This enables you to keep the same agreement name but make changes to the original terms and keep a record of these changes. You can create new versions by changing the Reason number field on the Agreement header.
You can further manage these changes by providing a reason for the revision. You can have many versions of the agreement, but only one version of an agreement can be active. Effective date ranges must also be exclusive for each agreement version.
For Pricing Agreements only, you have line level revision and reason capability that is independent of the Agreement level revision. You must manually end date the line and enter a reason number prior to entering the new agreement line.
Defining Special Terms for an Agreement
Order Management enables you to define special terms for an Agreement. These become defaults to the order lines when an agreement is used on an order. Defaulted attributes include: price list, freight terms, freight carrier, payment terms, accounting rule, and invoicing rule. The values of these attributes will default to the order lines when this agreement is used on an order.
Pricing Agreement Price List and Lines
Pricing Agreement price lists are defined in the Agreements window on the Pricing tab. When you select the Price List Type of Pricing Agreement, the LOV price lists that are displayed in the Price List field only those associated with Agreements. Choose to use an existing Agreement Price List, or create a new Agreement Price List. You can use each agreement price list with multiple pricing agreements. Agreement number is automatically created as a qualifier for the associated agreement price list. Only use this price list to specify the pricing agreement on the order line. You cannot use an agreement price list to price orders not associated with an agreement
Pricing Agreement Price List lines are defined on the bottom region of the agreements window. Here you can define agreement prices for the agreement price list using customer part numbers and inventory item numbers. You can also maintain line revisions and keep track of these with revision reasons.
Customer Items
You can define Pricing Agreements for customer items. The Customer Item must be setup in the inventory system. At order entry time, you can order either by the customer item or its cross referenced internal item.
Single Currency
Both Standard Agreements and Pricing Agreements are for a single currency. This is the currency that is specified on the price list. If you need an agreement to apply to multiple currencies, then you need to setup multiple price lists for each currency, and then setup multiple agreements and attach the price list to each.
Setting up Agreements
Before defining agreements, you need to consider the following implementation considerations to determine how agreements can be used in your business processes.
Note: For more information on setting up Pricing Agreements, Standard Agreements, and Sales Agreements, see the Oracle Order Management User's Guide.
Agreement and Customer Relationship
Agreements can be defined to be generic, that they can be used by any customer. Agreements can also be defined for a specific customer and all their related customers.
Defining Agreement Types
By setting up different Agreement Types (not to be confused with Type of Agreement), you can categorize agreements into a particular type. A type can be used to limit which agreements can be entered on a particular order type or a type can be used for segmenting for reporting purposes. Agreement type is not mandatory. You define Agreement Types by using the Lookups menu item under the Pricing menu.
Revision Reason
Revision reasons help you track why an agreement was revised. This is an optional field. You can define Revision Reasons by choosing Lookups from the Pricing menu.
Customer Items
You can define Pricing Agreements for customer items. The Customer Item must be set up in the inventory system. Set customer items in Order Management Super User > Items > Customer Items. You can specify the org ID and set up the customer items. The customer item must then be cross-referenced to an internal item.
In the Agreement window, the customer item LOV shows all customer items set up for that customer and the product value has its internal item number defaulted when a customer item is chosen.
Overview of Contexts and Attributes in Attribute Management
Contexts and attributes are used to define customer, pricing, and product hierarchies. Creating new pricing contexts and attributes enables you to create additional user-defined data sources for your pricing actions. For each attribute, you can select "User-Entered" as the attribute mapping method to derive the value for the attribute. User-entered means that the value is obtained when a user enters the value.
Using Attribute Management you can complete the following:
-
Create new pricing contexts and attributes.
-
Update existing contexts and attributes. However, you cannot update seeded contexts or their attributes.
-
Disable existing attributes.
Note: For information on attribute mapping methods available only in Oracle Advanced Pricing, see the Oracle Advanced Pricing Implementation Manual.
You can navigate to the Attribute Management feature as follows: Oracle Pricing Manager Responsibility > Setup > Attribute Management.
Recurring Charges
A recurring charge is a fixed charge that will be repetitively applied to an account on a periodic basis. Recurring charges are most commonly associated with subscription services such as Internet Service Provision, some Utility Rate Plans, Bank Account Fees and Credit Card fees. Charge periodicity is the interval by which the price for a recurring charge has been set up on a price list (e.g. Monthly, Quarterly, Yearly).
Oracle Advanced Pricing seeds CHARGE_PERIODICITY as a pricing attribute and the pricing engine now accepts an input value for this pricing attribute from the calling application. For details on how to set up the attribute, refer to the sections below.
Recurring Charges processing
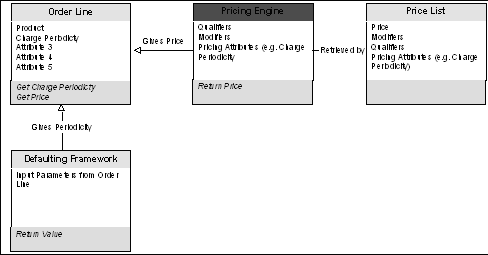
Creating Context and Attributes to be used for Pricing Setup windows
Pricing rules such as pricing attributes are used to drive your pricing actions. You can create new pricing contexts and attributes in the Context Setup window to help define your pricing rules. See Creating Context and Attributes for more information.
Linking Attributes to a Pricing Transaction Entity
Once you create a context and its attributes, you can link the context-attribute grouping to a specific Pricing Transaction Entity (PTE). For a given PTE, this combination can be used within a pricing setup. Each PTE has its own unique combination of attributes. See Linking Attributes to a Pricing Transaction Entity.
Related Topics
Summary of Attribute Levels for Pricing Setup windows
Creating Context and Attributes
The following sections describe how to set up contexts and attributes for Oracle Basic Pricing. Product contexts and their attributes define a product hierarchy for product information. For example, a product context called "Item" may consist of attributes such as Item Number, Item Category, and All Items. Pricing contexts and their attributes are used to define eligibility for a price list line or modifier. Once created, contexts and attributes can be used in price list lines, formula components, and modifiers.
In Basic Pricing, you can define new contexts for the Pricing Context, and new attributes for Pricing and Product contexts. You cannot create new contexts or attributes for the Qualifier context. Once you define a new context, you can also create its attributes.
The following table outlines the contexts and attributes that can be created in Basic Pricing:
| Context Type | Can you create new contexts for this Context Type? | Can you create new attributes? |
|---|---|---|
| Pricing Context | Yes | Yes |
| Product Context | No | For Item context only |
| Qualifier Context | No | No |
To create new pricing contexts
-
Navigate to the Context Setup window.
Context Setup window

-
Select Pricing Context as the Type.
-
Enter a Code which is a short name for the context. Once created, it cannot be updated.
-
Enter a Name and Description for the context. This creates the name that can be selected from the context field in the pricing setup windows.
The Seeded box is selected automatically if the context is a seeded value.You cannot change a seeded value.
-
Select the Enabled box to make this context available for pricing setup windows. If not selected, the context is disabled and does not display in the Context field on the pricing setup windows. All the attributes defined under this context will also be unavailable for setup.
-
When you have completed your entries, enter the attributes information in the Attributes region. See: Creating Attributes for more information on adding attributes.
Deleting Contexts
You cannot delete a context if it has one or more attributes.
Creating Attributes
For a context, you can create attributes that define the specific values which define pricing rules. For example, a pricing context such as Volume may consist of attributes such as Handling Weight or Handling Volume or whatever additional attributes you have chosen to define.
The pricing engine evaluates attributes during engine run time to determine which price lists and modifiers are eligible for the transaction. Attribute values can be derived at the order level, line level, or for both order and line levels. You can define attributes for a given context, and decide which attributes display in the list of values in the Pricing Setup windows.
Note: You must create all new attributes using the Attribute Management setup windows: Oracle Pricing Manager Responsibility > Setup > Attribute Management > Context and Attributes.
To create new attributes:
-
Navigate to the Context Setup window and select the context to which you want to add attributes.
Context Setup window: Attributes region
-
In the Attributes region, enter the Code which is a short name for the attribute. This is an internal name that is unique for a given attribute. Once created, it cannot be updated.
-
Enter a display Name and Description for the attribute. Since new attributes can be introduced by different applications besides Pricing, adding a brief description about the attribute is helpful.
-
Enter a numeric Precedence value which decides the processing sequence of qualifier/pricing attributes. For example, if two price list lines qualify for the same item, then the line with the higher precedence (lower precedence number) is given. Precedence numbers in the series of 5's and 10's are reserved for seeded pricing attributes and should not be used.
-
Enter the Application Name that created this attribute. If an Application Name is not entered, the system defaults Oracle Pricing as the creator of the attribute.
-
Select a Column Mapped value to which an attribute will be mapped. The list displays the names of unused columns only.
Columns QUALIFIER_ATTRIBUTE1 through QUALIFIER_ATTRIBUTE30 are reserved for seeded qualifier attributes. Columns 1-30 are available only for user Datamerge. The Pricing Manager user's list has unused columns between 31-100.
Columns1 to 100 are available and it is recommended to use pricing attributes 1 to 30 as user-entered pricing attributes.
-
Select a value from the Value Set field to define a domain of valid values for an attribute. The Datatype value indicates if the Value Set is numeric (Number) or alphabetic (Char).
-
Alternately, to create a new Value Set or view an existing one, click Value Sets to display the Value Sets window.
Value Sets window
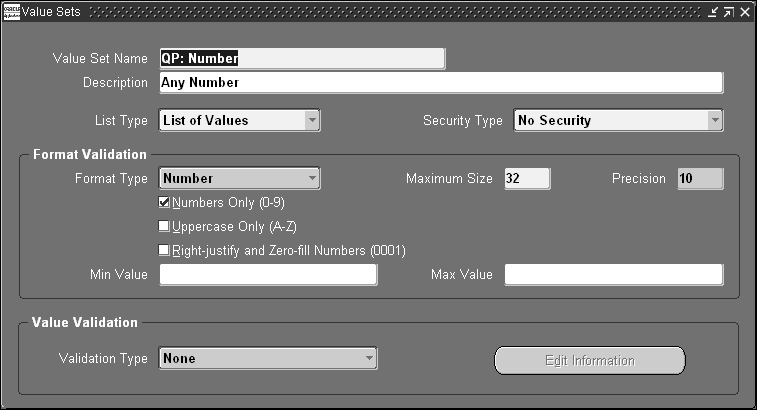
-
Once you have created a new value set, you can select the newly created value from the Value Set field.
Note: If you want to replace a Value Set of an attribute, the new Value Set must be the same datatype as the old one.
The Seeded box is selected automatically if the context is a seeded value. It remains selected even if you overwrite a seeded context.
-
-
Select Required to make the attribute a required value in pricing windows. If the attribute is made Required, then a user must enter the specified attribute, for example, every time he or she creates a sales order line.
-
Save your work.
Once you have created the context and its attributes, you can link an attribute grouping to a specific Pricing Transaction Entity (PTE).
Related Topics
Linking Attributes to a Pricing Transaction Entity
Deleting Attributes
Attributes already used in pricing setup windows cannot be deleted.
Linking Attributes to a Pricing Transaction Entity
Once you have created the context and its attributes, you can link an attribute grouping to a specific Pricing Transaction Entity (PTE).
You must link the context and attribute combination to a PTE, so that the context and attributes become available in the pricing setup windows for that PTE. Each PTE has its own unique combination of attributes. See Viewing Information about a Pricing Transaction Entity for additional information on Pricing Transaction Entities.
To link pricing attributes to a Pricing Transaction Entity
-
Navigate to the Pricing Transaction Entity-Attribute Linking window.
Pricing Transaction Entity-Attribute Linking window
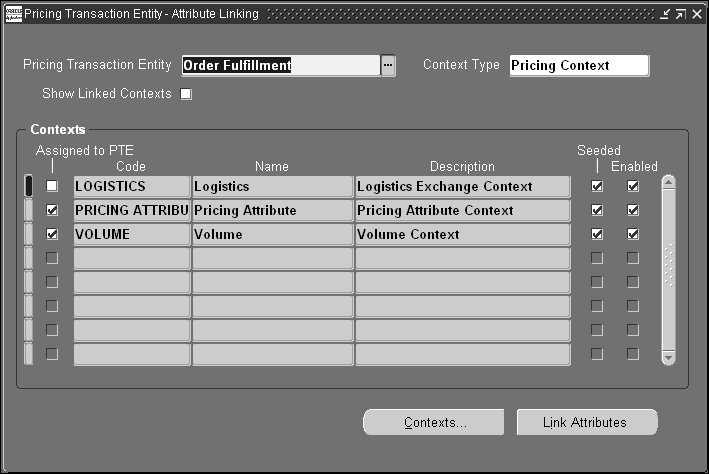
-
Select a Pricing Transaction Entity such as Order Fulfillment. To search for a Pricing Transaction Entity, click the Find icon.
-
Select Pricing Context as the Context Type.
Optionally, select the Show Linked Contexts box to display only those contexts assigned to the selected Pricing Transaction Entity.
The context(s) matching the criteria for the selected PTE and Context Type display in the Contexts region.
-
In the Contexts region, select the context whose attributes are to be linked to the PTE. If the Assigned to PTE box is not selected, then the attributes have not been created/selected for that context in the given PTE.
-
Click Link Attributes to display the Link Attributes window.
Link Attributes window
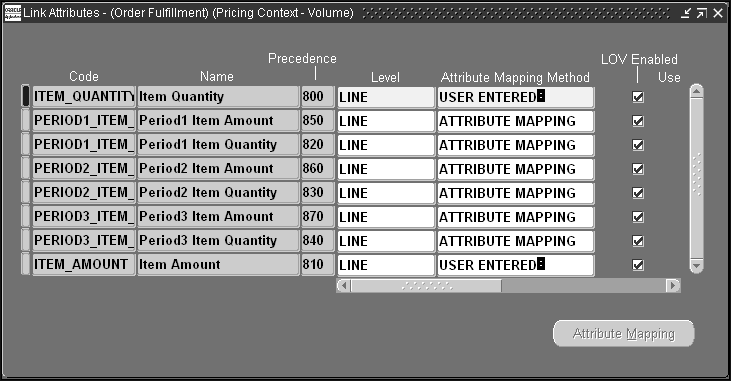
-
Select the attribute Code to be linked to the PTE.
-
Select an attribute level such as LINE that determines the level from where the attribute will be sourced.
-
Select USER ENTERED as the Attribute Mapping Method.
-
Select LOV Enabled if you want the attribute to display in the list of values of the pricing setup windows.
Link Attributes window (continued)
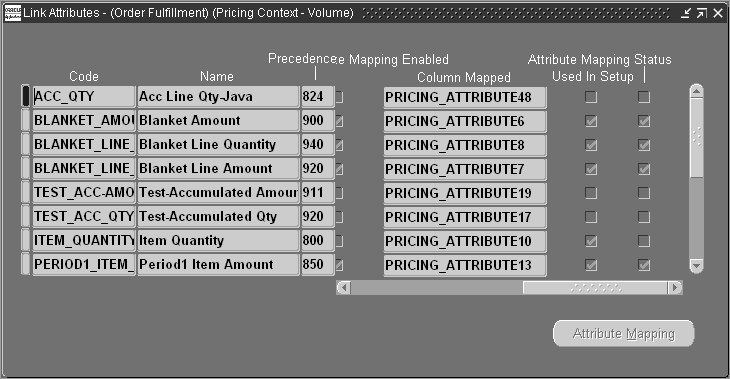
-
Use in Limits box: This field is view-only in Basic Pricing.
-
Attribute Mapping Enabled: This field is view-only in Basic Pricing. Indicates if the attribute is used in Attribute Mapping. This box is cleared for all seeded attributes to avoid the mapping of unwanted attributes.
-
Attribute Mapping Status: This field is view-only in Basic Pricing. This box is selected (or cleared) automatically by the concurrent program which generates the Build_Contexts API for mapped attributes.
-
Used in Setup box: Indicates if the attribute is used in an active pricing setup such as a price list, modifier, formula, or qualifier.
-
-
Save your work. The attribute is now linked to a Pricing Transaction Entity.
Note: You can view the newly linked context in the Pricing Transaction Entity-Attribute Linking window. The Assigned to PTE box indicates that the context and its attributes have been assigned to this PTE. The attributes you created can be viewed in the pricing setup windows.
-
Optionally, click Contexts to create a new context, or to update, enable, or view an existing context.
Viewing Information about a Pricing Transaction Entity
A Pricing Transaction Entity (PTE) consists of a group of applications that point to the same setup data and attributes. A PTE includes Request Types and Source Systems:
-
Source System: The application that captures the pricing setup data. For example iStore, Oracle Pricing and Oracle Marketing generate modifiers. Hence these applications could be source systems.
-
Request Type: Identifies the type of transaction that is being priced.
All applications belonging to the same pricing transaction entity have the same set of attributes available to them. This ensures that the applications sharing the same data always give the same price for an item regardless of the request type.
Assigning contexts and attributes to a Pricing Transaction Entity narrows the search parameters because the search engine only needs to evaluate the setup data generated by the source systems defined for that Pricing Transaction Entity.
Note: In Basic Pricing, the Pricing Transaction Entity - Source System and Request Types window is view-only: you can view the request types and source system for a given Pricing Transaction Entity but not make any updates.
Seeded Pricing Transaction Entities (PTE)
The following tables display the seeded Request Types and Source Systems for each PTE. For a list of seeded Attributes and PTEs, please refer to the Oracle Advanced Pricing Implementation Guide.
| Pricing Transaction Entity | Source Systems | Request Types |
|---|---|---|
| Order Fulfillment | AMS (Oracle Marketing) ASO (Oracle Order Capture) OKC (Oracle Contracts Core) QP (Oracle Pricing) |
ASO (Order Capture) OKC (Oracle Contracts Core) ONT (Order Management Order) |
To view a Pricing Transaction Entity (PTE)
-
Navigate to the Pricing Transaction Entity - Source System and Request Types window.
Pricing Transaction Entity - Source System and Request Types window
In Basic Pricing, this window is view-only so you can view but not update the request types and source system for a given Pricing Transaction Entity.
-
Click the Source Systems tab.
A source system defines the application such as Oracle Pricing that generates the setup data. You can view the following fields in the Source Systems tab:
-
Code and Description: The short name and Description for the source system application.
-
Enabled box: Indicates if the Source System is activated for the defined PTE.
-
-
Click the Request Types tab.
Pricing Transaction Entity - Source System and Request Types window: Request Types tab
-
Code and Description: A short name and Description for the request type.
-
Header or Line Structure and/or a Header and Line View: Displays the request type which may include a global record structure or a view defined to map the data.
-
Enabled box: Indicates if the request type is activated.
Note: A request type cannot be created for more than one Pricing Transaction Entity.
A request type cannot be deleted if a mapping rule is defined for it. A source system cannot be deleted if it is used in a setup for a given Pricing Transaction Entity.
Header/Line Structures
The table below shows examples of the header and line structures for the different request types for the Order Fulfillment Pricing Transaction Entity.
Global Structures PTE Request Type Header Structure Line Structure Order Fulfillment Order Capture ASO_PRICING_INT.G_HEADER_REC ASO_PRICING_INT.G_LINE_REC Order Fulfillment Oracle Contracts Core OKC_PRICE_PUB.G_CONTRACT_INFO OKC_PRICE_PUB.G_CONTRACT_INFO Order Fulfillment Oracle Contracts for Service OKS_QPATTRIB_PVT.G_CONTRACT_HDRREC OKS_QPATTRIB_PVT.G_CONTRACT_LINREC Order Fulfillment Order Management Order OE_ORDER_PUB.G_HDR OE_ORDER_PUB.G_LINE -
Summary of Attribute Levels for Pricing Setup windows
The following describes the attributes that display in each of the pricing component setup lists based on the level assigned to the attribute.
Price Lists window
The values for the pricing attributes display at the Line attribute level.
Modifier List Setup window
The values for pricing attributes display at the Line attribute level.
Formula Lines and Factors List
Since a formula can be applied either at order level or at line level, it is not possible at the definition time to restrict the attributes appearing in the lists based on the attribute level. There will be no level-based restrictions in the list of values.
Using Defaulting Rules in Basic Pricing
Some of the defaulting rules set up in Oracle Order Management (OM) can potentially change the final price returned by the pricing engine. Therefore, it is important to carefully select your defaulting values during order entry. It is important to note that defaulting rules are not supported for price adjustment entities.
Pricing Date
The pricing date instructs the pricing engine to price the order using list prices and benefits that are valid on that day.
At the Order Line level, you can setup a defaulting rule to default the pricing date entered in the order header, ordered date or requested date etc. By controlling the defaulting value of the pricing date you control the LOV of price lists being queried in OM and the list price and benefits applied on to the order.
Agreement
By entering an agreement name on an order the customer is able to receive the prices negotiated in the agreement. An agreement is tied to a standard price list or an agreement price list. An agreement price list could be chosen in Order Management only if the agreement to which the price list is tied to has been entered in the Sales Orders window.
You can use agreements to default details such as sales person, purchase order number, payment terms, and freight terms.
Price List
The price list on the order line is used to fetch the list price and apply benefits. If the item is not found in the price list, the secondary price list is searched. If the item is not listed on the secondary price list, or if there is no secondary price list, an error message is given.
If an agreement is mentioned on the order, then standard price lists and agreement price list attached to the agreement can be used. Price lists can be defaulted from customer, agreement, or order type.
Currency Code
The pricing engine searches for the price lists and benefits in the currency code mentioned on the order. Use defaulting to control the currency in which the order is going to be priced.
Accounting Rule Duration
Accounting Rules are defined in Receivables. Previously only Fixed Accounting Rules were used. Now both Fixed and Variable Accounting Rules are used to interface to Receivables. If the Variable Accounting Rule is used, the Duration field is enabled and the user must enter a value here. When you copy a PTO model with Variable Accounting Rule, only the Accounting Rule is copied, but not the Duration value. When you try to book the order, it gives an error prompting you to specify the duration, as the Duration value is missing. Additionally, if the profile option OM: Include Item Freeze Method is not set to Booking, then the lines which have the missing Duration values are not visible. Therefore it is recommended that whenever you are copying a PTO model with an accounting rule, ensure that:
-
The profile option is set to Booking.
-
Set up a defaulting rule in Order Management where you can populate the Duration field with a value. This will ensure that the Duration field will not be blank when copying.
Overview of Freight and Special Charges
This section discusses freight and special charges in Order Management, and provides tips and examples on how to set up the charges to perform common charge scenarios. In particular, the setup of the automatic conversion of costs to charges is detailed.
Freight and Special Charges are defined as the amount applied to the customer invoice for movement of a shipment to a destination or for other miscellaneous reasons. Freight and Special Charges can be applied on the order as a whole, or can be assessed on specific order lines. Costs that are associated with shipment of goods can be captured during the shipping process and can be passed through to orders as charges, if desired. These charges can be viewed and modified from the Sales Orders window by users with appropriate security.
Companies may choose to assess charges such as freight or handling charges which may vary based on customer, size of order, destination, weight, and other factors. While some companies pass actual shipping costs to their customers, other companies use shipping and handling charges to increase revenues.
In most cases, companies would like these policies to be implemented without manual intervention by an order taker or clerk; for example, in an e-business environment, where users can enter their orders through a self-service or other web interface.
Applying charges and capturing freight costs is now divided between Oracle Order Management and Oracle Shipping Execution. Order Management applies freight or other charges to the customer invoice while shipping captures all freight costs incurred on a shipment of goods
The charges can be applied to the order manually, via order import, through the Process Order open API or automatically based on the charges setup. At the time of order entry, some of the freight and special charges that will be applied on the order may be known. Other charges can be applied later in the order process, depending on user setup and business practices. The following seeded Freight and Special Charge types are included:
-
Export fees
-
Freight
-
Handling
-
Insurance
-
Miscellaneous charges.
All freight and special charges are passed to Receivables to be invoiced.
Freight Costs are actual expenses incurred by the shipper while transporting a shipment. Seeded Freight Cost types include:
-
Administration Fees
-
Duty Fees
-
Export Fees
-
Freight Costs
-
Handling Costs
-
Insurance
Shipping Execution allows users to input costs incurred on the shipment of goods using the Shipping Transaction window or through the Shipping Open Interface. Once the ship confirmation process completes, any costs input are transferred to Order Management for storing on the order, and they can be converted to charges based on rules the user specifies. Freight costs captured at shipping are not invoiced to the customer.
Freight Charges
Freight charges can be automatically derived from the freight cost. The freight charge represents the amount passed to the customer receiving the shipment. The freight charge can be equivalent to the freight cost or a greater amount, for example, freight cost plus a markup. Other ways commonly used to assess freight charges are based on predetermined fixed amount for each order or for each item or tiered amounts based on total order amount, ship method, priority, freight terms and other variables.
Therefore, pricing modifiers are used to define charges, and pricing qualifiers to define the rules for applying those charges. A pricing formula can be used to define the passing through of freight costs to charges.
The Freight and Special Charges features are available with Basic Pricing.
Seeded Freight and Special Charge Types
The following lists the available seed freight and special charge types that you can set up for a modifier.
| Lookup Code | Lookup Type | Description |
|---|---|---|
| Administration Fees | FREIGHT_COST_TYPE | Administrative Charges |
| Duty Fees | FREIGHT_COST_TYPE | Charges applied for duties |
| Export Fees | FREIGHT_COST_TYPE | Charges applied for Export/Import of goods. |
| Freight Costs | FREIGHT_COST_TYPE | Freight movement charges |
| Handling Costs | FREIGHT_COST_TYPE | Charges applied for Handling and packaging of goods |
| Insurance | FREIGHT_COST_TYPE | Charges applied for Insured Shipment |
| Miscellaneous Charge | FREIGHT_CHARGES_TYPE | Any miscellaneous Charges |
Seeded Freight and Special Charge Formulas
Oracle Pricing provides the following seeded formulas to use when setting up freight charges:
-
Cost to charge conversion formulas (simple pass-through formulas)
-
Cost to charge markup formulas (simple markup formulas)
Each seeded formula features its own formula expression, so you can select an existing seeded formula when setting up freight charges rather than create a new formula and expression. For example, you could select the QP: Cost to charge conversion of Administration Cost formula to convert the Administration Cost pricing attribute to a charge. See Oracle Order Management Implementation Manual, Seeded Pricing Formulas appendix for more information about seeded pricing formulas.
Process Flows
In this section, several common business flows are described to help explain the freight and special charges process.
Typical Sales Order with Automatic Charges
The basic flow for applying Freight or Special Charges to an order starts in the Sales Orders window: a user creates an order and enters the lines. When saving the lines, the freight and special charges are automatically applied to the order line based on the setup done by the customer. Once charges have been applied to the order header and line, the user can see the total charges in the total area of the main tab of the Order, and a total of charges for each line in the Charges column on the Order Lines window, Pricing tab.
In addition a user can view, modify or add manual charges by selecting Action > Charges in the Sales Orders window. The Charges window displays details about the Freight and Special Charges applied. If the charge has the Override Allowed box selected, then the user can change the charge.
Entering Costs and Converting Them to Charges
When you are ready to ship the order, you can enter any costs associated with the line or delivery. During ship confirmation (and specifically when the Order Management Interface processes), those costs are transferred to the order line as price adjustments. Then the conversion of the costs into charges will be triggered, provided the cost-to-charge conversion setup has been done. The converted charges will be applied to the line, and then those charges will get invoiced with the order line. Once the line is invoiced, the user will not be able to apply any new charges to the order line.
Sales Order with Manual Charges
The flow for adding charges manually is similar to the flow for automatic charges. The user enters the order header and lines. Automatic charges may be applied, depending on how the setup was done. The user can also manually apply any non-automatic charges if he or she has appropriate security. To do this, select the header or line that you want to apply charges to, click the Action button, and select Charges.
When the Charges window displays, select from the list of values in a blank line any manual charge that the order or line qualifies for. Security for manual charges is based on the profile option: OM: Charging Privilege. If the profile is set to None, the user will only have viewing access to charges and cannot apply manual charges. If set to Full Access, the user can apply manual charges and modify overrideable charges. If set to Unlimited Access, the user can apply manual charges and even modify non-overrideable charges.
Invoicing and Taxation
All charges are invoiced. Line level charges are invoiced with the line they are attached to. Header level charges are invoiced with the first line that is invoiced for that order. Header charges that are added after some lines have been invoiced will be invoiced with the next line that is interfaced to Invoicing. Charges are sent individually to Receivables as invoice header level freight charges, although Accounts Receivable summarizes them into one freight line for the Invoice.
Taxes on charges are not calculated at this time during order entry, even if charges are taxable in the jurisdiction. If it is necessary for charges to be taxed, the user should set the TAX: Invoice Freight as Revenue system parameter to Yes and also set up a dummy Freight item in Inventory that is taxable and specify it in the TAX: Inventory Item for Freight system parameter. Then OM's Invoicing Integration will send the charges to Receivable's Autoinvoice as Lines with that Inventory Item on them, rather than as Freight. There the charges can be taxed as required and revenue accounting for the charges using AutoAccounting can be done.
Returns
There are a few considerations regarding charges for return lines:
-
First, you can set up Freight and Special Charges that will be charged on return lines or orders such as restocking fees or return handling fees. These charges are set up just like any other charges, though you would most likely create rules (qualifiers) for applying these charges so that they apply only to return lines (line category = return).
-
Secondly, you may or may not want to refund charges that the customer paid on the original order that is being returned. You can define which charges are refundable by checking the Include on Returns box when the Charge Modifier is set up. If the return line is created referencing an existing order line, any refundable charges associated with the original line will be automatically applied as a negative charge on the return. If the user creates a new return line without a reference to any existing line, then the user will have to manually apply any refundable charges.
Back orders
There is a profile option that controls whether or not charges will be applied to backordered lines on an order. Some companies by policy do not charge freight or special charges on backorders, while other companies do. The profile OM: Charges for Backorders controls this function. Set it to YES to assess charges for backordered lines. The default is NO. This profile option can only be set at the site level.
Freight Terms
Freight Terms is an attribute of the order header and line. They can be used as a qualifier for applying charges.
Setting up Pricing Modifiers for Freight and Special Charges
In Oracle Order Management, you use a modifier type list of "Freight and Special Charges" to define the charges to be applied to the order or order lines. You define the specific charges such as handling, freight, or miscellaneous charges in the modifier lines region of the modifier list.
You can also select qualifiers for the modifier that define certain qualifications to be met before the modifier(s) can be applied to the order or order lines. For example, does this particular customer get these freight charges? Does the order amount justify (qualify for) these freight terms? Or does the size of the order (amount or quantity) dictate standard freight cost conversion with markup?
Each modifier features the following information such as:
-
The name of the charges to be applied.
-
How the charges are calculated.
-
What level the charges are applied.
-
How they are applied (automatically, based on qualifiers, or manually, or by a user).
The application method selected for a modifier line determines how the charges are applied:
-
Fixed LUMPSUM amount: A fixed charge amount such as a $10.00 handling fee.
-
Fixed AMOUNT per Pricing Quantity: A fixed amount charge per pricing quantity such as a $1.00 charge for each item ordered.
-
Fixed PERCENTAGE: A fixed percentage of the List Price of the item such as a 5% handling fee.
-
FORMULA: A formula to calculate the charge such as Insurance Cost * Constant. The basic components of the formula can be a PRICING ATTRIBUTE and NUMERIC CONSTANT to return a numeric value. The user can attach the formula to the Freight Charge modifier.
Note: If you set up charges to apply at the Order Header level, only Lumpsum or Formula types of calculations are allowed.
Terminology
Freight Costs:
Are costs incurred in the shipment of goods. In Order Management and Shipping Execution, these costs are entered at Ship Confirmation and reflect costs that your company pays for the movement of goods.
Freight Cost Types:
You must classify the Freight Costs by Freight Cost Types which categorize the types of costs incurred. Freight Cost Types are defined in the Oracle Shipping Lookups window. Additional Freight Cost Types lookups can be created by navigating to: Shipping > Setup > Lookups. Use the Search icon to view the existing lookups.
Freight Cost Names:
Are associated with a Freight Cost Type and identify the Freight Costs you are going to use. For example, a freight cost type "Export" might include the following names: harbor maintenance fee, ad valorem tariffs, import quota tariff. These are the names that the shipping clerk will see in the Shipping Transaction window when Freight Costs are entered. You set up Freight Cost Names by navigating to Shipping > Setup > Freight > Define Freight Cost Types. Press Control+F11 to view existing freight cost names. On a blank line, enter a new Name, choose a Freight Cost Type, Currency and Amount. The Amount entered here will default in the Freight Costs window at ship confirmation when that particular Freight Cost Name is selected in the Cost Type field. At ship confirm, the user has the option of accepting this default Amount, or entering a different amount.
Freight and Special Charges:
Defines the charges to be applied to a customer for shipping goods or for other services. Associated with each Freight Charge Type are Freight Charge sub-types. Charges are defined under the Miscellaneous lookup in Pricing. You can define any charges to be assessed that will not be converted from Shipping costs. These sub-types along with the Freight Cost Types (not Names) described show up as Charge Names when you define your Freight and Special Charge modifiers.
Business Scenario 1: Creating a simple freight charge and applying it to an order
Assume your company always wants to automatically assess a Freight Charge of $39.99 to all orders, and also a Handling Charge of $10.00. Certain users can change the amount of the charges at entry.
For this scenario, we will be using the lumpsum calculation method for the charges.
To create a simple freight charge and apply it to an order
-
Navigate to the Define Modifier window.
Define Modifier window: Main tab
-
Select Freight and Special charges List as the Type.
-
Enter a Number and Name that you will be able to recognize. The Number does not have to be numeric.
-
Select the Automatic box so that the modifier will be automatically applied to the order.
-
Select the Currency (optional - can be blank), Start and End Date range, and a Description for the modifier.
Note: Optionally, qualifiers could be added to the modifier to have charges applied only to orders or lines with certain attributes. However, for this scenario, no qualifiers are created so freight charges will always be applied.
Next, add one modifier line for Freight Charges and another one for the Handling Charges. You enter modifier lines in the Modifiers Summary tab in the lower half of the Modifiers window.
-
Enter a user-defined Modifier No for the first line.
-
Select Order or Line Level to indicate whether you want the modifier to be applied at the order or line level. For this example, select Order.
The Modifier Type of Freight/Special Charges is selected by default.
-
Optionally, enter a Start and End Date.
-
Select Automatic to apply the charges without user intervention.
-
Select the Override box to allow authorized users to change the amount of the charge once it is applied.
-
Select a Pricing Phase that controls when the charge will be applied.
-
Select Header Level Charges for Order Level modifiers and Line Charges for Line Level modifiers.
In the Discounts/Charges tab, enter the charge details:
Define Modifier: Discounts/Charges tab
-
Select Freight Costs from the Charge Name field.
-
Select Include on Returns to copy this charge to returns created from these orders.
-
Select Lumpsum as the Application Method and enter a value of $39.99.
Similarly, enter a second line within the Modifiers Summary tab region with settings similar to the first line:
-
In the Discounts/Charges tab, select Handling Costs as the Charge Name.
-
Select (or clear) Include on Returns.
-
Select Lumpsum as Application Method and the Value is 10 ($10.00).
-
Save your work. A basic Freight and Special Charge modifier with one line detailing Freight Charges and one line for Handling Charges has been created.
Note: To apply a modifier without any qualifiers (as in this example), then you must also set the pricing profile option QP: Blind Discount Option to Yes.
Applying Automatic Order Level Charges on an Order
To see how the modifier you created in the preceding step is applied, create a new order within the Oracle Order Management.
-
Enter the order header information including:
-
Customer
-
Order Type (for example, Standard)
-
Price List
-
Ship To & Bill To Addresses and Salesperson.
-
-
In the Lines tab, enter any Item with a quantity of 1 and save the order.
-
In the Order Main tab and can view in the Totals area the Charges of $49.99 which is the sum of the $39.99 Freight Charge plus the $10.00 Handling Charge.
-
To see the applied charges, select the Actions button > Charges to display the Charges window. You can view the following two applied freight charges:
-
Charge Name = Freight Costs and amount = $39.99
-
Charge Name = Handling Costs and amount = $10.00
Note: A user with appropriate security (based on the setting of the OM: Charging Privilege profile option) can override the amount of either charge by entering a new amount and a Reason and Comments, and then clicking Apply.
-
Applying Manual Order Level Charges on an Order
Suppose your company does not want to automatically apply charges to every order. Instead, you want the order entry clerk to choose what orders to charge.
To do this, change the setup of the previous modifier by clearing the Automatic box at the modifier list header and lines. Then enter a new order and line and save it. You will see that now no charges have been applied automatically.
To apply manual order level charges on an order
-
To apply the freight and handling charges manually, select the Actions button > Charges from the Order Header.
-
Click a new line in the Charges window.
-
Select the Charge Name = Freight Costs from the list of values. A charge named Freight Cost of $39.99 will appear. Now, click another new line in the Charges window, select the Charge Name = Handling Cost from the list of values. A charge named Handling Cost of $10.00 will appear.
-
If you cannot apply charges manually:
-
Confirm that the profile option, OM: Charging Privilege is set to Full Access or Unlimited Access.
-
Confirm that QP: Blind Discount Option is set to Yes (all modifiers with no qualifiers will be considered if Blind Discount is set to Yes).
-
To confirm these profile settings, navigate to: Edit > Preferences > Profile and query those profiles.
-
-
To verify that the manual application of the freight and special charges has occurred, review the Total Charges on the Order Main tab or click the Actions button > Charges.
A total of $49.99 displays in the Totals area, and the Freight Costs of $39.99 and Handling Costs of $10.00 displays in the Charges window. Since these charges were applied manually, the Fixed box will be automatically selected on the Charges window, indicating that those charges should not be changed by the system.
Business Scenario 2: Setting up Automatic Order Level Charges using Qualifiers
Assume your company always wants to automatically assess a Freight Charge of $39.99 to all orders with Freight Terms of Prepay & Add, and a Handling Charge of $10.00 for those same orders.
For this scenario, you can add simple qualifiers to the modifier set up in the previous scenario. Select the Modifier window and query the modifier list that was set up in the last section. Now we will make two changes to the modifier lines. First we will mark them as Automatic again and then specify qualifiers for them.
When you set up qualifiers for modifiers, select the qualifiers at the Modifier list header level or at the list line level. The qualifiers selected at the list header level will apply to all modifier lines defined in that list. This can be useful to specify common business rules at the list header only once. Any qualifiers specified at the list line level are specific to that particular modifier line. Use this if you need unique rules for applying one of the Charges but not all of them on a list.
For this scenario, we will set up header level qualifiers which will apply to both of our charges in this list.
To set up automatic order level charges using qualifiers
-
Click the List Qualifiers button on the top of the Define Modifier window to display the Qualifier - Header Level Qualifiers window.
Note: A window displays any predefined qualifier groups you may have already set up. For this scenario, do not select any of these. Instead, click OK to display the Qualifier - Header Level Qualifiers window.
Qualifier - Header Level Qualifiers window
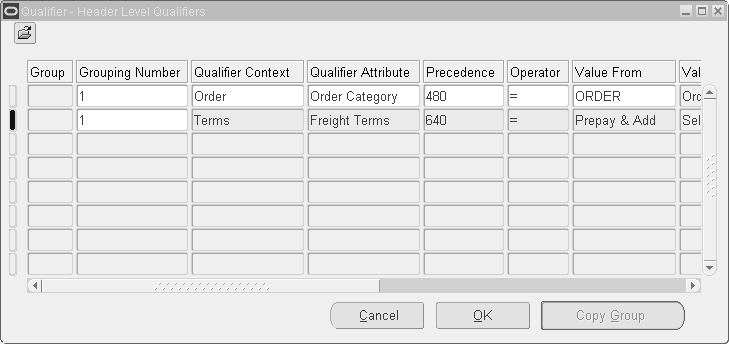
-
Enter 1 as the Grouping Number.
-
Enter Order as the Qualifier Context.
-
Select Order Category as the Qualifier Attribute. Accept the default Precedence value.
-
Select Operator is = and Value From = Order.
-
Similarly, enter the second qualifier for Freight Terms.
Applying a Qualified Automatic Order Level Charge to an Order
Create a new order and select Freight Terms as Prepay and Add on the header. Choose the Lines tab and enter a line or two and save your order. You should see the two charges applied automatically at the order header level as completed previously in Scenario 1. Confirm that the charges are correct by looking at the Order Main tab, Charges Total and by clicking Action > Charges to see details of the charges.
You can verify that the qualifier is working by entering another order with a different Freight Terms, and seeing that the charges are not applied.
Business Scenario 3: Case Study
The company's freight policy is defined as follows:
-
For each Regular delivered order, a charge of $3.00 will be applied automatically for freight.
-
For Regular deliveries, an additional freight charge of $0.50 per quantity is applied.
-
For Special deliveries, a charge of $11.50 per order and an additional $1.00 per quantity is applied.
The difference between Regular and Special deliveries depends on the carrier or transport company. It will be modeled as Shipment Priority at the Order Header which can be implemented in different ways:
-
Set up one Freight and Special Charges List with automatic application, with list lines qualified by Shipment Priority.
-
Set up a new Freight and Special Charges List with the Automatic box selected. Do not assign any List Qualifiers. Then enter four list lines:
The first two qualified by Shipment Priority equal to Regular
The second two qualified by Shipment Priority equal to Special
For each pair of list lines, one will be at Order level and will be calculated as a Lumpsum and the other will be at Line level and will be an Amount per quantity. For all of these, the Charge Name would be Freight Costs.
The following displays the Define Modifier window - Discounts/Charges tab with the following set of modifier lines.
Define Modifier window - Discount/Charges tab

The following table displays the qualifiers used in the setup. The second qualifier ensures that these charges are applied only on order lines and not on return lines.
| Grouping Number | Qualifier Context | Qualifier Attribute | Precedence | Operator | Value From |
|---|---|---|---|---|---|
| 1 | Order | Shipment Priority Code | <accept default> | = | Regular |
| 1 | Order | Line Category | <accept default> | = | Order |
Applying Automatic Order and Line Level Freight Charges on an Order
Create a new order and select the Shipment Priority as Regular on the header. Select the Line Items tab and enter several lines and save your order. You should see the header charge of $3.00 applied and you should also see line charges of 0.50 per item for each line. Confirm that the charges are correct by viewing the charges total on the Order Main tab, and the total charges for each line in the Lines tab, Pricing tab.
You can verify that the qualifier is working by entering another order with a Shipment Priority of Special and confirming that the higher charges are applied: $11.50 at the header and $1.00 for each unit of quantity on the lines.
This is how Charges can be applied or entered during order entry. The following section describes how to automatically convert Freight Costs entered at Ship Confirmation to Freight Charges.
Setting up Freight and Special Charges For Cost to Charge Conversion
After you define any Freight Cost Names in Shipping Execution, any costs entered at Ship Confirmation are transferred to Order Management and are available for the cost to charge conversion process. You can convert the exact cost amount to the charge amount, or you can do it with a markup or markdown.
The cost to charge conversion described here applies line level charges only. Costs are passed from Shipping to Order Management as line level price adjustments. These costs can be converted into order level charges using a user-defined pricing attribute for Order Level Costs and a custom sourcing rule to sum up the line-level costs.
To make the conversion process work (even if you are doing a straight cost conversion with no markup), you must set up a Pricing Formula specifying the conversion algorithm, and then use that Formula when you set up the Charge Modifier. For example, suppose you want a markup of 30% to be applied to the cost to get the final charge (e.g. freight cost + 30%).
Pricing also provides two types of seeded formulas that you can use when setting up freight charges:
-
Cost to charge conversion formulas (simple pass-through formulas)
-
Cost to charge markup formulas (simple markup formulas)
To set up freight and special charges for cost to charge conversion:
-
Navigate to the Pricing Formulas window.
Pricing Formulas window
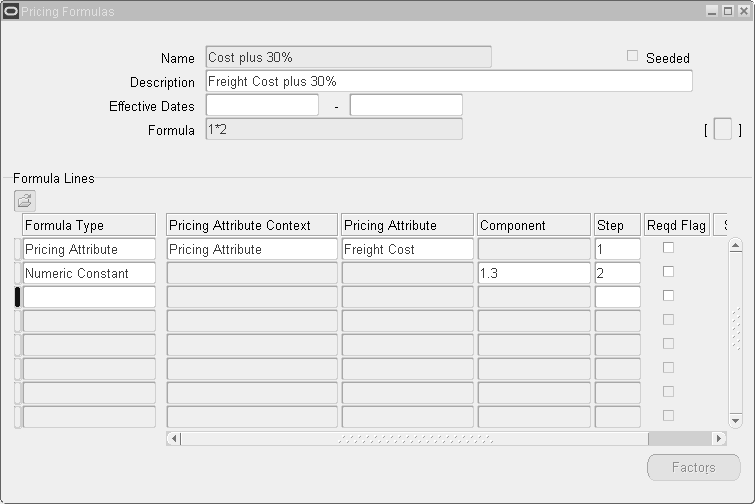
-
Enter a formula Name, a Description, Effective Dates (optional), and the Formula equation.
-
Enter the equation 1*2 which means to multiply step 1 by step 2.
-
In the Formula Lines region, the steps define the Pricing Attribute Freight Costs multiplied by a Numeric Constant of 1.3.
-
So using this formula, the system will take the freight cost (step 1) assigned at ship confirmation and multiply by the numeric constant of 1.3 (130%) (step 2) which will equal the final freight charge:
Now you create a new Charge Modifier List that uses this formula.
-
Navigate to the Define Modifier window.
-
Enter the Type as Freight and Special Charges List.
-
Enter a Number and a Name.
-
Select the Automatic box.
-
Select the Currency, Start and End Dates and add a Description for the modifier.
Next, enter modifier lines for the charge list:
-
Enter a Modifier Number.
-
Choose the Level = Line.
-
Select the Modifier Type as Freight and Special Charges.
-
Optionally, enter a Start and End Date. Check the Automatic box to apply the charges automatically. Then choose the Discounts/Charges Tab and enter the charge details.
-
In the Charge Name field, select Freight Costs, Application Method is Lumpsum and select the Formula you just created.
Now you can set up list level qualifiers which will apply to this modifier list. Click the List Qualifiers button on the list header and enter some qualifiers similar to the ones in this table:
Grouping Number Qualifier Context Qualifier Attribute Precedence Operator Value From 1 Order Line Category <accept default> = Order 1 Order Shipped Flag <accept default> = Yes 1 Order Shippable Flag <accept default> = Yes These qualifiers will make sure that these charges will be applied to Order Lines only when shipping occurs. (Shipped Flag = Yes). You can add any other qualifiers that make sense to your business such as limiting these freight charges to certain customers or orders with particular Freight Terms.
Apart from these list level qualifiers, you will need to create a line level qualifier for each modifier line in your list. This qualifier will link the Freight Cost Type entered at Ship Confirm to this Charge.
-
Select the modifier line with Charge Name = Freight Cost.
-
Click the Line Qualifiers button then enter: Grouping Number = 1, Qualifier Context = Order, Qualifier Attribute = Freight Cost Type Code, Precedence = accept default, Value From = Freight.
Header Level Qualifiers Grouping Number Qualifier Context Qualifier Attribute Precedence Operator Value From 1 Order Freight Cost Type Code <accept default> = Freight With the Formula and this Modifier created, you can now convert Shipping Cost into a Freight Charge. To try this, you will need to create a new order that matches the qualifiers (such as Customer or Freight Terms) you set up for your Charges.
Assigning Actual Freight Costs at Ship Confirmation
Once you have booked and pick released the order (using autocreate deliveries to simplify the process), you then enter the actual Freight Costs in the Shipping Transaction window when you do ship confirmation.
To assign actual freight costs at ship confirmation:
-
Navigate to the Shipping Transactions window, and query the lines of your order.
-
In the Lines/Containers tab of the Shipping Transaction window, select the Actions button > Freight Costs and click Go.
-
Enter the Cost Type = Freight Costs, Currency Code = USD and type in an Amount such as $15.00.
-
Ship confirm the delivery.
Ensure that you enter the Freight Costs before you Ship Confirm; if you do the ship confirm first, then it will be too late to add the freight costs. The actual Charges will be calculated based on the formula and the Freight Costs you just entered. If you have deferred the OM Interface at Ship Confirm, then you may not see the charges until after that interface has run.
-
To confirm freight costs to freight charges conversion, navigate back to the Sales Order Pad and query up your order. You will see the Freight Charge = $19.50 (15 + 30% of 15) on the Main tab.
Freight Costs Not included as Freight Charges
Inevitably, some freight costs are incurred after Ship Confirm which cannot be invoiced to the customer. For example, a truck shipment is delayed at the customer's dock during unloading and the carrier assesses the shipper a detention charge. Since the cutoff point for passing through freight costs occurs at the time of Ship Confirm, there is no possibility of invoicing the customer for this extra charge except manually.
Other Business Scenarios
Several other common business scenarios are provided to assist you in better understanding the setups required to map freight costs to freight charges.
Business Scenario 4: Standard Handling Charge
In this scenario, a distributor of music CDs wants to assess a standard handling charge of $1.99 per CD.
-
Navigate to the Define Modifier window and enter the following information:
Define Modifier Window: Heading Type Number Name Automatic Freight and Spec. <user defined> <user defined> <selected> -
On the first line of the Modifiers Summary tab, enter:
Define Modifier window: Modifiers Summary Tab Level Modifier Type Automatic Override Phase Line Freight/Spec <selected> <selected> Line Charges -
Click the Discounts/Charges tab and enter:
Define Modifier window: Discounts/Charges Tab Charge Name Application Method Value Handling Costs Amount 1.99 By using an application method of Amount, the pricing engine will assess a handling charge of $1.99 for each item ordered. If “Lumpsum” were used as the application method, the pricing engine would assess a handling charge of $1.99 per line (or per order if we had used an Order level modifier).
-
Click the Line Qualifiers button and enter:
Define Modifier window: Qualifiers -- Line Level Grouping Number Qualifier Context Qualifier Attribute Precedence Operator Value From 1 Order Line Category <accept default> = Order
The setup for this modifier is completed. A handling charge of $1.99 will be automatically applied to each item ordered. To verify that the Handling charge is functioning properly, navigate to the Sales Order Pad and enter a new order. Enter one line with a quantity of 10. Click the Action button and select Charges. The Charges window should show a Handling Charge of $19.99.
Business Scenario 5: Freight cost markup applied to all invoices with freight terms of prepay and add
A shipper wishes to assess a freight markup of $50 per line for all shipments with freight terms of Prepay and Add. The markup will be assessed against the actual freight cost entered by the Shipping Department. Since the Freight costs will not be available until the order is shipped, the company wants customer to see an estimated Freight Charge of $300 on each line of the order, which will be replaced with the actual charge after shipping. In addition, a standard Handling Charge of $10 will be added to each line of the order. All charges will be applied at the line level.
In this example, you need to set up a formula and a modifier with qualifiers.
-
First, set up the pricing formula and name it “Freight XX”. Navigate to the Formulas Setup window, and enter:
Pricing Formulas window: Heading Name Description Formula Freight XX Freight Costs 1 + 2 -
In the Formula Lines region, enter:
Pricing Formulas Window: Lines Formula Type Pricing Attribute Context Pricing Attribute Component Step Pricing Attribute Pricing Attribute Freight Cost <blank> 1 Numeric Constant <blank> <blank> 50 2 A pricing attribute can be anything used to price the item, from volume to item to freight cost. The purpose of setting up this formula is to apply a markup to the freight cost assigned at shipping. In this formula, the system will take the freight cost (step 1) assigned at ship confirmation and add $50 (step 2) which equals the final freight charge.
Now, when the formula Freight XX is selected in any pricing modifier, the $50 will be added to the Freight Cost at the line or header level, as defined in the modifier.
-
Navigate to the Define Modifier window to set up the pricing modifier for freight and special charges that should appear on the order:
Define Modifier window: Heading Type Number Name Automatic Freight and Spec. <user defined> <user defined> <selected> -
Next, select the Modifier Summary tab. On the first line, we will use the Freight XX formula in the modifier. Enter this:
Define Modifier Window: Modifiers Summary Tab Level Modifier Type Automatic Override Phase Line Freight/Spec <selected> <clear> Line Charges -
Select the Discounts/Charges tab, and enter:
Define Modifier window: Discounts/Charges Tab Charge Name Formula Application Method Value Freight Costs Freight XX Lumpsum <blank> Note that the formula used is the one you set up in the Pricing Formulas window. The Value column is null because the freight cost amount will be input by the Shipping Department at ship confirm.
Two more modifier lines must be created:
-
One line for Freight Charges
-
One line for Handling Charges
These lines will set up standard default amounts for these charges in case Shipping neglects to enter actual freight costs.
-
-
In the Modifier Summary tab, enter the Freight charge line information:
Define Modifier Window: Modifiers Summary Tab Level Modifier Type Automatic Override Phase Line Freight/Spec <selected> <clear> Line Charges -
In the Discount/Charges tab, enter the Freight Charge line information:
Define Modifier Window: Discounts/Charges Tab Charge Name Formula Application Method Value Freight Costs <blank> Lumpsum 300 -
Repeat the same process for the Handling Charge.
-
Enter the following:
-
Modifier No: Null
-
Level: Line
-
Modifier Type: Freight and Special Charge
-
Start Date: Null
-
End Date: Null
-
Automatic: Selected
-
Override: Cleared
-
-
-
In the Discount/Charges tab, enter the following information:
-
Charge Name: Freight Costs
-
Formula: Null
-
Application Method: Lumpsum
-
Value: 10
This modifier line will modify the invoice to include an amount of $10 as a Handling Charge per order. The standard Handling Charge will be assessed automatically; no manual input is required at order entry or ship confirm.
The completed Modifiers Summary window should appear like this:
Define Modifier Window: Modifiers Summary Tab Level Modifier Type Automatic Override Phase Line Freight and Spec. <selected> <clear> Line Charges Line Freight and Spec. <selected> <selected> Line Charges Line Freight and Spec. <selected> <clear> Line Charges The completed Discount/Charges window should appear like this:
Define Modifier Window: Discounts/Charges Tab Charge Name Formula Application Method Value Freight Costs Freight XX Lumpsum <blank> Freight Costs <blank> Lumpsum 300 Handling Cost <blank> Lumpsum 10 Next, you need to set up list qualifiers and line qualifiers. In this example, the List Qualifier is used to apply the modifier to orders with Freight Terms of Prepay and Add. The Line Qualifiers allow the pricing engine to apply the modifier to the order lines according to the processing status such as shippable, shipped. Prior to ship confirm, the order status is shippable and the standard freight charge ($300) will appear on the order entry Charges window. When the order status changes to shipped after ship confirm, the actual freight cost plus the $50 markup will apply. The Line Qualifiers trigger this functionality.
-
To set up the list qualifiers:
-
Click the List Qualifier button on the Modifier Definition window. The Qualifiers Group window appears, click OK.
-
Enter the following:
Define Modifier Window: Discounts/Charges Tab Grouping Number Qualifier Context Qualifier Attribute Precedence Operator Value From 1 Terms Freight Terms <accept default> <accept default> Prepay and Add
The order must pass this list level qualifier before it will review the line level qualifiers. Line qualifiers add more detailed requirements for the order to qualify for the Freight Charge.
To set up the line qualifiers
-
To set up the Line Qualifiers for this example, select the first modifier line and click the Line Qualifier button. The Qualifiers Group window appears, click OK. The Qualifier - Line Level Qualifiers window will appear.
-
Enter this information as qualifies for the 'cost to charge conversion modifier line:
Line Level Qualifiers: Line 1 Grouping Number Qualifier Context Qualifier Attribute Precedence Operator Value From 1 Order Shippable Flag <accept default> = Yes 1 Order Line Category <accept default> = Order 1 Order Shipped Flag <accept default> = Yes 1 Order Freight Cost Type Code <accept default> = Freight For Line 1, a grouping number is used because there are more than one line qualifiers that have to pass before the freight charge can be applied to the order. The table for Line 1 is read as follows: the Shippable Flag on the line must be Yes, AND, the Line Category on the line must be Order, AND, the Shipped Flag on the line must be Yes, AND, the Freight Cost Type Code on the Order must be Freight. All of these qualifiers must be true to apply the qualifier to the line.
-
To set up the Line Qualifier for the $300 estimated charge, select the second modifier line and click the Line Qualifier button. The Qualifiers Group window appears, click OK. The Qualifier - Line Level Qualifiers window will appear.
-
Enter the following to create the qualifiers to apply to lines with Line Category of Order and for Shippable lines that have not been shipped:
Line Level Qualifiers: Line 2 Grouping Number Qualifier Context Qualifier Attribute Precedence Operator Value From 1 Order Line Category <accept default> = Order 1 Order Shipped Flag <accept default> = No 1 Order Shippable <accept default> = Yes -
To set up the Line Qualifier for the Handling Charge, select the third modifier line and click the Line Qualifier button. The Qualifiers Group window appears, click OK. The Qualifier - Line Level Qualifiers window should appear.
-
Enter this information to apply the Handling Charge to outbound lines (Line Category = Order) that are shippable:
Line Level Qualifiers: Line 3 Grouping Number Qualifier Context Qualifier Attribute Precedence Operator Value From 1 Order Line Category <accept default> = Order 1 Order Shippable <accept default> = Yes The setup for formulas and modifiers in this example is complete.
-
To confirm that the setup for these Freight and Handling charges is correct, navigate to the Sales Order Pad and enter a new order.
-
Click the Others tab to confirm that the Freight Terms are Prepay and Add; this is so the list qualifier will be satisfied.
-
Click the Lines tab and enter a line.
-
Click the Action button and select Charges.
The charges should show the estimated freight charge of $300 and the handling charge of $10. These amounts are the default values set up in the modifier. When the actual freight costs are input by the Shipping Department at ship confirm, then the freight charge will change.
-
Book your order.
-
Navigate to the Shipping Transactions window and enter actual freight costs, then ship confirm the order.
-
Navigate to: Shipping > Transactions and find your order.
-
Click the Actions box and select Launch Pick Release and click Go.
Also, make sure to autocreate a delivery either at picking or before ship confirming the order. Once a delivery is created, click the Delivery tab. If your order line does not appear, use the Query Manager (flashlight icon) to find your order. When the order line appears, click the Actions box again and select Freight Costs and click Go.
Here is where you enter the actual freight costs for the shipment. Set Cost Type = Freight and enter an Amount = 200 and click Done.
Note: If you enter any other cost types here, they will not appear as a freight charge because you did not set up any other charges in the modifier for cost conversion. A charge was set up for Handling but it is not set for cost conversion.
-
Now, click the Actions box again and select Ship Confirm and click Go.
-
Return to the Sales Order Pad and find your order. Notice that the Charges Line total is now $260. This amount is Freight = $250 (actual freight charge + $50 markup from the pricing formula), Handling = $10.
In this example, the estimated Freight Charge of $300 went away after shipping, since the Shipped Flag = No qualifier on that modifier line is no longer satisfied. This means that if the Shipping Department neglects to input a Freight Cost, the estimated charge would still disappear, because of this qualifier. If instead you wanted the $300 charge to stay on the order even if the Freight Cost was not entered, then you should remove that second line of the qualifier for the estimated charge. Then, if the Freight Cost was not entered, the $300 charge would remain. If however a Freight Cost was entered, the resulting charge from the formula would replace the $300 charge if that charge was larger than $300.
Troubleshooting Freight and Special Charges
The following section provides troubleshooting information and suggestions when implementing charges and particularly the cost to charge conversion.
Fixed vs. Estimated Charges
A common business case is to set up the charges to apply estimated charges automatically at order entry with the expectation that they will be replaced with actual charges when the order is ship confirmed. To do this, you might set up a Charge Modifier that applies an automatic charge at entry, qualified by the line being shippable but in status entered. Later, when the cost to charge conversion occurs at ship confirm time, the converted actual charge will overwrite the estimated charge.
This can be controlled by using the Fixed box on the Sales Orders window - Charges window. If you do not want an applied charge to be overwritten by the system, at cost to charge conversion or by any subsequent pricing calls, select the Fixed box on the Charges window. The Fixed box is selected automatically for charges that are manually applied or any automatic charges that are manually overridden.
Note: The Fixed box should not be confused with the Overridable box, a view-only box which controls whether a user can manually change the amount of the charge.
Name Confusion
The naming convention you use is critical for using cost to charge conversion. You enter costs in the Shipping Transaction window using the Freight Cost Names defined in Shipping Execution, each of which belongs to a particular Freight Cost Type. It is the Freight Cost Type that you need to use as the qualifier for the Charge Modifier line, however, not the Name.
In Order Management, you never really see the Freight Cost Names except at Ship Confirm. To keep things simple, you might want to just have one Freight Cost Name for each Freight Cost Type, and have it be the same name.
Also, if you define additional Freight Cost Types (the lookups) (with their Freight Cost Names and amounts) thinking you can then convert them into charges, this can be done. But you have to tell Pricing that the new Freight Cost Type is to be used as a Pricing Attribute (so you can put it in a formula); otherwise you won't see it in the pricing attributes LOV in the formula, and so you won't be able to use it.
Multiple Automatic Charges
If you have multiple automatic Freight and Special Charge lists set up, then ONLY ONE charge for each Charge Type and Sub-Type combination will be used by Order Management. Which one will it be?
Which charge gets applied depends on INCOMPATIBILITY GROUP, PRECEDENCE and PHASE on the modifier. If the INCOMPATIBILITY GROUP is null (not specified) on the modifier, then the largest freight charge for each distinct/unique combination of charge type/sub-type will get applied to the order/line. If the INCOMPATIBILITY GROUP is not null, then within a particular PHASE and a particular INCOMPATIBILITY GROUP, the freight charge with the highest PRECEDENCE will be selected by the Pricing Engine if the INCOMPATIBILITY RESOLVE CODE is set to Precedence for the phase. If there is more than one freight charge eligible within a particular INCOMPATIBILITY GROUP in a particular PHASE and the PRECEDENCE is the same or if the INCOMPATIBILITY RESOLVE CODE is set to Best Price for the phase, then the smallest charge will get selected. Amongst these selected freight charges, Order Management applies the largest freight charge for each unique combination of charge type/sub-type to the order and line.
If you are using Basic Pricing, then you can only use an INCOMPATIBILITY RESOLVE CODE of Best Price. If you have licensed Advanced Pricing, then you can choose to use an INCOMPATIBILITY RESOLVE CODE of Precedence.
Pro-Rating the Costs
If you enter Costs in ship confirm at the Delivery Level, the costs that transfer back to the lines in Order Management are pro-rated to all the lines of the delivery, based on weight (if present) or volume (if present) or quantity shipped on each line. See the Shipping Execution User's Guide for how to get weight and/or volume on delivery details.
Cost to Charge Conversion Not Working
Did you enter the cost? If you don't enter Costs in ship confirm, then the cost to charge conversion will not occur. If you enter a cost of zero, then the conversion will take place based on the formula you set up. So if you want the charge to be Cost plus $50 and you enter a zero cost, then the charge generated will be $50. But if you don't enter a cost at all, then no charge will be put on the order.
Included items? Is the line you're trying to get the charges onto an included item in a PTO kit or model? If so, you won't be able to get the charges to convert easily. The reason for this is that the costs come to Order Management from Shipping as line level price adjustments, and the SHIP pricing event triggers the Freight and Special Charges modifier to be applied; since included items are not priced, this doesn't happen. Your only recourse to getting a cost-to-charge conversion working on an included item is to use an order level modifier.
Check the Phase: The phase which you selected when you set up the cost-to-charge conversion modifier line has to be one that is executed during the SHIP pricing event. For Basic Pricing, use the Line Charges phase. If you choose some other phase, then the phase that you use for the modifier line should be one that has the SHIP event associated with it.
You can check this by querying up the phase in the Event Phases window. (Navigation Path is Setup -> Event Phases under Pricing Manager responsibility.) Also make sure that the phase has freeze override flag checked. Please check the Advanced Pricing User's Guide to learn more about how to use this window.
Did the OM Interface run? If you defer running the interfaces (check box on Ship Confirm), the OM Interface may not have run yet. Be sure it has completed.
Did the cost to charge still not work? Finally, you can run a debug utility. This utility will help you or Support see whether the cost got to Order Management and if so, why it didn't get converted to a charge properly. It will spool the debug output to a file, where you can view the results.
To use this debug utility, you will need to know the line_id (order line id) of the order line for which the freight charge (cost to charge conversion) is not coming through. You can determine the order line by using the menu option: Help > Diagnostics > Examine, after querying up the order line. You also need to know the list_line_id (modifier line id) of the modifier that you set up to do the cost to charge conversion. You can figure this out by using the menu option: Help > Diagnostics > Examine, after querying up the freight charge modifier, navigating to the lines region and selecting the modifier line that you want to examine.
This debug utility will do the following things:
-
Check if cost was inserted by Shipping.
-
Check that the phase freeze_override flag is not N.
-
Check that the qp_list_header_phases table is populated.
-
Check if sourcing (attribute mapping) happened. If it did not, you need to run the Build Sourcing Rules concurrent request.
-
Check if line is an included item of a model; if it is, the charge will not be created.
-
Check if Charge_Type_Code matches the Cost Type Code being selected at Ship Confirm. It will also print out all other costs that have been passed to OM.
-
Check if this line has been Inventory Interfaced and OM Interfaced.
Service Duration Computation
Service duration based on the Service Contract start date/end date is calculated using the Service Contracts conversion routines (with or without UOM conversion). When the contract dates are not specified, inventory routines are used to calculate the service duration. In Oracle Order Management, the service duration is calculated service duration is still calculated in Order Management using the same service contracts routines that Pricing uses. Please note that if the service is renewed in Contracts, the price value will be recalculated and will display a different value.
Price Book
A price book enables you to view and/or print pricing data for a specific customer. You can also use it to see the final price that will be used in pricing an item within a category. The final price will be the list price with the adjustments and Freight and Special Charges (This is different from the Sales Orders window where you can see the list price and adjustments). You can add textual information, images, and other data to use as a catalog with specified effective dates.
Price Book publication allows authorized users to enter varied criteria to determine what they want to see and how they want to publish the Price Book data. This functionality is available through secure self-service portal that restricts the output to users with specific secure access to the data available to them. You can view the output, and download and/or print the Price Book. You have a choice of publishing formats such as paper, web portal, email, or excel spreadsheet.
You can use the Price Book in both basic and advanced pricing. As an Advanced Pricing user, you have access to all the functionality (viewing the Price Book online, creating Delta Price Books, and all publication options), while as a Basic Pricing user, you will be able to create and print only full Price Books.
Using the Pricing User responsibility, navigate to the Reports tab in the Advanced Pricing HTML Page. You can create a new Price Book or search for an existing one.
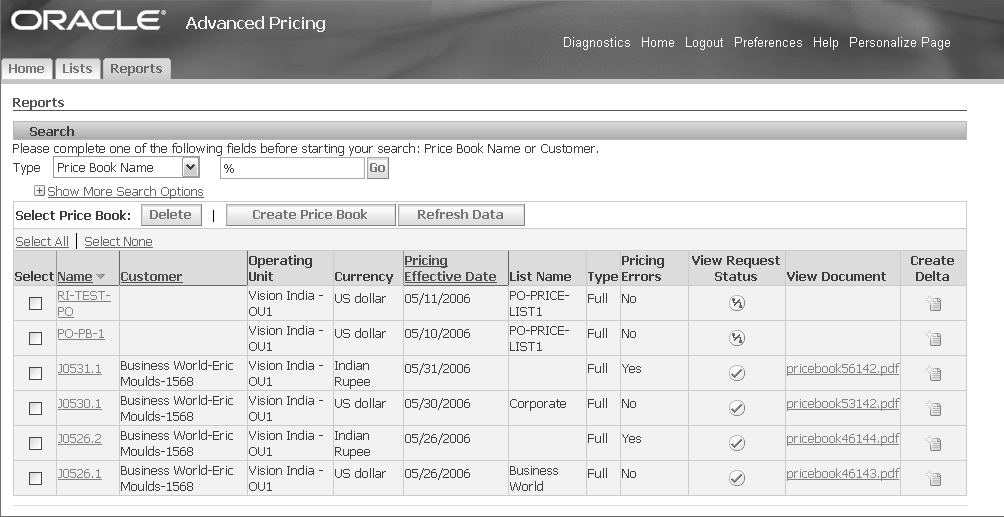
Click the Price Book Name in the search results table to view the Price Book details. You can print the Price Book from the window shown below:
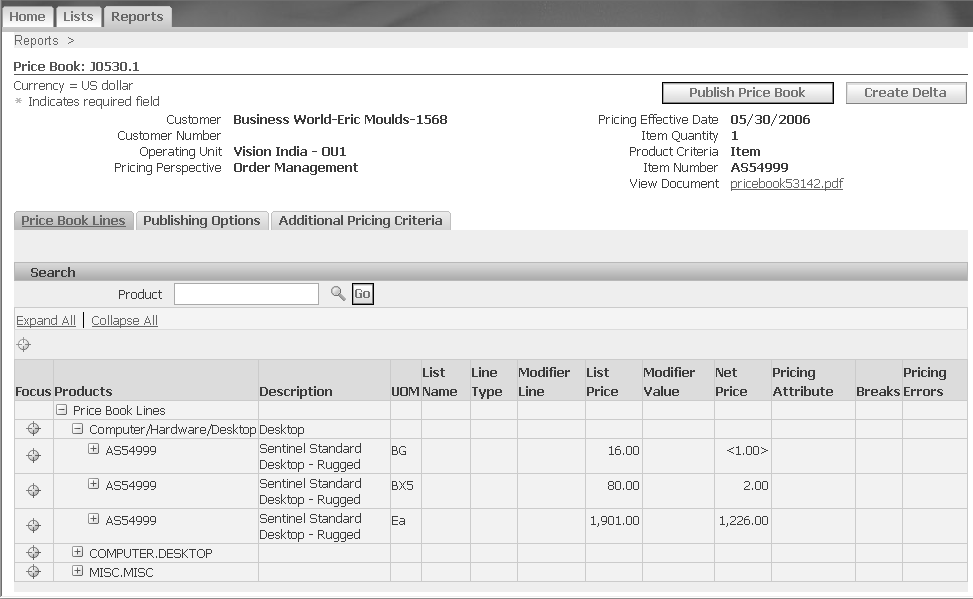
The Price Book lines are categorized according to categories. For more information on the Price Book, please refer to the Advanced Pricing Implementation Manual and the Advanced Pricing User's Guide.
Bulk Loader Import
Bulk Loader for Price List enables you to import large volumes of Price List data into the Pricing Tables from the interface tables. All selected records are processed at the same time rather than one record at a time. You can load one record or multiple records without interruption during the upload.
Errors are captured and held for later review and correction after which corrected interface data can be resubmitted. The interface program id is stored in the main pricing tables so users can determine which request id updated the records.
Bulk Loader can be used as a more efficient method than using the business object API which only processes one record at a time.
For more information on how Bulk Loader works, please refer to the Oracle Advanced Pricing Implementation Manual.