Multimodal and Consolidated Shipments
This appendix covers the following topics:
- Introduction
- Definitions
- Business Scenario 1: Multimodal Shipment
- Business Scenario 2: Consolidated Shipment
- Creating Locations and Stops
- Executing the Shipments
Introduction
This appendix presents two business scenarios:
-
Business Scenario 1: Multimodal Shipment: An order needs to ship bya different modes before arriving at its final destination.
-
Business Scenario 2: Consolidated Shipment: An order sourced from various locations needs to be staged at an intermediate location before arriving at its final destination.
Definitions
Consolidation: The collection of packages to be either dropped-off in a set or to share transportation costs. Consolidations may include shipments for an individual ship to location or for multiple different customers within the same vicinity.
Ship confirmation: To enter shipped quantity and inventory controls for specific shippable lines. You can ship confirm the same delivery/trip repeatedly until you close the delivery/trip. Once it is closed, no more changes can be made to a delivery/trip.
Ship-to location: The delivery point for consolidated shipments, gathered from multiple locations, that will be shipped to an intermediate and/or ultimate ship to location.
Delivery: A set of order lines to be shipped to a customer's ship-to location on a given date in a given vehicle. Multiple deliveries can be grouped into a single trip. A single delivery may include items from different sales orders and may include backorders as well as regular orders.
Ship confirmation: A process in Shipping Execution that enables you to identify shipped quantities, assign inventory control information for released lines, assign freight charges, and specify whether or not to backorder unfulfilled quantities of released line items.
Trip planning: The process of planning the necessary vehicles and grouping the scheduled shipments that will be included in a given trip. Planning the trip requires consideration of vehicle load capacities, container capacities and, in certain cases, the loading order for the customer's specified unload order.
Trip: An instance of a specific freight carrier departing from a particular location containing deliveries. The carrier may make other stops on its way from the starting point to its final destination. These stops may be for picking up or dropping off deliveries.
Stop: A location at which the trip is due for a pick-up or drop-off.
Shipment: An individual package sent to a customer. Thus, a shipment might contain an entire order, if all items in that order are pick released and packed together. A shipment might contain just part of an order that is pick released and packed. A shipment might also contain only part of a released order line, where some of the items on the picking slip are not in stock.
Ultimate ship-to location: The final destination of a shipment.
Business Scenario 1: Multimodal Shipment
Overview
When a customer's order needs to ship by different modes (for example, air, ocean, truck) to arrive at the final destination, multimodal shipping must be used. This business process starts when your company receives an order from your customer, the items are picked, and you need to ship them using multiple modes of transportation.
Once the order line reaches the Order Management workflow Shipping Activity, Order Management calls Shipping Execution to identify the line as ready to import. When shipping imports the order line, Shipping Execution picks the items and autocreates a delivery. Once a delivery has been created, it can be assigned to the corresponding carriers via trips. Shortly after assigning the delivery to the trips, the delivery can be shipped.
A few quick setup steps can be followed to execute this scenario. Setting defaults in the Organization and Shipping parameters will enable the streamlined pick process to occur. Trips can be created to represent multiple carriers either before the order has been placed or during the order flow from entered to shipped.
Required Setup
To accomplish Multimodal Shipment, the following setups are required:
Organization Parameters
-
Navigate to the Organization Parameters window.
-
On the ATP, Pick, Item-Sourcing tab, ensure that the Pick Confirm Required check box is deselected.
This will allow Oracle Inventory to automatically pick confirm each move order line.
Shipping Parameters
-
Navigate to the Shipping Parameters window.
-
On the Pick Release tab, check Autocreate Deliveries to use the delivery grouping rules that you have defined to group delivery lines into deliveries.
-
Check Auto Allocate to use the picking rules that you have defined in Oracle Inventory to determine the source.
Note: If you prefer to manually create a delivery ahead of time to assign delivery lines to, the Autocreate Deliveries box must be deselected.
-
Navigate to the Delivery tab.
-
You can define delivery grouping rules, based on conditions that make sense to your business process. Ship from location and ship to location are mandatory. These are the additional conditions:
-
Customer
-
Freight Terms
-
FOB Code
-
Intermediate Ship To Location
-
Ship Method
-
Picking Rules
-
Navigate to the Picking Rules window.
-
When you define an item you choose a picking rule to determine the order in which revisions, lots, subinventories, and locators are picked for sales orders. Shipping Execution submits requests to Inventory, which uses the information you enter in the Picking Rules window to generate pick lists for sales orders. If you select None for any of the criteria fields, then Inventory ignores that criterion. For example, if you select None for Revision, then Inventory picks units of an item without regard to revision levels. Inventory looks at the picking criteria in the order in which they appear in the Picking Rules window. Then, Inventory looks at the options (except for None options) for each criterion in the order in which they appear beneath each criterion.
See: Oracle Inventory User's Guide
Defaulting Rules
-
Navigate to the Defaulting Setup - Entity Attributes window.
-
Freight Terms and FOB are fields that appear on the order header that could be helpful to default during order entry. They may also be entered or the defaults overridden at the time the order is created. These fields can be entered until the delivery has been ship confirmed. Once the delivery has been ship confirmed, changes can not be made to the mentioned fields.
See: Oracle Order Management User's Guide
Define Location
-
Navigate to the Location window.
-
An intermediate address can be assigned to a trip once a location has been defined. This address will be used as the pick-up or drop-off location defined when a delivery is assigned to a trip. Upon saving the newly created location, the system will generate a number which corresponds to the location. In many cases, the location may represent a port or an airport.
See: Oracle Inventory User's Guide
Process Steps
-
Enter and book your order
-
Launch pick release.
-
There are several ways to launch pick release; however, the most streamlined method is to set up pick release to run as a concurrent process. Navigate: Shipping > Release Sales Orders > Release Sales Orders SRS.
Other methods for launching pick release include the following:
-
From the Shipping Transactions form, select a specific delivery line for pick release by selecting one or multi-selecting many delivery lines, then select one of the following: Pick and Ship or Pick Pack and Ship.
Additionally, you can navigate to the Release Sales Order window while in the Shipping Transactions form by using the Tools menu and selecting the Pick Release form.
-
Finally, pick release can be run manually. Navigate to the Release Sales Orders window.
Note: When pick releasing using the Release Sales Order window, any of the defaults set in the Organization and Shipping parameters can be overridden for that particular pick release.
-
Create your Trips. Navigate to the Shipping Transactions form.
-
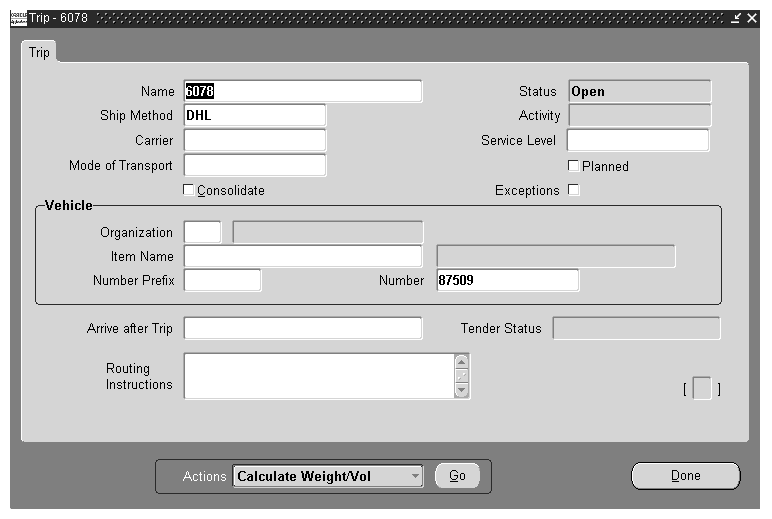
Populate the trip information. At minimum, Name and Ship Method.
-
Save each trip.
Example
When a delivery requires transportation on multiple carriers, the creation of a trip is required for each carrier.
Create Trip 2 to follow Trip 1
-
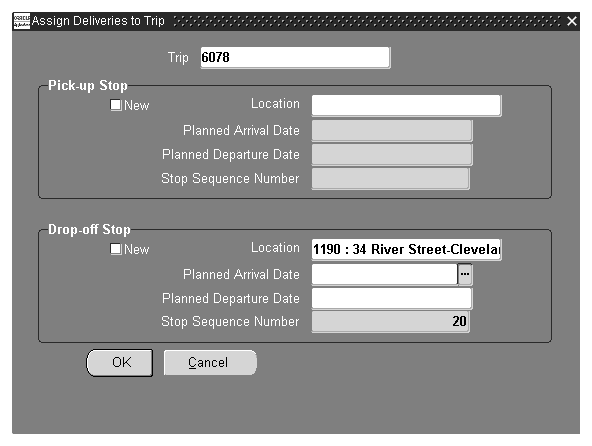
Assign Delivery to Trips
-
Find your delivery.
-
Select the action Assign to Trip.
-
Click Go and assign the delivery to each newly created trip.
Assign Delivery to Trip 2 (same procedure for each Trip)
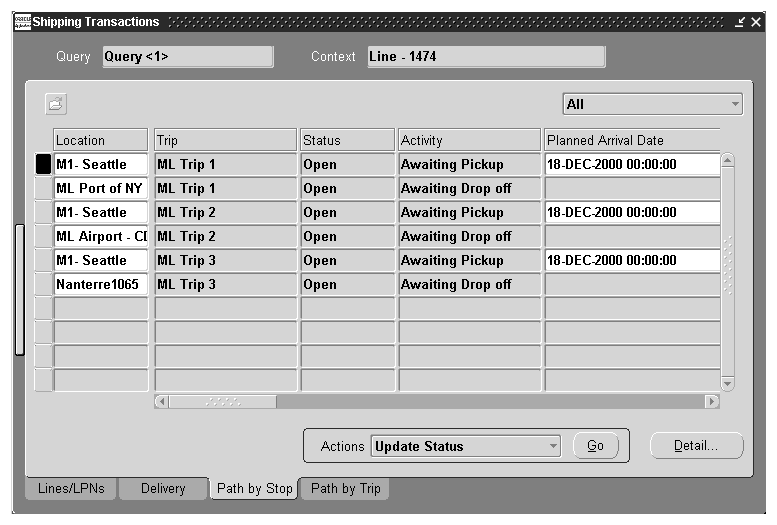
View the Stops
-
Navigate to the Shipping Transactions form.
-
Find your trip.
-
Click the Path by Stop tab and verify that there are two stops associated with each trip.
View Path by Stop tab
Ship Confirm the Delivery
-
Navigate to the Shipping Transactions form.
-
Find your delivery.
-
Highlight the desired delivery.
-
Select the action Ship Confirm.
-
Click Go.
-
When the Ship Confirm window appears, click OK to complete the process.
Process Order API runs after the delivery has been ship confirmed.
Note: The options in the Auto-create Trip Options box are grayed out.
-
Update the status of the stops to Closed.
The Inventory Interface will be submitted when the pick-up stop has been Closed. The delivery lines will now be available to the Receivables Interface.
Business Scenario 2: Consolidated Shipment
This scenario presents a solution in support of a process where items on a customer order are sourced from different geographical locations. The shipments containing the items are to be merged or consolidated at an intermediate location with the final delivery being made to the customer's ultimate ship to destination.
You can create a multileg shipment and to manage the activities at each stop along the shipment's journey.
A sales order is placed for two items: a desktop CPU and a monitor. The order lines are booked and scheduled in Order Management. The inventory for the desktop CPU resides in the M1 Inventory organization and the Monitor resides in V1 Inventory organization.
The objective is to create a plan that enables the shipments of the individual items to be made from their respective Inventory organizations, merge or consolidate at an intermediate distribution center location, and deliver to the customers ultimate ship to location as a single shipment.
Creating Trips
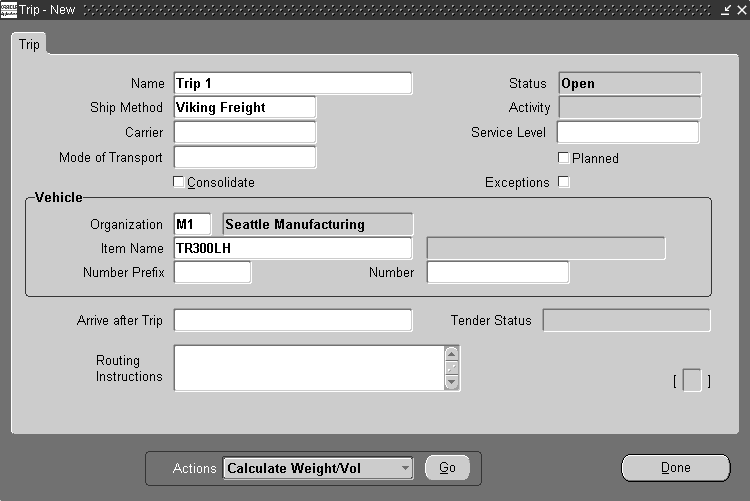
Once the order is booked, the order lines are imported into Shipping Execution where the Transportation Planner has visibility to the lines. At this point, the planner creates Trip 1 (consisting of carrier and vehicle information) for the desktop CPU located in Warehouse 1 in Seattle, WA. The key element depicting the trip is the ship method. The creation of the trip can be done in a variety of ways depending on your business process.
Autocreate Trip
When a trip is created using the Autocreate Trip functionality, two stops are created. The first stop consists of the location where the shipment is picked up, (ship from) and the second stop is the location where the shipment is dropped off (ship to). In the business scenario described here, an intermediate stop needs to be defined and assigned to the Trip 1.
-
Navigate to the Shipping Transactions form.
-
Enter criteria for the lines to ship.
-
Multi-select lines.
-
Select the action Autocreate Trips.
-
Click Go.
Oracle Shipping Execution creates the trips, creates the pick up and dropoff stops, autocreates the deliveries, and assigns the deliveries to trips.
Create Trip Manually
One of the two processes described would need to be performed in order to create Trip 2 for the monitor originating from warehouse V1 located in New York, and an ultimate destination of Chattanooga, TN. In the case of a manually created trip, deliveries could either be auto created or manually created and subsequently assigned to the trip.
-
Navigate to the Shipping Transactions form.
-
Expand the Data Entry tree (click the expand bar on the left side of the window).
-
Expand the Data Entry link.
-
Open Trip Data Entry.
-
On the Trip form, enter Name, Ship Method, and Vehicle Info.
-
Click Done.
Trip - New Window
Creating Locations and Stops
Creating Locations
In order to perform the merge or consolidation of the shipments originating from warehouse M1 and V1, a stop must be defined to represent the distribution center in Troy Michigan. (A stop is a location within your network where a shipment can be picked up or dropped off.) In this scenario, this is a non-Oracle location. The location of the distribution center must also be set up in Oracle Inventory in order to be used when defining a stop.
-
Navigate to the Location window.
Location Window
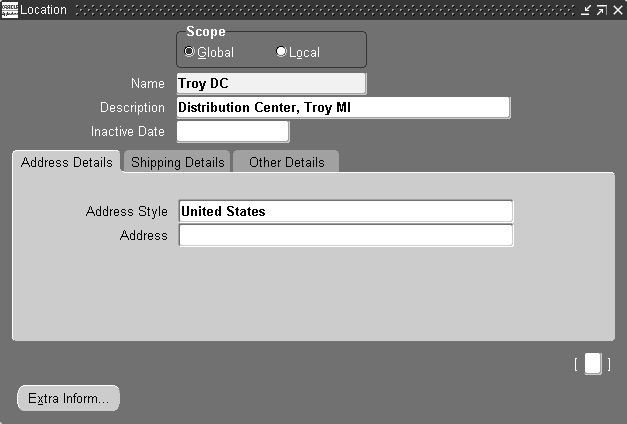
-
Enter a Name.
-
Enter a Description.
-
Optionally, enter an Inactive Date.
Note: The Address Style will default to United States. Use the list of values to change the Address Style.
-
Within the Address Details tab, enter the Address.
-
Within the Shipping Details tab, enter a Contact and Ship-To Location Detail, and select the type of site.
Note: Once the location is defined, the distribution center can be define as a stop and ultimately assigned as intermediate stops to Trip 1 and Trip 2.
Creating Stops
To create and assign Trip 1 with the intermediate Stop (for example, Distribution Center Location), the following process can be followed.
-
Navigate to the Shipping Transactions form.
-
Expand the Data Entry link.
-
Open the Stop Data Entry.
-
On the Stop form, select Location and Trip from their lists of values.
-
Enter Planned Arrival and Departure Dates.
-
Click Done.
Follow this same process for Trip 2.
At this point of the consolidation solution, a delivery has been created for the material being sourced from warehouse M1 and the delivery has been assigned to Trip 1. A delivery has also been created for the material being sourced from warehouse V1 and the delivery has been assigned to Trip 2. The intermediate stop (for example, Distribution Center Troy Michigan) has also been defined and assigned to Trip 1 and Trip 2.
A stop consisting of the location of the distribution center has been assigned to Trip 1 and Trip 2. The data at this point is represented in the following table.
| Trip | Pick up | Dropoff |
|---|---|---|
| 1 | M1 Seattle WA | Troy DC |
| 2 | V1 New York NY | Troy DC |
This screen represents similar data to Trip 2 described in our business scenario. The trip is awaiting pick up at M1 warehouse.
The solution at this point is represented by a Trip 1 originating at warehouse M1 (Seattle) and dropping off at the Troy distribution center and Trip 2 originating from warehouse V1 (New York) and dropping off at the Troy distribution center stop.
The final step is to create a Trip 3 that originates at the Troy distribution center, assign the deliveries that are on Trip 1 and 2 to Trip 3 and have the final drop off be the customers ultimate ship to destination.
To create trip 3:
Shipping Transactions
-
Navigate to the form.
-
Expand the Data Entry link.
-
Open Trip Data Entry.
-
On the Trip form, enter Name, Ship Method, and Vehicle Info.
-
Click Done.
-
Query the deliveries from trip 1 and trip 2.
-
Select the action Assign to Trip.
-
Select trip 3, select New Location.
-
In Pickup Location, enter DC; in Dropoff Location, enter Cust.
Executing the Shipments
Pick Releasing the Trip
Because the shipments are originating from two separate locations, it is assumed that the execution processes would be performed independently. However, a single user can execute the releases from both locations.
What has been done up to this point is a plan. The plan cannot take effect until actual inventory is allocated to the deliveries and trips. At the highest level, this can be accomplished by pick releasing the trip. The individual delivery can be pick released as well.
To pick release a trip:
-
Navigate to the Shipping Transactions form.
-
Query Trip 1.
-
From the Action menu, select Launch Pick Release.
-
Click Go.
The same process is performed at warehouse V1 for Trip 2.
See: Oracle Shipping Execution User's Guide
Pick slips will print at each of the warehouses indicating the items to be picked for their respective trips.
There are many options as part of the Shipping Execution setup steps to allow each organization to set up how picking is done. For example, pick slip grouping rules can be used to determine how released lines are grouped on to pick slips.
Once the trips from each warehouse are released, a bill of lading and packing list can be generated for each delivery in the trip. The bill of lading can be generated at ship confirmation as part of the Ship Confirm Doc Set or it can be generated before ship confirm.
Document categories and document sequences must be set up before bills of lading or packing slips can be generated.
See: Oracle Shipping Execution User's Guide
The bill of lading for Trip 1 and Trip 2 will indicate the Ship From address as the M1 and V1 locations and the Ship To address of the distribution center.
The order line should already contain the intermediate ship to information before being imported into shipping execution. For example, if the shipment from warehouse M1 had the intermediate ship to information on the line prior to it's being imported into shipping execution, and there wasn't an intermediate stop assigned to the M1 trip, the bill of lading would print with three addresses: The ship from address of warehouse M1, the intermediate address indicated on the shipment line, and the final destination ship to of Chattanooga TN.
In the scenario we're defining, if intermediate ship to was used, the bill of lading for Trip 1 would print with the ship from address of warehouse M1, an intermediate address of the Troy DC and the final ship to of the Troy DC. For Trip 1 the ultimate destination for Trip 1 is the Troy DC.
A packing slip can be generated prior to ship confirmation similar to the bill of lading. The following process can be used to generate the packing slip.
See: Oracle Shipping Execution User's Guide
Ship Confirming the Trip
The next step in the consolidation process is to Ship Confirm Trip 1 and Trip 2. This must be done at Inventory organization M1 and V1 in order to recognize revenue, decrement inventories, update Order Management and initiate the receivables interface to generate invoices.
The following depicts how the trip originating in the M1 (Seattle) warehouse would look prior to ship confirmation and closing the stop at M1. In this example the trip is named Trip 1.
-
Navigate to the Shipping Transactions form.
-
Query Trip 1.
-
Select the action Ship Confirm.
-
Click Go.
Closing the stop sets the trip to an In Transit status.
See: Oracle Shipping Execution User's Guide
Changing Stop Status
At this point in the process, it is assumed that the delivery from the M1 warehouse and the delivery from the V1 warehouse are on the carrier's truck and in transit to the Troy distribution center.
In order to perform the next step in the process, a communication mechanism must be in place that lets the Oracle user know that the shipment has reached the Troy distribution center.
When the user is notified that the shipment has reached the distribution center, the following process can be used to update the stop.
-
Navigate to the Shipping Transactions form.
-
Query the Stop (distribution center.)
-
Select the action Update Status.
-
Click Go.
-
Select Arrive and click OK.
The same process should be performed for Trip 2 after it reaches the Troy distribution center.
The arrive step indicates the drop off of the trip. The deliveries from M1 warehouse and V1 warehouse are now at the Troy distribution center.
Since the deliveries were assigned to trip 3 in the planning process, all that has to be done is print the new bill of lading for the final leg from the Troy DC to Chattanooga TN.
Once the bill of lading from the Troy distribution center to the final drop off in Chattanooga is printed, the Troy distribution center stop can be closed. Updating the status of the stop closes the stop. Use the following process to close the stop.
-
Navigate to the Shipping Transactions form.
-
Query your Stop.
-
Select the stop for the Troy distribution center.
-
Select the action Update Status.
-
Click Go.
-
Select Close.
See: Oracle Shipping Execution User's Guide