Order Inquiry and Status
This chapter covers the following topics:
- Pricing and Availability
- Profiles and Parameters
- Setup
- Order Organizer
- Profiles
- Creating & Managing Folders in Oracle Applications
- Order Information
- Setup
- Oracle Applications Framework (OAF) Overview
- Menus and Responsibilities
- FND Messages and Lookups
- UI Definition Overlays with the OA Personalization Framework
- OA Personalization Framework
- Personalization Levels
- Admin-Level Personalizations
- Create/Update View Page
- General Properties
- Column or Attribute Properties
- Search Query to Filter Data in Table
- Saving Your Personalized View
- Personalizing the Order Information Portal
- Advanced Settings
- Adding New Items With OA Personalization Framework
- Add a New Region Item
- Add a Link in the What's New Region
Pricing and Availability
Overview
Pricing and Availability provides item prices and displays the availability of items priced, across all organizations. The Pricing and Availability window enables you to:
-
Check price and availability
-
Check price and availability by item cross-reference, customer item, or item description.
-
View both the Selling Price and List Price of a product.
-
View price list breaks, automatic discounts, and available surcharges for a particular product or customer.
-
What-if analysis of price based upon an Agreement, Price List, Pricing Attribute, Order Quantity, Customer, Currency, Ship To, Bill To, OrderType, Pricing Date, or Request Date.
-
Check price by specific currency and select the currency type the Selling Price is calculated and displayed.
-
View a limited set of item attribute details.
-
Validate your Pricing Setup by ensuring your selling price is correctly returned by the pricing engine prior to placing an order; the selling price will include any eligible qualifiers, modifier, or discounts you have defined.
-
The Pricing & Availability form allows quick price and/or availability checking of an item without entering an order, and includes:
-
Automatic conversion of an queried item or item in the saved selection area into a Quote or a Sales Order.
-
Demand class, line type search criteria, well as the ability to enter "ask for" promotions and coupons.
-
Pricing and Availability checks of ATO items.
-
Enhanced defaulting of attributes that can affect Pricing and Availability, including demand class, item identifier type, order type, warehouse and price list.
-
A results tab that displays Related Items, such as up-sell, cross-sell or substitute items, and their price and availability.
-
A sub-tab of Pricing results tab displays additional benefits modifiers that are applicable but that do not affect the selling price, such as terms substitution, promotional goods, other item discounts, item upgrade, or coupons.
-
Display of modifier price breaks in addition to existing price list price breaks.
-
Ability to apply manual discounts to items having price checked.
-
Ability to store a selected group of items being checked to allow simultaneous ordering.
Profiles and Parameters
The following profiles control the look and feel of the Pricing and Availability form:
OM: Display Current Selections in Pricing and Availability
This profile controls whether or not the multiline area at the bottom of the window displays where you can save items before ordering them. The default is No. Leave this set to No if you want a simple form and want to operate on one item at a time. If you set it to Yes, a scratch pad area called Current Selections appears.
OM: Sales Order Navigation From Pricing and Availability
This profile controls how items are added to an order or quote. The options are Always, Never, or Ask. This determines if the Sales Order or Quick Sales Order form opens with the new order or quote displayed. If the value is Ask, you are asked if you want to open the window.
The following profiles also affect form behavior:
OM: Sales Order Form Preference
The profile controls the window that displays after the create order or create quote button is selected. The options are the Sales Orders window or the Quick Sales Orders window.
OM: Discounting Privilege
This profile controls the availability of manual discount.
OM: Unit Price Precision Type
This profile controls the precision of the pricing display. Choices are standard or extended precision.
OM: Add Customer
This profile controls whether the user can add new customers from this form.
ONT_PRC_AVA_DEFAULT_HINT
This seeded parameter enables you to enter the text that displays on the first line of the Hints region of the Pricing and Availability window.
Setup
To set up Pricing & Availability
-
Set the appropriate profile options, as specified in Profiles and Parameters.
-
Set appropriate user responsibilities for Function Security. Function Security controls the visibility of buttons for creating an order or quote. These buttons are not visible in the pricing and availability window. Function security also controls whether or not you can display cost and gross margin.
Note: Advanced Pricing must be fully installed to use the additional benefits features in the results area. You can still use Pricing & Availability with Basic Pricing but you not see any additional benefits or price list price breaks information.
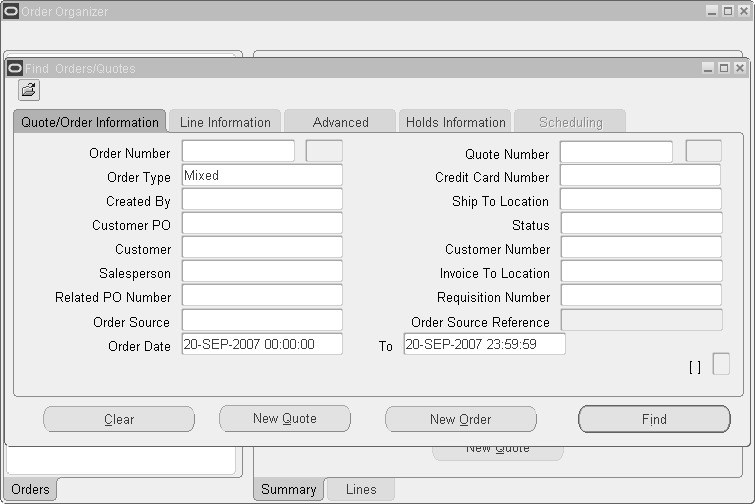
Order Organizer
Overview
The Sales Order Organizer has a Navigator tree view and a Summary information view. The tree view consists of a set of user-defined folders, or queries, that you use to access most commonly used orders/lines.
Tree View
The tree view consists of:
-
Todays Orders: Displays new orders for the session.
-
Search Results: Displays the search results from Find Window.
-
Personal Folders: Displays user-named queries.
-
Public Folders: Displays folders created as public
Summary Information View
Summary information consists of Summary and lines tabs. The information in Summary and Lines tabs is view only. The information shown in these tabs changes based on the selection in the tree nodes. You can access other functions through the Actions List/Special Menu or context menu.
Find in the Order Organizer
To run saved queries, use the find function in the Order Organizer or go straight to the summary form.
The find window in the Order Organizer form has the following advantages:
-
You can create different folders for the types of queries you most commonly perform and save these queries within the Order Organizer.
-
The organizer is extensible using folder technology and supports search fields specific to user requirements. You can determine how and where to display them.
Profiles
OM: Show Line Details
This profile allows you to optionally specify whether model details such as options, classes, or included items display in the Lines summary. Controlled at the user level, user preference is shown as an entry in the Tools menu. This preference can be changed for the forms session. Every form is opened in a separate session, and a forms session ends once it is closed. Once you change the selection, a lines summary block is re-queried with the new preferences.
The profile option value must be set to not display line details. By default, only standard lines, shipment lines, service lines and models display. Details of the model are not displayed.
OM: Administer Public Queries
This profile determines who can create/update public queries in the order organizer Tree.
Creating & Managing Folders in Oracle Applications
See Oracle E-Business Suite User's Guide for information on customizing the layout of data in various forms by creating and managing folders in Oracle Applications.
Setup
There is no specific setup associated with the organizer other than setting the profiles mentioned above and the definition of any required folders or queries.
Order Information
Overview
The purpose of Order Information is to provide an industry leading and competitively differentiating self-service order management offering to improve the accessibility of service to customers, improve customer satisfaction, and limit expensive calls to the support center.
The View Sales Orders Inquiry window allows you to search for Sales Orders and view their details. It also contains links to related information like deliveries, AR and Quality. Order Information can be personalized for the requirements of different self-service users. For example, Sales representatives may define various views on each of the customers they are responsible. A warehouse manager may want to only look at recently shipped deliveries. Such views can be defaulted for each responsibility.
Order Information can be used for internal and external users. View for the external user is secured by Customer, which you can assign. User can be assigned in the Define users window in System Administration responsibility in Oracle Applications. A user without a customer assigned to it is treated as an internal customer.
Implementation Requirements
You can use a browser to access the Order Information web page with a sign on and password. Request an account through your system administrator.
Profiles
OM: Customer Service Feedback
This profile option indicates the internal contact designated to receive the workflow notifications for RMA requests entered from Order Information. The list of values for this profile include all users, defined Oracle Applications through System Administrator responsibility, with no customer contacts. The default for this profile option is Null and optional.
OM: Customer Service Report Defect
This profile option indicates the internal contact who will receive a workflow notification for any Report Defects submitted from customers from Order Information. The list of values for this profile include all users, defined Oracle Applications through System Administrator responsibility, with no customer contacts. The default for this profile option is Null and optional.
OM: Records on Summary Page for External Users
This profile option determines if the system executes the default query for external users. The values are Y or N. Set to Y to run the default query. If the query is very long, you may want to set to N.
Personalize Self Service Defn
This profile option enables the global Personalize Page link on every page to allow personalizing any page or region of an OA Framework application. This profile must be set to Yes to allow users to personalize a region.
FND: Personalize Region Link Enabled
Every OA Framework-based application contains a global Personalize Page link. In addition, users can personalize regions. To personalize regions, set the value of this profile option to Yes. If this profile is set to No, users will not be able to personalize regions within Order Information.
Personalize Self-Service Defn
FND_CUSTOM_OA_DEFINTION
Set this profile option to Yes or No at the user level for an administrator or at the responsibility level for the system administrator. When you set this profile option to Yes, and log on as an Admin-level user or responsibility:
-
A global Personalize button appears on each self-service web application page. When you select the global Personalize button on any page, the personalization user interface prompts you for the administrative level at which you wish to create your personalizations. A navigation tree then lets you navigate to the region or nested region to personalize.
-
Personalize Region links appear for every personalizable region on each self-service web application page. When you select a Personalize Region link, the personalization user interface first prompts you for the administrative level at which you wish to create your personalization, then takes you directly to the page to personalize.
You can choose the Personalize button or Personalize Region links to create your personalizations.
Disable Self-Service Personal
FND_DISABLE_OA_CUSTOMIZATIONS
You can set this profile option to Yes or No at the site or application level. If this system profile option is set to Yes, any personalizations you make, regardless of the level at which you make the personalizations, will not be applied. Only the original base definition of each self-service web application page is ever displayed.
Note: Additionally, you may set the FND: Personalize Region Link Enabled profile to Yes to enable the "Personalize Region" links above each region on a page.
Related Topics
Oracle Self Service Web Applications Implementation Manual
Overview and the Oracle E-Business Suite System Administrators Guide Documentation Set
Setup
To setup an external user
-
Create a Customer Contact. Include Last Name, First Name, Title, and Job.
-
Navigate to N: System Administrator > Define Users. The external user can be set up by assigning a customer contact to the user in the Customer Field. Select the customer contact from the list of values. When this is set up, the external user sees only his or her data.
Personalization allows you to tailor the user interface to suit your preferences. Personalization refers to the ability to tailor the following to suit a business need:
-
Look and feel of the user interface
-
Layout of the user interface
-
Visibility of built-in content
-
Oracle Applications Framework (OAF) Overview
Oracle Applications Framework (OA Framework) is designed to provide rich and upgradable personalization capabilities.
Menus and Responsibilities
You can use the Menu and Responsibility forms to personalize and maintain security for Oracle Self-Service Web Applications. You can use the forms to assign specific responsibilities to your users and designate the menus that are available to the users of a given responsibility.
Related Topics
Oracle E-Business Suite System Administrator's Guide Documentation Set
FND Messages and Lookups
You can similarly use the Messages and Lookups forms to modify existing, or define new messages and lookups, respectively. For example, you may have a need to create additional messages for display within an application that is pertinent to your users or you may want to add new lookup values to a lookup type that are applicable to your site.
Related Topics
Message Dictionary, Oracle E-Business Suite Developer's Guide and Application Utilities Lookups and Application Object Library Lookups in the Oracle E-Business Suite Developer's Guide
UI Definition Overlays with the OA Personalization Framework
Finally, you can use the functionality of OA Personalization Framework to personalize the UI of an application page. Administrators can create personalizations that overlay the existing UI and are targeted to specific audiences.
OA Personalization Framework
OA Framework includes the OA Personalization Framework which allows you to personalize your user interface (UI) of Oracle Self-Service Web Applications without modifying any underlying code. Personalizing the appearance of or the data displayed in an Oracle Self-Service Web Application page is as easy as changing your web browser preferences.
All personalizations you make through the OA Personalization Framework are added on top of the base product meta data at runtime. These personalizations never overwrite the existing base product UI and are therefore preserved during upgrades and patches and can also be translated. This means you can create your personalizations on a test system first and easily load your finalized personalizations to your production system with little interruption.
Common types of personalizations you can accomplish with OA Personalization Framework:
-
Change the prompt for a field or other text on a page
-
Hide or show a field on a page
-
Reorder fields or items on a page
-
Restrict data that a user can access
-
Add new buttons, links, text items, images, etc.
-
Restrict query results in a table
With OA Personalization Framework, your personalizations are reflected immediately on the page.
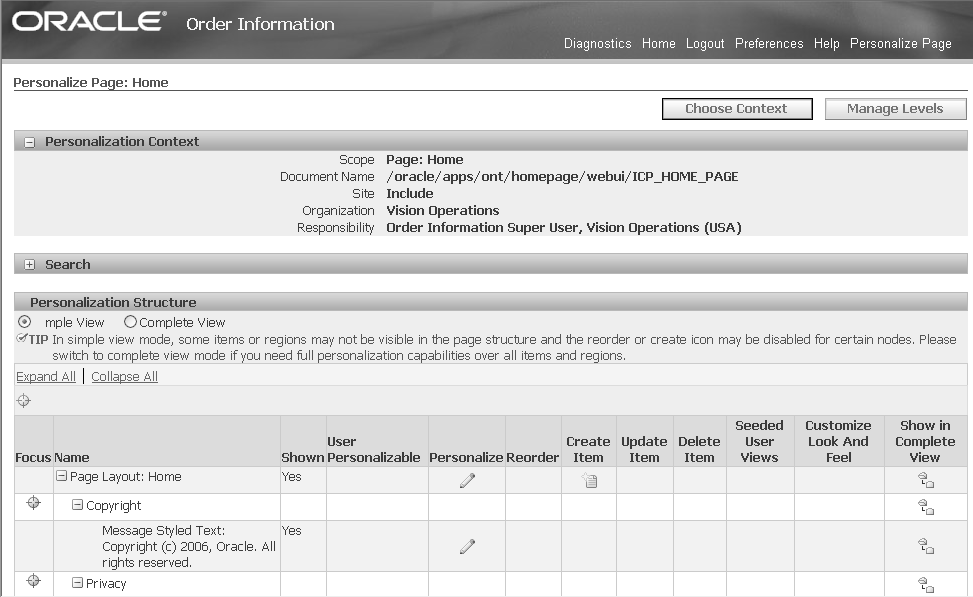
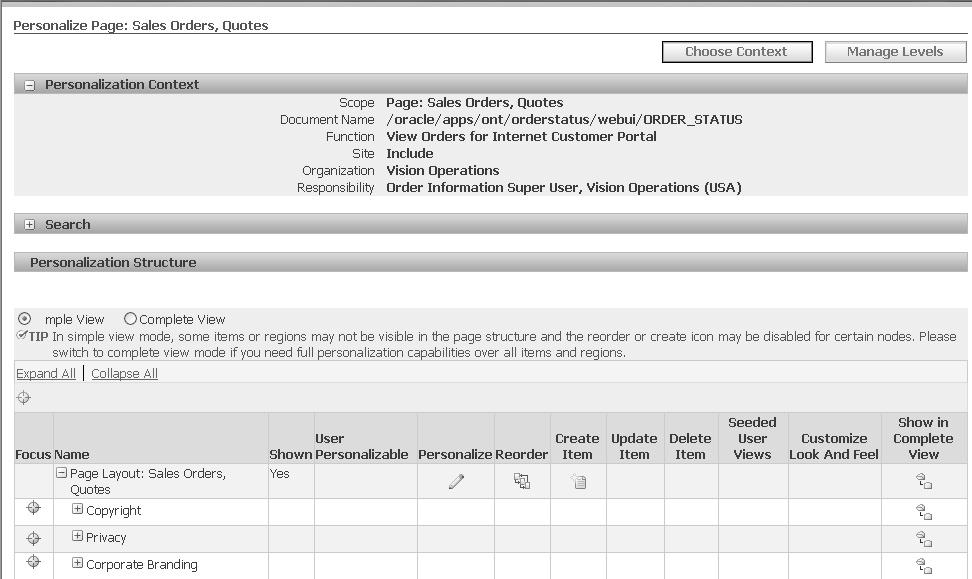
Personalization Levels
OA Personalization Framework supports localization, verticalization, and customization teams in their efforts to tailor self-service web applications. OA Personalization Framework accomplishes this by allowing you to make personalizations at distinct levels so that you may target those personalizations to specific audiences.
There are different personalization levels available from the administrative stand-point: Localization, Site, Organization, and Responsibility. When you make personalizations at any of these levels, the personalizations are available only to the audience defined by that level. Since personalizations should only be made at these levels by a system administrator, these are collectively referred to as Administrator-level (or Admin-level) personalizations. Admin-level personalizations can be performed on any component in a page.
Admin-Level Personalizations
To Personalize a Region at an Admin level
-
Sign-on to Oracle Self-Service Web Applications as a user who has Admin-level personalization access.
-
Select a responsibility.
-
Navigate to the application page that contains the region you wish to personalize.
-
Choose the Personalize... link above the region you wish to personalize or select the Personalize Region global button.
Note: If the region is a table, the Personalize Region link appears below the table.
-
In the Personalization Level field, select the administrative level at which you wish to personalize the region.
-
On the next page, enter a value appropriate for the Personalization level you selected. The Site level does not require any value as the personalization applies to all users of the current site. Other levels, such as Responsibility or Function, for example, require a specific responsibility or function name, respectively.
-
If you initially selected the Personalize Region link for a specific region, the Create View or Update View page for that region should appear. Use the Create View or Update View page to create a new view or update the existing personalized view of the region.
-
If you initially selected the global Personalize Region button, a navigation tree appears to the left of the Create View or Update View page. The tree displays the hierarchy of all the regions that make up the current application page and allows you to navigate to any region within the page. Select the region you wish to personalize from the navigation tree to display the Create View or Update View page for that region.
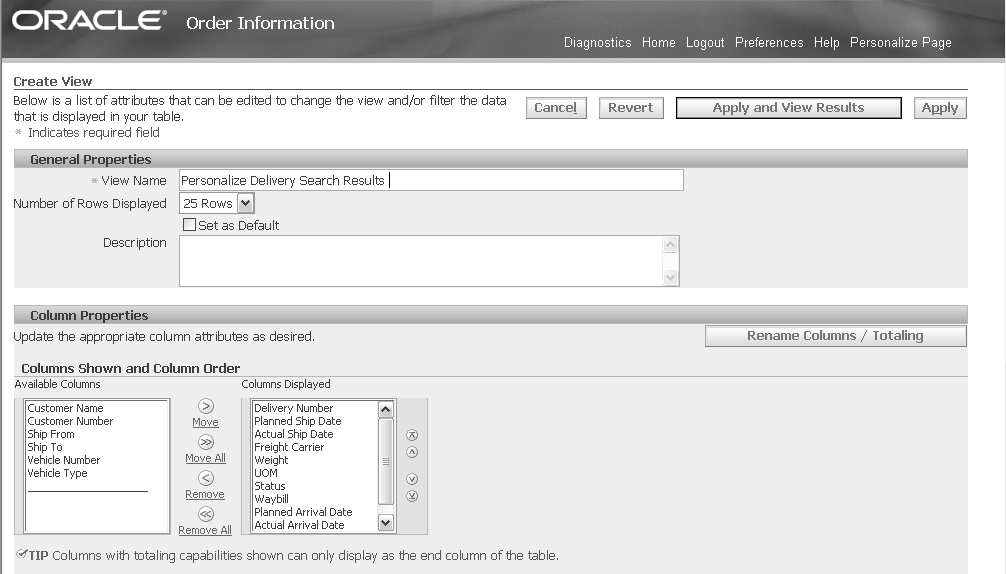
Create/Update View Page
The Create View page is identical to the Update View page, except that the fields in the latter page are pre-populated with settings from a prior personalization.
Note: In OA Framework 5.7 and above, the following restriction applies for pages developed in MDS or migrated to MDS from AK. When you personalize a parent region, you can no longer change any of the properties of its nested regions through the Advanced Settings page. You must select the Personalize Region link for the nested region and personalize the nested region itself. Only the properties of region items (such as individual fields) can be changed in the Advanced Settings page when you personalize a parent region.
General Properties
You may edit the General Properties of your region. Note that some of the properties discussed below do not appear if they are not relevant to the region you are personalizing.
-
The page always shows the personalization level and personalization level value, if any, at which you are making personalizations.
-
If the region has a header or label, you can update the value in the New Label field.
-
If your selected region is a table, select the number of rows of data you wish to display.
-
If the region has a corporate-branding image file or product-branding image file defined, you can specify your own GIF image files to replace either of these files. If the region you are personalizing is not nested within other regions, that is, it is a page layout region, the image in your custom product-branding image file replaces the product-branding image that appears beneath the Corporate logo. If your region is a nested region, such as a header level region, the image in your custom product-branding image file replaces the icon that appears next to the header.
-
If you are creating a personalization at an Admin-level that is higher than Localization, you have the option of associating a different controller class name with the region. This is useful if you are creating Localization-level personalizations and want to associate different controller classes with different localizations.
Note: You cannot change the controller class name associated with a region if you are creating an Org-or Site-level personalization, that is, a personalization at an Admin-level lower than Localization.
Column or Attribute Properties
If the region you are editing is a table, this part of the Create or Update View page is called Column Properties. If the region is not a table, this part of the page is called Attribute properties. Edit the Column/Attributes Properties section to specify the items you wish to display in the region and the order in which to display them.
-
Select an item from the Available Columns/Attributes or Columns/Attributes Displayed list and use the buttons between these lists to either move the selected item to or remove the selected item from the Columns/Attributes Displayed list.
Note: Items that are required fields in a page appear with an asterisk (*) and cannot be removed from the Columns/Attributes Displayed list.
-
Once you are satisfied with the items to display, use the buttons to the right of the list to reorder their sequence.
Note: You can hide or reorder the display of specific regions in a page by personalizing the region items of the top level region, that is, the parent container or page layout region.
-
Choose Advanced Settings to alter other settings for your items or add new items your region.
Sort Settings
If the region you are personalizing is a table, the Sort Settings section appears in the Create View or Update View page.
-
You can specify up to three levels of sorting for your data. Select a column from the Column Name context menu for each level of sorting you wish to perform.
-
For each sort column, you must specify whether to sort in ascending or descending order.
Search Query to Filter Data in Table
If the region you are personalizing is a table, then the Search Query to Filter Data in Table section appears in the Create View or Update View page. You can filter the data that is displayed in the table based on criteria that you specify.
-
Indicate how you want the filter to match your search conditions by selecting one of the following radio buttons:
-
Show table data when all conditions are met.
-
Show table data when any condition is met.
-
The first four columns of the table are listed for you to specify search criteria. Using the context menu following the column name, choose a search condition and enter a value to search for in that column.
-
Select a column from the Add column context menu and choose Add to add more search criteria to your filter.
-
If you leave the search criteria blank for a column, the filter will not search on that column.
Saving Your Personalized View
To save your personalized view
-
When you are done personalizing your view of the region, choose Apply to apply your personalizations to the region.
-
If you choose Revert to revert to default settings, the following occurs depending on the page you are using:
-
Create View page: the page defaults to the preseeded display settings. Also, if the region is a table, no query options are set.
-
Update View page: the page defaults to the display settings of the saved existing view. If the region is a table, the page also defaults to the query options of the saved existing view.
-
Personalizing the Order Information Portal
You can perform the following personalizations in Order Information Portal for all the four tabs:
Home Tab
You can personalize the What’s New region by changing the prompt and Destination URL attribute in the personalization page.
Order Status Tab
You can customize the search (Simple and Advanced) results pages by hiding/displaying columns like Operating Unit and End Customer.
Personalize the Order Detail Page – Header General Section. You can display/hide attributes like Operating Unit, Sales Agreement Number (for SA users), End Customer, End Customer Location, End Customer Address, End Customer Contact, Owner, Current Location, Install Base Current Address, Installed at Location, Install Base Installed At Address. The Descriptive Flexfields - Additional Header Information, Additional Header Global Information and Header Level Trading Partner Information are customizable too.
Customize the Order Detail Page - Header Shipping Section. You can display/hide defaulted attributes like Shipping Method &Partial Shipments Allowed.
Customize Order Detail Page - Header Billing Section. You can use personalization to display/hide fields like Tax Handling, Subtotal, Tax, Charges, Discount.
Customize Order Detail Page - Line Table Region. You can display/hide attributes like Sales Agreement, Dual UOM, Preferred Grade, Acceptance Status, Acceptance Date, Accepted By, Acceptance Reference, Acceptance Comments, Acceptance Signature, Ordered Quantity, Ship To Location, Actual Shipment Date, Schedule Arrival Date, Promise Date, End Customer Name, End Customer Location, End Customer Contact, Install Base Owner, Install Base Current Location, Install base Installed At Location.
Customize the Line Detail Page (this page is displayed by clicking the Detail icon in a line (row) of the Order Detail Page). You can display/hide the following attributes:
-
Descriptive Flexfield region and the underlying DFFs. They are: Additional Line Pricing Information, Additional Line Pricing Information, Additional Line Return Information, Additional Line Industry Information, Additional Line Attribute Information, Trading Partner Flexfield, Additional Line Global Information.
-
In the Quality Information region, you can unhide Item Description attribute.
-
In the Price Adjustment Details region, you can unhide List Line, Pricing Phase attributes.
Delivery Tab
In the Delivery tab, you can personalize the attributes/regions described below:
-
Customize the search results for both Simple and Advanced Search pages by hiding/displaying attributes like Vehicle Type, Vehicle Number and Customer Name.
-
Customize Advanced Search page by displaying hidden attributes like Operating Unit.
-
Customize the Delivery Detail Page - Vehicle Type and Vehicle Number in Header: Shipping Information region are hidden attributes that can be displayed by personalization.
-
Customize the Delivery Detail Page- delivery line table region. Operating Unit is a hidden attribute which can be displayed using admin personalization.
Customer Service Tab
You can modify and update contact information in the Customer Service tab by customizing the Additional Text field properties.
Related Topics
Order Information Portal supports neither Extensibility nor BC4J Object customization for the current release.
Advanced Settings
Starting with OA Framework 5.7, for pages developed in MDS or migrated to MDS from AK, if a region is nested beneath a parent region, you cannot change the properties of that nested region in the Advanced Settings page when you are personalizing the parent region. You must personalize the nested region itself. Only the properties of region items can be changed in the Advanced Settings page when you personalize a parent region.
You can change the labels for the items that you chose to display.
-
If an item is not originally marked as Required, but you want it to become Required, you can check the Required Field check box.
Note: Items originally marked as Required always remain required and cannot be changed with the Required Field check box.
-
Use the Updatable check box to mark whether the data for an item is updatable.
-
If you are personalizing a table, the Show Total column appears. You may check Show Total to turn on totaling for a specific item/column in your table, if it is applicable to the underlying data.
Note: If you choose to display a column with totaling capabilities, you may want to display this column as the last column of the table. You can reorder the columns in the Columns Displayed list located on the Create/Update View page.
-
Specify a default value for an item. This is optional.
-
You can display a static text message or tip for a column or region item. For example, suppose you need to add a tip on how to enter data into a specific column for your users in Japan.
-
If a column or attribute has a URL associated with it, you can edit the URL in the URL field. Columns/attributes such as buttons, images or links may have an associated URL that the application navigates to when a user clicks the button, image or link.
-
Choose Apply to accept your changes and return to the Create View or Update View page.
-
If the region you are personalizing is not a table, you may add a new item to the region. Choose the Add New Item button to add new items to your region with OA Personalization Framework.
Note: OA Personalization Framework does not currently support adding a new item to a table. All items in a table must be set to the same BC4J view usage name.
-
Use the Edit Item or Delete Item columns to edit or delete any of the items you create with OA Personalization Framework.
-
A column called Attachment Categories appears in the Advanced Settings screen. If an item within the region is an attachment item, an Categories button appears in the column for that item.
Adding New Items With OA Personalization Framework
You can add new items or fields in OA Framework-based pages in Oracle Self-Service Web Applications. You can only add new items to a self-service application page at the Admin-level.
To add new items
-
Enable Admin-Level personalizations for your application by setting the Personalize Self-Service Defn profile option to Yes.
-
Navigate to the Create/Update View for the page you wish to personalize, and then choose Advance Settings.
-
The Advanced Settings page includes an Add New Item button.
-
When you select Add New Item from the Advanced Settings screen, a new screen called Extended Region Item appears, that lets you define a new region item.
Add a New Region Item
The region application ID identifies the application for which the current region applies and is owned. The region code identifies the region for which you are adding a new region item.
-
Select an application ID that identifies the application for which this attribute applies and is owned. OA Personalization Framework creates an attribute based on the information you specify in this page and creates a usage of that attribute as the new region item.
-
Enter a name for the new region item.
-
Use the Item Style poplist to select the type of HTML User Interface object that represents the data for the new item. The item styles that you may choose are:
-
Button: A button represents an action that you can perform on a region. OA Framework generates buttons as images that represent the underlying function.
-
Images: An image can be a plain image that simply appears on the page, or can have a URL associated with it so that the user can click on it to navigate elsewhere. Although icon images are generally used as global buttons in Oracle Self-Service Web Applications, an icon image may also be used next to text to visually quantify its content, as in the case of tips, or in line messages
-
Raw Text: Any type of text. For example, the raw text style allows you to enter HTML tags to display text in bold.
-
Reset Button: A button that resets the values in a page.
-
Separator: A line to separate portions of a region. By default, the separator is rendered as a blue dotted line.
-
Spacer: A space that you can include in a region to improve the appearance of its layout.
-
Static Text: Text that is for display only and not for editing purposes. For example, if you wish to create a URL link, you would define its item style as static text.
-
Text: A text field that can be updated and have a default value.
-
Tip: Text that provides a tip about the contents of the region. When you select Tip as the Item Style, and then select Apply after completing the remainder of the Extended Region Item page, you return to Advanced Settings. In the Advanced Settings page, you can then specify the Tip Type and Tip Message name for the Tip region item.
-
-
Enter a label for the new region item. The value you enter gets displayed as the label of the region item.
-
Specify the horizontal and vertical alignment of the region item. A horizontal alignment of Start results in left alignment for languages that read left to right or in right alignment for languages that read right to left.
-
Specify a URL if your region item style is an Image, and you want to navigate to another URL when your user clicks on the image.
-
If your region item style is Image, specify filename of your image file. Do not include any path information, as all image files must reside in OA_MEDIA.
-
Enter a description for your region item.
-
Choose Apply to create the new region item. The new region item should now appear in the Advanced Settings screen.
-
If you are the creator of the new region item, you can select the Edit Item or Delete Item column icons in the Advanced Settings page to edit or delete the region item. If you are not the owner of the new region item, or the region item is not created from OA Personalization Framework, the Edit Item and Delete Item icons are disabled.
Add a Link in the What's New Region
To modify links in the "What's New" region:
The What's New region is configurable. From this region, administrators can link to other pages in Order Information, or to external URLs. This is done using the personalization framework.