Holds and Approval Management
This chapter covers the following topics:
Holds and Releases
Overview
In Oracle Order Management, applying and releasing holds can be performed directly from the Sales Order window. You can create holds based on a combination of two criteria, such as customer and item, or item and warehouse. You can manually send a notification through Oracle Workflow to specific individuals when an order hold is applied. A concurrent program can automatically release holds based on the Hold Until date. Additionally, you can track and view history information on holds at the order and/or line level.
When you prevent further processing on an order through an exception, you are placing a hold on the order. However, you can arbitrarily hold all orders for a specific customer or customer site, an individual order, or all order lines for a specific item. Furthermore, you can define holds that affect existing orders, future orders, or both. Holds can be placed automatically when certain metrics, such as credit limits, are violated. Holds can be automatically released by using Oracle Workflow once the order or line no longer violates the business metric. Oracle Order Management manages exposure to these various types of risks through this holds and releases functionality.
Setup
Profile Options and System Parameters
OM: Notification Approver
This profile enables you to send approval or FYI notifications to a role. It can be set at any level—Site, Application, Responsibility, or User. The value for this profile is retrieved based on the application context (user, responsibility, application) that was in place when the order or line was created. Notifications generated by OM flows can be sent to this role via a seeded WF item attribute (Notification Approver). This item attribute is used as a place holder for storing role information. When the Header or line is created, the item attribute Notification Approver is set based on the profile option setting. If all approvals need to go to this role, you do not need to use the Utility - Set Notification Approver. If they do not then you can use this seeded utility to set the value of the item attribute Notification Approver to various values.
Note: The Negotiation phase of a sales transaction does not support holds.
Note: Notifications can be sent via the workflow FYI Notification framework when an Order/line goes on hold. Release of the hold has to occur from an action selection on the Sales Order Pad. If a user places an order or line on hold manually and subsequently releases the hold they must perform Progress Order to move the order/line on in the workflow to the next activity.
OM: Prevent Booking for Line Generic Holds
This profile controls whether a transaction will fail booking if a generic hold has been applied.
OM: Schedule Line on Hold
This profile option has been changed to a system parameter and it controls whether scheduling should attempt to schedule lines that are on hold. The default is set to No.
OM: Promotion Limit Violation Action
This profile controls how and where holds are placed on order lines and headers when promotion limits are exceeded in Advanced Pricing or Trade Management.
Available options are: Place holds where violated, place order on hold when any violation occurs, or no holds applied. No holds applied is the default.
Workflow
Order Management comes with seeded Oracle Workflow approval processes. Review the seeded flows, activities and notifications to determine if the seeded data can meet your business needs. Typically, the Generic - Order Flow and Line Flows are used for standard orders. The user can modify this existing seeded workflows or create new workflows to include approval activities or wait-for-flow activities in order to safeguard processing orders that are on hold. Refer to the topical essay on Workflow at the end of this manual for details on setting up workflow processes.
Hold Lookup Codes
Set up your own codes for Hold Types, Holdable Header, and Line Activities for workflow in the Order Management Quickcodes window. To do this, navigate to the Order Management Lookup window: N: Order Management > Setup > Quickcodes > Order Management. Select the query manager (Flashlight icon) to view the existing codes or add a new code.
Reports
There are some seeded reports in Order Management for Holds. They include: Hold Source Activity Report, Lines on Credit Check Hold Report, Orders on Credit Check Hold Report and Outstanding Holds Report. You can run these reports by a variety of parameters, including, customer name, hold name, item, order, order type, etc.
Credit Check Rules & Profiles
When setting up credit checking rules, you have the ability to specify if you want to include orders currently on hold in the exposure calculation when the order flow performs a credit check. To set this option, Navigate: Setup > Credit > Credit Check Rules and check the box for Include orders currently on hold.
Customers
In Receivables, when setting up a Customer, you can specify whether or not to perform credit checking for this customer by checking the Credit Check box in the profile. When you process orders for that particular customer and if you use an order type and payment terms that also call for credit checking, the credit check process will run and if they do not pass based on their credit limits, the orders will go on hold automatically. In addition, there is a Credit Hold check box on the Customer window and at the address level. When you check the Credit Hold box at the Customer level, the application creates customer based hold sources in all Operating Units that have either addresses or orders for that customer. This puts all existing and future orders for that customer on hold in all those Operating Units.
When you check the Credit Hold box at the Address level, the application creates an address (account site use) based hold sources in that Operating Unit. This puts all existing and future orders for that address (account site use) on hold in all that Operating Unit.
To activate credit check holds on a customer or customer site, navigate to the Order Management or Receivables responsibility, and select Customers > Standard. This opens an HTML page called Customers. Enter a new customer by clicking the Create button. You can also search for an existing customer, select the Account Profile tab and then select the Credit Check and Credit Hold boxes. To perform credit checking, you will also need to set the credit limits for the customer in the Profile: Amounts Tab of the Customer page.
The hold source can be released by deselecting the Credit Hold box. However individual holds can be released in Order Management using the Release Hold action. Please note that releasing a hold source and releasing a hold are different: The hold source is the origin of the hold and will continue to put lines on hold until the hold source itself is released. The removal of the hold source releases all orders/lines that have been placed on hold. Releasing an single order from hold is done by assessing orders on an individual basis and only affects the specific order/line selection that you have made.
Process Flow
The process flows for holds in Oracle Order Management include the following:
Define Generic and Activity-Specific Holds
First Define a generic or activity-specific hold and assign the responsibilities that are authorized to apply or release the hold. A hold can be defined to be effective at certain steps of the order or line workflow or to be applied regardless of the stage of the orders flow. Because orders and returns are not affected by holds until they are applied, define all the holds you use in your business at once.
To define a generic and hold
-
To define a generic hold, navigate to N: Order Management > Setup > Orders > Holds.
-
Enter a user defined hold name.
-
Enter a user defined description.
-
Pick and select a previously defined hold Type such as User Hold.
-
Optionally, select the 'Hold Included Items' check box. Hold included items allow the user to cascade the hold placed against a model to the 'included items' defined in the model.
-
Optionally, enter hold until dates.
-
Assign specific responsibilities to allow access to apply or release this hold.
Note: If the authorization region is left blank all users may apply or remove holds.
To define an activity-specific hold
-
To define an activity-specific hold, Navigate to N: Order Management > Setup > Orders > Holds.
-
Enter a user defined hold name
-
Enter a user defined description.
-
Pick and select a previously defined hold Type such as User Hold.
-
Pick and select a workflow item, order header/order line.
-
Select a workflow activity.
-
Optionally, select the Hold Included Items check box. Hold included items allow you to cascade the hold placed against a model to the included items defined in the model.
-
If the hold is a line level hold you can select the Apply to Order and Line check box. This enables you to take advantage of line level activities at the order header level. For example, if there is an order that you need to hold up to pick release—which is not an order level action—you can check this flag and can then select the hold at the order header level, thereby allowing all lines to be processed up to pick release.
-
Assign specific responsibilities to allow access to apply or release this hold.
Note: If the authorization region is left blank all users may apply or remove holds.
By assigning a workflow item and activity, the hold will be honored based on where the activity is assigned. For instance, defining a hold with the workflow item as Order Header and the workflow activity as Book Order, the order will be placed on hold when the order has been booked. You can create activity-specific holds at the line level for shipping activities, which include: Pack Line, Pick Line, and Ship Line. You can define holds with these activities to hold lines at those particular activities.
Define Hold Sources
A hold source allows you to apply a particular hold to a group of existing orders, returns or lines and to new orders and lines meeting your hold criteria. Hold Sources are created to hold all current and future orders for an item, customer, order, warehouse or customer site (Bill to or Ship To locations), Sales Agreement No or a combination two attributes.
To define a hold source
-
To define a hold source, navigate to (N) Order Management > Orders, Returns > Order Organizer.
-
Select the Tools menu, and choose Create Hold Source.
-
Use the Create Hold Source window to define the entity based on which the orders and lines can be placed on hold. This entity can either be Customer, Warehouse, Bill To Site, Ship To Site, Item or the Order itself. It can also be a combination of up to two entities. See Create a Hold Source with Multiple Entities
-
In the Criteria Tab, use the list of values to retrieve the hold defined in the previous step. This defaults the Hold Type and Description as defined from the hold. You can add a Hold Until Date and Comments and/or hold all existing or future orders/lines if needed.
-
Select a Hold Criteria. This can be any of the following: Customer, Warehouse, Bill To Site, Ship To Site, Item, or Order. Enter a value for the Hold Criteria based on the selected Hold Criteria, such as Item number or Order Number.
Please refer to the Oracle Order Management User's Guide, Order Inquiry chapter (Holds Information Tab section) for more information on creating hold sources.
Create a Hold Source with Multiple Entities
Creating a Hold Source for Multiple Entities is the same as defining a single Apply Holds window except you must define two entities.
To define a hold source with multiple entities
-
To define a hold source with multiple entities, navigate to (N) Order Management > Orders, Returns > Order Organizer.
-
Select the Tools menu, and choose Create Hold Source.
-
Use the Create Hold Source window to define the entity based on which the orders and lines can be placed on hold. This entity can either be Customer, Warehouse, Bill To Site, Ship To Site, Item or the Order itself. It can also be a combination of up to two entities. Define two entities which orders and lines can be placed on hold based on the hold criteria defined.
For example, if you want to hold a specific item from being shipped to a customer, select the first Hold Criteria as Customer and the second as Item. This creates a hold source using that specific Customer and Item and does not process orders or lines that have that Item and Customer on it.
Order Management supports Hold Sources with up to two entities. The combinations of two supported entities are as follows:
-
Item > Customer
-
Item > Ship To Site
-
Item > Bill To Site
-
Item > Warehouse
-
Item > Sales Agreement Number
-
Warehouse > Customer
-
Warehouse > Ship To Site
-
Warehouse > Bill To Site
-
Sales Agreement Number > Ship To Site
-
Sales Agreement Number > Bill To Site
-
Sales Agreement Number > Warehouse
-
Sales Agreement Number > Ship To Site
-
Sales Agreement Line Number
For more information on the application and management of holds see the Oracle Order Management User's Guide.
-
Workflow
In Order Management, you can control the steps in your order process at which a hold is applied. Even with an exception, processing on an order can continue up to a certain step. More generally, when you place a hold against an item, you can disable any or all activities in its order process so the order cannot proceed unless the hold is removed.
For example, you cannot Book an order that has a generic order level hold or a Booking specific hold. The Book activity posts messages indicating that a hold exists. It then completes with an On Hold result and transition back to the Book - Eligible activity.
You can define custom workflow activities that honor holds. Order Management provides Public APIs that can apply holds, check whether an order or line is on hold and remove holds. You can also seed lookups (Holdable Header Activities, Holdable Line Activities) based on your custom workflow activities and define holds based on them.
Additionally, the notification functionality can be used for handling business exceptions, such as orders on hold, and for approval requests. For instance, you can setup a notification that requires a manager's approval when orders go on credit check hold. The role assigned to the Notification Approver, determines to whom the notification is sent. For instance, the person assigned as Notification Approver can be a Manager where all orders that are placed on credit check hold would be routed to him via e-mail for approval before the orders are released from the hold. Refer to the Required Setup, Profile Options section for details on assigning a notification approver.
Booking Process with Exception Handling
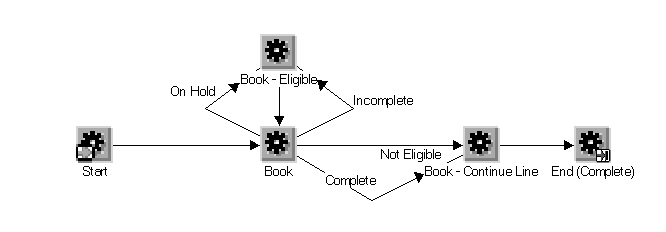
In this example, the booking process is designed to handle expected errors, that are validation or other errors that are expected as part of normal processing (i.e. Line on Hold, it cannot be Picked). If the Booking activity finds a hold on the Order, it will post a message that the Order is on hold and then complete with a result of ON_HOLD to the Booking eligibility block.
The flow needs to transition to a block that can be completed from the Sales Order window or to a Wait Activity.
The Line flow that is used with the Header flow should have the appropriate coordination wait-for-flow activity so that the line will not proceed until the appropriate action has been taken to resolve the errorWorkflow provides you the ability to customize your processes to include exception processing activities as well as approval activities in order to ensure the appropriate holds are placed on specific orders and/or lines.
Honor Holds in Repricing at Shipment
Overview
Order Management provides repricing at shipment functionality. Customers can put the reprice line workflow function in any place after booking, usually after shipping or fulfillment, in their order line workflow. This is a powerful feature used by customers who have long lead times between order entry and shipping and customers who want to be able to finalize their price list or discounts after an order line is entered. This activity can be selected in an activity hold. You can define a reprice line workflow activity specific hold and apply to the order lines you choose. After the pricing setup is finalized, you can release the hold and progress the order line. Also the reprice line workflow activity is enhanced to retry every twelve hours.
Setup
There are no mandatory setups to enable the functionality of this feature.
Approvals
Approval Routing
After a sales document—either a quote or a sales agreement— is assembled, it can be submitted for approval. The sales document can be routed to various people in the organization for review, including people from Sales, Business Practice, Legal, or Finance. Multiple people may be required to approve a sales document.
A workflow process for Approvals allows you to leverage any business process where Approvals may be required. The Approver list is set up in Oracle Order Management and tied to a specific transaction type; workflow notifications provide details of the approval or rejection. The Approval flow is seeded in the negotiation phase as well as in the Oracle iStore Returns flow. A list of approvers can be defined through the Transaction Types or Approvals window, which can be accessed from the Transaction Types window or the Transaction Types menu. In order to use the Approval list, it must be linked to a transaction type. The transaction type must be linked to a workflow which includes the Approval flow such as "Negotiation Flow - Generic with Approval."
Alert Approvers For Pending Approvals
Approvers on the approval list are notified based on the precedence defined on the Approval list. A notification provides a description of what needs approval, and provides an easy way to open the workflow notification for review. The workflow notification for a sales agreement provides the following:
-
Sales Agreement Number
-
Customer
-
Salesperson
-
Creation Date
-
Activation Date
-
Expiration Date
-
Ship To Customer
-
Invoice To Customer
-
Credit Holds.
-
Payment Terms
-
Mix Min Amount for Sales Agreement
-
Mix Max Amount for Sales Agreement
The workflow notification for a quote provides the following:
-
Quote number
-
Customer
-
Expiration Date
-
Salesperson
-
Creation Date
-
Ship To Customer
-
Invoice To Customer
-
Credit Holds (yes/no)
-
Currency
-
Total Amt
-
Gross Margin
-
Payment Terms
The line details include:
-
Line Number
-
Items
-
UOM
-
Quantity
-
Unit Selling Price
-
Margin
Quotes and Sales Orders can be accessed in the Order Information Portal from a link on the notification. However, Sales Agreements do not have any direct access from the notification. If you have Preview and Print enabled, the workflow notification features a link to a PDF with additional detail.
View sales document before approving/rejecting
When the next approver in the chain of approvers is notified that a document requires review and approval/rejection, the approver can either:
-
View a summary or abstract of the SA, including: SA number, Description, Customer name, Forwarded from, Requester, Total Amount (deal size), and an abstract/summary of the terms and conditions, or
-
View the entire sales document as it would appear for printing, including all products/services, pricing/discounts, and all other terms and conditions
Approve, Reject, or Reassign
The system can capture an approver's action:
-
Approval: The approver may approve the document. After approval, the document continues in the approval chain to the next approver, or if there are no additional approvers, the document status becomes "Approved."
-
Quotes: View a summary or abstract of the Quote, including Quote number, expiration date, Customer name, gross margin, line and item information and an abstract/summary of the terms and conditions.
-
Rejection: The approver can reject the document. A rejection stops the approval process and the person who initiated the approval is notified of the rejection and rejection reason. The transaction is set back to "Draft-Internal Rejected."
When rejecting, the reviewer can enter comments indicating why it was rejected, and be able to specify exactly what should be changed. This information is accessible and viewable by other approvers or by the initiator.
-
Reassignment: The approver, after reviewing the approval chain, may decide that someone else in the organization should be reviewing and approving the sales document, rather than him. By reassigning the approval to someone else, that original approver's approval is not captured, and instead, the person who has been reassigned as the approver takes his place. The approval continues to the next approver on the list.
Setup
A list of approvers can be defined at the Transaction Type level. The sales document is required to be approved by each participant on the list before the transaction is eligible to progress in the Workflow. Workflow provides a notification of time-out if the approver fails to respond. System Parameters used to define behavior if there is no response from the approver are:
-
Continue—Submit to next approver if timeout occurs (default)
-
Reject—if timeout occurs during the process
Note: A notification is sent to the approver as soon as the transaction is submitted for internal approval or approved by the previous approver. If no action is taken by the approver, a reminder is sent. The seeded time before a reminder is sent is three days. If there is no response, the system parameter determines if the transaction continues or is rejected. If the approver is the final approver and fails to respond, the transaction is rejected and returned to "Draft-Internal Rejected" status.
To set up the Approval List from the Transaction Type window
-
Navigate to (N) Orders, Returns > Setup > Transaction Type > Define.
Approvals Window
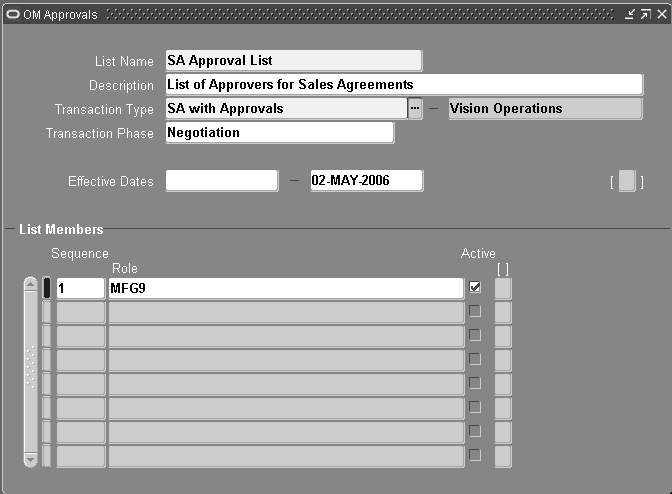
-
Select the Approvals button to bring up the Approver List.
-
Select the required names for approval from the Workflow Role view.
Note: Workflow Roles represent a union of the FND User/Responsibilities and the HR User.
-
Reorder the approval list as necessary. The order displayed here determines how the sales document is routed for approval. Ensure that the seeded Negotiation-Generic with Approval (or a copy) is assigned to the transaction type. See: Define Order Management Transaction Types.
To set up the Approval List directly
-
Navigate to (N) Orders, Returns > Setup > Transaction Type > Approvals.
-
From the approval list window, select the required names for approval and order them in the sequence that the sales document should be routed.
-
When the Approval List is defined, it can be associated to a transaction type.
To setup automatic attachment of a PDF to include contract documents if Oracle Sales Contracts is enabled of contract documents to the workflow approval notification, please refer to the section Preview and Print Sales Documents..
To set up contacts and roles for approvals
-
To set up contacts and roles for approvals, ensure that the users are set up in HR as an FND User so that they are visible in Workflow Roles.