Order Inquiry
Overview of Order Organizer
The Order Organizer enables you to manage existing orders and returns in your system. Using this window you can find your recent orders, orders past their requested shipment date, orders on a particular hold, or orders for an important customer.
When you open the Order Organizer, the Find window is displayed. It enables you to enter search criteria to locate an order or a group of orders. The Find window has the following tabs: Quote/Order Information, Line Information, Advanced, Holds Information, Scheduling. The fields in these tabs enable you to enter or select values which is used as the criteria for finding and displaying orders.
Each of the tabs of the Order Organizer window contain the folder enabled Operating Unit field. You can specify criteria to search for orders and include the Operating Unit field as one of the search criteria or you can leave the field blank to search across all operating units that you have access to. If the Operating Unit field has a value then the LOVs for fields that are Operating Unit sensitive will show data only from that Operating Unit. If the Operating Unit field is blank then those LOVs will show data from all Operating Units accessible to you. If you change or clear the Operating Unit field, the operating unit sensitive fields will be cleared too.
Note: The Related PO Number field in the Find window (Quote/Order Information tab) displays drop-ship orders only and not back-to-back orders.
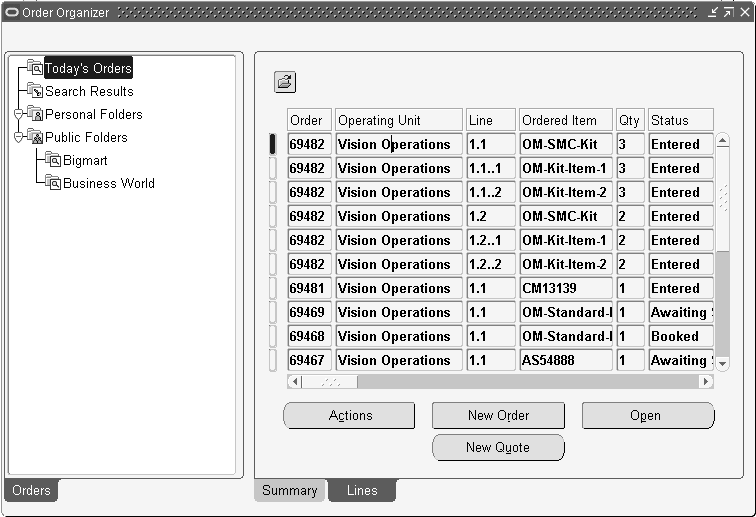
The Order Organizer window consists of the Navigator Tree and the Search Results (Order Summary) window. Double clicking an entry in the Navigator Tree refreshes the results window to show corresponding orders or lines.
The Operating Unit field is a folder enabled field and can be made visible in the Order Summary tab of the Search Results. The summary window displays order information sorted by Operating Unit. If you have specified sorting parameter(s) using folder functionality, then the Operating Unit will be the last sorting parameter.
Note: The right mouse button is enabled in the Order Organizer window.
Order Organizer Window
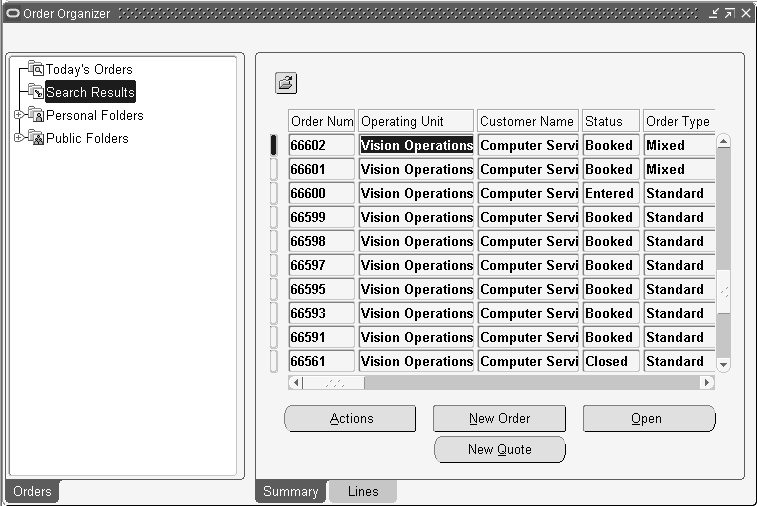
Navigator Tree View
The Navigator Tree contains two pre-defined queries and two pre-defined folders to enable administrators and end users to have quick access to their customers' orders.
Today's Orders
Double-clicking on Today's Orders displays information about all orders you entered today in the results window.
Search Results
Selecting the Search Results displays information about orders matching the most recent query criteria you entered in the Find window. You can also save a search and its results to avoid entering it again by using the right mouse button.
Personal Folders
Selecting the Personal Folders expands the tree and shows you a list of queries you have previously saved. To access orders matching any of your saved queries, select the appropriate entry. This way you can organize and access orders you deal with on a regular basis.
Public Folders
If you are an administrator, you may want to pre-define a handful of useful searches and make them available to all of your users. This way, these queries are defined once and everyone does not have to define them individually.
Find Window
The Find window of the Order Organizer consists of the following tabs: Quote/Order Information, Line Information, Advanced, Holds Information, Scheduling.
The Operating Unit is a folder enabled field and available in all the tabs. It defaults to your default Operating Unit. You can choose another Operating Unit that you have access to from the LOV to restrict your search to that Operating Unit. To expand your search to all Operating Units that you have access to, you can leave the field blank. The fields in the various tabs that are Operating Unit sensitive will behave as follows:
When the Operating Unit field is blank the LOVs for those fields will show values from all Operating Units accessible to you. Once you choose a specific value, the Operating Unit will be populated accordingly. Once the Operating Unit field has a value, the LOVs for all the Operating Unit sensitive fields will show data from only that Operating Unit.
The Order Organizer window displays the fields that are now available to you as a result of the converged inventory models into a single Oracle Inventory model: Secondary Cancelled Quantity, Secondary Fulfilled Quantity,Secondary Shipping Quantity,Secondary Shipped Quantity,Secondary Shipping UOM, Secondary Reserved Quantity. These fields are view only. The Line Information tab has a new field Lot Number that enables you to query for sales order lines using Lot Number (lot-indivisible items) as a criterion.
Quote/Order Information tab
The operating unit sensitive fields in this tab are:
-
Order Type
-
Ship To
-
Invoice To (Bill To)
-
Sales Agreement Number
-
Customer Location
-
Customer PO Number
-
Sales Person
-
Related PO Number
-
Requisition Number
-
Order Source Reference
-
Invoice Number
-
Deliver To
When the Operating Unit field has no value specified, the Price List LOV displays only those price lists (global or operating unit specific) that belong to the operating unit to which you have access. If there is a default operating unit or one that you have specified, the Price List LOV will show price lists that are global and those that are defined for the specified Operating Unit.
Line Information Tab
The following fields are operating unit sensitive:
-
Ship To
-
Sales Agreement Number
-
Deliver To
-
Invoice To (Bill To)
-
Line Type
-
Project
-
Task Number
-
Ship Set
-
Fulfillment Set
-
Customer PO Number
-
Related PO Number
-
Price List
-
Internal Item
Note: LOV's for Related PO Number and Requisition Number display the operating unit as well. For Related PO Number LOV shows Sales Order OU and the Purchase Order OU. For Requisition Number the LOV shows the Sales Order OU and the Requisition OU.
If there is an Operating Unit specified in the Find Window, then the Item LOV will display values based on the Item Validation Organization for that Operating Unit. If the Operating Unit field is blank then the then the Item LOV will display values based on the Item Validation Organization for your default Operating Unit. If you do not specify an Operating Unit or do not have a default Operating Unit set then you will be unable to use Item as a search criteria.
Searching by Customer or Customer Site: The Customer Relationship system parameter setting determines the data displayed in the Ship To/Bill To/Deliver To LOVs when a Sold To Customer Name is specified. If the Operating Unit field has a value and the Sold To is specified, then the Ship To/Bill To/Deliver To LOVs display data based on the Customer Relationship System Parameter setting for that Operating Unit.
Holds Information Tab
You can use this tab to search for Order or Lines on Hold or to search for Hold Sources.
The Holds Information tab in the Order Organizer enables you to search for hold sources, or for order or lines on hold. The operating unit field is folder enabled and displays a default value.
For example,when searching for Hold Sources based on Ship To or Bill To:
If there is a value in the Operating Unit field on the Quote/Order Information tab, the LOVs will show values for Ship To and Bill To from that Operating Unit.
If there is no value specified then the LOVs will show data across all Operating Units accessible to you. When you select a value, the Operating Unit field will be populated based on the value selected.
Clearing or changing the Operating Unit will clear the Ship To or Bill To values.
Hold Source
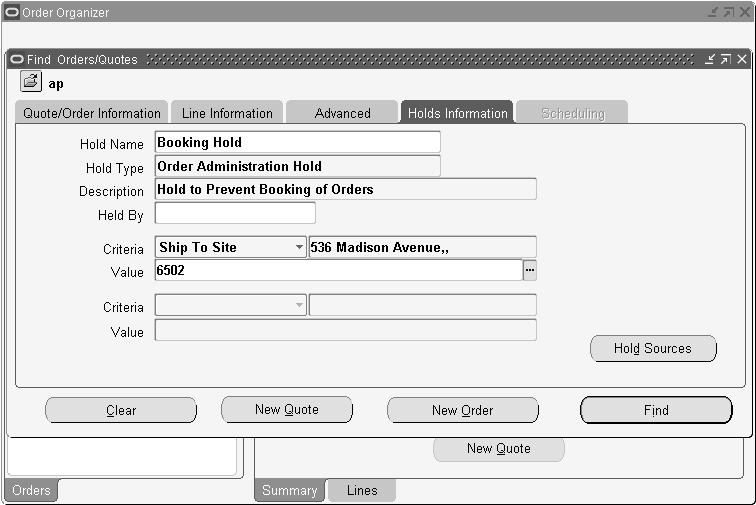
An Operating Unit will be NOT be required to search for a Order, Blanket, Customer or Warehouse based Hold Source.
You can specify any criteria to search for a hold source. If you specify an operating unit in the Quote/Order Information tab and the hold source was created in that operating unit, the hold source search results will be displayed in the Hold Sources window for that operating unit (click the Hold Sources button in the Holds Information tab to open the Hold Sources window). If you do not specify an operating unit in the Quote/Order Information tab, the search results display the hold source details for all operating units it was created in.
The search criteria for hold sources that you can use are:
-
Bill To Site
-
Creation Date
-
Customer
-
Deliver To Site
-
Item
-
Order
-
Order Type
-
Payment Type
-
Price List
-
Project Number
-
Sales Agreement Number
-
Sales Channel Code
-
Ship To Site
-
Shipping Method Code
-
Top Model
-
Warehouse
Scheduling Tab
The Operating Unit is a folder enabled field on this tab. It displays your default Operating Unit. You can choose a different Operating Unit that you have access to from the LOV. If you wish to search for order lines across Operating Units, you can clear the field.
When there is no Operating Unit defaulted or specified, the LOVs for the following Operating Unit sensitive attributes display values from all the Operating Units you have access to:
-
Order Type
-
Line Type
-
Ship To
-
Project Number
-
Task Number
When you pick a value for one of these fields, the form will default the Operating Unit and then the LOVs for the other fields will only show values from that Operating Unit. When you clear the Operating Unit field or change the Operating Unit value, the window will clear all the fields listed above.
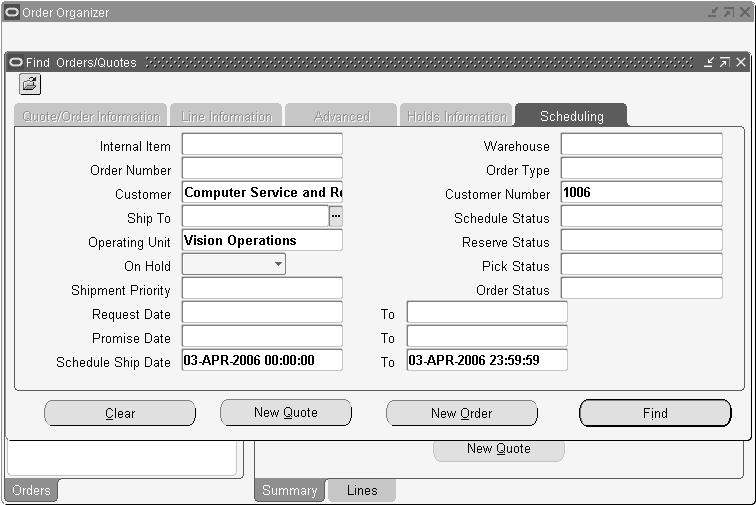
Please refer to the Lines Information tab above on details regarding searching based on Item. Search by Reservation Set: The LOV for this field will only show you reservation sets that you have created.
For additional details on using the Scheduling Organizer, please refer to the section Overview of Scheduling across Orders in the Chapter ATP, Reservations and Scheduling.
Querying Orders
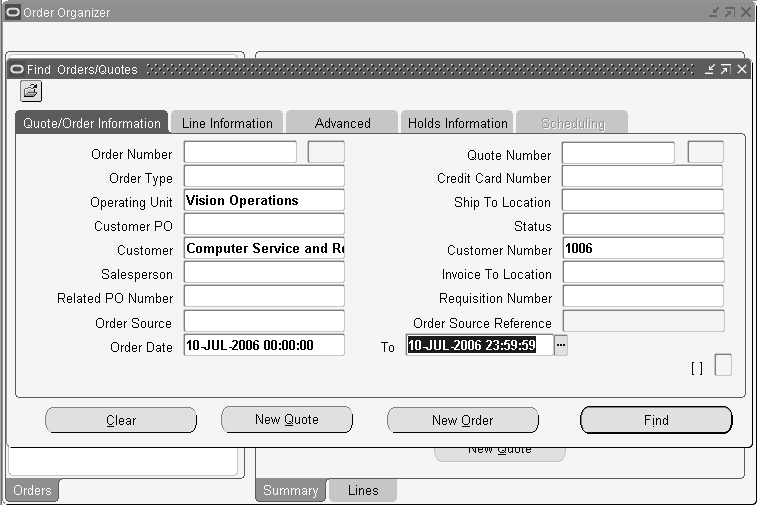
The Find Orders window queries existing orders, order lines, returns, and returns lines based on the criteria you enter.
Note: The right mouse button is enabled in the Find Orders window.
To query an order:
Navigate to the Find Orders window by selecting the Flashlight icon from the Menu while within the following:
-
The Order Organizer
-
The Sales Order Header window
-
The Sales Order Line window
-
In the Order Information tabbed region, enter criteria on which to base your query.
-
Select the Line Information tabbed region to enter line level criteria on which to base your query.
-
Select the Advanced tabbed region to enable the following options:
Choose from: Include Closed Orders, Include Closed Lines, Include Cancelled Orders, and Include Cancelled Lines. Additionally, choose to query RLM orders sequenced or not sequenced.
-
Select the Holds Information tabbed region to use hold criteria to query information.
Additionally, you can choose to include additional fields for input when querying orders utilizing Oracle Folder functionality. Below lists the additional fields currently available for display within the Find Orders window.
-
Operating Unit
-
Agreement
-
Check Number
-
Deliver To
-
Delivery Name*
-
Delivery Name To*
-
Demand Class
-
Expiration Date*
-
Expiration Date To
-
Freight Carrier
-
Freight Terms
-
Invoice To Customer*
-
Invoice To Customer Number
-
On Hold
-
Order Hold
-
Original System Document Type
-
Price List
-
Ship To Customer
-
Ship To Customer Number
-
Shipping Method
-
Warehouse
-
If the value within a column of the table above contains an asterisk, then the field listed can be used to locate specific range. For example, Delivery Name and Delivery Name To can both be added to a folder to enable a user to query orders using a range of Delivery Names.
-
Click Find.
The results display in the Order Organizer window.
See: Sales Orders Workbench section in Order Fulfillment chapter.
To create a new order:
-
Click New Order.
To create a new return:
-
Click New Order.
See: Overview of Returns section in the Order Fulfillment chapter.
Saving Personal or Public Queries
The Find Orders window queries existing orders, order lines, returns, and returns lines based on the criteria you enter.
Note: The right mouse button is enabled in the Find Orders window.
To query an order:
-
Navigate to the Find Orders window by selecting the Flashlight icon form the Menu while within the following:
-
The Order Organizer
-
The Sales Order Header window
-
The Sales Order Line window
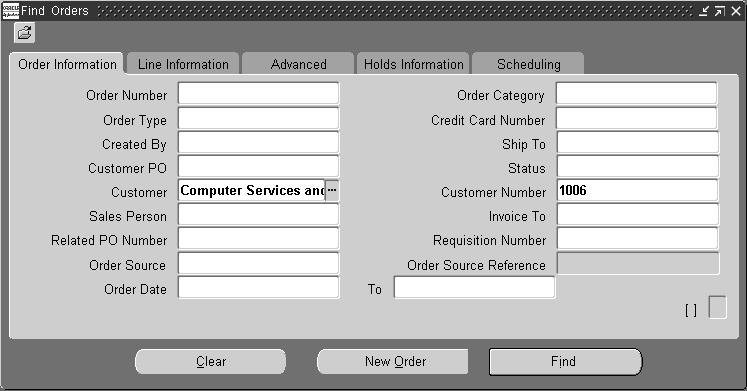
Find Orders Window
-
In the Order Information tabbed region, enter criteria on which to base your query.
-
Select the Line Information tabbed region to enter line level criteria on which to base your query.
-
Select the Advanced tabbed region to enable the following options:
Choose from: Include Closed Orders, Include Closed Lines, Include Cancelled Orders, and Include Cancelled Lines. Additionally, choose to query RLM orders sequenced or not sequenced.
-
Select the Holds Information tabbed region to use hold criteria to query information.
Additionally, you can choose to include additional fields for input when querying orders utilizing Oracle Folder functionality. Below lists the additional fields currently available for display within the Find Orders window.
-
Agreement
-
Check Number
-
Deliver To
-
Delivery Name*
-
Delivery Name To*
-
Demand Class
-
Expiration Date*
-
Expiration Date To
-
Freight Carrier
-
Freight Terms
-
Invoice To Customer*
-
Invoice To Customer Number
-
On Hold
-
Order Hold
-
Original System Document Type
-
Price List
-
Ship To Customer
-
Ship To Customer Number
-
Shipping Method
-
Warehouse
-
If the value within a column of the table above contains an asterisk, then the field listed can be used to locate specific range. For example, Delivery Name and Delivery Name To can both be added to a folder to enable a user to query orders using a range of Delivery Names.
-
Click Find.
The results display in the Order Organizer window.
See: Sales Orders Workbench.
To create a new order:
-
Click New Order.
To create a new return:
-
Click New Order.
See: Overview of Returns.
To save a personal or public query:
-
Enter your query criteria using the Find window. You can access the Find window by selecting Find from the View menu or by selecting the Flashlight icon within the Oracle Toolbar.
-
Click Find. Orders matching your query criteria will be displayed in the Order Organizer and the Search Results node will be highlighted.
-
Move your mouse over the Search Results node. Press the right mouse button and select Save Query.
-
Enter a descriptive name for your query.
-
If the value of the profile option OM: Administer Public Queries is set to Yes, you will see a check box labeled Public. Checking this check box will save this query under Public Folders and all users will see it. Leaving this check box unchecked will save this query under Personal Folders and only you will have access to it.
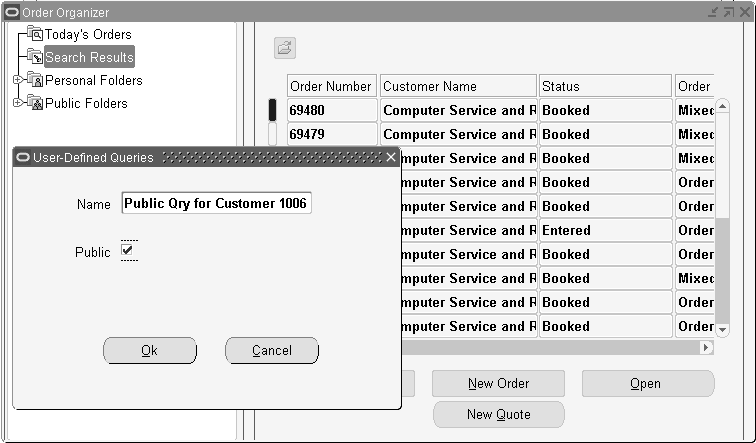
Note: If you select the Public Folder or Private Folder then switch tabs, the system doesn't synchronize the data in the tabs (Summary and Lines) as per the last executed criteria. Public Folder and Private folders don't hold any search criteria and the system doesn't execute any query when these are active or focused nodes.
-
Choose OK to make your changes permanent or choose Cancel if you change your mind and do not wish to save this query.
Deleting a Previously Saved Query
You can delete a query previously saved by you. The value of profile option OM: Administer Public Queries must be set to Yes for you to be able to delete public queries. Follow these steps to delete a previously saved query:
-
In the Order Organizer window, choose the Public or Personal Folders to show your saved query.
-
Place your mouse over the node you want to delete and select the right mouse button.
-
Select Delete Query.
-
On the confirmation dialog, select Yes to delete this query or No if you change your mind.
Renaming a Previously Saved Query
You can rename a query previously saved by you. The value of profile option OM: Administer Public Queries must be set to Yes for you to be able to rename public queries. Follow these steps to rename a previously saved query:
-
In the Order Organizer window, double-click on Public or Private Folders to show your saved query.
-
Move your mouse over the node you want to delete and press the right mouse button.
-
Select Rename Query.
-
Enter a new name for your query.
-
If the value of the profile option OM: Administer Public Queries is set to Yes, you will see a check box labeled Public. Checking this check box will save this query under Public Folders and all users will see it. Leaving this check box unchecked will save this query under Personal Folders and only you will have access to it.
-
Choose OK to make your changes permanent or choose Cancel if you change your mind and leave the query as is.
Summary Tab
The Summary tab region shows header level summary of all orders and returns corresponding to the folder selected in the Navigator Tree. This includes order numbers, order types, customer information, order totals and more. Some of the important operations you can perform from this window are:
-
The Operating Unit field is a folder-enabled field and you can view order details along with operating unit details in the summary tab. You can also sort your search results according to Operating Unit.
-
Open and edit an existing order or return by clicking Open Order.
-
Enter a new order or return by clicking New Order.
-
Perform any applicable action or operation on this order by clicking Actions and choosing the appropriate action.
-
Multi-select and mass change order header information at once for multiple orders or by selecting Mass Change from the Tools menu. You can perform mass change from the Quick Order Organizer (Tools menu) too.
-
View detailed workflow status information for an order header by selecting Workflow Status from the Tools menu.
-
View additional order header related information such as holds history, delivery information, invoicing information and quantity change history by clicking the right mouse button and selecting Additional Order Information.
-
View additional shipping details by selecting View Shipping Status from the Actions Button menu.
-
If you query on invoice or credit memo number, Order Organizer displays the original order or return related to the invoice but does not display other documents related to the invoice or credit memo.

Lines Tab
The Lines tab region shows order line level information of all lines across all orders and returns corresponding to the folder selected in the Navigator Tree. This includes line numbers, items, quantity and pricing information, ship to sites and ship-from warehouses, summary of workflow stage, tax, etc. Some of the important operations you can perform from this window are:
-
The Operating Unit field is folder-enabled and you can view order details along with the corresponding Operating Unit as well as sort the results according to Operating Unit.
-
Open and edit the order or return that a line belongs to by clicking Open Order.
-
Enter a new order or return by clicking New Order.
-
Perform any applicable action or operation on an order line by clicking Actions and choosing the appropriate action.
-
Multi-select and mass change order line information at once for multiple lines, by selecting Mass Change from the Tools menu. You can perform mass change by using the Quick Order Organizer too.
-
View detailed workflow status information for an order line by selecting Workflow Status from the Tools menu.
-
View additional order line related information such as Holds History, Delivery Information, Invoicing Information, Quantity Change History, etc. by clicking the right mouse button and selecting Additional Line Information.
-
If you enter an incorrect or null value as a line number, the following error message displays: Enter a valid order/line number combination.
-
Assign, add or remove lines to a Ship, Arrival or Fulfillment sets.
You can search for lines by line number. Line Number From and Line Number To are folder enabled fields. You can specify line numbers to search, for example, 100 to 150, and Order Organizer will return all the relevant lines of the order.
Pricing and Availability Overview
Pricing and Availability provides Oracle Order Management users with the two most common requirements concerning customers that request products:
-
How much is the product going to cost?
-
Do you have the product in stock now?
Using Oracle Order Management, you can quickly view the price of an item and additionally display the availability of the item (across all the organization setup in the sourcing rule) being priced utilizing the functionality provided within the Pricing and Availability window. The Pricing and Availability window enables you to perform a price check or an availability check by entering an item and then requesting the pricing and availability details for the item.
The Pricing and Availably function within Order Management also enables you to:
-
Perform price and availability checking without creating an order.
-
Perform price and availability checking without placing demand or reservations.
-
Easily create an order or quote if the query results in a customer's decision to buy the item.
-
Perform price and availability checking by item cross-reference, customer item, or item description.
-
View both the Selling Price and List Price of a product.
-
View price breaks, other automatic discounts, and Surcharges as well as other benefits not affecting the selling price currently available for a particular product or customer.
-
Perform price and availability checking without consuming modifier limits.
Note: All amounts displayed and calculated as a result of a price and availability search use the decimal precision defined for the currency entered or defaulted.
-
Perform price check what if analysis based upon an Agreement, Price List, Pricing Attribute, Order Quantity, Customer, Currency, Ship To, Bill To, Order Type, Pricing Date, or Request Date.
-
Perform price checks by specific currency and indicate in which currency you wish to view the calculated Selling Price.
-
View a limited set of item attribute details.
-
View related items such as upsell items or cross-sell items, substitutes, supercession items, etc.
-
Validate your Pricing Setup by ensuring your selling price is correctly returned by the pricing engine prior to placing an order; the selling price will include any eligible discounts and surcharges you have defined.
Note: Pricing and Availability results do not guarantee order line item price or the availability of an item. Within Oracle Order Management price is guaranteed only at the time an order is Booked.
The Available to Promise information in Order Management displays a window that is populated from either APS or on-hand inventory information. Since availability information can be viewed outside of Order Management, only primary inventory quantities are displayed. Secondary quantities that are available as a result of the converged inventory model are not displayed.
Availability is guaranteed only if a hard reservation is placed for an order line against available supply (supply has being allocated to the order line). Successfully scheduling an order line indicates that you have soft pegged existing supply for the item under normal circumstances should be available if you attempt to pick the order line).
Performing Pricing and Availability
The Pricing and Availability window enables you to perform price and availability checking.
Within this release of Oracle Order Management, you cannot use the Pricing and Availability window to perform price and availability checking for models, kits, service items, or Oracle Processing Manufacturing items.
Pricing and Availability results do not guarantee order line item price or the availability of an item. Within Oracle Order Management:
-
Price is guaranteed only at the time an order is Booked.
-
Availability is guaranteed only if a hard reservation is placed for an order line against available supply (supply has being allocated to the order line). Successfully scheduling an order line indicates that you have soft pegged existing supply for the item under normal circumstances should be available if you attempt to pick the order line).
The Pricing and Availability window currently does not support availability checking for substitute items.
Multi-Org Access Control in the Pricing and Availability window
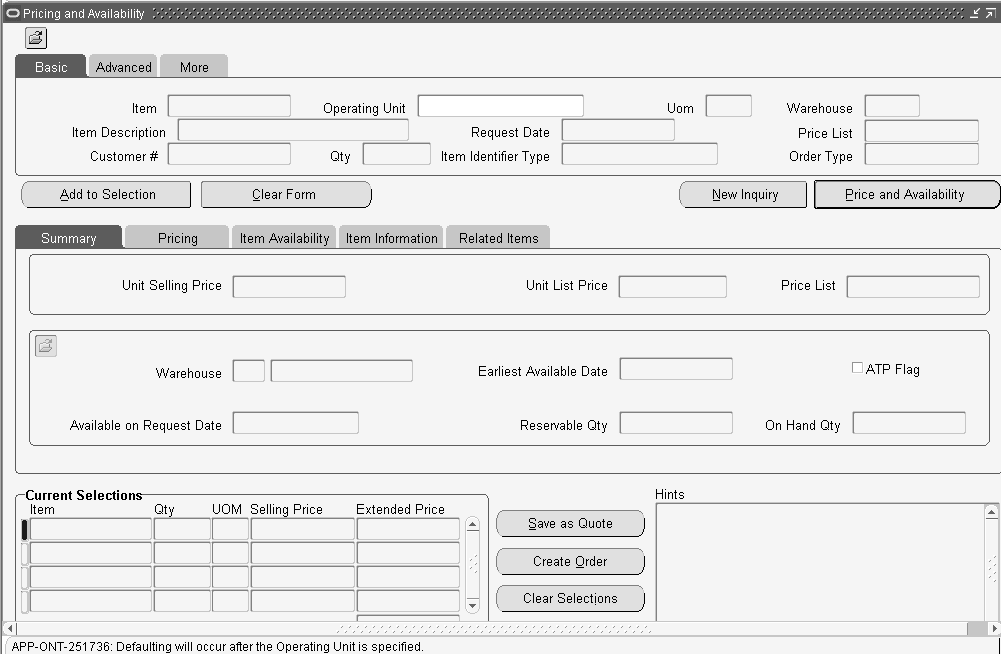
The Operating Unit is a folder enabled field. It displays the default Operating Unit. You can choose a different Operating Unit that is accessible to you from the LOV. An Operating Unit is required to do a Pricing and Availability check. All the other fields in the window are grayed out if the Operating Unit field has no value. Initial defaulting will not occur unless the Operating Unit field has a value. Changing or clearing the Operating Unit will clear all the other fields.
Defaulting Rules
The Pricing and Availability window utilizes a subset of your existing defaulting rules currently enabled within the Sales Order window. While you can default many different attribute values within the Sales Order window, the Pricing and Availability window uses defaulting rules to include other attributes like Order Type, Bill To, Agreement, Ship To, Demand Class, Currency, Warehouse, demand class, item identifier type, order type, and item Primary UOM.
If defaulting rules are not enabled, Order Management will attempt to default field values in the following manner:
-
If you enter a Customer, Order Management will default the warehouse and Price List based upon the Customer setup for the Customer Name/Number entered.
-
If you enter an Item, Order Management will default the Default Shipping Organization (warehouse) and Primary UOM for the organization item definition.
-
If you enter the Ship To, Order Management will default the warehouse and Price List based upon the Customer setup for the Customer Name/Number entered.
-
If you enter the Bill To, Order Management will default the Price List based upon the Customer setup for the Customer Name/Number entered.
-
If you enter an Agreement, Order Management will use the Agreement Price List specified.
The Defaulting framework is used to determine the default warehouse for availability checking in this window. If the item has a preferred shipping location setup in the item definition (Order Management tab), then that location may be used if defaulting from item is part of the defaulting rule. If no warehouse is defaulted (because no rule is set up), then the availability call will be accomplished with a null warehouse, and the sourcing rules are used to determine the appropriate warehouse.
You can view availability across other warehouses that the item is enabled in by selecting the Global Availability tab in the Results block. Once there, you can automatically see the availability in each of the other locations, without taking any other action.
Note: If a warehouse is not defaulted or keyed then the pricing and availability search is initiated with a NULL value for the Warehouse field; your Sourcing Rule definitions are then used to determine the appropriate Ship From warehouse.
Note: However, if defaulting rules for the attribute warehouse are enabled, the defaulting rule will be used to determine the warehouse value.
Note: If the Customer and site information is not entered, then item availability assumes that the item will be shipped from the Warehouse specified in the search region. If the warehouse is not entered, and cannot default, then availability checking assumes that the item will be shipped from the item master validation organization.
Block Pricing Support
The term Block Price means an application method where the price will be defined for the entire set of a block. The use of this Block Pricing concept enables you to set up various price break scenarios, using Point and Range price break types with multiple application methods. For such price breaks, a lump sum price could be used for these blocks in addition to per unit or percent prices. Block Price means Lump sum price or rate. Block pricing details display in the Price Breaks tab as Price List price breaks only.
While working within the Pricing and Availability window, the default action when a user selects the Enter key is to execute a price and availability check; anytime you press the Enter key within the Pricing and Availability window, a new Price and availability check is always initiated.
For example, suppose you enter an item and select the Enter key; a pricing and availability check is initiated. Or, suppose you enter an item, customer name, and Bill To and then select the Enter key; a pricing and availability check is initiated.
Note: If you use Oracle Advanced Pricing Qualifiers and Modifiers to assist the pricing engine in determining selling price, you should include the key qualifying attributes in the Search Region when performing price and availability checking.
Note: For example, suppose you had a Qualifier attached to an item on a price list for a specific Customer: ensure you enter the qualifier, (Customer (name or number)) when performing price and availability checking in order for the pricing engine to properly qualify eligibility. Eligible modifiers attached to the qualifiers will be shown in the Summary Pricing Tab.
Add to Order and Add To Quote Capability
The Pricing and Availability window enables the creation of a quote or an order. To create an order, click Create Order, or to create a quote, click Save as Quote. If you do not want to order the item but instead want to look up the price and availability of another item, you can click New Inquiry to clear the window, or you can just enter another item and start over.
Two new seeded security functions Create Orders from the Pricing and Availability window and Create Quotes in Order Management determine if you can create orders and quotes respectively from the Pricing and Availability window. If these functions securities are not granted to the user of the attached menu, the Create Order and Save as Quote buttons will be hidden and you will not be allowed to create either or both orders and quotes.
Note: OM: Sales Order Form Preference controls whether you see the Sales Orders window or the Quick Sales Orders window once you have clicked to create an order or quote.
Find and Add Customer Integration
Find Customer
You can open the Find Customer window using the Tools menu. Once the search is complete, you can select a customer, and bring that information back to use it in the query of the price and availability of an item for an order.
For more information on the Find Customer window, please refer to the Finding Customer Information section.
Add Customer
You can open the Add Customer window using the Tools menu. After entering the Customer, Address, or Contact information, you can create the new information, to be used in the query of the price/availability of an item for an order. Add Customer functionality is enabled through the tools menu only if the user has the permission to create either Customer or Contact/Sites. This is determined based on the profile OM: Add Customer.
The Add Customer window enables you to create a customer that does not require extensive setup steps. Please refer to the Adding Customers using the Add Customer Window section.
See: Pricing and Availability Overview
Search Region
All Tabs within the Search region of the window make use of Oracle Applications Folder functionality, enabling you to modify the field's displayed within each tab. All tabs are seeded with the most common searchable attributes to enable complete flexibility to display your most-frequently used Pricing criteria on the Basic (search) Tab. All the items are present in all the tabs through folder functionality.
Basic Search Tab
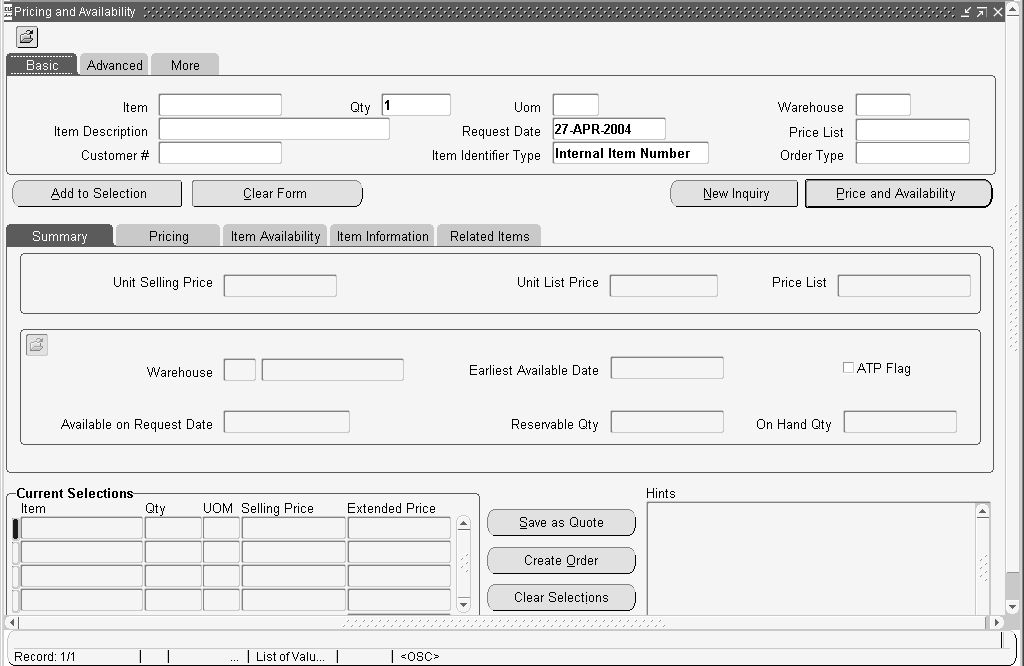
The following search fields have been seeded in the default folder for this tab:
-
Item: Enter an item or item description to check price and availability.
This field is required unless you enter a value in the Item Description field.
-
Qty (Quantity): Enter the quantity you wish to check pricing and availability for. This field is required and the default is 1.
-
UOM (Unit of Measure): Select a unit of measure or accept the default to perform price and availability checking. This field is required and the default value is the Primary Unit Of Measure (within the item master validation organization) for the item entered.
-
Warehouse: (Organization): Select an organization to perform price and availability checking. The default for this field is the value of the Default Shipping Organization for the organization item definition.
-
Item Description: Enter an item description or item to check price and availability. This field is required unless you enter a value in the Item field.
-
Request Date: Enter the Request Date to use within pricing and availability check. The default for this field is System Date.
Note: When you perform price and availability checking within the Pricing and Availability window, availability check calculations are based upon Ship Date (ATP Type = Ship Date and Request Date = Ship Date).
-
Price List: Select a Price list to use for determining the price returned when performing price and availability checking.
Note: If the User Search Flag (within the Oracle Advanced Pricing Event Phases window) is set to Yes, Order Management will determine a price for an item if you do not enter a price list. Pricing Availability will not retrieve a list price or modifiers when the User Search Flag in pricing setup is set to No.
-
Customer # (Customer number): Enter the Customer number when performing price and availability checking.
-
Item Identifier Type: Select an item identifier to use when performing price and availability checking. The default for this field is Internal Item Number.
The List of Values (LOV) for this field will display:
-
Customer Item Number
-
All enabled Cross Reference Types (defined within the Oracle Inventory).
Note: Ensure that the Order Management quickcode definition for quickcode = ITEM_IDENTIFIER_TYPE has the value INT (Internal Items) defined (default field value for Item Identifier Type).
Note: If the value INT is not defined, then the Pricing and Availability window LOV display for the Item Identifier Type field will be null, and the LOV for both item and item description field will be restricted to Internal Items only.
Note: The value selected for this field will limit the LOV that displays for the Item and Item description type fields; valid values for Item and Item description fields are based upon the value you selected in Item Identifier Type field.
Note: For example, if you choose to enter a Customer Number and then select Customer Item Number for the Item Identifier Type field, the LOV for the Item and Item Description will be limited to displaying only Customer Item Numbers defined for the customer entered. Additionally, if you enter a value in the Item or Item Description fields, and then select a value (other than the default) for Item Identifier Type, both the Item and the Item Description fields are cleared of any data; you must re-enter or select the Item or Item Description again.
-
-
Order Type: Enter an Order Type to be used when performing price and availability checking.
Advanced Search Tab
The following search fields have been seeded in the default folder for this tab:
-
Customer (Customer Name): Enter the Customer Name to be used when performing price and availability checking.
-
Customer # (Customer number): Enter the Customer number to be used when performing price and availability checking.
-
Order Type: Enter an Order Type to be used when performing price and availability checking.
-
Agreement: Select an Agreement to be used when performing price and availability checking.
-
Price List: Select a Price list to use for determining the price returned when performing price and availability checking.
-
Pricing Date: Enter a Pricing Date to be used when performing price checking. The Pricing Date entered is used by the pricing engine to ensure that only valid effective dates for qualifier, modifier, and discount breaks are used to determine price.
-
Ship To Location: Select a value for the Ship To field to be used when performing price and availability checking.
-
Bill To Location: Enter the Bill To Location to be used when performing price and availability checking.
Note: You cannot enter a value for either the Ship To or Bill To fields without first entering a Customer Name or Customer Number.
-
Warehouse (Organization): Select an organization to perform price and availability checking. The default for this field is the value of the Default Shipping Organization for the organization item definition.
More Search Tab
The following search fields have been seeded in the default folder for this tab:
-
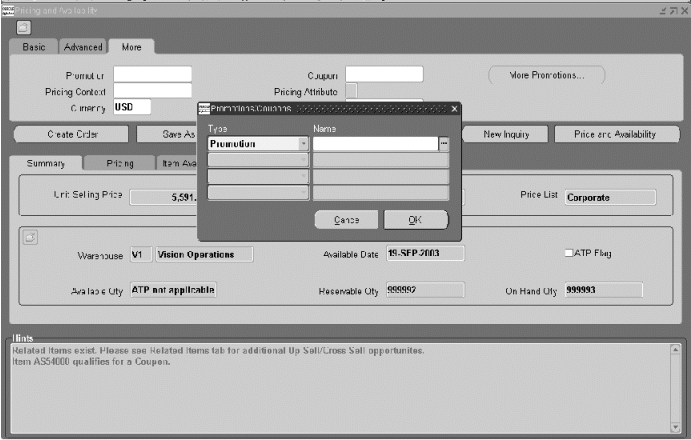
Promotion - Enter the name of an 'ask for' promotion modifier to be applied to this query.
-
Coupon - Enter the number of a coupon to be applied to this query.
-
Use the More Promotions button to enter more promotions or coupons, if desired.
-
Pricing Context: Select a Pricing Context to be used when performing price and availability checking.
The LOV for this field displays all enabled flexfield structures defined for the Oracle Advanced Pricing Descriptive flexfield Pricing Contexts.
-
Pricing Attribute: Enter a Pricing Attribute based upon the Pricing Context entered. If you choose to enter a Pricing Attribute without entering a pricing Context, the Pricing Attribute Descriptive Flexfield will prompt you to first enter a Pricing Context.
-
Currency: Select a currency to be used when performing price and availability checking. This field is required and the default value is the Ledger currency.
The Ledger currency used within Order Management is determined by the Ledger linked to the value entered in Operating Unit field within the Order Management Parameters window.
-
Pricing Date: Enter a Pricing Date to be used when performing price checking. The Pricing Date entered is used by the pricing engine to ensure that only valid effective dates for qualifier, modifier, and discount breaks are used to determine price.
Summary Tab
The following details are displayed within this results tab:
Pricing Block
This block does not enable the use of Oracle Applications Folder functionality.
-
Unit Selling Price
-
Unit List Price
-
Price List
Availability Block
The Availability Block utilizes Oracle Applications Folder functionality, enabling you to modify the field's display within this tab. The following details (by default) are displayed within this block:
-
Warehouse
-
Earliest Available Date: This field will either contain:
-
A value in the future if the full quantity requested is not available on the Request Date
-
A value of the request date if the if the requested quantity is available on the requested date
-
A NULL value for items that are not ATP enabled
-
ATP Flag
Available on Request Date (a value of a variable amount if the item is ATP enabled, or the message ATP not applicable for items that are not ATP enabled.
Note: if the requested qty is not fully available on the request date, then the field "Available on Request Date" shows the available qty on request date and the field "Earliest Available Date" displays the earliest date when the full requested quantity is available. A hint will also be added to the hints region for this.
-
-
Reservable Qty
-
On Hand Qty
Note: Order Management also provides a hidden fields within the seeded folder for the Availability Block within the Summary Tab. The hidden fields is:
-
Default Source Type - shows the value 'internal' or 'external' depending on where the item is sourced from.
-
Pricing Results Region
The Summary Pricing Tab region utilizes Oracle Applications Folder functionality, enabling you to modify the field's display within this tab. The fields that are hidden in this folder are: List Price in Pricing UOM, Margin %, Margin Amount, Unit Cost, Pricing Date, Pricing Quantity, Pricing UOM, Ordered Quantity, Ordered UOM, Price List start and end dates, Price List Line start and end dates, and Price List Rounding Factor. The following details (by default) are displayed within this tab:
-
Unit List Price
-
Unit Selling Price
-
Currency
-
GSA Indicator
-
Price List
-
Extended Price
-
Effective Until - this is the earliest date among the following: price list ending effectivity date and any modifier list line ending date
Details Region, Price Breaks Sub-Tab
The Price Breaks Sub-Tab does not utilize Oracle Applications Folder functionality. Any qualified price breaks (both price list and modifier breaks) are displayed in the Pricing Results tab, Price Break Sub-tab. There is a radio button you can use to switch between displaying modifier or price list breaks.
The following details are displayed when the Price List radio button is enabled within this tab:
-
Value From
-
Value To
-
List Price (for the price break displayed)
-
Break Type (Point, Block, or Range)
-
Attribute (this is the attribute entered in the Value From refers to; for example Volume, Quantity, Weight)
The following details are displayed when the Modifier radio button is enabled within this tab:
-
Modifier Name
-
Value From
-
Value To
-
Type (of modifier)
-
Value (a percent or amount, depending on the method)
-
Method (percent, amount, lumpsum)
-
Break Type (Point or Range)
-
Attribute (this is the attribute entered in the Value From refers to; for example Volume, Quantity, Weight)
Details Region, Price Adjustments Sub-Tab
The Price Adjustments Sub-Tab does not utilizes Oracle Applications Folder functionality. Any automatic discounts (shown as a negative amount) available for your customer are displayed on this tab. Additionally, any modifiers that have changed the selling price of the item are displayed; pricing modifiers that do not affect the selling price are shown on the Additional Benefits sub-tab. The following details are displayed within this tab:
-
Modifier Name
-
Modifier Type
-
Adjustment Amount – the net amount by which this adjustment has affected the selling price
-
Net Price: the running total of the Unit List Price and the Modifier amount
-
Automatic check box – this box is checked if the modifier has been automatically applied
-
End Date (this is the ending effectivity date for this modifier list line)
To apply a manual modifier, click the Add Adjustment button and select the manual modifier you want to apply. You must have security to apply manual modifiers (based on the OM: Discounting Privilege profile) or you will not see this button.
Details Region, Additional Benefits Sub-tab
Additional benefits- are modifiers that are applicable but do not affect the selling price, including terms substitution, promotional goods, other item discounts, item upgrade, coupons, and accruals. Advanced pricing benefits may include free or promotional goods, favorable payment, or freight terms, coupons issued, accruals, etc. The customer service representative (CSR) can communicate the accompanying additional benefits to the customer.
What you see in this region depends on the type of additional benefit that is being displayed.
Note: If Advanced Pricing is not fully licensed, these benefits cannot be defined and this tab will not be visible. You can use the Pricing and Availability window with Basic Pricing, however you will not see Additional Benefits or Price List price breaks.
Item Availability Results Region
The Item Availability region utilizes Oracle Applications Folder functionality, enabling you to modify the field's display within this tab.
Note: If the Customer and site information is not entered, then item availability assumes that the item will be shipped from the Warehouse specified in the search region. If the warehouse is not entered, and cannot default, then availability checking assumes that the item will be shipped from the item master validation organization.
No data will be shown in this region unless sourcing rules are defined for that item. Even if the item is enabled in organizations, it will not show the availability in those organizations unless there are valid sourcing rules to source the item from those organizations.
Details
ATP inquiry within Order Management utilize Oracle Global Available To Promise data that has been previously collected. Oracle Global Available To Promise verifies that the quantity ordered is available on the request date you specify, and uses the item or organization ATP rule to determine the supply and demand to be considered in the calculation (for both collected and planned data). When you request availability within the Pricing and Availability window, Oracle Global Available To Promise supplies the ATP date and available quantity from APS.
See: Oracle Advanced Supply Chain Planning User's Guide and Oracle Global Available To Promise User's Guide for additional details.
-
The Item Availability Tab displays multi-line availability data for all organizations defined by your sourcing rules.
-
The profile option INV:Capable to Promise determines if you are performing availability checking against planned data or collected data.
-
If the quantity requested is not available on the Request Date, then availability data will be displayed within the Earliest Available Date field. This date field will also show a date even if the requested quantity is available on the Requested date. It shows null for Non-ATP items in which case the Available Quantity fields shows 'ATP Not Applicable'
-
Availability is always checked, whether an item is ATP enabled or not. If ATP is not enabled for an item, Order Management will display item availability information even for non-ATP items provided you have defined sourcing rules for the item. If there are no sourcing rules defined for the item, Order Management will not display any details other than the message ATP not applicable within the Available Qty field.
Note: For ATP items, availability can be seen only when Oracle APS is installed.
The following field details are displayed within the Item Availability Tab:
Warehouse, Warehouse Name (either: the warehouse entered in the More Search Tab, the default warehouse as determined by sourcing rules, or the default warehouse as determined by enabled defaulting rules)
-
Available on Request Date
-
On Hand Qty
-
Reservable Qty
-
If the ATP flag for an item is not enabled, the following field details are displayed within the Item Availability Tab:
-
On-hand
-
Reservable Quantity
-
Earliest Available Date
Note: ATP Inquiry is for informational purposes only and does not place demand or reserve on-hand inventory.
Note: The Pricing and Availability window currently does not support ATP inquiry for any configurations you have defined, and pegging details are not displayed.
-
Item Information Results Region
Summary Region
The Summary Item Information Tab block utilizes Oracle Applications Folder functionality, enabling you to modify the fields displayed within this tab. The following fields are hidden in this tab – ATO item flag, ATP flag, Default Source Type, Description, Inventory Item Name, Item, Item Type, Make or Buy indicator, Orderable on the Web, Reservable, Returnable, Shippable, Stockable and Taxable flags. The following details (by default) are displayed within this tab:
-
Warehouse (this field always displays the item validation organization (warehouse))
-
Lead Time (Cumulative Total Lead Time item attribute)
-
Primary UOM (not shown by default)
-
Default Source Type
-
User Item Type (User Item Type item attribute)
-
Can Order Internally check box (Internal Orders Enabled item attribute)
-
Weight and Weight UOM (not shown by default)
-
Item Status (Item Status item attribute)
-
Serviceable check box (Serviceable item attribute)
-
Customer Can Order check box (Customer Orders Enabled item attribute)
-
Volume and Volume UOM
Item Specific UOM Conversion Region
The Item Specific UOM Conversion block within the Item Information Tab region does not utilizes Oracle Applications Folder functionality. The following details are displayed within this tab:
-
UOM / Conversion Rate
-
Base UOM
Note: Only Item specific (intra class) UOM conversions are to be displayed, along with Base UOM information; Standard and Inter-class UOM conversions are excluded from any UOM conversions that are displayed.
Related Items Results Region
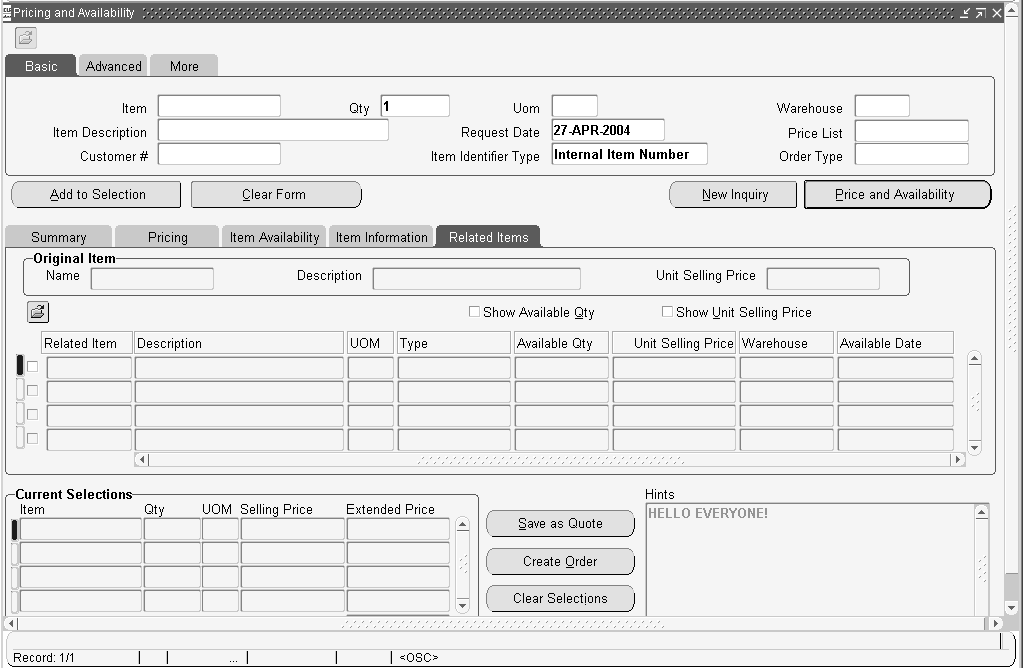
This tab for related items is folder enabled. The default display contains: Related Item, Description, UOM, type, Available Quantity, Unit Selling Price, Warehouse and Available Date. There are hidden additional fields, available through folder functionality. Additional fields include ATP Error Message, Extended Price, Price List, Request Date and Unit Price. The following types of item relationships are supported and are displayed in the related items tab. All the relationship types will be treated as Cross-sell except substitute, superceded and Up-Sell. Since there is no item attribute which distinguishes whether it is an add or replace, you must be aware that the Relationship Types 2, 4, and 8 will be treated as substitutions.
-
Related
-
Substitute
-
Cross-Sell
-
Up-Sell
-
Service
-
Prerequisite
-
Collateral
-
Superseded
-
Complimentary
-
Impact
-
Conflict
-
Mandatory Charge
-
Optional Charge
-
Promotional Upgrade
-
Split
-
Merge
-
Migration
Note: All the setup for Related Items must be done in Inventory before you can see them in the Pricing and Availability window.
Current Selections Region
Current Selections: The Pricing and Availability window contains a region used as a placeholder for multiple items to later create an order or quote from all or any of them. You can save items to the Current Selections without creating an order or quote. The profile OM: Show Current Selections Region for P/A will control whether the form will display this region or not.
If you select an up-sell, substitute or superceded item and then click Add to Selection, the selected item will replace the original item and be placed in the Current Selections region. You can only select one replacement item.
If you select one or more cross-sell items (or other relationship types) and then click Add to Selection, the original item and all of the selected items will be placed in the Current Selections region.
To clear the Current Selections region, click Clear Selections. To clear the entire window, click Clear Form. To clear only the inquiry section, click New Inquiry.
Repricing of the Current Selections region: Since the price of the main item or the items in the current selections region can depend on other items because there may be cross item discounts, we reprice all the items when an item is deleted from the current selections region. When we price the main item, we consider all the items present in the current selections region, so if there any discounts because of presence of other items, it will be shown. Also, the price of the items in the Current Selections region are updated, if a new item is added to that region as price may change because of additional modifiers because of the new item.
Hints Region
The Hints regions displays messages about the item being queried that alert you to view one or more Results regions. For example, if related items exist, a hint will be displayed. If additional pricing benefits apply to this item, a hint will be displayed. If price breaks exist, a hint will be displayed here. There is also an OM System Parameter where you can enter a Default Hint for Pricing & Availability. If you enter text in that parameter, it will be displayed in the Hints region.
To perform a price/availability check for a single item and then add it to an order:
When you perform a Price/Availability check, for performance reasons only the current tab in the results region is populated. As you navigate to other tabs data is populated.
-
Navigate to the Pricing and Availability window.
-
Enter your item information, then tab out of the Item field. Choose your item from the List of Values.
-
Enter a customer account number (if known) or search for customer by name using the List of Values, or Find Customer.
-
Click Price and Availability. Review your information. When the customer agrees, click Add To Order, depending on the current selections displayed.
Note: If the order type was already defaulted or entered before the Pricing and Availability query, then a message can be displayed saying ‘Order xxxxx has been created. Do you want to open the order?' If the order type was not previously available, you will be asked to choose an order type, and then receive the same message as above. If you want to open the order, you will be transferred to either the Quick Sales Orders or the Sales Orders window with that order displayed. If you choose No, you will remain in the Price and Availability window to enter another query. The note displayed after a quote/order is created depends on the profile option Sales Order navigation from Pricing and Availability form. It can just display a note, ask you want to see the details or go directly to the Sales Orders window based on this profile.
To perform a price/availability check for a single item and then save it as quote:
You can create quotes/orders without doing a price/availability check. It is not always necessary to do a price/availability before creating a quote/order.
-
Navigate to the Pricing and Availability window.
-
Enter your item information, then tab out of the Item field. Choose your item from the List of Values.
-
Enter a customer account number (if known) or search for customer by name using the List of Values or use Find Customer.
-
Click Price and Availability.
-
The customer wants a quote. Click Save As Quote. See above note regarding selecting Order Type and viewing the resulting order or quote.
To perform a price/availability check with related items, and then add it to order (Selected items region not displayed):
-
Navigate to the Pricing and Availability window.
-
Enter your item information, then tab out of the Item field. Choose your item from the List of Values.
Note: The item turns a different color and a message is displayed in the hint region indicating that Related Items exist for this item.
Note: If a line level modifier is applied to the main item in the search region, it is not applied to related items which does not substitute the main item. If the related item, is for instance 'up-sell,' that substitutes the main item, then the manual modifier applied to the item in the search region is carried over to the related item.
-
Enter a customer account number (if known) or search for customer by name using the List of Values or use Find Customer.
-
Click Price and Availability.
-
Select the Related Items tab in the results section to view Related Items. If the customer wants a related item, select the check box on the lines displaying the pertinent related item.
Related Items tab.
-
If the customer wants an order, click Add To Order. See above note regarding selecting Order Type and viewing the resulting order or quote.
Note: For automatic Item upgrade through pricing, the new item is added to the current selections region, The price shows for the old item, but the related_items and availability is for the new item.
To perform a price/availability check with manual adjustments applied, and then add it to an order (Selected items region not displayed):
-
Navigate to the Pricing and Availability window.
-
Enter your item information, then tab out of the Item field. Choose your item from the List of Values.
-
Enter a customer account number (if known) or search for customer by name using the List of Values or use Find Customer.
-
Click Price and Availability, then choose the Price Adjustments tab. Click Add Adjustment, and select a manual adjustment from the List of Values. The manual adjustment is applied and the unit selling price is updated to reflect the adjustment.
The button Add Adjustment is displayed based on the combination of the profile "OM: Discounting Privileges" and the "enforce List price" flag for the Order Type. If the order type is not entered then we do not consider the "Enforce List Price" flag and assume it to be false. We look at the profile OM: Discounting Privilege to see if the user has the privilege to apply the manual adjustments. Also if this privilege is FULL, then if the Order Type has Enforce List Price, a manual adjustment cannot be applied. If the privilege is None the user can never apply a manual adjustment.
Note: When the Enforce List Price is set to Yes, Automatic Modifiers are not appiled regardless of the OM: Discounting Privilege profile.
OM: Discount Privilege Options OM: Discounting Privilege Enforce List Price Apply Manual Adjustment? Full Y No Full N Yes Unlimited Does not matter Yes Non-overridable only Y No Non-overridable only N Yes None Does not matter No -
Click Add To Order. See above note regarding selecting Order Type and viewing the resulting order or quote.
To perform a price/availability check with the customer providing a coupon number and asking for a specific promotion, and then add it to an order (Selected items region not displayed):
Note: In the promotions window, only "ASK FOR" promotions display. Ask for promotions can be either Manual or Automatic. Automatic Ask For promotions, are automatically applied to the promotion when you choose from the Promotions Lov. For Manual Promotions, you must first choose that promotion in the promotions Lov. Once this is done, then the promotion will appear in the Manual Adjustments Lov and you manually apply it.
-
Navigate to the Pricing and Availability window.
-
Enter your item information, then tab out of the Item field. Choose your item from the List of Values.
-
Enter a customer account number (if known) or search for customer by name using the List of Values or use Find Customer.
-
Choose the More tab. Enter the coupon number and promotion number, or optionally search for the promotion or coupon using the List of Values. If you have more than one promotion or coupon, click More Promotions to access the Promotions/Coupons window.
Pricing and Availability Window displaying the region to Enter Additional Promotional/Coupon information window.
-
Click Price and Availability.
-
Select the Price Adjustments tab and click Add Adjustment. The List of Values displays the available manual adjustments. Choose a manual adjustment. The manual adjustment is applied and the unit selling price is updated to reflect the adjustment.
-
Click Add To Order. See above note regarding selecting Order Type and viewing the resulting order or quote.
To perform a price/availability check for multiple items, and then add them in a group to an order:
-
Navigate to the Pricing and Availability window.
-
Enter your item information, then tab out of the Item field. Choose your item from the List of Values.
-
Enter a customer account number (if known) or search for customer by name using the List of Values or use Find Customer.
-
Click Price and Availability, and then click Add To Selections. The item is added to the current selection region along with the related items. The data displayed includes the quantity, unit selling price, extended price.
-
Begin a new Pricing and Availability search as in the steps above, then click Price and Availability.
-
The customer wants both items, click Add To Order. See above note regarding selecting Order Type and viewing the resulting order or quote.
To perform a price/availability check for multiple items with related items, and then add them in a group to an order:
-
Navigate to the Pricing and Availability window.
-
Enter your item information, then tab out of the Item field. Choose your item from the List of Values. If there are related items, the item turns a different color and a message is displayed in the Hint region.
-
Enter a customer account number (if known) or search for customer by name using the List of Values or use Find Customer.
-
Click Price and Availability.
-
Select the Related Items tab in the results section to view Related Items. If the customer wants a related item, select the check box on the lines displaying the pertinent related item.
Note: If the selected items results in “Add” (Cross-sell) then the item will be added to the current selection as mentioned below If the selected item results in a replace then a message results giving you the option to initiate a new pricing/availability inquiry for the replace item. If you select Yes then the results are re-displayed for the replace item. If you select No then the replace item is selected in the related items tab.
-
Click Add To Selections. The item is added to the current selection region along with the items selected in related items. If a replace item is selected then only the replace item is added and not the original item.
-
Start a new Pricing and Availability by entering an item, then tab out of the field. Select the item and enter the quantity and UOM.
Note: The Pricing and Availability window calls the pricing engine in the Batch mode. If you define a Custom Phase and associate it with an event that is placed in sales order then that phase has also to be associated with the BATCH event to get the modifier in the Pricing and Availability window. If you define Custom Phases or end dates, in some phases in other events then do the same for the BATCH event.
-
Click Price and Availability. Click Add To Order.
Note: If the order type was already defaulted or entered before the pricing and availability query, then a message is displayed saying ‘Order xxxxx has been created. Do you want to open the order?' The order is created with both the items and with related items. If the order type was not previously available, you are asked to choose an order type, and then you receive the same message as above. If you want to open the order, you are transferred to the Quick Sales Orders window with that order displayed. If you enter No, you remain in the Price and Availability window to enter another query.
To perform Pricing and Availability checking:
-
Navigate to the Pricing and Availability window.
Pricing and Availability Window
-
Determine your Pricing and Availability search criteria by entering specific or partial values for required fields within the Search Criteria Region. Required fields are Currency, UOM, Quantity and either item name or item description (Since either the item name or the description can be entered to check price and availability neither field is displayed with the mandatory field color).
You must enter a value for all required fields, and you can enter additional optional values to further refine your search criteria within any of the three Search tabs available.
Note: If you clear the form, and then requery for price and availability checking, the current tabs selected in both the Search and Results regions remains active.
Note: For example, if you are currently viewing details within the Pricing tab, click the Clear button or Clear Record icon from the Toolbar, re-enter a new item, and click Price and Availability, the Pricing Tab details still displayed.
Overview of Find Customer Information
The Sales Orders and the Quick Order Entry windows contain an enhanced method of finding customers and addresses. Customers may have multiple accounts, so the account name is the same but the account number is different. When several instances of the same customer exist, locating an address or identifying a customer can be difficult. The same situation is applicable to customer contacts. Contacts are associated with either a customer account or an address. The Find Customer Information window enables these searches.
Finding Customer Information
You can use the Find Customer Information window to locate a customer account, address, or a contact. This search can be initialized from both the Sales Orders and Quick Order Entry windows.
The Find Customer Information window can be started four different ways:
-
Through the new Find Customer icon on the tool bar.
-
By invoking the List of Values from the following fields: Ship To City, Ship To Postal Code, Ship To Address2, Ship To Address4, Ship To Address5, Invoice To City, Invoice To Postal Code, Invoice To Address2, Invoice To Address4, Invoice To Address5, End Customer Address2, End Customer Address4, End Customer Address5, Customer Location Address2, Customer Location Address4, or Customer Location Address5. This allows you to search using different attributes.
-
By entering a partial value and then tabbing out of the above fields.
-
Through the right mouse menu Customer >Find Customer.
On the Quick Order Entry window the Find Customer Information window can be opened in the Addresses window either from the Tools menu, by a right mouse click, or from the Find Customer icon, in addition to the methods mentioned above.
Note: The Find Customer Information window can be invoked in the Quick Order Entry window from the Tools menu when the cursor is in the order header region.
Find Customer Information Window
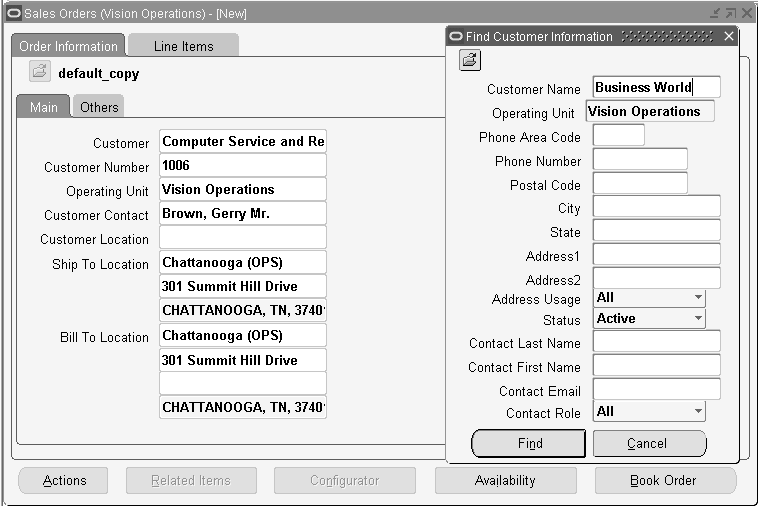
The Operating Unit field is folder enabled in the Find Customer window. The field will default the Operating Unit from the Sales Order window. If there is no default then you can select an Operating Unit accessible to you from the LOV. An Operating Unit is required before you can specify other search criteria.
Phone country code & Phone extension are hidden fields and can be displayed using folder functionality.
The phone number field can be used for looking up a customer. The phone number can be either a customer phone number or a phone number associated with a specific address.
Note: The telephone number will search for a match at the customer or site level only. Searching on partial telephone numbers is not supported.
Advanced Item Search
Order takers need the ability to rapidly identify what product their customers want to order, and to search for items using different methods and parameters. Some of the parameters needed by customers include:
-
Item description
-
Category
-
Catalog information
-
Manufacturer
-
Form, fit, and function
The list of specific parameters will vary by industry. Users need the ability to access electronic catalogs of goods supplied by different manufacturers and order by characteristics that vary frequently. For example, a distributor of CDs, DVDs, or videos may take orders by the Current Chart Position or the catalog number, artist, title, etc. All these methods of searching for the item are available from the Advanced Item Search window, which can be called from the Sales Orders or Quick Sales Orders windows, and once an item is selected, it creates the sales order line.
Note: The Advanced Item Search functionality will not support returns. In case of returns, you will need to identify the item to return. You can identify this item from the sales order or search for the item to return from the Simple Ordered Item Search LOV.
Advanced Item Search Major Features
Advanced Item Search From the Sales Orders Window
You can access the Advanced Item Search from the Sales Orders window. Once the item has been located, you can create an order line with the selected item.
Validation of the Item Sent to the Order Line
Using the Sales Orders window, choose the Actions menu to access the Advanced Search page. Along with entered search criteria as specified in the Advanced Search page, the following restrictions apply while performing the query:
-
Items returned by the query must be customer order enabled.
-
Items must be enabled in the inventory organization passed by Order Management. Order Management passes the item validation organization of the operating unit which is associated with the responsibility of the person entering the order. This ensures that the selected items will be valid when returned to the sales order.
Note: It is not the item status that is considered during order entry. The flag Customer Order Enabled controls if an item can be entered through sales order pad and the flag Internal Order Enabled controls if an item can be ordered internally. Item status controls values of the 8 "status" attributes (stockable, transactable, purchasable, customer order enabled etc.). See the Oracle Inventory User's Guide, Item Setup.
Select Multiple Items From a Single Search
More than one item may be selected, and they are sent back to the Sales Orders window. The default quantity added to the order line will be 1.
Advanced Item Search Process Flow
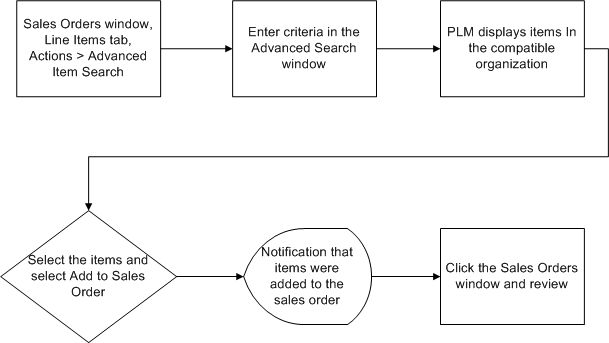
User Procedures
The new Advanced Item Search is available from the Quick Sales Orders window, and Sales Orders window.
To access Advanced Item Search from the Sales Orders or Quick Sales Orders window:
-
Navigate to the Sales Orders or Quick Sales Orders window.
-
Enter the header information and choose the Line Items tab.
-
Choose Actions > Advanced Items Search. Click OK.
Advanced Items Search Page
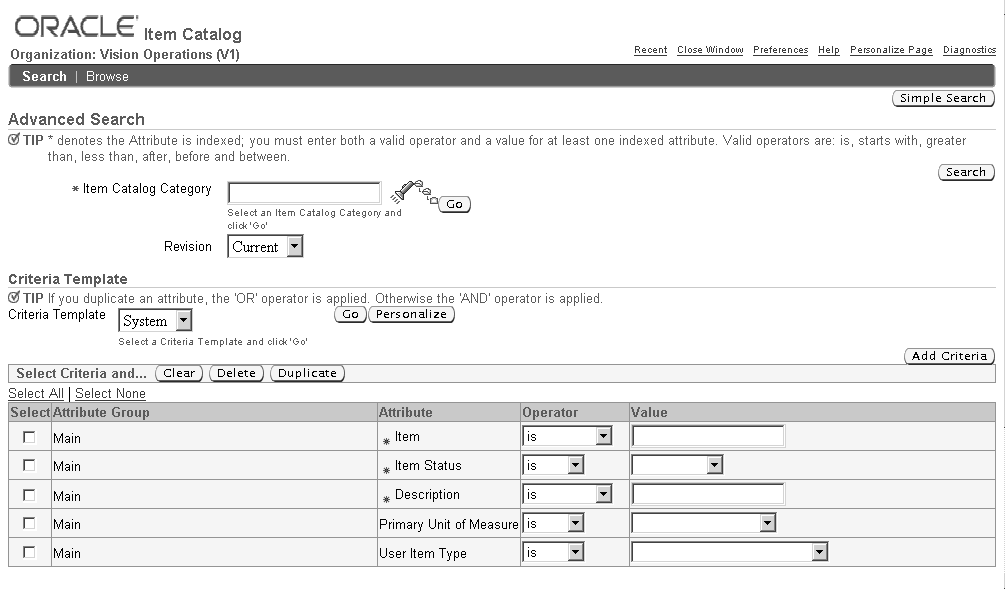
-
Enter your search criteria and click Search. The Advanced Items Search page displays.
-
Select the item(s) for the sales order and click Go. Optionally click the Item link to display the item details. After selecting the appropriate items, they are added to the sales order.
-
The Sales Orders window displays asking if the items are to be added. Click OK to create the new line items. If you click CANCEL all the item selection will be lost and no lines will be added to the sales order.
Note: If you click OK or CANCEL in the Sales Orders window's Message window before completing item selection in the Advanced Item Search window, the synchronized Advanced Item Search session will be automatically inactivated and an error message displays in the Advanced item search window after you complete the item selection and click Go.
Note: If any of the lines fail validation, a messages displays in the Processing Messages window. If you click Cancel the item selection is discarded. If the window of a previously synchronized session is used without closing it, after the items are added to Sales Orders window, an error message displays.
Message Name: ONT_AIS_ADD_LINES (Note)
Message Text: Please select items in the Advance Item Search page. Items selected in the Advance Item Search page will be added to the sales order. Do you want to continue?
Message Name: ONT_AIS_NO_ITEM_SELECTED (Note)
Message Text: No items were selected in the Advanced Item Search page.
Message Name: ONT_AIS_ QUICKSALES_LINES (Note)
Message Text: Please specify the header information and navigate to the line region to use this feature.
Message Name: ONT_ADVITEMSRCH_CONFIRM (Note)
Message Text: Confirmation message for the Advanced Item Search and Sales Orders window Synchronization.
Message Name: ONT_ADVITEMSEARCH_SELECTED (Note)
Message Text: Please close this Advanced Item Search page and go to the Sales Orders window to synchronize your item selection.
Message Name: ONT_ADVITEMSRCH_ERROR (Error)
Message Text: Error message for the Advanced Item Search and Sales Orders window Synchronization.
Message Name: ONT_ADVITEMSRCH_USEDSESSION (Error)
Message Text: This Advanced Item Search session has already been synchronized with the Sales Orders window. To make any new items selection please close the Advanced Item Search page and start a new Advanced Item Search operation from the Sales Orders window or use other Advanced Item Search page that is still not synchronized with the Sales Orders window.