Integration with other Applications
Publishing Plan Results to Order Management Overview
Advanced Supply Chain Planning (ASCP) can make planning recommendations based on the latest supply / demand picture. With ASCP, these recommendations can be published to Order Management, automatically updating the sales order line(s).
These scheduling attributes can be updated by ASCP:
-
Scheduled arrival date
-
Scheduled ship date
-
Warehouse, if the line is not firmed
-
Delivery lead time
-
Ship method
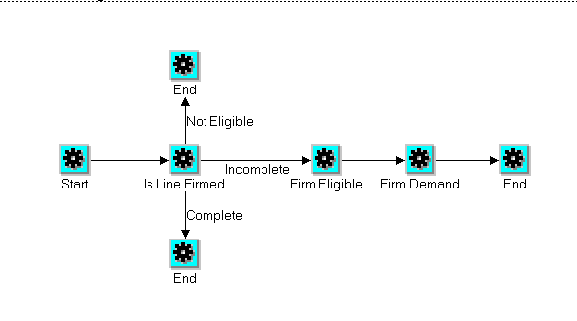
Order Management provides the following three ways to firm a line. Once the line is firmed, the warehouse cannot be changed by planning output.
-
Based on the event
-
Through workflow block
-
Firm using the Sales Orders window
Based on the Event
Order Management provides a scheduling parameter for this requirement. A value set containing Schedule, Shipping Interfaced, and None is in this parameter. Based on the requirement, a customer can select the appropriate value for this parameter. The values are:
Schedule: Lines will be firmed once they are scheduled. APS will not be able to make updates to the warehouse after the line is scheduled.
Shipping Interfaced: APS is not allowed to update the warehouse once lines are interfaced to shipping. Lines are firmed one they are interfaced to shipping.
None/Null: APS is not allowed to update the warehouse on the line until it is shipped, closed, fulfilled, or cancelled.
Through the Workflow Block
The purpose of the Wait to Firm - Line process is to hold lines, until they are progressed. During the progress, lines are firmed. A customer can customize their line flow and place this sub process anywhere in the flow based on their need. Lines reaching this sub process will wait till they are progressed by user/system. You can manually progress the lines to continue their process. When the line is progressed, the system will firm the lines and progress to next activity/process. You can also schedule a concurrent program, Progress from Firm Process, to progress the lines.
Wait to Firm - Line
Firm using the Sales Orders Window
-
The Firm check box is located on the Sales Orders window, Shipping tab.
-
You can manually firm/unfirm the lines, based on your requirements.
-
You can not update the Firm check box on closed, shipped, cancelled, or fulfilled lines.
Notification
Automatic notifications are sent when a planner changes the dates on the scheduled lines. Using manual notification functionality on the Sales Orders window, Actions > Notifications, you can send manual notifications
Progress from Firm Process Concurrent Program
Order Management provides a concurrent program to progress the lines that are waiting at this sub process. You can schedule this program periodically to progress lines that are waiting at this sub process.
Override ATP
-
APS can update the overridden lines, if they are not firmed.
-
When APS updates the overridden line with new dates, Order Management will un-override the line.
-
Order Management will allow APS to update the overridden lines, irrespective of the authorization profile value.
-
Sets -If one of the lines in a set is firmed, Order Management will not allow APS to update the warehouse on any of the lines in that set.
-
APS will call Order Management to update sets only when all the items in the set are planned items.
-
Ship Sets - If a line being processed is part of ship set, then APS will pass the complete set to Order Management to update the scheduling attributes.
-
Arrival Sets - If a line being processed is part of an arrival set, then APS will pass the complete arrival set to Order Management to update the scheduling attributes.
-
ATO Models - APS will pass the ATO model alone to Order Management when the configuration line does not exist. Order Management has to query the whole ATO model and cascade the changes.
-
APS will pass only the configuration line to Order Management when the configuration exists for an ATO model. Order Management has to cascade the changes to whole of ATO model and process them.
-
The Firm flag will be cascaded across the whole model, including the configuration item. When new lines are added to the firmed ATO model, the firm flag will be defaulted to new lines.
-
Updates occur only if all the lines in the ATO model are planned items.
-
PTO Models and Kits - Ship Model Complete (SMC) models and SMC kits are not supported.
-
Options and included items in non-SMC models and kits are supported.
User Procedures
To firm the eligible line using the Sales Orders window:
-
Navigate to the Sales Orders window.
-
Enter a line to schedule.
-
Go to the Shipping tab and check the Firm check box.
-
Save your work.
Note: If you try to firm a non-eligible line for example a return or service external line, you will receive an error message that the line cannot be firmed.
To un-firm the firmed line using the Sales Orders window:
-
Navigate to the Sales Orders window.
-
Enter a line to schedule.
-
Go to the Shipping tab and check the Firm check box to firm the line.
-
Save the changes.
-
Uncheck the Firm check box. The line is un-firmed.
If you are using a seeded subprocess, Wait to Firm Line, in workflow, you can progress the line from that status in one of two ways:
Manually from the Sales Orders window, select Actions > Progress Order.
Run the concurrent program, Progress from Firm Process.
Note: You cannot unfirm a shipped, canceled, closed, or fulfilled line.
Defining Sales Order Main and Other Header Information
Defining Sales Order Line Item Main Information
Defining Sales Order Line Shipping Information
Defining Sales Order Line Addresses Information
Defining Sales Order Line Return Information
Defining Sales Order Line Services Information
Defining Sales Order Line Project Manufacturing Information
Defining Sales Order Line Release Management Information
Global Order Promising for ATO Configurations
ATO Models are now enabled with global availability so that entering a source organization is not mandatory.
Multiple Sources
Global Order Promising (GOP) currently does not automatically select a warehouse based on sourcing rules for an ATO model as it does for standard items. The warehouse must be specified for the ATO Model before scheduling it. This is done so that CTO can provide the mandatory components for ATP based on the specific Bills of Material (BOM) in that organization.
This new functionality will enable you to order an ATO model without specifying a warehouse, regardless of whether the system uses ODS or PDS. In addition, if there is a match for the configured item and if using Planning Data Store (PDS), the system will use the match at the time of scheduling. The new Match functionality is not provided for Operational Data Store (ODS).
Note: The Global Forecasting enhancement is a prerequisite.
Global Order Promising for ATO Configurations Major Features
Net Existing Inventory of Configured Assemblies
With a fully licensed version of planning and PDS, ASCP and GOP can recognize and net existing supply for configured parts that has a BOM that is equivalent to the model and options being ordered. The Match functionality is based on the configured item. Configured items are created as before, either manually or by using a concurrent program.
When scheduling an order for a model and options, GOP matches for existing configurations inventory prior to the ATP call. If a match is found, the promised availability considers the matched configuration supply in addition to building the model and options. Once the configuration is linked to the sales order line, ATP promises availability based on the configuration instead of the model and options (if the date for the configuration is better than that for the model and options).
Formerly, if users were using predefined configurations, they could not promise an accurate delivery to their customers. Now they can check to see if there is any on hand or on order for a match that is not consumed by other orders before checking the availability of making a new item. ATP considers existing reservations in this process.
Note: The Match functionality is available with PDS, but not with ODS.
Allow Multiple Sources for an ATO Model, GOP Determines the Best Source During Scheduling
For both PDS (Planning Data Store) and ODS (Operation Data Store), GOP can determine the best source (customer specific) for an ATO Model based on internal and external capacity in Oracle ASCP. GOP can determine the best source if the warehouse is not specified.
Splitting of the ATO Model, Beyond Configuration Creation
The seeded constraint for not allowing an ATO model split once the configuration is created has been changed to enable this, since CTO can create a configuration item before booking.
Allow the Change of Warehouse on a Scheduled ATO Model
The seeded constraint to restrict the change of warehouse on an ATO model has been converted from a seeded constraint to non-seeded constraint.
Allow an Unscheduling Operation on an ATO Model, beyond the Configuration Creation
The constraint for not allowing the unscheduling of an ATO model once the configuration item is created, is no longer mandatory.
If an Availability check is made on the ATO Model, Order Management will display only the ATO Model and not its child lines. Child line details can be seen by navigating to ATP Details window.
Similarly, if the ATO Model is part of a set, all the lines from that set except ATO child lines are displayed.
Enable Configuration Actions Before Booking the Order
Once the GOP for ATO Model is installed, you can link the configuration item after scheduling, making following actions available once the ATO model is scheduled:
Push Group Changes for Models
Push group logic will be implemented for the ATO Models once GOP for the ATO Model is implemented. If the ATO Model is added to an existing set, the system sends the complete ATO Model to ATP for the set date. If the scheduling succeeds, the ATO Model is placed into the set. If not, based on the push group date value, the complete set is pushed for the next available date or fails the request to add the ATO Model to the set.
If a new option is added to the ATO Model, that is already in the set, it re-schedules the complete ATO model for the set date and based on the results, will either push the complete set for the new date or fail the addition based on the push group profile value.
User Procedures
Note: Note: Set the profile option for BOM: Match Existing Configurations to Yes if you are using PDS. Without setting this profile, there will be no difference in functionality between ODS and PDS.
PDS or Planning Data Store: Represents all the information within Oracle ASCP which encompasses those in the ODS and other output tables from planning. PDS based ATP implies ATP based on planning output.
ODS or Operation Data Store: Represents all the information that acts as destination for the collected data from each of the data sources (both Oracle Applications or legacy systems). This acts as the input for the snapshot portion of the planning process. ODS based ATP implies ATP based on collected data.
To perform availability using multiple sources for ATO Models:
-
Navigate to the Sales Orders window.
-
Create a sales order.
-
Configure an ATO Model without a warehouse.
-
Make sure the sourcing rules have been specified in APS.
-
Check the availability for the ATO Model.
-
The system will provide the availability details from multiple sources, either before or after there is a configured item. If using PDS and if the item is ATPable, the Availability picture will take into account any existing matches.
To provide a warehouse for an ATO Model based on the sourcing rules:
-
Navigate to the Sales Orders window.
-
Create a sales order.
-
Configure an ATO Model without a warehouse.
-
Make sure the sourcing rules have been specified in APS.
-
Schedule an ATO Model, either with or without the configured item.
-
The warehouse is derived based on the planned output and sourcing rules.
Inbound Purchase Order Changes
The inbound purchase order change transaction is an electronic data interchange transaction supported by Order Management and Oracle e-Commerce Gateway.
Validation
Oracle e-Commerce Gateway reads a transaction interface data file from the translator and writes the data into Order Management's Open Interface tables for processing by the Order Import program. Order Import validates the data and populates the Order Management tables with validated data. The validation is based on the same business rules applied to the data as if entered interactively and then imported into the system.
The following flows are followed to process a change request in Order Management:
-
Receive the change requests data from Oracle e-Commerce Gateway into the Order Import interface tables
-
Manually in the Order Import Corrections window, review the changes and set the change request as ready to be processed if appropriate
-
Run Order Import to process the change request
-
The change request will either get processed successfully or fail with errors
-
If failed, resolve the excepting manually and run Order Import again until all the exceptions are resolved
-
If all errors cannot be resolved for some reason, mark the change request as rejected
-
A purchase order change acknowledgement will be created if the required conditions are meet
-
Change request will be purged from the Order Import tables after a successful import
Change Sequence
You can control the sequence of processing of multiple changes to a line such as, if you have multiple Oracle e-Commerce Gateway headers changing one order line. You control the sequence of processing the Oracle e-Commerce Gateway lines by specifying values in a column called CHANGE_SEQUENCE. These lines will be processed in the ascending value of the change sequence numbers.
Once a change is applied, Oracle e-Commerce Gateway updates the sequence number in the base tables against the appropriate order and line number. Any future Oracle e-Commerce Gateway processing compares incoming change sequence numbers against this sequence number to determine the process. The change sequence number in the base tables indicates the last change sequence number that was applied to an order or line.
Similarly, the change sequence number in the base order line table indicates the last change sequence number that was applied to that line of an order.
Different lines may have different change sequence numbers since a change sequence may or may not apply to all the lines of an order. But the change sequence number at the order header level will always be the latest change sequence that was applied to an order or any of its lines. At any point in time, the change sequence at any line of an order cannot be greater than the change sequence at the order header.
If an error is encountered while processing changes for any of the lines in a change sequence, the entire change sequence will not process. Either all the changes under a change sequence are processed or none.
The change sequence numbers must be ascending. You can force processing of out of sequence change request by setting OE_HEADERS_ INTERFACE.FORCE_APPLY_FLAG to Yes. The default value is No.
For example, if the base order header table has a change sequence number of 5, the last change sequence that was applied to the order was 5. The following table describes how different actions are performed for obtaining different change sequences:
| Change Sequence Number | Force Apply Flag |
Ready FLag |
Action by Oracle e-Commerce Gateway |
|---|---|---|---|
| 4 | N | Y | Error. The change sequence number 4 is less than the change sequence number in the master table 5. |
| 6 | N | Y | Processes |
| 8 | N | Y | Error. Waits for transaction with the change sequence number 7. |
| 8 | Y | Y | Processes since Force Apply Flag is set to Yes. |
For header level changes, a full order cancellation can be performed. You can set the CANCELLED _FLAG to Y in the order headers interface table to cancel the entire order.
For ship-to location changes, you can provide the new ship-to-location code in SHIP_TO_ORG_ID column in the order headers interface table to be applied to an existing order. This defaults the value for any new shipment. You can change this attribute for all outstanding shipments of that order. In the Sales Orders window, if you change this attribute at the header level, all outstanding line shipments will not change automatically.
Line/Shipment Level Changes
Order Management supports a two-level data where the shipments of a line are treated as a separate lines with the same line number, but a different shipment number. All the operations completed at the line level are completed at the shipment level.
-
Adding a new line--New lines can be added to an existing order. Set the OPERATION_CODE at the line level to Insert.
-
Deleting an existing line--Existing lines can be deleted from an existing order. Set the OPERATION_CODE at the line level to Delete.
-
Cancelling an existing line--An existing line in an order can be cancelled by placing zero quantity in each of the shipment records.
-
Item change--An item on a line can also be changed if the order is not booked.
-
Ship-To location code change--A ship to location code can be changed at the line level of an order by providing the new code in SHIP_TO_ORG_ID column.
-
Quantity change--The quantity ordered can also be changed at the line level by providing a new value in the ORDERED_QUANTITY column.
Change Acknowledgements
Order Management maintains a different set of tables for acknowledgement data. After a change request is processed, the acknowledgement data is written to the acknowledgement tables.
The following table describes Inbound Order Header level Acknowledgement Codes, associated definitions, and whether or not the Acknowledgement Code enables the Change Request functionality in Oracle Purchasing for a order header linked to a purchase order.
| X12 CODE |
DEFINITION | Determine in PO Change Request Process |
|---|---|---|
| AC | ACKNOWLEDGE - WITH DETAIL AND CHANGES | NO |
| AD | ACKNOWLEDGE - WITH DETAIL, NO CHANGES | NO |
| AE | ACKNOWLEDGE - WITH EXCEPTION DETAIL ONLY | NO |
| AH | ACKNOWLEDGE - HOLD STATUS | NO |
| AK | ACKNOWLEDGE - DETAIL OR CHANGE | NO |
| AP | ACKNOWLEDGE - PRODUCT REPLENISHMENT | NO |
| AT | ACCEPTED | YES |
| NA | NO ACKNOWLEDGEMENT NEEDED | NO |
| RD | REJECT WITH DETAIL | YES |
| RF | REJECT WITH EXCEPTION DETAIL ONLY | NO |
| RJ | REJECT, NO DETAIL | YES |
| RO | REJECTED WITH COUNTER OFFER | NO |
| ZZ | MUTUALLY DEFINED | NO |
The following table describes Order Line level Acknowledgement Codes, associated definitions, and whether or not the Acknowledgement Code enables the Change Request functionality in Oracle Purchasing for sales order lines linked to a purchase order.
| X12 CODE |
DEFINITION | Determine in PO Change Request Process |
|---|---|---|
| AC | ITEM ACCEPTED AND SHIPPED | NO |
| AR | ITEM ACCEPTED AND RELEASED FOR SHIPMENT | NO |
| BP | ITEM ACCEPTED - PARTIAL SHIPMENT, BALANCE | |
| DR | ITEM ACCEPTED - DATE RESCHEDULED | YES |
| IA | ITEM ACCEPTED | YES |
| IB | ITEM BACKORDERED | YES |
| IC | ITEM ACCEPTED, CHANGES MADE (IF THERE ARE MORE THAN ONE CHANGE | YES |
| ID | ITEM DELETED | YES |
| IP | ITEM ACCEPTED, PRICE CHANGED | YES |
| IQ | ITEM ACCEPTED, QUANTITY CHANGED | YES |
| IR | ITEM REJECTED | YES |
| IS | ITEM ACCEPTED, SUBSTITUTION MADE | YES |
| SP | ITEM ACCPETED, SCHEDULE SHIP DATE PENDING (Oracle Order Management Schedule Ship Date.) | YES |
Purge Change Requests
Once a request is processed successfully, the request is deleted from the Order Import tables. However, if there is an error, you need to resolve the exception then revalidate the transaction or you can delete the request if the error cannot be resolved for any reason. Otherwise, the request remains in the Order Import tables indefinitely.
Inbound PO Change Data Elements
The REJECT_FLAG in the lines interface table specifies any reject lines. If a line is rejected, it will also be acknowledged and then deleted from the Order Import tables.
Change Request Status
Order Import interprets the statuses in the table in the business needs section the following way:
-
Pending--The READY_FLAG is set to N in the headers interface table and the change request is not ready to be processed. Once the review process is completed, the READY_FLAG can be set to Y using the Order Import Corrections window and the change request will be processed.
-
Deleted--The order or order line is deleted from the interface tables using the Order Import Corrections window.
-
Rejected--The change request is not processed and no data will be updated. But However, an acknowledgement is necessary and the REJECT_FLAG is set to Yes using the Order Import Corrections window.
Change Request Type Codes
The CHANGE_REQUEST_CODE in the order header and lines interface tables specifies the type of the request. These are reference only codes and are retained in the Order Management tables. These codes assists you in determining the type of change.
Customer and Supplier Items/Parts
Order Management cross references between your customer and supplier part numbers. The customer part number takes priority over the supplier item number when both numbers are provided.
Customer Line Number
The CUSTOMER_LINE_NUMBER column in the order lines base table specifies the line number in the customer's purchasing system. This is a display only field and no processing will be based on this attribute. You can enter and update the customer line number on-line. The customer line number is copied to new line records if you split the shipments.
Customer Shipment Number
The CUSTOMER_SHIPMENT_NUMBER column specifies the order lines base tables to specify shipment number in your customer's purchasing application. This is a display only field and no processing is based on the attribute. You can enter and update the customer shipment number on-line. If you split the shipment, the customer shipment number will be copied to the new shipment record.
Operations Code
You can set the OE_ HEADERS_INTERFACE.OPERATION_CODE to Update or Delete if you are trying to update or delete an order respectively.
Original System Data
Header Level:
You can identify which order is the change request for by providing the same value in ORIG_SYS_DOCUMENT_REF and ORDER_SOURCE_ID columns in the Order Import tables as in the same column in the base order header table. This is often the customer's purchase order number. If an existing order does not have any value in this column, you will not be able to process change requests against that order.
Line/Schedule Level
You can identify which line is the change request coming against by providing the same value in ORIG_SYS_LINE_REF, ORDER_SOURCE_ID, and ORIG_SYS_DOCUMENT_REF columns in the interface tables as exists in the same column in the base order lines table. This is often the customer's purchase order line number concatenated with the shipment number or current customer request date. A complex ORIG_SYS_LINE_REF may be the concatenation of the customer line number + current request date + ship to address ID.
If an existing line does not have any value in this column, you will not be able to process change requests against that order.
Order Source ID
You can set the ORDER_SOURCE_ID to 6 in the Order Import tables. ORDER_SOURCE_ID 6 is the code for the Order Source, EDI.
Payment Term
The CUSTOMER_PAYMENT_TERM_ID column contains the payment term derived by data in the transaction. If this is different from the one derived by Order Management, a warning is displayed. You can change the payment term in the Sales Orders window.
Price
The CUSTOMER_ITEM_NET_PRICE column in the order lines table contains the price sent by the customer. If this price is different from the price calculated by the system, Order Management provides you with a warning. You can then change the price using the Sales Orders window.
Outbound Purchase Order Acknowledgements
The outbound Purchase Order Acknowledge process generates data that is used to notify your customers of the latest status of their orders. This includes following information from Order Management:
-
Acceptance or rejection of the entire order
-
Acceptance or rejection of the each line items
-
Shipment level detail about quantities, request, and promise dates
These acknowledgements reflect the status given to the original purchase order, purchase order changes due to your customer's purchase order change request, or your changes. You may need to change shipment quantities or change shipment dates. All purchase order acknowledgements must contain adequate data to allow your customers' process to match the acknowledgement data from Order Management back to the purchase order in their purchasing application.
Three processes are involved in processing and extracting all purchase order acknowledgements from Order Management.
-
Process a new or changed order through Order Management using standard procedures.
-
Write PO acknowledgements and PO Change acknowledgements data to Acknowledgement tables. This is done automatically based on logic for new and change order in the Order Management. Only customers who are Trading Partners and enabled for the transactions in the Oracle e-Commerce Gateway have acknowledgement data written to these tables.
-
Extract PO acknowledgements and PO Change acknowledgements data from the Acknowledgement tables. This is done by the Oracle e-Commerce Gateway.
-
Update the Order Management base table with ACK_CODE and ACK_DATE.
Original Purchase Order Acknowledgements
After the new order has been created, booked and scheduled dates are determined, the PO acknowledgement records are flagged that this is the first time that the order is acknowledged. Erroneous new orders that have been marked as rejected are also flagged for the original PO acknowledgement. The original purchase order acknowledgement data with the flag is written to the acknowledgement tables.
Purchase Order Change Acknowledgements
The purchase order change acknowledgement data is written to the acknowledgement tables:
-
When the entire order is impacted, such as an order cancellation through Order Import or Sales Orders window
-
After an order is created or all changes have been applied, the order is booked, and the schedule ship date is available for all the lines of the order
-
When any of the attributes such as the quantity, price, schedule ship date or location are changed on any of the lines of an order
Change Request Types
Order Management accepts the following types of change requests that will initiate a purchase order acknowledgement:
-
Header level-- PO number, PO date, change sequence, bill-to location, ship-to location (at the header level only)
-
Cancelled purchase orders
-
Line and shipment levels--Customer line number, item (supplier), customer item, quantity ordered, unit of measure, unit price, ship-to location, request date (customer), and promise date (supplier)
-
Cancelled and add line items
Sales Orders Window
The Sales Orders window is used to create new sales orders and change existing orders. If you entered or changed a sales order which is not acknowledged, such as, all the lines are not booked or the scheduled dates are not entered, the Process Order API is to create or update the sales order in the OM base tables, which In turn will call Acknowledgement Process to call acknowledgement. As all the lines are not Booked and Scheduled no acknowledgement records will be created in Acknowledgement tables at all.
Acknowledgement Process
The acknowledgement process determines whether Oracle e-Commerce Gateway is installed and if the Trading Partner sold to site is enabled for the acknowledgement transaction. If the Trading Partner is enabled for the specific transaction, the acknowledgement process verifies if the conditions for the acknowledgement are satisfied such as, if an order is booked or a schedule date is set up.
Note: The Trading Partner site for the acknowledgement is the site identified as the SOLD_TO customer. Add SOLD_TO code for the SITE_USE_CODE lookup type for the receivables setup (quick code). Add SOLD_TO usage for the customer and set one primary usage for it.
Rejected Orders in the Order Import
Rejected changes are included in the acknowledgement process. The acknowledgement API picks up all rejected records from the Order Import interface tables.
When Acknowledgement Process is called from Order Import, all the records of the set are rejected such as, all records of the headers and lines have a REJECT_FLAG set to Yes. You must reject all the data since the data cannot be corrected. The acknowledgement process creates acknowledgements for all rejected data for the set. A verification for the data change is performed, if the acknowledgement is called from the Process Order API.
Note: The Process Order API calls the acknowledgement process which finds the required data and sends all the data simultaneously.
If the enabled condition is satisfied, then a new order can be entered using the Sales Orders window. The OE_Acknowledgement_PUB API will not create any records in the acknowledgement table until the order has a status of Booked. Unless all the lines of header are Booked and have Schedule Ship Date data, data will not be created in the acknowledgement tables. If the new orders are entered using the Sales Orders window, the API will be called and records will be created in acknowledgement tables.
You can correct the Lines Forever record or mark the record as Rejected by using the Order Import Corrections window.
The following table displays combinations of possible conditions, status flags and what updates are made to the action table in respect to the acknowledgement:
| Condition | ERROR_FLAG | REJECT_FLAG | Acknowledgement |
|---|---|---|---|
| 1 | Yes | No | No record created. |
| 2 | No | No | Record created. |
| 3 | Yes | Yes | Record created. |
| 4 | No | Yes | Record created. |
Only those lines satisfying Condition 2 are used to call Process Order API in order to create records in the base order table. Once Process Order API successfully creates the records, the OE_Acknowledgement_PUB API acknowledges all lines that can be corrected and query interface tables to find records with REJECT_FLAG set to Yes to acknowledge the lines that cannot be corrected as rejected lines.
If the changes are entered in the Sales Orders window, the Process Order API writes records to the acknowledgement tables. When you save the order, choose the Acknowledge button in the Sales Orders window and Order Management checks for when the Oracle e-Commerce Gateway Enabled Trading Partner, booking and schedule ship date will be performed. Save the new or updated order.
The following table provides several example conditions within the Order Import Interface table, and the associated database updates to both Order Management base tables and Acknowledgement tables based upon the condition.
| Order Import Interface Table Condition | Base Table | Acknowledgement Table |
|---|---|---|
| O1 - Order changes can be corrected. | O1 | O1 |
| O2 - Order changes cannot be corrected. | No record created. | No record created. |
| O3 - Bad Order (cannot be corrected) | No record created. | O3 - Lines cannot be corrected and are acknowledged. |
| O4 - Three lines that can be corrected and two lines that cannot be corrected. | O4- Three lines that can be corrected. | O4 - Acknowledgement of three lines that can be corrected and two lines that cannot be corrected. |
Outbound PO Acknowledgement Data Elements
Acknowledgement data such as first acknowledgement and last acknowledgement date, and acknowledgement codes are recorded in the Sales Orders master table. Acknowledgement indicators exists at the header and line levels only.
The following table describes Outbound Order Line level Acknowledgement Codes, associated definitions, and whether or not the Acknowledgement Code enables the Change Request functionality in Oracle Purchasing for a order header linked to a purchase order.
| X12 Code | Definition | Determine in Po Change Request Process |
|---|---|---|
| DR | Item Accepted - Date Rescheduled | Yes |
| IA | Item Accepted | Yes |
| IB | Item Backordered | Yes |
| IC | Item Accepted, Changes Made (If there are more than 1 change) | Yes |
| ID | Item Deleted | Yes |
| IQ | Item Accepted, Quantity Changed | Yes |
| IR | Item Rejected | Yes |
| IS | Item Accepted, Substitution Made | Yes |
| SP | Item Accepted, Schedule Ship Date Pending (Oracle Order Management Schedule Ship Date) | - |
Line Item Status
Order Management maintains a Line Item Status code to return in the Purchase Order Change Acknowledgement transactions. The following code indicates the status of the Purchase Order Change Request after the request is applied to the sales order.
Header Level Acknowledgement Code
The process retains a Purchase Order Change Request Status code at the header level in order to return it in the Purchase Order Change Acknowledgement transaction.
The following table describes Outbound Order Header level Acknowledgement Codes, associated definitions, and whether or not the Acknowledgement Code enables the Change Request functionality in Oracle Purchasing for a order header linked to a purchase order.
| X12 Code | Definition | Determine in Po Change Request Process |
|---|---|---|
| AC | Acknowledge - with Details and Changes | No |
| AD | Acknowledge - with Detail, No Change | No |
| AE | Acknowledge - with Exception Detail Only | No |
| AH | Acknowledge - Hold Status | No |
| AK | Acknowledge - Detail or Change | No |
| AP | Acknowledge - Product Replenishment | No |
| AT | Accepted | Yes |
| NA | No Acknowledgement needed | No |
| RD | Reject with Detail | Yes |
| RF | Reject with Exception Detail Only | No |
| RJ | Reject - No Detail | Yes |
| RO | Rejected with Counter Offer | No |
| ZZ | Mutually Defined | No |
Oracle e-Commerce Gateway Transactions
The purchase order and purchase order change acknowledgement process supports data for the following EDI standard transactions. This data can be extracted from Order Management acknowledgement tables and copied to the transaction interface file by the Oracle e-Commerce Gateway.
The following table provides e-Commerce Gateway Transaction Codes, X12 data values, and EDIFACT values for two purchase order transactions.
| Transactions | Direction | e-Commerce Gateway Transaction Code | X12 | EDIFACT |
|---|---|---|---|---|
| Original Purchase Orders Acknowledgement | Outbound | POAO | 855 | ORDRSP |
| Purchase Order Change Acknowledgement | Outbound | POCAO | 865 | ORDRSP |
The first time that orders are acknowledged they are flagged as the original acknowledgement. These original acknowledgements are extracted by the POAO transaction process in the Oracle e-Commerce Gateway.
All subsequent acknowledgements for the given purchase order are flagged for the purchase order change acknowledgement extract for the POCAO transaction.
The translator maps the data to the chosen EDI standard transaction from the data in the Oracle e-Commerce Gateway transaction files. The translator determines which EDI standard transaction to map the data for the given Trading Partner.
The POAO and POCAO processes set the acknowledgement flag so that next POAO and POCAO extract processes do not retrieve the acknowledged order again. Also the order purge process can delete the data. The POAO and POCAO processes update the dates on the order's and order line's master tables to indicate when the acknowledgement is extracted.
For additional details, see:
Oracle e-Commerce Gateway User's Guide
Oracle e-Commerce Gateway Implementation Manual
Vertex Engine-Related Updates
Order Management has been enhanced to better support the tax vendor Vertex through integration with Oracle E-Business Tax. Since E-Business Tax allows legal entity-related tax setup and Order Management requires that all lines in the same order belong to the same legal entity, please make sure your Receivables transaction type, invoice source and non delivery invoice source in the line type refer to the same legal entity as the order type. Also the Receivables tax setup submenu included in Order Management setup menu has changed to not allow setup of tax Codes, Authorities, Sales Tax Rates, Exceptions, Exemptions, Tax Groups, General Ledger Tax Assignments and Tax Reporting Ledger. For more details about tax setup and migration, please refer to Oracle E-Business Tax User Guide and Financials Functional Upgrade document.
Also some of the Order Management windows have additional/renamed fields as a result of the Vertex uptake. Additionally profile options have been changed. These changes to Order Management are described in the sections below:
Order Header: The fields Tax Exempt Number, Tax Handling and Exempt Reason remain the same.
Note: When the profile option EBTAX: Allow Override of Customer Exemptions is set to Yes, you can enter values in the Exemption related fields.
Order Line: The field Tax Code in the Order Line has been renamed to Tax Classification Code. The field Tax Group is no longer used. When the profile option EBTAX: Allow Override of Tax Classification Code is set to Yes, you can enter values in the Tax Classification Code field.

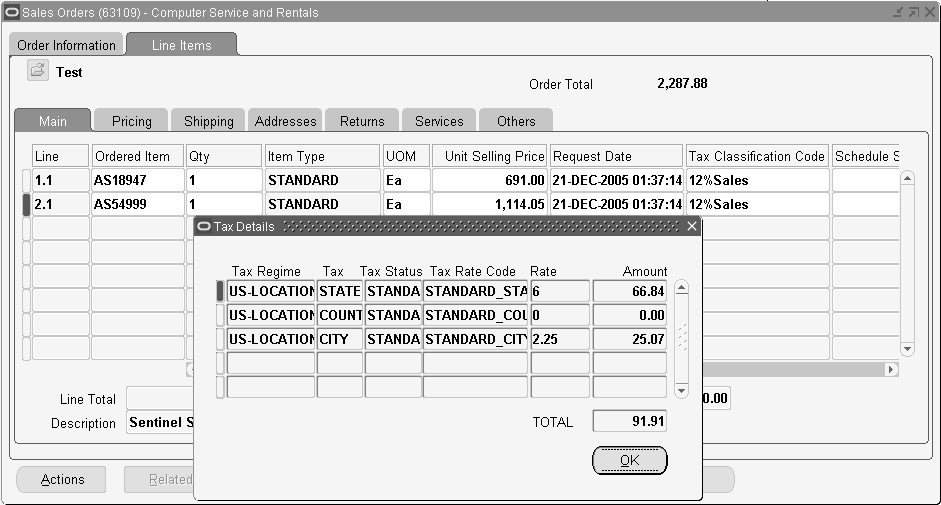
Additionally when you click Actions > View Tax Details, the Tax Details window displays the following fields: Tax Regime, Tax, Tax Status, Tax Rate Code, Rate, Amount. The Order Information Portal shows similar tax-related fields in the Additional Details page.
Tax calculation takes place depending on the tax event (Entered, Booked, Invoiced) specified in the Transaction Type window. Use Actions > Calculate Tax to ensure that the tax calculation is carried out. In case you update information in the sales order line, the tax engine is called again and the tax is recalculated. Also if you change the tax classification code, the tax is recalculated.
International Trade Management
International Trade Management, includes Export Compliance Screening (ECS) which is comprised of Denied Party Screening (DPS), License Determination, and Embargo etc.
Note: This depends on the services supported by the vendors. This can be any number. Each check helps to ensure that exporters are shipping within government regulations.
International trade requires adherence to individual country specific rules, regulations, and duties applicable between countries of trade when processing orders for export. International Trade Management (ITM) utilizes software applications to assist with the facilitation of international trade by providing the latest details surrounding the complex set of rules and guidelines surrounding international trade. Each rule or guideline surrounding international trade ensures that exporters are shipping products in compliance with existing government regulations. By interfacing your order processing routines with ITM vendor software applications, you can:
-
Produce evidence of due diligence when screening shipments for export
-
Halt export shipments for regulation or rule violations
United States exporters are required by the United States government to perform due diligence when exporting products or services. Oracle Order Management, utilizing the features of the Oracle ITM Adapter and integration to third party ITM vendor software applications, provides you with the necessary application tools to perform Export Compliance screening.
See Export Compliance Workbench
Export Compliance Screening
Export Compliance Screening is an optional procedure within an order flow enabling you to determine the eligibility of shipments for adherence to statutory government requirements surrounding the export of products. The United States Bureau of Export Administration and several other countries maintain referenceable Denied Party Listings (DPL) which provide a complete listing of entities that goods cannot be exported to.
Export Compliance screening enables export compliance prior to shipment, alerting users to possible problems that might halt export shipments due to government regulations. Oracle Order Management automatically enables you to manage your export compliance screening compliance strategies through the use of:
-
A workflow subprocess
-
Workflow alerts
-
Generic holds
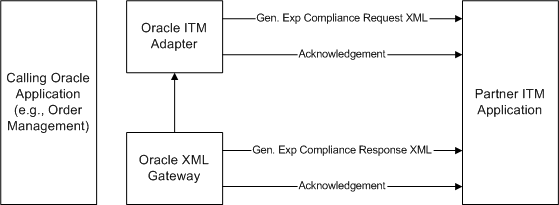
-
An interface to the Oracle ITM Adapter for integration with third party (ITM) software applications. The Oracle ITM Adapter enables you to process (screen) orders by way of XML transactions with third party ITM software vendors to manage your Export Compliance Screening process.
You can:
-
Manually or automatically place an Export Compliance Screening hold for an order line
-
Override or remove an Export Compliance hold
-
Provide Alert notifications for sales order lines that have been placed on hold due to an Export Compliance screening failure
Within Order Management, Export Compliance Screening occurs at the order line level by inserting the Export Compliance Screening subprocess after booking but prior to the Create Supply or Ship Line workflow subprocesses for an order line flow. Export Compliance Screening validates the order line item by shipment location; sales orders are validated against the DPL based upon the Ship From country for each order line.
Prerequisites
-
Verify seeded Order Management ITM line workflows meet your business processes for compliance, or create new line workflows for your ITM screening processing.
-
Create new or update existing Order Management transaction types to enable your ITM order and line workflows.
-
Register users and perform the necessary setup to enable XML communications between the Oracle ITM Adapter and your third party ITM vendor.
See: Oracle Shipping Execution User's Guide, International Trade Management, Setup Process
Generic Export Compliance Major Features
Generic Export Compliance Screening
Generic Export Compliance is generic term applicable for all the export related compliance checks. These include Denied Party Screening, Embargo Country Screening, License Determination, Document Generation etc. The partner ITM application evaluates the transaction for export compliance and responds to Oracle Applications with the overall compliance pass or fail status for each of the order line.
Note: The US Government often updates the Denied Party List, and partner ITM applications may update this information every seven days.
General Flow of Data for Generic Export Compliance
Note: Generic Export Compliance Screening will have two results: Success or Failure. The screening types will depend upon the types supported by the vendor and the setup. The ITM Adapter response will send a result of success or failure. A new hold EXPORT COMPLIANCE HOLD is seeded that is a generic type of hold. This hold is applied on an order line when compliance fails.
Note: Denied party screening done in earlier releases will remain intact.
If the screening type is a denied party and the compliance fails, a Denied Party Hold will be applied on the line and if the generic screening fails, the new Export Compliance Hold will be applied.
Holds
Following holds can defined.
Hold Type: Import/Export Compliance
Hold Defined: Export Compliance Hold
Holds information can be checked from the Additional Line Information Window in the Sales Orders window.
Holds provide security to apply/release by responsibility. Holds can be released from the Sales Orders window for a single line or multiple lines by using multi-select functionality.
Pick Release honors generic holds.
Holds Functionality provides the following Reports:
-
Outstanding Holds Report: Lists outstanding holds, sorted by Customer. Customer, Hold name, and Item can be entered as parameters.
Hold Source Activity Report: Gives the audit-trail of holds. Hold Type from/to, Hold name from/to, Activity date from/to can be entered as parameters.
To resolve the order when it is on Export Compliance Screening hold:
-
Navigate to the Sales Orders window.
-
Enter the order header and line information.
-
Book and schedule the order.
-
Pick Release, and Ship Confirm.
If screening fails a Hold is applied on the line and the block is released, an Alert is sent from Workflow.
-
The hold is reviewed. If it is determined to be a False Positive, the Hold is removed and the line can be Pick Released and Ship Confirmed. If it is determined to be, non-compliant you must decide whether to cancel the line or the order.
Export Compliance Screening Workflow
Export Compliance Screening has been implemented as a sub-process that can be inserted into existing lines workflow.
Export Compliance Screening - Line Level
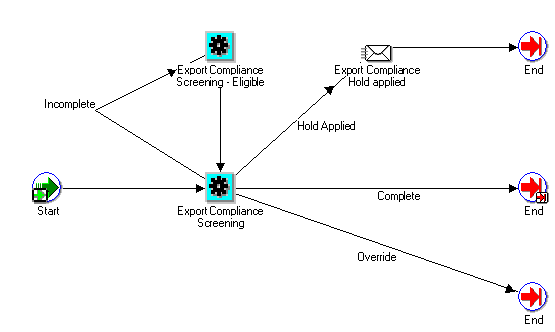
Line Flow - Generic, With Export Compliance Workflow process
The Line Flow - Generic, With Export Compliance line flow is seeded for Oracle Order Management.
Line Flow - Generic, With Export Compliance Workflow
Export Compliance Screening Activity will populate the Generic Adapter Interface Tables and wait for the Export Screening to complete. After the records are processed, they are analyzed. If the screening was successful, then the Export Compliance Screening activity is completed with Complete result.
Once an order with an order type that enables export compliance screening has been Booked and the records received (interfaced) by the Oracle ITM Adapter, Order Management will set the order line status to Awaiting Export Screening, and the workflow is then set to a status of Wait (activity). All records with this status are then processed by the Oracle ITM Adapter and sent electronically to the ITM vendor software application or your choice (determined during your ITM setup). ITM vendor software applications then process the records for compliance.
Once records have been processed for compliance, the results are returned to the Oracle ITM Adapter, which then updates corresponding Oracle Adapter response tables and a call is placed to Order Management to progress order lines past the Wait activity. Order and lines will then continue within their respective line flows, dependent upon the return values from your ITM vendor software application. The return values from your ITM vendor software application are interpreted by the Oracle ITM Adapter, which can return one of the following values to the Export Compliance Screening workflow subprocess:
-
Data Error: Data errors can occur:
-
When Export Compliance data is passed from Order Management to the Oracle ITM Adapter
-
When Export Compliance data is passed from the Oracle ITM Adapter to your ITM vendor
-
If you have submitted data to your ITM vendor for a country that is unsupported by your ITM vendor
-
For errors from your ITM vendor that you have not defined a corresponding definition (within the Oracle Shipping Execution ITM Error Classification window) for interpretation by the Oracle ITM Adapter
-
If there are system/setup errors, the flow is not changed, as the processing did not go through. A report is provided that can be used to view the errors and resubmit the transactions for processing.
Data errors halt Export Compliance screening, and the data error must be corrected before further processing can occur. Order lines will have a status of Data Error - Export Screening, and be waiting at the Export Compliance Screening Eligible workflow activity.
Data errors can be viewed within the Process Messages window, and then you can progress the order and lines by submitting the Export Compliance Screening concurrent program using the Order Management SRS window or by selecting Progress Orders from the Tools menu.
-
-
Success: The order line successfully passed export compliance screening by your ITM vendor software application; the order or line progresses to the next activity within it's respective flows.
-
On-Hold/Failure: The Export Compliance checks performed by your ITM vendor software application determined that the order or line violates the DPL, and Order Management will place an Export Compliance Hold to halt the order line from continuing within its line flow. A notification is sent, and the order lines are halted at the next activity within the line flow.
Export Compliance hold details are viewable from the Additional Line Information Window (Actions button) within the Sales Order or Order Organizer windows. The generic hold will then have to be released (or the order or line cancelled) for the order line to progress further in the flow.
-
If the generic hold placed is determined to be False-Positive Hold (hold should not have been placed by your ITM vendor software application), you can remove the hold and the order line can then continue processing within it's line flow (line can be Pick Released and Ship Confirmed).
-
If the generic hold is determined to be a true Export Compliance hold, you must decide whether to cancel the order or cancel the line.
-
-
Override: This output status from the Oracle ITM Adapter indicates that this record is to be progressed further regardless of any errors your ITM vendor software application sends back to the Oracle ITM Adapter.
You can choose to submit Oracle Shipping Execution Skip Screening concurrent program to progress order lines with a status of Override.
See: Oracle Shipping Execution User's Guide, Setup Steps, Skip Screening concurrent program.
-
System Error: The Oracle ITM Adapter encountered a system error that did not allow records interfaced from Oracle Order Management to be sent or fully processed by your ITM vendor software application. The order line does not progress any further within its line flow. Order and lines will be waiting at the Export Compliance Screening workflow activity.
System errors can be generated as a result of:
-
Your ITM vendor software application site is currently down
-
Network communication problems
You can choose to submit Oracle Shipping Execution Resubmit Errored Requests concurrent program for order lines with system errors.
Error Interpretation rules can be defined that are meant only for a particular vendor. For example: Partner ITM application sends the message ‘Export Compliance function not part of European' as a data error (type = 3, code = 1). E.g: Ireland does not have Export Compliance check and Partner ITM application reports it as a data error. To handle these cases, the Adapter will provide an Error Processing window that you can use to classify the errors. The Response Analyzer window provided by Adapter can be used to specify how an error should be interpreted. E.g: A data error (type = 3, code = 1) can be interpreted as SUCCESS or ERROR.
See: Oracle Shipping Execution User's Guide, Resubmit Errored Requests concurrent program.
-
Manual Screening and Overriding or Completing Export Compliance Screening
If the network, Adapter, trading partner server had some problems and the system is down for an extended period of time, then you can manually screen the lines and progress them. Based on business processes, you can manually screen the lines during Pick Release process.
To progress the flow for many lines and manually screen them later, the Adapter has a concurrent program that can be used to complete the transactions with Override mode. For transactions that are processed in Override' mode, the line flow will be completed with the Override result. This concurrent program can be used to override the records processed with System errors (which is the usual case). This program can also be used to progress unprocessed transactions, if the Adapter itself is down.
For individual lines, if manual screening was successfully completed then you can, with System Administrator responsibility, complete the Export Compliance Screening activity from the workflow status screen. Even though this is not recommended as a general rule, this can be done for exception cases when the complete/override action does not really impact the functional line flow.
Validations Before Export Compliance Processing
Prior to Order Management populating the Oracle Adapter Interface tables for the Oracle ITM Adapter, the following order validation is enforced:
-
The Ship To organization id (ship_to_org_id) or the Ship From organization warehouse must be present.
-
The Party Name for the Ship To cannot be NULL.
Process Messages Window
The Process Messages window can be used to display all messages for an order or line. The navigation to this window is: Orders, Returns > Process Messages. You can query messages using Order Number, Order Type, Customer and other attributes.
Notification Activity within Export Compliance Screening Subprocess
Within the seeded Export Compliance Screening subprocess, the Notification activity is predefined to always send a notification to user SYSADMIN for orders or lines placed on export compliance hold.
If you require the Notification activity to send a notification to another user, you must
-
Customize the Notification Activity within the Export Compliance Screening subprocess (copy and modify)
or
-
Replace the Notification activity within the Export Compliance Screening subprocess (copy and modify) with the Order Management Notification Approver activity. The Order Management Notification Approver workflow activity must also be customized to send a notification to a user other than SYSADMIN.
Export Compliance Workflow Details
Export compliance screening is implemented by utilizing the seeded Order Management Line workflow, Line Flow - Generic, With Export Compliance or by inserting the Export Compliance Screening subprocess within new or existing line workflows.
The export Compliance Screening subprocess should ideally be placed after the Booking activity but prior to the Create Supply subprocess; if you do not have the Create Supply subprocess within your order lines flows, then you must place the Export Compliance Screening subprocess prior to the Ship Line subprocess; you cannot place the subprocess between the picking and shipping activities.
Note: A line level hold placed prior to Booking an order does not stop an order from being Booked. Therefore, if you place the Export Compliance Screening subprocess within an order line flow prior to the Booking activity, the order will still be Booked, irrespective of the outcome of the Export Compliance screening subprocess.
Constraints
Order Management has provided an additional constraint to disable (not allow) user or system splits if an order line has been interfaced to the Oracle ITM Adapter and is awaiting a response from your ITM vendor software application. The constraint is seeded by default, and cannot be disabled or removed by a user.
Additional constraints for an order line have been created to not allow changes to Customer Name, Ship From, Ship To, Sold To, Bill To, and Deliver To values once a line has been interfaced to the Oracle ITM Adapter and is awaiting a response from your ITM vendor software application. These constraints are not seeded by default; they can be disabled or updated.
Order Purge
Orders that have been processed for Export Compliance are required to be on file for review by the United States government for a standard period of time (currently seven years). If you currently use the functionality of Order Purge to remove orders from your system, ensure you do not purge orders that have undergone Export Compliance Screening prior to the required time they must be kept on file.
Note: The Order Purge concurrent program contains no logic to determine if an order line has undergone the Export Compliance screening process; if an order line has undergone Export Compliance Screening, and the input parameters to the Order Purge concurrent program enable the order and lines to be purged, the order and lines will be purged.
Export Compliance Workbench
The Export Compliance Screening Workbench enables you to review all orders and lines that have undergone the Order Management export compliance screening process and perform additional order processing. Within the Export Compliance Screening Workbench, you can:
-
Release orders lines that have been placed on Export Compliance holds.
-
Review additional information surrounding Party and order details.
-
Submit orders lines for reprocessing in case of system errors.
The Export Compliance Screening Workbench window displays order, line, and screening results in three regions, respectively.
Find Window
The Export Compliance Workbench is displayed after clicking Find while the initial Find Screening Results window is displayed.
Find Screening
Choose to limit the data displayed within the workbench by entering or selecting field values for the following fields available within the initial Find window:
-
Operating Unit: This shows you the default Operating Unit. You can pick a different Operating Unit accessible to you from the LOV. You can leave the field blank to search for Export Compliance Results across all Operating Units accessible to you.
-
Order Number (From/To)
-
Screening Date (From/To)
-
Order Type
-
Customer Name
-
Customer Number
Note: The Order Number and Order Type LOVs show data from a single Operating Unit or all Operating Units accessible to you based on whether the Operating Unit field has a value or not.
Once you have your determined and entered your criteria, select Find.
Export Compliance Workbench Window
Orders Region
Order Management displays order details for export compliance eligible orders. The following order information is provided within the Order region:
-
Order Number
-
Customer Number
-
Customer Name
Lines Region
Order Management displays order line details for export compliance eligible order lines. The following information is displayed within the Line region:
-
Line Number
-
Item
-
Item description
Screening Results Region
Order Management displays the screening results for screened export compliance order lines. The following information is displayed within the Screening Results region:
-
Screening Type
-
Entity Type
-
Party Name
-
Country
-
Response Result
-
Vendor
-
Response Date
-
Error Type
-
Error Code
-
Error Message
-
Export Compliance Description
Note: Error messages displayed within field Error Message are error messages returned to the Oracle ITM Adapter from your ITM vendor software application.
Additionally, you can choose to
-
Navigate to the Sales Orders window to view additional order or line details by clicking Details.
-
Resubmit an order line that has System Errors by first selecting the order line (or by selecting multiple order lines use the multi select functionality) and then clicking Retry.
-
Remove export compliance holds by clicking Release Holds and then entering a reason for releasing the hold in the Release holds window.
-
Review additional Export Compliance Matches detail by clicking Denied Party.
The Denied Party Matches window displays additional party details surrounding compliance screening that has occurred.
Denied Party Matches Window
Authoring and Negotiating Contract Terms
Oracle Sales Contracts offers companies a comprehensive solution to negotiate and manage contractual relationships with their customers. Companies can standardize their corporate contract policies and improve internal controls to minimize risk and comply with regulatory requirements. Contract terms and conditions are captured in a central library, providing visibility to all departments to ensure timely execution and compliance.
Oracle Sales Contracts extends Order Management by offering embedded terms & conditions authoring and negotiation capabilities. Contracts functionality is woven into the existing Order Management sales processes.
Oracle Order Management transactions have been enhanced to support the ability to author and negotiate contract terms on Order Management business documents, including:
-
Sales Orders:
-
Release Orders: Sales Orders with a Sales Agreement reference
-
Sales Agreements: Long-term agreement which can be referenced on a sales transaction to leverage volume pricing and terms and conditions
Contract terms authoring and negotiation features include the ability to:
-
Default standard pre-approved language from a Contract Template
-
Change the Contract Template
-
Choose additional pre-approved standard clauses from the contract terms library
-
Create non-standard clauses (either from scratch or from existing language)
-
Compare clause text to compare differences between clause versions
-
Remove clauses
-
Choose alternate clauses
-
Update clause variables to insert text into clause language
-
Validate the contract terms
For additional information on Sales Contracts features, please reference the following sections:
Authoring and Negotiating Contract Terms: reference section “Authoring and Negotiating Contract Terms Major Features”
Negotiating and holding price on a sales agreement: reference section “Pricing of Sales Agreements”
Blanket Sales Agreement approval process: reference section “Approvals”
Previewing and printing a contract: reference section “Preview and Print Sales Documents”
Capturing customer acceptance: reference section, “Customer Acceptance”
Blanket sales agreement lifecycle management: reference section” Sales Agreement Processes”
-
Terminations
-
Receiving notifications prior to BSA expiration
-
Versioning blanket sales agreements
-
Making changes after customer acceptance: reference section, “Modifying a Customer Accepted Blanket Sales Agreement or Sales Order section”
To learn more about setting up the Contract Terms Library, please refer to the Oracle Sales Contracts Implementation and Administration Guide.
Authoring and Negotiating Contract Terms Major Features
Contract terms can be added to a business document by defaulting a Contract Template that contains pre-approved clauses. If no default is provided, a contract template can be manually selected. You can add additional pre-approved clauses to a business document, and edit clauses on a business document. You can also change the current contract template, or delete clauses.
Adding Clauses and Accessing Contract Terms in a Business Document
Contract terms and conditions can be added to a business document by defaulting a Contract Template that contains pre-approved clauses. If no default is selected, a contract template can be selected. You can add additional, pre-approved clauses to a business document, and edit clauses on a business document.
Authoring and Negotiating Contract Terms on a Sales Agreement or Quote/Sales Order
From the Contract Terms window opened from the Sales Agreement or Quote/Sales Order, you can:
-
Apply the default contract template selected
-
Change the Contract Template on a Business Document
-
Remove Contract Terms
-
Manage Sections under which clauses are organized
-
Add and Update Clauses
-
Update variable values on clauses
-
Move Contract Terms
-
Renumber Contract Terms
-
Validate Contract Terms
-
Check for Clause Updates
-
Manage Contract Documents
-
Preview Contract
Selecting a Contract Template
In order to work with sections, clauses, and contract documents in a business document, you must first apply a contract template to the business document. Using the Contract Terms window, you can select and apply the contract template to create the terms and conditions on the Sales Agreement or Quote/Sales Order document.
Once you have opened the Contract Terms window, a prompt asks you to specify a contract terms template, if one has not been defaulted already.
If a Contract Template has been defaulted onto the Sales Agreement or Quote/Sales Order, when you click Contract Terms, it opens the Contract Terms page displaying all of the contract terms that came from the contract template.
When a Contract Template is chosen, the latest version of the clauses are applied to the Sales Agreement or Quote/Sales Order as of the system date.
Validation on the compatibility and applicability of the clauses is performed by a separate clause related quality check during the Submit Draft activity for the Sales Agreement or Quote. The validation occurs during the Book activity for Sales orders.
You can choose a different contract template after making an initial selection. If you have saved the Sales Agreement or Quote/Sales Order with the original contract template selection and subsequently choose a new contract template, all the standard clauses referenced on the Sales Agreement or Quote/Sales Order are removed and you start over from a new template.
If clauses in addition to those that came from the contract template were added to the Sales Agreement or SO, and you change the contract template, those additional clauses will not be deleted; instead they will be moved to an 'unassigned' section where you can then assign them to sections. Clauses from the contract template that were modified are not deleted, and will be moved to an unassigned section.
The system will remove the foreign key reference for that version forward, the version history will have a back up with previous foreign key references provided you saved the original transaction and have the template set to auto generate revision or you manually version the Blanket Sales Agreement or Quote/Sales Order.
Note: The Contract Source and Authoring Party fields, located on the Main tab of the Sales Orders and the Sales Agreements windows are folder enabled. The Contract Source displays Structured Terms (when there is a default template on the sales document) until you change the source or clear the template, then it will change to Attached Document or No Terms. When there is no default template the Contract Source will display No Terms unless you assign a template or set the source to Attached Document using the Contract Terms window, where it will be Structured Term or Attached Document respectively.
The Authoring Party displays 'Internal' when there is a default template, and changes when you change the Authoring Party to Customer using the Contract Terms window. 'None' displays when the terms are removed and there is no attached document. The Contract Template displays the name of the template, and if the contract source is 'Attached Document' the field displays the template. When there is no default template or you remove the terms/template reference then the field is blank.
A default contract template can be set based on the Order Management Transaction Type. Please reference the Order Management Implementation Manual for information on setting the default Contract Template.
A default contract template is available to apply to the business document only if it has been setup in the Contract Terms Library. If the default contract template is not the right template, you can search the Contract Terms Library to change the contract template. To setup a contract template, please reference the Oracle Contracts Implementation and Administration Guide.
Prerequisites
Oracle Contracts must be set up, including clauses and contract templates. For more information, please see Defining Contract Templates section of Oracle Contracts Implementation and Administration Guide.
To apply a contract template:
-
Launch the Contract Terms page from:
BSA - (B) Contract Terms
Quote/Sales Order - Action Contract Terms or Right Mouse click
-
Click the Search for Contract Template icon, to search and select a contract template from the library.
-
Enter your search criteria and click Go. The Results page displays all templates that:
Match the search criteria for Template Name and Description
Are active as of the start date of the contract
Are relevant for the organization in which the contract is authored
-
Select the appropriate template from the list and click Select.
-
In the Contract Terms page, click Apply Template to apply the standard clauses.
Adding contract terms to a Release Order
Quote/Sales Orders with a Sales Agreement reference may also need to add clauses specific to that release. A Quote/Sales Order with a Sales Agreement reference has the flexibility to reference a Contract Template whether by default or manual assignment via the Contract Terms window. Full functionality of the Contract Terms window is available for Release Orders. Clauses are maintained at the header level. BSA references can be at the header and/or line level.
Note: There is no incompatibility check between clauses in the Sales Agreement and clauses on the Release order. The Sales Agreement will remain a reference. To access the Sales Agreement and view its clauses, you can either open the Sales Agreements window from the sales order by choosing Action > View Sales Agreement or by navigating directly to the BSA window.
Contract Terms Page
The Contract Terms page is the page from which you perform most of the operations related to the contract terms, that is, the sections, and clauses in a business document. The Contract Terms page is the page that displays a summary list of the contract terms for a business document.
You reach the Contract Terms page when you choose to author, edit or revise contract terms for your business document.
The Contract Terms page contains the following:
General contract details
Clauses help
General Contract Details
The general details include the following:
Authoring Party
Contract Source
Contract Template
Note: Actions that can be performed at the contract level are represented in the general contract details either as buttons, such as Apply Template, or as explicit entries in an Actions pulldown list.
Authoring Party
This field indicates which party authored the contract terms. It has the following possible values:
-
Internal: Indicates that an internal party authored the contract terms.
-
Customer: Indicates that an external party authored the contract terms.
-
None: Indicates that nobody has authored the contract terms, that is, there are no contract terms on the business document.
Contract Source
This field how the contract terms are represented in the system. It has the following possible values:
-
No Terms: Indicates that no contract terms exist on the business document yet.
-
Structured Terms: Indicates that the structured clauses, as seen on the Clauses tab of the Contract Terms page, represent the clauses of the contract. With this option, you must also select a value for the Contract Template field.
Initially, you specify this by selecting a value in the Contract Template field and clicking Apply Template (see Applying Contract Templates). Subsequently, you can change the contract template through the Update Contract Source action.
-
Attached Document: Indicates that the clauses of the contract appear in an attached document, usually a Microsoft Word document.
Initially, you click Update Contract Source to attach (upload) the document. Subsequently, you can attach either another document or another version of the original document through the Update Contract Source action.
Note: You must have the non-standard authoring privilege to use the Attached Document feature.
Contract Template
This field specifies the contract template that is associated with the business document.
If Contract Source=Structured Terms, you must select a contract template from the approved contract templates in the Contract Terms Library.
If Contract Source=Attached Document, the value of Contract Template may be null, meaning that no structured terms exist.
Contract Template field, this indicates that you had previously specified a Contract Source of Structured Terms for the business document, but subsequently switched to an attached document representation of the terms.
Clauses Tab
The layout of the Clauses tab depends on the value of the Contract Source field.
Clauses Tab (Contract Source=Attached Document)
Note: You must have the non-standard authoring privilege to use the Attached Document feature. See Oracle Contracts Function Security.
When Contract Source=Attached Document, the Clauses tab contains a message indicating that the contract terms are supplied in an attached document, and a link to the attached document.
The number of actions you can perform is limited compared to the actions available in the Clauses tab (Contract Source=Structured Terms.) In particular, the actions related to the editing of sections and clauses are not available, since you will be editing offline in Microsoft Word or some other application.
Clauses Tab (Contract Source=Structured Terms)
When Contract Source=Structured Terms, the main part of the Clauses tab displays the sections and clauses in the business document.
In the Clauses tab, you can perform the following general operations:
-
Expand or collapse the results to display full details or an outline of the sections and clauses.
Note: By default, the contract terms page will always display only the first level of sections and clauses. If you wish to view Clauses within Sections, use the Expand All feature.
-
Focus on one section and the clauses in that section; you can click the Contract Terms link above the search results to return to the display of all sections.
-
Click the Show link for a clause to display clause and instruction text; click Hide to hide the text fields.
The Contract Terms page also displays the following columns:
-
Non-Standard: A check mark in this column indicates that the clause is non-standard. For more information, please see: Create Non-Standard Clauses
-
Mandatory: Clauses that are marked as Mandatory cannot be deleted.
-
Contract Expert: Clauses that have been added as a result of using the Contract Expert feature.
-
Select Alternate: A Plus (+) sign indicates that the clause has alternates. Click the Plus sign, to view and select an alternate clause. Note: If the clause previously had a (+) indicator that is now no longer seen, it maybe because the relationship has been removed in the clauses library.
-
Update: Click the Update icon if you want to make any changes to an clause.
-
Delete: Click the Delete icon if you want to remove an clause. You cannot delete clauses that are marked as Mandatory.
Note: Exception to this rule would be if you are in the contract terms page with the function security of ‘Super User’ assigned to you.
In the Clauses tab (Contract Source=Structured Terms), you perform all the operations dealing with sections and clauses in a business document. The main operations are:
-
Viewing Clauses
-
Adding Sections
-
Adding Standard Clauses
-
Updating Clauses and Creating Non-Standard Clauses
-
Moving Sections and Clauses
-
Renumbering Sections and Clauses
-
Deleting Section and Clauses
Changing Contract Templates
-
When the Contract Source = Structured Terms, and a Contract Template has been defined, you can choose a different template after making an initial choice.
If you change the template on a contract:
-
All standard clauses will be deleted from the contract.
-
All manually added standard and non-standard clauses are retained. However, they are moved to an Unassigned section.
-
Any other changes, such as formatting and layout, are removed.
To change contract templates:
-
From the Contract Terms page, click Change.
-
The system displays the Change Contract Template page. Click the Search for Contract Template icon to search and select a template from the library.
-
Enter your search criteria and click Go.
-
The Results page displays all templates that match your search criteria.
-
Select the appropriate template from the list and click Select.
-
In the Change Contract Template page, click Apply to bring in all the clauses from the template to the contract.
Removing Terms
After applying a Contract Template to a contract, you can choose to remove all the clauses and sections that are in the contract. To use this feature the contract must be in an unapproved status.
To remove terms:
-
Navigate to the Contract Terms page. For BSA, (N) Blanket Sales Agreement (T) Main (B) Contract Terms. For Sales Order, (N) Sales Order (A) Contract Terms.
-
In the Actions field, select the Remove Terms option.
-
Click Go.
-
Click Yes to confirm removal of all the clauses and sections in the contract. Once the terms are removed, the system displays the initial page and the Apply Template button becomes available.
Adding and Deleting Sections
Sections allow Clauses to be grouped together for logical display in the contract. For each section, you can add subsections and group clauses as necessary. You can manually create a section for the contract or select a pre-defined section from the Sections library. To add a section to a contract, select the location for the section. You can select an existing section and choose to add the new section before, after, or within the section. If you choose to add the section within the selected section, it would be treated as a subsection.
You can only update sections that are manually added. Sections that are added from the Sections Library or the Unassigned section (Unassigned is a seeded section) cannot be updated.
For more information, please see the Defining Sections of Oracle Contracts Implementation and Administration guide.
To add a new section:
The steps for adding a new section manually or for adding a new section from the Sections Library are:
-
Create a new BSA or Quote/Sales Order or open an existing one.
-
Launch the Contract Terms page. From BSA (N) Blanket Sales Agreement (T) Main (B) Contract Terms. For Sales Order, (N) Sales Order (A) Contract Terms.
-
Select an existing section and click Add Section. If no sections exist on the Contract Terms Page, select the Contract Terms node and click Add Section. The system displays the Add Section page.
-
In the Location field select the appropriate location for the new section.
-
In the Create field, select one of the following options:
-
From Library: Select this option if you want to select a section from the Sections library. In the Title field, enter the title for the section. You can also use the Search for the Title icon to search for the title and select it in the Search and Select Title page.
-
New: Select the New option if you want to add a section manually. Enter the Title and Description for the new section.
-
-
Click Apply.
Deleting a Section
If you delete a section, all clauses and subsections within that section are deleted. A section with mandatory clauses in it, cannot be deleted.
To delete a section:
-
Create a new BSA or Quote/Sales Order or open an existing one. Launch the Contract Terms page. From BSA (N) Blanket Sales Agreement (T) Main (B) Contract Terms. For Sales Order, (N) Sales Order (A) Contract Terms.
-
Click the Delete icon for the section you want to remove.
-
In the Delete Section page, click Yes.
Adding and Updating Clauses
As part of creating contract terms, you can:
-
Add Standard Clauses
-
Update Clauses
-
Delete Clauses
-
Create Non-Standard Clauses
-
Select Alternate Clauses
Adding Standard Clauses
You can add one or more standard clauses at a time to a business document. Standard clauses are clauses that have been approved, but do not have to belong to any contract template. You may have placed standard clauses into one or more folders.
The general procedure of adding standard clauses to a business document is as follows:
-
First, you must decide where to place the standard clause or clauses in the business document.
-
Then, you must find the standard clauses either by using search criteria, or by browsing folders.
-
Finally, you must select the standard clause or clauses that you want to add.
Note: This procedure describes the addition of standard clauses into a business document. You can also create new non-standard clauses in a business document.
Prerequisites
You must be in the Contract Terms page for your business document.
Select the place among the contract terms in the business document where you want to add the clause or clauses. You can select either a section, a subsection, or another clause.
Click Add Clause.
Clauses can be added in two ways:
Search and add clauses
Browse and add clauses
To search and add clauses:
-
Create a new BSA or Quote/Sales Order or open an existing one.
-
Launch the Contract Terms page. From BSA (N) Blanket Sales Agreement (T) Main (B) Contract Terms. For Sales Order, (N) Sales Order (A) Contract Terms.
-
To add a standard clause, select the location where it needs to be added to the contract.
-
Click Add Clause. The system displays the Add Clause page.
-
You can search for a clause using the following search criteria:
-
Clause Keyword
-
Clause Number
-
Clause Type
-
Clause Title
-
Default Section
-
Include Future Dated Clauses: Select if you want to search for clauses that are effective as of a future date.
-
-
Click Go to view the search results. The Results section displays all clauses that are active as of the start date of the contract.
-
Optionally, you can click the Show link for any clause to review the clause text and instruction text.
-
Select the clause or clauses that you want to add.
-
Click Apply.
To browse and add clauses:
In the process of deciding which clauses to add to a business document, you can browse folders to see the clauses in the folders.
Prerequisites
You must have started the process of adding standard clauses to a business document, and then clicked Browse.
The system displays a list of folders to select the clauses from.
-
Create a new BSA or Quote/Sales Order or open an existing one.
-
Launch the Contract Terms page. From BSA (N) Blanket Sales Agreement (T) Main (B) Contract Terms. For Sales Order, (N) Sales Order (A) Contract Terms.
-
To add a standard clause, select the location where it needs to be added to the contract.
-
Click Add Clause. The system displays the Add Clause page.
-
Instead of using the Search option, click Browse to search for clauses by Clause folders. For more information, please see the Defining Clause Folders section of Oracle Contracts Implementation and Administration Guide.
-
To view all clauses assigned to a particular folder, select the folder.
-
Optionally, you can click the Show link for any clause to review the clause text and instruction text.
-
Optionally, select the clause or clauses that you want to add to the business document, and click Apply. The Contract Terms page appears, displaying the clauses that you added.
To update clauses:
From the Contract Terms page, you can update clause details in a business document. To update a clause on a business document, start with either of the following procedures:
View the clause first, by clicking the Title link for the clause, then click Update.
Note: If the Protect Text check box is set for the clause, you cannot update the clause.
Click the Update icon for the clause.
-
Create a new BSA or Quote/Sales Order or open an existing one. Launch the Contract Terms page. From BSA (N) Blanket Sales Agreement (T) Main (B) Contract Terms. For Sales Order, (N) Sales Order (A) Contract Terms.
-
Click Update to open the Update Clause Page.
-
In the Update Clause page make the necessary changes to the clause. You cannot change the clause type or any of the attributes such as ‘Mandatory’, ‘Protect Text’, etc.,
-
Optionally you can add variables to the clause.
If you have added variables to the clause, you can perform the following operations for each added variable:
a. Click the Value flashlight icon, and select a value for the variable.
b. To insert the variable into the text, click the place in the text where you want the variable to be added, then click the Insert icon in the Clause Variables section for the variable to be added.
-
Click Save or Apply.
To delete clauses:
-
Open a BSA or Quote/Sales Order and launch the Contract Terms page. From BSA (N) Blanket Sales Agreement (T) Main (B) Contract Terms. For Sales Order, (N) Sales Order (A) Contract Terms.
-
Click the delete icon for the clause to delete. The system displays the Delete Clause page.
-
Click Yes to confirm the action.
Note: Clauses marked as Mandatory cannot be deleted.
Creating Non-Standard Clauses
There are two ways to create a non-standard clause. You can:
-
Create a new non-standard clause
-
Create a non-standard clause from any standard clause
You can leverage the rich text editor functionally to format clause text using features such as bold, italics, bullets, underline, etc.
Prerequisites
You must be in the Contract Terms page of your business document. Select the place among the contract terms in the business document where you want to place the new non-standard clause to be added.
To create a new non-standard clause:
-
Open a BSA or Quote/Sales Order and launch the Contract Terms page. From BSA (N) Blanket Sales Agreement (T) Main (B) Contract Terms. For Sales Order, (N) Sales Order (A) Contract Terms.
-
Select the section, subsection, or another clause.
-
Click Add Clause. The system displays the Add Clause page.
-
Click Create Non-Standard Clause. The system displays the Create Non-Standard Clause page with the Non-Standard check box selected..
-
Enter the following parameters:
-
Clause Title (Required)
-
Display Name (Optional)
-
Type (Required)
-
Description (Optional)
-
Clause Text (Required)
-
-
Optionally, you can add variables to the clause.
If you have added variables to the clause, you can perform the following operations for each added variable:
Click the flashlight icon, and select a value for the variable.
To insert the variable into the text, click the place in the text where you want the variable to be added, then click the Insert icon in the Clause Variables section for the variable to be added.
-
Click Save or Apply.
Creating a Non-Standard Clause from any Standard Clause:
From the Contract Terms page, you can create a non-standard clause from a standard clause in a business document, starting with either of the following procedures:
View the clause first, by clicking the Title link for the clause, then click Update.
Note: If the Protect Text check box is set for the clause, you cannot update the clause.
Click the Update icon for the clause.
To compare standard and non-standard clauses:
You can compare the text of two clauses when you have created a non-standard clause in a business document from a standard clause, and you want to compare the non-standard clause with the original standard clause.
-
Click the Title link for the non-standard clause to open the View Clause page.
-
Click Compare to Standard Clause. The system displays the Compare Clauses page. The inserted texts are marked with an Underline line, and deleted texts are marked with a Strike-through line.
Note: Changes to embedded variable values within clause text are not compared on a business document. Variable tags are compared, not variable values.
To move contract terms:
Clauses are organized in groups of sections and subsections. To reorganize the order which sections and clauses appear on the printed contract, you can move contract terms (sections and clauses) within a BSA or Quote/Sales Order.
-
Open a BSA or Quote/Sales Order. From BSA (N) Blanket Sales Agreement (T) Main (B) Contract Terms. For Sales Order, (N) Sales Order (A) Contract Terms.
-
In the Contract Terms page, select the clause or section to move.
-
Use the Destination Location field to specify the insert location by selecting one of following options:
-
Before Selection
-
After Selection
-
Within Selection
-
-
Select the appropriate radio button as the destination for the clause or section.
-
Click Apply.
-
Renumber the contract terms. To achieve proper numbering, you need to manually renumber the contract terms. See Renumbering Contract Terms
Renumbering Contract Terms
After making any changes, such as moving or deleting sections and clause, you need to manually renumber the contract terms. Numbering schemes are defined in the Contract Terms Library. For more information please see the Defining Numbering Schemes section of Oracle Contracts Implementation and Administration Guide.
To renumber contract terms:
-
Open a BSA or Quote/Sales Order. From BSA (N) Blanket Sales Agreement (T) Main (B) Contract Terms. For Sales Order, (N) Sales Order (A) Contract Terms.
-
Click Renumber to open the Renumber page.
-
In the Pick Numbering Scheme filed, select a scheme from drop down list.
-
Preview the numbering scheme before applying the changes to the contract terms.
-
Click Apply to save.
Resolve Alternate Clauses
Some clauses in the business document may have alternate clauses that you can choose from.
Clauses that have alternates are highlighted with a link to indicate that alternates are available.
You can navigate to the view that lists the base clause and its alternates, make a choice, and return to the main view. Now the view is refreshed with the selected 'alternate' clause.
Check For Clause Updates
Use the Check for Clause Updates function to view the list of clauses that have newer versions in the library, and then select the applicable ones to apply to the contract terms. This feature checks for latest updates for only those clauses that are currently in the contract.
To check for clause updates and apply the latest version of a clause:
-
Open a BSA or Quote/Sales Order. From BSA (N) Blanket Sales Agreement (T) Main (B) Contract Terms. For Sales Order, (N) Sales Order (A) Contract Terms.
-
In the Actions field, select the Check for Clause Updates option.
-
Click Go to open the Check for Clause Updates page. This page includes the following fields:
-
Clause: Clause Name
-
Section: The location of clause in the document
-
Current Version: The clause version used in the document
-
Latest Version: The latest version available
-
Compare Text: Click the icon to open the clause text and review differences between the current and library versions.
-
-
Select the clauses to update and click Apply.
Clause Variable Resolution
Users can enter or update values for user-defined variables using this feature. Users may enter a value for a variable using the Global feature that will update all the clauses using that variable. To enter or update a variable value globally, enter a value in the column Global Value for a variable in the table below. Users can also update the value of a variable on specific clauses. Entering or updating a single clause instance affects only that clause. You can use the Override Global Value check box to protect the variable value from future global updates
There are two ways to resolve variable values:
Automatically - system variable values are automatically populated from values populated in other BSA or Quote/Sales Order fields. Resolution of these values occurs when the contract is previewed and printed.
Manually - user defined values require user input. Users can enter or update values for user-defined variables using this feature.
Users may enter a value for a variable using the Global feature that will update all the clauses using that variable. To enter or update a variable value globally, enter a value in the column Global Value for a variable in the table below. Users can also update the value of a variable on specific clauses. Entering or updating a single clause instance affects only that clause. You can use the Override Global Value check box to protect the variable value from future global updates
To update variable values:
Click Update Variable Values.
In the Update Variable Values page, you can perform one or more of the following operations for each variable:
Select the variable. The clauses that contain the selected variable appear in the Clauses section in the lower part of the page.
Click the Global Value flashlight icon to set a global value for the variable.
For each clause that uses that variable, click the Value flashlight icon to set a specific value for the variable in that clause.
To ensure that a specific value for a variable in a clause overrides any global value for that variable, select the Override Global Value check box for the clause.
Click Save or Apply.
Validating Contract Terms
As part of the quality assurance process for a sales contract, you can validate contract terms.
To validate contract terms only, you can launch the Validation process at any time during the contract terms authoring process.
The system also validates contract terms automatically when a sales contract is submitted for approval.
-
The terms and conditions associated with a Blanket Sales Agreement or Quote/Sales Order document will be validated to ensure that:
-
Each clause is compatible with other clauses associated to the business document
-
All sourced variables are populated based on the source data element values
-
Once a standard clause is modified and becomes a non-standard clause, it will not be included in the incompatibility check.
Note: For Order Management transactions (BSA, Quote/SO), if there are multiple messages, you can see all at one time through Actions > View Messages which opens the Processing Messages window. For single messages, the message will appear on the transaction (BSA, Quote/SO) window.
About Microsoft Word Integration
While Oracle Contracts provides authoring capabilities for contract terms and conditions, it is common practice to use an external word processor, such as Microsoft Word, to author complex contracts. Oracle Contracts enables users to use Microsoft Word for extensive offline text editing, and for sending the contract terms for review, negotiation and approval.
The terms and conditions can be supplied to a business document in either of the following ways, as defined by the values of the Contract Source field of the business document:
Structured Terms
The contract terms are represented by the structured terms defined in the Oracle Contracts application.
Attached Document
The contract terms exist in a Microsoft Word document which is attached to the business document; the attached document is categorized as the primary contract document for the business document. An attached document is typically in Microsoft Word format, but may be in any format.
Note: You must have the non-standard authoring privilege to use the Attached Document feature. See Oracle Contracts Function Security.
The content of attached documents is not verified or validated by Oracle Contracts.
The Structured Terms option provides you with the ability to enter sections, clauses, and contract templates as you author the contract, and to control the contract text all the way to contract approval, using Oracle Contracts features. An important feature, available while the Contract Source is Structured Terms, is the ability for you to generate a Microsoft Word document from the structured terms, and to download this external document to your desktop.
The Attached Document option provides the convenience of being able to use offline documents, from authoring and editing the contract through to contract approval. In some organizations, contract terms are provided solely in offline documents; these documents can now used within the contract life cycle as maintained by Oracle Contracts.
Maintaining or Altering the Contract Source
For many business documents, you will maintain the same Contract Source for the entire contract life cycle, as in the following cases:
For business documents which are always associated with a contract template and whose terms and conditions are always represented by Structured Terms, this means that you can use all the Oracle Contracts features and facilities throughout the contract life cycle.
With the Attached Document feature, you can provide the terms and conditions in a Microsoft Word document or another type of document, as is the policy in some organizations. This document that contains the contract terms is attached to the business document as the Primary Contract Document.
Note: It is not necessary to always have the same file as the Primary Contract Document throughout the contract life cycle, so long as the currently-attached file provides the most recent version of the terms and conditions.
For a business document, you may switch the Contract Source as follows:
From Structured Terms to Attached Document
From Attached Document to Structured Terms
Switching Contract Source from Structured Terms to Attached Document
When you start off with your contract terms represented by structured terms, there are two general situations where you may want to switch the Contract Source of the contract terms to Attached Document:
You make the decision that you prefer the convenience of working with offline documents.
Your reviewers and approvers prefer to work with offline documents, and feed extensively modified contract terms back to you in offline documents. You then incorporate these offline documents directly into the contract life cycle as the main contract term documents.
Note: You must have the non-standard authoring privilege to use the Attached Document feature. See Oracle Contracts Function Security.
The content of attached documents is not verified or validated by Oracle Contracts.
Overview
The main stages involved in switching from structured terms to an attached document are as follows:
-
If you have Contract Source=Structured Terms, you can generate and download a Microsoft Word document from the structured terms.
-
After you have generated and downloaded a Microsoft Word document to your desktop, you can edit the document externally, and save it to a location accessible from your desktop.
-
Switch the Contract Source of the business document to Attached Document, and upload the edited file from where you saved it.
The document is attached as a contract document with Document Category=Contract, and is marked as the Primary Contract Document.
Note: If reviewers and approvers provide you directly with an offline document containing all the contract terms, which you wish to make the primary contract document, you do not have to go through the first two stages.
If your contract terms were previously represented by structured terms, the switch keeps the contract template association with the business document, but effectively masks all the sections and clauses that were available before the Contract Source switch, whether they originated from the contract template, or were added in subsequently.
All of these sections and clauses can be reactivated in the business document if you switch the Contract Source back to Structured Terms and use the same contract template as before.
Scenario Starting With Structured Terms
In this case, you start off with the terms and conditions provided by a contract template, sections, and clauses in Oracle Contracts.
-
Start with the Contract Source of the business document as Structured Terms.
-
Add in and edit sections and clauses as appropriate.
-
Generate a Microsoft Word document of the structured terms.
-
Edit the Microsoft Word document offline.
-
Possibly send out copies of the Microsoft Word document for review.
-
You can "inform" Oracle Contracts of the editing changes in the Microsoft Word document in either of the following ways:
If the amount of offline editing is not extensive, maintain the Contract Source of the business document as Structured Terms, and repeat the external editing changes in the sections and clauses of the Oracle Contracts structured terms.
Useful Tip: In this case, use the Manage Contract Documents page to attach the Microsoft Word document as a supporting document. This way, you have a record of the original document on which the structured updates were based.
If the amount of offline editing is extensive, switch the Contract Source of the business document from Structured Terms to Attached Document, and attach the Microsoft Word document as the Primary Contract Document.
Generating and Attaching Microsoft Word Documents
When you start off with a contract template and structured contract terms and conditions, the standard set of steps for creating, editing, and attaching Microsoft Word documents is as follows:
Generating Microsoft Word Documents of Structured Terms
Editing Offline Microsoft Word Documents
Uploading Offline Documents
Generating Microsoft Word Documents of Structured Terms
From the Contract Terms page, you can generate a Microsoft Word document of the structured terms.
Prerequisite:
You must be in the Contract Terms page for your business document. The Contract Source of the business document must be Structured Terms.
To generate Microsoft Word documents of Structured Terms
-
Select the Generate Word Document action, and click Go.
This downloads a document containing the sections, clauses, and variable values of the business document to your desktop.
Note: If your business document contains deliverables, the deliverables are not exported unless they are included as a variable inside a clause.
-
The downloaded document is a .rtf (Rich Text Format) file, which you can view and edit in Microsoft Word.
Depending on how your Web browser is set up to handle .rtf files, a number of options are possible when you download the document. For example, a File Download dialog box may appear, where you can choose to Open or Save the file. Another option is that the downloaded document may automatically open, ready for editing.
-
For details of editing, see Editing Offline Microsoft Word Documents.
Editing Offline Microsoft Word Documents
This stage is performed entirely within Microsoft Word. The menu options described in this section are based on Microsoft Word 2000. Newer releases of Microsoft Word may use different names.
When you download a Microsoft Word document, the following Microsoft Word document properties are set in the downloaded file:
| Property | Value | Equivalent Menu Options |
|---|---|---|
| Track Revisions | On | Tools > Track Changes > Highlight Changes > Track changes while editing (checked) |
| Show Revisions | On | Tools > Track Changes > Highlight Changes… > Highlight changes on screen (checked) |
| Print Revisions | On | Tools > Track Changes Highlight Changes… > Highlight changes in printed document (checked) |
| Document Protection Tracked Changes | Tools > Protect Document… > Tracked changes |
Notes
-
If you wish to remove the tracked changes from your Microsoft Word document, then, after editing, you must unprotect your document (use the Microsoft Word menu option Tools > Unprotect Document), then accept or reject the changes.
-
When you save the external Microsoft Word document, be sure to save it to a folder always accessible from your desktop, that is, not to a temporary folder.
-
In order for your changes to be updated in the Oracle Contracts system, you must upload the offline document.
Uploading Offline Documents
You upload an offline document when you update the Contract Source of the business document to Attached Document, and specify the name of the attached file.
Note: Although typically you will be uploading documents created by word processors such as Microsoft Word, you can upload any type of document.
Prerequisite:
You must be in the Contract Terms page for your business document.
You must have the non-standard authoring privilege to use the Attached Document feature. See Oracle Contracts Function Security.
To upload offline documents
-
Select Update Contract Source for the Action, and click Go.
-
In the Contract Source field, select Attached Document. The File and Description fields appear. You must provide a value for both fields.
-
Click Browse, and select a file from your desktop.
-
Enter a mandatory Description for the file.
-
Click Apply.
Oracle Contracts uploads the new file, and verifies that it does not overwrite any existing file.
When the file has been successfuly uploaded, a message appears with a link to the file that you have attached.
The file has been uploaded to the Oracle Contracts system. If you click the link to view the file, and decide to edit the file, remember to subsequently save it to a folder that is accessible from your desktop, and later to upload it back to the system.
The uploaded file has been attached to your business document, with a Document Category of Contract, and has been designated at the Primary Contract Document. You can see this if you decide to manage the contract documents.
You can also manually set a document to be the Primary Contract Document for your business document. See Adding or Updating Contract Documents from Your Desktop.
Switching Contract Source from Attached Document to Structured Terms
If, at some point in the past, the Contract Source for the business document was Structured Terms, you can switch back to representing your contract terms as structured terms.
When you switch the Contract Source for the business document back from Attached Document to Structured Terms, there are two situations:
If you do not select a new contract template - that is, you do not select any value in the New Contract Template field - all the previous structured terms that were in the business document are reactivated.
If you select a value in the New Contract Template field, whether it is the same as the last contract template or a completely new one, this applies the latest version of the selected contract template from the Library.
If the Contract Source for the business document has never previously been Structured Terms, then you must select a contract template as part of the switch.
In all cases, the category of the attached document will change from Contract to Supporting Document, or the document will be deleted. The system will warn you in advance of the outcome, and allow you to cancel your switch operation.
Note: After the switch, the only active terms and conditions for the business document are those provided by the structured terms.
Using Contract Expert to Add Clauses to Business Documents
The following applies when the Contract Source of a business document is Structured Terms.
Prerequisite
You can only use Contract Expert on a business document if the contract template of the business document is Contract Expert enabled. Also, the value of the profile option OKC: Use Contract Expert must be Yes.
Overview
During authoring, when you use Contract Expert on a business document, you invoke one or more rules associated with the contract template.
During the Contract Expert session, the rules are continously evaluated, and typically clauses are selected to be added to the business document. However, the clauses are not added immediately to the business document as a result of each individual rule evaluation, they are "held in reserve". This is because these reserved clauses can be subject to further conditions in the Contract Expert session. When these further conditions are evaluated and processed, this can result in extra clauses being added to the reserved list of clauses.
When you exit the Contract Expert session, all the reserved clauses are either added to the business document or discarded.
Rule Conditions
The types of conditions that appear in rules are as follows:
Question
You answer one or more questions. Your answers determine if and which clauses are to be reserved for subsequent addition to the business document.
Rules may include dependent questions, that is, questions that are only presented depending on the answer to a previous question.
Clause
A Clause condition checks for the existence or absence of particular clauses among the clauses reserved by Contract Expert rule evaluation, and reserves further clauses as a result.
System Variable
Oracle Contracts automatically reserves one or more clauses depending on the value of a system variable.
A Contract Expert session typically consists of two stages, both of which have a corresponding page:
Questions stage - you start Contract Expert and answer the questions set up in the rules.
View Clauses stage - you view the clauses to be added into the business document as a result of your answers and the other rule conditions.
Select one of the following:
Starting Contract Expert and Answering Questions
Viewing Clauses to be Added by Contract Expert
Starting Contract Expert and Answering Questions
Prerequisites
You must be in the Contract Terms page for your business document.
The contract template for your business document must be Contract Expert enabled.
The profile option OKC: Use Contract Expert must be set to Yes.
To start Contract Expert and answer questions
-
Click Use Contract Expert.
Note: If Contract Expert has already been run on a business document, and the profile option OKC: Use Contract Expert is then set to No, the Use Contract Expert button is not available. You must change the profile option to Yes to be able to run Contract Expert again on the business document.
-
The Questions page appears. If there are no questions on the page, you can go to the second stage of the Contract Expert session, to view the clauses to be added to the business document.
-
Answer the questions, either by selecting or entering values. Before you submit the business document for approval, you must answer all the mandatory questions. You can do this in one or more Contract Expert sessions; note that for each session the profile option OKC: Use Contract Expert must be set to Yes. For more information on answering Contract Expert questions, see Contract Expert Question Notes.
-
After you have answered questions in the Questions page, you can perform one of the following operations:
a. Click Cancel. If you confirm this, you exit the Contract Expert session and expert will not bring in any clauses into the document.
b. Click Save Responses. This establishes a save point for your questions. In future Contract Expert sessions, or even later in the same Contract Expert session, you can either answer further questions or change your existing answers.
c. Click Continue. This moves you to the second stage of the Contract Expert session, to see the clauses that will be added to the business document based on the rule conditions.
Contract Expert Question Notes
-
If you want to edit questions that depended on others, you must edit the lowest-level questions first, then work back up the hierarchy as far as you require.
-
You may select a blank answer to a lower-level question to remove it from the list of questions.
-
If you have replaced a Contract Expert added clause in your business document with an alternate clause, and then run Contract Expert again, Contract Expert will not replace the alternate with the original clause.
Viewing Clauses to be Added by Contract Expert
Prerequisites
You must have started a Contract Expert session.
You must have clicked Continue in the Questions page.
See Starting Contract Expert and Answering Questions.
Note: The clauses appear in this page not only because of the questions you have answered, but also because of the existence of other clauses in the business document and the values of system variables.
To view clauses to be added by Contract Expert
-
After viewing the clauses to be added to the business document, you can either go back to the Questions page, that is, continue at step 3, or click Finish to exit the Contract Expert session and add the clauses on the page to the business document.
-
When you finish the Contract Expert session, you return to the Contract Terms page, where the clauses added as a result of the session are available in the default section that was set up in the contract template.
-
You can then perform all the standard operations on these clauses, such as renumbering, moving to other sections, editing, deleting , and so on.
-
After viewing the clauses to be added to the business document, you can perform one of the following operations:
a. Click Cancel. If you confirm this, you exit the Contract Expert session without adding any clauses to the business document.
b. Click Back. You return to the Questions page, and can continue to answer questions. See step 3 of Starting Contract Expert and Answering Questions.
c. Click Finish. You exit the Contract Expert session, and the clauses that appear in this page are added to the business document. You return to the Contract Terms page for your business document, where the clauses added as a result of the session are available in the default section that was set up in the contract template. These clauses are marked as Contract Expert clauses.
You can perform all the standard operations on these clauses, such as renumbering, moving to other sections, editing, deleting , and so on.
For information on setting up Contract Expert, reference the Oracle Contracts Implementation and Administration guide.
To use Clause QA check with a BSA:
The Clause QA check can be run manually from the Contract Terms page (Actions > Validate), or by initiating the Blanket Sales Agreement for internal approval (click Submit Draft from BSA).
To use Clause QA check with a Quote:
-
Navigate to the Quote window.
-
Create a Quote (draft status), including header and lines information and save your work.
-
Apply the Contract Template choose Action > Contract Terms, add a standard clause, and save your work.
-
Requeries the Quote and choose Submit Draft to start the internal approval process.
-
Upon submission of the Quote for internal approval, clause QA check will run to ensure clauses are valid. The Quote receives internal Approval.
-
The Quote is previewed and then printed choose Action > Preview and Print, to present to the customer for acceptance.
-
Navigate Action > Customer Acceptance.
-
Enter Supplier and Customer acceptance details and choose Customer Acceptance which transitions the Quote to a sales order.
To Use the Clause QA check with a sales order:
This is the negotiation flow without approval.
-
Navigate to the Sales Orders window.
-
Creates a sales order (Entered status), including header and lines information and save it.
-
Apply the Contract Template Action > Contract Terms, add a standard clause, and save the changes.
-
Requery the sales order.
-
There is no system defined internal approval process.
-
The sales order is previewed and then printed Action > Preview and Print, to present to the customer for acceptance.
-
If you are satisfied with the sales order data, choose Book the Sales Order.
-
At time of booking, the clause QA check will automatically be run.
To run the validation process:
-
To manually initiate the validation process, open a BSA or Quote/Sales Order. From BSA (N) Blanket Sales Agreement (T) Main (B) Contract Terms. For Sales Order, (N) Sales Order (A) Contract Terms. Then from the Contract Terms page, choose Validate from the Actions drop down menu. To automatically initiate the validation, submit the BSA or Quote/Sales Order for approval and the system will run the validation.
-
The Validation Results page displays the number of errors and warnings, and information related to errors and warnings including:
-
Type
-
Title
-
Section
-
Severity
-
Problem
-
Problem Description
-
Suggestions for fixing the errors or warnings.
-
-
If warnings are present, you may choose to fix the issues or proceed with the approval process. For more information, please see the Validation Errors and Warnings section of Oracle Contracts Implementation and Administration Guide.
Note: This functionality will be integrated with Order Management messages. The messages will be visible from either the Contract Terms window, thet Sales Agreement window, or the Quote/Sales Order.
Managing Contract Documents
Contract documents are files attached to a business document that represent or relate to the business document's contractual terms.
There are three categories of contract documents that can be added to your business document:
Contract
Contract Image
Supporting Document
You can have as many contract documents of each document category attached to the business document as you require.
Contract
The Contract category documents can be added to a business document by the following means:
Automatically, as part of the approval process when enabled in Workflow .
Manually
The Contract category documents that are automatically added are the standard PDF documents which are generated during approval. When you manually add a Contract category document, it does not have to be a PDF document.
Contract Image and Supporting Documents
Documents whose category is Contract Image or Supporting Document can only be attached manually to the business document, which can have any status.
Users can attach contract documents to a business document. The following categories of documents can be attached:
-
Contract
This is a softcopy document (e.g. PDF, MSWord, or other) representing the entire contract, created during authoring of the contract.
This is a scanned image of a hardcopy of the signed contract.
This can be any document such as e-mails, faxes, images and spreadsheets.
While the business document is in draft mode, the user can add, update and delete the attached contract documents. After the business document has been approved and a PDF has been automatically generated, the PDF will be stored and attached as a contract document.
As part of authoring contracts, you can:
-
Add Contract Documents
-
View and Update Contract Documents
| Category | Draft | Approved | Previous Version |
|---|---|---|---|
| Contract | Add, Delete, Update | - | - |
| Contract Image | Add, Delete, Update | Add, Delete | - |
| Supporting Document | Add, Delete, Update | Add, Delete | - |
Add Contract Documents
You can add additional documents from:
-
Your Desktop
Previous Versions or Business Documents
To add contract documents from your desktop:
When you add a contract document from your desktop, you must specify the following:
Description
Category, which is the document category for the contract document.
Document Type, which is either a file name or a web address.
When you update a contract document, and it was originally added from the desktop, you can change the description and the document category.
-
From a BSA or Quote/Sales Order, you can access Contract Documents either by clicking Actions and selecting Contract Documents, or by navigating to the Contract Terms page and selecting Manage Contract Documents from the Actions menu.
-
From the Contract Documents page, in the Actions List of Values click Add from Desktop.
-
Click Go to open the Add Document page.
-
Category field: Select a Category for the new document.
-
Description field: Enter a description for the document.
-
File: Enter the document location and file name. Optionally, click Browse to locate the file.
-
Click Apply to validate and add the document.
To add contract documents from previous versions:
-
From the Contract Terms window, click Manage Contract Documents to open the Contract Documents page.
-
In the Actions List of Values, select Add from previous versions.
-
Click Go. The Add Document From Previous Versions page displays the list of documents.
-
Select the check box for the document to add.
-
Click Select.
Manage (View and Update) Contract Documents
You can limit the documents shown by selecting a particular document category and / or a specific contract version.
You can view all the existing contract documents for a business document
You can add contract documents to a business document using one or both of the following ways:
You can add contract documents from the desktop.
You can add contract documents from previous versions of the business document.
You can update the contract documents already attached to the business document.
You can delete contract documents from the business document.
When working on a business document that has already been approved, you can add new documents or add documents from previous versions.)
Note: When you create a business document by duplicating an existing business document, none of the contract documents associated with the original business document are copied across to the new business document.
Deleting Contract Documents
You can delete contract documents from the business document. This removes the contract document from the business document.
To delete contract documents
-
When processing a particular business document, clickManage Contract Documents. This displays the Manage Contract Documents page, showing all the contract documents attached to the business document.
-
Click the Delete icon to delete the contract document.
-
Click Yes to confirm that you want to remove the contract document from the business document.
Special Considerations in Managing Contract Terms:
Copying Clauses
The system copies the corresponding clauses automatically when any Business Document is copied. If you copy an old version, the system obtains clauses associated with that version. Copied clauses will not run through any validations. A separate QA check will be done when users submit the business document to the system.
Order management must call clauses API to copy the T's&C's from source to destination.
Attachments Are Not Copied From the Source
Attachments will not be carried over to the new agreement. The original agreement could have a signed copy of the document and hence should not be carried over to the new agreement. All standard documents must be manually attached to new agreement again.
Copy can use the standard attachment function used for sales orders to also copy for BSA
.
Tracking Clause Versions in Sales Agreements
Versioning of the Sales Agreement can be triggered manually or automatically. If a Sales Agreement attribute is changed and business rules associated with the Sales Agreement dictate, the system will trigger a new version of the Sales Agreement. For changes made to the terms and conditions on a Sales Agreement, the system will not automatically version the Sales Agreement in this case - the Sales Agreement must be manually versioned. For all other Sales Agreement attributes, automatic and manual versioning is supported.
Viewing Contract Template Selection from Sales Agreements and Quote/Sales Orders
You can view which Contract Template, if any, has been assigned to the BSA or Quote/Sales Order. A contract template field on the BSA or Quote/Sales Order header provides a read-only view of the Contract Template assigned to that BSA or Quote/Sales Order.
Viewing Contract Terms on the Sales Agreement and Quote/Sales Order Documents
You can view the terms and conditions associated with the Sales Agreement or Quote/Sales Order. After the Contract Template is selected from the Contract Terms window, the system provides you with:
-
A listing of the clauses (this is an unformatted, structured view listing each clause name)
-
You can view the formatted, printable sales agreement contract document. The formatted, printable Sales Agreement or Quote/Sales Order contract document can be generated for viewing from either the Contract Terms window (Preview Contract button), or from the Sales Agreement window or the Quote/Sales Order (Actions > Preview & Print)
Variable values will be resolved when you initiate the formatted preview/print view only.
Contract Term Deviations
Deviations are changes to contract terms in a business document that make them different from the standards established by both of the following:
The contract terms in the contract template associated with the business document
Contract Expert rules, if they apply to the business document
Note: Because deviations are based on contract terms and rules associated with a contract template, the concept of contract term deviations does not apply to business documents whose Contract Source is Attached Document.
Actions That Trigger Deviations
The following are the actions that trigger contract term deviations:
-
Users add non-standard clauses to the business document.
-
Users remove clauses from the business document.
-
Clauses are required by Contract Expert rules to be either included or removed from the business document, and you have not completed all the Contract Expert requirements.
-
For a clause on a business document, later versions of the clause are available in the Library.
-
Users add standard clauses or their alternates to the business document.
You can generate a report of the deviations from your contract terms standards, through either of the following methods:
Manually, as part of the authoring process.
Automatically, when you submit a business document for approval. The deviations report includes two components:
-
A tabular list of the Clause Deviations as evaluated and generated by Oracle Contracts.
-
An Approval Abstract, consisting of text that you enter manually, typically specifying reasons for the deviations.
-
Each entry of the Clause Deviations list includes the following columns:
-
Category - A high-level categorization of the deviation.
-
Deviation - The type of deviation.
-
Section - The section title from the business document
-
Clause Title -The clause display name from the document.
-
An Approval Abstract, consisting of text that you enter manually, typically specifying reasons for the deviations.
-
In addition, the deviation report entry generated manually contains a Compare Text icon, which enables you to compare old and new versions of the clause text in the following cases:
-
A standard clause was modified.
-
An expired clause on the document has a newer valid version in the Library.
-
An alternate clause has been replaced in place of the original clause.
-
Downloading the Deviations Report
For some types of business document, you can download the deviations report to a Microsoft Word document, edit it offline, and attach it to your business document as a contract document.
Copying the Deviations Report
The deviations report that is created automatically as part of the approval process is not copied to the next version of a business document; however, any documents that you attach manually to an earlier version are copied across to a new version of the business document.
Generating a Deviation Report Manually
Prerequisites
You must be in the Contract Terms page for your business document.
The Contract Source of the business document must be Structured Terms.
To generate a Deviation report manually
-
Select Review Contract Deviations for the Action, and click Go. The Deviations Report appears, displaying the clause deviations in the lower part of the window. The deviations initially appear sorted by Category -the deviation category. For more information on the report details, see About the Deviations Report.
-
In the View By field, you can select Section to order the deviations by Section. NOTE: However, the download feature will always download the deviations report sorted on category.
-
When it appears in a deviations report entry, you can click the Compare Text icon to compare the clause text. The situations when this occurs are as follows:
-
A standard clause was modified. – In this case, the compare text displays the non-standard and the standard text versions
-
An expired clause on the document has a newer valid version in the Library. – In this case, the system compares the expired clause text with the library version
-
An alternate clause has been replaced in place of the original clause.] – In this case, the compare text displays the alternate clause text and the original clause text
-
-
You can select the check box Generate for Approval if you want the Deviations Report to be attached to the approval notification. Selecting this option overrides the value of the profile option OKC: Generate deviations report for approval.
Note: You can have different values of theGenerate for Approval check box for different versions of a business document.
-
In the Approval Abstract box, optionally enter text that you want to describe the deviations.
-
You can click Download to download the deviations report to your desktop. After downloading the report, you can save the report, edit it offline, and attach it as a contract document with the category Approval Abstract. The Approval Abstract documents appear as attachments to approval notifications. For more details, see Managing Contract Documents.
For more information on setting up the Deviations Report, please refer to the Oracle Contracts Implementation and Administration Guide.
Customer Acceptance
Document binding is the final phase of the BSA or Quote negotiation. Once the BSA or Quote is approved internally it will submitted for customer approval. On receipt of customer approval the system must able to capture following information on the BSA or Quote.
-
Supplier signed date
-
Supplier Name
-
Customer Name
-
Customer signed date
The information will be captured in the signature block on the window. The block has fields for customer and supplier.
No validation will be built around these fields and they are not mandatory for user entry.
-
Enter BSA or Quote
-
Submit Draft (starts Internal Approval process)
-
Obtain internal approvals
-
Confirm customer acceptance. This is a manual step, you must enter signatory information (optional), action 'Customer Acceptance' or progress the flow. The Quote is transitioned to a sales order in either the Enter or Booked status. Once you have entered signatory information (optional) on the BSA, action 'Customer Accepted' or progress the flow. The BSA status will change to 'Awaiting Start Date' or 'Active' determined by the effective start date of the BSA.
Purging Sales Orders with Terms and Conditions
Purge Sales Orders With Clauses
Considering that contract terms can be perpetual, it is necessary for you to distinguish between Sales orders with clauses (a Contract Template will have been assigned) from Sales orders without clauses, and to provide an option to make sales orders with clauses in-eligible for the regular PURGE process.
When purging Sales orders, you can select a purge parameter that specifies whether orders with clauses are eligible for purging. If you select No for this parameter, then the order will not be eligible for purging if it has clauses.
To purge orders, navigate to the Order Management Navigator menu > Orders, Returns > Order Purge > Order Purge Selection.
-
In the Parameters window, you may select either Yes/No in the Contract Terms field. If selecting the default value, No, then any orders with clauses will not be eligible for purging. If you select Yes, orders with clauses (Terms and Conditions) are eligible for purging.
-
A parameter exists in the Order Purge Selection program. Navigate to System Administrator Navigator menu > Concurrent > Program > Define. Query for “Order Purge Selection” program, and click Parameters.
Note: This parameter will only be active if the user has licensed Sales Contracts.
-
A parameter exists, Contract Terms with a Yes or No value set.
-
The default value should be No. This means by default, all orders containing terms and conditions will NOT be eligible for purge.
-
If a Sales order is eligible for purge, all versions of the Sales order (with its clauses) can be purged.
Security - Contract Terms Authoring
Locking the Sales Agreement or Quote/Sales Order and Related T's&C's
Document security is controlled through the Order Management Process Constraints framework. A seeded processing constraint setup is included for the most common Sales Agreement and Quote/Sales Order scenarios.
You can set up processing constraints to prevent changes to Sales Order attributes at certain points in the sales order lifecycle, such as:
-
When the sales order is submitted for approval
-
After Customer Acceptance
-
When the Sales order is created from an Oracle Quoting, with Customer Acceptance
Using Processing Constraints
Specify the condition to base the security on by using pre-seeded validation templates. Then, if the condition is validated as true, processing constraint rules are checked and certain actions to the sales order attributes may be specified as not allowed.
Validation Templates
The following templates should be seeded for Sales Agreements and Sales Orders:
-
Customer Accepted – this condition should be based on when the Sales Agreement or Quote/Sales Order Workflow for customer acceptance has been completed and acceptance is attained. When this validates true, then attributes are frozen. Applies to Sales Agreement and Quote/Sales Orders.
-
Customer Accepted – this condition should be based on when the Sales order (without acceptance workflow) has been accepted by the customer – the template would validate as true when the Customer Sign Date field is not null. This would be a table-based template.
-
Submitted for Approval – this condition should be based on when the Workflow for approval has been initiated (not completed) so that when the user initiates the approval process, the Sales Agreement / Quote SO attributes are frozen.
Customer Accepted from Quote – because the T's&C's have been negotiated and accepted in the Quote negotiation phase, once a sales order is placed, there shouldn't be any contractual changes made to the Sales order (unless the customer agrees to the change). This condition should be based on a) when the Sales order originates from an Oracle Quoting, and b) when the sales order field Customer Signing Date is not null. When this condition validates as ‘true,' then attributes of the sales order are frozen. This only applies to sales orders.
Processing Constraint Rules
When a condition from the validation template validates as true, the system will:
-
Check which responsibilities the constraints are applicable to
-
Enforce the constraint rules according to the setup of the processing constraint rules. There will not be system seeded processing constraint conditions -- users will have to build their own conditions.
When any of the three conditions (sales order is submitted for approval, after Customer Acceptance, or when the sales order is created from the quote with Customer Acceptance) are validated as true, you cannot update the sales order attributes identified in the Constraints region of the Processing Constraints screen:
-
Sales order header and line attributes (already seeded)
-
Contract Terms – this means that when you click Contract Terms on the Sales Orders window, the Clause Authoring window opens in read-only mode. You cannot:
-
Change contract template
-
Renumber
-
Use contract expert
-
Check for clause updates
-
Update variable values
-
Add clauses
-
Delete clauses
-
Update clauses
-
Add sections
-
Move clauses
Note: You can manage Contract Documents and Preview/Print the Contract, even if the Contract Terms window is in read-only mode. This means rather than enter one row in the Constraints region to specify updating all attributes is not allowed, you must enter each attribute where update is not allowed and exclude Contract Documents and Preview.
-
The following modes are available for the BSA and Quote/Sales Orders window.
Read Only Mode
From the BSA or Sales Orders window, when the Clause Authoring window is invoked, you cannot perform updates to clauses in read only mode.
The only actions that are allowed in read only mode are preview of terms and conditions, and contract document management.
Update Mode
From the BSA or Sales Orders window, when the Clause Authoring window is invoked, you can perform all clause related tasks.
Security
You can define rules to control changes to contract terms. This can be done by using processing constraints framework. The rules will be defined the same way as for any other attributes on the BSA.
System must check security rules before it opens the Contract Terms window or before it allows user to pick template on BSA. You can only access the Clauses window in view only mode if security does not permit to change the contract terms.
The constraints work the same way for contract template as it works for Sales orders. Since quote/I-store flow is supported only for the create operation the constraints defined for create operation on the header remain the same.
The Processing Constraint Framework will provide the Security framework for Sales Agreements. Several new seeded validation templates will be created as well as allowing definition at the Sales Agreement header and Sales Agreement line. You can define your constraints based on your business processes.
Contract Terms Function Level Security
Sales Contracts allows organizations to control levels of access to authoring contract terms on a business document. Many businesses have multiple roles involved in the contract negotiation process including contract negotiators, contract administrators, and contract approvers. Negotiators may have standard authoring privileges with access to standard clauses and alternates in the Library. Administrators may have additional privileges that allow them to author non-standard clauses or remove contract terms. Approvers or super users may have privileges that allow them to override standard authoring controls. For instance, with super user authoring privileges, a user can delete a mandatory clause from a business document or edit a clause that is text protected.
Sales Contracts provides the following levels of authoring access to business documents.
-
Standard Authoring Privileges: Users can add standard clauses, update variable values, and change terms.
-
Non-standard Authoring Privileges (Default): To enable users to create non-standard clauses while authoring business documents, the default access is set at the non-standard authoring level. In addition to the available functions in the Standard Authoring Privileges level, users can author non-standard clauses and remove or delete terms.
-
Override Authoring Controls Privileges: In addition to the available functions in the Non-standard Authoring Privileges level, users can delete mandatory clauses and override the lock text option.
-
Restricted Contract Authoring privileges: Users with this privilege can only apply a contract template and use contract expert. This is the most restrictive contract authoring security level.
Non-standard Authoring Privileges level is the default security level, if you add the seeded menus. To change the security level from the default to the Standard Authoring Privileges level, remove the Author Non-standard Terms function from the list of available functions. For the Override Authoring Controls Privileges security level, add the Override Authoring Controls function to the list. To setup a user with the restricted contract authoring security level, an administrator must remove the “Author Non-Standard Terms” and “Author Standard Terms” functions from the user’s menu.
If you want to set up your own responsibility, you can then attach menus to the responsibility, typically by copying existing menus. Subsequently, you can grant or revoke specific functions from the menus, such as the Override Authoring Controls function. Please refer to the Oracle Contracts Concepts and Procedures Guide to obtain more details on how to setup and use these functions.
Note: If you customize responsibility functions or menus to change function security access levels, you must also bounce the midtier port for your changes to be effective.
Version Contract Terms On Sales Agreements
When versioning the Sales Agreement, whether manually or automatically, any contract terms on the agreement will also be copied and versioned.
If a change is made to a contract term, the system will not automatically version the Sales Agreement. You must manually enter the new Sales Agreement version number, and navigate to the Contract Terms window and make clause changes. The system then would version the Sales Agreement along with the associated contract terms.
To version the Sales Agreement when making changes to contract terms:
Manually enter version number and reason.
Navigate to the Contract Terms to make changes.
View History
You can see all versions of an agreement, including each agreement’s contract terms. An action to view the associated contract terms for each version of the contract and pricing terms is on the Agreements Summary window.
Modifying a Customer Accepted Sales Agreement or Sales Order
You can initiate a new version of a signed Sales Agreement or Sales order, and make changes to the new version. Once the changes have been manually approved, the agreement should then take affect and the former version should be placed in history.
You can view the old version for historical reference.
The system retains the information on who versioned the document, and on what date. This information is available from the Version History window.
-
The Sales Agreement is versioned, and the old version is moved to history.
-
If the customer accepted Sales Agreement is on hold; you cannot order against this Sales Agreement now.
As part of the versioning process you are required to enter:
-
Version number
Version reason
Approver name(s) and date(s) (Optionally capture this in comments/attachments)
Enter changes directly on the new version of the Sales Agreement, that is still on Hold.
Run the Clauses QA check to validate any newly added clauses (Mandatory user step)
Print the document
Enter customer signatures in the new version
Remove the hold from the new version.
When you version the Sales Agreement, any price list and/or modifier associated to the Sales Agreement will not be versioned in this release.
Sales Contracts Workbench
The Contracts Workbench page is an HTML page that exists on top of the Contracts Repository page. It enables Contract Administrators to view, organize, create and keep track of sales contracts using various features like search, bins, notifications.
The Contract Administrator drafts contracts, negotiates with the external party, administers contract approval, and manages contract execution and administration. The Contract Administrator either negotiates contracts directly with customers, or updates the contract based on feedback from the customer, usually obtained through the Sales group. He/she is the primary user of the Sales Contract Workbench.
The following features of the Sales Contracts Workbench are used by Contract Administrators:
-
Search – Simple and Advanced
-
Notifications Bin - container for all contract-related notifications (for example, users have to be notified of approved or expired contracts)
-
Shortcuts – to actions and reports
-
Contracts Bin – the main container that displays the contracts in the Workbench and from this container you (as Contract Administrator) can perform the following actions and create/use the following bins and views:
-
Actions available on each bin – you can perform different actions from each bin, like updating contract terms, viewing the contract PDF, opening the business document for updates, etc.
-
Contract Administrator attribute—defines how contracts can be assigned to a Contract Administrator and identified in search criteria for populating a bin with your contracts.
-
Bookmarked Contracts—this view in the Contracts bin displays only contracts that you have bookmarked. You can create and remove bookmarks.
-
Default views for contract bins—defines the default contract bins and views available for each bin.
-
These Contract Workbench features are covered in more detail in the sections below.
Simple Search
Simple Search has three fields that you can use – specify a document type (Sales Order, Sales Agreement), contract attribute (Number, Name) and then enter a value for the attribute. All three fields should be entered. The Search Results page is shown below:
Advanced Search
Advanced Search enables you to first specify Intent – Buy, Sell or Other. Once the Intent is specified, select one of the following Document Types:
-
All
-
All Order Management Types
-
Quote
-
Sales Order
-
Sales Agreement
-
Miscellaneous Contract
Once you have selected a Document Type, the search criteria fields are displayed depending on the document type. Some common search criteria fields across document types are: Number, Name, Operating Unit, Contract Type, Contains Contract Terms box, Status.
The search results for advanced search are shown below and you can perform some actions like viewing contract terms, updating contracts, exporting etc.
The following actions can be performed from the search results table; these actions are also available from the contract bins on the Workbench:
-
View Contract (icon in column)
-
View Summary (link)
-
Open (drop-down action)
-
Update Contract Terms (drop-down action)
-
View Contract Documents (drop-down action)
-
Add Bookmark (drop-down action)
-
Remove Bookmark (drop-down action)
-
Export (button)
-
Customer name (link)
-
Full List (button)
Notifications Bin
Notifications are sorted based on the Date Sent field with the recent most date on the top of the list. To view the notification details, click the Subject link. The following notification types are currently in use:
-
Contract Clause Approval
-
Contract Template Approval
-
Contract Template export to Configurator
-
Deliverables Notification
-
OKC: Contract Repository Approval
-
OM Blanket Header
-
OM Negotiation Header
-
OM Order Header
-
OM Order Line
-
OM Standard
-
OM Send Acknowledgment
-
Order Capture - Quoting Alert
-
iStore Alerts Workflow
-
ASO Approval
-
ASO Notification
Shortcuts Bin
The following shortcuts are available in the Contracts bin for performing contracts-related actions: Creating sales agreements, sales orders, quotes and miscellaneous contracts; search contract clauses and templates; performing Contract Clause Analysis; viewing Bookmarked Contracts; importing Miscellaneous Contracts; downloading Import Template.
Contracts Bin
The Contracts Bin consists of the following bins apart from Notifications, Shortcuts. The actions available from the seeded bins are the same actions available from the search results table. You can rename a seeded bin or a seeded view within a bin.
Bin1 or My Contracts: There are a number of seeded views in this bin. The views show only those contracts where the Contracts Administrator is the logged in user. Views in this bin display contracts of all document types, including sales agreements, sales orders, quotes and miscellaneous documents. Some of the seeded (and personalizable) views in this bin are My Work List, Contracts Pending Approval and Signing, and Contracts last viewed.
Bin2 or My Sales Agreements: The views in this bin are seeded and personalizable and display the sales agreement document type only. The views show only those contracts where the Contracts Administrator is the logged in user. Some of the seeded views in this bin are Expiring Sales Agreements, Expired Sales Agreements, Sales Agreements in Negotiation, Sales Agreements with Outstanding Commitments.
Bin3 or All Contracts: This bin contains no seeded views and displays contracts of all document types. You can create your own views and place them in this bin. To create/update views please refer to the section Creating and Updating Views.
Creating and Updating Views
You can create or update views by clicking Personalize next to the view LOV. You can customize the following:
-
Define the View name
-
Define the number of rows to display for that view (within that bin)
-
Set whether the view is the default view for that bin
-
Define the column properties and the order in which the columns are displayed for that view
-
Define the sort settings
-
Define the search criteria for that view
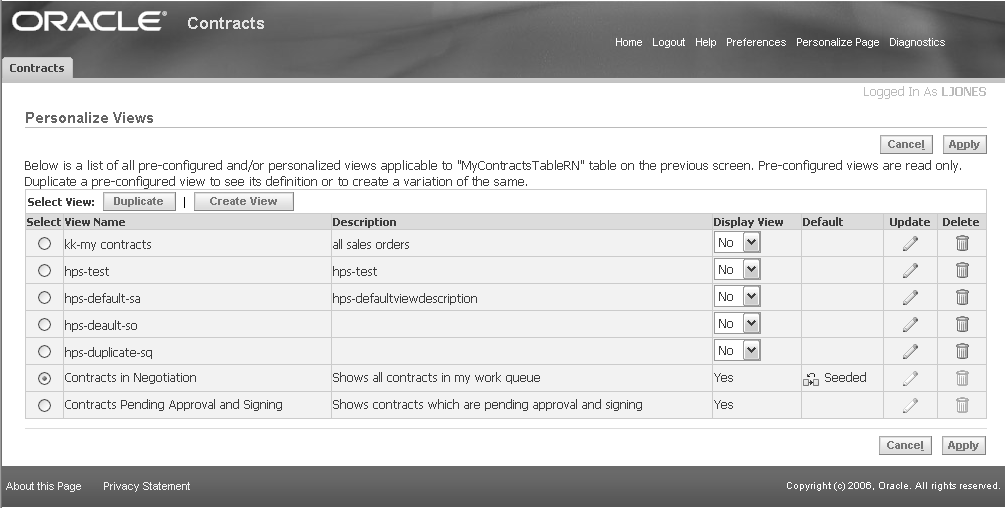
Updating the Contract Administrator field
Now you can update the Contract Administrator and Legal Contact fields in the Contract Terms page using one of the following methods:
Automatic Defaulting: The Contract Administrator field is automatically updated when contract terms are found in the business document.
Manual Update: Open the Update Contract Details page from Actions or Shortcuts and enter the required values from the LOVs.
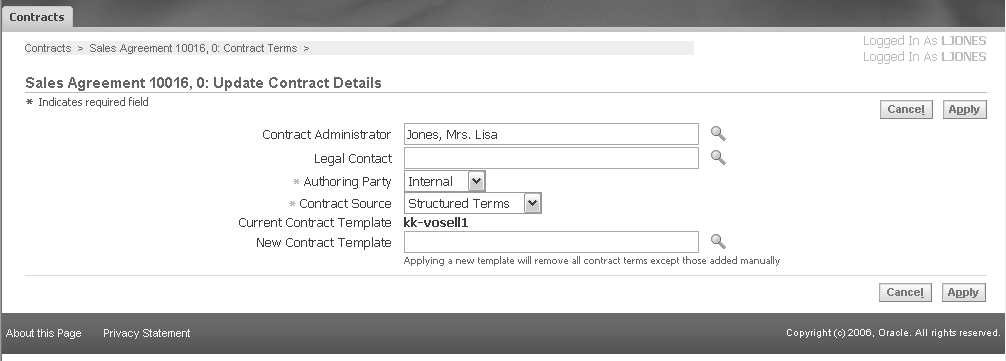
Update Contract Administrator Concurrent Program
This concurrent program enables you to mass update the Contract Administrator field on multiple contracts at a time. It is available from the Shortcuts as Assign Contract Administrator.
Order Management Diagnostics
With this release, Order Management now provides three additional diagnostics tools (concurrent programs) to assist you with reviewing order details, debug information and order processing flows.
The three new concurrent programs have been seeded within the standard Order Management Concurrent Programs Request Group and any user having access to this request group will be able to submit these programs and view the outputs. Order Management recommends that you authorize a limited number of users access to this request group for reviewing these diagnostic outputs.
Launch Sales Orders from TeleSales
Order Management makes the transition from the eBusiness Center window in Oracle TeleSales to the Sales Orders window seamless. Customers provide their Name, Address, and Contact information. The information is entered in the eBusiness Center and is carried over and populated in the Sales Orders window. Based on this information, if a customer account, account site, or account contact do not exist, they are created automatically, saving time for the Customer Service Representative (CSR). See: Oracle TeleService User Guide.
Sales Orders From TeleSales Major Features
-
You can open the Sales Orders window from the Order tab in the eBusiness Center window.
-
There are now two tabs, Order and Quote. In the past the two were combined as one, Quote/Order where you could create an opportunity, Create a Quote, View Quotes, and View Orders. Now the Order tab has the functionality to view order related information in a tabular format and create new orders (New button). Users can also navigate to the Sales Orders window to view the order details.
-
The Quote tab maintains its previous functionality with the exception that you can no longer View Orders from the Quote tab.
-
Populate Party information including Party, Party Address, Party Contact, and/or Account information into the Sales Orders window.
Note: Note: This information is critical to the success of the order creation. Without it, the CSR enters party information in TeleSales yet can not create an order without an account. You must enter at least Party and Party Address information to make use of this auto-create (of account layer information) and use the Sales Orders window. Party Contact information is not required but entering that will make the flow more seamless.
Note: You must set up the Account Numbering and Location Numbering (Site Numbering) as Automatic. We convert the party layer to account layer (if needed) and expect the Account Numbering and Site Numbering profiles to be automatic. If you do not want to use Automatic Numbering , then first create the Account Layer and then use this feature. This way Order Management will find the Account Sites. The TCA System Options controlling this automatic numbering are: for account: Automatic Customer Numbering, and for Sites: Automatic Site Numbering. These options are present in the Receieveables System Options form.
-
If the Party Contact is not associated to an account, all information provided in the eBusiness Center that is passed from TeleSales to Order Management will be used to create a new account, account sites, and account contacts.
-
The information provided in TeleSales will be brought over to Order Management. Account information entered in the eBusiness Center header is passed to the Sales Orders window, and populates the corresponding fields.
For example, a customer calls Major Credit Cards responding to an advertisement he received in the mail. After giving the CSR his name and code from the advertisement, the Sales Orders window opens, populated with this customer's information and the Salesperson. The new account has been created behind the scenes. This saves the Salesperson time keying in data, and speeds up the transaction.
Note: Note: If more than one account is found, the CSR is presented with a list to choose from, prior to the Sales Orders window opening.
-
You can open the Sales Orders window (in an entry mode) to create a new order. The Salesperson is defaulted for the order, which is required at the time of booking an order.
Note: Note: Order Management requires a Salesperson for booking an order. If the users is a Salesperson, the information is passed from the eBusiness Center to the Sales Orders window. If not, Order Management will default the Salesperson based upon the defaulting rules and the value of the profile OM: Default Salesrep.
-
You can choose to open the Sales Orders window or the Quick Sales Orders window from TeleSales depending on the profile settings.
Note: Note: If the profile option OM: Sales Order Form Preference, is set to Quick Sales Orders, then TeleSales will open the Quick Sales Orders window. If it is set to Sales Orders, TeleSales will open the Sales Orders window. The default is Sales Orders. This profile can be set at all levels.
Business Scenarios - Campaign to Cash without Contacts or Quoting
The TeleSales agent receives a call from Josephine Brown with LMNO Corp, to place an order. The agent captures the LMNO customer information with the contact of Josephine Brown, then accesses a Sales Orders window from TeleSales to pass the customer information and places the order. Josephine Brown is automatically created as a new contact for LMNO Corp. Order Management continues to process the order through fulfillment and passes the information to Accounts Receivable to invoice LMNO Corp.
User Procedures
Creating a Sales Order Using TeleSales
You can initiate an order in TeleSales on the eBusiness Center window from the Order tab. When the TeleSales agent clicks New, the Sales Orders or Quick Sales Orders window opens, based on the profile option setting, populated with the account information. You can select the Order Type from the LOV. Based on the Order Type selected, the price list and other relevant information will default.
For more information see: Oracle Order Management Implementation Manual.
To create a sales order in TeleSales using the Order tab:
-
Navigate to the eBusiness Center window.
eBusiness Center Window - Order Tab
-
Enter the Customer, account number, and other information in the dBusiness Center header, then choose the Order tab.
-
Click New to open the Sales Orders window and continue placing the order.
The Sales Orders window opens with the account information passed from TeleSales. You can proceed with placing the order. Information is derived in the Sales Orders window based on the existing defaulting rules.
Sales Orders Window - TeleSales Information Populated
-
Save your work.
To create a sales order in TeleSales using Contact information:
-
Navigate to the eBusiness Center window.
-
Choose the Party Type 'Party Relationship.' Enter the Organization and Person information.
-
Enter the Account number, if it exists.
eBusiness Center Window
Note: You can select the Order Type from the LOV. Based on the Order Type selected, the price list and other relevant information will default, depending on the defaulting rules.
Sales Orders Window - Contact Information

-
Enter the sales order information and save your work.